| Oracle® Business Intelligence Applications Configuration Guide 11g Release 1 (11.1.1.8.0) E49133-01 |
|
|
PDF · Mobi · ePub |
| Oracle® Business Intelligence Applications Configuration Guide 11g Release 1 (11.1.1.8.0) E49133-01 |
|
|
PDF · Mobi · ePub |
This section includes an overview of how to configure Oracle Business Intelligence Applications.
This chapter contains the following topics:
Section 2.2, "Overview of Oracle BI Applications Configuration Manager and Functional Setup Manager"
Section 2.3, "Getting Started With Oracle BI Applications Configuration Manager"
Section 2.4, "About Users and Roles in Oracle BI Applications Configuration Manager"
Section 2.5, "About the Main Task Areas in Oracle BI Applications Configuration Manager"
Section 2.7, "About Setup Objects in Oracle BI Applications Configuration Manager"
Section 2.8, "About the Work Area in Oracle BI Applications Configuration Manager"
Section 2.9, "About Accessibility Features In Oracle BI Applications Configuration Manager"
This section lists terminology that relates to configuration in Oracle Business Intelligence Applications.
Source Instance - The name given by the Oracle BI Applications Administrator to the transactional system (that is, OLTP) that serves as the source of data for Oracle Business Analytics Warehouse. A Source Instance is registered in the System Setups\Define BI Applications Instance\Source Systems dialog in Oracle BI Applications Configuration Manager.
BI Application Offering - A BI Application product that you have purchased. For example, Oracle Financial Analytics, or Oracle Sales Analytics. An Oracle BI Applications Offering can have one or more Functional Areas.
Functional Area - A component part of an Oracle BI Applications Offering. For example, Workforce Effectiveness, Leave & Accrual, Workforce Development are Functional Areas in Oracle Human Resources Analytics. A Functional Area is the smallest unit of an Oracle BI Applications Offering that can be implemented.
Functional configuration for Oracle Business Intelligence Applications is done using the following tools:
Oracle BI Applications Configuration Manager:
Contains the setup objects for Oracle BI Applications.
Provides administrative GUIs for setup and configuration.
Recommended for ongoing administration and maintenance of functional setups.
Quick review of the setup values and for troubleshooting.
For more detailed information about Oracle BI Applications Configuration Manager, see Section 2.2.1, "What is Oracle BI Applications Configuration Manager?".
Functional Setup Manager (FSM) for Oracle BI Applications
Oracle BI Applications Configuration Manager leverages FSM to provide Task based implementation, with guided set of sequenced tasks and dependency management.
Provides phased implementations capability.
If you are using Oracle Fusion Applications, be aware that FSM for Oracle BI Applications is different from the Oracle Fusion Functional Setup Manager:
- FSM for Oracle BI Applications includes only the features applicable for Oracle BI Applications functional setup.
FSM is launched from Oracle BI Applications Configuration Manager to perform functional configurations.
FSM is recommended for initial implementation.
FSM invokes Oracle BI Applications Configuration Manager UI for setup tasks.
For more detailed information about FSM for Oracle BI Applications, see Section 2.2.2, "What is Functional Setup Manager?".
Oracle BI Applications Configuration Manager is a Web application for setting up and maintaining an Oracle Business Intelligence Applications environment.
For functional configuration, Oracle BI Applications Configuration Manager works in conjunction with Functional Setup Manager to provide guided Tasks to configure Offerings and Functional Areas. For more information about using FSM in conjunction with Oracle BI Applications Configuration Manager, see Section 3.1, "What is Functional Configuration?".
Oracle BI Applications Configuration Manager enables you to do the following:
Launch Functional Setup Manager to configure Offerings and Functional Areas (for example, by specifying Domain Mappings, Data Load Parameters, and Reporting Parameters).
Functional Setup Manager provides a list of guided Tasks that enable you to configure Oracle BI Applications Modules and Functional Areas. For example, a Functional Developer might use a Task named 'Configure Initial Extract Date' to set the value of INITIAL_EXTRACT_DATE to '2005-01-01'.
For more information, see Chapter 3, "Performing Functional Configuration".
Monitor and manage setup data, and extend Oracle Business Analytics Warehouse where necessary.
For example, a Functional Developer might have set the value of INITIAL_EXTRACT_DATE to '2005-01-01'. If you want to change this value to '2006-01-01', then you might use the Manage Data Load Parameters tab in Oracle BI Applications Configuration Manager to edit the value of this parameter.
For more information, see Section 4.2, "Roadmap for Setup Data Maintenance and Administration".
Monitor and manage Load Plans that you use to perform ETL.
For more information about performing ETL, click the Help icon on the Manage Load Plans dialog, or refer to Oracle Business Intelligence Applications ETL Guide.
Migrate configuration data across environments, using the Import and Export options.
For more information, see Section 4.13, "About Exporting and Importing Setup Data for Oracle BI Applications Configuration Manager".
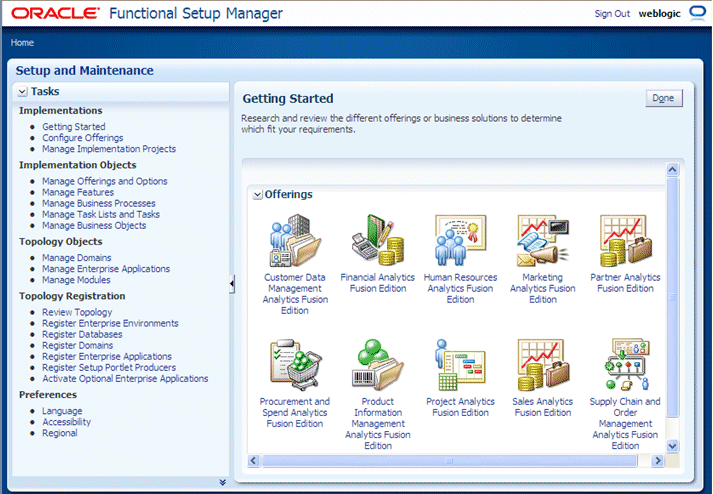
Functional Setup Manager (FSM) enables you to manage and perform functional configuration tasks for Offerings. Examples of FSM Tasks are 'Configure Initial Extract Date', and 'Configure Global Currencies'

FSM is installed and deployed as part of Oracle BI Applications. In FSM, you select the Oracle BI Applications Offering and Functional Areas that you wish to deploy. FSM generates a list of configuration tasks specific to the Offering and Functional Area(s) that were selected. These tasks can be assigned to different functional developers and the status of the Oracle BI Applications implementation project can be monitored in FSM. Setup screens guide functional developers through the performance of each task.
In Oracle BI Applications Configuration Manager, select the Perform Functional Configurations link. When prompted, specify a user name with appropriate privileges for the tasks that you want to perform. For example, to create an Implementation Project and assign Tasks to Functional Developers, connect as a user with 'BI Applications Implementation Manager' privileges. For more information about user-privileges, see Section 2.4, "About Users and Roles in Oracle BI Applications Configuration Manager".
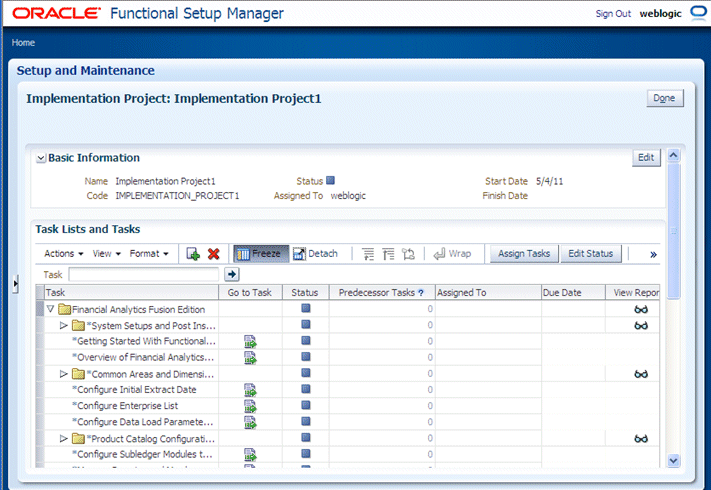
When you launch FSM as a user with the BI Applications Administrator role or the BI Applications Implementation Manager role and open an Implementation Project, you see the Functional Tasks that relate to the Offering being deployed by that Implementation Project.
The example screen shot below shows Functional Tasks for Oracle Financial Analytics.

This section explains how to log into Oracle BI Applications Configuration Manager and how to access the User Assistance, Help, Documentation, and other resources that are available.
Oracle BI Applications Configuration Manager provides the following Help and User Assistance features:
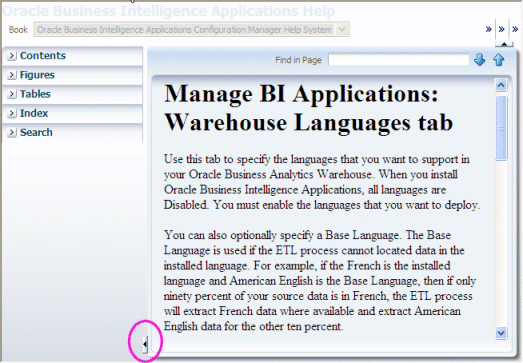
Context-sensitive Help - Click the Help icon on any dialog to view context-sensitive Help for that dialog. When the context-sensitive Help is displayed, use the Table of Contents, Index, and Search facilities to locate User Assistance on other areas of the product.
Tip: To maximize the text pane in the Help window, choose Maximize Reading Pane from the View menu. Alternatively, use the Collapse Pane arrow to hide the left hand tabs (see the following screenshot), or use the vertical sizing bar (above the Collapse Pane arrow) to reduce the width of the tabs.

Inline Help, such as Mouse-over Tool tips - Hold the cursor over an object to view a tool-tip for that object.
Use the Oracle BI Applications Configuration Manager Import and Export facilities to migrate your setup data across environments (for more information, Section 4.13, "About Exporting and Importing Setup Data for Oracle BI Applications Configuration Manager").
To access Oracle BI Applications Configuration Manager or Functional Setup Manager, you must log in as a user with one of the following Duty Roles:
BI Applications Administrator
Users with the BI Applications Administrator Duty Role have access to all Oracle BI Applications Configuration Manager UIs and all FSM UIs. For Oracle BI Applications Configuration Manager, only users with this duty role can perform System Setups.
BI Applications Developer
Users with the BI Applications Functional Developer Duty Role have access to Oracle BI Applications Configuration Manager UIs except for the System Setup screens. In FSM, these users have access to the list of functional setup tasks assigned to them, and can execute setup tasks (that is, using the Go to Task option in FSM).
BI Applications Implementation Manager
Users with the BI Applications Implementation Manager Duty Role have access to the Oracle BI Applications Configuration Manager Overview page and dialogs for the Export and Import of Setup Data. In FSM, these users have access to Configure Offerings and Manage Implementation Projects UIs, but they cannot execute setup tasks (that is, they do not have access to the Go to Task option in FSM).
Setting up users with these Duty Role privileges is performed when Oracle BI Applications is set up.
To find out which user IDs have which Duty Role privileges, use your LDAP tools and Oracle APM to determine which users have the Duty Role privileges BIA_ADMINISTRATOR_DUTY, BIA_IMPLEMENTATION_MANAGER_DUTY, and BIA_FUNCTIONAL_DEVELOPER_DUTY. For more detailed information about security privileges required for Oracle BI Applications components, see Section 2.1.11 'Security Overview of Oracle BI Applications Configuration Manager and Functional Setup Manager' in Oracle Business Intelligence Applications Security Guide.
Oracle BI Applications Configuration Manager has the following main task areas:
System Setups - use this area to set up Source Systems, Target Databases, Warehouse Languages and so on.
Functional Configuration - use the Perform Functional Configurations link to perform Functional Configuration using Oracle Functional Setup Manager.
Setup Data Maintenance and Administration - use this area to monitor the configuration settings that your Functional Developers have made using Oracle Functional Setup Manager, and make changes where required. For example, a Functional Developer might have used a Task in FSM to set the value of INITIAL_EXTRACT_DATE to '2005-01-01'. If you want to change this value to '2007-01-01', then you might use the Manage Data Load Parameters tab in Oracle BI Applications Configuration Manager to edit the value directly, instead of reassigning the Task in FSM.
Export and Import Configuration - use this area to backup your setup data and migrate your setup data to a separate environment.
There are four types of Functional Setup Tasks in FSM:
Tasks to configure Data Load Parameters. For example, Example: task Configure Initial Extract Date displays Data Load Parameter INITIAL_EXTRACT_DATE.
Tasks to manage Domains and Mappings. Example: task Manage Domains and Member Mappings for Employee Dimension displays Domain Maps for the Employee Dimension.
Tasks to configure Reporting Parameters - Example, task 'Configure Reporting Parameters for Master Organization' displays Reporting Parameter FSCM_MASTER_ORG.
Tasks that provide information. These tasks might be:
A set of instructions for editing components using tools other than Oracle BI Applications Configuration Manager. For example, to configure the BI Metadata Repository, you use Oracle BI EE Administration Tool. The names of these Tasks are prefixed with 'How To….'.
Conceptual, overview or supporting information. Example, task 'Overview of Financial Analytics' provides information about Functional Areas in this offering.
Oracle BI Applications Configuration Manager data includes the following Setup objects:
Data Load Parameters - used to control the nature of data loaded from the transactional system into the Business Analytics Warehouse. Examples: INITIAL_EXTRACT_DATE, TIME_GRAIN.
Domain Mappings and Member Mappings - used to map a Source column List of Values to a Warehouse column List of Values. Example: Domain Maps for the Employee Dimension: COUNTRY -> W_COUNTRY.
Reporting Parameters - correspond to Dynamic Repository Variables in the RPD and allow these variables to be set using Oracle BI Applications Configuration Manager. Example: FSCM_MASTER_ORG.
This section explains the work area in Oracle BI Applications Configuration Manager.
The figure below (Figure 2-3) shows the main Tasks bar and the Functional Configuration work area for Domains and Mappings.
Tip:
To set accessibility preferences, click the Accessibility link in the top right hand corner to display the Enable Accessibility Preferences dialog. For example, you might want to display high contrast colors, or use large fonts.
Oracle BI Applications Configuration Manager uses the following menus and options:
Table 2-1 Menu Options in Oracle BI Applications Configuration Manager
| Icon or Menu Option | Description |
|---|---|
|
Actions Use the Actions menu to display a list of available options for the currently selected object. For example, common actions are Enable, Disable, Add, and Edit. |
|
|
Detach Use the Detach icon to view a table tab in a separate larger pane. For example, use this option to view data in wide columns more easily. To re-attach a separated pane, click Detach again. Note: If you are editing a master-detail table, the Detach option does not detach the master-detail relationship. |
|
|
View Use the View menu to select which columns to view, and re-order columns. |
Oracle BI Applications Configuration Manager uses the following icons:
Table 2-2 Icons and Menu Options in Oracle BI Applications Configuration Manager
| Icon or Menu Option | Description |
|---|---|
|
Add Use the Add icon (or + symbol) to add an object. For example, click the Add icon on the Define BI Applications Instance - Source Systems tab to add a new Source System. |
|
|
Set parameter value before full data load This icon indicates that the value of a Data Load Parameter must be set before you perform a full load of data from the source instance to Oracle Business Analytics Warehouse. |
|
|
Edit Use the Edit icon (or pencil symbol) to edit the object that is currently selected in the table. For example, click the Edit icon on the Define BI Applications Instance - Source Systems tab to edit the currently selected Source System details. Alternatively, click on the value in the Parameter Value column to edit the value. |
|
|
Global Parameter This icon indicates that the parameter is global (that is, it applies to all (or a majority of) ETL tasks). |
|
|
Go To Top Use this icon to display the all nodes in the domain hierarchy. |
|
|
Go Up Use this icon to display the next highest level of nodes in the domain hierarchy. |
|
|
Overridable Parameter This icon indicates an overridable Application Specific parameter. An Overridable parameter icon indicates that each associated Fact Group or Dimension Group can have a different value. For more information, see Section 4.5.1, "Key points about working with Data Load Parameters". |
|
|
Parameter This icon denotes a parameter. For Data Load Parameters, if displayed in the Data Load Parameters pane (or top list), then this icon indicates an Application Specific parameter. If displayed in the Group Specific Parameter Values For pane (or lower list), then this icon indicates a Non-Overridable Application Specific parameter, which means that each associated Fact Group or Dimension Group must have the same value. In other words, if you change the value for one Fact Group or Dimension Group, then all Fact Groups and Dimension Groups are updated with that value (if you first confirm at a Warning dialog). |
|
|
Show as Top Use this icon to display only the currently selected parent node and child nodes. Note: This icon is only active for child nodes. |
|
|
Read Only Parameter This icon indicates that a Data Load Parameter parameter value is read-only, which means that you cannot change that parameter value on the Manage Data Load Parameter dialog. |
|
|
Parameter Category This icon denotes a grouping of related parameters, for example, the Configure Time Dimension category is a group of parameters that are related to calendars. To expand a Parameter Category, click Expand: To collapse a Parameter Category, click Collapse: |
|
|
Query By Example Use the Query By Example icon to toggle the display of the Query By Example fields above each display column. When Query By Example fields are displayed, enter a value into a Query By Example field and press [Enter] to search for records that match that value. To clear a query, clear the text in the Query By Example field and press [Enter] again. For example, to search for parameters with names beginning with Global, type Global in the query box above a Name column, then press [Enter]. To clear the query, clear the text 'Global' from the query box above the Name column, then press [Enter]. For more information about how to use Query By Example, see Section 2.8.5, "How to use Query By Example". |
|
|
Select Date Use the Select Date icon to toggle the Calendar pane, which enables you to select a date. For example, on the Export Setup Data tab, select January 1 2010 to display only files that were exported on that day. |
|
|
Start Search Use the Start Search icon to display parameters matching the value or wildcard specified in the adjacent text box. |
Tip:
To see a tool tip for an icon, mouse-over the icon. In the following screenshot, mousing-over the Edit icon displays the tool tip 'Edit Data Source Information'.

To change the sort order of displayed items, click on or mouse-over the field name on which you want to sort, then click the up arrow or down arrow that is displayed in the field label. Sort options are only displayed on mouse-over or when a field label or column is selected. For example, to display domain names in descending alphabetical order, you might click on the Name field label and click the down (or Sort Descending) arrow.
The following screenshot shows the sort options the Name field on the Domain Mappings dialog.
Query By Example enables you to locate parameter values using a free-text search.
To use Query By Example:
If the Query By Example fields are not displayed, click the Query By Example icon (see the following screenshot).
For information about menus, see Section 2.8.3, "About the Icons"
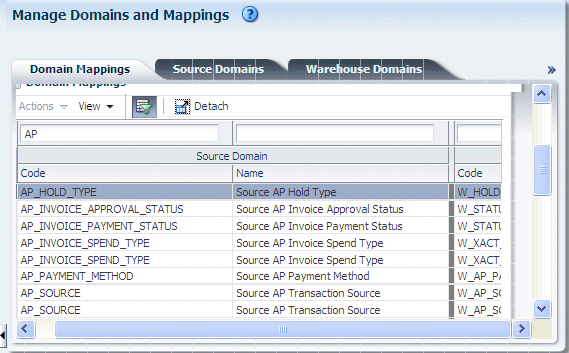
Enter a value into each Query By Example field on which you want to search.
For example, to search for domains with a code beginning with 'AP', type AP into the box above the Code column (see the following screenshot).

Press [Enter] to start the query.
To clear a query, clear the text in the Query By Example field and press [Enter] again.
Oracle BI Applications Configuration Manager provides the following accessibility features:
Screen Reader - this feature provides accessibility-specific constructs in the User Interface to improve the user-experience with a screen reader. For example, menu items are labelled with 'Menu Item', and tables and list items are provided with a radio button to enable navigation and selection using the Tab and Spacebar keys.
High contrast colors - this feature provides high-contrast-friendly visual content, in conjunction with the high-contrast mode in the browser and in the operating system.
Large fonts - this feature provides browser-zoom-friendly content in large text.
If accessibility features are not required, you should disable the above features.
How to enable or disable Accessibility features:
Select the Accessibility link in the top right hand corner of the screen to display the Enable Accessibility Preferences page

Use the check boxes to select or de-select the features.
Click Apply.