6 Updating the Oracle Unified Directory Software to 11g Release 2 PS2 (11.1.2.2.0)
This chapter covers a broad strategy for updating your directory service to the latest version, without service interruption, as well as the steps for updating an individual server instance.
The chapter covers the following topics:
-
Section 6.1, "What's New in Oracle Unified Directory 11g Release 2 PS2 (11.1.2.2.0)"
-
Section 6.2, "Starting Points for Oracle Unified Directory Update"
-
Section 6.4, "Updating a Directory Service Without Service Interruption"
-
Section 6.5, "Updating an Existing Oracle Unified Directory Instance"
6.1 What's New in Oracle Unified Directory 11g Release 2 PS2 (11.1.2.2.0)
For more information, see "New Features Introduced with Oracle Unified Directory 11g Release 2 PS2 (11.1.2.2.0)" in the Oracle Fusion Middleware Administrator's Guide for Oracle Unified Directory.
6.2 Starting Points for Oracle Unified Directory Update
The following starting points are supported:
-
Oracle Unified Directory 11g Release 1 (11.1.1.5)
-
Oracle Unified Directory 11g Release 2 (11.1.2.0)
-
Oracle Unified Directory 11g Release 2 PS1 (11.1.2.1.0)
6.3 Special Instructions for Updating to Oracle Unified Directory 11g Release 2 PS2 (11.1.2.2.0)
The following components are not updated to the Oracle Unified Directory 11g Release 2 PS2 (11.1.2.2.0) environment:
-
Global Index Catalogs configured using
gicadm: You cannot update 11g Release 1 (11.1.1.5) or 11g Release 2 (11.1.2.0) global index catalogs configuration. After updating to Oracle Unified Directory 11g Release 2 PS2 (11.1.2.2), you must reconfigure global index catalogs usinggicadmas described in the section "Configuring Global Index Catalogs by Using gicadm" in the Oracle Fusion Middleware Administrator's Guide for Oracle Unified Directory. -
You cannot update earlier versions of Oracle Directory Services Manager to Oracle Unified Directory 11g Release 2 PS2 (11.1.2.2.0). You must update Oracle Directory Services Manager as described in Section 6.6, "Updating Oracle Directory Services Manager".
6.4 Updating a Directory Service Without Service Interruption
Updating a replicated Oracle Unified Directory topology involves updating the software for each server instance individually. Usually, however, you should be able to update an entire topology without any interruption in service. Because a particular server instance must be stopped during the update process, maintaining service during an update necessitates that you have alternative servers that can handle client requests while a particular server is down.
The strategy for maintaining service during an update depends on the specifics of your deployment.
If your deployment includes one or more proxy server instances that route client requests to the backend servers, you can safely take down one directory server at a time, and update that server instance. The proxy server will take care of rerouting client requests to ensure uninterrupted service. Upgrading the proxy server instance requires more than one proxy server instance with the same configuration.
If your deployment does not include a proxy server, you must configure your client applications to send requests to an alternative server while a specific directory server instance is being updated.
The following sections outline the steps to follow in each of the scenarios described previously:
-
Section 6.4.1, "Upgrading in a Topology That Includes a Proxy Server"
-
Section 6.4.2, "Upgrading in a Topology That Does Not Include a Proxy Server"
6.4.1 Upgrading in a Topology That Includes a Proxy Server
The following diagrams show two replicated topologies that include replicated proxy servers. This section covers two scenarios:
-
The first topology assumes that the directory servers and replication servers (RS) are installed on the same host.
-
The second topology assumes that the directory servers and replication servers are installed on separate hosts.
Group 1 and Group 2 in these diagrams refer to configured replication groups. For more information, see "Replication Groups" in the Administration Guide for Oracle Unified Directory.
6.4.1.1 Replication Server and Directory Server on the Same Host
If a single host contains both a replication server and a directory server, and those servers are associated with the same ORACLE_HOME directory, the servers are stopped and updated at the same time.
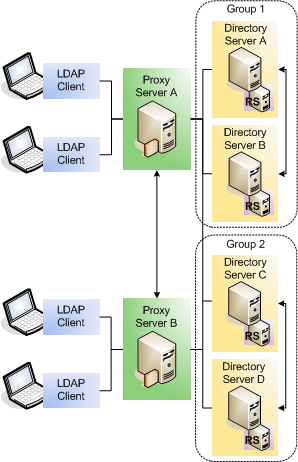
The update strategy in this topology would be as follows:
-
Change the configuration of proxy server A so that no requests are routed to directory server A.
-
Stop directory server A. The replication server running on this host is stopped at the same time.
-
Update directory server A, following the steps in Section 6.5, "Updating an Existing Oracle Unified Directory Instance".
-
Restart directory server A.
-
Test that your directory service is working properly before upgrading successive servers.
-
Repeat steps 1-5 for each directory server in that replication group.
-
Follow steps 1-6 for each replication group in the topology.
-
Stop proxy server A.
-
Update proxy server A, following the steps in Section 6.5, "Updating an Existing Oracle Unified Directory Instance".
-
Restart proxy server A.
-
Repeat steps 8-10 for the remaining proxy servers in the topology.
6.4.1.2 Replication Server and Directory Server on Separate Hosts
If the replication server and the directory server are installed on separate hosts, the servers are stopped and updated in the sequence described here.
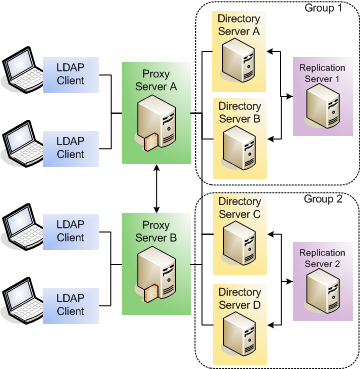
The update strategy in this topology would be as follows:
-
Change the configuration of proxy server A so that no requests are routed to directory server A.
-
Stop directory server A.
-
Update directory server A, following the steps in Section 6.5, "Updating an Existing Oracle Unified Directory Instance".
-
Restart directory server A.
-
Test that your directory service is working properly before upgrading successive servers.
-
Repeat steps 1-5 for each directory server in that replication group.
-
Stop replication server 1.
The replication mechanism ensures that directory servers A and B now connect to replication server 2.
-
Update replication server 1, following the steps in Section 6.5, "Updating an Existing Oracle Unified Directory Instance".
-
Restart replication server 1.
-
Follow steps 1-9 for each replication group in the topology.
-
Stop proxy server A.
-
Update proxy server A, following the steps in Section 6.5, "Updating an Existing Oracle Unified Directory Instance".
-
Restart proxy server A.
-
Repeat steps 11-13 for the remaining proxy servers in the topology.
6.4.2 Upgrading in a Topology That Does Not Include a Proxy Server
In a topology that does not include any proxy server instances, you must update your client applications so that they point to an alternative directory server each time you take a directory server down for update.
The following diagram shows a replicated topology that does not include a proxy server. This topology assumes that the directory servers and replication servers are installed on the same ORACLE_HOME directory.
Group 1 and Group 2 in this diagram refer to configured replication groups. For more information, see "Replication Groups in the Administration Guide for Oracle Unified Directory.
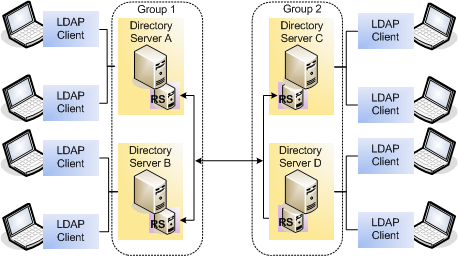
The update strategy in this topology would be as follows:
-
Change your client application configuration so that applications do not access directory server A directly.
-
Stop directory server A. The replication server on this host is stopped and updated at the same time.
-
Update directory server A, following the steps in Section 6.5, "Updating an Existing Oracle Unified Directory Instance".
-
Restart directory server A.
-
Test that your directory service is working properly before upgrading successive servers.
-
Change your client application configuration so that applications do not access directory server B directly.
-
Stop directory server B.
-
Update directory server B, following the steps in Section 6.5, "Updating an Existing Oracle Unified Directory Instance".
-
Follow steps 1-8 for each replication group in the topology.
6.5 Updating an Existing Oracle Unified Directory Instance
You can update all Oracle Unified Directory server instances that are associated with a specific ORACLE_HOME directory by installing the updated software version over the existing ORACLE_HOME.
To update an existing Oracle Unified Directory installation, follow these steps:
-
Download the latest Oracle Unified Directory version from OTN or Oracle Software Delivery Cloud.
For more information, see Section 2.1, "Obtaining the Software".
-
Stop any Oracle Unified Directory server instances that are associated with the
ORACLE_HOMEdirectory that you are upgrading.Unix
$ instance-dir/OUD/bin/stop-dsWindows
instance-dir\OUD\bat\stop-ds.batServers in the topology that are associated with a different
ORACLE_HOMEwill not be updated and do not need to be stopped. -
Follow the steps outlined in Section 2.2, "Installing Oracle Unified Directory".
Where you are required to specify an installation location, enter the same OUD Base Location Home and Oracle Home Directory (
ORACLE_HOME) that you specified for the original installation.For more information about these directories, see Section 1.4, "Understanding the Installation Directories".
The installer recognizes an existing installation and updates the relevant binary files. Do not recreate the server instances.
-
For Windows, you must manually copy the
start-ds.batfile (located at INSTALL_DIR\bat\start-ds.bat) and replace thestart-ds.batfile of the instances that needs to be upgraded. -
Upgrade any Oracle Unified Directory server instances that are associated with the
ORACLE_HOMEdirectory:Unix
$ instance-dir/OUD/bin/start-ds --upgrade
Windows
instance-dir\OUD\bat\start-ds.bat --upgrade
The output of the
start-ds --upgradecommand is logged in the<INSTANCE_PATH>/logs/server.outdirectory. -
Restart the server instances that you stopped in Step 1.
Unix
$ instance-dir/OUD/bin/start-dsWindows
instance-dir\OUD\bat\start-ds.bat
6.6 Updating Oracle Directory Services Manager
When you update the Oracle Unified Directory software, the Oracle Directory Services Manager (ODSM) binaries are also updated to version 11.1.2.2.0. Depending on your application server, perform the following:
6.6.1 Updating Oracle Directory Services Manager on Oracle WebLogic Server
ODSM 11.1.2.2.0 is compatible with WebLogic Server 11g Release 1 (10.3.6), and with the Oracle Application Development Framework 11g Release 1 (11.1.1.7.0).
Note:
You must restart the Oracle WebLogic Server after updating the Oracle Unified Directory software.To upgrade Oracle WebLogic Server from 10.3.5 to 10.3.6, download the WebLogic Server 10.3.6 update installer and follow the steps in Section 2.3.1.1, "Installing Oracle WebLogic Server". You must stop all WebLogic domains before upgrading the WebLogic software. For more information, see the Upgrade Guide for Oracle WebLogic Server.
You must update your Oracle Application Development Framework to 11.1.1.7 for ODSM 11.1.2.2.0 to function correctly. To update Oracle Application Development Framework, from 11.1.1.5 or 11.1.1.6 to 11.1.1.7, download Oracle Application Development Framework and follow the steps in the Oracle Fusion Middleware Installation Guide for Application Developer. Note that, even if you have not upgraded the WebLogic software, you must stop the WebLogic domains before you upgrade the Application Development Framework. For more information about upgrading the Oracle Application Development Framework, see the Upgrade Guide for Oracle SOA Suite, WebCenter, and ADF.
6.6.2 Updating Oracle Directory Services Manager on IBM WebSphere
To update the Oracle Directory Services Manager on IBM WebSphere, perform the following steps:
Note:
Before you update Oracle Directory Services Manager on IBM WebSphere, you must upgrade Oracle Unified Directory, as described in Section 6.5, "Updating an Existing Oracle Unified Directory Instance".-
You must patch your existing Oracle Application Development Framework to 11g Release 1 (11.1.1.7.0), as described in "Applying the Latest Oracle Fusion Middleware Patch Set" in the Oracle Fusion Middleware Patching Guide.
-
Upgrade Oracle Platform Security Services, by running the following commands on the command line:
On UNIX operating systems:
$MW_HOME/oracle_common/common/bin/wsadmin.sh -username wasadmin -password wasadmin1
Opss.upgradeOpss(jpsConfig="<was_install_location>/profiles/<application_server_profile_name>/config/cells/<cell_name>/fmwconfig/jps-config.xml",jaznData="<MW_Home>/oracle_common/modules/oracle.jps_11.1.1/domain_config/system-jazn-data.xml")
For example:
Opss.upgradeOpss(jpsConfig="/disk01/IBM/WebSphere/AppServer/profiles/Custom01/config/cells/Cell01/fmwconfig/jps-config.xml",jaznData="/Middleware/oracle_common/modules/oracle.jps_11.1.1/domain_config/system-jazn-data.xml")
-
Update the Oracle Application Development Framework on IBM WebSphere, by running the following commands:
On UNIX operating systems:
$MW_HOME/oracle_common/common/bin/wsadmin.sh -username wasadmin -password wasadmin1
ADFAdmin.updateADFLibrary('<cell_name>','<node_name>','<server_name>')
For example:
ADFAdmin.updateADFLibrary('Cell01','Node01','OracleAdminServer') -
Stop the node by using the following command on the command line:
WAS_HOME/profiles/profile_name/bin/stopNode.sh
For example, to stop the node on a UNIX operating system:
/opt/IBM/WebSphere/AppServer/profiles/Custom01/bin/stopNode.sh
-
Stop the OracleAdminServer by using the following command on the command line:
WAS_HOME/profiles/profile_name/bin/stopServer.sh OracleAdminServer
For example, to stop the OracleAdminServer on a UNIX operating system:
/opt/IBM/WebSphere/AppServer/profiles/Custom01/bin/stopServer.sh OracleAdminServer
-
Stop the deployment manager by using the following command on the command line:
UNIX
WAS_HOME/profiles/deployment_mgr_profile_name/bin/stopManager.sh
Windows
WAS_HOME\profiles\deployment_mgr_profile_name\bin\stopManager.sh
For example, to stop the deployment manager on a UNIX operating system:
/opt/IBM/WebSphere/AppServer/profiles/Dmgr01/bin/stopManager.sh
-
Start the deployment manager by using the following command on the command line:
UNIX
WAS_HOME/profiles/deployment_mgr_profile_name/bin/startManager.sh -username admin_user -password admin_password
Windows
WAS_HOME\profiles\deployment_mgr_profile_name\bin\startManager.sh -username admin_user -password admin_password
For example, to start the deployment manager on a UNIX operating system:
/opt/IBM/WebSphere/AppServer/profiles/Dmgr01/bin/startManager.sh
-
Synchronize the node by using the following command on the command line:
UNIX
profiles/Server_profile_name/bin/syncNode.sh <host_name> <SOAP_Port> -username admin_user -password admin_password
Windows
profiles\Server_profile_name\bin\syncNode.sh <host_name> <SOAP_Port> -username admin_user -password admin_password
For example:
/disk01/IBM/WebSphere/AppServer/profiles/Custom01/bin/syncNode.sh myhost.mycompany.com 8879 -username wasadmin -password welcome1
-
Start the node by using the following command on the command line:
WAS_HOME/profiles/profile_name/bin/startNode.sh
For example, to stop the node on a UNIX operating system, enter:
/opt/IBM/WebSphere/AppServer/profiles/Custom01/bin/startNode.sh
-
Start the OracleAdminServer by using the following command on the command line:
WAS_HOME/profiles/profile_name/bin/startServer.sh OracleAdminServer
For example, to start the OracleAdminServer on a UNIX operating system, enter:
/opt/IBM/WebSphere/AppServer/profiles/Custom01/bin/startServer.sh OracleAdminServer
-
Update Oracle Directory Services Manager by using the following command on the command line:
On UNIX operating systems:
<MW_HOME>/oracle_common/common/bin/wsadmin.sh -conntype SOAP -port <DMGR_SOAP_PORT> -username admin_user -password admin_password -f <ORACLE_HOME>/odsm-tools/update_odsm_was.py -o <ORACLE_HOME>
For example:
$Middleware/oracle_common/common/bin/wsadmin.sh -conntype SOAP -port 8881 -username wasadmin -password welcome1 -f /Oracle/Middleware/Oracle_OUD1/odsm-tools/update_odsm_was.py -o /Oracle/Middleware/Oracle_OUD1