6 Deploying Oracle Exalytics for High Availability
This chapter describes how to use the Exalytics Domain Management Utility to horizontally scale out the Exalytics Machine for scalability (high-availability) and performance (load balancing).
For additional details, see "Deploying Oracle Business Intelligence for High Availability" in Oracle Fusion Middleware System Administrator's Guide for Oracle Business Intelligence Enterprise Edition.
Note:
To use the manual steps to horizontally scale out the Exalytics Machine, see Appendix A, "Deploying Oracle Exalytics for High Availability."The chapter includes the following sections:
6.1 Requirements for High Availability
The following are required for a high availability configuration:
-
Each computer has an independent instance of Oracle TimesTen.
-
Each computer has an odbc.ini file that contains a separate DSN for each instance of Oracle TimesTen. Each Oracle TimesTen DSN uses the client/server mode of connection.
-
A BI Server repository can point to one or more physical repositories, but one set of aggregates exists per physical data source. Each physical data source has its own connection pool.
6.2 Diagram of High Availability
Figure 6-1 shows a diagram of high availability for the Exalytics Machine. In certain scenarios, the system might benefit from using Oracle HTTP Server in the web tier.
Figure 6-1 HIgh-Availability for the Exalytics Machine
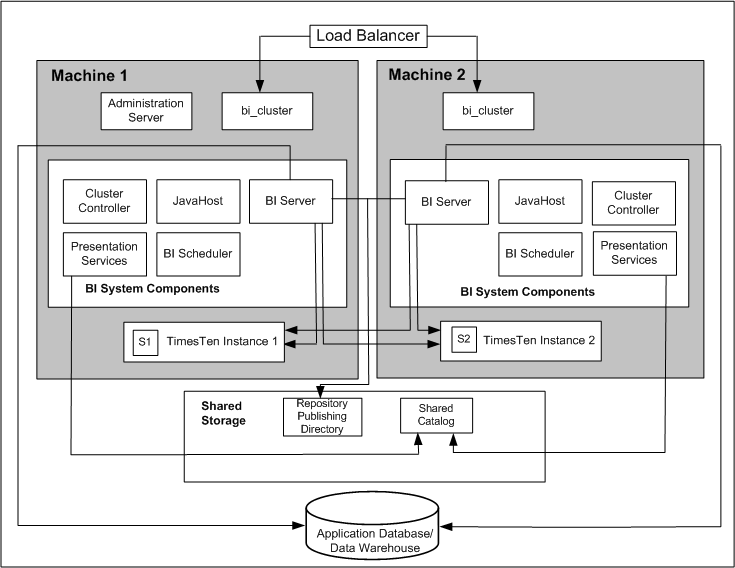
Description of "Figure 6-1 HIgh-Availability for the Exalytics Machine"
6.3 Configuring for High Availability
You use a combination of the Exalytics Domain Management Utility and manual steps to scale-out an existing Oracle Business Intelligence domain.
This section contains the following topics:
-
Section 6.3.1, "Step 1: Preparing the First Exalytics Machine"
-
Section 6.3.2, "Step 2: Preparing the Second Exalytics Machine"
-
Section 6.3.4, "Step 4: Installing and Configuring Oracle TimesTen"
-
Section 6.3.5, "Step 5: Configuring Shared Storage for Persistent Stores"
-
Section 6.3.6, "Step 6: Configuring the Front-End Load Balancer"
6.3.1 Step 1: Preparing the First Exalytics Machine
Install Oracle Exalytics on the first Exalytics Machine using the instructions that are provided in Section 4.3, "Installing Business Intelligence Software on New Deployments" of this guide before installing on the second Exalytics Machine.
6.3.2 Step 2: Preparing the Second Exalytics Machine
To prepare the second Exalytics Machine:
-
Confirm that Release 1 Patchset 4 is installed on the second Exalytics Machine.
-
Create the user, as described in Section 4.3.3.1, "Creating a Password on the Operating System."
-
Create the inventory for Oracle TimesTen, as described in Section 4.3.3.2, "Optional: Creating the Inventory for Oracle TimesTen."
-
Download the files into an installers directory, as described in Section 4.3.3.4, "Downloading the Oracle Installation Files into a Staging Directory Structure."
-
Create an input properties file, as described in Section 4.3.3.5, "Creating an Input Properties File."
6.3.3 Step 3: Scaling Out the Existing BI Domain
You scale out the existing Oracle Business Intelligence domain by running the Exalytics Domain Management Utility.
Note:
The Exalytics Domain Management Utility only scales out and configures Oracle Business Intelligence. If you want to scale out and configure Oracle TimesTen, then install it manually on the second Exalytics Machine. See Section 6.3.4, "Step 4: Installing and Configuring Oracle TimesTen."To scale out an Oracle Business Intelligence domain:
-
Verify that all processes are running on the existing domain. See Section 4.3.5.2, "Viewing Status of an Exalytics Domain."
Make a note of the AdminServer port number. You need to enter the port number later when prompted by the Exalytics Domain Management Utility.
-
Log in to the second Exalytics Machine as the user that you created in Step 2 of Section 6.3.2, "Step 2: Preparing the Second Exalytics Machine."
-
To scale out an Oracle Business Intelligence domain, enter the following command:
/opt/exalytics/bin/exalytics-domain-management.sh --action=scaleout_domain --input=<location and name of the input file> --domain=<domain_name on the first Exalytics Machine>For example, to scale out domain "menlo" from the first Exalytics Machine, enter the following command:
/opt/exalytics/bin/exalytics-domain-management.sh --action=scaleout_domain --input=/home/oracle/Installers/input.properties --domain=menlo -
When prompted by the Exalytics Domain Management Utility, perform the following tasks:
-
Enter the user name and password for the Oracle WebLogic Server administrator.
-
Enter the AdminServer host name.
-
Enter the AdminServer port number.
The Exalytics Domain Management Utility performs the following actions on the second Exalytics Machine:
-
Installs Oracle WebLogic Server
-
Installs Oracle Business Intelligence
-
Creates an Oracle Instance
-
Scales out the Managed Server
-
Scales out the existing BI domain
After the installation completes, a message is displayed that you can successfully connect to the scaled-out domain. The output looks similar to the following:
[LOGMSG] [11-13-13 00:54:31] [INFO] [menlo] [scaleout_domain] Success connecting to <server-name_on_scaled_out_domain> on port: 12003
-
-
To verify that the scaled out domain is listed on the second Exalytics Machine, enter the following command on the second Exalytics Machine:
/opt/exalytics/bin/exalytics-domain-management.sh --action=list_domains --input=/home/oracle/input.propertiesThe report displays the scaled out domain on the second Exalytics Machine. The Node type is displayed as "Scaled out node". The output should look similar to the following:
============================================================
                 Domain: menlo
============================================================
Node type: Scaled out node
Provisioning status: Completed
Middleware Home: /u01/app/oracle/product/exalytics/exalyticsdomains/menlo/fmw
BI Instance Home: /u01/app/oracle/product/exalytics/exalyticsdomains/menlo/instances/instance1
    -------------------
    | Application URLs |
    -------------------
Oracle Enterprise Manager: http://<server-name>:12000/em
Oracle WebLogic Admin Console: http://<server-name>:12000/console
Oracle Business Intelligence: http://<server-name_on_scaled_out_domain>:12001/analytics
Oracle BI Publisher : http://<server-name_on_scaled_out_domain>:12001/xmlpserver
    ------------
    | WebLogic |
    ------------
Domain Home: /u01/app/oracle/product/exalytics/exalyticsdomains/menlo/user_projects/domains/bifoundation_domain
Admin Server Host: <server-name>
Admin Server Port: 12000
BI Managed Server Host: <server-name_on_scaled_out_domain>
BI Managed Server Port: 12001
    ------------
    | TimesTen |
    ------------
TimesTen enabled: No


Found 1 domain(s) in total
6.3.4 Step 4: Installing and Configuring Oracle TimesTen
To install and configure Oracle TimesTen:
-
Enter the following commands:
cd /home/oracle/EXALYTICS_INSTALLERS/tt
>./setup.sh
instance name tt1122 [default chosen]
install client/server and data manager [default chosen]
specify particular location for install [3]
enter location [custom location chosen /u01/app/oracle/product/TimesTen]
create daemon home - [default chosen]
daemon logs - [default chosen]
accept default port no - 53396
restrict access to TT to group oracle? - Yes
enable PL/SQL - yes [default chosen]
TNS_ADMIN – not chosen during install.
port for TT server - 53397
quickstart and doc - no [default chosen]
doc without quickstart - yes [default chosen] - location default
TT replication with clusterware - no - [default chosen]
-
Run the daemon configuration scripts for Oracle TimesTen as root, as described in Section 4.3.4.4, "Running the Daemon Configuration Scripts for Oracle TimesTen."
-
On the first Exalytics Machine, configure the BI Server to communicate with either instance of Oracle TimesTen by creating two DSNs for Oracle TimesTen, as described in Section 4.3.4.7, "Configuring the ODBC Connection from Oracle Business Intelligence to Oracle TimesTen."
-
On the second Exalytics Machine, perform the same procedure as in the previous step to create DSNs for Oracle TimesTen to configure the connectivity from the second BI Server to either instance of Oracle TimesTen.
-
Update the opmn.xml file on the second Exalytics Machine to point to the driver location for ODBC for Oracle TimesTen by editing the following "variable" elements. The edited text is shown in bold.
<variable id="LD_LIBRARY_PATH" value="$ORACLE_HOME/common/ODBC/Merant/5.3/lib$:$ORACLE_HOME/bifoundation/server/bin$:$ORACLE_HOME/bifoundation/web/bin$:$ORACLE_HOME/clients/epm/Essbase/EssbaseRTC/bin$:$ORACLE_HOME/bifoundation/odbc/lib$:$ORACLE_INSTANCE$:$ORACLE_HOME/lib:/u01/app/oracle/product/TimesTen/tt1122/lib" append="true"/>
<variable id="TIMESTEN_DLL" value="/u01/app/oracle/product/TimesTen/tt1122/lib/libttclient.so"/>
The opmn.xml file is in the following directory:
/u01/app/oracle/product/fmw/instances/instance2/config/OPMN
-
Stop and start the Notification Server (OPMN).
-
Go to the following directory that contains the OPMN command-line tool:
/u01/app/oracle/product/fmw/instances/instance2/bin
-
Run the following command:
./
opmnctl stopallStops OPMN and all Oracle Business Intelligence system components.
-
Go to the following directory that contains the OPMN command-line tool:
/u01/app/oracle/product/fmw/instances/instance2/bin
-
Run the following command:
./
opmnctl startallStarts OPMN and all Oracle Business Intelligence system components.
For more information, see "Using the OPMN Command Line to Start, Stop, Restart, and View the Status of System Components" in Oracle Fusion Middleware System Administrator's Guide for Oracle Business Intelligence Enterprise Edition.
-
-
Validate that you can use a client/server DSN for Oracle TimesTen from the first Exalytics Machine by entering the following commands:
cd $ORACLE_INSTANCE/bifoundation/OracleBIApplication/coreapplication/setup/
. ./bi-init.sh (bash shell)
cd Times-Ten-root-dir/tt1122/bin
./ttisqlcs –connstr "uid=oracle;pwd=welcome1;dsn=bim_tt1";
These commands use the SQL client for Oracle TimesTen to connect to the Oracle TimesTen server on the first Exalytics Machine and validate that the BI Server can communicate with Oracle TimesTen.
-
Repeat the previous step for the client/server DSN for Oracle TimesTen from the second Exalytics Machine.
6.3.5 Step 5: Configuring Shared Storage for Persistent Stores
As part of the process of configuring the Exalytics Machine, you must configure various persistent stores to be located on a shared directory location such as a NAS (network attached storage). The following list outlines those stores and includes link for information on configuring them:
-
Repository for the Oracle BI Server. Specify a shared RPD publishing directory in Fusion Middleware Control to propagate online repository changes in a cluster. The master BI Server copies its local repository to this directory when online changes are made. When slave BI Servers start, if the version in the publishing directory is newer, then each slave server copies the version in the shared directory to its local disk.
For information, see "Using Fusion Middleware Control to Upload a Repository and Set the Oracle BI Presentation Catalog Location" in Oracle Fusion Middleware System Administrator's Guide for Oracle Business Intelligence Enterprise Edition.
-
Oracle BI Presentation Catalog. Each Oracle BI Presentation Services instance loads the catalog from the catalog location that is specified in Fusion Middleware Control. Copy any existing catalogs to shared storage before reconfiguring this location to shared storage.
For information, see "Using Fusion Middleware Control to Upload a Repository and Set the Oracle BI Presentation Catalog Location" in Oracle Fusion Middleware System Administrator's Guide for Oracle Business Intelligence Enterprise Edition.
-
Global cache. The global cache resides on a shared file system and stores purging events, seeding events (which are often generated by agents), and results sets that are associated with seeding events. Each BI Server maintains its own local query cache for regular queries. The query cache for the BI Server continues to be located on the local node.
For information, see "Using Fusion Middleware Control to Set Global Cache Parameters" in Oracle Fusion Middleware System Administrator's Guide for Oracle Business Intelligence Enterprise Edition.
6.3.6 Step 6: Configuring the Front-End Load Balancer
Configure a front-end load balancer, which is properly configured with the Oracle WebLogic Server Cluster Plug-in. For information, see "Configuring High Availability for Oracle Business Intelligence and EPM" in Oracle Fusion Middleware High Availability Guide.
6.4 Troubleshooting the Highly Available Deployment
This section contains solutions that are related to a highly available deployment:
-
Section 6.4.1, "Connection Issues with the Oracle BI Server and Oracle TimesTen"
-
Section 6.4.2, "Client Installer Cannot Locate the Driver for Oracle TimesTen"
-
Section 6.4.3, "Oracle BI Server Does Not Fail Over to the Instance of Oracle TimesTen"
-
Section 6.4.4, "Aggregates Are Not Present in Second Instance"
6.4.1 Connection Issues with the Oracle BI Server and Oracle TimesTen
You might find that the BI Server cannot connect to Oracle TimesTen on either the first or the second node. To resolve this issue, check the following:
-
Verify that the DSNs for Oracle TimesTen are configured correctly in the odbc.ini and opmn.xml files, as described in the following list:
-
The odbc.ini file in the ORACLE_INSTANCE/bifoundation/OracleBIApplication/coreapplication/setup directory has the proper DSNs defined to connect to both instances of Oracle TimesTen, as described in Section 4.3.4.7, "Configuring the ODBC Connection from Oracle Business Intelligence to Oracle TimesTen."
-
The opmn.xml file in the ORACLE_INSTANCE/config/OPMN/opmn/ directory has the LD_LIBRARY_PATH variable set correctly to point to the shared library folder for Oracle TimesTen. The TIMESTEN_DLL variable must also be defined correctly, as shown in the following example:
<variable id="TIMESTEN_DLL" value="u01/app/oracle/product/TimesTen/tt1122/lib/libttclient.so"/>
-
-
The BI Server must use the ODBC driver for Oracle TimesTen Version 3.5 for connection.
During deployment of a repository, ensure that you use the ODBC driver for Oracle TimesTen Version 3.5 for the database connection pool. Without the use of this driver version, the BI Server cannot connect to Oracle TimesTen.
6.4.2 Client Installer Cannot Locate the Driver for Oracle TimesTen
After you use the Client Installer to install the Oracle BI Administration Tool on a Windows computer, you might notice that the Administration Tool displays an error message such as the following:
Unable to load Times Ten Driver ttclient.dll.
This error message indicates that you cannot use the ODBC drivers in Oracle TimesTen to import metadata from a physical table source for Oracle TimesTen. To resolve this issue, set the TIMESTEN_DLL environment variable to point explicitly to the driver location for Oracle TimesTen, as shown in the following example:
set TIMESTEN_DLL=C:\TimesTen\tt1122_32\bin\ttclient1122.dll
6.4.3 Oracle BI Server Does Not Fail Over to the Instance of Oracle TimesTen
If the BI Server does not fail over to the second Oracle TimesTen instance on the scaled-out node, then ensure that the logical table source (LTS) for the repository has mapped both the physical data sources for Oracle TimesTen. This mapping ensures that at the logical table source level, a mapping exists to both instances of Oracle TimesTen. If one instance of Oracle TimesTen is not available, then failover logic for the BI Server at the DSN level tries to connect to the other instance of Oracle TimesTen.
6.4.4 Aggregates Are Not Present in Second Instance
You might notice that aggregates that were created on the first instance of Oracle TimesTen are not available on the second instance of Oracle TimesTen. Keep in mind that no automatic replication exists between the Oracle TimesTen instances in the scaled-out deployment. The two instances are distinct and run on different computers but have the same deployed data stores. If you create aggregates using SQL scripts from Oracle BI Summary Advisor or the Aggregate Persistence Wizard on one instance of Oracle TimesTen, then you must manually create the same aggregates on the second instance of Oracle TimesTen. You must ensure that you keep the two instances of Oracle TimesTen synchronized. For information, see "Life Cycle Use Cases for Aggregate Persistence" in Oracle Fusion Middleware Metadata Repository Builder's Guide for Oracle Business Intelligence Enterprise Edition.