| Agile Product Lifecycle Management AutoVue for Agile Installation and User Guide Release 20.2.2 E40039-01 |
|

 Previous |
 Next |
| Agile Product Lifecycle Management AutoVue for Agile Installation and User Guide Release 20.2.2 E40039-01 |
|
Previous |
Next |
This chapter describes how to view attachments in Agile PLM using AutoVue for Agile, and how to work with the Agile-specific AutoVue features and functions.
You can view files from either the Attachments tab of a business object or from the Files tab of a file folder object.
|
Note: When multiple files are displayed in AutoVue for Agile, use the document navigation buttons in the viewer toolbar to select the document that appears in the viewer window. |
To view a file from Web Client, Attachments tab:
Go to the Attachments tab of a business object that references the file.
Click the file name link in the attachments table.
If the attachment row refers to a file folder with only one file, AutoVue for Agile opens and displays that file.
If the attachment row refers to a multiple-file file folder, each file is listed in the File Name column. Click the file link you want. AutoVue for Agile opens and displays that file.
Or, you can use the Attachment tab View button:
Go to the Attachments tab of a business object that references the file.
Select one or more attachment rows.
Click the View button's drop-down arrow and select View from the menu.
If you selected one attachment row that refers to a file folder with only one file, AutoVue for Agile opens and displays that file.
If you selected one attachment row that refers to a multiple-file file folder, AutoVue for Agile opens and displays all the files in the multiple-file file folder.
If you selected more than one attachment row, AutoVue for Agile opens and all the files in all the selected rows are displayed in the viewer.
To view a file from Web Client, Files tab:
Go to the Files tab of a file folder object containing the files you want to view.
Click the filename link in the file table.
AutoVue for Agile opens and displays the file.
Or, select one or more file rows.
Click the tab menu View button's drop-down arrow and select View from the menu.
AutoVue for Agile opens and displays the selected files.
|
Note: When multiple files are displayed in AutoVue for Agile, use the document navigation buttons in the viewer toolbar to select the document that appears in the viewer window. |
To view a file from Java Client, Attachments tab:
Go to the Attachments tab of a business object that references the file.
Double-click the attachment row.
If the attachment row refers to a file folder with only one file, AutoVue for Agile opens and displays that file.
If the attachment row refers to a multiple-file file folder, the Select Files window appears. Select one or more files to view and click OK. AutoVue for Agile opens and displays the files you selected.
Or, you can use the Attachment tab View File(s) button:
Go to the Attachments tab of a business object that references the file.
Select one or more attachment rows.
Click the View File(s) button's drop-down arrow and select View from the menu.
|
Note: If the View icon is visible on the button, you can simply click the button. |
If you selected one attachment row that refers to a file folder with only one file, AutoVue for Agile opens and displays that file.
If you selected one attachment row that refers to a multiple-file file folder, the Select Files window appears. Select a file to view and click OK. The file displays in the Viewer. The Navigation buttons in the Viewer allows you to navigate to other files.
If you selected more than one attachment row, AutoVue for Agile opens and all the files in all the selected rows are displayed in the viewer. The Select Files window does not appear.
To view a file from Java Client, Files tab:
Go to the Files tab of a file folder object containing the files you want to view.
Double-click the filename in the file table. AutoVue for Agile opens and displays the file.
Or, select one or more file rows.
Click the tab menu View File(s) button's drop down arrow and select View from the menu.
|
Note: If the View icon is visible on the button, you can simply click the button. |
The Viewer opens and displays the selected files.
When the AutoVue for Agile window is open, you can use the viewer menus to select additional Agile files. For many viewer functions this is a preferred method compared to pre-selecting the files in the Agile client.
The specific AutoVue for Agile menu choices that are available to allow you to select an Agile attachment file depend upon the function you originally chose in Agile PLM when you opened AutoVue for Agile (View, Compare, or Overlay) and the file type of the currently viewed file.
|
Note: Because the list of available AutoVue for Agile menu selections for attachment file selection can vary, some of the following menu selections may not be available for you to choose in a specific viewer session. |
The possible available AutoVue for Agile menu selections that allow you to select another attachment file include:
File > Open URL
Analysis > Compare
File > Import File as Overlay - (available if a 2D file is active)
File > Import File for Mockup - (available if a 3D model is active)
Analysis > Cross Probe
When you choose one of these menu selections, in order to select the file you want to view or to add to the current analysis view, a File Open dialog appears. The Agile Browse button in the File Open dialog allows you to use your Agile Bookmarks to select a file. The Agile Search button in the File Open dialog allows you to perform a quick search and select a file.
To use your Agile Bookmarks to select an attachment file:
Choose an available Viewer menu option:
File > Open URL
Analysis > Compare
File > Import File as Overlay
File > Import File for Mockup - (available if a 3D model is active)
Analysis > Cross Probe
Follow any dialog prompts until the File Open dialog appears.
Click the Agile Browse button in the File Open dialog to display the DMS: File Open dialog.
The DMS: File Open dialog displays your Agile Bookmarks in a tree structure.
|
Note: If you have not defined any Bookmarks in Agile PLM, the Agile Browse button does not appear in the File Open dialog. |
Click + to expand a bookmark and display its item revisions or its file folder versions.
Click a revision or version row to highlight the file you want to view.
Click OK in the DMS: File Open dialog.
The selected file name appears in the File Name field of the File Open dialog.
Click OK in the File Open dialog.
AutoVue for Agile opens the selected file, or, if appropriate, adds the selected file to the current analysis function.
To perform a quick search to select an attachment file:
Choose an available Viewer menu option:
File > Open URL
Analysis > Compare
File > Import File as Overlay
File > Import File for Mockup - (available if a 3D model is active)
Analysis > Cross Probe
Follow any dialog prompts until the File Open dialog appears.
Click the Agile Search button in the File Open dialog to display a Search dialog which allows you to run a quick search.
Define your search and click the Search button:
Class - Select an object class, for example, Items.
Search Parameter - Enter a text string or a number.
Agile PLM searches the object ID number attribute and the object Name or Description attribute. A Quick search behaves like a Contains search for text strings. The search criteria is treated as a single string and Agile PLM searches for names or descriptions that contain the search parameter string. In the case of ID numbers, Agile PLM searches for an exact match, however, you may use wildcard characters to specify part of an ID number as a search criteria.
Search Attachment Content - Set this parameter to Yes to search the contents of the attachment files as well.
In the Search Results table, click the + next to the object number to expand the list of attachment files for that object.
Click a revision row or a version row to select the file you want to view.
Click the Load File button. The selected file name appears in the File Name field of the File Open dialog.
Click OK in the File Open dialog.
AutoVue for Agile opens the selected file, or, if appropriate, adds the selected file to the current analysis function.
You can view a file from an item Attachments tab or a file folder Files tab and then select, from the AutoVue for Agile window, other item revisions or file folder versions of the file to compare against. After comparing one revision or version, you may select another, comparing multiple revisions or versions of the file from within the AutoVue for Agile window.
To compare multiple item revisions of an attached file:
On the item Attachments tab, select the file you want to compare.
Choose View from the tab menu. AutoVue for Agile opens, displaying the selected file.
In the viewer menu, choose Analysis > Compare. The File Open dialog appears.
Check the Document Versions checkbox, if it is not already checked.
Use the drop-down menu to select another revision of the file for comparison.
|
Note: Only released item revisions appear in the drop-down list. To compare the attachment of a pending revision, view the pending revision file, and then use Analysis > Compare to select released revisions for comparison. |
Click OK. AutoVue for Agile opens the selected version in a second window and displays the differences between the two files in a third window.
To compare another revision, choose File > Exit Compare in the viewer menu.
Repeat steps 3 through 6 to select another item revision.
To compare multiple file folder versions of a file:
On the file folder Files tab, select the file you want to compare.
Choose View from the tab menu. AutoVue for Agile opens, displaying the selected file.
In the viewer menu, choose Analysis > Compare. The File Open dialog appears.
Check the Document Versions checkbox, if it is not already checked.
Use the drop down menu to select another file folder version of the file for comparison.
Click OK. AutoVue for Agile opens the selected version in a second window and displays the differences between the two files in a third window.
To compare another file version, choose File > Exit Compare in the viewer menu.
Repeat steps 3 through 6 to select another file folder version.
|
Note: Viewing structured data in a Design data model class object relies on the Structure tab to resolve related objects in the structure. |
When you open a CAD assembly file in a Design object, Agile PLM also automatically opens the subordinate CAD part files in AutoVue for Agile, allowing you to view the entire CAD design. Agile PLM uses the assembly structure, as defined on the Structure tab of the Design object and the Structure tabs of its child Design objects.
This process is seamless and requires no action by the user other than initiating the view function for the assembly file.
The following list provides details about how Agile PLM extracts CAD Structure files from the Design object and its Structure table for CAD design viewing:
The file type of the Design object selected file must be designated as a CAD Structure file type on the File Association tab of the Viewer & Files node in Agile Administrator.
The structure used to extract files is explicitly set on the Design object Structure tab.
Agile PLM identifies which Design objects files to extract by the following methods:
If the value of the File Category attribute from any file row of a child Design matches the File Category value of the starting file, the file is extracted.
If the selected starting Design object file has no value for Category, then all files in all child Designs are extracted, including the starting Design object.
If multiple file rows on a Design object structure have the same Category value as the starting file, they are all extracted, at any level in the tree.
If the user selects multiple Design object files and chooses View, each selected file is interpreted separately, based on Design structure viewing logic.
When a Design object is from a business object's Attachment tab, Agile PLM uses the rules for viewing Designs, not the rules for viewing DocuBOMs. That is, Design object viewing rules are always applied to Design objects whether the viewing action is initiated from a Design object or from the business object Attachments tab.
|
Note: Viewing structured data in a File folders class object relies on the DocuBOM or the Relationships tab to resolve related objects in the structure. |
While this technique for viewing structured CAD files in DocuBOMs is still supported, it has been superseded by Design structures as the preferred way for storing and viewing CAD data.
CAD data can be stored in Agile PLM using document object BOM structures. This is usually accomplished automatically when Agile PLM and EC are integrated using EC CAD connectors. A CAD assembly file is attached to an Agile document object, and the subordinate CAD part files are also attached to Agile document objects. The part file document objects appear on the BOM tab of the CAD assembly document object, thus creating a hierarchical file structure for the attached files.
|
Note: Files types that are used in structured file hierarchy are specified in Agile Administrator Viewer & Files node with the CAD Structure file association. |
When you open a CAD Structure assembly attachment, Agile PLM automatically opens the subordinate part files in AutoVue for Agile also, allowing you to view the entire CAD design. This process is seamless and requires no action by the user other than initiating the view function for the assembly file.
The following list provides details about how Agile PLM extracts CAD Structure files from the document BOM structure for CAD design viewing:
Agile PLM extracts only file types specified as CAD Structure file types. If an attached file type is not specified as a CAD Structure file type, Agile PLM does not traverse the document structure to find other files.
If the file type is specified as a CAD Structure file type, then Agile PLM will traverse all levels of the document hierarchy, starting with the selected file, and extract other files necessary to build the complete model.
In order to avoid pulling out unnecessary files, the viewing logic makes use of the Attachment Type attribute on the document's Attachments tab. If there is a value in this attribute (such as SOURCE) for the originally selected file attachment, then only files whose Attachment Type attribute matches this value will be extracted. If there is no value in the Attachment Type attribute, then all files within the structure hierarchy will be extracted.
If there are multiple file attachments with the matching value of Attachment Type on the same document, they will all be extracted and sent to the AutoVue for Agile. This includes the document from which the view operation was initiated.
If any given document in the hierarchy does not have any file attachments, or any with the correct value of Attachment Type, the extraction process does not stop but simply continues down the tree.
The Agile administrator may have configured Agile PLM to use the CAD Revision BOM attribute. This is a technique, principally used by the standard Agile EC CAD Connectors, to provide an As Saved fixed BOM resolution for CAD designs. If this is enabled, when you view a past revision of a design it will appear exactly as it was saved. If not, the view may differ slightly if child components have been revisioned in the meantime (that is, standard Agile BOM resolution logic is followed).
You may select any document revision for viewing, including a pending revision. If the CAD Revision attribute is enabled, then viewing a pending Rev will display any active pending Revs within the structure that were saved from CAD.
All AutoVue for Agile operations support CAD Structure file types, including View, Markup, Compare, Cross Probe, Overlay, and Digital Mockup.
When a File Folder object is open in Web Client, you can view information about all versions of the by using the Actions menu View All Versions command.
When a Design object is open, you can view information about all versions/revisions of the Design by using the Actions menu View All Versions command.
You can select a version and/or revision from the version pull-down selector on File Folder objects. Revisions (if set) are indicated to the right of the version.
To switch between versions of a Design object in Web Client:
From the Version drop-down list at the top of the Design object, select the version/revision you want to view.
|
Note: A version number in brackets, for example [4], indicates a version that has not yet been checked in. In this example, when version 3 was checked out, a pending version [4] was created. Selecting [4] in the version drop-down list allows you to view and work with the pending version. |
To open the Versions palette:
In the Actions menu, choose View All Versions. The Versions palette opens.
|
Note: The View All Versions action is available only in Web Client. Java Client does not support Design objects. |
The Version palette displays the following information about each version:
| Versions Column | Description |
|---|---|
| Column 1 | Displays the approval status of the file folder version.
The approval status is displayed only if there are approvers on the Routing Slip. |
| Version | The version number. |
| Checkin Date
Checkin User |
The date the version was checked in and the user who performed the checkin.
When the version is checked out, these fields are blank. |
| Change Info | Indicates how the version was modified before it was checked in.
Files indicate that the object's files were modified; for example, files were replaced, added, or deleted. For Design objects, Structure indicates that the Design's Structure tab was modified. |
| Label, Revision, Revision Date | These are version-specific editable fields used primarily with Design data model objects. |
Actions you can initiate in the Versions palette:
View: Click the View drop-down menu to choose one of the options.
View: Select any version row and click View to view the file or files in AutoVue for Agile.
Compare: For single-file versions, select two version rows, and choose Compare in the View button drop-down list. AutoVue for Agile compares the selected files.
The Design object Version palette includes the following additional actions:
Comparison Report: (Design objects only) Click the Comparison Report drop-down menu to choose one of the options.
Compare: Select any two version rows and click Compare to compare the Designs in the Comparison Report drop-down menu. A Design Comparison Chart displays a comparison report.
Comparison by Search: Select a version row and click Compare by Search in the Comparison report drop-down list. A Compare by Search palette opens. In the drop-down list select either Latest Version or All Versions. Enter a search string (enter * to search for any design object) and execute a quick search. Choose from a list of Designs to compare with the original Design object. The Design Comparison Chart displays a comparison report.
Design Comparison Chart
The Design Comparison Chart displays reports of the compared Design objects.
The plus sign expands the Design object to display a list of child objects attached to it. You can collapse the object using the minus sign. Click the grey dot icon to see more details about Attributes and Files. Colors indicate the state of the Design object. For example, Blue - Added, Orange - Modified, Red - Deleted.
Purge Version: Design objects store large CAD files, which are updated regularly. The Purge Version action allows you to remove unwanted Design versions and help optimize file storage. To begin the process, the Design object needs to be in the checked in state. Purging starts at the original version and continues down the Structure tab, and goes through all the versions, including the child objects. The process stops if you cannot purge a child object.
You can get, open, view, and print any version of an attachment file from the Attachments tab of the business object.
You can easily access history without clicking through to the File Folder object. This is useful when a single file is being modified and accessed by multiple people/different functions. For instance, user can easily trace and identify in which versions another user made their edits - this is identified from version create date and checkout user.
The Versions dialog displays, for each version, the Version Creation Date (date the version was created), whether that version has redlines (indicated by the Has Been Redlined icon), and the Checkout User (user who created that version). This allows you to easily see the history of an attachment from the Attachments tab, including who modified the file, and when it was modified.
To switch between versions of file folders from an object's Attachments tab in Web Client:
On the Attachments tab, select the attachment row you want.
In the tab menu, choose More > View Versions. The Versions dialog appears.
In the Versions dialog, select the row you want, and choose the appropriate dialog menu button (Get, View, or Print).
Optionally, select two version rows, and then choose Compare or Overlay in the View action button drop-down menu.
To switch between versions of file folders from an object's Attachments tab in Java Client:
On the Attachments tab, select one attachment row that you want to access.
Click the Show Versions button. The Versions dialog appears.
Select the version row or rows that you want to access.
Click the appropriate action button (Get, Open, View, or Print).
Optionally, click the Has Been Redlined icon to open the AutoVue for Agile and display the redlines.
Optionally, select two version rows, and then choose Compare or Overlay in the View action button drop-down menu.
Ad hoc 2D, 3D, and EDA markups can be done from the Files tab in the file folder object. Change order-controlled 2D, 3D, and EDA markups can be done from the Redline Attachments tab in the ECO. When you view a markup file, the original document, also known as the base file, opens too.
|
Note: Change order-controlled and ad hoc markups are independent from each other. |
To view change order-controlled markups, open the redlined file from the appropriate revision of the item Attachments tab or from the change order Redline Attachments tab (see "Viewing ECO Redlines from the Attachments Tab of the Item Pending Revision").
To view ad hoc markups, open the redlined file from the file folder object Files tab.
Marking up refers to drawing and writing in an electronic document. With AutoVue for Agile, your original document remains unchanged because your markups are saved in separate markup files. When you view a markup file, AutoVue for Agile loads the markups into memory and lays them over the original document.
There can be as many markup files as you wish for a document because each has its own unique filename. This allows several individuals to mark up the same document at the same time because a unique markup file is created for each person's work. With the markup information attached to each markup file, you can even tell who created each markup.
Markup files are divided into uniquely named layers. Create, name, and color the layers to organize your work as you like. For example, different colors could indicate time priorities, and each layer could contain markups relating to a common purpose. Markup files are stored with other attachment files in the file vault, part of Agile File Manager (AFM). Markup files are managed by Agile and are automatically retrieved and presented when you view the redlined document.
With appropriate privileges, you can redline Microsoft Office documents, 2D, 3D, and EDA files on the Files tab of a file folder object and redline 2D, 3D, and EDA files on the Redline Attachments tab, accessible from the Affected Items tab of an ECO.
|
Note: You can create and edit file markups only through the Affected Items tab of an ECO or the Files tab of a file folder object. Your Agile administrator must give you privileges that allow you to mark up or redline attachments. For more information about ECOs and file folder objects, see Getting Started with Agile PLM. |
|
Note: If the item or file has already been redlined, then the Has been redlined icon will be displayed in the place of the Do Redlining icon. |
To mark up or redline an attachment file from an ECO in the Web Client:
If you have not already done so, add an item with an attachment to the Affected Items tab of an unreleased ECO. The item now has a pending revision associated with the unreleased ECO.
|
Note: When redlining an attachment through an ECO, the pending revision attachment Folder Version must be set to a specific version number; if the Folder Version is set to LATEST-x, you will not be able to create redline markups. However, you can edit the Folder Version on the Attachments tab of the pending revision so that it refers to a specific Folder Version. |
For example, if the pending revision of the item refers to Folder Version LATEST-7 of the file folder, select that row on the Attachments tab, click the Edit button and use the Folder Version drop-down list to select 7. Click Save to complete the edit process. You will now be able to create redline markups for that attachment. On the Affected Items tab, click the Do Redlining icon for that item to open the Redlines page.
On the Affected Items tab, click the Do Redlining icon (or Has been redlined icon) next to the item to open the Redlines page.
On the Redline Attachments tab, click the Do Redlining icon (or Has been redlined icon) on the row of the file you want to redline. (This icon is available only when markups are allowed.)
Use the tools described in the Online Help to redline the attachment. To view the Online Help, choose Help > Content in the menu bar.
|
Note: ECO markups are saved against and associated with the pending revision of the item. If the ECO is released without first replacing the file, the markups appear against the released revision of the item. |
To ad hoc mark up or redline an attachment file from a File Folder object in the Web Client:
On the Files tab of a file folder object, click the Do Redlining icon (or Has been redlined icon) on the row of the file you want to redline. (This icon appears available only when markups are allowed.)
Use the tools described in the viewer Online Help to redline the attachment. To view the Online Help, choose Help > Content in the menu bar.
|
Note: Ad hoc markups are saved against and associated with the version of the file folder object. |
|
Note: If the item has already been redlined, then the Has been redlined icon is displayed for that item row in the Affected Items table. An icon appears on the Redline Attachments tab to indicate that the attachment in that row has been redlined. To initiate redlining, select the attachment row you want to redline and click the Redline button. |
To mark up or redline an attachment file from an ECO in the Web Client:
If you have not already done so, add an item with an attachment to the Affected Items tab of an unreleased ECO. The item now has a pending revision associated with the unreleased ECO.
|
Note: When redlining an attachment through an ECO, the pending revision attachment Folder Version must be set to a specific version number; if the Folder Version is set to LATEST-x, you will not be able to create redline markups. However, you can edit the Folder Version on the Attachments tab of the pending revision so that it refers to a specific Folder Version. |
For example, if the pending revision of the item refers to Folder Version LATEST-7 of the file folder, select that row on the Attachments tab, double-click the Versions field to edit it and then select 7. Click Save to complete the edit process. You can now create redline markups for that attachment. On the Affected Items tab, in the redline Attachment tab, select the row and click the Redline button.
On the Affected Items tab, select the row of the Item you want to redline. The redline tabs for the selected item appear in the lower section of the Affected Items tab.
On the Redline Attachments tab, select one or more rows and click the Redline button (this button is only active when markups are allowed).
Use the tools described in the viewer Online Help to redline the attachment. To view the Online Help, choose Help > Content in the menu bar.
|
Note: ECO markups are saved against and associated with the pending revision of the item. If the ECO is released without first replacing the file, the markups appear against the released revision of the item. |
To ad hoc mark up or redline an attachment file from a File Folder object in the Web Client:
On the Files tab of a file folder object, select one or more rows and click the Redline button (this button is only active when markups are allowed).
Use the tools described in the viewer Online Help to redline the attachment. To view the Online Help, choose Help > Content in the menu bar.
|
Note: Ad hoc markups are saved against and associated with the version of the file folder object. |
To mark up or redline an attachment file from an ECO in the Java Client:
Add an item with an attachment to the Affected Items tab of an unreleased ECO. The item now has a pending revision associated with the unreleased ECO.
|
Note: When redlining an attachment through an ECO, the pending revision attachment Folder Version must be set to a specific version number; if the Folder Version is set to LATEST-x, you will not be able to create redline markups. However, you can edit the Folder Version on the Attachments tab of the pending revision so that it refers to a specific Folder Version. |
For example, if the pending revision of the item refers to Folder Version LATEST-7 of the file folder, select that row on the Attachments tab, click the Edit button and use the Folder Version drop-down list in the Edit dialog box to select 7. Click OK to complete the edit process. You will now be able to create redline markups for that attachment. Select the added item on the Affected Items tab of the ECO.
On the Redline Attachments tab, select the row containing the file you want to redline and click the Do Redlining icon in that row.
When AutoVue for Agile opens, click the Markup button. (This button is available only when markups are allowed.)
Use the tools described in the viewer Online Help to redline the attachment. To view Online Help, choose Help > Contents in the AutoVue for Agile menu bar.
|
Note: ECO markups are saved against and associated with the pending revision of the item. If the ECO is released without first replacing the file, the markups appear against the released revision of the item. |
To ad hoc mark up or redline an attachment file from a file folder object in the Java Client:
Double-click the row containing the file you want to redline.
When AutoVue for agile opens, click the Markup button. (This button is available only when markups are allowed.)
Use the tools described in the viewer Online Help to redline the attachment. To view the Online Help, choose Help > Contents in the AutoVue for Agile menu bar.
|
Note: Ad hoc markups are saved against and associated with the version of the file folder object. |
The change order redlines of 2D, 3D, and EDA files are based on the pending revision of the item. The markup changes are visible from either the change order's Redline Attachments tab or from the pending revision item Attachments tab.
|
Important: AutoVue for Agile 3D features and access to 3D files are available only with AutoVue applications that support 3D files. AutoVue for Agile features for schematic and PCB files, also referred to as EDA files, are available only with AutoVue applications that support those files. For more information about purchasing or installing AutoVue, contact Oracle Consulting - Agile Practice. |
Viewing ECO Redlines from the Attachments Tab of the Item Pending Revision
You can view the change order markup redlines of the pending revision by displaying the Attachments tab of the item pending revision, for example, revision (C) ECO000453. The redlined file is indicated by the icon (Web Client) or the Has been redlined icon (Java Client).
In Web Client, click the Has been redlined (for versions 9.2.2.x and 9.2.1.x, for version 9.3.x) icon in the row of the file you want to view.
In Java Client, select the redlined file you want to view and click the Has been redlined icon.
If you have checked out the redlined file and checked in a new version from the Attachments tab, the Has been redlined icon does not appear on the Attachments table.
To view the redlines of previous versions in Web Client:
9.2.2.x/9.2.1.x: On the Attachments tab of the pending revision, click the Show Versions icon in the row you want to view. The Versions dialog appears.
9.3.x: Select View Versions from the Actions menu.
On the version row for which you want to view redlines, click the Has been redlined (for versions 9.2.2.x and 9.2.1.x, for version 9.3.x) icon.
|
Note: If you need to determine which file folder version is associated with the change order redlines, refer to the change order History tab. |
To view the redlines of previous versions in Java Client:
On the Attachments tab of the pending revision, select the row you want to view.
Click the Show Versions button. The Versions dialog appears.
On the version row for which you want to view redlines, doubleclick the Has been redlined button.
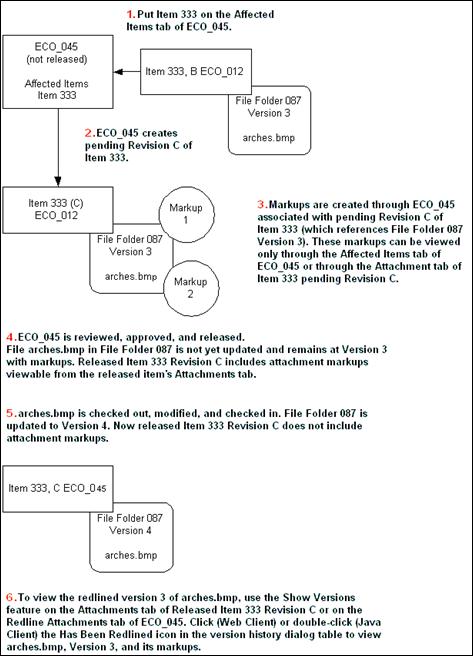
However, if you do not replace the attachment file on the pending revision item prior to the change order release, you can access the redlines only from the released revision of the item. The following diagram shows an example of the change order attachment redlining process.
See also Product Collaboration User Guide and Getting Started with Agile PLM User Guide.
For information about working with markups, including markup layers and markup objects, refer to the viewer Online Help. Choose Help > Contents in the AutoVue for Agile menu bar.
If you exit the AutoVue for Agile without saving, you will lose any redlines you have added to the attachment.
Attaching Information to Markup Files: In Markup mode, the Markup > Properties command displays the Markup Information dialog box with five information fields attached to the current active markup file.
Markup Rotate: Markup Rotate allows you to rotate symbol markup objects.
To rotate a symbol markup object:
Select the symbol markup object you want.
Choose Markup > Object > Rotate.
Place the cursor on one of the corner squares that indicate the selected object.
When you see the crossed-arrows cursor (pointing in four directions), hold down the left mouse button and adjust the rotation angle of the object.
Release the mouse button when you are finished with adjusting the rotation angle.
Markup promotion is the ability to bring forward, or promote:
Change markup promotion between versions within the same pending revision of the change order.
Ad-Hoc markups from older file folder versions to the newer versions.
This allows you to re-validate older markups against a new design.
To promote change-based markups in Web Client:
Open the change order and display the Affected Items tab.
On the Affected Items tab, select the row of the item you want to redline. The redline tabs for the selected item appear in the lower section of the Affected Items tab.
On the redline Attachments tab, select one or more rows and click the Redline button. (This button is active only when markups are allowed).
When AutoVue for Agile opens, create a new markup. In the AutoVue for Agile Markup menu, choose the New command.
In the AutoVue for Agile Markup menu, choose the Open command. The Markup Files dialog appears
Click the All Revisions checkmark. AutoVue for Agile displays all valid markups. The available markups are associated to files that have the same file extension as the file you are viewing.
Select the markup files you want to promote to the current markup.
Click OK. The promoted markups display in the file you are currently viewing.
To save the promoted markups with the change order revision, save the markups before exiting the viewer. In the AutoVue for Agile Markup menu, choose one of the Save commands.
To promote change-based markups in Java Client:
Open the change order and display the Affected Items tab.
On the Redline Attachments tab:
In the row containing the file you want to redline, click the Do Redlining icon.
When AutoVue for Agile opens, create a new markup. In the AutoVue for Agile Markup menu, choose the New command.
In the AutoVue for Agile Markup menu, choose the Open command. The Markup Files dialog appears.
Click the All Revisions checkmark. AutoVue for Agile displays all valid markups. The available markups are associated to files that have the same file extension as the file you are viewing.
Select the markup files you want to promote to the current markup.
Click OK. The promoted markups display in the file you are currently viewing.
To save the promoted markups with the change order revision, save the markups before exiting the viewer. In the AutoVue for Agile Markup menu, choose one of the Save commands.
To promote file folder ad hoc mark ups in Web Client:
Open the file folder object and display the Files tab.
To initiate redlining, select the Files table row you want to redline and click the Redline button.
When AutoVue for Agile opens, create a new markup. In the viewer Markup menu, choose the New command.
In the AutoVue for Agile Markup menu, choose the Open command. The Markup Files dialog appears.
Click the All Revisions checkmark. AutoVue for Agile displays all valid markups. The available markups are associated to files that have the same file extension as the file you are viewing.
Select the markup files you want to promote to the current markup.
Click OK. The promoted markups display in the file you are currently viewing.
To save the promoted markups with the current file folder version, save the markups before exiting the viewer. In the AutoVue for Agile Markup menu, choose one of the Save commands.
To promote file folder ad hoc mark ups in Java Client:
Open the file folder object and display the Files tab.
Click the Do Redlining button (or Has been redlined button ) on the row of the file you want to redline. (This button is available only when markups are allowed.)
When AutoVue for Agile opens, create a new markup. In the viewer Markup menu, choose the New command.
In the AutoVue for Agile Markup menu, choose the Open command. The Markup Files dialog appears.
Click the All Revisions checkmark. AutoVue for Agile displays all valid markups. The available markups are associated to files that have the same file extension as the file you are viewing.
Select the markup files you want to promote to the current markup.
Click OK. The promoted markups are displayed in the file you are currently viewing.
To save the promoted markups with the current file folder version, save the markups before exiting the viewer. In the AutoVue for Agile Markup menu, choose one of the Save commands.
Augmented Business Visualization (ABV) is a solution that integrates the visual representation of models and drawings in AutoVue with the data and processes from Agile 9. AutoVue's ABV techniques enable creation of change objects in Agile from AutoVue.
You can create ABV solutions by integrating your application with AutoVue's hotspot framework. Hotspots activate a portion of 2D or 3D drawing, either by changing the text color, or triggering an action.
Example: When you click on a part in 3D or 2D model in AutoVue, the below mentioned options appear to help you create a change (provided you have the privileges).Create ECRCreate ECO
When you select and click an option, it directly takes you to the cover page of an ECR. The change object is automatically created in Agile and the selected Part added as Affected Item on the Change object.
|
Note: The sample Process Extension provided as a download on OTN assumes that CAD connector is used and configured such that the CAD system filename is the same as the Agile Part Number and Design name. |
AutoVue provides a mechanism to turn all 3D parts that contain a specific attribute into a hotspot. Based on the hotspot configuration, when you right click the hotspot, additional options automatically appear on the right-mouse button menu.
When you start the AutoVue client, the Create ECO/ECR options are visible in AutoVue.
When you select the Create ECO/ECR option, Change objects associated with the relevant attributes appear. If not, an error message appears.
You are directed to the cover page of the Change object in Agile. The system returns only Change objects for which you have privileges.
|
Note: If you are using custom GUI files, ensure VueActionHotspots is included in all the GUI files. |
For information about working with 2D files, including CAD views and measuring objects, refer to the AutoVue for Agile Online Help. Choose Help > Contents in the AutoVue for Agile menu bar.
AutoVue applications that include EDA features, include:
Ability to view all relevant EDA formats including artwork formats, PCB/IC layouts, schematics and manufacturing formats
Cross probe between a PCB layout and related schematics (see "Cross Probing.").
Verify design by testing for manufacturability or design violation.
Generate and export Bills of Material in a variety of formats.
For detailed information about all the EDA features, refer to the viewer Online Help. Choose Help > Contents in the AutoVue for Agile menu bar.
For information about working with 3D files, including light settings and models, refer to the viewer Online Help. Choose Help > Contents in the AutoVue for Agile menu bar.
|
Note: The Agile administrator must specify the 3D file extension in the Files Types list in Agile Administrator Viewer & Files node in order for you to view the 3D files. |
AutoVue 3D features include:
3D compare
Digital Mockup
Measurement
Interference checking
Cross-sectioning
|
Important: 3D features and access to 3D files are available only with AutoVue applications that support 3D files. Features for schematic and PCB files, also referred to as EDA files, are available only with AutoVue applications that support EDA files. For more information about purchasing or installing AutoVue applications, contact Oracle Consulting - Agile Practice. |
For details about how Agile PLM views 3D CAD assemblies, see:
3D CAD assemblies are made up of many files dependent one upon another. For example, a SolidWorks or Pro/E CAD design consists of at least one assembly file and one or more part files. The 3D files are used primarily in manufacturing departments for drawing the blueprint of the new instrument. 3D files may be added to the Files tab in one or several file folder objects.
One File Folder
All files in one CAD assembly are added to the Files tab of one file folder. When you view the assembly, Agile prompts you to identify the top file in the assembly and the complete assembly is displayed in AutoVue for Agile.
One Design
Assembly Files are added to the Files tab and parts files can be referenced from the Design added to the Structure tab.
Multiple File Folders
The assembly file is added to the Files tab in one file folder object, and parts files can be referenced by adding other file folder objects containing the files as relationships with no rules to the Relationships tab of the assembly's file folder object.
3D files can be redlined both through a change order (Redline Attachments) and on the Files tab of the file folder object.
To view a CAD assembly from Web Client, Attachments tab:
Go to the Attachment tab of the business object that references the assembly.
Double-click the multiple-file attachment row that references the CAD assembly. The Select Files window appears.
|
Note: A multiple-file attachment row is indicated by a file folder icon in the Filename field, followed by the filenames of all the files in the file folder. |
Or use the Attachment tab View File(s) button:
On the business object Attachments tab, click to select the multiple-file attachment row.
Click the View File(s) button's drop-down arrow and select View from the menu.
In the Select Files window, click the radio button to select the option View all files as an assembly, starting from the selected file.
Click to select the file row of the assembly file that indicates the top or starting file of the assembly.
Click Finish.
To view a CAD assembly from Web Client, Files tab:
Go to the Files tab of a file folder object containing the CAD files for the assembly that you want to view.
Click to select the row for the top or starting file of the assembly.
Click the View File(s) button's drop-down arrow and select View As Assembly from the menu.
To view a CAD assembly from Web Client, Attachments tab:
Go to the Attachment tab of the business object that references the assembly.
Click the multiple-file attachment row that references the CAD assembly.
|
Note: A multiple-file attachment row is indicated by a file folder icon in the Filename field, followed by the filenames of all the files in the file folder. |
Use the Attachment tab View button:
On the business object Attachments tab, click to select the multiple-file attachment row.
Click the View button's drop-down arrow and select View from the menu.
To view a CAD assembly from Web Client, Files tab:
Go to the Files tab of a file folder object containing the CAD files for the assembly that you want to view.
Click to select the row for the top or starting file of the assembly.
Click the View button's drop-down arrow and select View menu.
To view a CAD assembly from Java Client, Attachments tab:
Go to the Attachment tab of the business object that references the assembly.
Double-click the multiple-file attachment row that references the CAD assembly. The Select Files window appears.
|
Note: A multiple-file attachment row is indicated by a file folder icon in the Filename field, followed by the filenames of all the files in the file folder. |
Or use the Attachment tab View File(s) button:
On the business object Attachments tab, click to select the multiple-file attachment row.
Click the View File(s) button's drop-down arrow and select View from the menu.
In the Select Files window, click the radio button to select the option View all files as an assembly, starting from the selected file.
Click to select the file row of the assembly file that indicates the top or starting file of the assembly.
Click OK.
To view a CAD assembly from Java Client, Files tab:
Go to the Files tab of a file folder object containing the CAD files for the assembly that you want to view.
Click to select the row for the top or starting file of the assembly.
Click the View File(s) button's drop-down arrow and select View.
In Agile, cross probing feature is initiated from either the business object Attachments tab or the file folder Files tab rather than from the viewer menus. See the viewer Online Help for more information about cross probing. Choose Help > Contents in the AutoVue for Agile menu bar.
|
Important: Cross probing features are available only with AutoVue applications that support this feature. For more information about purchasing or installing AutoVue applications, contact Oracle Consulting - Agile Practice. |
Use cross probing to interrogate ECAD schematic and layout files in separate viewer windows.
|
Note: The Agile administrator must specify the ECAD file extension in the Files Types list in Agile Administrator Viewer & Files node in order for you to view the ECAD files. |
You can select both needed files from the same Attachments tab or the same file folder Files tab from which you launch the Cross Probe action. Or, you can select one file on the current tab and then search for the remaining file from the attachments of any other object.
The View > By Search > Cross probe option allows you to find other files in the system, which you may want to use to cross probe, without having to select two files from the same Attachments tab or Files tab; that is, you can search and select one attached file from Part 234 and another attached file from Part 765.
Alternatively, you can view a single ECAD file and then initiate cross probing within the viewer by adding another file from your desktop.
|
Note: AutoVue supports and enables correct view of ECAD files.For Example: When an .emp or .emn file is selected for view or markup treat the file sent to the viewer applet is the same as MCAD files such as .asm and .prt files. |
To initiate cross probing in the AutoVue for Agile, you must first select and view an appropriate file type that can be used for cross probing analysis.
To view an appropriate file for cross probing:
Display the Attachments tab or the Files tab.
Select a file row you want to work with and choose:
Web Client: View > View
Java Client: View Files(s)
AutoVue for Agile opens and displays the selected file.
In the AutoVue for Agile Analysis menu, choose Cross Probe. The AutoVue for Agile File Open dialog appears.
Use one of the following File Open dialog methods to select a file for cross probing:
Browse to browse your local directories to select and open files from the AutoVue for Agile window.
Agile Browse to use Agile bookmarks to open files from the AutoVue for Agile window.
Agile Search to perform an Agile Quick Search to select and open files from the AutoVue for Agile window.
Browse your local directories to select an attachment file:
Click the Browse button in the File Open dialog to display File Open dialog.
Use the Look in drop-down list to select the directory you want.
Select the file you want and click Open.
Click OK in the File Open dialog.
The Viewer opens the selected file, or, if appropriate, adds the selected file to the current analysis function.
If a markup is saved when Digital Mockup is active, the contents of the Digital Mockup, including all objects and their orientations, are saved.
Agile Browse to use your Agile Bookmarks to select an attachment file:
Click the Agile Browse button in the File Open dialog to display the DMS: File Open dialog.
The DMS: File Open dialog displays your Agile Bookmarks in a tree structure.
|
Note: If you have not defined any Bookmarks in Agile PLM, the Agile Browse button does not appear in the File Open dialog. |
Click + to expand a bookmark and display its item revisions or its file folder versions.
Click a revision or version row to highlight the file you want to view.
Click OK in the DMS: File Open dialog. The selected file name appears in the File Name field of the File Open dialog.
Click OK in the File Open dialog.
The Viewer opens the selected file, or, if appropriate, adds the selected file to the current analysis function.
Agile Search to perform a quick search to select an attachment file:
Click the Agile Search button in the File Open dialog to display a Search dialog which allows you to run a quick search.
Define your search and click the Search button:
Class - Select an object class, for example, Items.
Search Parameter - Enter a text string or a number.
Agile PLM searches the object ID number attribute and the object Name or Description attribute. A Quick search behaves like a Contains search for text strings. The search criteria is treated as a single string and Agile PLM searches for names or descriptions that contain the search parameter string. In the case of ID numbers, Agile PLM searches for an exact match, however, you may use wildcard characters to specify part of an ID number as a search criteria.
Search Attachment Content - Set this parameter to Yes to search the contents of the attachment files as well.
In the Search Results table, click the + next to the object number to expand the list of attachment files for that object.
Click a revision row or a version row to select the file you want to view.
Click the Load File button. The selected file name appears in the File Name field of the File Open dialog.
Click OK in the File Open dialog.
The Viewer opens the selected file, or, if appropriate, adds the selected file to the current analysis function.
To run cross probing:
Display the Attachments tab or the Files tab.
Select both file rows you want to work with and choose:
9.2.2.x or 9.2.1.x Web Client: View > Cross Probe.
9.3.x Web Client: View. The file opens in AutoVue for Agile, then choose Analysis > Cross Probe.
Java Client: View File(s) > Cross Probe.
Each file is displayed in a separate viewer window.
Begin cross probing.
See the viewer Online Help for more information about cross probing.
To run cross probing by search:
Display the Attachments tab or the Files tab.
Select a file row you want to work with and choose:
9.2.2.x or 9.2.1.x Web Client only: View > By Search > Cross Probe.
The Select Files dialog appears, with three Search tabs.
Java Client: View File(s) > By Search > Cross Probe.
The search dialog allows you to search for any business object (for example, items or manufacturer parts) and select the attachments of those objects to use to Cross Probe.
Use any of the following search methods:
Search tab lets you create a simple search or an advanced search. You can check to search attachment contents, too.
Saved Searches tab opens to your navigation pane where you can browse in search folders, select a search, and run it. Again, returned results may be moved to the Selected Items table, and click OK.
Shortcuts tab opens to your navigation pane where you can select objects from My Bookmarks or Recently Visited. The system displays shortcuts to only those objects that are appropriate to the operation you are performing.
Only business objects with attached files appear in the search results table. For example, a business object that you viewed recently will not appear on the Recently Visited list of the Shortcuts tab if it has no attachments.
When the results of your search are returned, select a row in the Results table, and the related files for that object appear in the Related Files table.
In the Related Files table, select and move attachments to the Selected Files table.
You can continue to run multiple searches or shortcuts until you are finished selecting the attachments you want.
When you are finished, click OK. Each file is displayed in a separate viewer window.
Begin cross probing.
See the Online Help for more information about cross probing. Choose Help > Contents in the AutoVue for Agile menu bar.
Comparing files is also described in the AutoVue for Agile Online Help. In Agile, rather than initiating file compare from the viewer menus, you initiate file compare from either the Files tab of File Folders or the Attachments tab of business objects .
For detailed information about file comparison features, see the AutoVue for Agile Online Help. Choose Help > Contents in the AutoVue for Agile Menu bar.
Markups (redlines) are not supported in the AutoVue for Agile compare mode.
You can select and compare two files from a single file folder Files tab or a single business object Attachments tab.
To initiate comparing files:
Display the Attachments tab or the Files tab.
Select both files you want to work with and choose:
Web Client: View > Compare
Java Client: View File(s) > Compare
The files and the comparison results display in a single viewer window.
For more information about compare file features and options, choose Help > Contents from the viewer menu bar.
The Compare Files by Search feature allows you to:
Compare files from different released revisions of an item.
Compare files from different file folder versions.
Select any file on any business object Attachments tab or on any file folder Files tab, and then search for a file to use for comparison.
Depending on your search, you can select a business object, and then select a file from the list of related files for that object. Or, if you have the appropriate privileges, you can search for file folder objects, and then select a file from the list of related files for the selected file folder.
|
Note: For item objects, introductory revisions and unreleased pending revisions do not appear in the related files list. |
To initiate comparing files by search:
Display the Attachments tab or Files tab.
Select a file row you want to work with and choose:
9.2.1.x or 9.2.2.x Web Client: View > By Search > Compare
9.3.x Web Client: View > Compare By Search (A search dialog allows you to search for the object.)
Java Client: View File(s) > By Search > Compare
The Compare Files By Search dialog appears with three search tabs.
The search dialog allows you to search for any business object (for example items or manufacturer parts) and select the attachments of those objects to compare.
Use any of the following search methods:
Search tab lets you create a simple search or an advanced search. You can check to search attachment contents, too.
Saved Searches tab opens to your navigation pane where you can browse in search folders, select a search, and run it. Again, returned results may be moved to the Selected Items table, and click OK.
Shortcuts tab opens to your navigation pane where you can select objects from My Bookmarks or Recently Visited. The system displays shortcuts to only those objects that are appropriate to the operation you are performing.
Only business objects with attached files appear in the search results table. For example, a business object that you viewed recently will not appear on the Recently Visited list of the Shortcuts tab if it has no attachments.
When the results of your search are returned, select a row in the results table, and the related files for that object appear in the Related Files table.
In the Related Files table, select the file you want.
If the selected search object is a file folder, use the Version drop-down list in the Related Files table to select the file folder version you want.
If the selected search object is an item, in the Related Files table displays item attachments for each released revision of the item (the file name followed by the revision number or letter, for example, widget.dwg - A and widget.dwg - B).
|
Note: For item objects, Introductory revisions and unreleased pending revisions do not appear in the related files list. |
If the selected search object is a business object, check the Show Matching File Types Only checkbox to display only the related files that are the same file type as the file with which you want to compare.
When you are finished, click OK.
You can continue to run multiple searches or shortcuts until you are finished selecting the attachments you want.
The files and the comparison results appear in a single viewer window. For more information about compare file features and options, choose Help > Contents in the AutoVue for Agile menu bar.
To initiate comparing files in AutoVue for Agile, you must first select and view an appropriate file, that is, a file type that can be used for compare analysis.
View an appropriate file for compare:
Display the Attachments tab or the Files tab.
Select a file row you want to work with and choose:
Web Client: View > View
Java Client: View Files(s)
AutoVue for Agile opens and displays the selected file.
In the AutoVue for Agile Analysis menu, choose Compare. The AutoVue for Agile File Open dialog appears.
Use one of the following File Open dialog methods to select a file to compare:
Browse to browse your local directories to select and open files from the AutoVue for Agile window.
Agile Browse to use Agile bookmarks to open files from the AutoVue for Agile window.
Agile Search to perform an Agile Quick Search to select and open files from the AutoVue for Agile window.
Browse your local directories to select an attachment file:
Click the Browse button in the File Open dialog to display File Open dialog.
Use the Look in drop-down list to select the directory you want.
Select the file you want and click Open.
Click OK in the File Open dialog.
The Viewer opens the selected file, or, if appropriate, adds the selected file to the current analysis function.
If a markup is saved when Digital Mockup is active, the contents of the Digital Mockup, including all objects and their orientations are saved.
Agile Browse to use your Agile Bookmarks to select an attachment file:
Click the Agile Browse button in the File Open dialog to display the DMS: File Open dialog.
The DMS: File Open dialog displays your Agile Bookmarks in a tree structure.
|
Note: If you have not defined any Bookmarks in Agile PLM, the Agile Browse button does not appear in the File Open dialog. |
Click + to expand a bookmark and display its item revisions or its file folder versions.
Click a revision or version row to highlight the file you want to view.
Click OK in the DMS: File Open dialog. The selected file name appears in the File Name field of the File Open dialog.
Click OK in the File Open dialog.
The Viewer opens the selected file, or, if appropriate, adds the selected file to the current analysis function.
Agile Search to perform a quick search to select an attachment file:
Click the Agile Search button in the File Open dialog to display a Search dialog which allows you to run a quick search.
Define your search and click the Search button:
Class - Select an object class, for example, Items.
Search Parameter - Enter a text string or a number.
Agile PLM searches the object ID number attribute and the object Name or Description attribute. A Quick search behaves like a Contains search for text strings. The search criteria is treated as a single string and Agile PLM searches for names or descriptions that contain the search parameter string. In the case of ID numbers, Agile PLM searches for an exact match, however, you may use wildcard characters to specify part of an ID number as a search criteria.
Search Attachment Content - Set this parameter to Yes to search the contents of the attachment files as well.
In the Search Results table, click the + next to the object number to expand the list of attachment files for that object.
Click a revision row or a version row to select the file you want to view.
Click the Load File button. The selected file name appears in the File Name field of the File Open dialog.
Click OK in the File Open dialog.
The Viewer opens the selected file, or, if appropriate, adds the selected file to the current analysis function.
Overlaying files is also described in the viewer Online Help. In Agile, this feature is initiated from the file folder Files tab rather than from the viewer menus. For detailed information about file overlay features, see the viewer Online Help. Choose Help > Contents in the AutoVue for Agile menu bar.
|
Important: Overlaying files features are only available with AutoVue applications that support this feature. For more information about purchasing or installing AutoVue applications, contact Oracle Consulting - Agile Practice. |
To initiate overlaying files:
Display the Attachments tab or the Files tab.
Select both file rows you want to work with and choose
Web Client: View > Overlay.
Java Client: View File(s) > Overlay.
The files are displayed in a single viewer window, one on top of the other. For more information about overlay file features (for example, File > Import File as Overlay in the menu bar) and options, choose Help > Contents in the viewer menu bar.
To initiate overlaying files By Search in Java Client:
Display the Attachments tab or the Files tab.
Select a file row you want to work with and choose:
9.2.2.x or 9.2.1.x Web Client: View > By Search > Overlay.
The View Files by Search dialog appears, with three Search tabs.
9.3.x Web Client: View. The file opens in AutoVue for Agile, then choose File > Import File as Overlay.
Java Client: View File(s) > By Search > Overlay.
The Select Files dialog appears, with three Search tabs.
The search dialog allows you to search for any business object (for example, items or manufacturer parts) and select the attachments of those objects to use to overlay.
Use any of the following search methods:
Search tab lets you create a simple search or an advanced search. You can check to search attachment contents, too.
Saved Searches tab opens to your navigation pane where you can browse in search folders, select a search, and run it. Again, returned results may be moved to the Selected Items table, and click OK.
Shortcuts tab opens to your navigation pane where you can select objects from My Bookmarks or Recently Visited. The system displays shortcuts to only those objects that are appropriate to the operation you are performing.
Only business objects with attached files appear in the search results table. For example, a business object that you viewed recently will not appear on the Recently Visited list of the Shortcuts tab if it has no attachments.
When the results of your search are returned, select a row in the Results table, and the related files for that object appear in the Related Files table.
In the Related Files table, select and move attachments to the Selected Files table.
You can continue to run multiple searches or shortcuts until you are finished selecting the attachments you want.
When you are finished, click OK.
The files are displayed in a single viewer window, one on top of the other. For more information about overlay file features (for example, File > Import File as Overlay in the menu bar) and options, choose Help > Contents in the viewer menu bar.
To initiate overlaying files in the AutoVue for Agile, you must first select and view an appropriate file, that is, a file type that can be used for overlay analysis.
View an appropriate file for overlay analysis:
Display the Attachments tab or the Files tab.
Select a file row you want to work with and choose:
Web Client: View > View
Java Client: View Files(s)
AutoVue for Agile opens and displays the selected file.
In the AutoVue for Agile File menu, choose Import File as Overlay. The AutoVue for Agile File Open dialog appears.
Use one of the following File Open dialog methods to select a file to overlay:
Browse to browse your local directories to select and open files from the AutoVue for Agile window.
Agile Browse to use Agile bookmarks to open files from the AutoVue for Agile window.
Agile Search to perform an Agile Quick Search to select and open files from the AutoVue for Agile window.
Browse your local directories to select an attachment file:
Click the Browse button in the File Open dialog to display File Open dialog.
Use the Look in drop-down list to select the directory you want.
Select the file you want and click Open.
Click OK in the File Open dialog.
The Viewer opens the selected file, or, if appropriate, adds the selected file to the current analysis function.
If a markup is saved when Digital Mockup is active, the contents of the Digital Mockup, including all objects and their orientations, will be saved.
Agile Browse to use your Agile Bookmarks to select an attachment file:
Click the Agile Browse button in the File Open dialog to display the DMS: File Open dialog.
The DMS: File Open dialog displays your Agile Bookmarks in a tree structure.
|
Note: If you have not defined any Bookmarks in Agile PLM, the Agile Browse button does not appear in the File Open dialog. |
Click + to expand a bookmark and display its item revisions or its file folder versions.
Click a revision or version row to highlight the file you want to view.
Click OK in the DMS: File Open dialog. The selected file name appears in the File Name field of the File Open dialog.
Click OK in the File Open dialog.
The Viewer opens the selected file, or, if appropriate, adds the selected file to the current analysis function.
Agile Search to perform a quick search to select an attachment file:
Click the Agile Search button in the File Open dialog to display a Search dialog which allows you to run a quick search.
Define your search and click the Search button:
Class - Select an object class, for example, Items.
Search Parameter - Enter a text string or a number.
Agile PLM searches the object ID number attribute and the object Name or Description attribute. A Quick search behaves like a Contains search for text strings. The search criteria is treated as a single string and Agile PLM searches for names or descriptions that contain the search parameter string. In the case of ID numbers, Agile PLM searches for an exact match, however, you may use wildcard characters to specify part of an ID number as a search criteria.
Search Attachment Content - Set this parameter to Yes to search the contents of the attachment files as well.
In the Search Results table, click the + next to the object number to expand the list of attachment files for that object.
Click a revision row or a version row to select the file you want to view.
Click the Load File button. The selected file name appears in the File Name field of the File Open dialog.
Click OK in the File Open dialog.
The Viewer opens the selected file, or, if appropriate, adds the selected file to the current analysis function.
Important AutoVue for Agile features for schematic and PCB files, also referred to as EDA files, are available only with AutoVue applications that support those files. For more information about purchasing or installing AutoVue, contact Oracle Consulting - Agile Practice. For information about Agile PLM configuration settings for AutoVue for Agile, see the Agile PLM Administrator Guide.
For information about these features, refer to the viewer Online Help. Choose Help > Contents in the AutoVue for Agile menu bar.
For detailed information about collaboration features, refer to the viewer Online Help. Choose Help > Contents in the AutoVue for Agile menu bar. The following sections discuss AutoVue for Agile server information and Agile privileges that affect collaboration sessions.
|
Important: Real-time collaboration features are available only with AutoVue applications that support this feature. For more information about purchasing or installing AutoVue applications, contact Oracle Consulting - Agile Practice. |
The Collaboration feature lets multiple users team up and review documents interactively and simultaneously, thus shortening an otherwise lengthy review process where documents are passed back and forth. The Collaboration feature is available to all users who have Agile Discovery, Read, and the appropriate privileges that allow you to redline attachment files (for example, the Agile default role Markup for Self).For ECO attachment redlining, you must also have a role that includes an appropriate Attachment Redlines privilege (Attachment Redlines for Others or Attachment Redlines for Self).
From the Collaboration menu, anyone with the required Agile privileges can initiate a Collaboration session and act as host, or join a Collaboration session if invited by the host.
|
Important: If you plan to host a Collaboration session, ensure that all intended participants have Discovery, Read, and the appropriate privileges that allow them to redline attachment files (for example, the Agile default role Markup for Self and, for ECO attachment redlining, a role that includes an appropriate Attachment Redlines for Self or Attachment Redlines for Others privilege). If they can view and redline a file, they have the necessary privileges. If they cannot, contact your Agile administrator, who can grant them the necessary privileges, before you attempt to initiate the Collaboration session. |
In order to participate in the collaboration session, all the collaborators must be logged into Agile and viewing a file in the viewer when you start the collaboration session. They do not need to view the file you are going to review in the collaboration session; they can view any file. For this reason, they may choose to view a small file that will load quickly.
When the host initiates a Collaboration session, a session object is created on the server, which is maintained for the duration of the Collaboration session. Session information is available from the Collaboration menu during a Collaboration session. It displays the session subject (the name assigned to the Collaboration session), the session ID (each session subject is assigned a unique session ID), the name of the base file viewed, the host, and the list of users participating.
A session markup file is created during the Collaboration session to which all participants can add markup entities. Participants are assigned different layer colors for the session so that the markup entity from each participant is identifiable. The host for the session owns the markup file and is the only one who can save it.
|
Note: In order to use the collaboration feature, all users must connect to the same AutoVue for Agile server. All users must specify, in their user profile, Preferences tab, under System Preferences, the same Preferred File Manager setting. Remote users may have to change their preferred File Manager profile setting in a distributed File Manager environment. |
In 3D mode, you can use the Mockup feature (DMU) to test alignment and interference of multiple assemblies. You can save the mockup as a redline markup entity.
To initiate DMU analysis of files in AutoVue for Agile, you must first select and view an appropriate file, that is, a file type that can be used for DMU analysis.
View an appropriate file for DMU analysis:
Display the Attachments tab or the Files tab.
Select a file row you want to work with and choose:
Web Client: View > View
Java Client: View Files(s)
AutoVue for Agile opens and displays the selected file.
In the AutoVue for Agile File menu, choose Import File for Mockup. The AutoVue for Agile File Open dialog appears.
Use one of the following File Open dialog methods to select files for DMU analysis:
Browse to browse your local directories to select and open files from the AutoVue for Agile window.
Agile Browse to use Agile bookmarks to open files from the AutoVue for Agile window.
Agile Search to perform an Agile Quick Search to select and open files from the AutoVue for Agile search window.
Agile Browse to use your Agile Bookmarks to select an attachment file:
Click the Agile Browse button in the File Open dialog to display the DMS: File Open dialog.
The DMS: File Open dialog displays your Agile Bookmarks in a tree structure.
|
Note: If you have not defined any Bookmarks in Agile PLM, the Agile Browse button does not appear in the File Open dialog. |
Click + to expand a bookmark and display its item revisions or its file folder versions.
Click a revision or version row to highlight the file you want to view.
Click OK in the DMS: File Open dialog. The selected file name appears in the File Name field of the File Open dialog.
Click OK in the File Open dialog.
The Viewer opens the selected file, or, if appropriate, adds the selected file to the current analysis function.
Agile Search to perform a quick search to select an attachment file:
Click the Agile Search button in the File Open dialog to display a Search dialog which allows you to run a quick search.
Define your search and click the Search button:
Class - Select an object class, for example, Items.
Search Parameter - Enter a text string or a number.
Agile PLM searches the object ID number attribute and the object Name or Description attribute. A Quick search behaves like a Contains search for text strings. The search criteria is treated as a single string and Agile PLM searches for names or descriptions that contain the search parameter string. In the case of ID numbers, Agile PLM searches for an exact match, however, you may use wildcard characters to specify part of an ID number as a search criteria.
Search Attachment Content - Set this parameter to Yes to search the contents of the attachment files as well.
In the Search Results table, click the + next to the object number to expand the list of attachment files for that object.
Click a revision row or a version row to select the file you want to view.
Click the Load File button. The selected file name appears in the File Name field of the File Open dialog.
Click OK in the File Open dialog.
The Viewer opens the selected file, or, if appropriate, adds the selected file to the current analysis function.
Browse your local directories to select an attachment file:
Click the Browse button in the File Open dialog to display File Open dialog.
Use the Look in drop-down list to select the directory you want.
Select the file you want and click Open.
Click OK in the File Open dialog.
The Viewer opens the selected file, or, if appropriate, adds the selected file to the current analysis function.
If a markup is saved when Digital Mockup is active, the contents of the Digital Mockup, including all objects and their orientations, are saved.
To initiate Digital Mockup of files:
Display the Attachments tab or the Files tab.
Select all the file rows you want to work with and choose:
9.2.2.x or 9.2.1.x Web Client: View > Digital Mockup.
9.3.x Web Client: View > View. After AutoVue for Agile opens, chose File > Import file for Mockup.
Java Client: View File(s) > Digital Mockup.
Manipulate the models using the viewer features including the features in the Analysis menu, for example User Defined Coordinate Systems, Manipulators, Interference Checking, and Part Alignment.
For information about these features, refer to the AutoVue for Agile Online Help. Choose Help > Contents in the AutoVue for Agile menu bar.
To initiate Digital Mockup of files By Search:
Display the Attachments tab or the Files tab.
Select a file row you want to work with and choose:
9.2.2.x or 9.2.1.x Web Client: View > By Search > Digital Mockup.
The View Files by Search dialog appears, with three Search tabs.
9.3.x Web Client: View > View. After AutoVue for Agile opens, choose File > Import file for Mockup.
Java Client: View File(s) > By Search > Digital Mockup.
The Select Files dialog appears, with three Search tabs.
The following steps apply to 9.2.2.x and 9.2.1.x Web Client and the Java Client only:
The search dialog allows you to search for any business object (for example, items or manufacturer parts) and select the attachments of those objects to use for the mockup.
Use any of the following search methods:
Search tab lets you create a simple search or an advanced search. You can check to search attachment contents, too.
Saved Searches tab opens to your navigation pane where you can browse in search folders, select a search, and run it. Again, returned results may be moved to the Selected Items table, and click OK.
Shortcuts tab opens to your navigation pane where you can select objects from My Bookmarks or Recently Visited. The system displays shortcuts to only those objects that are appropriate to the operation you are performing.
Only business objects with attached files appear in the search results table. For example, a business object that you viewed recently will not appear on the Recently Visited list of the Shortcuts tab if it has no attachments.
When the results of your search are returned, select a row in the Results table, and the related files for that object appear in the Related Files table.
In the Related Files table, select and move attachments to the Selected Files table.
You can continue to run multiple searches or shortcuts until you are finished selecting the attachments you want.
When you are finished, click OK. The files are loaded into the same AutoVue for Agile workspace.
Manipulate the models using the viewer features including the features in the Analysis menu, for example User Defined Coordinate Systems, Manipulators, Interference Checking, and Part Alignment.
For information about these features, refer to the viewer Online Help. Choose Help > Contents in the AutoVue for Agile menu bar.
|
 Copyright © 2010, 2013, Oracle and/or its affiliates. All rights reserved. Legal Notices |
|