| Agile Product Lifecycle Management Administrator Guide Release 9.3.3 E39286-04 |
|

 Previous |
Agile PLM has the possibility of integrating aspects of your PLM system with Single Sign-On (SSO) capability.
With SSO configured and enabled for your PLM system, a user that has signed in to the system once (for instance, through the corporate portal) is not prompted again by a "login" dialog in such cases as:
Launching Web Client
Clicking on a URL for an email notification
When a customer's supplier launches the Microsoft Excel-based Solution from a Declaration
When Web Client times out.
|
Note: SSO is a Web-based solution that can be enabled only for Agile Web Client. SSO cannot be configured or applied from Java Client, Administrator module in Java Client, or the Agile SDK. |
Single Sign-on integrates with the centralized security management, other business and training applications, and improves user productivity in Agile Web Client environment.
The sections below give a general overview to Single Sign-On in Agile PLM, followed by steps to configure and deploy SSO with Windows NTLM.
The following sections outline the steps to configure and deploy NTLM for Single sign-on capability.
Microsoft Windows NTLM has been certified for Agile PLM. Discuss your company's needs with your Oracle Consulting - Agile Practice representative.
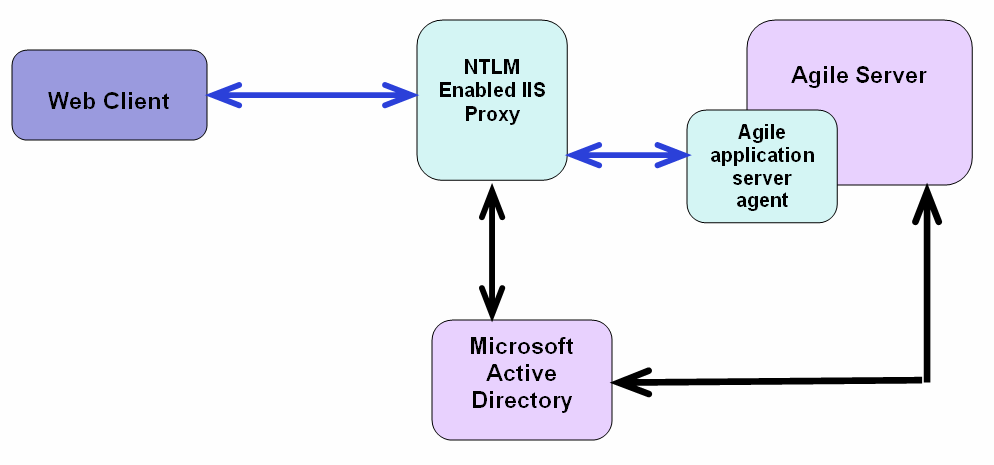
These are the steps to configure Windows NTLM for Single sign-on with Internet Information Services (IIS) as proxy server for WLS.
|
Note: The prerequisite for this configuration is that the Windows server on which IIS is running has been joined to a Windows domain. "Microsoft Active Directory" is the name of the Windows Domain controller since Windows 2000. |
Install and enable Windows Authentication in IIS for site to use Windows NT LAN Manager for authentication:
Navigate to Administrative Tools > Service Manager.
Navigate to Roles > Web Server
Right-click Add Role and Install Windows Authentication.
Navigate to IIS.
Click Default Site.
Double-click Authentication.
Enable Windows Authentication.
Disable Anonymous Authentication.
In Site Authentication page, select Windows authentication.
Click Providers.
Make NTLM Provider as First.
|
Note: Agile 933 PLM with WLS12C must be installed and IIS7.5 Proxy configuration must be completed before proceeding to further steps. |
IIS7.5 Proxy Configuration with Agile PLM:
Install and configure the WebLogic plug-in patch.
Download the WLSPlugin11g-IIS6-IIS7-IIS75-win64-x64.zip from the location
http://www.oracle.com/technetwork/middleware/ias/downloads/wls-plugins-096117.htm
Extract the plug-in zip to location
C:\myhome\weblogic-plugins-1.1
Create iisproxy.ini file in %PLUGIN_HOME%\lib\ with the settings below:
WebLogicHost=wls-host
WebLogicPort=wls-port
Debug=ALL
WLLogFile=C:\Temp\wl-proxy.log
Ensure that the %PLUGIN_HOME%\lib is included in the system PATH:
Control-Panel > System > System Properties > Environment Variables > System Properties > PATH
Open IIS Manager; use Default Web Site or create a Web Site.
Click the site.
Open Handler Mappings and add a script map:
Set the Extension to like '*'
Set Executable to %PLUGIN_HOME%\lib\iisproxy.dll, and give a Name.
Start IIS.
A. To configure your PLM system for SSO with NTLM, perform these operations.
|
Important: Stop the Agile Server. For information on how to stop the Agile PLM server, see the Installing Agile PLM on Oracle WebLogic Server guide. |
In the WLS console, go to Summary of Security Realms > AgileRealm > Providers.
Click New and add "AgileIdentityAsserter" as the AgileRealm Authentication Provider.
Open the added AgileIdentityAsserter, select the Active type as Authorization (the AGILESSO is already a default value there). Both should be selected.
Click Save, then click Activate the Changes, and then logout from the console.
Stop the Application server.
B. Edit this file:
agile_home/agileDomain/applications/application.ear/application.war/WEB-INF/web.xml.
WLS 12C supports multiple authentication methods. Add the following elements:
<login-config>
<auth-method>client-cert, form</auth-method>
<realm-name>AgileRealm</realm-name>
<form-login-config>
<form-login-page>/default/login-cms.jsp</form-login-page>
<form-error-page>/default/loginError.jsp</form-error-page>
</form-login-config>
</login-config>
C: Perform the following setting modifications for the action "CLICK ON LOGIN UPON LOGOUT SHOULD LOGIN AUTOMATICALLY IN SSO ENABLE SYSTEM".
Edit this file:
agile_home/agileDomain/config/agile.properties
Set the agile.sso.enabled value in agile.properties to the following:
agile.sso.enabled= true
Set the agile.sso.cookie.name in agile.properties to the following:
agile.sso.cookie.name=AGILESSO
|
Note: Manually add agile.sso.enabled property in the agile.properties file located in agile_home/agileDomain/config and set the value to true. |
D. Restart the Agile server.
E. Ensure that NT user name and password exist in DB:
Ensure that the NT user name and password exist in the DB to which the application is connected (by migrating from Microsoft Active Directory Domain LDAP Server. Refer to "LDAP" for information about configuring the LDAP server, migrating users and activation) to which the application is connected.
F. Set Web Server Proxy URL in Agile PLM Administrator:
Log in to Java Client as administrator.
Navigate to the Location node.
Enter the Web Server Proxy URL.
Restart the File Manager.
G. Attempt to access the Proxy URL in your Windows computer:
In IE browser, it should automatically login to Agile PL M.
In Firefox browser, it will ask for your network credentials only for the first time access.
If the Recipe & Material Workspace application is configured with the Agile 9.3.x SSO environment, the system administrator needs to update the Agile Proxy (SSO) URL in the CFMConfig.xml of "<AgileHome>\AgilePharma\config".
The entry must be changed to read:
<AgileSSOProxyUrl> </AgileSSOProxyUrl>
For more information about the system configuration of Agile Recipe & Material Workspace, see the Recipe & Material Workspace Administrator Guide.
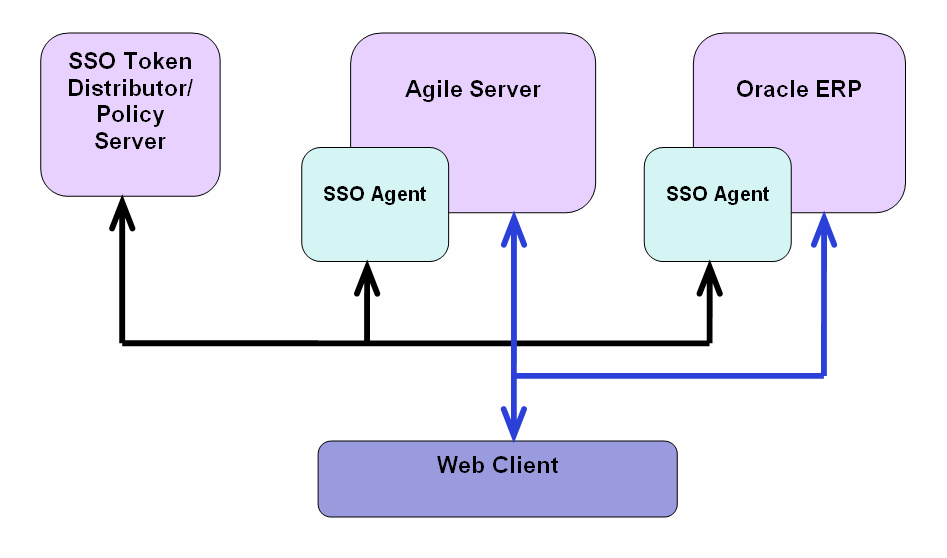
The following are possible SSO deployment scenarios with NTLM, one for secure proxy and one for transparent or no proxy.
With this deployment, authentication takes place on the proxy server, so it is recommended for those companies that use a proxy server.
Request flow with this deployment:
User launches browser to access Agile PLM (for example, http://agileplm.xyz.com/Agile/PLMServlet).
The NTLM-enabled IIS server challenges the browser for credentials.
After a successful NTLM handshake, the request reaches Agile Application Server (AAS) agent with user information.
NTLM is a connection-based authentication protocol. For each new socket connection between client and server (or proxy), it has to exchange credentials by sending and responding to HTTP requests and responses.
The AAS agent passes the user information to the application server security framework.
The user will be allowed to access Agile applications.
This authentication happens whenever the client sends an HTTP POST request; therefore, authentication can re-occur even during an established user session.
Request flow with this deployment:
User launches browser to access Agile (for example, http://agileplm.xyz.com/Agile/PLMServlet).
The Agile Application Server (AAS) agent installed on server challenges the browser for credentials.
After a successful NTLM handshake, the AAS agent passes the user information to the application server security framework.
The user will be allowed to access Agile applications.
Oracle Access Manager (OAM) ensures authentication and strict authorization policies are applied to your applications and services such as:
Controlled access to web applications, Enterprise Java Beans (EJB) applications, J2EE resources, and common packaged enterprise applications.
Web SSO for secure access to multiple applications with one authentication step.
Flexible authentication support.
Agile PLM 9.3.3 is certified with OAM (12g) suite of products.
This section covers Oracle Access Manager (OAM) 11g configuration with Agile PLM.
"OAM11g Configuration with Agile PLM 9.3.3 Using IIS 7.5 Web Server"
"OAM11gR2 Configuration with Agile PLM 9.3.3 Using OHS11gR2 Web Server"
"OAM11gR2 Configuration with Agile PLM 9.3.3 Using Apache 2.2 Web Server"
Perform the prerequisite steps, and then perform the configuration steps as explained in the following sections.
Ensure the following components have been downloaded and installed.
Installed/configured and tested IIS 7.5 webserver with Agile 9.3.2 (Agile should be installed on WLS12C). You can refer to the Knowledge Base for details.
Download OAM WebGate 10g for IIS from the site:
http://www.oracle.com/technetwork/middleware/ias/downloads/101401-099957.html
Get oam_int_win_v11_cd1.zip from disk2 for windows.
Extract and start installation using Oracle_Access_Manager10_1_4_2_5_Win64_ISAPI_WebGate.exe
Now install OAM WebGate 10g on the same system where IIS 7.5 webserver has been installed.
Ensure that IIS7.5 is installed with all Role Services. If not, you can add those from Server Manger. Navigate to Web Server, right click, Add Role Services. Add all role services. You can refer to the Knowledge Base for details.
The following sections/main steps explain the configuration of the OAM11gR2 Server with the Agile PLM 933 application:
To perform OAM WebGate Agent registration in OAMServer:
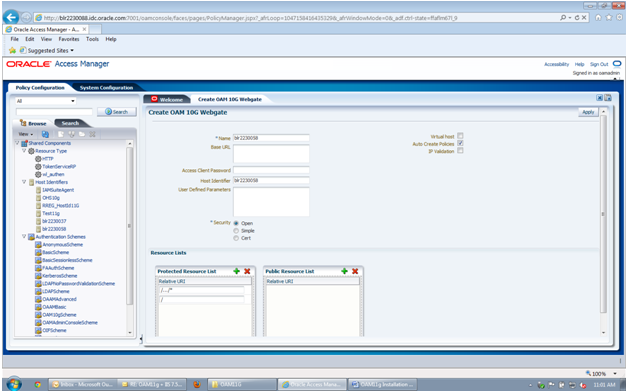
Create a WebGate entry on OAM console through UI mode Steps:
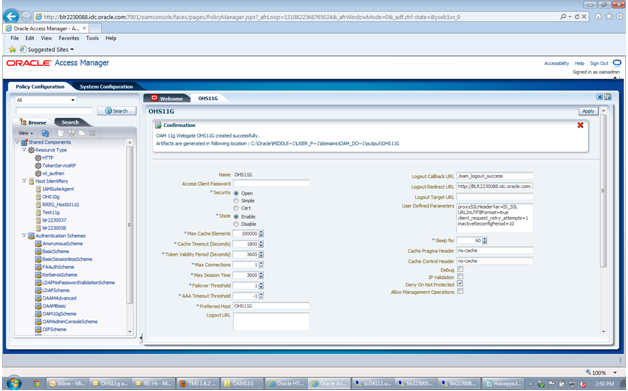
Click New OAM WebGate 10g in welcome page.
Enter the Name. The host identifier will populate automatically.
Click Apply.
The following steps must be performed after the installation of OAM10g WebGate for IIS 7.5 Webserver:
Navigate to Site-ISAP Filters tab and add Filter OracleWebGate point to webgate.dll.
Navigate to Site.
Right-click Add Application.
Give alias name as access and point physical path to Web Gate\access folder.
Navigate to Host Level.
Click ISAPI and CGI Restrictions.
Click Add.
Add the path to webgate.dll and type description as OracleWebGate.
Select check box Allow extension path to execute.
Click OK.
Navigate to Web Gate/access.
Right click Properties.
Navigate to Security.
Assign Full Control to Everyone.
Restart IIS.
To configure WebLogic proxy for IIS 7.5 Webserver:
Ensure that you have installed and configure the WebLogic proxy plug-in patch for IIS 7.5 Webserver.
You can download the WLSPlugin11g-IIS6-IIS7-IIS75-win64-x64.zip from the location:
http://www.oracle.com/technetwork/middleware/ias/downloads/wls-plugins-096117.html
Extract the plug-in zip to location C:\myhome\weblogic-plugins-1.1.
|
Note: This will be referred as the variable PLUGIN_HOME going forward. |
Create iisproxy.ini file in %PLUGIN_HOME%\lib\ with below details:
WebLogicHost=wls-host
WebLogicPort=wls-port
Debug=ALL
WLLogFile=C:\Temp\wl-proxy.log
WLExcludePathOrMimeType=/obrar.cgi
Ensure that the %PLUGIN_HOME%\lib is included in the system PATH
(Control-Panel > System > System Properties > Environment Variables > System Properties > PATH)
Open IIS Manager, use 'Default Web Site' or create a 'Web Site' based on your needs.
Click the site.
Open 'Handler Mappings' and add a script map
Set the 'Extension' like '/Agile/*'
Set 'Executable' to %PLUGIN_HOME%\lib\iisproxy.dll
Give a 'Name'
Create new directory oamsso under
<IIS inetpub>\wwwroot\
and copy file logout.html to oamsso folder from OAM server
<Middleware Home>\user projects\domains\oam_domain\output\<933IIS Agent>
Navigate to Host Level and click on ISAPI and CGI Restrictions and click on Add, add the path to iisproxy.dll and select allow extension path to execute.
Open IIS Manager, use either 'Default Web Site' or create a 'Web Site'.
Click on the site.
Double-click on Request Filtering in right pane.
Click Edit Feature Settings in Actions pane.
In Edit Request Filtering Settings Dialog, change Maximum query string (Bytes) to:
4096
Click OK.
|
Note: If you need to add any protect and unprotect resources to work with specific functionality, then add those resource URLs as handler mappings by following the same process above. |
Restart IIS.
To configure OAM WebGate:
Add the authorization policy as below:
Navigate to OAM Console > Policy Configuration > Applications domain > Agent (Name of the Agent in this case) > Authorization Policies.
Open Protected Resources Policy.
Navigate to Response tab.
Add Response as below:
Name= remote-user
Type=Header
Value=$user.attr.dn
Click Apply.
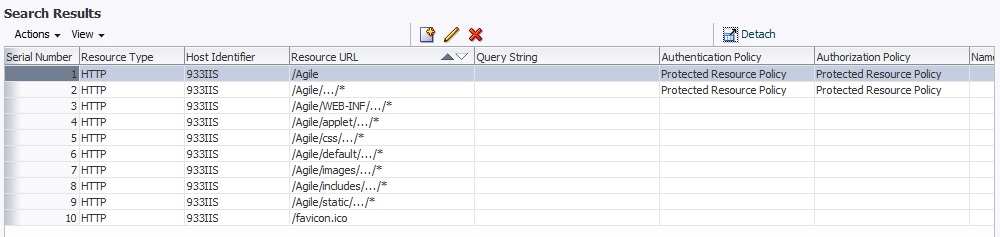
Configure Resources for Web gate:
Add these resources with webroot context (in this case Agile):
Add resource URLs
/Agile
/Agile/…/*
with Authentication and Authorization policy as Protected Resource Policy.
Exclude the Resources for Gantt Chart.
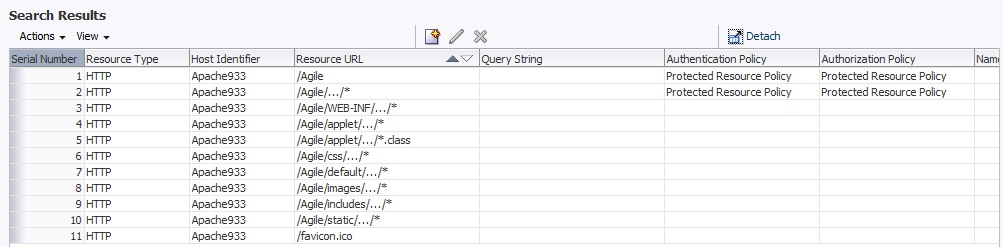
You must exclude the below static resources to work on Gantt chart with WebGate. Also use the webroot context while creating Resources to exclude.
Navigate to OAM Console > Policy Configuration > Applications domain > Open WebGate10g Agents.
Click Resources.
In the Resources window, click Search.
Add the following Resource Types by using the Create button. IN the Create New page:
Select Type as HTTP.
Select the Host Identifier of the Web Gate Agent.
Type the Resource URL with webroot context.
Select Protection level as Excluded.
Add the resources as shown in the following figure.
Navigate to the WebLogic console where the Agile application is installed and create AgileIdentityAsserter.
In WLS Console:
Click Lock and Edit.
Move to Summary of Security Realms >AgileRealm >Providers.
Click New.
Create AgileIdentityAsserter Authentication with "AgileIdentityAssertion" Provider.
Open the added AgileIdentityAsserter.
Select the Active type as remote-user and Save.
Click Activate Changes.
Logout from the console.
Open agile.Properties file, and add the below settings:
oam.header.name=remote-user
oam.sso.logout.url=/oamsso/logout.html?end_url=/Agile/PLMServlet
|
Note: Where /Agile is the web-root context for the installed application. |
Open the Web.xml (\application.ear\application.war\WEB-INF\ web.xml) and change auth-method as below:
<auth-method>client-cert, form</auth-method>
Restart the WebLogic Application Server where the Agile Application is installed.
Configure LDAP Server (which is used as identity store in OAM) with Agile, Migrate LDAP Users into Agile Application and Activate LDAP users.
Login to Agile Java Client.
Navigate to the Location node.
Enter the Web Server Proxy URL.
Restart the File Manager.
Attempt to login to Agile Proxy URL with the IIS 7.5 webserver port number as configured.
You should see the OAM Credentials page.
Enter the appropriate OAM (Configured LDAP Identity store user) username and password and the Agile application home page should be presented.
Perform the prerequisite steps, and then perform the configuration steps as explained in the following sections.
Ensure the following components have been downloaded and installed.
Installed WebTier Patch set6(11.1.1.7.0)-forOHS11g on top of Web Logic 10.3.6.
This should be installed with "Install and Do Not Configure" option. Refer to the Knowledge Base for more details.
Configure only Oracle HTTP Server (OHS) without selecting the component 'Web Cache' and without selecting 'Associate Selected components with Web Logic domain' option.
Installed Web gate 11g R2 (11.1.2.1.0) for OHS11g
The following sections/main steps explain the configuration of the OAM11gR2 Server with the Agile 933 Application:
Create WebGate11g Agent in OAM Console:
A. The following steps are required to be performed post installation of WebGate11g for OHS11g Webserver on the Server where you installed your OHS and WebGate.
Deploy WebGate:
Go to the directory <Middleware Home>\<Web Gate Home>\webgate\ohs\tools\deployWebGate>
Run the batch file as below:
deployWebGateInstance.bat -w <Middleware Home>\<WebTierHome>\instances\instance1\config\OHS\ohs1 -oh C<Middleware Home>\<Web Gate Home>
You should see the following sample on the console:
Copying files
C:\WLS1036\Oracle_OAMWebGate1\webgate\ohs\config\oblog_config_wg.xml
1 File(s) copied
C:\WLS1036\Oracle_OAMWebGate1\webgate\ohs\tools\openssl\simpleCA\cacert.pem
1 File(s) copied
C:\WLS1036\Oracle_OAMWebGate1\webgate\ohs\tools\openssl\simpleCA\cakey.pem
1 File(s) copied
Add to the PATH in Environment Variables:
<Middleware Home>\<Web Gate Home>\webgate\ohs\lib; <Middleware Home>\<WebTier Home>\bin;
Update httpd.conf with the WebGate configuration:
<Middleware Home>\<Web Gate Home>\webgate\ohs\tools\EditHttpConf>EditHttpConf.exe -w
<Middleware Home>\<WebTier Home>\instances\instance1\config\OHS\ohs1 -oh <Middleware Home>\<Web Gate Home>\
You should see the following sample on the console:
The web server configuration file was successfully updated
C:\WLS1036\Oracle_WT1\instances\instance1\config\OHS\ohs1/httpd.conf has been backed up as C:\WLS1036\Oracle_WT1\instances\instance1\config\OHS\ohs1/httpd.conf.ORIG
Copy the cwallet.sso and ObClientAccess.xml file from OAM Server:
From location <Middleware Home >\user_projects\domains\oam_domain\output\OHS11G in OAM Server
To Web Tier instance directory: <Middleware Home>\<WebTier Home>\instances\instance1\config\OHS\ohs1\webgate\config
B. Add the authorization policy:
Navigate to OAM Console > Policy Configuration > Applications domain > Agent (Name of the WebGate11g Agent in this case) > Authorization Policies.
Open Protected Resources Policy.
Navigate to Response Tab.
Add Response as below:
Name= remote-user
Type=Header
Value=$user.attr.dn
Click Apply.
C. Add user defined parameters for OHS11g WebGate Agent in OAM Console:
Navigate to OAM Console > System Configuration > Access Manager Settings >S SO Agents > OAM Agents > WebGate 11G Agent.
Add the below parameters to User Defined Parameters attribute:
UniqueCookieNames=enabled
filterOAMAuthnCookie=false
Click Apply.
D. Configure resources for WebGate::
Add these resources with webroot context (in this case Agile):
Add resource URLs
/Agile
/Agile/…/*
with Authentication and Authorization policy as Protected Resource Policy.
Exclude the Resources for Gantt chart:
We Need to Exclude the below static resources to work on Gantt chart with WebGate. Also use the webroot context while create Resources to exclude.
Navigate to OAM Console > Policy Configuration > Applications domain > Open WebGate Agents.
Click Resources.
In the Resources window, click Search.
Add the following Resource Types using Create Button.
In Create New page:
Select Type as HTTP.
Select the Host Identifier of the Web Gate Agent.
Type the Resource URL.
Select Protection level, Authentication Policy.
Add the resources as shown in the following figure:
Navigate to <Middleware Home>\<WebTier Home>\instances\instance1\config\OHS\ohs1
Edit the file mod_wl_ohs.conf file and add below information:
<IfModule weblogic_module>
           WebLogicHost <wls host>
           WebLogicPort <wls port>
           Debug ON
           WLLogFile C:\Temp\weblogicOHS.log
     </IfModule>
    <Location /Agile>
         SetHandler weblogic-handler
    </Location>
   <Location /JavaClient>
       SetHandler weblogic-handler
  </Location>
Where /Agile is the web root context of the Agile application.
Navigate to <Middleware Home>\<WebTier Home>\ohs\conf and edit the file httpd.conf and add the following lines:
# Include the configuration files needed for mod_weblogic
include "${ORACLE_INSTANCE}/config/${COMPONENT_TYPE}/${COMPONENT_NAME}/mod_wl_ohs.conf"
# Include the SSL definitions and Virtual Host container
include "${ORACLE_INSTANCE}/config/${COMPONENT_TYPE}/${COMPONENT_NAME}/ssl.conf"
# Include the admin virtual host (Proxy Virtual Host) related configuration
include "${ORACLE_INSTANCE}/config/${COMPONENT_TYPE}/${COMPONENT_NAME}/admin.conf"
include "moduleconf/*.conf"
include "<Middleware Home>\<WebTier  Home>\instances\instance1\config\OHS\ohs1/webgate.conf"
Navigate to the WebLogic console where the Agile application is installed and create AgileIdentityAsserter.
In WLS Console:
Click Lock and Edit.
Move to Summary of Security Realms >AgileRealm >Providers.
Click New.
Create AgileIdentityAsserter Authentication with "AgileIdentityAssertion" Provider.
Open the added AgileIdentityAsserter.
Select the Active type as remote-user and Save.
Click Activate Changes.
Logout from the console.
Open agile.Properties file, and add the below settings:
oam.header.name=remote-user
oam.sso.logout.url=/oamsso/logout.html?end_url=/Agile/PLMServlet
|
Note: Where /Agile is the web-root context for the installed application. |
Open the Web.xml (\application.ear\application.war\WEB-INF\ web.xml) and change auth-method as below:
<auth-method>client-cert, form</auth-method>
Restart the WebLogic Application Server where the Agile Application is installed.
Configure LDAP Server (which is used as identity store in OAM) with Agile, Migrate LDAP Users into Agile Application and Activate LDAP users. See "Agile LDAP Configuration" to configure LDAP Server with Agile PLM.
Login to Agile Java Client.
Navigate to the Location node.
Enter the Web Server Proxy URL.
Restart the File Manager.
Attempt to login to Agile Proxy URL with the IIS 7.5 webserver port number as configured.
You should see the OAM Credentials page.
Enter the appropriate OAM (Configured LDAP Identity store user) username and password and the Agile application home page should be presented.
Perform the prerequisite steps, and then perform the configuration steps as explained in the following sections.
Ensure the following components have been downloaded and installed.
Download Apache2.2 from Apache site and install/configure and test Apache2.2 with Agile 9.3.3 (Agile should be installed on WLS12C). You can refer to the Oracle Knowledge Base for details.
Download and install OAM WebGate 10g for Apache 2.2 from
http://www.oracle.com/technetwork/middleware/ias/downloads/101401-099957.html
and install it on the same system where Apache web server has been installed.
You can refer to the Oracle Knowledge Base document 1526342.1 for details: https://support.oracle.com/epmos/faces/ui/km/DocumentDisplay.jspx?id=1526342.1
The following sections/main steps explain the configuration of the OAM11g Server with the Agile 932 Application:
You must add a WebGate Agent for the Apache Webserver in the OAM Server using RREG tool.
To perform OAM WebGate Agent registration in OAMServer:
Create a WebGate entry on OAM console through UI mode Steps:
Click on New OAM WebGate 10g in welcome page.
Enter the Name. The host identifier will populate automatically.
Click Apply.
OAM WebGate Configuration
Edit httpd.conf under Apache2.2\conf folder and perform the following actions to Configuring Centralized Logout:
Add the below lines in httpd.conf file:
#*******Default Login page alias***
Alias /oamsso "/scratch/qa/webgate/access/oamsso"
<LocationMatch "/oamsso/*">
Satisfy any
</LocationMatch>
#**********************************
Copy file logout.html to oamsso folder from OAM server <Middleware Home>\user projects\domains\oam_domain\output\<Apache933 Agent>
Restart Apache.
Configure Resources for WebGate:
Add these resources with webroot context (in this case Agile):
Add resource URL's ” /Agile, /Agile/…/* ” with Authentication and Authorization policy as Protected Resource Policy
Exclude the Resources for Gantt chart:
We need to exclude the below static resources to work on Gantt chart with WebGate. Also use the webroot context while create Resources to exclude.
Navigate to OAM Console > Policy Configuration > Applications domain > Open WebGate Agents
Click Resources.
In the Resources window, click Search.
Add the following Resource Types using Create Button. In Create New page:
Select Type as HTTP.
Select the Host Identifier of the WebGate Agent.
Type the Resource URL with webroot context
Select Protection level as Excluded
Add the resources as below:
Navigate to the WebLogic Administration console where the Agile application is installed and create AgileIdentityAsserter.
In WLS Console, click Lock and Edit.
Move to Summary of Security Realms >AgileRealm >Providers.
Click New and Create AgileIdentityAsserter Authentication with "AgileIdentityAssertion" Provider.
Open the added AgileIdentityAsserter.
Select the Active type as remote-user and then Save.
Click Activate Changes and logout from the console.
Open agile.Properties file, add the below settings:
oam.sso.logout.url=/oamsso/logout.html?end_url=/Agile/PLMServlet
|
Note: Where /Agile/PLMServlet is the web-root context for the installed application. |
Open the Web.xml (\application.ear\application.war\WEB-INF\ web.xml) and change auth-method as below:
<auth-method>client-cert, form</auth-method>
Restart the WebLogic Application Server where the Agile Application is installed.
Configure LDAP Server (which is used as identity store in OAM) with Agile.
Migrate LDAP Users into Agile Application and Activate LDAP users. For more information, see "Agile LDAP Configuration" to configure LDAP Server with Agile.
Login to Agile Java Client.
Navigate to Location node.
Enter Web Server Proxy URL.
Restart the File Manager.
Attempt to login to Agile Proxy URL with the Apache webserver port number as configured.
You should see the OAM Credentials page.
Enter the appropriate OAM (configured LDAP Identity store user) username and password and the Agile application home page should be presented