| Agile Product Lifecycle Management Administrator Guide Release 9.3.3 E39286-04 |
|

 Previous |
 Next |
| Agile Product Lifecycle Management Administrator Guide Release 9.3.3 E39286-04 |
|
Previous |
Next |
This chapter provides information about how to customize and configure lists.
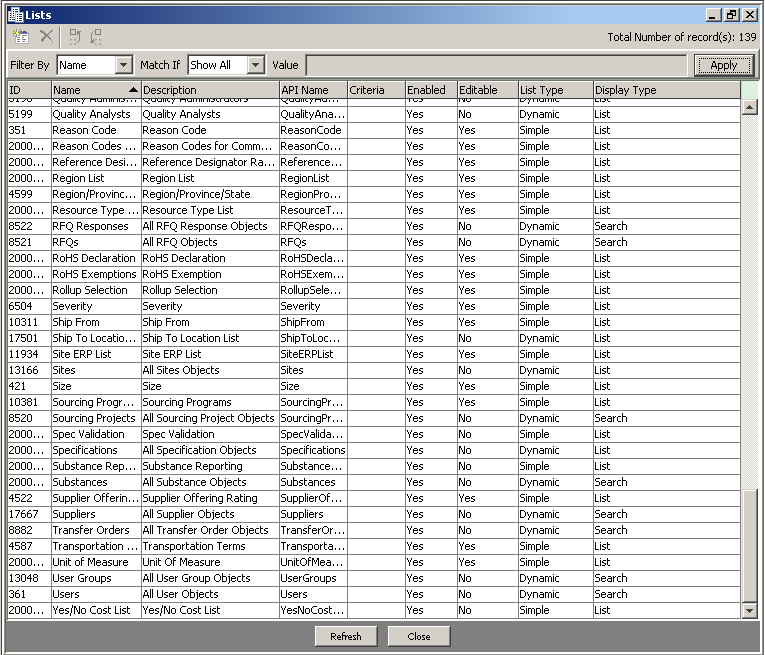
The List node accesses a collection or library of lists. Use the List node to manage lists that are used across multiple classes. You can define custom lists that can be used for Page Two and Page Three list attributes. Many attributes in the Agile PLM system are configured to be lists. Attributes, properties, flex fields on tables, and cells can all be lists.
There are six lists that pertain to the routing managers of workflows: Change Analyst list, Component Engineer list, Price Administrator list, Compliance Manager list, Quality Analyst list, and Quality Administrator list. They are not editable from the Lists node. Names of users are added and removed from these lists according to what you set for a given user's Lists property (Users > <user> > General Info tab (Profile area) > Lists).
On the Lists node, the single editable property for these six lists is called Display Type. This property lets you choose whether the "routing manager" list field in routable objects appears to the originating user as a List or as a Search format. For companies sized so only a few people are on each list, the drop-down list may be fine. Larger companies may have, for example, one or two dozen change analysts, and they will find the Search format useful; you can select the appropriate change analyst for a change order and all the other analysts will not receive notifications about that change order.
|
Note: The default for the Display Type field is List. |
To create a custom list for the list library:
Under Data Settings, double-click Lists. The Lists window appears.
Click the New button. The Create List dialog box appears.
Fill in the Name and Description fields. They are both limited to 255 characters.
The API Name field is automatically populated when you fill in the Name field.
It is recommended that you accept the automatically generated API name to enhance internal consistency. If necessary, you can enter a different API name.
An API name may contain only ASCII characters a-z, A-z, 0-9, and _ (underscore), and may be from 1 to 255 characters in length. API names are case sensitive and must be unique within a context.
Select Enabled or Disabled in the Enabled list.
Select the type of list you want from the List Type drop-down list.
Click OK. The new List: <name> window appears. The new list also appears in the list library.
The Create a new list value window automatically appears. Fill in the Name and Description fields.
The API Name field is automatically populated when you fill in the Name field.
It is recommended that you accept the automatically generated API name to enhance internal consistency. If necessary, you can enter a different API name.
Select Yes or No in the Active list.
Click Add or Add Another.
|
Note: You can create a list without populating it with list items. |
To add values to a list:
Under Data Settings, double-click Lists. The Lists window appears.
If necessary, use the filter bar to display the list you want to populate. Double-click a list to open it.
Click the List tab. The List:<name> List window appears.
Click the New button. A dialog box appears.
On separate lines, separated by a carriage return, enter item names. The API names are generated automatically. For example, you may enter:
Red
Blue
Green
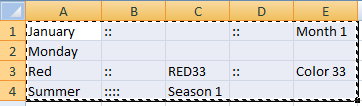
Alternately, you can specify API Name and Description with the following format: type the item name, type two colons (::), the API name, type two colons (::), and then type a description of the item. The name and description can each be up to 255 characters. The format will be List Value (name)::API Name::List Description.
If you omit the API name, it will be automatically generated. The following examples are all valid entries:
January::::month 1
Red::RED33::color 33
Monday
|
Note: Do not use commas when adding values to a list. |
On separate lines, enter additional list items as needed. You can type names and descriptions of as many list items as you want, separating them with a carriage return. You can also paste list items into the dialog box from a text editor, such as Notepad or from a spreadsheet application, such as Excel.
|
Note: This dialog box is limited to 4000 bytes. The "carriage return" for each item uses 1 byte. If the average list item uses 20 bytes (including spaces and the carriage return), the list can contain approximately 200 items. Additional list items can be added by selecting New again. |
After you finish typing new list items, click OK. The list items are added to the list.
By default, the Active property of a list item is set to Yes. To make it inactive, double-click the row and choose No for the Active property.
This process of adding multiple list items at a time is called "batch add".
You can use a spreadsheet application, such as Excel, to organize the items you want to batch add to a list, and then use copy and paste to batch add the list items to a list. Each row of the spreadsheet must be in the format described in Step 6 above.
To batch add list items from a spreadsheet:
Enter the list items in the spreadsheet. Each row must follow the format in Step 6 above. The following example shows four different valid rows in a single spreadsheet. (Your spreadsheet will probably use the same format for each row.):
Select the cells in the spreadsheet and copy them (CTRL-C).
Place your cursor in the Add batch list values dialog and paste (CTRL-V):
Click OK.
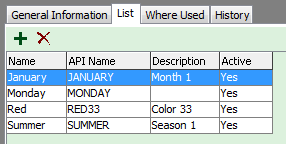
The list values are added to the list object:
There are three types of lists for users in Agile PLM.
Simple Lists
Cascade Lists
Dynamic Lists
While Simple and Cascade lists are maintained manually by editing the list entries, Dynamic lists rely on criteria for generating list entries. Agile PLM permits sorting of lists in Java Client based on Type (a new column on lists window).
Simple lists can be categorized into two types: SingleLists and MultiLists.
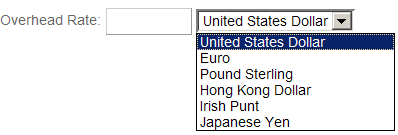
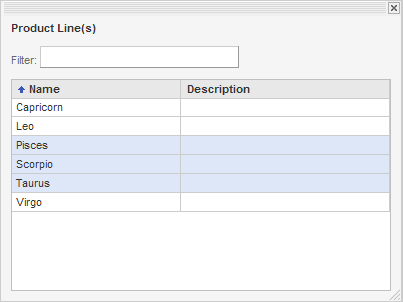
A SingleList attribute or cell presents a list from which only one value can be selected. The following figure shows the Overhead Rate field, a currency SingleList cell in Web Client.
A MultiList attribute or cell is a list from which multiple values can be selected. In Web Client, you can select values for a MultiList cell using the Multiple Value Selection window, shown in the following figure.
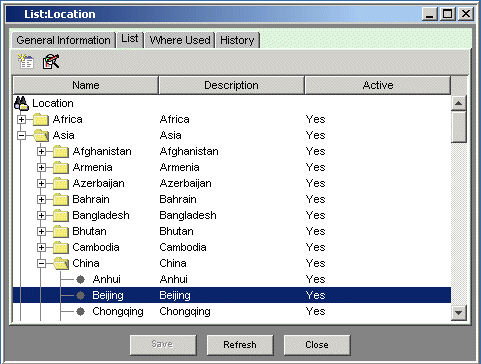
A list with multiple hierarchical levels is called a cascade list. A SingleList or MultiList attribute can be configured in Java Client to have multiple hierarchical levels. The following figure shows the setup window (in Java Client) for the Location list, a cascade list. The list has separate levels for continent, country, and city.
|
Note: The Location list is the only ready-to-use cascade list that ships with Agile PLM. However, you can define your own cascade lists. |
For more information about cascade lists, see "Creating Cascade Lists."
The Simple and Cascade lists are a static type of list that has an unchanging set of values. A Dynamic list contains a list of values that are updated at run time. Dynamic lists are based on a criteria that is available in Agile PLM. The Criteria field is only available for Dynamic lists.
To create a Dynamic list:
Under Data Settings, double-click Lists. The Lists window appears.
Click the New button. The Create List dialog box appears.
Fill in the Name, API Name and Description fields.
To enable the list, make sure the Enabled list is set to Yes.
In the List Type list, select Dynamic.
In the Criteria field, choose a criteria from the list and click OK.
Then click OK in the Create List dialog box.
The new List:<name> window appears.
The Type value of a list cannot be changed once created. There is a result set record limit applicable to searches that is also applicable to Dynamic lists. A pop-up search in Web Client on the list will yield the first 250 entries. These entries display as active links to the object with the Quick View available.
If a criteria associated to a list or another object is modified, Agile warns the user with a pop-up confirmation. If the criteria is saved ignoring the warning, the list entries that are on the list also change accordingly.
Reusing a criteria available in Agile PLM is inadvisable. Creating new criteria dedicated solely to the purpose of list creation is a recommended best practice to ensure the integrity of the list data. Developing and implementing a naming convention to distinguish the dynamic list criteria from others will help in the criteria selection process because you cannot create a criteria during the list creation process.
Changing a criteria associated with a list that is already in use will not lead to immediate data loss. The existing data is preserved provided that the attribute is not modified again. However, editing the object to modify another attribute erases the list selection. The data in the attribute is preserved until it is overwritten with new content. Therefore, it is possible to revert the criteria and the attribute data will appear automatically because the attribute data is preserved in the database until it is overwritten.
This section provides instructions for configuring drop-down lists in Java Client.
To modify a list:
Under Data Settings, double-click Lists. The Lists window appears.
If necessary, use the filter bar to display the list you want to modify.
Double-click a list to open it.
On the General Information tab, edit the Name or Description fields.
To disable the list, change the Enabled field to No.
|
Note: If the list is currently being used in the Agile PLM system, it cannot be disabled. |
To modify the list values (that is, the list entries), click the List tab. Add, delete, or modify values as necessary.
|
Note: If the list is currently being used in the Agile PLM system, its list entry values can be deleted, but there will be a warning message. It is recommended that you deactivate a list entry value so that it no longer appears in Agile PLM clients. |
Click Save to save your changes.
To delete a list:
Under Data Settings, double-click Lists. The Lists window appears.
If necessary, use the filter bar to display the list you want to delete.
Select a list.
Click the Delete button, and then click Yes to confirm.
|
Note: If the list is currently being used in the Agile PLM system, it cannot be deleted or disabled. |
To modify a list value (list entry):
Under Data Settings, double-click Lists. The Lists window appears.
If necessary, use the filter bar to display the list you want to modify.
Double-click a list to open it.
Click the List tab.
Double-click a list value to open it.
Fill in the Name and Description fields. They are both limited to 255 characters.
To deactivate the value, set the Active field to No.
|
Note: By making a list value inactive, you effectively hide it from Agile PLM clients. However, users can still search for inactive values. |
Click OK to save your changes.
To delete a list value (list entry):
Under Data Settings, double-click Lists. The Lists window appears.
If necessary, use the filter bar to display the list you want to modify.
Double-click a list to open it.
Click the List tab.
Select a list value.
Click the Delete button: you may see the Confirm Dialog with a warning (and the prompt "Do you want to continue to delete?"), click Yes to continue the delete.
You may see the Delete List Item dialog, which indicates the system's assessment that the list item (list entry) is in use, and that you must first remove all references to the list entry before trying again to delete it.
|
Note: If the list is currently being used in the Agile PLM system, its values cannot be deleted. However, you can deactivate a list value so that it no longer appears in Agile PLM clients. |
To change the list used by a List or MultiList attribute:
Under Data Settings, double-click Classes. The Classes window appears.
Open the class or subclass whose attributes you want to modify.
Click the User Interface Tabs tab.
Double-click a tab to open it.
Click the Attributes:<Table> tab.
Double-click the List or MultiList attribute you want to modify.
For the List property, select a list. You can also click New List to create a new list.
Click Save to save your changes.
|
Note: If any Agile PLM objects have the attribute set to use the currently selected list, you cannot select a different list. |
Once you have created the list for a List attribute, you can establish its default value if necessary. For more information, see "Setting Default Values." A default value is one that is selected automatically for a field when you create a new Agile PLM object. The default value for a List attribute must be one of the values in its associated list.
Only the administrator has the ability to set a multi-value default for a multilist attribute.
The Display Type setting available for Routing Manager Lists is also an available setting for Lists and Multilists for Web Client. In Java Client the administrator chooses whether the object list attribute is displayed as a List or Search format in Web Client. If the selection is List mode then the entries display in a drop-down list. If the selection is Search mode then the entries display in a search palette.
For list attributes that contain more than 250 entries, the Web Client automatically displays the entries in Search mode.
Failure mode is used by product service requests (PSRs) to indicate how the item failed when quality incidents are reported. The failure mode is a list of values that are specific to each item subclass. For instance, if a customer created a subclass of Items called Optics, then a Failure Mode list would be created for Optics that contains the types of defects specific to optical components. Failure mode lists have the following special characteristics:
When you create a new subclass of the Documents or Parts classes, the list library automatically creates a new Failure Mode list for that subclass.
If you change the subclass name after it has been created, the name of the related failure mode list is not updated. This list will be updated after refresh.
The Where Used tab of failure mode lists is disabled due to the special handling of failure modes in the Agile PLM system.
A failure mode list cannot be deleted unless its corresponding subclass has been deleted.
Because of their special characteristics, failure mode lists should not be used for other types of list attributes.
Cascade lists have multiple hierarchical levels, presenting several lists within lists.
Configuring cascade lists is very similar to configuring single-level lists. See "Configuring Lists," for more information about modifying lists. Cascade lists have the following additional restrictions:
Once you create a cascade list, you cannot change it to an ordinary list. After the list is saved, the List Type property is read-only.
Each folder within a cascade list must contain unique values. However, different folders within a cascade list can share the same values.
Cascade list values must be added one at a time. There is not a batch method for adding cascade list values.
A cascade list can have any number of levels. However, in practice you should try to limit a cascade list to no more than four levels.
Ability to choose a branch value of a cascade list; both the nodes and the final list values.
To create a new cascade list:
Under Data Settings, double-click Lists. The Lists window appears.
Click the New button. The Create List dialog box appears.
Fill in the Name, API Name and Description fields.
To enable the list, make sure the Enabled list is set to Yes.
In the List Type list, select Cascade.
Click OK. The new List:<name> window appears.
To add values to the list, click the List tab.
Click the New button. A dialog box appears.
Type in the list item name, the API name, and then type a description of the list item.
Click Add to add the value and close the dialog box. To save the value and add other values to the same level, click Add Another.
|
Note: List values are always added to the level below the currently selected value in the cascade list. |
To add more values, repeat steps 8 through 10.