| Agile Product Lifecycle Management Administrator Guide Release 9.3.3 E39286-04 |
|

 Previous |
 Next |
| Agile Product Lifecycle Management Administrator Guide Release 9.3.3 E39286-04 |
|
Previous |
Next |
This chapter describes the predefined business classes delivered with Agile PLM, and how to create subclasses, assign autonumber sources, and tailor the arrangement of tabbed windows and formatted fields for your product data.
The Classes node provides a framework for classifying objects in Agile PLM. Everything that an Agile PLM user creates is an object. As administrator, you can define new types of business objects, or modify the default classes and subclasses.
The default classes that are available in Agile PLM depend on which licenses your company purchased. Unavailable classes appear in red type on the Classes page.
Each class represents a kind of action (business process) or kind of entity (business object). Every class has at least one default subclass. Every object created in Agile PLM is an instance of a subclass.
Before you start configuring Agile PLM, you should consider what types of business objects your company requires. You can then tailor Agile PLM to your requirements. For example, you might want to create several new subclasses in the Parts class to organize the kinds of parts that your company manufactures or purchases.
The Agile PLM object framework is preconfigured to be ready-to-use, or you can tailor it as follows:
Create additional subclasses
Modify classes and subclasses as needed
Create new attributes for classes (Page Two) and subclasses (Page Three) as needed
Modify the properties of attributes
Display or hide attributes or tabs
Reorder table columns or fields
Agile PLM classes have the following three levels:
Base Class – The highest level object. Base class is the parent object of classes. You cannot create or delete base classes, but you can rename them. Examples of provided base classes are Users, Items, and Changes.
Class – The primary level of organization in Agile PLM. Also called main class. Inherits the general properties and process extensions of its base class. Classes are the organizing framework for the creation of subclasses. You cannot create or delete classes, but you can rename or disable them. Examples of provided classes are Parts, Change Orders, and Change Requests classes.
Subclass – Inherits all properties and attributes of its parent class. Subclasses arrange the information and data that describes a specific business object in Agile PLM. You can rename subclasses. You can also create a subclass in any class except Users, Automated Transfer Orders, Requests For Quote, RFQ Responses, and Standard Reports. You can delete or disable any subclass except those descended from Items, Changes, and File Folders base classes. Examples of provided subclasses are User, Part, Document, ECO, and ECR.
|
Important: Before renaming any classes, particularly the base classes, make sure you become familiar with the default classes provided with Agile PLM. Class names must be unique. |
Each class represents a specific process or kind of entity:
Routable objects are created from classes that represent processes, such as a change in the change control process, or a transfer order, or a product service request. These objects can be routed to Agile PLM users for approval or other input through workflows (see "Workflows").
Nonroutable objects are created from classes that represent entities or things, such as parts, sites, RFQs, users, prices, or reports. These objects can be "flagged" for progress by using lifecycle phases, see "Customizing Lifecycle Phases." The nonroutable objects—especially parts and documents—can be changed by the process of information-gathering through workflows, which are created through such routable objects as change orders or change requests.
|
Note: The File Folders class has a default, non-editable workflow with a single Review status and no other statuses. This provides file folder objects with a Routing Slip tab, which permits approvers to sign off and comment on a file folder. However, file folder objects also have lifecycle phases and are considered nonroutable. |
In PLM, Object Types are each and every one of the rows in the Classes node. Object types are organized by the hierarchy of Base Class (a kind of template), Class (more detailed, generally specific to a PLM solution), and Subclass (most specific organizing group).
So, for example, let ECO987 be an individual business object: it is a single instance of the object type ECO (a subclass), which is derived from the object type Change Orders (a class), which in turn is derived from the object type Changes (a base class).
Therefore, each new subclass that you create is also an object type. So, Items, Parts, and Part are each an object type, and if you add subclasses called Capacitor and Resistor, each of these are also object types.
"Object Type" is a significant field in such areas of PLM administration as Criteria, Privileges, Notifications, and Event Management. For these and many other functions, it is a crucial element to inform the PLM system precisely what kind of object is to be accessed and subject to user actions.
To view an Agile PLM class or subclass:
On the Admin tab, under Data Settings, double-click Classes. The Classes window appears.
Double-click the class or subclass you want to view.
Now click the User Interface Tabs tab. Double-click any row to display that tab's information:
The General Information tab displays the name and description of the UI tab and whether it is visible.
Once you have opened one tab, a drop-down list permits you to switch to any of the other tabs for that object.
Your company may be licensed to a subset of the list of object types in Classes node.
Routable objects direct or recommend changes to nonroutable objects. These classes have a default workflow for changes to seek approval from other users. Objects from these classes can be changed without approval.
Nonroutable Objects are not routed to Agile PLM users with workflows; objects from some of these classes, however, are changed by a user submitting a workflow (from routable classes) for approval from other users. For information about installed nonroutable objects, see "Agile PLM's Installed Nonroutable Object Types."
The following tables list all the possible installed routable object types in Agile PLM.
Routable object base classes are:
Changes
Declarations
Packages
Product Service Requests
Projects
Quality Change Requests
Transfer Orders
Table 5-1 Changes base class routable objects
| Class | Subclass | Description |
|---|---|---|
|
Change Orders |
ECO |
Directives to change an item; can advance the revision ("rev") of an item |
|
Change Requests |
ECR |
Requests for a change to an item |
|
Deviations |
Deviation |
Directives to temporarily substitute one item for another |
|
Manufacturer Orders |
MCO |
Changes to AML data, such as information about manufacturers or manufacturer part numbers |
|
Price Change Orders |
PCO |
Directives to change a published price; can advance the revision of a published price |
|
Site Change Orders |
SCO |
Changes to BOM and AML information for a specific site |
|
Stop Ships |
Stop Ship |
Directives to stop shipping/using an item |
Table 5-2 Declaration base class routable objects
| Class | Subclass | Description |
|---|---|---|
|
Substance Declarations |
Substance Declaration |
Seeks compliance information for each substance within the specification |
|
Part Declarations |
Part Declaration |
Seeks part-level compliance information and other composition header-level information (manufacturing parameters) |
|
JGPSSI Declarations |
JGPSSI Declaration |
Seeks compliance information (weights) according to the JGP standard. |
|
Homogeneous Material Declarations |
Homogeneous Material Declaration |
Seeks complete breakdown of parts on the Bill Of Substances and compliance information at the homogeneous material level |
|
Supplier Declarations of Conformance |
Supplier Declaration of Conformance |
Seeks compliance with specifications from customers and government agencies |
|
IPC 1752-1 Declarations |
IPC 1752-1 Declaration |
A Joint Industry Guide (JIG) material composition declaration for electronic products |
|
IPC 1752-2 Declarations |
IPC 1752-2 Declaration |
A homogeneous material composition declaration for electronic products |
Table 5-3 Packages base class routable objects
| Class | Subclass | Description |
|---|---|---|
|
packages |
Package |
Packages of data to share with partners |
Table 5-4 Product Service Requests base class routable objects
| Class | Subclass | Description |
|---|---|---|
|
Problem Reports |
Problem Report |
Quality incidents with items or products |
|
Non-Conformance Reports |
NCR |
Quality conformance issues with items or products |
Table 5-5 Projects base class routable objects
| Class | Subclass | Description |
|---|---|---|
|
Activities |
Phase; Program; Project; Task |
Components of project planning in Product Portfolio Management; activities are time-based objects to which resources can be assigned |
|
Gates |
DG1, DG2, DG3, DG4, DG5, DG6; Gate; Milestone |
Project management milestones in Product Portfolio Management; gates identify cross-PLM deliverables of the product development process to enable executive reviews of projects |
Your company may be licensed to a subset of the list of object types in Classes node.
Nonroutable Objects are not routed to Agile PLM users with workflows; objects from some of these classes, however, are changed by a user submitting a workflow (from routable classes) for approval from other users.
Routable objects direct or recommend changes to nonroutable objects. These classes have a default workflow for changes to seek approval from other users. Objects from these classes can be changed without approval. For information about installed routable objects, see "Agile PLM's Installed Routable Object Types."
The following tables list all the possible installed nonroutable object types in Agile PLM.
Nonroutable object base classes are:
Customers
Discussions
File Folders
Items
Manufacturers
Manufacturers Parts
Part Groups
Prices
Reports
Requests for Quote
RFQ Responses
Sites
Sourcing Projects
Specifications
Substances
Suppliers
Users
User Groups
Table 5-8 Customers base class nonroutable objects
| Class | Subclass | Description |
|---|---|---|
|
customers |
Customer |
Clients of the company |
Table 5-9 Discussions base class nonroutable objects
| Class | Subclass | Description |
|---|---|---|
|
discussions |
Discussion |
Informal, threaded dialogue |
Table 5-10 File Folders base class nonroutable objects
| Class | Subclass | Description |
|---|---|---|
|
File folders |
File Folder Markup |
Objects that include files or URLs; this class includes all file folder objects except historical report file folders |
|
Designs |
Design |
Objects that permit building design structures in the CAD environment |
Table 5-11 Items base class nonroutable objects
| Class | Subclass | Description |
|---|---|---|
|
Documents |
Document |
Specifications, blueprints, manufacturing data, and so forth |
|
Parts |
Materials Subclass Model Option Class Part Recipe |
Parts manufactured within the company, or provided by manufacturers or suppliers and given internal part numbers
|
Table 5-12 Manufacturers base class nonroutable objects
| Class | Subclass | Description |
|---|---|---|
|
manufacturers |
Manufacturer |
Qualified manufacturers |
Table 5-13 Manufacturer Parts base class nonroutable objects
| Class | Subclass | Description |
|---|---|---|
|
Manufacturer parts |
Manufacturer Part |
Parts provided by manufacturers |
Table 5-14 Part Groups base class nonroutable objects
| Class | Subclass | Description |
|---|---|---|
|
Part groups |
Commodity Part Family Item Group |
Containers of other parts (items or manufacturer parts) that share such properties as mass or composition information.
|
Table 5-15 Prices base class nonroutble objects
| Class | Subclass | Description |
|---|---|---|
|
Quote Histories |
Quote History |
Organizes bid prices from RFQ responses; cannot be revised by a PCO (see grouping of Changes in preceding table) |
|
Published Prices |
Published Price; Contract |
Organizes prices of the company's products; can be revised by a PCO (see grouping of Changes in preceding table) |
Table 5-16 Reports base class nonroutable objects
| Class | Subclass | Description |
|---|---|---|
|
Standard Reports |
Administrator Report; Standard Report |
The ready-to-use reports for administrators (Administrator Reports) and users (Standard Reports include Products, Sourcing, Quality, Process, Personal, and Global reports) |
|
Custom Reports |
Custom Report |
Reports created and used within company |
|
External Reports |
External Report |
Reports created outside Agile PLM |
Table 5-17 Request For Quote base class nonroutable objects
| Class | Subclass | Description |
|---|---|---|
|
Requests for quote |
RFQ |
Requests for quote, which are assembled from sourcing projects and sent to suppliers for formal bids |
Table 5-18 RFQ Responses base class nonroutable objects
| Class | Subclass | Description |
|---|---|---|
|
RFQ responses |
RFQ Response |
Bids, that is, responses from suppliers to your company's RFQs |
Table 5-19 Sites base class nonroutable objects
| Class | Subclass | Description |
|---|---|---|
|
Sites |
Site |
Manufacturing locations within the company, or closely partnered with the company |
Table 5-20 Sourcing Projects base class nonroutable objects
| Class | Subclass | Description |
|---|---|---|
|
Sourcing projects |
Sourcing Project |
Work preparatory to creating RFQs and capability for analysis across multiple RFQs |
Table 5-21 Specifications base class nonroutable objects
| Class | Subclass | Description |
|---|---|---|
|
Specifications |
Specification |
Lists of banned substances (or substances of concern) and their threshold values |
Table 5-22 Substances base class nonroutable objects
| Class | Subclass | Description |
|---|---|---|
|
Substances |
Substance |
A single chemical element used in composition of items, manufacturer parts, and part families |
|
Materials |
Material |
A compound chemical, a substance consisting of multiple substances |
|
Subparts |
Subpart |
A subunit of a component, used to get to the homogeneous material level to collect compliance information |
|
Substance Groups |
Substance Group |
A group of multiple substances, with a base substance that is what legislation is interested in, for example, "Lead and Lead Compounds" |
Table 5-23 Suppliers base class nonroutable objects
| Class | Subclass | Description |
|---|---|---|
|
Suppliers |
Broker Component Mfr Contract Mfr Distributor Mfr. Representative |
Qualified suppliers of manufacturer parts; used by PCM (which uses the ready-to-use subclasses) and PG&C solutions |
Table 5-24 Users base class nonroutable objects
| Class | Subclass | Description |
|---|---|---|
|
Users |
User |
Individuals using the Agile PLM system |
Table 5-25 User Groups base class nonroutable objects
| Class | Subclass | Description |
|---|---|---|
|
User groups |
User Group |
Groups of people using the Agile PLM system, e.g., departments, teams, site-specific groups. |
|
Functional Teams |
Functional Team |
Groups of people that comprise a functional team; each member is assigned a workplace job function. |
When a base class is disabled, the child classes and subclasses are automatically disabled. When a class is disabled, the child subclasses are disabled. When a base class, class, or subclass is disabled, it is "grayed out" in the user interface for Java Client or Web Client. Examples of where the disabled class would be unavailable are the Create menu and search options. Existing searches and criteria are not deleted or modified if a class is disabled; existing objects of disabled object types remain in the Agile PLM database.
|
Note: Item, Change, User, and File Folder base classes cannot be disabled, nor can their child classes or ready-to-use subclasses. |
Lifecycle phases describe the valid phases for classes whose objects are nonroutable, that is, they do not follow workflows. Items, sites, manufacturers, manufacturer parts, prices, sourcing projects, RFQs, RFQ responses, suppliers, customers, prices, commodities, specifications, substances, and file folders all have lifecycle phases.
Lifecycle phases at the base class level are inherited by classes and subclasses. The lifecycle stamp is automatically created for you using the name and color you specified for each lifecycle phase. The user can set a default value for the Lifecycle phase list only if it is required by the administrator for manufacturer parts, manufacturers, commodities, specifications or substance classes.
You can modify lifecycle phases for the following base classes:
Commodities
Customers
File Folders
Items
Manufacturer Parts
Manufacturers
Prices
Specifications
Substances
Suppliers
|
Note: You cannot delete or rename the Preliminary lifecycle phase for items. Objects in the Sites, Sourcing Projects, Requests for Quote, and RFQ Responses classes have read-only lifecycle phases that cannot be renamed or deleted. |
To modify lifecycle phase settings:
Select the base class you want to work with, and select the Lifecycle Phases tab. The Lifecycle Phases window appears.
Double-click the lifecycle phase you want to modify.
In any editable field, enter a new value or select from the drop-down list.
When you have finished, click Save.
You can add lifecycle phases to base classes, classes, or subclasses.
To add a lifecycle phase:
Select the class you want to work with, and select the Lifecycle Phases tab. The Lifecycle Phases window appears.
Click the New button. The Define Lifecycle Phase dialog box appears.
Enter a name, API name and description for the lifecycle phase. The name can be up to 29 characters.
In the Enable field, select Yes or No from the drop-down list.
For items, there is an additional field, Add LifeCyclePhase On Bom Rule. Select Allow, Disallow, or Warning (the default).
If you select Disallow, users will be prevented from adding items currently in this lifecycle phase to an item's BOM table.
When you are done, click OK.
To select a different color for the lifecycle phase:
Modify the lifecycle phase on the appropriate lifecycle phases tab.
Select the class you want to work with, and select the Lifecycle Phases tab. The Lifecycle Phases window appears.
Double-click the lifecycle phase you want to modify. The Define Lifecycle Phase dialog box appears.
Select the color you want from the Status Stamp Color drop-down list.
When you are done, click OK.
You can remove a lifecycle phase only from the level in which it was created. When you remove a lifecycle phase from a class, it is also removed from all subclasses that inherit from the class. For example, if you create a new lifecycle phase in the Items base class, you can open the Items base class later to remove it. The lifecycle phase is also removed from the Parts and Documents classes, and the Part and Document subclasses.
|
Note: You cannot delete the Preliminary lifecycle phase for items. |
To remove a lifecycle phase:
Select the class you want to work with, and select the Lifecycle Phases tab. The Lifecycle Phases window appears.
Select the lifecycle phase you want to delete.
Click the Delete button.
Click OK in the confirmation message to delete the lifecycle phase.
The lifecycle phase is deleted and is no longer available as a selection in Agile PLM.
If you delete a lifecycle phase that has already been used to release an item in Agile PLM, it still indicates that phase, but users cannot assign that phase in the future.
When users create an object in Agile PLM, they first specify its subclass, such as ECO, Part, Capacitor, and so on. These subclasses are created and defined in the Classes node. The defined Agile PLM classes are each equipped with at least one subclass. You can create more subclasses in any class. For example, the Parts class can have subclasses called Capacitors, Resistors, Diodes, and so on.
You can decide to use just the default subclasses, define new subclasses, or rename subclasses.
You can delete a subclass if it has not been used to create any of these objects from the administrative nodes:
Search criteria
An object in Java Client or Web Client
A privilege mask
You cannot create new subclasses for the following classes:
Users class
Automated Transfer Orders class
Requests For Quote class
RFQ Responses class
Standard Reports class
|
Note: Setting up new subclasses in Agile PLM requires a lot of planning. If you set up new subclasses without an overall plan, you may find in a few weeks that you want to "start over," however, now new subclasses are in use and will not be easy to remove from the system. It is better to become proficient with Agile PLM objects using the ready-to-use classes and subclasses while you develop an overall plan that covers your company's needs. |
Consider the following details before creating a new subclass:
For which Agile PLM class will you create a subclass?
What name will you give the new subclass? Remember that a subclass name must be unique, and cannot be used more than once in the same Agile PLM system.
Do you need to track product data specific to this subclass? If so, you may also want to set up a Page Three tab for this subclass.
If you plan to create a Page Three for the new subclass, you will need to adjust some users' roles and privileges to allow Page Three modification.
For new subclasses that have autonumbering, you should consider the following:
Will you permit users to assign numbers manually for the new subclass?
Will you be creating new autonumber sources for the subclass, or will you use existing autonumber sources?
If you plan to use existing autonumber sources, which ones?
You can see how a subclass is configured by viewing its properties. For example, to see what number sources are assigned to a Change Orders subclass, you can view the subclass properties in Administrator.
To view the properties of a subclass:
Under Data Settings, double-click Classes. The Classes window appears.
Double-click the name of the subclass you want to view.
The properties of the subclass are listed on the General Info tab.
Subclasses that can be autonumbered have an AutoNumber Source property. Since subclasses in the Manufacturers, Manufacturer Parts, and Sites classes do not use autonumbering, they do not have an AutoNumber Source property.
The Agile PLM administrator can change the AutoNumber Source property for a subclass to do the following:
Require automatic number assignment for the subclass, so that manual number assignment is prevented.
Assign one or more different autonumber sources for the subclass.
Remove autonumber source assignments from the subclass.
To change the autonumber sources used for a subclass:
Under Data Settings, double-click Classes. The Classes window appears.
Double-click the name of the subclass you want. The subclass properties window appears.
Click the icon next to the AutoNumber Source field. The List Chooser dialog box appears.
To move a number source from the Choices list to the Selected list, select it, and click the right arrow. You can also move the number source by double-clicking it.
You can select more than one number source.
Click OK to close the dialog box.
To create a new autonumber—more customized than those offered by the automatic sequencing of autonumbers—click the New AutoNumber button and follow the instructions in the dialog box. For more information, see "Creating a New AutoNumber Source."
To prevent users from entering an object number manually, select No in the Autonumber Required drop-down list. For more information, see the next section.
Select Yes or No in the AutoGenerate drop-down list.
Click Save.
If you decide to require autonumbering for a specific subclass, you can prevent users from entering numbers manually. You can require autonumbering for any subclass that can be autonumbered.
|
Note: Several Agile PLM subclasses, such as Manufacturer and User, do not allow autonumbering. |
To prevent manual number assignment for a specific subclass:
Under Data Settings, double-click Classes. The Classes window appears.
Double-click the name of the subclass you want. The subclass properties window appears.
In the Autonumber Required drop-down list, select Yes.
Click Save.
You can change the name of any subclass. If you change the name of a subclass that has already been used to create objects in Agile PLM clients, the subclass name for the existing objects is changed to reflect the new name. You can also enter a different description for the subclass; a description is optional.
|
Caution: Although all characters are supported within Agile PLM, and should not create issues within Agile's clients, it is recommended that you avoid using the following characters when renaming or creating subclasses, due to issues that could potentially arise in integrations or custom applications written on the SDK., comma . period (dot) : colon ; semicolon = equal sign |
To change the name of a subclass:
Under Data Settings, double-click Classes. The Classes window appears.
Double-click the name of the subclass you want. The subclass properties window appears.
Enter a new name and description in the Name and Description fields.
Click Save.
The subclass name is changed for all objects in the subclass. The new name appears as a selection in the Type drop-down list in the New Object dialog box in Java Client, and the new name appears as a selection in the Type drop-down list in the Create New Change Order window in Web Client.
On the subclass properties window, there is a property called Site-Specific BOM. The value for the property is either Allow or Disallow.
Allow – The subclass may be added to a site-specific portion of a BOM.
Disallow –The subclass may not be added to a site-specific portion of a BOM.
This property determines whether a Parts or Documents subclass may be part of a site-specific BOM.
For example, let the Manufacturing Item subclass have the Site-Specific BOM property set to Allow, and subclass Part have it set to Disallow. A user at the Singapore site can add any manufacturing item to the site-specific section of the BOM for Singapore, but not add a part to the site-specific section of the BOM for Singapore. A Global user can add either a manufacturing item or a part to the Global section of the BOM.
The default value for all newly created Parts and Documents subclasses is Allow.
To change the Site-Specific BOM property of a subclass:
Under Data Settings, double-click Classes. The Classes window appears.
Double-click the name of the subclass you want. The subclass properties window appears.
In the Site-Specific BOM field, select Allow or Disallow. Click Save.
This is the procedure for creating a new subclass. Review the points in "Before You Begin." Remember you can keep a subclass disabled while you run some tests before releasing it to your users.
To create a new subclass:
Under Data Settings, double-click Classes. The Classes window appears.
Click the New Subclass button. The New Subclass dialog box appears.
Select a class from the drop-down list.
Fill in the Name, API Name and Description fields, and select Yes or No in the Enabled list. You must use a unique subclass name.
Click the icon next to the AutoNumber Source field. The selection dialog box appears.
To move a number source from the Choices list to the Selected list, select it, and click the right arrow. You can also move the number source by double-clicking it.
You can select more than one number source.
Click OK to close the dialog box.
To create a new autonumber—more customized than those offered by the automatic sequencing of autonumbers—click the New AutoNumber button and follow the instructions in the dialog box. (This task is explained in "Creating a New AutoNumber Source.")
To prevent users from entering an object number manually, select No in the Autonumber Required drop-down list. (For more information, see "Preventing Manual Number Assignment.")
Select Yes or No in the AutoGenerate drop-down list.
If you selected the Parts or Documents class in step 3 above, set Site-specific BOM to Allow or Disallow. (For more information, see "Changing the Site-Specific BOM Property.")
When you have specified all the settings, click OK.
The new subclass appears under the class name in the Classes window.
|
Note: Number sources are created and configured in the AutoNumbers node. For instructions, see "About AutoNumber Sources." |
You can delete any subclass that has not been used to create a saved search, an object, or reusable criteria.
|
Note: If you attempt to delete a subclass that has already been used to create a search, an object, or a reusable criteria, an error message states that the object is already in use. |
To delete a subclass:
Under Data Settings, double-click Classes. The Classes window appears.
Double-click the subclass you want to delete. The subclass properties window appears.
Click the Delete button.
In the confirmation dialog box, click OK.
The subclass no longer appears under the class name on the Classes window.
When users open an object in Agile PLM clients, they see a tabbed page, or window of tabs. From the Classes node, you can enable (make visible) or disable (hide) most object tabs. You can also rename any object tab. You configure optional Page Two and Page Three tabs by enabling the tabs to make them visible.
Although you can hide most object tabs, you cannot disable or hide the following tabs:
The first tab of any object, specifically:
Cover Page tab of any change, package, PSR, QCR, transfer order, or project
General Info tab of any manufacturer, manufacturer part, user, user group, site, customer, discussion, price, or report
Title Block of any item or file folder
Affected Items tab of any change and the Affected Prices tab of PCOs
Action Items tab of discussions
Selected Content tab and Where Sent tab of any transfer order – in fact, no tab of ATOs can be disabled or hidden
Files tab of file folders (not historical report file folders)
Response List tab of RFQs and RFQ responses
Replies tab of discussions
Team tab and Workflows tab of projects
To configure the attributes that appear on a tab, you must go to the setup window for that tab. See "Defining Attributes."
If you need to document additional information for change orders, for example, you can enable an extra tab called a Page Two tab by default. This tab then appears next to the Cover Page tab for all subclasses in the Change Orders class. You can use the default name Page Two for this tab, or you can give it a more specific name.
|
Note: In Web Client, Page Two attributes are displayed on the Cover Page tab, under the heading Page Two (any custom tab name is not displayed). The user can scroll down to see the additional "Page Two" information. |
If you need to record additional information that is specific to a subclass, you can enable an extra tab called a Page Three tab by default. For example, you can set up a Page Three tab for the subclass Capacitors and create a field called Insulation (or multiple fields as needed), where users record information about insulation for each capacitor object created. You can use the default name Page Three, or you can give the tab a more specific name.
|
Note: In Web Client, Page Three attributes are displayed on the Cover Page tab, below the Page Two attributes, under the heading Page Three (any custom tab name is not displayed). The user can scroll down to see the additional "Page Three" information. |
You can customize the Agile PLM client user interface by showing, hiding, or renaming the tabs in classes.
|
Note: If you hide the BOM tab or the Manufacturers tab, the buttons under the Redline BOM and the Redline Manufacturer tabs are disabled. |
The name and visibility of any tab depends on the settings at the subclass level. For example, in the Change Orders class, if you set Page Two tab to Name = P2, Visible = No, and in ECO subclass, if you set Page Two tab to Name = P2 of ECO, Visible = Yes, then in Java Client or Web Client, the Page Two tab will be visible and appear as P2 of ECO.
|
Note: If you hide a Page Two or Page Three tab, any attributes configured for the tab are still visible as search selections in Java Client or Web Client unless you also hide them. See "Removing a Page Two or Page Three Tab." |
To show, hide, or rename a tab:
In the Classes window, locate the tab you want and double-click it to display the setup window for that tab.
For example, click Change Orders Class, display the User Interface Tabs tab, then double-click Workflow to display the setup window for the change order Workflow tab.
If you want, on the General Information setup tab, enter a new name for the tab.
The tab, with its new name, appears in Java Client. In Web Client, the tab data appears on the first object tab, for example, the Cover Page tab.
|
Note: When you change the name of Page Three tabs for Content Transfer Order (CTO) subclasses, the modified Page Three tab name does not appear in the Content Service filters. The name Page Three always appears in the filters. |
In the Visible drop-down list, select Yes to make the tab visible in Agile PLM clients.
When you have finished your modifications, click Save.
Each object tab uses one of two different formats to display data in Agile PLM clients:
Form format – Attributes appear on the tab in rows and columns, according to the attribute order, lowest number first, left to right, then top to bottom. Each attribute field is labeled. Web Client has two columns. In Java Client, the number of columns varies depending on the size of the object window.
Table format – Attributes appear on the tab in a table. The attribute names appear as column headings in the table.
You can modify the order in which object attributes appear on object tabs in both forms and tables.
In Web Client, on a form type tab, the attributes appear in one column when the server preference Multicolumn Display is set to One Column. (For information about two-column display, see "Multi-Column Layout on a Web Client Form Tab.")You can determine the order in which they appear. Starting with the lowest numbered attribute, the attributes appear from top to bottom. Attributes with Input Width property set to Long span the width of the tab. Header attributes, which appear on Page Two and Page Three tabs only, also span the width of the tab. The following figure shows an example of how attributes appear on a form tab in Web Client.
In Java Client, attributes appear on the tab in rows and columns, according to the attribute order, lowest number first, left to right, then top to bottom. The number of columns changes as the user resizes the object window. No matter how many columns are in an object window, the attributes are always displayed by attribute order. Header attributes (Page Two and Page Three) span the width of the object window.
To modify the order of attributes on a form tab:
On the User Interface Tabs tab of the setup window for the class, locate the tab you want, and Double-click it to display the setup window for that tab.
For example, Double-click Change Orders, then Double-click Cover Page to display the setup window for the change order Cover Page tab.
Click the Attributes tab.
Click the Order visible attributes button. The Define Attribute Order dialog box appears. All the object tab attributes with Visible property set to Yes appear in the list of attributes.
Click an attribute name to highlight it.
Click the up arrow to move the highlighted attribute up one position in the list. Click the down arrow to move the highlighted attribute down one position in the list.
Continue highlighting attributes and moving them up or down in the list until they are in the order you want.
When you are finished, click Save.
The attributes appear on the Attributes setup tab in the order you specified.
To verify that the order was changed, open an object in Java Client or Web Client where the tab appears. Click the tab to view the form or table and confirm the change.
|
Note: Java Client form tabs are always displayed in a single column as described in "Modifying Attribute Order on a Form Tab, Single Column." The server preference setting Multicolumn Display = Two Columns controls the form tab display in Web Client only. |
The way attributes appear on Web Client form tabs when Multicolumn Display is set to Two Columns is determined by the combination of:
The Input Width setting of each attribute (Short, Medium, Long).
The attribute order settings for the form tab (lowest number first, from left to right, then top to bottom).
The height of any multitext attributes.
The presence of a thumbnail on the first object tab.
After you have configured a two-column form tab, log in to Web Client and view the tab to test and confirm that the appearance is acceptable to you. Click the Edit button on the tab and view the tab in edit mode, also. You can modify the attribute order and modify the attribute Input Width settings to adjust and refine the appearance of the form tab.
The Input Width of an attribute determines whether it can be displayed on the same row with another attribute. A row can be any of the following combinations:
Short, Short
Short, Medium
Medium, Short
Medium, Medium
Long
Short and Medium attributes are displayed across the width of one column. Long attributes and Headings are displayed across the width of the tab.
Table 5-26 Attribute Input Width Settings
| Attribute Type | Input Width property setting options |
|---|---|
|
MultiList |
Short Medium Long |
|
List |
Short Medium Long |
|
Text |
Short Medium Long |
|
MultiText |
Medium Long |
|
Date |
Short Medium Long |
|
Numeric |
Short Medium Long |
You cannot modify the Input Width of the following form tab attributes, however, each attribute type uses a consistent display method on the form tab.
To modify the form tab attribute order, follow the instructions in "Modifying Attribute Order on a Form Tab, Single Column."
Starting with the lowest number, the attributes display from left to right, then top to bottom. Short and Medium attributes can appear on the same row. Long attributes appear on one row.
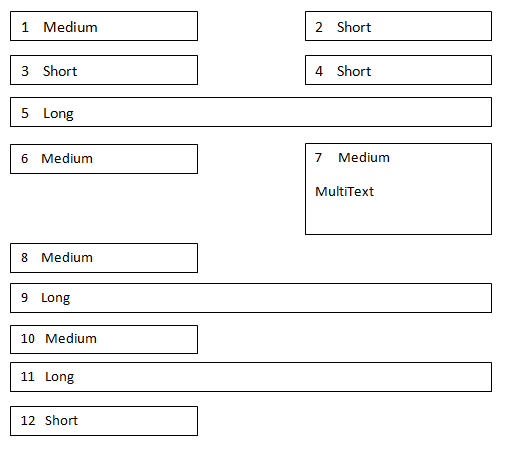
The following diagram illustrates how the attributes are displayed on the Web Client form tab. Note that MultiText attribute (order number 7) is taller than other attributes, but it is aligned at the top of the row with attribute number 6. Attribute number 8 appears on a row below MultiText attribute 7.
Also note that long attributes 9 and 11 have been placed in order between medium and small attributes in such a way that the second column is empty in the rows before and after attributes 9 and 11. When you have configured a form tab, it is important to log in to Web Client and view the tab to check for empty spaces in the second column. You can modify the form tab attribute order to eliminate those spaces.
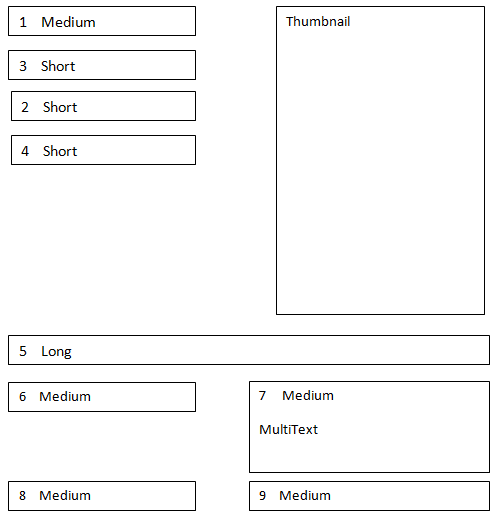
When a thumbnail appears on a form tab, the attributes appear in order from the lowest order in a single column on the left of the thumbnail. Only short and medium attributes can be displayed in the column to the left of the thumbnail.
When the left column has is filled to below the bottom of the thumbnail, then the attributes will wrap the left column to the right column.
If a long attribute falls into the column to the left of the thumbnail, that long attribute is displayed below the thumbnail and all the attributes following that long attribute are displayed below. If there is additional space in the column to the left of the thumbnail before the long attribute is displayed, then the remainder of that column space is blank.
In both Web and Java Clients, on a table-type tab, the attributes appear in a table; the attribute names are table headings for each column. You modify the order of attributes on a table tab the same way you do on a form tab. See "Modifying Attribute Order on a Form Tab, Single Column."
You can create extra tabs for Java Client. When enabled, these tabs are always displayed behind the first or second tab, and are named Page Two or Page Three by default. You can change these tab names to something more specific if necessary.
|
Note: In Web Client, Page Two and Page Three information is displayed below the Cover Page information on the Cover Page tab. Users scroll down to see this information. |
While Page Two tabs record supplemental information for an entire class of objects, such as the Change Orders class, Page Three tabs record information specific to individual subclasses, such as ECOs or Capacitors.
The Page Two tab's built-in Create User feature is described next.
Each Page Two tab has a Create User attribute that permits users with a Create privilege, but not a Read privilege, to create an object. Users with their name in the Create User list can then also open and read any pending or preliminary objects they have created.
To activate the Create User feature for a class of objects, such as Change Orders, you must first make the Create User attribute visible on the Page Two tab for that class. Then the attribute can be used both to display the name of the Create User on the tab, and to create criteria in the Criteria node.
For example, if you set the subclass criteria for a read privilege to Create User Equal To $USER, then the privilege mask will be enabled when the current user is also the user who created the object. For more information about Create User criteria, see "Applying Create User Criteria."
There are two stages for designing a Page Two or Page Three tab. This section outlines the process for these two stages, and then gives you detailed instructions for each step in the process.
The following is a summary of the two stages in designing a Page Two or Page Three tab.
Stage I: Preparing Page Two or Page Three Attributes
Make the tab visible and name the tab.
Make the attributes visible, and name them.
Assign length properties to text attributes.
Assign other attribute properties, such as drop-down lists or defaults.
Stage II: Setting Up the Tab
Set the attribute order.
The following sections provide detailed instructions for creating a Page Two or Page Three tab.
The first stage in designing a Page Two or Page Three tab is to:
Make the tab visible and name the tab. This work is done from the Page Two or Page Three General Information setup tab. For instructions, see "Showing, Hiding, or Renaming a Tab."
Select the attributes that you want to appear on the tab, make them visible, and give them names that describe the fields and their use. This work is done from Page Two or Page Three Attributes setup tab.
|
Note: Attribute names are the criteria for Java Client or Web Client searches. By making attribute names both specific and unique, you increase the efficiency of Agile PLM client searches. If you modify the name of an attribute once a system is in production, you may affect existing searches. |
Consider the following details before designing a new tab.
Do you want to create an extra tab for an entire Agile PLM class (Page Two), or a tab that's specific to a particular subclass (Page Three)?
If you are creating a Page Three tab, remember that you also need to create privilege masks that enable users to modify attributes for the specific subclass.
Do you plan to use Agile ChangeCAST to transfer information to an ERP system? If so, the information must be on a Page Two tab. Page Three data cannot be transferred using ChangeCAST.
What do you want to name the tab?
Which attributes will appear on the tab?
What are the properties for each attribute, including name, drop-down list values, default values, the format for text fields, and so on. See "Defining Attribute Properties."Where will each field be placed (located under a heading) on the tab in Web Client?
What are the length requirements (in characters) for each text field?
What will the tab order be, that is, the sequence in which fields are activated when a user presses the Tab key? (This is determined by the attribute order.)
For more information about attributes, see "Recognizing Attribute Types."
To make the tab visible, and configure the attributes you want to use:
Make the tab visible and name the tab. For instructions, see "Showing or Hiding an Attribute on a Tab."
Locate the attributes you want, and double-click them to open the setup window.
For detailed instructions, see "Modifying Attributes." For Page Two tab attributes, double-click the class, for example, Change Orders. For Page Three tab attributes, double-click the subclass, for example, ECO.
Enter a new name for each attribute.
Make the attributes visible; select Yes in the Visible drop-down list.
Set the appropriate properties for each attribute type (see "Defining Attribute Properties."
For List and MuliList attributes, define the list selections (see "Configuring Lists.")
For Text and MultiText attributes, set the MaxLength and Include Characters properties.
For Numeric attributes, set the MinValue, MaxValue, and Scale properties.
For Heading attributes, enter a heading Name (Headings are used in Web Client only).
For Date attributes, set the Default Value date using the calendar utility.
For Money attributes, set the Default Value.
If appropriate, set a default value for each attribute. (See "Setting Default Values.")
When you are finished configuring the attributes, click Save.
Once you have completely defined the attributes for your Page Two or Page Three tab on the Attributes tab, you define the attribute order to set up the physical appearance of the tab.
After selecting the attributes that will appear on the Page Two or Page Three tab and establishing their properties, you need to arrange the fields on the tab. You do this by using the Order visible attributes button on the Attributes setup tab.
|
Note: For detailed information about setting attribute order, see "Modifying Attribute Order on a Form Tab, Single Column." |
To set up the order the attributes appear on the tab:
Click the Order visible attributes button. The Define Attribute Order dialog box appears.
Click an attribute name to highlight it.
Click the up arrow to move the highlighted attribute up one position in the list. Click the down arrow to move the highlighted attribute down one position in the list.
Continue highlighting attributes and moving them up or down in the list until they are in the order you want.
When you are finished, click Save.
The tab order refers to the sequence in which the fields in an Agile PLM client Page Two or Page Three tab is activated when a user presses the Tab key.
The field tab order is determined by the attribute order, as described above.
Java Client displays actual tabs for Page Two and Page Three tabs. However, Web Client displays the Page Two and Page Three information on the first object tab (for example, Cover Page, Title Block, or General Info tab). When viewing an object with Page Two and Page Three information, the user scrolls down to see that information. For example, the Page Two information is displayed below the Cover Page information. The Page Three information is displayed below the Page Two information.
To make the additional information on the first tab easier to understand in Web Client, each Page Two and Page Three tab has 10 Heading attributes. Make Heading attributes visible and give them a meaningful name. Then, position them on the attribute order list so they describe the group of attributes that follow them.
For example, a Page Two attribute order list might be set as follows:
Table 5-27 Example of a Page Two attribute order list
| Attribute order list | Type of attribute |
|---|---|
|
Page Two |
Heading01 |
|
Create User |
CreateUser |
|
Date Created |
Date01 |
|
Component Properties |
Heading02 |
|
Resistance |
Text01 |
|
Material |
List01 |
|
Notes |
Multitext10 |
The attributes appear in Web Client, following the Cover Page information, in the format shown in the figure below. In Java Client, the Page Two and Page Three attributes (including Heading attributes) are displayed on the Page Two and Page Three tabs.
You may effectively remove a Page Two or Page Three tab from Java Client or Web Client by changing its Visible property to No. You must make this change in the Tabs node and also in each of the Page Two attributes that were defined for the tab. If you do not change an attribute's Visible property to No, it continues to appear in Java Client or Web Client Search folders.
If you have been reading this chapter sequentially, the term "attributes" is already familiar. Before going into the detailed discussion of "Defining Attributes," this section introduces two special kinds of attributes: user-defined flex fields and read-through attributes.
When users open an object in Agile PLM clients, they see a tabbed window with fields. These fields are called attributes. From the Classes node, you define how these attributes appear for each Agile PLM class.
The individual fields that you define for each Agile PLM class appear on the tabs for all subclasses within that class. For example, the part categories that you define for the Parts class become the part categories for its subclasses, such as Capacitors, Resistors, and Diodes. In addition, if you enable an extra tab called a Page Two tab for an Agile PLM class, the tab and its attributes also appear for each subclass within the class.
Each subclass also has its own setup window for the Page Three tab where you can define the fields that are specific to the subclass, and will appear only on the Page Three tab for that subclass.
You can create an infinite number of attributes in any class or subclass. These are called "user-defined flex fields." They are distinct from the predefined flex fields installed with Agile PLM.
User-defined flex fields can be created only on Page Two and Page Three tabs. As such, any user-defined flex field is specific to a class (Page Two) or to a subclass (Page Three).
|
Note: User-defined flex fields are specific to a class and therefore require class-specific privileges. Base class privileges (such as Read Items or Modify Preliminary Items) do not apply to class attributes. The subject of roles and privileges in Agile PLM is broad, but you may want to refer to a small tutorial, "Building and Testing Attributes, Read/Modify Privileges, and Roles." |
To create a user-defined flex field in a class:
Under Data Settings, double-click Classes. The Classes window appears.
As an example, double-click the Change Orders class, then click the User Interface Tabs tab.
Double-click Page Two, then click the Attributes: Page Two tab.
Click the New icon. The New Attribute dialog appears.
Type in a name and API name for the new attribute. Also select an attribute type from the drop-down list. Click OK.
|
Note: An attribute name cannot contain a colon ( : ), a semicolon ( ; ), or an equal sign ( = ). |
The new attribute object appears. This user-defined flex field will be present in all objects created in the Change Orders class, for this example.
You may now fill in the various supporting fields, such as Description, Visible, Default Value, Required, and Available for Subscribe.
To create a user-defined flex field in a subclass:
Under Data Settings, double-click Classes. The Classes window appears.
As an example, double-click the ECO subclass, then click the User Interface Tabs tab.
Double-click Page Three, then click the Attributes: Page Three tab.
Click the New icon. The New Attribute dialog appears.
Type in a name and API name for the new attribute. Also select an attribute type from the drop-down list. Click OK.
|
Note: An attribute name cannot contain a colon ( : ), a semicolon ( ; ), or an equal sign ( = ). |
The new attribute object appears. This user-defined flex field will be present in all objects created in the ECO subclass, for this example.
You may now fill in the various supporting fields, such as Description, Visible, Default Value, Required, and Available for Subscribe.
User-defined flex fields are more limited than predefined flex fields. They are supported in the following places in Agile PLM:
Advanced Search
User-defined flex fields can be used as a query condition
User-defined flex fields can be used in display/output of search results
User-defined flex fields can be used as an attribute for sorting of search results
Roles and Privileges
User-defined flex fields can be used as an AppliedTo attribute in Read privilege
User-defined flex fields can be used as an AppliedTo attribute in Modify privilege
Workflow
User-defined flex fields can be used in entry required fields
User-defined flex fields can be used in exit required fields
Subscription
User-defined flex fields can be made available for subscription when this field changes or is updated
Ready-to-Use Standard Reports
For reports where user can optionally select Page Two attributes to display in report results, user-defined flex fields can also be selected.
Custom Reports
User-defined flex fields can be used as a query condition in building a custom report
User-defined flex fields can be used in display/output of report results
User-defined flex fields can be used as an attribute for sorting and grouping of report results
Agile Integration Service
User-defined flex fields can be used as part of AIS
Agile Content Service
User-defined flex fields for an ECO can be exported through ATO and CTO
Page Two and Page Three attributes of CTO can also be exported along with the data of the Agile objects attached to the Selected Content tab of CTO.
Export
User-defined flex fields can be exported into supported output formats
Criteria
User-defined flex fields can be used as a value in defining Criteria
SDK
User-defined flex fields support Set (update) the property and Get (retrieve) the property, but does not support Create.
User-defined flex fields are not supported in the following places within the Agile system:
DataLoad
User-defined flex fields cannot be loaded by using DataLoad
Notification
User-defined flex fields cannot be used as a data tag that can be sent in subject or body of the notification
ACS
User-defined flex fields cannot be exported along with the data of the objects present in the Selected Content tab of ATO
|
Note: ATO is autogenerated due to which enabling Page Two and Page Three attributes is limited and is not allowed in ATO class settings. |
Some fields on some tabs are able to display pertinent information about a related object. These fields are referred to as "read-though" fields. The data that is displayed in a read-through field is a read-only copy of attribute data from a different object that is related to the currently viewed object. If a tab has read-through fields, you can enable or disable them as needed.
Some tabs with read-through fields are not editable (for example, the item object Changes tab). However, a few editable tabs include both types of attributes: editable and read-through (for example, the item object Manufacturers tab). Read-through fields cannot be edited on the tab because they are read-only copies. However, if the original attribute is modified, the read-only copy in a read-through field will reflect those modifications.
In Agile Administrator, on the <Tab Name>:Attributes tab of the setup window of object tabs that include both editable fields and read-through fields, read-through fields include the name of the related object in their names. For example, on the item object Manufacturers tab, attributes with names that begin with "Mfr" or "Mfr. Part" are read-through fields from the Manufacturer and Manufacturer Parts objects, for example, Mfr. Name and Mfr. Part Notes.
Oracle Agile PLM makes it also possible for the administrator to consistently define Page One and Page Two fields as read-through fields, as follows:
All Item P1 / P2 fields can be defined as read-through fields on the Item > BOM table (excluding Page Two heading fields)
All Item P1 / P2 fields can be defined as read-through fields on the Item > Where Used table (excluding Page Two heading fields)
Most Item P1 / P2 fields can be defined as read-through fields on the associated Change > Affected Items table (excluding Page Two heading fields and these special handling of Rev-related fields: REV.COMPLIANCY_CALC_DATE [only on ECO and MCO], REV.COMPLIANCY [already on ECO and MCO], and REV.INCORP_DATE [ECO only for the future revision, MCO for the revision it applies to]).
This does not include any new (user-generated) P2 multilist fields.
The Item BOM tab and the Item Manufacturers tab include both editable fields and read-through fields.
Editable fields on an item's BOM tab describe the relationship between it and the items on its BOM, for example, Quantity, Find Number, Reference Designators. Read-through fields on the BOM tab allow you to display additional information about the items listed on the BOM tab, for example, Page Two data of the BOM items.
Editable fields on an item's Manufacturers tab define the relationship between it and its manufacturer parts, for example, Preferred Status and Reference Notes. Read-through fields on the Manufacturers tab allow you to display additional information about the Manufacturer (for example, the manufacturer's address), or the Manufacturer Part (for example, Page Two data of the Manufacturer Parts).
|
Important: Like all read-through fields, the read-through fields on the BOM tab and the Manufacturers tab cannot be edited on those tables. Because these read-through cannot be edited on the BOM tab and Manufacturers tab, they also cannot be redlined from the Redline BOM tab or the Redline Manufacturers tab. |
For your reference, the item object BOM tab and item object Manufacturers tab attributes which can be edited and, therefore, redlined are listed in the table below.
A user's assigned roles and privileges also determine which specific fields he can edit or redline.
Table 5-28 Item object BOM and Manufacturer table fields that can be edited or redlined
| Item object BOM table fields which can be edited or redlined | Item object Manufacturers table fields which can be edited or redlined |
|---|---|
|
BOM Date01 - BOM Date15 BOM Description BOM List01 - BOM List15 BOM MultiText30, BOM MultiText44 BOM Notes BOM Numeric01 - BOM Numeric15 BOM Text01 - BOM Text15 BOM Multilist01 - Multilist10 Find Num Item Number Qty Ref Des |
AML Split (%) Mfr. Name Mfr. Part Number Mfr. Tab Date01 - Mfr. Tab Date05 Mfr. Tab List01 - Mfr. Tab List05 Mfr. Tab MultiList01 - Mfr. Tab MultiList03 Mfr. Tab MultiText30, Mfr. Tab MultiText31 Mfr. Tab Numeric01 - Mfr. Tab Numeric05 Mfr. Tab Text01 - Mfr. Tab Text05 Preferred Status Reference Notes |
Attributes are the fields that appear on Agile PLM client tabs. You can define these attributes by configuring their properties.
Each object tab has its own setup window. To display the tab setup window you want, use the guidelines in the following table.
Table 5-29 Guidelines to display tab setup window
| Type of attribute or property | Setup activity | Action |
|---|---|---|
|
Class-specific attribute (all tabs except Page Three) |
Define attributes for tabs: Cover Page Title Block General Information Page Two Affected Items Workflow Relationships Attachments History Changes BOM Manufacturers Where Used Sites Escalations Selected Objects Where Sent |
In the Classes window:
|
|
Subclass properties |
Define properties, for example, for Name, Description, Number Source, AutoNumber Required, Site-specific BOM, and so forth |
In the Classes window:
|
|
Subclass-specific attribute (Page Three tab only) |
Define attributes for: Page Three |
In the Classes window:
|
For example, to define attributes for the Affected Items tab of the Change Orders class:
Under Data Settings, double-click Classes. The Classes window appears.
Double-click Change Orders Class.
Click the User Interface Tabs tab.
Double-click Affected Items. The Affected Items tabbed setup window appears.
An attribute's type indicates how it is used in Agile PLM. For example, a Text attribute is used for entering text into a field on a Java Client or Web Client tab. The types of attributes used in Agile PLM are listed in the table below.
Table 5-30 Attribute types and values to enter
| Type | What to Enter in the Field |
|---|---|
|
Date |
Enter date and time, or select date and time from a pop-up calendar. |
|
Heading |
Displays a heading above a group of attributes. Enables the user to identify a group of associated attributes on these tabs. Heading attributes are available on Page Two and Page Three. They are also available on the General Information and Preferences tabs of User classes. |
|
Icon |
Read-only attribute type. Used to display icons in tables (for example, BOM table, search results table) that indicate, for example, the object type, that the object has attachments, that the object has a manufacturer, or that the object has a pending change. |
|
List |
Select one item from a list. Select one item from a cascading list. |
|
Money |
Enter a monetary amount. |
|
MultiList |
Select one or more items from a multiple-selection list. The list can be a cascading list. Note: There is no limit to the number of list entries in a multi-list field and the number of possible multi-list fields on Items P2 is 15. |
|
MultiText |
Enter a block of text (up to 4,000 characters) that wraps across multiple lines. |
|
Numeric |
Enter a numeric value. |
|
Text |
Enter a single line of text; the allowable length varies, but generally it is up to 50 characters. |
The Agile PLM administrator can set default values (such as the current date, or current user) to automatically appear in a field when new objects are created. See "Setting Default Values."
The following table lists the attribute properties, the settings available for these properties, and how the settings are applied in Agile PLM. It also indicates the attribute types each property can be applied to.
|
Note: The "Required" property (found near the end of this table) is important to understand, as it provides a visual cue for users to attend to that attribute when creating a business object in that class or subclass.Note that a field that is "required to fulfill creation" of an object, this idea is not the same thing as "required fields" that are found in Agile Workflows. |
Table 5-31 Defining Attribute Properties
| Property | Attribute type | Setting | Application in Agile PLM |
|---|---|---|---|
|
Name |
All |
Supplied by administrator |
The name of the field as you want it to be displayed for users, limited to 40 characters. Although all characters are supported within Agile PLM, and should not create issues within Agile's clients, it is recommended that you avoid using the following characters when renaming or creating attributes, due to issues that could potentially arise in integrations or custom applications written on the SDK. , comma . period (dot) : colon ; semicolon = equal sign |
|
API Name |
All |
System-generated at object creation |
Unique systemwide identifier for objects and can be autogenerated. You can specify an API name, but internal consistency is enhanced by accepting the system-generated name. |
|
* Type |
All |
N/A |
Not configurable by the Agile PLM administrator.Indicates the type of attribute: date, list, multilist, text, multitext, numeric, image, or heading. |
|
Visible |
All |
Yes/No |
Yes—Makes the attribute visible in Agile PLM clients. Users will see this attribute when they create objects in this class or subclass. No—Keeps the attribute hidden in Agile PLM clients. Users will not see this attribute when they create objects in this class or subclass. Note that all Item Title Block fields can be disabled. |
|
List |
List MultiList |
Supplied by administrator |
Selections to appear in the drop-down list for users to choose from. The default value must appear among the selections entered here. For list attributes whose selections are defined elsewhere, this property reads (List) and the property is not editable on the attribute setup window. For example, the Lifecycle Phase attribute selections are those that are defined on the Lifecycle Phases node. List entries are limited to 255 characters each. |
|
DefaultValue |
All |
Supplied by administrator |
The default value to display when a new object is created. For lists and multilists, the default value must be one of the values in the selection list (see "Setting Default Values for Lists"). For some fields, you can use a default variable. For MultiText attributes, the administrator is constrained to 510 characters of default text, despite the Max (System) Length value of 4,000. Web and Java client users are not constrained in this field in business objects. |
|
Enable for Search Criteria |
All |
Generally "No" but can be set to Yes by administrator |
Permits (Yes) or prevents (No) the attribute from being added as a criteria for a Parametric search. (Parametric searches are documented in Getting Started with Agile PLM.) |
|
MaxLength |
Text MultiText |
Supplied by administrator |
Sets the maximum number of bytes that can be entered in the field (spaces = 1 byte; carriage returns = 2 bytes). Valid settings range from 0 to the maximum allowed for that attribute (see the attribute's Max (System) Length property). Generally speaking, 1 character = 1 byte; however, some Agile installations are localized with Chinese or Japanese characters that can use 2 or 3 bytes per character. This must be factored in when setting the value of this property in relation to Max (System) Length value. Because many attributes appear in many areas of Agile PLM, and the MaxLength can be set independently for specific attributes, issues can develop if there is too much range of MaxLengths for similar attributes. For example, a part number may appear on the Title Block of the part, the BOM of (same or other) parts, and the Affected Items of changes. It is best to set the MaxLengths of such similar attributes to a standard value. When setting MaxLengths, consider field length limitations of other applications used by your company to which Agile PLM data is exported. |
|
* Max (System) Length |
Text MultiText |
N/A |
Not configurable by the Agile PLM administrator. Designates the maximum length of the data field in bytes, and represents the maximum number of bytes allowed in the field by Agile PLM clients. An attribute's Max (System) Length value cannot be exceeded by its MaxLength value. |
|
Include Characters |
Text Multitext |
Select from list |
This setting determines whether spaces are allowed in the field and which types of alphabetic and numeric characters are allowed. Select from the list of character sets defined on your Agile PLM system. For more information, see "Character Sets." |
|
Min Value |
Numeric |
Supplied by administrator |
The minimum value for the numeric field. |
|
Max Value |
Numeric |
Supplied by administrator |
The maximum value for the numeric field; must be greater than or equal to zero (0). |
|
* Order |
All |
N/A |
This number indicates the order in which the attribute field appears on the table or form. It is an Agile system-generated number greater than 0. The Agile system generates this number when you use the Order visible attributes button to arrange the attributes. |
|
Site-Specific Field |
Select from list |
Common = this attribute inherits its value from the global value. Site-Specific = the value of this attribute is independent from the global value. This property does not apply to all attributes. If it does not apply, it is set to N/A and it is not editable. This property is not editable for all attributes where it does apply. In those cases, the property has a default value of either Common or Site-Specific and it cannot be edited. For examples, view the attribute setup for the Affected Items tab of the Change Orders class. |
|
|
Height |
MultiText |
Supplied by administrator |
Determines the number of lines in the text area that are displayed when in edit mode. (In Web Client, the text area displays 4 lines.) |
|
Scale |
Numeric Money |
Supplied by administrator |
The number of digits after the decimal point in a numeric field. This setting must be greater than or equal to zero (0). |
|
*Attribute |
All |
N/A |
Not configurable by the Agile PLM administrator. Lists the database attribute name for the selected node. Since the Name property gives the attribute name as it will appear to the Agile PLM user, the Attribute and Name properties are often different. |
|
* Base ID |
All |
N/A |
Not configurable by the Agile administrator. Lists the original system ID for the attribute before it was modified in any way. |
|
Input Width |
MultiText List (Web Client) MultiList (Web Client) |
Medium Long |
Controls the display width of attributes. Settings are Medium and Long.
|
|
Input Height |
MultiText |
3 to 15 |
Controls the display height of MultiText attributes. Settings are numeric integers ranging from 3 to 15. |
|
Required |
All |
Yes/No |
Yes —The field appears to the user in bold font, which is a visual cue that the field should be populated. If an attribute that has Required set to Yes is not populated during the Create New process (in Web Client), or it is emptied during an Edit and the user tries to Save (in both clients), the user will be prompted to fill the field, and the procedure will not complete. You can set Heading attributes to be Required. See "An Exception involving Required Fields in Object Modification." No —The field does not appear to the user in bold font, and it does not stop the Create New or Edit/Save process if it is not populated. |
|
Available for Subscribe |
All |
Yes/No |
Determines whether or not this attribute can be subscribed to by a user (who has sufficient privileges). Subscription is documented in Getting Started with Agile PLM, Chapter 5, Working with Objects. |
|
Note: An asterisk * indicates that the Agile PLM administrator cannot change these properties.The file type of an attached file is determined by the characters following the last period in a file name. Therefore, users should not use file names ending with a period (.). |
If you modify a business object and you select a different subclass as part of the modification, you receive this warning: "You are changing the subclass of the object. Do you want to continue using the same object name or number?" This warning does not warn you of another risk, that the object's original subclass and the subclass to which the object is being assigned may have differing required fields. A field that is set to be required in the "new" subclass may not be required in the "original" subclass, but the system does not check for "new" required fields, nor does it warn you of this possible discrepancy.
To include an image attribute on a table, set its Visible property to Yes. The image attribute's Name property identifies which type of icon the image attribute displays. The name does not appear to the end user; you do not need to modify it.
To determine in which table column the image will appear, see "Modifying Attribute Order on a Form Tab, Single Column."
A property may be configurable for one attribute and not for another. For example, you cannot edit the Name property of the lifecycle phase attribute on the Title Block tab, but you can edit the Name property of the item lifecycle phase on the BOM tab.
As the Agile PLM administrator, you can easily change a configurable property. For example, if you decide the maximum allowable length for the change order number should be 15 characters instead of 30 characters, you can change the MaxLength property setting on the Change Orders Cover Page tab.
|
Note: Because many attributes appear in many areas of Agile PLM, and the MaxLength can be set independently for specific attributes, issues can develop if there is too much range of MaxLengths for similar attributes. For example, a part number may appear on the Title Block of the part, the BOM of (same or other) parts, and the Affected Items of changes. It is best to set the MaxLengths of such similar attributes to a standard value. |
To modify an attribute property:
Under Data Settings, double-click Classes. The Classes window appears.
To modify any class tab attribute, double-click the class name.
For example, to modify the Affected Items tab attributes for change orders, double-click Change Orders, then select the User Interface Tabs tab. All the Change Orders class tabs are listed.
Click Affected Items. The Classes Tab setup window appears.
Select the Attributes:Affected Items tab. All the fields for that tab are listed.
To modify a Page Three tab attribute for a specific subclass, double-click the name of the subclass listed under the class name.
For example, double-click ECO under Change Orders class, then select the User Interface Tabs tab. All the ECO subclass class tabs are listed.
Double-click Page Three. The Class Tabs setup window appears.
Select the Attributes:Page Three tab. All the fields for that tab are listed.
Double-click the attributes you want to modify.
Modify the attribute properties. Depending on the type of property, use one of the following methods:
Enter text.
Select a value from a list.
Click the icon next to the field to open a dialog box.
For date attribute default values, click the calendar icon next to the field to select a specific date, or use a variable. See "Default Value Variables".
When you have finished your modifications, then click Save.
When the same attribute appears on several tabs, you must establish the same properties for it everywhere it appears.
For example, an item's Number attribute appears on the item's Title Block (that is, its "Page One" tab), the item's BOM tab (Item Number attribute), and the Affected Items tab of any associated changes (Item Number attribute). You must establish identical properties for this attribute in all three locations.
For example, in an item's Title Block.Number field, if you set its Include Characters property to All, you should also set the item's BOM.Item Number.Include Characters property to All, and set [associated change].Affected Items.Item Number .Include Characters property to All. If you do not, when you try to add an affected item, for example, Agile PLM clients prevent you from adding the affected item, and return an error message.
Setting proper attributes enables Page Two and Page Three data to be copied properly when using Save As to create a new object (for instance, a project number field on Page Two of both ECOs and MCOs), and enables you to display information from an item's Page Two on its BOM table or an associated change's Affected Items tab (for instance, a Unit of Measure field).
Regarding the Save As method of object creation: if a subclass has Required fields set up (by the administrator) and the user does a Save As but there is a type violation in the source object on one of the required fields, Save As will complete with the value still copied over to the source. Previously in this case, the user would encounter an error during Save As saying that a violation occurred on certain attributes, and Save As cannot be completed.
You can set default values to appear for attributes.
To change a default value setting:
Locate the attribute you want, and double-click it to open the setup window.
(For detailed instructions, see "Modifying Attributes.")
In the DefaultValue field, enter the default value you want. Depending on the type of attribute, enter a variable (see "Default Value Variables"), enter text, select from a drop-down list, or select a date.
When you have finished your modifications, click Save.
The new default value appears in the Agile PLM client field when a new object is created.
Many attributes can be either hidden or displayed on a tab. For example, you can either show or hide the fields on the Pending Changes tab, and the attributes on the Page Two tab are hidden until you need to use them.
To show or hide an attribute on a tab:
Locate the attribute you want and double-click it.
(See "Modifying Attributes.")
In the Visible field for the attribute, select Yes to make the attribute visible. To hide the attribute, select No.
When you have finished your modifications, click Save.
The attribute is now either visible or hidden on the tab. To view the modifications, open the object in Java Client or Web Client where the attribute appears.
You can change the field label or the heading of a table column by editing the attribute's Name property.
For example, attributes on the Title Block tab of Parts class objects are displayed as labeled fields. You can modify the labels that appear by editing the attributes' Name properties. Fields on the Affected Items tab of Change Orders class objects are displayed in a table; the table column heading, or field, is the attribute name. You can modify the table column heading by editing the attribute's Name property.
|
Note: The Lifecycle Phase attribute name on the Parts and Documents class Title Block tabs cannot be edited. |
To edit a field label or a column name in a table:
Locate the attribute you want and double-click it.
(See "Modifying Attributes.")
In the Name field, highlight the text you want to edit and enter a new name.
When you finish all the attribute modifications, then click Save.
To verify that the name was changed, open an object in Java Client or Web Client where the table appears. Click the tab to view the field or table and confirm the modification.
Each of the predefined subclasses provided with Agile PLM has a default icon associated with it. The subclass icons appear (in Java Client and Web Client) to visually differentiate the various types of objects. You can replace some or all of these icons at any time.
To replace the default subclass icon with a custom icon:
Open the subclass and, on the General Information tab, enter a file name in the Icon property for that subclass.
For Documents and Parts subclasses, there is an additional property called Icon for Assembly. This is the icon image that is used when the object represents an assembly.
For both the Icon and Icon for Assembly properties, fill in only the graphic file name (including extension), for example,electrical.gif.
You must place the custom graphic in two locations on the proxy server, one for Web Client and one for Java Client. The system finds the graphic depending on the client being used.
WebLogic:
Stop WebLogic.
For Web Client, place the custom graphic in the location \AGILE_HOME\agileDomain\applications\application.ear\application.war\images\
For Java Client, place the custom graphic in the location \AGILE_HOME\agileDomain\applications\application.ear\JavaClient.war\lib\images\custom.jar
Delete \AGILE_HOME\agileDomain\servers\xxxx\
Restart WebLogic.
|
Note: For Java Client, custom icons must be added to the custom.jar file. For instructions on how to update a JAR file, refer to Sun's documentation on the JAR utility. An online tutorial on the JAR utility is available athttp://docs.oracle.com/javase/tutorial/deployment/jar/update.html.
You can also use many Zip-compatible utilities, such as WinZip, to update a JAR file. |
The Agile Application Server must be restarted for the new icons to take effect.
The Agile Smart Object URL feature is designed to enable effective collaboration through email, spreadsheets, documents, WIKIs, and so forth. Users or automated tools can generate smart readable URLs that point to a specific object in Agile PLM, that open a specific attachment file, and that open a search page in Agile PLM.
Smart URLs for Agile objects can specify a specific tab, revision, or version to display when the object opens in Agile PLM.
For detailed information about all types of Smart URLs, see Getting Started with Agile PLM, chapter "Working with Business Objects in Web Client", section "Smart URL Quick Access to Objects, Files, and Searches."