| Agile Product Lifecycle Management Administrator Guide Release 9.3.3 E39286-04 |
|

 Previous |
 Next |
| Agile Product Lifecycle Management Administrator Guide Release 9.3.3 E39286-04 |
|
Previous |
Next |
This chapter documents utilities for the Agile administrator that are unique to Java Client.
The API Name field is present on many Administrator objects and PLM business objects. When it is present, API Name is a required field. It is a unique systemwide identifier for objects and can be autogenerated. You can specify an API name, but internal consistency is enhanced by accepting the system-generated name. The API Name works as a system-identifying key because it tends not to change, while the Name attribute is much more likely to change.
See the Accessing PLM Metadata with API Name Field chapter in SDK Developer Guide for more information.
The following is a list of where you see the API Name field for objects in Agile PLM:
Classes > Base Classes > Classes, Subclasses, Tabs, Tables, Attributes
Character Sets
Lists > List Values
Criteria
AutoNumbers
Roles
Privileges
Workflows > Workflow Statuses
Notifications
UOM
Dashboard Management
Agile Content Service > Subscribers, Destinations, Events, Filters, Package Services, Response Services, Format Library
Event Management > Events, Event Handlers, Event Subscribers, Event Types, Event Handler Types
Examples > All nodes
You can generate Administrator reports to show the current settings for the Administrator nodes. These reports are available in the navigation pane's Analytics and Reports tab > Standard Reports folder > Administrator Reports subfolder. These reports are especially useful when you are planning to reconfigure an Agile PLM component.
The following table lists Agile PLM administrator reports.
Table 4-1 Agile PLM Administrator Reports
| Report | Description |
|---|---|
|
Agile Classes report |
Lists current and default attribute settings for all Agile PLM classes; this is a valuable tool for Agile systems engineers when performing upgrades to the Agile PLM system |
|
Attachments Accessed by User Report |
Lists attachment actions by user. Lists attachment actions performed by the specified users or user groups during the specified time span. For each user attachment action, this report includes the business object, the associated folder object, the attachment file name, the action (Get, Open, View, Checkout, Checkin, Add or Remove) and the time of the action. In the report parameters, you can specify All Users, or you can search for and select the specific users or user groups you want. See also "Attachment IP Reports." |
|
Attachment History Report |
Lists attachment actions by object. Lists the attachment history actions for the specified object or objects. In the report parameters, specify the objects to include in the report by either a saved search or by defining a search. When a change object or change request object is specified, you are prompted to choose to create the report with the change object attachments or with the affected items attachments. See also "Attachment IP Reports." |
|
Criteria Library Configuration report |
Lists existing reusable criteria and where they are used |
|
Events Configuration Report |
Lists existing event-specific objects as follows: Events: list of existing Event Masks; each row in this section begins with chosen Event Type, then Name of the event mask, followed by all other "event"-object attributes. Event Handlers: list of existing Handler Masks; each row in this section begins with chosen Handler Type, then Name of the handler mask, followed by all "handler"-object attributes.
Event Subscribers: list of existing Subscriber Masks; each row in this section begins with Name of the subscriber mask, followed by all "subscriber"-object attributes. |
|
Inactive Users / User Groups on Active Functional Teams Report |
Lists inactive users and inactive user groups that are members of active functional teams. See "Running Approval Matrix Reports." |
|
Login Failure report |
Captures failed attempts for system login and workflow signoff, and the reason for each failure. |
|
Preferences Configuration report |
Lists the current attribute and property settings of the Preferences and Viewer and Files nodes. |
|
Privilege Mask Detail report |
Lists each privilege mask by name and description, whether or not it is enabled, roles where it is used; provides Object Type, Applied To, and Criteria values |
|
Roles and Privilege Summary report |
Lists each role by name, description, and whether or not the role is enabled; lists users assigned to each role; lists the name and description of privilege masks in each role |
|
SmartRules Configuration report |
Lists the current setting of each SmartRule |
|
Subclass in Use report |
Lists all subclasses and where they are used: global searches, reusable criteria, workflows, privileges, and roles |
|
User Group Configuration report |
Lists all user groups, users assigned, and pertinent user properties for each user; also includes a second table that indicates each group's escalation person and criteria for escalation |
|
User History Report |
Lists all history actions for the specified users or user groups during the specified time span. This report includes all history actions of the specified user on all Agile PLM objects, including object Create or Delete, and the modification of any object attribute. See also "User History Reports." |
|
User Share Lists for Granted ACL report |
Lists the objects and associated roles to which users have been granted access |
|
User Subscriptions Lists report |
Lists the class attributes and actions about which users have subscribed to receive notifications |
|
User Usage report |
For each active user, lists usage over a period of time, from the start date you select to the present; includes number of logins and total online login time in minutes See also "User History Reports." |
|
Users Configuration report |
Lists all users and their properties, except passwords |
|
Workflow Approval Report |
Shows how job functions have been assigned for approvers, observers, acknowledgers, and notified in workflows. Information is displayed by workflow, status, and criteria. See "Running Approval Matrix Reports." |
|
Workflow Job Functions Without Users Report |
Lists routable objects where a job function has been specified for a signoff action, but no user has been added to the workflow tab. See "Running Approval Matrix Reports." |
|
Workflows Configuration report |
Lists all existing workflows and the properties (status properties, criteria-specific properties) of each workflow's status list |
You can save these reports for before-and-after comparisons when making changes to your database. For example, if you are going to be upgrading your Agile PLM system, you might want to first generate an updated Agile Classes report to keep a record of your current Classes configuration. Then compare it with one generated afterward.
To generate Administrator reports:
Select the Analytics and Reports tab and expand the Administrator Reports node folder.
Double-click the report you want. Agile Web Client opens to the specific report page, for instance, the Administrator Report: User Usage Report page.
Click Execute. The Specify Parameters dialog box opens. The User Usage report requires a From and To time range and the users you are requesting information about.
When you have populated the fields, click Finish. A message appears: "Server is generating the report. Please wait."
Select the encoding type; the default encoding type is Unicode (UTF-8). If you need to use a different encoding type, select it in the drop-down list. When you are ready, click Continue.
Follow the directions in the Save As dialog boxes to save the file to disk and choose a location to save it.
Modify the file name to include the report date and time. For example, User_usage072604_3PM.csv.
When the download is complete, click Close in the dialog box.
In Java Client when you click the Admin tab, there is a toolbar of buttons that either perform a single function or open to a utility or tool.
Disable System Access – this button will close off user calls to the Agile Application Server (AAS). If you need to disable system access, use Email To Users button to let users know when and for how long they should not use the system. When you click Disable System Access, it changes appearance and becomes Enable System Access.
Synchronize Admin data across cluster – this button performs a "synchronize" data routine across multiple AAS servers in a cluster; if your PLM setup uses one AAS server, this button is not enabled. An Oracle Consulting – Agile Solutions representative can provide you with more in-depth information about deploying and maintaining clustered servers.
Email To Users – see "Sending Email to Users."
Global Replace – see "Global Replace."
Admin History – see "Administrator History."
Disable Triggering Events – see "Control of Event Components."
Use the Email To Users button to email a message to all active (enabled) users, all logged-in users, or to specific users that you select.
When you click the Email To Users button, the Email to Users window appears. You can send email to the following groups of recipients:
All active users – Email all enabled users a message that they will receive the next time they log in to Agile PLM. For example, you may want to inform all enabled users that a new class or subclass or workflow is now available for their use.
All logged-in users – Email all logged-in users a message that you want them to receive immediately. For example, you may want to inform all logged-in users that the Agile PLM system will be down in 10 minutes.
Other users – Email a message to selected users. After you select the Other users option, open the address book by clicking the button at the end of the field to open the address book, from which you choose the users for your message.
Enter the message in the Content field, then click Send.
The Global Replace button lets you replace one user with another in workflows, escalations, and transfer authority assignments. You can use this capability in a variety of situations, for instance, when an employee leaves the company or moves to another assignment. Global Replace can accomplish the following:
Replace a user as an approver, observer, acknowledger, or routing manager in a single workflow or all existing workflows; however, this does not replace the user in the actual changes he is currently working on, which must be done manually.
Change the designated escalation person for single or multiple users and user groups.
Change the transfer authority person for single or multiple users and user groups. You can replace To users but not From users.
The "users" in the From and Replace With drop-down lists include all existing user groups. See "User Groups."
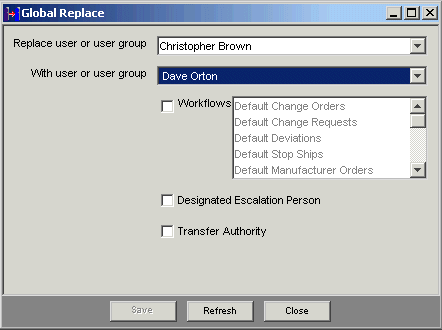
To define or change the settings in the Global Replace window:
Click Global Replace in the Admin tab toolbar. The Global Replace window appears.
You can specify the following values in the Global Replace window:
Table 4-2 Global Replace Properties
| Property | Description |
|---|---|
|
Replace user or user group |
The "Replace" person is the user or user group you are replacing. Select a user or user group from the drop-down list. |
|
With user or user group |
The "With" person is the user or user group who will replace the "From" person. Select a user or user group from the drop-down list. |
|
Workflows |
Select a specific workflow from the drop-down list. To change every instance of the "Replace" person to the same "With" person in all workflows, use Ctrl-shift or Shift-click to select all the workflows in the list. With the check box selected, the "Replace" person is replaced with the "With" person in approver, observer, acknowledger, and change analyst (routing manager) capacities in the designated workflow. |
|
Designated Escalation Person |
Replaces the "Replace" person with the "With" person as the designated escalation person. |
|
Transfer Authority |
Replaces the "Replace" person with the "With" person as the person who has the authority to approve, reject or acknowledge the "Replace" person's changes. (See "Transfer Authority for Self.") |
If you have selected more than one workflow in the Workflows field, when you click Save you see this confirmation message: "Are you sure you want to replace <Replace person> with <With person> for all Workflows?"
If the "Replace" person is a routing manager, and the "With" person is not, a warning appears. If you answer the prompt with Yes (to continue), when the "Replace" person is used in any default routing manager property (for example, Default Change Analyst), this function will be filled by a non-routing manager. If that is an unwanted result, you should instead answer the prompt with No and select a more appropriate "With" person.
For more information about routing managers, see "Routing Managers."
The Agile PLM system tracks several kinds of "history," some available only to the administrator and some available to all users. These topics are considered in the following sections:
Object History and Administrative Object History – the object history shows only the history of that object, which includes all actions performed by users and administrator users; those actions that involved an administrator also are listed in the Administrator History window.
Administrator History – records administrative actions on all objects in Agile PLM. Administrator History also records history of deleted objects and settings.
History of Deleted Objects – when an object is deleted, its history is preserved. This type of history is also accessed in Administrator History.
Previous Administrator Histories – displays object history that took place in previous releases of Agile PLM. This kind of history is in Previous Administrator Histories. This will only have content for customers upgrading from Agile 8.5 or Agile Advantage.
Every object in Agile PLM has a History tab, on which all individual actions performed are recorded, for example, Create, Modify, and Delete. Different data is recorded on the History tab depending on the object type. The history of actions performed by an Agile PLM administrator appears also in "Administrator History."
All objects have a record of the information listed in the following table on their History tabs. Many kinds of Agile objects have additional fields on their History tab.
Table 4-3 History Tab properties
| Property | Description |
|---|---|
|
Action |
The action that was performed, for example, create, modify, delete. |
|
User |
The user who performed the action. |
|
Local Client Time |
The date and time the action was performed. |
|
Details |
Details of the object, property, or action after the modification. |
When a modification is made to an administrative object on a node that records the assignment or reference of one object to another object, history is logged on the object that "owns" the reference or assignment. See the table below. For example, if you assign a role (object) to a user (object), the user object owns the referenced role object, and the History tab of the user object is updated.
When a modification is made to an administrative object, the action is recorded and displayed in the Administrator History window. Administrator History also records history of deleted objects and settings.
Administrator History does not include User history or User Group history.
The following table describes the fields in the Administrator History window. These fields are similar to the history table fields for Agile PLM administrative objects.
Table 4-5 Fields in the Administrator History window
| Field | Description |
|---|---|
|
Action |
The action that was performed, for example, create, modify, delete. |
|
Object |
The name of the object on which the action was performed, for example, the name of a workflow, privilege mask, or criteria. |
|
Username |
The user who performed the action. The username is an active link; click it to open the user's tabbed page. |
|
Local Client Time |
The date and time the action was performed. |
|
Details |
Details of the object, property, or action after the modification. |
The Administrator History can be cleared or purged.
|
Caution: The familiar "Delete" button implies different behavior in this context. You cannot delete selected lines from the Administrator History window; this works as a true "purge" capability. Purge also removes the records in the Previous Administrator History window. |
To purge Administrator History:
On the Admin tab toolbar, click the Admin History button.
On the Administrator History window toolbar, click the Purge button.
You are prompted with three options to answer the question, Would you like to export the existing history?
If Yes, purge all history records with an export file: If you click Yes, all records in Administrator History are purged, and an export file is created with all the data. This is a recommended course if your company was ever audited and these archives are required.
If No, purge all history records without an export file: If you click No, all records in Administrator History are purged, and an export file is not created.
If Cancel, cancel purge action: If you click Cancel, the operation is not executed.
If you click Yes or No, all records in Administrator History are instantly purged. They cannot be retrieved.
When an object or setting is deleted, the history of the object or setting is maintained in Administrator History. However, the data is no longer maintained on the object or setting History tab.
For example, if you delete an object, such as a workflow, its history entries, including the delete action, are maintained in Administrator History. However, there is no longer a History tab for the workflow object (the object does not exist anymore), so there is no individual object history for that workflow.
If you remove one object from another—for instance, removing a privilege from a role—the removal of the privilege is recorded in Admin History with reference to the role.
Java Client and Web Client support "soft" and "hard" deletes. When you soft-delete an object in the database, it is not permanently deleted. A soft-deleted object is marked "Deleted" in the database, and its object number or name is reserved. You cannot create another object with the same type and number or name as a soft-deleted object.
|
Note: You can undelete a soft-deleted object, if you have the appropriate privileges set by the Agile administrator. |
When you run a search, soft-deleted objects do not appear in the search results table. To locate soft-deleted objects, you must run the predefined deleted object searches in the Recycle Bin Searches folder.
|
Note: You have access to the Recycle Bin Searches folder if Recycle Bin Searches is included in the Searches field of your user profile. If you have the appropriate privileges, you can edit your user profile and add Recycle Bin Searches to the list of searches in the Searches field. |
A hard-deleted object is permanently removed from the database.
|
Caution: You cannot undelete a hard-deleted object. |
To soft-delete, hard-delete, or undelete an Agile object:
You must have the appropriate Delete or Undelete privileges for that object.
The object must meet the conditions that allow it to be deleted or undeleted.
In general, if deleting or undeleting an object would cause the compromise of data integrity, the delete or undelete action is disabled.
You cannot delete an object unless all of its relationships and subscriptions are removed.
For detailed information about deleting specific object types see the Deleting Agile Objects section of Getting Started with Agile PLM.
To soft-delete an object in Java Client:
Select and open the object you want to delete.
Click the Delete button, and respond Yes to the confirmation prompt.
The object is soft-deleted.
To undelete an object in Java Client:
Run the appropriate Deleted objects search from the Recycle Bin Searches folder.
Open the deleted object you want to restore.
Click the Undelete button.
To hard-delete a soft-deleted object (if you have the appropriate privileges) in Java Client:
Run the appropriate Deleted objects search from the Recycle Bin Searches folder.
Open the object.
Click the Delete Object button, and respond Yes to the confirmation prompt.
In several nodes of Administrator, exporting and importing functions are available.
Data Settings
Criteria
Workflow Settings
Workflows
User Settings
Roles
Privileges
You can export Agile PLM-object definition data to a file. You can import an Agile PLM-object definition data file to create a new object. Example objects (such as example roles) cannot be imported or exported.
|
Note: On the Tools menu of Agile PLM clients, Import and Export utilities can be used to import and export product data, not Agile PLM system metadata. The Import and Export utilities are documented in the Agile PLM Import and Export Guide. |
|
Important: When you import Administrator data from a test system to a production system, verify the imported data as completely as is possible immediately. |
When you import or export workflow data, you must select the encoding type. The following table lists available encoding types.
The Administrator Export function exports the necessary data to create the object. Not all properties are exported. For example, exporting a privilege mask does not export the Where Used information. You can examine the exported text file to determine which properties are exported for each type of object.
To export Administrator data:
Open the node you want to work with: Workflows, Criteria, Roles, or Privileges.
Select the objects you want to export. You can export one object, or all objects in the table; the Workflows, Criteria, and Privileges windows have an Export All button.
In windows with a filter bar, to display all the objects in the node, Select Show All in the Match If drop-down list, and click Apply. See "Filtering Data in Java Client."
Click the Export button in the window toolbar.
For workflow exports only, the Encoding Type dialog box opens. See the table above. The encoding type generally used is Western European (ISO). If you need to use a different encoding type, select it in the drop-down list, and click OK.
|
Note: You must specify the same encoding type when you import the file later. |
Follow normal Save As procedures to give the file a name and select a location to save it to disk. Modify the file name to make it easy to identify. You might include the object exported, the date, and the encoding type. For example, ChangeOrderWorkflow072602_ISO.txt.
When you are ready, click Save. Verify the data in the file you exported.
You can import an exported text file to create an object in the Agile PLM system.
You cannot create two objects with the same name. For example, you cannot import an object data file for a workflow named ABC if there is already a workflow named ABC in your Agile PLM system. You have the option of overriding the existing named object; in that case, the imported object replaces the existing object in the Agile PLM system.
Note that some properties—for example, user assignments—are not exported. When you import the object data text file, you will create a new object without those properties (for example, with no user assignments).
|
Note: Before you import it, open the text file you want to import to verify which object properties were exported. |
To import Administrator data:
Open the node you want to work with: Workflows, Criteria, Roles, or Privileges.
Click the Import button in the window toolbar. The Import File dialog opens.
For workflow imports only, the Import File dialog includes an Encoding Type field. Make sure the encoding type matches the exported file of workflow(s).
|
Caution: You must select the same encoding type you used when you exported the object. Import results are not reliable if you do not use the same encoding type. |
Next to the Files to be Imported field, click the Browse button to locate and select the file you want to import. Click Open.
Click OK. The import operation takes place. Verify the data in the imported file.
In Java Client, use Tools > Process Extensions or the Process Extensions button or Admin tab > Data Settings > Process Extensions to access the library of Custom Process Extensions (that is, those PXs that preceded Events-based PXs).
If there are no Custom PXs deployed on your Agile PLM system, that item is unavailable on the Tools menu, and "Empty" appears below the button when you click it.
For details about configuring custom process extensions, see "Process Extensions." For technical information on how to develop custom process extensions for your Agile PLM system, see the Agile PLM SDK Developer Guide.
With the introduction of Event Management, it is possible to have more flexibility with PXs, through Java PX handlers and Script PX handlers. The previously existing Process Extensions capabilities remain intact, but Events Management permits PXs to be triggered through normal user and system actions. See Chapter 29, "Event Management." For technical information on developing the new PX handlers, see the Agile PLM SDK Developer Guide.
Agile PLM is an internationalized application that permits companies to enter non-English label data, and for users to see their client user interface in their preferred language. English is included with all licenses. Agile PLM is certified for French, German, Italian, Japanese, Korean, Russian, Simplified Chinese, International Spanish, and Traditional Chinese.
|
Important: This list of supported languages is current as of July, 2011 and is subject to change. See the Languages tab found in the Preferences node for your current installation supported languages. |
For the Product Governance & Compliance solution, there is a fully supported Japanese version of the Rollup in Excel template. Localized versions of the Rollup in Excel template are supported in Chinese, French, and German. Additionally, there is a fully supported Japanese version of the JGPSSI template for creating JGPSSI Declarations.
Every user has a language preference (<user object> > Preferences > Format Preferences (heading only) > Language) that you will likely set during configuration of your company's business objects (which includes, of course, Agile users).
If the company has purchased a localized language as part of PLM, that language will appear in the drop-down list for the Language property.
To set the language preference for a user:
Open the user profile. (This will likely be set when you create your company's Agile users. This task instructs for an already-created user object.)
Click the Preferences tab.
Under Format Preferences, click the drop-down list button for the Language field.
The drop-down list shows English and any other languages your company has licensed.
Select a language, and click Save. That user will see supported elements of Agile in that language.
If you change any user's Language preference, that user (if logged in) must log out and log back in to see changes in their user interface.
Users can switch their own Language preference (again, non-English languages that the company has a license for). In Java Client, the user clicks Current User... from the Settings drop-down menu of the main toolbar and follows the previous instructions.
In Web Client, the user's path to the Language setting is My Settings > User Profile > Preferences > Edit > Language (under Format Preferences).
For more information about Agile PLM Language settings, see "Default Systemwide Preferences."
In this manual the term "multi-language capability" refers both to those "Administrator-editable" objects that can hold different licensed languages inputs separately, and those non-editable objects that can be displayed in different languages according to any end-user's Language preference setting.
The following list includes those Administrator nodes whose objects are supported by the multi-language capability. If the node is listed as supported, it does not matter whether the object is created by the administrator or by a user. (As always, the ability for users to create an object in Agile is defined by their roles and privileges.) Names and Descriptions of these objects are supported for multi-languages unless otherwise noted.
Administrator-editable items can hold names in any enabled language. The administrator can configure these items into a different language for users by setting the Language user preference. For instance, Company A has a localized version of Agile PLM with Japanese enabled (and, by default, English). The administrator creates a list; he can name the list differently for English users and Japanese users. Users with language preference set to Japanese will see the list named in Japanese as the administrator configured.
Multi-language support is provided for the following kinds of objects:
Notifications (Name, Description, Subject, Body)
Full Text Search is supported for attachment files in Japanese, Traditional Chinese, Simplified Chinese, German, International Spanish, Russian, Italian, Korean, and French localized versions
Dashboard Management
Product Portfolio Management:
Schedule Status
Cost Status
Quality Status
Resource Status
Default Role
Agile Content Service:
Subscribers
Destinations
Events
Filters
Package services
Response services
Format Library
Product Governance & Compliance:
Signoff Message
Compliance Rollup Scheduling
Compliance Rollup Rule Setting
Supplier Declaration Process Extension
Specification Mapping
Event Management
Objects that are predefined in Agile-that is, are not editable in Administrator, for example, an Example Role-are fully supported by multi-language capability. For instance, a user whose Language preference is English who logs in will see the "Example-Administrator" role in English; when the same user logs in with the Language preference set to Japanese, he will see a translation of "Example-Administrator" as configured by the Japanese user administrator.
While most types of Administrator data are supported for multi-language capability, the following types of Admin data are not supported for multi-languages, but only in localized user interfaces.
User Settings
Users
User Groups
Supplier Groups
System Settings
Viewers & Files
Company Profiles
PCM Ship-To Location
Any values/strings input by user
Attribute names with "01", "02", "03", etc appended
As an example, let's say Company B has a localized version of Agile PLM with Simplified Chinese enabled (and also English). The administrator, who has a language preference of English, creates a user group and names it UserGroup_1. Then, another Agile administrator for Company B, whose language preference is set to Simplified Chinese, changes the name of UserGroup_1 into a Chinese name with Chinese characters. Now the name of the user group appears to everyone as the Chinese name in Chinese characters, even those users whose language preference is English.
|
Note: Full Text Search is supported for attachment files in Japanese, Traditional Chinese, Simplified Chinese, German, International Spanish, and French localized versions. |
When you set up fields in any language, you have to be logged in with your own Language preference set to that language. If you make changes in Japanese with your Language preference set to Japanese, and then you want to make changes in English, you must change your Language preference to English, log out, log back in, and proceed. Or you can log out and log back in as a different administrator user whose Language preference is English.
To give an example of how the Language setting for individuals is handled by the multi-language capability in Agile, let Jim and Jan be two users:
Case 1: Company C has an English version of Agile only. Everyone in Company C sees Agile user interface and business objects in English; no user can change their Language user preference to another language.
Case 2: Company D has a localized version of Agile with Japanese enabled (and, by default, an English license). You have configured the company so all users' Language preference is Japanese. Jim sets his Language user preference to English. After logging back in, Jim now sees his user interface and the objects he creates in English. Jan is a typical user whose Language preference has remained Japanese: the objects that Jim created appear to Jan in Japanese.
Case 3: Company E has a localized version of Agile, with Simplified Chinese enabled. The administrator has configured the users at the Hong Kong office so their Language user preference is Chinese. Other people in Company E working outside Hong Kong still keep English as their language preference. Now the administrator creates a subclass of the Parts class, and names it "Modules". Objects from this subclass appear to everyone in Company E with the name Modules, no matter which Language is set in the user preference.
Later on, the administrator decides that the Modules subclass should be renamed in Chinese for the Hong Kong users. He sets his own Language preference to Simplified Chinese, and renames the Modules subclass as a translated name in Chinese characters. Now the Modules subclass name appears in Chinese characters to all Hong Kong users with Language user preference set to Chinese. But the English users still see the subclass name Modules in English.
Case 4: Company F has a localized version of Agile, with Simplified Chinese enabled. The administrator has configured the users at the Hong Kong office so their Language user preference is Chinese. Everyone there adds information (for instance, in creating objects) in Chinese. When a user in Hong Kong creates a business object, it appears in Chinese to everyone in Company F, no matter which Language they have set in the user preference.
If you create a new subclass, its name can enter the system in localized (translated) form; however, if you rename the newly created subclass, or any subclass, it is renamed in the same language you are logged in with (Language user preference).
For Java Client to show non-English characters (in the user interface and user-entered text), it must be running on an operating system that supports a particular language. If it is not, some anomalies can appear, for example, "blank squares" instead of proper non-English characters. This is often the case for double-byte character sets such as Japanese and Chinese.
For instance, Jan is using a computer with a Japanese operating system. She enters Japanese text into an ECO's Description field. Then Jim launches Java Client on an English operating systems computer; when he views this ECO, Japanese text that was entered into the Description field may appear corrupted (having "blank squares"): the English operating system may not support Japanese characters (Windows English version requires installing the Asian Language Pack to support Japanese characters).