| Agile Product Lifecycle Management Administrator Guide Release 9.3.3 E39286-04 |
|

 Previous |
 Next |
| Agile Product Lifecycle Management Administrator Guide Release 9.3.3 E39286-04 |
|
Previous |
Next |
This chapter explains how to configure the Approval Matrix feature in Agile PLM.
The Agile PLM Approval Matrix feature enables you to automatically assign users to workflow actions (Approvers, Observers, Acknowledgers, and Notified on Entry) by the job functions each person performs at work, for example, Developer or Product Manager.
A Functional Team matches a user with a job function. For example:
Mary Jones – Developer
John Smith – Product Manager
Bob White – QA Lead
The Administrator configures a workflow to associate a job function with a workflow action, for example:
Approver – Developer
Acknowledger – Product Manager
Observer – QA Lead
When a routable object is created, one or more functional teams are selected in the Functional Team(s) field. When the routable object enters a signoff status, the job functions configured in the workflow are matched to the job functions in the Functional Teams. Agile PLM then populates the Workflow table with the appropriate users. From the examples above:
Approver – Developer – Mary Jones
Acknowledger – Product Manager – John Smith
Observer – QA Lead – Bob White
The Agile PLM Approval Matrix feature enables you to automatically assign Approvers, Observers, and Acknowledgers to routable object workflow actions according to the job functions each person performs at work, for example, Developer or Product Manager. Each user and user group can be assigned multiple job functions, if needed. Users and job functions are linked in Functional Teams. Functional teams are associated with a routable object as the routable object moves through the workflow. The combination of Functional Team, workflow criteria and approval template determines which users perform which workflow actions: Approver, Observer, or Acknowledger.
By default, the Approval Matrix feature is not automatically enabled when Oracle Agile PLM is initially installed or upgraded. To use the Approval Matrix feature, you must configure the necessary Agile PLM Administrator settings. The Approval Matrix Manager can then configure and maintain the necessary Functional Teams.
To setup the Approval Matrix Feature:
Enable the Functional Teams class, and enable the necessary Functional Team(s) attributes. See "Enable Approval Matrix Classes and Attributes."
Add the Job Function(s) attributes to the Applied To property of the appropriate Read and Modify privilege masks. See "Modify Privilege Masks."
Assign the Approval Matrix Manger role to the users you have chosen to manage the approval matrix functions. See "Assign Approval Matrix Administrator Role."
Create a role that gives the Approval Matrix Managers access to the Approval Matrix Administrator reports. See "Create Approval Matrix Administrator Reports Role."
Modify the workflow criteria-specific properties by specifying job functions for the default approvers, acknowledgers, observers, and notify users. See "Configure Job Functions in the Workflow."
To administer Approval Matrix:
Select job functions in the Job Function(s) attribute of user objects and user group objects. See "Assigning Job Functions to Users and User Groups."
Create functional teams and choose job functions for each team. See "Creating and Managing Functional Teams."
Use the Approval Matrix Administrator reports assist in the ongoing management of approval matrix usage and functional teams. See "Running Approval Matrix Reports."
To use functional teams with routable objects:
To use the Approval Matrix feature you must first enable the Functional Teams class and you must enable (make visible) the necessary attributes in other classes.
To enable the Functional Teams class and subclass:
Under Data Settings, double-click Classes. The Classes window appears.
Double-click the Functional Teams class name. The class properties window appears.
Next to the Enabled drop-down list, select Yes.
Click Save.
To enable the associated attributes:
The following table lists the Agile PLM classes that include attributes that are associated with Functional Teams and Job Functions.
Table 40-1 Attributes associated with Functional Teams and Job Functions
| Class or object | Tab | Attribute | Notes |
|---|---|---|---|
|
Functional Teams |
n/a |
n/a |
Functional Teams is a class under the User Groups base class. |
|
User |
General Info User Groups/ Functional Teams |
Job Function(s)NameJob Function(s)Status |
None |
|
Customers |
Quality |
Functional Team(s) |
PSRs table and QCRs table |
|
Suppliers |
Quality |
Functional Team(s) |
PSRs table and QCRs table |
|
Parts |
Quality |
Functional Team(s) |
PSRs table and QCRs table |
|
Documents |
Quality |
Functional Team(s) |
PSRs table and QCRs table |
|
User Group |
General Info Functional Teams |
Job Function(s) Name Job Function(s) Status |
None |
|
Changes Declarations PSRs QCRs |
Cover Page Workflow Affected Items |
Functional Team(s) Reviewer Job Function Functional Team(s) |
None |
The following table lists objects and tabs where the Functional Team(s) attribute appears as a read-through field. (See "About Attributes, Flex Fields, and Read-Through Fields").
Table 40-2 Where Functional Team(s) attribute appears as read-through field
| Class or object | Tab | Attribute |
|---|---|---|
|
Changes |
Affected Items Redline BOMRedline Manufacturers |
Functional Team(s) |
|
Declarations |
Items Manufacturer PartsPart Groups |
Functional Team(s) |
|
Items |
BOM ManufacturersPricesQualityWhere Used |
Functional Team(s) (PSRs table and QCRs table) |
|
Manufacturers |
Where Used |
Functional Team(s) |
|
Product Service Requests |
Affected Items |
Functional Team(s) |
|
Quality Change Requests |
Affected Items |
Functional Team(s) |
|
Customer |
Related QCR Related PSR |
Functional Team(s) |
|
Supplier |
Related QCR Related PSR |
Functional Team(s) |
To read and modify the Approval Matrix attributes you enabled, you must add those attributes to the appropriate Read and Modify privilege masks. The table in "Enable Approval Matrix Classes and Attributes" lists the object attributes that must be added to the Applied To property of the appropriate privilege masks.
If you have configured custom privilege masks, you must modify them to include the Approval Matrix attributes in the Applied To property.
For roles that create and modify user objects:
Read Users
Modify Users
For roles that create and modify user groups:
Read User Groups
Modify User Groups
For roles that allow the modification of routable objects, the Read and Modify privilege masks associated with those routable objects, for example:
Read Changes
Modify Eng Changes
Read Prod Service Request
Modify Prod Service Request
Read Quality Chg Request
Modify Quality Change Request
Refer to "Routable and Nonroutable Objects" for a complete list of Agile PLM routable objects.
Assign the Approval Matrix Manager role to the users who will be managing and updating the Functional Teams. This role allows the Approval Matrix Manager to create Functional Teams, add users to the Functional Team, remove users from the Functional team and define the user's Job Function on that team.
If you want the Approval Matrix Manager user to also assign Job Functions to users or user groups, then that user must be assigned a role that allows him to edit the Job Function(s) attribute on user objects and user group objects.
To assign the Approval Matrix Manager Role:
In Java Client, navigate to Admin > Roles.
Search for the Approval Matrix Manager role:
In the Filter By field, select Name.
In the Match If field, select Contains
In the Value field, enter matrix.
Click Apply.
Double-click the Approval Matrix Manager row to open the role.
In the Approval Matrix Manager role window, click the Users tab.
Click the Add User button.
In the Select Users dialog, search for the users you want, and move them into the Recipients list.
Click OK.
To facilitate the management of Functional Teams, there are three Administrator reports that provide information about how the Approval Matrix feature is configured. You can create a role that allows a user (for example, the Approval Matrix Manager) to run those three Administrator reports in Web Client. Because the reusable criteria conditions specify only the three Approval Matrix-related reports, this role does not allow the user to view or run any other Administrator Reports.
To create an Approval Matrix Administrator Reports role:
Create an Approval Matrix Administrator Reports criteria.This criteria specifies the names of only the three Approval Matrix Administrator reports.
Create a new reusable criteria. (See "Creating a New Criteria").
In the Name field, enter Approval Matrix Administrator Reports.
In the Object Type field, select Administrator Report.
Click Add to begin defining the criteria conditions. Define the criteria conditions as follows:
General Info.Name Equal To Workflow Approval Report Or
General Info.Name Equal To Workflow Job Functions Without Users Report Or
General Info.Name Equal To Inactive Users / User Groups on Active Functional Teams Report
Create the following privilege masks. Specify the Approval Matrix Administrator Reports criteria as the Privilege Criteria in each privilege mask.
Create an Administrator privilege mask as follows.
To run any administrator reports, the user must have a valid Administrator privilege mask. However, only one single Applied To property is needed for the Approval Matrix Administrator user to be able to run approval matrix administrator reports. For this privilege mask, the Users property will give the user an active Administrator privilege, but will restrict access to other Administrator functions. See also "Specialized Administrator Privilege Masks."
Create an Administrator privilege mask.
In the Name field, enter Administrator for Approval Matrix Administrator Reports.
In the Applied to property, select Users.
Click Save.
Create a Run Approval Matrix Administrator Reports role as follows:
Create a new role. (See "Creating a New Role from Scratch").
In the Name field, enter Run Approval Matrix Administrator Reports.
Assign the following privilege masks to the role. (These are the privilege masks that you created in steps 2 and 3 of this procedure.)
Discover Approval Matrix Administrator Reports
Read Approval Matrix Administrator Reports
Run Approval Matrix Administrator Reports
Administrator for Approval Matrix Administrator Reports
Click Save.
Assign the Run Approval Matrix Administrator Reports role to the appropriate users.
In the role window, click the Users tab.
Click Add Users to open the Select Users dialog box.
Select and use the arrows to move users from the Names list to the Recipients list.
When you are finished, click OK.
In the workflow statuses that include signoff capability (Review-type statuses and Released-type statuses), you can define approval template settings for each status criteria.
That is, for each status criteria, you can select a job function for the default Approver, Observer, Acknowledger, or Notified person. When the routable object enters that workflow status, Agile PLM matches the job functions in the workflow with the assigned job functions in the functional teams that were selected in the Functional Team(s) field on the Cover Page tab. Agile PLM then populates the routable object Workflow tab with the names of the appropriate users or user groups.
To configure the job functions approval template:
Under Workflow Settings, double-click Workflows. The Workflows window appears.
Double-click the workflow you want. The workflow window appears.
Click the Status tab to display it.
In the Status table, click a review-type or released-type status to select it.
In the lower Criteria table, double-click the criteria you want to modify.
In the field you want to configure, click the icon to open the Address Book. The fields to configure are:
Notify Upon Entry
Approvers
Acknowledgers
Observers
Click the Job Functions tab.
Select the job functions you want and use the arrow buttons to move them into the Recipients list.
When you are done, click OK.
Repeat step 6 through step 9 to configure the remaining fields.
In the Group Signoff Expansion field, select either All (default) or Any. This property determines whether user groups are expanded to populate the Workflow tab with the usernames of the members of the group (All) or to populate the Workflow tab with the user group name (Any – only one user needs to sign off).
The Approval Matrix Manager user manages the Functional Teams. Approval Matrix Manager tasks include:
Verifying the assigned Job Functions of users and user groups.
Creating functional teams.
Adding users and user groups to a functional team.
Selecting job functions for the members of the functional team.
Removing members of a functional team.
The ability to modify the Job Function(s) attribute of user objects and user groups objects requires a role that includes the appropriate Modify privilege masks.
Each user or user group can be assigned multiple job functions. A user can be a member of multiple functional teams and therefore, he can have a different job function on each functional team.
See "Modifying User Properties" and "Modifying a User Group" for basic modification instructions.
In Java Client:
Locate and open the user or user group you want to modify.
(Under User Settings, double-click the Users node or the User Groups node.)
In the Job Function(s) field, click the icon to open the selection dialog.
Select one or more job functions in the Choices list and use the arrow buttons to move them to the Select list.
When you are done, click OK.
In the user object window click Save.
In Web Client:
Locate and open the user or user group you want to modify.
(Choose Tools and Settings > Address Book > Users or Tools and Settings > Address Book > User Groups.)
Click Edit.
In the Job Function(s) field, click the icon to open the selection palette.
Double-click a row to add it to the field.
Press Escape to close the palette.
When you are done, click Save.
In Web Client, to add the same job function to multiple users simultaneously:
Open the address book Users tab.
Choose Tools and Settings > Address Book > Users.
Select the rows of the users you want to modify.
If necessary, use the Personalize filter to narrow your choices.
Choose More > Assign Job Functions.
The Assign Job Functions dialog appears.
In the Job Functions field, enter a job function name or click the icon to open the selection palette.
Double-click a row to add it to the field.
You can select one or more job functions.
Press Escape to close the palette.
When you are done, click Save.
|
Note: Functional Team objects are created in Agile PLM Web Client.You must have a role that allows you to create and modify Functional Teams. |
See also "Assigning Job Functions to Users and User Groups.".
To create a functional team:
In Web Client, choose Tools and Settings > Address Book > Functional Teams.
The Address Book opens with the Functional Teams tab displayed.
Click Add.
In the Create New dialog, select a value in the Type field, if necessary.
In the Name field, enter the name of the functional team.
Click Save.
The functional team object is displayed.
Modify the remaining fields on the General Info tab, if desired.
Description – Enter a meaningful description.
Status – Can be set to Active or Inactive.
Owner – If desired, select a different user.
Click Save.
On the Job Functions tab, you specify the job functions that will be included in this functional team, and you select the user or user group that will perform each job function on this team.
To add select job functions and add team members:
Click the Job Functions tab.
Click the Add button. The Add Job Function to Functional Team dialog appears.
In the Job Function field, click the icon to open the selection palette.
Double-click to select a job function.
You can select only one job function for each job function table row. Each job function can be listed only once on the job function table.
Press Escape to close the palette.
Click the icon to open the Users/User Groups search palette.
Search for the user or user group you want to add.
The search is limited to users or user groups that have been assigned the job function that you selected in step 4. For example, if you select Developer as the job function, the search is limited to users or user groups that where Developer is included in their Job Function(s) attribute.
Double-click the users you want to add.
If desired, you can perform additional searches to find more users or user groups to add.
You can add as many users and user groups as needed.
When you are done, click Add.
The row is added to the job functions table.
To remove a job function from the Job Function table:
Select the row you want to remove.
Click Remove.
To edit a job function row:
You can add or remove users or user groups in the User/User Groups cell of the Job Functions table.
In the table row you want to modify, double-click inside the User/User Groups cell. The search palette appears.
Click the small x button on each user or user group you want to remove.
Type the name of the user or user group you want to add separated by semicolons.
Or, click the icon to open the address book palette.
The search is limited to users or user groups that have been assigned the job function in that row.
Press Return to save your modifications to the cell.
When you are done, click Save on the job functions table.
Use the Workflow Job Functions Without Users Report to identify the routable objects that have missing users.
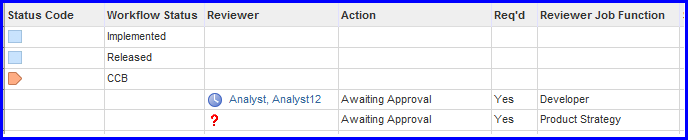
The Missing User icon (a red question mark) is displayed in the Reviewer column of routable object workflow table when:
A job function has been defined as a reviewer for the routable object.
And
There is no identified user or user group to assign as a reviewer.
A missing user can appear if:
The job function is not included on the functional team Job Functions table.
Or
The job function is included on the Job Functions table, but no users or user groups are listed in the Users/User Groups field.
For example, the workflow requires that a user with the Product Strategy job function must approve the routable object. The functional team that was selected in the routable object Functional Team(s) attribute does not include the Product Strategy job function. When the routable object enters the CCB status, the missing user is indicated by the Missing User icon.
To resolve a missing user on the routable object workflow table:
You must have the appropriate modify privileges to edit the workflow table Reviewer field.
Double-click inside the table cell where the Missing User icon appears. A small search dialog appears.
Only users and user groups that have the specified job function included in their Job Function(s) attribute appear in the search results. For example, when you resolve a missing user for a Product Strategy reviewer job function, then the search results are limited to Product Strategy users and user groups.
Enter text to find a reviewer:
Begin typing a name and Agile PLM displays a name that matches in the search results field.
Click the name in the search results field to select it.
Press Enter to populate the Reviewer cell and to close the search dialog.
Or, click the icon to launch the address book palette.
Execute a search.
Double-click to select the search result row you want.
Press Escape to close the address book palette.
Press Enter to populate the Reviewer cell and to close the search dialog.
When you are done, click Save on the workflow table to save your edits.
To facilitate the management of Functional Teams, there are three Administrator reports that provide information about how the Approval Matrix feature is configured. These reports produce Excel spreadsheets. For general instructions about running "Administrator Reports."
The reports are:
If you have the appropriate privileges, you can run these reports in Web Client. If you initiate a report in Java Client, Web Client opens to that specific report page.
To access Approval Matrix Administrator reports in Web Client:
In the REPORTS drawer in the left navigation pane, click the Expand icon next to the Reports and Analytics folder to view the top-level folders.
Click the Expand icon next to the Standard Reports folder.
Click the Expand icon next to the Administrator Reports folder.
In the Administrator Reports folder, click the name of the report you want to run to open the report page in the content pane.
For general instructions about running "Administrator Reports."
Use the Inactive Users / Users Groups on Active Functional Teams Report to identify disabled users (and user groups) that are members of active functional teams. This enables you to identify which functional teams need to be modified to remove the inactive user or user group.
To run the report in Web Client:
In the REPORTS drawer in the left navigation pane, navigate to the report: Reports and Analytics > Standard Reports > Administrator Reports. Click Inactive Users / User Groups on Active Functional Teams Report. The report is displayed in the content pane.
Click the Execute button.
When the File Download dialog appears, click Open to open the spreadsheet report, or click Save to save it on your local drive.
For general instructions about running "Administrator Reports."
The Workflow Approval Report shows how job function workflow approvals have been configured in each workflow.
To run the report in Web Client:
In the REPORTS drawer in the left navigation pane, navigate to the report: Reports and Analytics > Standard Reports > Administrator Reports. Click Workflow Approval Report. The report is displayed in the content pane.
Click the Execute button.
When the File Download dialog appears, click Open to open the spreadsheet report, or click Save to save it on your local drive.
The report shows how workflows are defined by workflow, status, and criteria. The report include the workflow name, status, criteria, criteria description, action (Approver, Acknowledger, Observer, Notified), and job function.
A "Yes" in a cell indicates which job function will perform which action for each criteria. Note the "Yes" cells in the following report excerpt:
The Workflow Job Functions Without Users report list the routable objects that have job functions defined in their workflow, but no user is associated with the job function on the routable object Workflow tab. This report lists:
Job Function
Object Type
Object ID
Object Description
Status
Workflow Role (Approver, Observer, Acknowledger, Notified)
To run the report in Web Client:
In the REPORTS drawer in the left navigation pane, navigate to the report: Reports and Analytics > Standard Reports > Administrator Reports. Click Workflow Job Functions Without Users Report. The report is displayed in the content pane.
Click the Execute button.
In the Available Classes list, select the classes you want to include in the report. Use the left and right arrow buttons to move them to the Selected Classes list. Use the up and down arrow buttons to arrange them in the order you want.
Click Finish.
When the File Download dialog appears, click Open to open the spreadsheet report, or click Save to save it on your local drive.
When Agile PLM has been configured to use the Approval Matrix feature and the Approval Matrix Manager has created the necessary functional teams, then end users can use functional teams in the workflow process.
To use functional teams in the workflow process:
Create a routable object, for example, an ECO.
On the Cover Page tab, the two attributes that control the Approval Matrix feature are:
Workflow – Select the appropriate workflow for your routable object.
Functional Team(s) – Select one or more functional teams.
When the routable object enters a signoff status (review-type status or released-type status), Agile PLM matches the job functions in the workflow definition to the job functions in the functional teams, and populates the routable object Workflow tab with Approvers, Acknowledgers, Observers. That is:
A functional team matches one or more users with a job function. For example:
Mary Jones – Developer
John Smith – Product Manager
Bob White – QA Lead
The Agile administrator configures a workflow to associate a workflow action with a job function, for example:
Approver – Developer
Acknowledger – Product Manager
Observer – QA Lead
On the routable object Cover Page or General Info tab, one or more functional teams are selected in the Functional Team(s) attribute. When the routable object enters a signoff status, the job functions configured in the workflow are matched to the job functions in the functional teams. Agile PLM then populates the Workflow table with the appropriate users. From the examples above:
Approver – Developer – Mary Jones
Acknowledger – Product Manager – John Smith
Observer – QA Lead – Bob White