| Agile Product Lifecycle Management Product Collaboration User Guide Release 9.3.3 E39292-03 |
|

 Previous |
 Next |
| Agile Product Lifecycle Management Product Collaboration User Guide Release 9.3.3 E39292-03 |
|
Previous |
Next |
Agile PLM provides a way to track the relationships between items and their manufacturers and to create an approved manufacturers list (AML).
This section covers the following topics:
The Agile Approved Manufacturers List (AML) solution enables an organization to manage information related to manufacturers and the parts they produce.
With Agile AML, you can quickly find, for instance, which manufacturers are producing a particular part, their identification information for that part, where that part is used, and contact information for the manufacturer.
The AML of an item is represented by the rows of information on the Manufacturers tab of the item. Each row represents a manufacturer part. See "Manufacturers Tab of an Item."
Additionally, you can use manufacturer change orders (MCOs) to change manufacturing data.
|
Note: You can also use a site change order (SCO) to change site-specific manufacturing data. |
The AML features let you work with the following manufacturing objects:
The manufacturer - this object holds data about product manufacturers, including contact information and where their parts are used in your assemblies.
The manufacturer part - this object describes product parts from the manufacturers' point of view, with information such as their part numbers and their names for that part, and also information about where this part is used in your assemblies and which manufacturing sites use this manufacturer part.
For more information about manufacturing objects, see "Manufacturing Objects: Manufacturers and Manufacturer Parts."
AML capabilities allow you to track complex, many-to-one relationships. The following figure shows an example of a more complex situation such as those commonly found in real-life manufacturing.
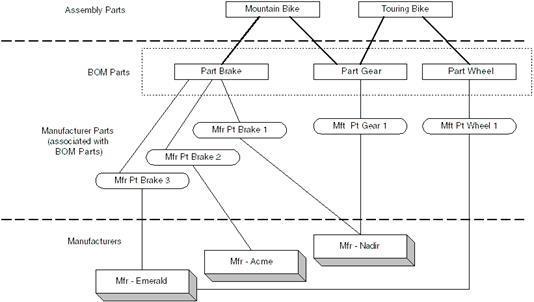
In this example, one part has more than one manufacturer part, and some manufacturers provide more than one manufacturer part.
|
Note: Depending on the Agile Administrator setting for the Multiple Items Per Manuf Part SmartRule, your Agile PLM system may be configured so that a manufacturer part can be added to the Manufacturers tab of only one item. Contact the Agile administrator if you have questions about manufacturer parts associated with multiple items. |
A manufacturer part can apply to all manufacturing sites where the product is built, some sites, or just one site. The common portion of the AML lists AML information that is shared between all the sites assigned to the item. Each site can add other manufacturing information to the AML table that is site-specific-for example, manufacturers that are used by the site because they are located nearby. Also, a manufacturer part may be Preferred at one site and Alternate at another site. Manufacturer parts used by multiple sites are listed multiple times on the AML tab, once for each site.
The AML Required on Buy field of a site determines whether a manufacturer part is required for an item when the item is specified as a Buy for a given site. For more information about AML Required on Buy, see "AML Required on Buy Field."
|
Note: Whether an item is specified as a Buy is determined by the value in the Make/Buy field on the Sites tab of the item. |
To track manufacturing data in Agile PLM, you must first set up the manufacturers in your database and then create the manufacturer parts that they produce for use in your assemblies.
Order is important. You cannot create a manufacturer part until you have created the corresponding manufacturer.
The process is performed in the following sequence:
Create the manufacturer.
For example, create a manufacturer named Acme.
Create the manufacturer part.
Create manufacturer part number AM230PS, specifying Acme as the manufacturer.
Add the manufacturer part to the Manufacturers tab of the internal part.
For example, on part P001232, go to the Manufacturers tab and add Acme AM230PS.
Once the relationships have been established, it is easy to track manufacturing data activity.
From this point on, manufacturing data can be managed through the redlining process. This is discussed in "Redlining through ECOs, MCOs, and SCOs."
|
Note: Manufacturing objects are not subject to the change control process and can be created, edited, and deleted by any user granted the necessary privileges. Those changes go into effect immediately. |
To set up manufacturer data in the database:
Create the manufacturer. This represents the manufacturer of the purchased part.
Create the manufacturer part. This represents the part that the manufacturer produces.
Match the manufacturer part to the corresponding item by adding it to the item's Manufacturers tab.
This section covers the following topics:
Manufacturing objects have several of the same tabs as items (Where Used, Attachments, Relationships, and History), but they also have differences. For example, they have a General Info tab rather than a Title Block tab, and they do not have a Changes tab or BOM tab.
The table below lists the default fields on the tabs of these two manufacturing objects.
The Agile administrator may have added additional sections (Web Client) or tabs (Java Client), called Page Two and Page Three by default. These sections or tabs contain custom fields defined by the administrator.
Manufacturer object tabs:
Table 4-1 Manufacturer object tabs
| Tab | Fields include |
|---|---|
|
General Info tab |
Name Lifecyle Phase Mfg. Type Contact URL D-U-N-S Number contact information |
|
Where Used tab |
Item Number Item Description Mfr. Part Number Mfr. Part Lifecycle Phase |
|
Attachments tab |
Attachment Number Attachment Description File Name File Version File Size File Type Modified Date Last View Date Checkout User Checkout Date Checkout Folder For information about working with attachments see Getting Started with Agile PLM. |
|
History tab |
Action User Local Client Time User Action Time (optional) Comments Details |
Manufacturer Part object tabs:
Table 4-2 Manufacturer Part object tabs
| Tab name | Fields include |
|---|---|
|
General Info tab |
Manufacturer Name Manufacturer Part Number Description Mfr. Part Type Lifecycle Phase Item Group(s) - If this field has been enabled, then it displays the item group of which the current manufacturer part is a member PG & C fields - The following fields are related to Agile PG&C. For more information, see the Agile Product Governance and Compliance User Guide. Compliance Calculated Date Part Family Mass Overall Compliance |
|
Where Used tab |
Where Used table includes: Item Sites Item Number Item Description Mfr. Tab Preferred Status Mfr. Tab Reference Notes Pending Change Where Used table includes the same fields as above, with one additional field: Pending Change |
|
Attachments tab |
Attachment Number Attachment Description File Name File Version File Size File Type Modified Date Last View Date Checkout User Checkout Date Checkout Folder For information about working with attachments see Getting Started with Agile PLM. |
|
History tab |
Action User Local Client Time User Action Time (optional) Comments, Details |
|
Prices tab |
This tab relates to Agile PCM. For more information, see the Product Cost Management User Guide. |
|
Compliance tab Suppliers tab |
These tabs relate to Agile PG&C. For more information, see Agile Product Governance & Compliance User Guide. |
The manufacturer Where Used tab lists all the manufacturer part numbers for the manufacturer and the items that use the manufacturer parts. The information on this tab is filled in automatically.
The manufacturer part Where Used tab lists all the items that use the manufacturer part. The information on this tab is filled in automatically.
The Where Used tab includes two tables:
Where Used - displays the latest revision of the items where the manufacturer part is used. Latest revision can be either an Introductory revision or the latest released revision.
Pending Change Where Used - displays the pending revisions of the items where the manufacturer part is used, including the pending change order number.
|
Note: When you first view the Where Used tab, the Pending Change Where Used table is hidden by default. |
To view or hide the Pending Change Where Used table in Web Client:
On the Where Used tab, click the Pending Changes Where Used sub-tab.
To view an item from the Where Used tab using Web Client:
Click the item number.
To view or hide the Pending Change Where Used table in Java Client:
Use the View drop-down list to select either Show Pending or Hide Pending.
To view an item from the Where Used tab using Java Client:
Double-click the item's row.
When you view the Where Used tab of a manufacturer part, the table displays where-used information according to item number and manufacturing site.
See also: "How Sites Work."
|
Note: If your company has the necessary licenses, and you have been granted the necessary privileges, then you can perform the Prices tab processes described here. |
The Prices tab displays the price information for this manufacturer part. The information on this tab is filled in automatically. Click the price object number (in the Number column) to open that price object. For more information see the Product Cost Management User Guide.
If you do not have Discovery privilege for an item, site, or manufacturing object, then it does not appear on the Where Used tab. The Agile administrator can specify whether to display a warning message telling you how many objects are not displayed. (For sites, this applies only to the Where Used tab of manufacturer parts. The Where Used tab of manufacturers does not include a column for site information.) For more information, see "Details about Discovery and Read Privileges."
Your Read privileges and Enforce Field Level Read privileges determine which fields you are able to view. For more information, see "Details about Discovery and Read Privileges."
Manufacturer objects contain information about manufacturers with which your organization collaborates.
Creating a manufacturer is the first step in adding a new manufacturer part to the Agile PLM database. After you create the manufacturer, then you create the manufacturer part in association with that manufacturer. When you then associate the manufacturer part with an item, the manufacturer part is referenced on the Where Used tab of the manufacturer object.
If you have the necessary privileges, then you can modify a manufacturer object directly at any time. Manufacturers are not under change control.
To find manufacturers in your Agile PLM database, use the same search process as you use for any other object. For more information about searches, see Getting Started with Agile PLM.
See also: "Lifecycle Phase of a Manufacturer," "D-U-N-S Number."
The lifecycle phase field on the General Info tab of the manufacturer object indicates its lifecycle phase. The following table lists the default manufacturer lifecycle phases. The Agile administrator may define a customized list of lifecycles for your Agile PLM system.
The D-U-N-S Number field enables companies to list the DUNS of their suppliers in the system.
D-U-N-S stands for Data Universal Numbering System. A D-U-N-S number is a unique nine-digit sequence that identifies an organization.
See also: "Manufacturing Object Tabs."
The manufacturer part object displays information about a part produced by a specific manufacturer, including the manufacturer's part number, lifecycle phase, where it is used, and a history of actions affecting that manufacturer part.
The combination of the manufacturer name and manufacturer part number must be unique to that manufacturer part. In other words, you cannot create another manufacturer part for the same manufacturer using the same manufacturer part number. Agile PLM does support the situation in which different manufacturers use an identical part number, however.
If you have the necessary privileges, then you can modify a manufacturer part object directly at any time. Manufacturer parts are not under change control.
To find manufacturer parts in your Agile PLM database, use the same search process as you use for any other object. For more information about searches, see Getting Started with Agile PLM.
After you create a manufacturer part, then you can add it to the Manufacturers tab of the Agile part to which it corresponds. For more information about working with manufacturer parts, see "Creating and Managing Manufacturing Objects."
The lifecycle phase field on the General Info tab of the manufacturer part object indicates its lifecycle phase. The following table lists the default manufacturer part lifecycle phases. The Agile administrator may define a customized list of lifecycles for your Agile PLM system.
Table 4-4 Manufacturer Part object Lifecycle phases
| Lifecycle name | Lifecycle definition |
|---|---|
|
Active |
This manufacturer part is available for use. |
|
Obsolete |
This manufacturer part should no longer be used. |
See also: "Lifecycle Phase of a Manufacturer."
This section covers the following topics:
In Web Client, you can create a manufacturer with the Create New > Manufacturers command or the Actions > Save As command.
In Java Client, you can create a manufacturer with the File > New > Manufacturers command or with the New Object button, or the Save As command, on the More Actions menu (click the More button at the top of the object window) and on the right-click shortcut menu.
Unlike items, manufacturers do not need to go through the release process. They are immediately available for use.
|
Note: The manufacturer name must be unique to one manufacturer, just as an item number must be unique to an item. |
Although different manufacturers can use the same manufacturer part number, the combination of manufacturer plus manufacturer part number must be unique to one manufacturer part object.
The process for creating new objects involves two main steps: creating an empty object, and then filling in the object tabs with information specific to the object.
To create a manufacturer using Web Client:
Choose Create New > Manufacturers.
In the Create New dialog, use the Type drop-down list to select the type (subclass) of manufacturer you want to create.
Type a unique name for the manufacturer.
Complete any required fields.
Click Save.
The new manufacturer appears in the content pane with the General Info tab displayed in edit mode.
Fill in information on the General Info tab and click Save.
Fill in information on the remaining manufacturer tabs, as desired.
You do not enter information on the Where Used and History tabs. Those tabs are completed automatically.
To create and complete a manufacturer using Java Client:
Choose File > New > Manufacturers.
In the New dialog, use the Type drop-down list to select the type (subclass) of manufacturer you want to create.
Type a unique name for the manufacturer.
Complete any required fields.
Click OK.
The new manufacturer appears with the General Info tab showing.
Fill in information on the manufacturer tabs, as desired.
You do not enter information on the Where Used and History tabs. Those tabs are completed automatically.
See also: "Modifying Manufacturing Objects."
Using the Save As feature is a quick way to create a manufacturer that is similar to an existing manufacturer.
In Web Client, you can create a manufacturer using the Actions > Save As command.
In Java Client, you can create a manufacturer using the File > Save As command, the Save As command on the More Actions menu (click the More button at the top of the object window) or the Save As command on the right-click shortcut menu.
|
Caution: In general, you should not use Save As to create an object in a different class or subclass (type) from the original object. The different classes or subclasses may not have the same tabs or defined fields, and you may lose access to some data in the newly created object. |
To create a manufacturer using the Save As command in Web Client:
Select and open an existing manufacturer.
Choose Actions > Save As.
If appropriate, select a different manufacturer type (subclass) from the list.
Enter the name of the new manufacturer.
Complete any required fields.
Click Save.
The new manufacturer appears in the content pane with the General Info tab displayed in edit mode.
Edit information on the General Info tab as required and click Save.
To create a manufacturer using the Save As command in Java Client:
Select and open an existing manufacturer.
Choose File > Save As.
If appropriate, select a different manufacturer type (subclass) from the list.
Enter the name of the new manufacturer.
Complete any required fields.
Click OK.
The new manufacturer opens with the General Info tab on top.
See also: "Modifying Manufacturing Objects."
To create manufacturer parts, you must have the appropriate Create Manufacturer Parts privilege.
In Web Client, you can create a manufacturer part with the Create New > Manufacturer Parts command. From an open manufacturer object, you can create a manufacturer part with the Actions > Create Manufacturer Parts command. You can also use the Actions > Save As command from an open manufacturer part.
In Java Client, you can create a manufacturer part with the File > New > Manufacturer Parts command or with the New Object button. You can also use the File > Save As command when a manufacturer part is open.
You can also create a manufacturer part on-the-fly as you add information to the Manufacturers tab of an item.
Unlike items, manufacturer parts do not need to go through the release process. They are immediately available for use.
|
Note: Different manufacturers can use the same manufacturer part number, however, the combination of manufacturer plus manufacturer part number must be unique to one manufacturer part object. |
See also:
To create a manufacturer part using Web Client:
Choose Create New > Manufacturer Part. (You can also choose Actions > Create Manufacturer Part from within a manufacturer.)
In the Create New dialog, use the Type drop-down list to select the type (subclass) of manufacturer part you want to create.
Select the manufacturer of the new manufacturer part by using one of the following methods:
Type-ahead search:
In the Manufacturer Name field, begin typing the name of the manufacturer. Agile PLM searches for manufacturer names that begin with the characters you type.
As you type, Agile PLM displays a list of the matching values alphabetically and automatically displays the first matching value in the Manufacturer field.
Use the up arrow and down arrow keys to highlight a value in the list. Press the Return key to select the highlighted value.
Or, click a value in the list to select it.
Quick Search:
Click the Launch the Palette button.
Enter the search criteria and click Search. Agile PLM searches for manufacturer names that contain the specified text.
In the search results table, double-click the name of the manufacturer you want.
Press the Escape key to close the search palette.
Create to Add:
Click the Create to Add button.
In the Create New dialog, use the Type drop-down list to choose a manufacturer subclass.
Enter the name of the new manufacturer.
Click Save.
Type a number for the manufacturer part.
Complete any required fields.
Click Save.
The manufacturer part is displayed in the right content pane with the General Info tab in edit mode.
Edit the General Info fields as desired, and click Save.
You do not enter information on the Where Used and History tabs. Those tabs are completed automatically.
To create and complete a manufacturer part using Java Client:
Choose File > New > Manufacturer Parts.
In the New dialog, use the Type drop-down list to select the type (subclass) of manufacturer part you want to create.
Select the manufacturer of the new manufacturer part.
In the Manufacturer Name field, type the manufacturer name or a portion of the manufacturer name. Press the Tab key or click the Validate checkmark:
If you enter a valid and unique manufacturer name, then Agile PLM selects that manufacturer name and the Validate checkmark is disabled. Press the Tab key to continue with the next step.
If you did not enter a valid and unique manufacturer name, then the resolution dialog appears.
In the resolution dialog, select the manufacturer you want and click OK.
If the manufacturer you want does not appear in the search results, then you can perform another search or you can create a new manufacturer:
Search - In the resolution dialog, select a search method. If you choose to perform a simple search, then enter the value to search for and click Search. You can also define an advanced search, run a saved search, or select a bookmarked or recently visited manufacturer (Shortcuts). (For more information about searches, see Getting Started with Agile PLM.) In the search results, select the manufacturer you want, and click OK.
Create - If you need to create a new manufacturer for the manufacturer part, then click the Create button in the resolution dialog. A create dialog appears that lets you select the manufacturer type (subclass) in the Type drop-down list and enter the manufacturer name. Click OK. The resolution dialog closes and the newly created manufacturer is selected.
For further details, see "How to Use Java Client Manufacturer Name Automatic Validation."
Type a number for the manufacturer part.
Complete any required fields.
Click OK.
The new manufacturer part appears with the General Info tab showing.
Fill in information on the manufacturer part tabs, as desired.
You do not enter information on the Where Used and History tabs. Those tabs are completed automatically.
Whenever you create a manufacturer part, or add to or edit the table of an item's Manufacturers tab, Agile PLM provides an automatic search and validation process to quickly search for and select the manufacturer you want to specify.
This section includes the topics:
Agile PLM Java Client uses automatic manufacturer name validation whenever you create a manufacturer part or you edit manufacturer part information.
With the appropriate privileges, you can create a manufacturer part by using the following Agile PLM features:
Object creation: File > New or Create New button.
Item object Manufacturers tab, add manufacturer part by create.
Change object Affected Items tab, Redline Manufacturers tab, add by create.
Change object Affected Items tab, manufacturer part bulk change process.
With the appropriate privileges, you can edit manufacturer part information on the following tabs:
Item object Manufacturers tab.
Change object Affected Items tab, Redline Manufacturers tab.
Change object Affected Items tab, manufacturer part bulk change process.
Whenever manufacturer name automatic validation is used, follow these steps:
In the Manufacturer Name field of the create or edit dialog, type the name of the manufacturer or a portion of the name for which you want to search.
If you enter a valid and unique manufacturer name, then Agile PLM selects that manufacturer name and the Validate checkmark is disabled. Press the Tab key to move to the next field in the dialog.
|
Note: You may leave the Manufacturer Name field blank. When the resolution dialog appears, use the search options to search for the manufacturer you want or to create a new manufacturer. |
For example, to find the manufacturer name Motorola, then you can type any of the following text strings to begin your search. Agile PLM performs a Starts With search for any manufacturer name that starts with the letters you typed.
mot
motorla
mo
|
Note: Agile PLM automatically adds an asterisk character * to the end of the text string. |
When you move the cursor out of the Manufacturer Name field, the validation process begins and the validation dialog appears. You can move the cursor out of the name field by using any of the following methods:
Press the Tab key.
Click the Validate checkmark in the Manufacturer Name field.
Click another field in the dialog.
Attempt to exit the edit dialog by clicking OK.
Attempt to exit the create dialog by clicking OK.
In the resolution dialog, select a manufacturer name in the search results and click OK. The resolution dialog closes and the selected manufacturer name appears in the Manufacturer Name field of the create or edit dialog.
If the manufacturer name you want does not appear in the search results, then you can:
Run another search.
Select a search method. If you choose to perform a simple search, then enter the value to search for and click Search. You can also define an advanced search, run a saved search, or select a bookmarked or recently visited manufacturer (Shortcuts). (For more information about searches, see Getting Started with Agile PLM.)
Create a new manufacturer object.
Click the Create button in the resolution dialog to create a manufacturer object. See "Creating Manufacturers."
See also: "Where is Java Client Manufacturer Name Automatic Validation Used?."
Using the Save As feature is a quick way to create a manufacturer part that is similar to an existing manufacturer part.
|
Caution: In general, you should not use Save As to create an object in a different class or subclass (type) from the original object. The different classes or subclasses may not have the same tabs or defined fields, and you may lose access to some data in the newly created object. |
To create a manufacturer part using the Save As command in Web Client:
Select and open an existing manufacturer part.
Choose Actions > Save As. The Save As dialog appears.
If appropriate, select a different manufacturer part type (subclass) from the list.
Select the manufacturer of the new manufacturer part, if desired.
|
Note: If you use the same manufacturer, then you do not need to modify the Manufacturer Name field. |
To select a different manufacturer for the new manufacturer part, use one of the following methods:
Type-ahead search:
In the Manufacturer field, begin typing the name of the manufacturer. Agile PLM searches for manufacturer names that begin with the characters you type.
As you type, Agile PLM displays a list of the matching values alphabetically and automatically displays the first matching value in the Manufacturer field.
Use the up arrow and down arrow keys to highlight a value in the list. Press the Return key to select the highlighted value.
Or, click a value in the list to select it.
Quick Search:
Click the Launch the Palette button.
Enter the search criteria and click Search. Agile PLM searches for manufacturer names that contain the specified text.
In the search results table, double-click the name of the manufacturer you want.
Press the Escape key to close the search palette.
Quick New:
Click the Create New button.
In the Create New dialog, use the Type drop-down list to choose a manufacturer subclass.
Enter the name of the new manufacturer.
Click Save.
Enter the new manufacturer part number.
Complete any required fields.
Click Save.
The new manufacturer part opens with the General Info tab on top.
Make any necessary modifications to the other tabs.
To create a manufacturer part using the Save As command in Java Client:
Select and open an existing manufacturer part.
Choose File > Save As.
If appropriate, select a different manufacturer part type (subclass) from the list.
Select the manufacturer of the new manufacturer part.
|
Note: If you use the same manufacturer, then you do not need to modify the Manufacturer Name field. |
In the Manufacturer Name field, type the manufacturer name or a portion of the manufacturer name. Press the Tab key or click the Validate checkmark.
If you enter a valid and unique manufacturer name, then Agile PLM selects that manufacturer name and the Validate checkmark is disabled. Press the Tab key to continue with the next step.
If you did not enter a valid and unique manufacturer name, then the resolution dialog appears.
In the resolution dialog, select the manufacturer you want and click OK.
If the manufacturer you want does not appear in the search results, then you can perform another search or you can create a new manufacturer:
Search - In the resolution dialog, select a search method. If you choose to perform a simple search, then enter the value to search for and click Search. You can also define an advanced search, run a saved search, or select a bookmarked or recently visited manufacturer (Shortcuts). (For more information about searches, see Getting Started with Agile PLM.) In the search results, select the manufacturer you want, and click OK.
Create - If you need to create a new manufacturer for the manufacturer part, then click the Create link in the Select Objects dialog. A create dialog opens that lets you select the manufacturer type (subclass) in the Type drop-down list and enter the manufacturer name. Click OK. The resolution dialog closes and the newly created manufacturer is selected.
For further details, see "How to Use Java Client Manufacturer Name Automatic Validation."
See also: "Creating a Manufacturer Part in Java Client," "Creating a Manufacturer Part in Web Client."
Any user with the necessary privileges can modify information about a manufacturing object. Manufacturing objects are not required to go through the change control process, therefore, all modifications go into effect immediately.
|
Caution: If you change a manufacturer part number or manufacturer name, these changes are automatically made to the Manufacturers tab of the items where the manufacturer or manufacturer part is listed and to any other tabs where the manufacturer is listed, such as the Where Used tab. |
See also: "Creating Manufacturers," "Creating Manufacturer Parts."
For important details about deleting manufacturing objects, see Appendix A, "Deleting Agile Objects."
This section includes the following topics:
The Manufacturers tab displays information taken from related manufacturing objects. For more information, see "Manufacturers Tab."
See also: "Working with Manufacturing Data on Preliminary Items," "Modifying Manufacturing Data from the Redlines Tab."
The following table lists the buttons on the Manufacturers tab of an item.
Table 4-5 Item object Manufacturers tab, Web Client buttons and actions
| Button or Action,Web Client | Description |
|---|---|
|
Edit mode - Enter edit mode by double-clicking any editable table cell. Save Cancel |
Lets you edit the AML table using Web Client table editing features. The editable fields are in the form of text boxes, list boxes, and so on. Use the Save and Cancel buttons to either save or cancel your edits. |
|
Remove |
Removes the selected rows from the table. |
|
Add |
Displays the Web Client table addition tool, which lets you select manufacturer parts to add to the AML table by type-ahead searching, quick searching, or by creating a new manufacturer part. You can use the Add button if there is no ECO or MCO created against the item. |
Table 4-6 Item object Manufacturers tab, Java Client buttons and actions
| Button, Java Client | Description |
|---|---|
|
|
Lets you edit the AML row by displaying the selected rows in edit mode. The editable fields are in the form of text boxes, list boxes, and so on. |
|
|
Removes the selected rows from the table. |
|
(Java Client)
(Java Client) |
Adds a manufacturer part at the end of the table. It can be an existing manufacturer part or one you create while adding it. (Use the button drop-down list to choose either the Search or Create add method.) You can use this button if there is no ECO or MCO created against the item. |
|
|
For the selected row, opens the associated change object with the Redline Manufacturers tab displayed. |
See also: "Working with Manufacturing Data on Preliminary Items."
The following table lists the default fields on the Manufacturers tab of an item. The Agile administrator may have created additional fields.
Table 4-7 Item object Manufacturer tab fields
| Field name | Description |
|---|---|
|
(icon) |
Has Attachment The appearance of this icon indicates that the manufacturer part has an attachment. Click this icon to open the manufacturer part with its Attachments tab displayed. |
|
Mfr.Name |
The name of the manufacturer. |
|
Mfr. Part Number |
The number assigned to the manufacturer part by the manufacturer of the part. |
|
Mfr. Part Description |
The description assigned to the manufacturer part by the manufacturer of the part. |
|
Mfr. Part Lifecycle Phase |
Indicates whether the manufacturer is an active manufacturer of the part. |
|
Preferred Status |
Indicates whether the manufacturer is preferred or an alternate for this part. |
|
Sites |
Lists the sites that use the manufacturer part. |
|
Reference Notes |
Notes about the manufacturer. |
|
Summary Compliance |
Compliance information. For more information, see Product Governance & Compliance User Guide. |
|
AML Split (visible only if the Agile administrator has enabled it) |
Lets you define the percentage allocated for the manufacturer part at the selected site. For more information, see Product Cost Management User Guide. |
See also: "Working with Manufacturing Data on Preliminary Items," "Modifying Manufacturing Data from the Redlines Tab," "Viewing AML Information by Site."
You can view the AML for a specific site by selecting a site from the Site drop-down list above the tabs. Sites included in the list are the sites specified on the Sites tab of the item that are also listed in the Sites field of your user profile.
When you select a site, the Manufacturers tab displays the common AML plus the AML of the site you selected. To view the AML for all sites at once, select ALL in the Site list.
You can perform actions only on the items associated with the selected site. For example, if you select San Francisco in the Site drop-down list, then you see all manufacturer parts that are part of the common and San Francisco portions of the AML.
The Rev and Site drop-down lists work independently. For more details, see "Working with Item Revisions."
After you have created a manufacturer and a manufacturer part, you associate them with a part in the Agile PLM system. You do this by adding the manufacturer part to the Manufacturers tab of the Agile part only for preliminary items. Otherwise, this requires a change through an MCO, ECO, or SCO. This establishes the link between your part (Agile PLM item object) and their part (manufacturer part number, for example, Motorola 467), which makes it possible to track the use of their part throughout the system.
You can list more than one manufacturer part from the same manufacturer, or from more than one manufacturer. For example, if a manufacturer makes two parts that you sometimes use for that assembly, then you can mark one as Preferred and the other as Alternate. (You can do the same thing if two different manufacturers supply a part.)
|
Note: If you want a manufacturer part to apply to a specific site, then before adding the manufacturer part to the Manufacturers tab, select that site from the Site drop-down list above the tabs. |
Depending on the lifecycle phase of an item (and your assigned privileges), you can modify Manufacturers tab data by one of these methods:
Add or modify directly on the Manufacturers tab of items. This method is for preliminary items with no pending or released ECOs or MCOs. See "Adding a Manufacturer Part to the Manufacturers Tab."
Use an ECO, MCO, or SCO to modify manufacturing data on the redlines tab. This method is for released items or items with pending ECOs or MCOs. See "Adding a Manufacturer Part on the Redline Manufacturers Tab."
Once a manufacturing object has been used on the Manufacturers tab of an item, any alterations you make to the manufacturing object are also made on the Manufacturers tab of that item. Because manufacturing objects are not required to go through the change control process, all modifications that are made go into effect immediately. Because these alterations are not made through a change object, they will not be passed to the ERP system by ChangeCAST or Agile Content Service. To avoid potential problems between the Agile PLM and ERP systems, it is important to bear this in mind when making changes to any manufacturing object that is in use on an item's Manufacturers tab.
See also: "Modifying Manufacturing Data from the Redlines Tab."
The following sections describe how to modify data directly on the Manufacturers tab of an item has not been released and does not have a pending revision:
You can add manufacturer parts to the Manufacturers tab of an item.
To add a manufacturer part to the Manufacturers tab in Web Client:
On the Manufacturers tab, select the site for which you want to add the manufacturer part from the Site drop-down list.
Click the Add button. The table addition palette appears adjacent to the Mfr. Part Number column.
Select the manufacturer part by using one of the following methods:
Type-ahead search:
If you did not select a site in the object Site drop-down list, then you can select a site now in the palette drop-down list.
In the Mfr. Part Number field, begin typing the number of the manufacturer part. Agile PLM searches for manufacturer part numbers that begin with the characters you type.
As you type, Agile PLM displays a list of the matching values alphabetically and automatically displays the first matching value in the Mfr. Part Number field.
Use the up arrow and down arrow keys to highlight a value in the list. Press the Return key to select the highlighted value.
Or, click a value in the list to select it.
Quick Search:
Click the Launch the Palette button.
If you did not select a site in the object Site drop-down list, then you can select a site now in the palette drop-down list.
Enter the search criteria and click Search. Agile PLM searches for manufacturer part numbers that contain the specified text.
In the search results table, double-click the name of the manufacturer part you want.
Or, highlight a search result row and press Enter.
Press the Escape key to close the search palette.
Create New:
Click the Create to Add button.
In the Create New dialog, use the Type drop-down list to choose a manufacturer subclass.
Select the name of the new manufacturer.
Enter the manufacturer part number
If you did not select a site in the object Site drop-down list, then you can select a site now in the palette drop-down list.
Click Add.
To add a manufacturer part to the Manufacturers tab in Java Client:
1. On the Manufacturers tab, select the site for which you want to add the manufacturer part from the Site drop-down list.
2. In the Add button drop-down list, choose either Add > Create or Add > Search.
3. If you chose Add > Create, then:
Fill in the required information in the New dialog. See "Creating Manufacturers.".
If you enter information for a manufacturer part that already exists, then Agile PLM displays a prompt asking you whether to use the existing manufacturer part when you click OK in step c.
If you have not already done so, select the site to which you want to associate the manufacturer part for this item. Select Common to associate the manufacturer part with this item for all sites assigned to this item.
Click OK.
If you chose Add > Search, then:
In the Select Object dialog, select a search method to search for an existing manufacturer part, or select a bookmarked or recently visited manufacturer part (Shortcuts). If you choose to perform a simple search, then enter the value to search for. (For morin information about searches, see Getting Started with Agile PLM.)
If you have not already done so, select the site to which you want to associate the manufacturer part for this item. Select Common to associate the manufacturer part with this item for all sites assigned to this item.
Click OK.
See also: "Modifying Manufacturing Data from the Redlines Tab."
To delete a manufacturer part from the Manufacturers tab of an item that is in the Preliminary lifecycle phase in Web Client:
On the Manufacturers tab, select the manufacturer part row to be deleted.
Click the Remove button on the Manufacturers tab.
To delete a manufacturer part from the Manufacturers tab of an item that is in the Preliminary lifecycle phase in Java Client:
On the Manufacturers tab, select the manufacturer part row to be deleted.
Click the Remove button on the Manufacturers tab.
See also: "Modifying Manufacturing Data from the Redlines Tab."
You can directly edit manufacturer part information from the Manufacturers tab of an item if the item is in the preliminary state, has never been released, and has no pending ECOs or MCOs against it.
To edit values for a manufacturer part in Web Client:
Open the item to be edited.
On the Manufacturers tab, double-click any editable cell in the redline Manufacturers table to edit the field. The table is now in edit mode.
Press the Tab key or the arrow keys to move the focus to the next editable cell.
Use the tab toolbar buttons (Add, Remove, More) and table editing features to make the modifications you want.
Click Save to save your modifications.
To edit values for a manufacturer part in Java Client:
Open the item to be edited.
On the Manufacturers tab, select the rows that you want to edit.
Click the Edit button, and change the data as necessary in the Edit dialog.
You can use the navigation buttons in the open Edit dialog to select other rows to edit.
Click OK.
See also: "Modifying Manufacturing Data from the Redlines Tab."
If you have the appropriate privileges and Agile PLM system SmartRule settings allow it, then you can modify AML information through the Redline Manufacturers tab of an ECO, MCO, or SCO.
This section contains the following topics:
"Adding a Manufacturer Part on the Redline Manufacturers Tab"9
"Editing Manufacturer Part Information on the Redline Manufacturers Tab"
On some Agile PLM systems, depending on how the Agile administrator has configured settings, you can make manufacturer part redline changes from ECOs, SCOs, and MCOs. MCOs can redline only manufacturer parts data; ECOs can redline manufacturer parts data, BOMs, and attachments; SCOs can redline manufacturer parts data and BOMs for specific sites only.
MCOs and SCOs do not advance, or roll, the revisions of the affected items, however, ECOs do advance the revisions of the affected items.
Redlining manufacturing data from an ECO or SCO is the same as the process from an MCO. However, because you can use ECOs to redline manufacturing data, BOMs, or attachments, the ECO redlines include a Redline BOM tab, a Redline Manufacturers tab, and a Redline Attachments tab. The SCO redlines include a Redline BOM tab and a Redline Manufacturers tab.
|
Note: If a change includes conflicting redlines made from multiple manufacturing sites, then those conflicting redlines are removed from the BOM and Manufacturers table for all associated sites. |
For more information about changes, see Chapter 7, "Changes."
You display the Redline Manufacturers tab from the Affected Items tab of an ECO, MCO, or SCO.
To open the redlines for the AML of an item in Web Client:
Open the change through which you want to redline the AML of an item.
On the Affected Items table, select the item you want to redline.
When you choose a view in the Views list that excludes Sites information (for example, Hide Site Rows), the items are listed once on the Affected Items table. When you choose a view in the Views list that includes Sites information (for example, Base View), the items are listed multiple times, once for each site. Simply select one row in the table. If needed, then you can select a different site setting on the Redline Manufacturers tab.
In the redlines pane at the bottom of the Affected Items tab, display the Manufacturers tab.
If you selected a site-specific row in the Affected Items table, then only that row appears in the redline Manufacturers tab. If you selected the common site row in the Affected Items table, then both the common manufacturer part row and the site-specific manufacturer part rows are displayed in the redline Manufacturers tab.
Double-click any editable cell in the redline Manufacturers table to edit the field. The table is now in edit mode.
Use the tab toolbar buttons (Add, Remove, Undo Redlines, More) and table editing features to make the modifications you want.
Click Save to save your modifications. See the following table for details.
Table 4-8 Redline Manufacturers tab buttons and actions, Web Client
| Web Client button | Action |
|---|---|
|
Double-click an editable cell to enter table edit mode. |
Use the Web Client edit features to edit table cells. Press Tab or arrow keys to move the focus to the next editable cell. |
|
More menu |
In table edit mode, choose Copy, Paste, Fill-down, Fill-down (selected cells), Fill-up, Fill-up (selected cells) |
|
Save |
Saves modifications made in table edit mode. |
|
Remove |
Redline-deletes the selected rows from the redline Manufacturers table. |
|
Undo Redlines |
Clears the redlines from the selected rows. See Chapter 4, "Undoing Changes to the Redline Manufacturers Tab." |
|
Add |
Lets you redline-add a manufacturer part to the item. |
To open the redlines for the AML of an item in Java Client:
Open the change through which you want to redline the AML of an item.
In the Affected Items table, select the item you want to redline.
The View drop-down list has two settings: Hide Sites and Show Sites. When you select Hide Sides, the items are listed once on the Affected Items table. When you select Show Sites, the items are listed multiple times, once for each site. Simply select one row in the table. If needed, then you can select a different site setting on the Redline Manufacturers tab.
In the bottom pane of the Affected Items tab, display the Redline Manufacturers tab.
In the Site drop-down list, select the site for which you want to redline manufacturer part information. Select ALL to redline manufacturer part information for all the item's sites.
Select a row in the Redline Manufacturers table and use the buttons to make the modifications you want. See the following table for details.
Table 4-9 Redline Manufacturers tab buttons and actions, Java Client
| Java Client button | Action |
|---|---|
|
|
Displays the selected row in the Redline Manufacturer dialog so that you can redline editable fields. Use the buttons in the upper left corner to view and edit other rows in the table. Click OK when you are finished. |
|
|
Lets you redline-add a manufacturer part to the item. |
|
|
Redline-deletes the selected rows from the Redline Manufacturers table. |
|
|
Clears the redlines from the selected rows. |
If a row in the table has a red line through every cell, then it means that manufacturer part was deleted from the Manufacturers table. If just a few of the cells have a short red line through them, then it means Manufacturer table attributes were modified. Any cell that was modified has a red line through the old value and the new value appears in red.
See also: Chapter 7, "Changes," Chapter 8, "Affected Items of Changes."
To add a manufacturer part to the Redline Manufacturers tab in Web Client:
Follow the instructions in "Redline Manufacturers Tab."
When the redline Manufacturers tab is displayed, click the Add button and use the Web Client object selection palette features to search for and to select the manufacturer parts you want.
Continue as described in "Adding a Manufacturer Part on the Redline Manufacturers Tab."
To add a manufacturer part to the Redline Manufacturers tab in Java Client:
Follow the instructions in "Redline Manufacturers Tab."
When the Redline Manufacturers tab is displayed, use the Add button drop-down list to choose Add > Search to search for a manufacturer part.
Continue as described in "Adding a Manufacturer Part on the Redline Manufacturers Tab."
To create a new manufacturer part to add to the Manufacturers tab:
In Web Client, use the Add button, and then click the Create to Add button in the search palette.
In Java Client, use the Add button drop-down list to choose Add > Create.
If you use this option, then you must also select a manufacturer from a list of existing manufacturers or, if needed, create a new manufacturer. See "Adding a Manufacturer Part on the Redline Manufacturers Tab."
Redline-deleting a manufacturer part has these behaviors:
If the selected row is red, then redline-deleting it removes the row.
If the selected row is black, then redline-deleting it puts a red line through the row.
To delete a manufacturer part in Web Client:
Select the row to delete.
Click the Remove button on the redline Manufacturers tab.
To delete a manufacturer part in Java Client:
Select the row to delete.
Click the Remove button on the Redline Manufacturers tab.
An item's AML (approved manufacturers list) is represented by the rows of information on the item object Manufacturers tab. Each row in the AML table represents a manufacturer part. If the item has not yet been released, then you can edit this table on the item Manufacturers tab, for example, add or remove manufacturer parts, modify editable fields, including any editable custom fields that the Agile administrator has enabled. Your assigned roles and privileges determine which AML table fields you are allowed to edit. See "Modifying a Manufacturer Part on the Manufacturers Tab."
If the item has been released or has a pending revision, then you must use the Redline Manufacturers tab to modify the AML (Manufacturers tab) of the item. You display the Redline Manufacturers tab from the Affected Items tab of an ECO or MCO.
On the Redline Manufacturers tab you can make the same modifications that you are allowed to make on the Manufacturers tab of an item that has not been released, including modifying any editable custom fields that the Agile administrator has enabled.
If the Agile administrator has enabled them, then the item Manufacturers tab may also include read-through fields that display additional information derived from the manufacturer object or the manufacturer part object, for example, the manufacturer address fields or the manufacturer part Page Two fields. On both the item Manufacturers tab and the Redline Manufacturers tab, a read-through field contains a read-only copy of attribute data from a manufacturer or manufacturer part.
|
Note: You cannot use the item Manufacturers tab or Redline Manufacturers tab to modify the read-through fields nor to modify the attributes of the manufacturer part objects. The Manufacturers tab and Redline Manufacturers tab are used only for defining the AML of the item - the relationship between the item and the manufacturer parts. |
To modify the attributes of a manufacturer or manufacturer part, you must open the manufacturer or manufacturer part and then modify it with the edit feature. See "Modifying Manufacturing Objects."
For more information about read-through fields and about which fields are editable on the item Manufacturers tab, see Agile PLM Administrator Guide.
|
Note: Your assigned roles and privileges also determine which attributes you are allowed to edit. |
To edit a field on the redlines tab in Web Client:
Double-click any editable cell in the redline Manufacturers table to edit the field. The table is now in edit mode.
Use the tab toolbar buttons (Add, Remove, Undo Redlines, More) and table editing features to make the modifications you want.
Click Save to save your modifications.
To edit a field on the redlines tab in Java Client:
Select one or more rows to edit, and then click the Redline Manufacturer button.
In the Redline Manufacturers dialog, make the required changes in the fields. Use the buttons in the upper left corner to display and edit other rows in the table.
When you are finished, click OK.
Agile PLM draws a red line through the old information and enters the new information, in red, below the old information.
See also: Chapter 7, "Changes," Chapter 8, "Affected Items of Changes."
The Undo Redlines button lets you undo modifications to the redlines tab. The Undo Redlines button removes the red elements from the selected rows.
To undo a deletion (where Agile PLM has drawn a red line through the entire row):
Select a deleted row.
Click the Undo Redlines button.
Respond to the confirmation dialog.
Web Client: Click Undo.
Java Client: Click Yes.
To undo a modification (where Agile PLM has drawn a short red line through the modified value):
Select the modified row.
Click the Undo Redlines button.
Respond to the confirmation dialog.
Web Client: Click Undo.
Java Client: Click Yes.
See also: "Modifying Manufacturing Data from the Redlines Tab."
You can print object tabs and other data from your Agile PLM system. You can print the current tab or all tabs. Attachments are printed from their native applications or from the AutoVue for Agile viewer.
In Web Client, with the object open, choose Actions > Print.
In Java Client, with the object open, use the Print button.
For additional information about printing objects, see Getting Started with Agile PLM.
|
 Copyright © 2010, 2014, Oracle and/or its affiliates. All rights reserved. Legal Notices |
|


