| Agile Product Lifecycle Management Getting Started Guide Release 9.3.3 E39288-03 |
|

 Previous |
 Next |
| Agile Product Lifecycle Management Getting Started Guide Release 9.3.3 E39288-03 |
|
Previous |
Next |
This chapter describes working with business objects in Agile Java Client, including the actions of creating, modifying, printing, emailing, and deleting business objects.
Finding and opening Agile objects is a straightforward process: the easiest way is to run a simple search. You can type a word in the Quick Search field-on the main toolbar of both clients-that describes the Agile content you are interested in. For example, typing computer will return a list of all objects with the word "computer" in their name or description. If you already know an object's ID number, typing it in the Quick Search field returns the object.
For more information about finding objects or data in Agile PLM, see Chapter 8, "Finding Agile Data with Searches."
Once you have found an object that you will want to refer to often, you can bookmark it to return to it easily.
The two main ways of interacting with Agile business objects with an object open are either by using the Actions menu, or through the fields and attributes on its various tabs.
An important feature for working with Java Client is the More menu. In Java Client, right-click anywhere in the opened object to see a shortcut menu with the same commands found in the More menu.
On most tabs, if you right-click outside any table rows within the object, that object's main shortcut menu opens (except for the Changes, Quality and Where Used tab). However, on any tab with a table, you can also select a row in a displayed table and right-click, and a shortcut menu for the object referenced in that row opens.
Table 6-1 Java Client More menu
| Command | Description |
|---|---|
|
Save As |
Creates a new object based on the current object. |
|
Delete |
Deletes the object (a "soft delete"). For more information about deleting objects, see Appendix A, "Deleting Agile Objects." |
|
|
Choose either All Tabs or the tabs you want. The list of tabs changes with the current object's class. |
|
Incorporate and Unincorporate |
Available for items: incorporation locks the checkout and check in capabilities of file folders on the Attachments tab of the item. This important capability is available only on the More menu. For more information about incorporating, see the Product Collaboration User Guide. |
|
Add Bookmark |
Saves a pointer to the object on your My Bookmarks list. |
|
Send |
Opens the address book and lets you select one or more users to send the object to, including a comment. A notification is then sent to the designated users with a link to the object. |
|
Sharing |
Opens a page linked to the current object that lets you share the object or delete an existing share. For more information, see"Sharing Objects with Other Users." |
|
Subscribe or Subscriptions |
Allows user to subscribe to receive a notification when certain attributes change. Offers a list of subscriptions for the current object: Lifecycle Phase Change or Status Change, Add File, Delete File, Checkin File, Checkout File, and Cancel Checkout File. See Subscribing to Objects. Note: Subscribe capabilities are not available for Report objects or for User Group objects. |
|
Export |
Opens the Export wizard in a browser window. |
|
Process Extensions |
Offers a list of currently available process extensions, which have been created by your administrator. |
|
Audit Status |
Audits the remaining statuses in the object's workflow to test whether the workflow can advance through those statuses. |
|
Audit Release |
Audits the remaining statuses in the object's workflow to test whether the workflow can be released per the existing conditions in the statuses. |
|
View Workflows |
Shows eligible workflows for this (routable) object, in visual form. Offers drop-down list to select another workflow to view. |
|
Create Change |
Creates a new change order with the open item (part or document) already added to the Affected Items tab. |
|
Create Product Service Report, Create Quality Change Request |
Creates a new PSR or QCR with the open item already added to the Affected Items tab. |
|
Create Declaration |
Creates a new Declaration with the open item already added to the Affected Items tab. |
When you select a row in a table and right-click, the following actions are available:
Table 6-2 Table row right-click shortcut menu actions
| Actions Available when Selecting a Table Row | Description |
|---|---|
|
Open, Copy, or Paste |
Select a row in a table, and then open the object on the selected tab, or copy the selected tab and paste it into another table. |
|
|
Select a row in a table and then print the object's selected tab or tabs. |
|
Create Product Service Report, Create Quality Change Request |
Creates a new PSR or QCR with the item in the selected row already added to the Affected Items tab. |
Tabs organize the content of Agile objects. A brief list of the most common tabs found in many objects across Agile PLM's solutions follows. The following table gives basic information about tabs that are elaborated on later in this manual and elsewhere in the Agile documentation set, such as the platform-specific user guides. Some Agile solutions-such as Product Cost Management and Product Portfolio Management-have specialized tabs not listed below.
The Agile PLM Administrator Guide describes all the preconfigured business classes with all their default tabs.
|
Note: Remember that part of Agile PLM's flexibility includes the administrator's ability to rename business classes and subclasses, tabs within objects, and fields within tabs, so some tabs listed below may have a different name within all classes or within a particular class of object that your company works with.Your ability to see or work with any object or any tab in Agile is governed in large part by your roles and privileges. If you are having trouble opening, seeing, or modifying an object, tab, or field, see the Agile administrator. |
Table 6-3 Object tabs
| Tab | Description: what information this tab collects | Found in these classes of business objects |
|---|---|---|
|
"Page One" |
The Cover Page tab is the Page One for all routable objects—the Change, PSR, QCR, Transfer Order, Package, and Project base classes—and also RFQ and RFQ Response objects. The Title Block tab is the Page One for all Item and File Folder objects. The General Information tab is the Page One for all remaining (nonroutable) classes. Header links on the Page One of the objects enable the user to quickly navigate to the specific group and update the fields. The Page 2 and Page 3 attributes are also available as header links. |
All objects have a "Page One" that uses one of the names to the left. |
|
Page Two and Page Three |
Further information about the object. These are added by the administrator as extensions of "Page One." Page Two fields are the same for all objects in the same business object class. Page Three fields are the same for all objects in the same subclass. Both "Page Two" and "Page Three" can be replaced by more specific names. |
Depends on how classes have been set up. |
|
History |
Summary of actions taken on this object. History is recorded for all objects in your Agile PLM system's database, and shows all actions by users and administrators. The History tab is populated automatically. |
All. |
|
Attachments (and Files) |
View, copy (get), or print attached files. Attach files and URLs to the current object by adding them to a file folder. Access Viewer to redline attached files (once the object is on an ECO, only from the Redline Attachment table on the Affected Items tab). Note: The Files tab lists all contents of file folder objects; so, an item's Attachments tab lists file folder objects, and file folder objects have a Files tab listing contents. (For more information, see Chapter 11, "Working with File Folders.") |
All classes except File Folders (which contain attachment content) and Reports. |
|
Changes |
Information about change objects that involve the item or published price object. Pending Changes and Change History tables are the two tables on the Changes tab. |
Items and Published Prices. |
|
BOM |
All the items that comprise the current part. (Documents may or may not have bills of material, depending on your system settings.) Items on a BOM can be a single item or an assembly of several items. |
Items. |
|
Manufacturer |
Lists manufacturers that have been approved to supply a particular item. The list identifies the manufacturer part for the current item. |
Items & Sourcing s. |
|
Where Used |
Lists other objects where the current object is used. The Where Used tab is populated automatically. To open an object listed on the tab, click its Number or Name link; in Java Client, double-click the row. The type of objects that appear on the Where Used tab depends on the current object: Item – Assemblies and manufacturing sites that use the item. Manufacturer – (Item/MPN Where Used tab) Parts and assemblies that use manufacturer parts provided by the manufacturer. Manufacturer Part – Parts and assemblies that use the manufacturer part. File Folder – Objects with attachments contained in the file folder. Discussion – Objects that use the discussion, including RFQs, RFQ responses, activities, and gates. |
Items, Manufacturer Parts, Manufacturers, Discussions, File Folders, Declarations. |
|
Affected Items (in PCOs: Affected Prices) |
Lists the items that are affected by the current change object. Users with sufficient privileges can use the Affected Items tab to:
Note: When you add an item to the Affected Items tab of a change, if the site you have selected during the "add" process is not associated with the item, you are prompted to add the site association to the item. That site association remains in effect for that item, even if the change is canceled or if you remove the item from the Affected Items table of the change. |
Changes, PSRs, QCRs |
|
Workflow (routable objects only) |
Shows where the routable object is in the assigned workflow (by using a flowchart), and lists present and past signoff information. Add or remove approvers and observers. Move the object to another status in the workflow. |
Changes, PSRs, QCRs, Packages, Transfer Orders, Projects, Declarations |
|
Sites |
Shows where each object is being produced at specified manufacturing locations within the company. See the Note for Affected Items in this table. |
Items |
|
Escalations |
When a workflow status exceeds its escalation time period without a signoff, user groups or individual users can be notified. This tab shows whose escalations (other users) can be signed off by the current user (myself). Note: The settings in a user's Allow Escalation Designation Approval property (on the General Info tab) comes into play. |
Users and User Groups |
|
Shares |
A user's or user group's Shares tab - it exists for these objects only - lists those objects for which the user/user group has been granted "shared roles" by a different user. The user (or members of the named user group) can then perform actions permitted by the roles for that object only. See "Sharing Objects with Other Users." |
Users and User Groups |
|
Subscriptions |
Users |
|
|
Relationships (in projects: Content) |
The relationships and dependencies between this object and other routable objects or nonroutable objects (with lifecycle phases). If the current object is a routable object, the Rule column displays the rule that defines how the workflow status or lifecycle phase of other objects affect the workflow progression of the current routable object, or how the workflow progression of the current routable object affects the workflow progression of the related objects. If the current object is a nonroutable object (with lifecycle phases) and the related object is a routable object, you can specify a rule for the relationship, thus creating a dependency between the current nonroutable object and the routable object. A relationship with a rule indicates a routable object whose workflow progression is affected by the lifecycle phase of the current nonroutable object. A relationship with no specified rule does not limit or affect the workflow progression of the related routable object. You can use non-rule relationships to record objects that are somehow related to the current object, but do not have any dependencies with the current object. You cannot specify a rule for a nonroutable object relationship with another nonroutable (lifecycle phase) object. See "Relationships and Dependencies Between Objects." In Product Portfolio Management objects (Projects), relationships are included on the Content tab. All Project object Content table rows with rules are named deliverables. |
All classes (except Actions Items and Reports) For Projects classes, relationships are included on the Content tab and relationships with rules are named deliverables. |
|
Prices |
Prices tab of an item includes information about price objects associated with the item, including "priceline" information. Prices tab of a manufacturer part includes information about price objects associated with the manufacturer part. |
Items & Manufacturer Parts |
|
Quality |
Information regarding PSRs and QCRs created in relation to the item. Those objects have these cross-linked tabs: Related PSR tab for PSRs PSR Items tab for QCRs PSRs tab for Suppliers and Customers |
Items |
To create an object, you must be assigned the Create privilege for the kind of object that you want to create. See your Agile administrator.
In Java Client, you can create a business object in these ways:
use the main toolbar New Object button menu to choose a base class and a class from the expanded lists
use the File > New command to choose a base class and a class from the expanded lists
if you have an object open, use the File > Save As command
You can also create some objects as you add them to an Agile table. For example, you can create an item to add it to the BOM tab of a parent item or to the Affected Items tab of a change.
There are some options to create objects from "within" another object. For example, from within an item, the Actions menu includes Create Change, Create PSR, Create QCR, and Create Declaration. From within a manufacturer, you can choose Create Manufacturer Part.
Once you create an object, that item exists until you delete it. If you create a new object and then decide you do not want to keep it, be sure to delete the object; otherwise, the new object is still in the database and the object's identifier (such as the item number) cannot be reused. See Appendix A, "Deleting Agile Objects."
|
Note: Although all characters are supported within Agile PLM, and should not create issues within Agile's clients, it is recommended that you avoid using the following characters when creating objects, due to issues that could potentially arise in integrations or custom applications written on the SDK., comma . period (dot) : colon ; semicolon = equal sign |
The process for creating new business objects in Java Client involves two main steps: creating an empty object and then filling in the object tabs with information specific to the object.
To create and complete an object in Java Client:
Choose File > New on the main menu bar or click the New Object button on the main toolbar.
From the drop-down menu that opens, choose the base class for the business object you want to create. Any base class with two classes expands to offer choices in all possible child classes (thus, Transfer Order will offer Content Transfer Order but not Automated Transfer Order). The New dialog box opens.
The New dialog specifies the object type and, for some objects, assigns an Autonumber.
The autonumber format and sequence are determined by the Agile administrator. The administrator also determines whether using autonumbers is required or optional.
Click OK. The new object appears with the Cover Page, Title Block, or General Information tab showing.
Fill in information on the object's tabs, as necessary. Some tabs are completed automatically, such as the Changes, Where Used, and History tabs. You do not enter information on these tabs.
|
Note: The object is created as of step 4 in the procedure. (In Web Client, objects are created through wizards.) All object-required fields are indicated by the field name displayed in bold type. If you attempt to close the object with any required fields empty, an error message will advise "You have not completed all required fields. Please complete all fields in bold." |
Using the Save As feature is a quick way to create an object that is similar to an existing object.
|
Note: In general, you should not use Save As to create an object in a different class or subclass from the original object. The different classes or subclasses may not have the same tabs or defined fields, and you may lose access to some data in the newly created object.For example, parts generally have a BOM tab. By default, documents do not. When you save a part as a document, you cannot view the part's BOM in the resulting document unless your Agile administrator has configured your system to permit documents to have BOMs. |
To create an object using Save As:
Select and open an existing business object.
Choose File > Save As. The Save As dialog appears.
The two fields in the Save As dialog box are (object) Type and (Auto)Number. Choose an available object type from the drop-down list, and click the Autonumber button for an autonumber or fill in an ID number manually.
Depending on the selected object type, the Save As dialog may display additional required fields. Complete any required fields.
Click OK. The new object is created and opens automatically.
Make any appropriate modifications on the tabs of your new object.
If the Agile administrator has set the appropriate preferences, fields in the optional Page Two and Page Three sections are copied to the new object. For information about the behavior of Page Two and Page Three fields in your Agile system, see your Agile administrator.
Save As copies data from a field in the existing object to the same field in the new object. If a field or list value in the existing object is not available in the new object, then that field or list value is not copied to the new object.
|
Note: Because Page Three data applies to a specific subclass only, if you use Save As to create a new business object in a different subclass, the Page Three data is not copied to the new object. |
You cannot initiate Save As from a non-Site Change Order (SCO) change object to create an SCO object, nor can you initiate Save As from an SCO object to create a non-SCO change object. Because Site Change Orders (SCOs) affect only site-specific information, and other types of changes are not limited to site-specific information (for example, ECOs and MCOs), SCOs can be Save-As-created only from another SCO. The Site Change Order's site-specific only usage makes it incompatible with other change types when using the Save As feature.
On Java Client table tabs where you can add objects to the table, the Add button presents one or more object choice methods that are appropriate for the type of objects that can be added to that table. For example, when adding users to a user group, clicking the Add button displays the address book.
When adding items to a BOM table, the add methods are:
Create an item while adding it.
Search for an existing item.
Type in Known Number(s) of one or more existing objects.
Add a blank row to the BOM table that can be filled in later.
Whenever a user adds an item to a BOM or adds an affected item to a change, the user is prompted to respond to a warning message. If an item then happens to violate an "Item Addition Rule," the Agile PLM system knows how to handle it.
These are some item addition rules, that is, the question stemming from a potential violation of the rule:
If there are duplicate items, would you still like to continue?
Some items may not be associated with some sites; would you like to add the association?
If one item does not exist, do you want to use it anyway?
Do you want to add items, whose lifecycle phase is in the warning list, to the BOM?
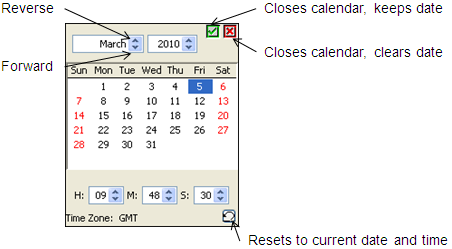
You can modify date fields by using the calendar tool, and also by typing in the field.
To use the calendar tool:
In a date field, click the calendar icon to open the calendar (if it is enabled).
Select a date from the calendar and set a time if necessary.
The new date and time are set
|
Note: The default time format is "12 hours" with am and pm. |
Double-clicking the date enters it directly to the field.
To switch to a different month or year, click the appropriate Forward or Reverse button.
Optional, with the Today button you can reset the date and time to the current date and time.
Close the calendar window.
With the red icon
Closes the calendar without storing the set date and time.
With the green icon
Closes the calendar and keeps the set date and time.
To edit the date and time:
Select the date and time you want to change.
First, enter the new date in the format specified in your user profile (by default, mm/dd/yyyy).
Press the Spacebar.
Then enter the time in the format specified in your user profile.
This step is optional; if you do not enter a time, by default the time displays midnight in the specified format.
Press the Tab key or the Enter key.
To edit just the time stamp:
Select the time you want to change.
Enter the new time in the hh:mm:ss format.
Press the Tab key or the Enter key.
To modify a list field:
Click the drop-down list button to display the list entries.
Select an entry from the list.
To modify a MultiList field:
Click the MultiList select button to display the palette of list entries.
Select one or more list entries:
Double-click a row to add the entry to the Selected list.
Or, select a row, and use the arrow key to move the entry into the Selected list.
Press OK to close the palette.
If the attribute for the list field includes a large number of list entries, the Agile administrator may choose to configure Agile PLM to display the editable list with search display.
To modify a search display list field:
|
Note: The MultiList button also opens the Search palette. |
Click the MultiList select button to display the search palette.
In the search palette, enter a search string and click the Search button.
In the search results table, double-click a row to add the entry to the Selected list.
Or, select a row, and use the arrow key to move the entry into the Selected list.
Press OK to close the palette.
|
Note: For list fields that contain more than 250 list entries, The Search palette is displayed. |
You can print information from any tabbed object.
Attachments are printed from their native applications or the Viewer. For more information, see "Printing Attachment Files."
To print an object:
Open the object.
To print all tabs, click the Print button in the object window. To print a single tab only, click the down arrow next to the Print button and select the appropriate option.
|
Note: If any of the tabs are blank, that is, containing no visible fields, you cannot print all tabs. Instead, select individual tabs to print. |
If you select the BOM, the BOM Printing Option dialog box appears.
Select the levels to print, or select the All depth check box to print all levels.
Click OK.
A preview of the printout appears in a separate dialog box.
To print, click the Print button in the Print dialog box.
You can email any Agile object to another user listed in the Agile address book. Email is sent to the email address specified in the Agile user profile. The email contains a URL that links to the mailed object, and the recipient can click the URL to view the object in Agile PLM.
The Agile administrator sets your user profile Preferred Client preference to determine whether you receive links to Web Client or Java Client.
To email an Agile object:
Open the object.
Choose File > Send, or click the Send button.
In the Send dialog box that opens, click To to open the address book.
In the address book, use the right arrow to move names to the Recipients list, and click OK.
For information about using the address book, see "Selecting Users and User Groups from the Address Book."
Enter any comments in the Comment field.
Click Send to mail the object.
You can generate quick access URLs that provide direct pointers to either Agile objects or to Agile attachment files.
These quick access URLs can be pasted into other applications or files such as spreadsheet files, word processing files, a company Intranet web page or WIKI page, or into an email.
For information about quick access to Agile objects using quick access URLs, see:
For information about quick access to attachment files using attachment quick access URLs, see:
For information about quick access to searches using search quick access Smart URLs, see:
A Discussion can be created from the main toolbar Create menu, or from a business object's Discussions tab. Discussions are integrated into the Product Portfolio Management solution, and are also applicable to the Product Cost Management solution; however, discussions can be created and modified in the same manner as any Agile PLM object, and their utility can be applied to the other Agile PLM solutions, Product Collaboration, Product Governance & Compliance, and Product Quality Management.
Discussions are always created and viewed in Web Client. To access a discussion while using Java Client, you can search to locate an existing discussion and open the object, which will open the Web Client. Or you can simply open the Web Client and proceed from there, including creating discussions.
The following objects classes have a Discussions tab: Sourcing s, Request for Quote, RFQ Responses, Activities, and Gates. See Product Portfolio Management User Guide and Product Cost Management User Guide for information about using discussions in those solutions.
For more information about Discussions, refer to the section "Discussion Objects."
Sharing lets you grant one or more of your roles to another Agile user or user group for specific objects. The capability to share a given role requires being assigned the Grant privilege specific to that object. You can share only your assigned roles, that is, the roles that are listed in the Roles field on the General Info tab of your user profile, and the roles that are listed in the Roles field on the General Info tab of any groups of which you are a member.
You cannot share roles that have been shared with you by another user, and you cannot share roles that have been shared with a user group to which you belong.
When a role has been shared with a user (or members of a user group), each user can then perform actions permitted by the roles for that object only; a user does not "acquire" the role in any permanent or far-reaching way.
A user's or user group's Share tab lists those objects for which the user has been granted "shared roles" by a different user. Click the Share tab in your user profile to see objects being shared with you and what role(s) allow and define your interaction with each object. If you belong to a user group, you can see objects being shared with you through the user group by opening the group object and clicking the Share tab.
To share an object:
Display the object.
Right-click anywhere in the object and choose Sharing.
Or, use the More menu and choose Sharing.
The Share <named object> window appears.
Click the Add button. The Add Access Control Entry dialog box appears.
In the Users field, click the Check Names icon button; the Address book appears. Select the Names or Groups tab, and move those you want to the Recipients list.
Click OK. All users in the Selected Users list will appear in the Users field.
Now select an appropriate role or roles for your chosen users to have available for this object.
Click OK. The Share <named object> window appears again displaying the selected users and selected roles.
Click Close. This returns you to the original object. Click Refresh.
|
Note: When you right-click and choose Sharing, the Share window now shows you the complete list of users who have access to this object and the roles you specified. |
Subscribing to an object sets you up to receive notification of events that happen to that object. For example, you might subscribe to a change to be notified when the change is released, or you might subscribe to an attachment to be notified when the attachment is checked in. You can also be notified when specified fields are modified. You select the events about which to be notified. To be notified when certain fields change, you specify those fields.
You must have the Subscribe privilege for a specific object class to be able to subscribe to that class's objects. See your Agile administrator to be assigned additional privileges.
|
Note: Subscribe capabilities are not available for Report objects or for User Group objects. |
On the Subscription tab of your user profile, you can view the objects to which you have subscribed. To cancel or remove a subscription, select the object, and click Remove.
Subscription events trigger two types of notifications: Email and Inbox. Email notifications are sent only if your Receive Email Notification preference is set to Yes; this field is on the Preferences tab of your User Profile. The ability to edit user information is determined by your privileges.
It is possible to subscribe to an item revision change and a price revision change. Since you cannot subscribe to a specific status change (for example, changed to Released) for a change that increments the revision of the Item (an ECO) or the Price object (a PCO), subscribing to the object itself-the part, document, or price-is the way you can be notified that the revision of the object has been modified by the release of an ECO or PCO.
To be notified of changes to a file folder, subscribe to its "check-in" events. The version number of File Folder objects automatically increments every time they are checked in. However, it is not possible to subscribe to file folder versions, which work differently than item revisions. So, subscribing to a file folder's Check-ins is the way you can be notified that the file folder has been altered; file folders are not subject to changes (objects from the various change classes).
To subscribe to an object:
Display the object.
|
Note: Subscribe capabilities are not available for Report objects or for User Group objects. |
Right-click the object and choose Subscribe.
Or, use the More menu and choose Subscribe.
Indicate whether you want to be notified when the subscribed object is modified by selecting the appropriate Subscriptions check boxes. You can select one or more:
Lifecycle Phase Change (or Status Change if it is a routable object)
Field Change
Select from the displayed list of fields. Your Agile administrator determines which fields are available for subscription.
Revision Change (items and prices)
Add File
Delete File
Checkin File
Checkout File
Cancel Checkout File
Click Save. A message indicates that your subscription was saved.
The events you can subscribe to vary per object. Product Portfolio Management has the following Activity-specific subscription events that do not apply to other objects. You can subscribe to actions related to:
Discussions
News
Action Items
Schedule
Cost
Health
The Apply to all levels below check box in activities and gates "push" a subscription to all subordinate objects. If you subscribe to an activity that has a schedule and select this check box, you will automatically subscribe to all of the activity's projects, phases, and tasks (that is, any object created in the preconfigured subclasses of Activities class). Because Page Two and Page Three fields can be defined differently for projects, phases, and tasks, any of the attributes that do not apply are ignored.
This section includes the following topics:
You can associate objects to each other by using the "Relationships Tab"
Relationships tab. A relationship between two Agile objects is bi-directional and is displayed on the Relationships tab of both objects.
|
Note: In Agile PPM, relationships are called deliverables and are managed on the PPM object Contents tab. For more information about the PPM Contents tab, see Agile Product Portfolio Management User Guide. |
Specifying a rule for a relationship defines how the related Agile objects affect each other. For example, you can define a relationship rule so that ECO_100 affects ECR_250. When ECO 100 reaches the Implemented status, ECR_250 is promoted to the Complete status automatically.
|
Note: Rules are optional; you can create a relationship between two objects without specifying a rule. |
A relationship is created when you add an object to a table in the Relationships tab of another object. The classes of objects that can reference each other on a Relationships tab are:
All object classes, except Reports and Action Items.
For Agile PPM Projects classes, relationships are named deliverables and are included on the Content tab.
The Agile administrator configures the Agile PLM system to enable the Relationships tab for each object class, making it visible. If you find that you want to create a relationship between objects and those tabs are not visible, see the Agile administrator.
Once you create relationships between objects, you can also create an advanced search for such relationships. See "Relationship Searches."
A relationship without a rule is a simpler, less dynamic instance of object-to-object relationship; it simply lists references to other objects. It can be thought of as "bi-directional" information, because relationships without rules do not trigger events.
By default, the Relationships table for each object class displays the following columns. The Agile administrator may enable additional columns. If you have questions about the configuration of the Relationships tabs in your Agile system, see the Agile administrator.
Table 6-4 Relationships tab default attributes
| Default attribute | Description |
|---|---|
|
Criteria Met |
If the relationship has a rule, the Criteria Met icon in this column indicates that the criteria specified in the rule has been met. Java Client:
|
|
Name |
The object name or object number that uniquely identifies the related object. |
|
Description |
The description that appears in the Description field of the related object. |
|
Current Status |
The current workflow status or lifecycle phase of the related object. |
|
Rule |
The rule defined for the relationship. If no rule is defined, this column is blank. |
|
Type |
The object type (or subclass) of the related object. |
|
Note: For Design object relationships only, a Version-specific relationship can be created. |
Use the View drop-down list to sort the relationships table rows. See also Using the Table Filter.
Table 6-5 Relationship tab views
| View option | Description |
|---|---|
|
All Relationships |
Displays all relationship table rows. |
|
Complete |
Displays relationships that have a rule specified and the criteria of the rule has been met. |
|
Pending |
Displays relationships that have a rule specified and the criteria of the rule has not been met. |
|
Rule Not Specified |
Displays relationships that do not have a rule specified. |
The buttons on the Relationships tab allow you to add, edit, and remove relationships and relationship rules.
Table 6-6 Relationship tab actions
| Button | Description |
|---|---|
|
Edit Relationship |
Lets you edit the selected rows. See "Editing the Relationships Table." If your Agile administrator has enabled relationship table attributes in addition to the default attributes, you can edit the additional attributes if you have the appropriate privileges. |
|
Add > Search |
Adds a relationship to the table by searching for the object you want. See "Adding Relationships to Objects." |
|
Add > Create |
Adds a relationship to the table by creating a new object. See "Adding Relationships to Objects." |
|
Remove Relationship |
Removes the selected relationship table rows. See "Removing Relationships." |
|
Edit Rule |
Edits the rules in the selected relationship table rows. See "Editing a Relationship Rule." |
|
Add Rule |
Adds a rule to the selected row by opening the Relationship Rule dialog for you to specify a rule. See "Adding a Rule to a Relationship." |
|
Remove Rule |
Removes the rules from the selected relationship table rows. See "Removing a Relationship Rule." |
|
Show Filter Hide Filter |
Opens the filter tool, which lets you sort the relationships table by multiple criteria. If the filter tool is presently displayed, clicking this button hides the filter tool. |
The Relationships tab includes a table filter.
The Show Filter and Hide Filter button toggles the display of the table filter. The table filter lets you define filter criteria based on any column in the table. You can define multiple filter criteria, which are combined in an AND search of the table rows.
For example, you can filter for relationships whose Description column includes the word marketing and the Rule column is Not Null (the relationship has a rule).
The format of each filter criteria row is similar to an Agile search criteria:
<attribute> is <Match If Operator> <value to match>
To use the Table filter:
On the Relationships tab, click Show Filter to display the Filter: criteria.
In the first filter drop-down list, labeled --Select an Attribute--, choose from a list of the columns in the assignments table.
In the next drop-down list, choose a Match If operator. The list of available Match If operators depends on the attribute type you chose as the --Select an Attribute-- drop-down list.
For more information, see "Search Operators and Attribute Types."
In the remaining field, enter the filter values.
To add a filter criteria row, click the Add Row at the end of the row. A filter criteria row is added to the display.
To delete a filter criteria row, click the Delete Row at the end of the row. The row is deleted.
Click Apply to filter the relationships table. Only relationships that match your filter criteria are displayed.
To define different set of filter criteria, click Clear to clear the criteria and begin again.
You can add objects to the relationships table of any object. The relationship is listed on the Relationships tabs of both objects. You must have the appropriate modify privileges for both objects in the relationship: the object to which you are adding the relationship and the related object.
To add a relationship to an object:
Go to the Relationships tab of the object.
To add by search, click the Add button drop-down list and select Search.
In the Add Relationship dialog, choose a search method:
Enter the value to search for and click Search to perform a quick search.
Define an advanced search.
Run a saved search.
Select a bookmarked or recently visited item (Shortcuts).
In the search results, select the objects you want and move them to the Select Related Objects list.
When you are finished, click OK. All the objects in the Selected Related Objects list are added to the relationships table.
To add by creating a new object, click the Add button drop-down list and select Create.
In the New dialog, select a type from the Type drop-down list.
If appropriate, enter an object number and complete any required fields.
Click OK. The new object is added to the relationships table.
With the appropriate privileges, you can edit the nondefault attributes of the relationships table of any object. Default relationship table attributes cannot be edited. For a list of default relationship table attributes, see "Relationships Tab." If no nondefault attributes are enabled for the relationships table you are viewing, the Edit button may be disabled.
|
Note: You cannot add, edit, or remove relationship rules with the relationship table edit feature. For more information about relationship rules, see "Relationships and Dependencies Between Objects." |
To edit a relationship:
Open the object you want and click the Relationships tab.
In the table, select the rows you want to edit.
Click the Edit button. The rows are in edit mode.
Make the changes, and click Save.
When you remove a relationship, it is removed from the Relationships tab of the current object and from the Relationships tab of the related object. Any rules associated with the relationship are also removed.
To remove a relationship:
In the table from which you want to remove objects, select the object that you want to remove.
Click the corresponding Remove Relationships button. You are prompted to confirm your choice.
Specifying a rule for a relationship defines the manner in which one Agile object can affect the workflow status of another Agile object. A relationship rule includes a Source Object, an Event, a Target Object, and a Result. The format of a relationship rule is shown in the following sentence:
When <Source Object> is <Event>, set <Target Object> to <Result>.
That is, an Event in the Source Object triggers a Result in the Target Object.
A Source Object can be either a routable object with a workflow (for example, a change order or a project object) or a nonroutable object with a lifecycle phase (for example, a part or a document).
An Event is a change in the workflow status or a change in the lifecycle phase of the Source Object.
A Target Object is always a routable object with workflow statuses.
A Result is always a change in the Target Object's workflow status.
Here are some examples of relationship rules:
When ECO_100 is Implemented, set ECR_334 to Closed.
When ECO_565 is Released, set NCR_009 to Closed.
When Part_945 is Production, set Task_Design_Assembly to In Process.
When Document_934 is Prototype, set ECO_3445 to Released.
When Part_D457 is Prototype, set Task_Promote_BOM_to_Prototype to Complete.
When FileFolder0098 is Concept, set Audit_0061 to Initiated.
The resulting change in the Target Object's workflow status also requires that all other conditions required for the workflow to advance have been met. For example, for a change order to be released, it must pass a release audit. If the relationship rule triggering event occurs, but the change order does not pass the release audit, its workflow status will not change. In a similar manner, if a change order passes its release audit, but the relationship rule triggering event has not occurred, the change order workflow status will not change. In both cases, when all the required criteria are fulfilled and the relationship rule triggering event has occurred, the Target Object's workflow status will change.
|
Note: You cannot define rules for reference objects. |
The following guidelines and restrictions apply to relationship rules:
You cannot define a rule for a reference object.
You cannot define a rule for a workflow object if no workflow has been selected for that object. Rules are based on workflow statuses and workflow statuses are defined by each workflow. If a routable object is Unassigned (it has no workflow assigned) then there is no identified list of statuses to select when defining a relationship rule.
Only one rule can be defined for each relationship table row. However, you can add the same object to the relationship table in multiple rows and define a different rule for each row.
If you want two objects to advance through their respective workflows simultaneously, you create relationship entries for each status.
The Criteria Met column in the relationship tables indicates that the Source Object's triggering event has occurred. If the triggering event is that the Source Object's workflow status changes to Status_02, but the workflow status was manually changed to Status_03, skipping over Status_02, the Target Object's event (workflow status change) will not occur. If you remove the relationship row or you remove the relationship rule, the Target Object's event can occur.
The Criteria Met field, once checked (the Complete icon appears) is not "unchecked" if an object is returned to an earlier status for other reasons.
A relationship rule causes the Target Object only to advance in its workflow, never to return to a status it has already left.
A nonroutable object with no workflow, for example, an item, can be a Source Object but it cannot be a Target Object. You can create a rule between a nonroutable object and a routable object only when the nonroutable object is the Source Object.
You can create a relationship without a rule between two nonroutable objects. Agile PLM will not allow you to create a rule between two nonroutable objects.
The relationship rule can be defined from the Relationships tab of either object.
You must have the appropriate "modify relationship" privilege for both objects to create a relationship without a rule between two objects. To create a rule between two related objects, you must, in addition, have the appropriate "modify rule" privilege for both objects.
The "modify rule" privilege allows you to specify a routable object as the Target Object in a rule. That is, it allows you to specify a rule that triggers a modification (Result) in the Target Object.
When both objects in a relationship are routable objects, if you do not have "modify rule" privilege for one of the objects in that relationship, in any rule you create, that object can be only the Source Object (because it will not be modified when the rule criteria is met); it cannot be the Target Object.
|
Note: If there are relationships with rules defined for multiple statuses of a single routable Target Object, the system checks that related events that apply to earlier result statuses have been met before advancing the workflow. For example, for a specific Target Object, if there are events defined for both Submitted and Released statuses, and the events for the Released status are satisfied, the system will not advance the Target Object's workflow to Released status until the events for the Submitted status are also satisfied. |
To add a rule to a relationship:
On the Relationships tab, select the table row of the related object to which you want to add a rule.
Click the Add Rule button.
|
Note: If the Add Rule button is disabled, it is not possible to add a rule to the selected relationship because both objects are nonroutable objects. |
In the Relationship Rule dialog, use the drop-down lists to define the rule.
When you are finished, click OK.
To edit a rule to a relationship:
On the Relationships tab, select the table row of the related object to which you want to edit a rule.
Click the Edit Rule button.
In the Relationship Rule dialog, use the drop-down lists to edit the rule.
When you are finished, click OK.
To remove a rule to a relationship:
On the Relationships tab, select the table row of the related object to which you want to remove a rule.
Click the Remove Rule button.
You are prompted to confirm your choice.
This is some additional information about relationships as they are used in the PQM solution:
|
Important: When relationships are created between PQM objects, a blank rule is created for the relationship. You must edit the blank rule to define how you want the PQM objects to affect each other. |
When a QCR affects the PSR, that is, when a QCR and PSR are related and the relationship rule follows the format:
When <QCR source object> is <event>, set <PSR target object> to <result>
all items from the PSR Affected Items tab are displayed on the PSR Items table of the QCR. If the PSR was used to aggregate multiple PSRs, then the related PSRs' affected items are displayed.
When this QCR is affected by a PSR, that is, when the QCR and the PSR are related and the rule follows the format:
When <PSR source object> is <event>, set <QCR target object> to <result>.
all items from the PSR Affected Items tab and the related PSR's affected items are not displayed on the PSR Items table of the QCR.
For detailed information about deleting objects, see Appendix A, "Deleting Agile Objects."
 – Criteria Met