| Agile Product Lifecycle Management Product Cost Management Supplier Guide Release 9.3.3 E39299-02 |
|

 Previous |
 Next |
| Agile Product Lifecycle Management Product Cost Management Supplier Guide Release 9.3.3 E39299-02 |
|
Previous |
Next |
This chapter provides information about responding to requests for quotes.
Buyers send requests for quotes (RFQs) to their suppliers to get price quotes. The sourcing manager assigns you the (Restricted) RFQ Responder role so you can respond with the requested price information and submit your responses.
As an RFQ responder, you can:
Determine the bid or no-bid decision for each part, and complete the requested response information for the parts you have chosen to bid.
Propose alternate parts, instead of the part specified in the RFQ, from a manufacturer not in Agile database.
Provide material and non-material price information.
When a buyer creates an RFQ, one or more RFQ Response objects are created for your supplier organization. If you are the owner of the RFQ Response, a notification appears in your Notification Inbox. You may also get a notification email, depending on notification settings.
You can respond to RFQs within PCM, or you can export the response line items to a text file and use an external text editor, such as Microsoft Excel, to respond. In Advanced Wizard Edit mode and Advanced Table Edit mode, you view RFQ Response information on a set of tabs on the RFQ Response object page. In Basic edit mode, the RFQ Response information is displayed on pages that are accessible via hyperlinks.
|
Note: For information about entering and submitting RFQ response information, see "Completing RFQ Responses." |
Before you can proceed with an RFQ, you may be required to accept the Terms and Conditions, if they have been set mandatory by the buyer. Should you choose to decline, you will not be able to view the RFQ and you will be returned to your Notifications Inbox. These Terms and Conditions prescribe buyer's expectations and RFQ-specific stipulations.
If you forward an RFQ to another user in your organization, he or she must also accept the Terms and Conditions to proceed further with it.
The following table describes each RFQ Response object tab and the actions you can perform from each one.
| Tab | Description | Actions |
|---|---|---|
| Cover Page | Displays general details about the RFQ Response. | View RFQ Response details. |
| Responses | Displays response line details, and lets you filter the response information to view specific details, and perform various response entry tasks. | Filter the view of response details. Propose alternate manufacturer parts. Enter or modify response details. Set expiration dates. Export or import response line details. Submit selected response lines. |
| Changes | Displays changes made to the RFQ Response by the sourcing manager. | View change details by item view or response view. View item change summary by items that were added, deleted, or changed. |
| Discussion | Displays the discussion objects related to the RFQ Response. | View the list of discussions in the table to reply, delete, and add discussions. |
| Attachments | Displays any file attachments for the RFQ Response. | View file attachment details. Edit, remove, and add attachments. |
| History | Displays a list of actions performed during the life of the RFQ Response. | View user, date, time, and description for each action. |
The RFQ Response process flow is shown in the following diagram
In Basic edit mode, a list of the process flow steps is displayed in the left pane.
View Cover Page - Takes you to the RFQ Cover Page where you will find general information about the RFQ.
View Attachments - Opens the RFQ Response Attachments tab so you can view attachments.
View Line Items - Opens the RFQ Response Responses tab.
Enter Responses - Selects all items in the RFQ and lets you fill in cost information using your preferred response edit mode.
Export Responses (xls) and Export Responses (csv) - Selects all items in the RFQ and lets you export the RFQ so that you can work offline on your response.
Import Responses - Opens the import wizard so that you can import the work you have completed offline.
Submit - Saves your work if you have not already done so, then sends all valid responses to the sourcing project manager.
In Basic mode, you can click a link in the process flow list to initiate that action. If the action requires a selection, you are redirected to the appropriate page to make the selection. In some instances, you cannot go to a step in the process until you have completed the previous step.
In Advanced Table Edit and Advanced Wizard Edit modes, you can complete these actions using the menu buttons on the tabs of the RFQ Response object.
The lifecycle phases of RFQ Response are listed in the table below.
| Lifecycle Phase | Description |
|---|---|
| New | New indicates that you have not yet opened and reviewed the RFQ Response. This is the lifecycle phase of an RFQ Response when it first appears in your inbox. |
| Open | Open indicates that you can modify and work with the RFQ Response. When you open a new RFQ Response, the lifecycle phase changes to Open. You can modify an open RFQ Response, including entering response information on the Responses tab and submitting responses. |
| Locked | Locked indicates that the sourcing manager has locked the RFQ associated with this RFQ Response. Suppliers cannot make any modifications to the Responses if the Buyer has locked the RFQ. Although you may be able to still enter data, the system throws an error if you attempt to save any changes. |
| Closed | Closed indicates that the sourcing manager has closed the RFQ associated with this RFQ Response. You cannot make any modifications to an RFQ Response in the closed lifecycle phase. |
When you view an RFQ Response in either Advanced Table Edit mode or Advanced Wizard Edit mode, the Actions menu appears above the tabs. This menu applies actions to the entire RFQ Response object. Use the Actions menu commands to send or forward the RFQ Response or to create a bookmark.
The RFQ Response Actions menu allows you to:
Bookmark the RFQ Response for fast, convenient access.
Send the RFQ Response to other users with appropriate privileges.
Forward your RFQ Response to another user within your company.
Subscribe to an RFQ Response so that you can be notified when any field that you have subscribed to is modified.
Share the RFQ Response with another user by granting one or more of your roles to another Agile PLM user for the current RFQ Response object.
Copy a URL to the clipboard.
Bookmarks are links you create for quick access to open the RFQ Responses you are working on. To create a bookmark for an RFQ Response, open the RFQ Response and choose Bookmark from the Actions menu. The RFQ Response number is saved in the Bookmarks list in the navigation pane on the left side of the Agile Web Client page.
You can delete bookmarks you no longer need.
To delete a bookmark:
Click the Organize Bookmarks icon in the My Bookmarks folder in the left pane.
If the bookmark you want to delete is in a bookmark subfolder, navigate to that folder.
Select the row(s) of the bookmark(s) you want to delete.
Click Remove.
Click Save.
You can send any Agile PLM object to another user listed in the Agile PLM address book, if you (and the other user) have the appropriate send privilege for the object type. The user receives an email that contains a link to the object. The recipient can then click the link to view the object in Agile PLM.
|
Note: When you send an RFQ Response, the ownership of the RFQ Response is not changed. If you want to transfer ownership of an RFQ Response to another user in your supplier organization, use the Forward action, described in Forwarding RFQ Responses on page 37. |
To send an RFQ Response:
Open an RFQ Response.
Choose Actions > Send. The Send dialog appears.
Click the Address Book icon next to the Notify field to find and select the users or groups to whom you want to send the RFQ Response.
Enter comments, as needed. Your comments are included in the body of the message.
Click Send.
|
Note: Click the Send notification as urgent checkbox to set the notification message's priority flag to High. |
You can forward an RFQ Response to another user in your supplier company. This is helpful when several people are involved in answering and returning a response to the buyer.
Once you forward a response, you can no longer edit it, but you can still view it. Also, if needed, the person you forward the RFQ Response to can forward it back to you. When an RFQ Response is forwarded, the initial supplier contact user remains the primary contact. If the buyer modifies the RFQ Response in any way, it automatically reverts to the initial supplier contact and disappears from the second contact user's workflow routings. You can specify a comment to accompany the notification when forwarding a response.
|
Note: It is recommended that when using RFQ Forward, the additional Contact Users' Preferred Inbox View be set to Notifications. This will allow the user to view any instructions that may be included in the body of each notification. |
To forward an RFQ Response:
Open an RFQ Response.
Choose Actions > Forward. The Forward Response dialog appears.
Select the user to whom you want to forward the RFQ Response in the Notify dropdown list. The list includes the contact users related to the organization.
Enter comments, as needed.
Click Send.
|
Important: If the RFQ has Terms and Conditions associated with it, any supplier user who opens up the forwarded RFQ is required to accept the terms in order to open the RFQ. A record of forwarding is maintained on the History tab. |
As an alternative, you may choose to have users work in parallel, instead of waiting for the RFQ Response to be forwarded along. To allow users to work in parallel, see "Authorized Users."
An authorized user is a user within your organization who is authorized to work with a particular object. For example, you can select one or more authorized users for an RFQ Response. Authorized users can work on the RFQ Response in parallel. Alternatively, if you want the authorized users to work in sequential order, one authorized user can work on an RFQ Response and then forward it to the next user when they are done.
To add an authorized user to an RFQ Response:
Open an RFQ Response.
Click Edit on the CoverPage tab.
Type in the users you want to add or click the Address Book icon next to the Authorized Suppliers field to search.
Click Save once you have added the suppliers.
The sourcing manager in a buyer organization sends a request for quotes (RFQ) to your company. The RFQ responder receives the request and provides a response to the requester. The responder becomes the owner of an RFQ Response object. You can access an RFQ Response in two ways:
From the Notifications tab in your Inbox - You receive notifications about subscriptions or completed processes and requests to accept ownership of an action item or activity. Click the new notification message. Click the RFQ number on the Notifications & Requests page to open the RFQ Response object.
From RFQ Response searches - Search for RFQ Responses. On the search results page, click the RFQ number you want.
The Cover Page tab of an RFQ Response displays general information about that RFQ Response. Review the Cover Page for information such as the response due date, instructions, contact information, who owns the RFQ Response in your organization, percent of progress, and lifecycle phase.
|
Note: Whether or not you can view the Responses tab of an RFQ Response object depends on the Response Edit Mode selected on the Preferences tab of your user profile. If the Response Edit Mode is set to Basic, you will not see any tabs when you open the RFQ Response. For information about changing your Response Edit Mode, see "RFQ Response Edit Mode." |
The Responses tab is where you do most of your work. You can check the RFQ item responses, negotiate prices and terms, and submit bids to the buyer.
|
Note: In Basic response edit mode, you can do these things on the Response page, which is accessed by clicking the View Line Items link in the left pane. |
In order to see the supplier's view of an RFQ, you must log in to Agile PLM as the user who is the supplier's contact person with RFQ response permissions.
When you click the Responses tab, you can view the responses to the RFQ in the response table. The columns displayed on the Responses tab can vary in different RFQs, depending on how the sourcing manager decides to create each RFQ. The fields selected by the sourcing manager will show up as columns in the table on the response tab.
In addition to non-material and material price fields for each price scenario (quantity break or price period), the Responses tab includes at least the following fields:
| AML Status | The status of the manufacturer part for the item, for example, whether the manufacturer part is the preferred part or the alternate part. |
| Number | The part number for the item listed. Manufacturer part numbers (MPNs) are indented under associated internal part numbers (IPNs). If the buyer has opted to not share IPNs, you are notified, and you cannot view the BOM. If an IPN leaf level or assembly does not have an associated AML, or if the buyer sets the quote level at an assembly level without an AML, the IPN appears. |
| Rev | The revision of the item. |
| Description | The description of the item. |
| Manufacturer | The name of the manufacturer for the MPN. |
| Commodity | The commodity name, for example, ICs, Resistors, or Diodes. |
| Bid Decision | The decision to bid or not bid, and the reason for not bidding. |
| UOM | Displays the quantity unit of measure. |
To view an object listed on the Responses tab, click its number.
The three action buttons that are available on the RFQ Response Responses tab are:
Responses - You can to choose Enter/modify, Bulk Edit Expiration Dates, or Submit an RFQ Response. You can also Propose Alternate Parts, Delete Alternate Parts, or Lookup Prices.
View - View Costed Bill of Materials or view Bill of Materials Structures.
More - Fill-up, Fill down, Fill-up (selected cells), Fill down (selected cells), Export, and Import content.
These buttons are optional and configurable in the "data to share with suppliers" section in the RFQ (or the associated sourcing project). Adjacent to the Responses drop down lists, there are two optional buttons:
Costed BOM - Limited view of BOM items and prices; only part of the BOM is actually quoted to this supplier. Parts in the hierarchy that have not been requested for quotes are not displayed.
Content BOM - View of a BOM and each item's children parts. If an assembly is quoted as a Component/Custom Component, the BOM tree underneath the assembly does not appear in the Costed BOM view, but is visible in the BOM Content view.
|
Note: These buttons can not be added once the RFQ has been opened to suppliers. |
In addition to the RFQ Response object lifecycle phase, each response line has its own unique lifecycle status. This allows each response line item to be managed and tracked separately.
The following table lists symbols related to RFQ response lines. These symbols are displayed for each line on the Responses tab.
| Symbol | Represents | Description |
|---|---|---|
 |
Pending | This icon indicates that the response information for the item has not yet been submitted. |
 |
Ready | This icon indicates that all requested response information has been entered for the item and is ready to be submitted. |
 |
Invalid | This icon indicates that some requested response information has not been entered for the item (or has been entered incorrectly); more information is needed.
In the Advanced Wizard and Basic edit modes only, when you click this icon, the response goes into edit mode and fields that need attention are indicated by |
 |
Submitted | This icon indicates that the response for this item has been submitted. |
 |
Error | This icon indicates that a field is invalid and needs to be fixed. |
 |
Locked | This icon indicates that you cannot make any changes to the response line; the response line is locked. |
 |
Requote | This icon appears for the items that are sent to you for a requote. |
 |
Details | This icon marks the Price Details (Has Price Information) column. If a line item has in this column, it means that it has price information available for it. You can click the dot icon to view the response price details for the item. |
 |
Supplier Proposed | This icon indicates that this is an alternate manufacturer part that you proposed. |
 |
Quantity Changed or New Line Added | The buyer has changed quantities or added a new line to the response since it was submitted. |
 |
View Response Changes | Click this icon to view the history of the changes that have been made to the response for this item. |
When you first display the Responses tab, the information appears according to the default price scenario. You can select another type of price scenario from the Price Scenarios dropdown list.
All Price Scenarios - View all price scenarios associated with the response.
Default Price Scenario - View the default price scenario associated with the response. The default is defined as the lowest quantity break of the effectivity period that falls within today's date, or the earliest effectivity period.
Selected Price Scenarios - Select from a list of price scenarios.
To view information for a selected price scenario:
Open an RFQ Response, and go to Responses tab.
In the Price Scenarios dropdown list, select Selected Price Scenario. In the window that appears, select the price scenarios you want to show from the Hidden Fields list. Click the right arrow to add them to the Displayed Fields list.
Click OK.
Each price scenario represents either one quantity break or one quantity per price period. The following table shows examples of quantity breaks and target prices for one period for several different items.
| Item number | 10/01/04 - 12/31/04 QuantityBreak1 - Quantity | 10/01/04 - 12/31/04 QuantityBreak1 - Target Price |
|---|---|---|
| 10-007 | 1 | 0.04 |
| 10-008 | 10 | 12.80 |
| 10-009 | 1 | 0.04 |
| 10-010 | 10 | 16.60 |
| 10-011 | 1 | 0.04 |
| 10-012 | 1 | 0.09 |
| 10-013 | 5 | 2.95 |
| 10-014 | 100 | 122.00 |
|
Note: To set a price value to 0, you must explicitly enter 0. |
The Agile PLM system supports different price scenarios, so RFQ response fields vary based on the price periods and quantity breaks specified for a particular RFQ. Prices can be based on multiple quantity breaks (up to 6) or on multiple price periods, with one or more quantities per price period.
The pre-defined filters available on the Responses tab are as follows:
Items Need Response - Identifies those parts for which the supplier has to provide prices or update prices (in case of requotes) and resubmit.
Items With Split - Displays items whose AML have AML splits.
Preferred AML - Displays items that have AML where the status is set to "preferred".
You can also personalize the view of the Responses tab, as well as other tabs, using the Table Personalization palette. For more information, see "Personalizing PCM Object Tabs."
There are two basic ways to enter your response information into PCM:
Online - Enter the information online in the Agile Web Client. For details, see "Creating Online Responses."
Offline - Export the selected response lines of the Responses tab to a file, edit the exported file in a spreadsheet program, such as Microsoft Excel, and then import the edited file, with your data, into Agile PLM. For details, see "Creating Offline Responses."
When you receive an RFQ notification email and click the URL link to access the Product Cost Management system, you are taken automatically to the Cover Page of that new RFQ. Once there, if your preferred Response Edit Mode is set to Basic, you can click any step in the process flow list to move to that corresponding page. The step you select is highlighted in the left pane, so that you can tell where you are in the process. Otherwise, if you are not using Basic response edit mode, click on individual tabs in the RFQ Response to create your online response.
For more information on process flow, see "About the RFQ Response Process Flow."
You can enter response information online in any of the three following ways:
Advanced Table Edit
Advanced Wizard Edit
Basic Edit
Specify the method you want to use on the Preferences tab in your user profile. For information about setting the Response Edit Mode preference, see "RFQ Response Edit Mode."
In Advanced Table Edit mode, you can enter bids for multiple line items in a single view. You can enter responses directly in the fields on the Responses tab.
|
Note: In this edit mode, you must double-click the first field you want to enter, however, any following fields are made editable with just a single-click (or by using the Tab keys). |
To enter response information using the Advanced Table Edit method:
|
Note: Make sure your Response Edit Mode preference is set to Advanced Table Edit. For details, see "RFQ Response Edit Mode." |
Open the RFQ Response that you want to work with, and go to Responses tab.
Select a different bid decision from the Bid Decision dropdown list, if appropriate.
For each quantity break, provide the material price and non-material price (if applicable).
The edit function for Material and Non-material prices depends on the Quote As method set by the buyer:
Assembly - You can edit only the Non-material price.
Component - You can edit only the Material price.
Custom Component - You can edit both Material and Non-material prices.
Enter or change the quantity in the Inventory Available field.
Fill in the Valid From field, if appropriate.
Change the expiration date in the Valid Until field, if appropriate.
When you are finished, click Save, or click Cancel to return to the previous page without saving your entries.
|
Note: A question mark icon appears next to any line item that has not been correctly completed. Although all valid fields are saved to the database, you cannot submit a response to the sourcing manager until invalid required fields are completed. |
Once you save a valid response, the Ready symbol appears in the Response Readiness Status column.
|
Note: You can copy response data values from one cell to another. Select the value you want to copy and press Ctrl + C. Place the cursor on the destination cell, and press Ctrl + V to paste the copied value. Alternatively, you can click on More > Fill-down or More > Fill-up to copy the contents of one cell to the rows below or above it, respectively. |
In Advanced Wizard Edit mode, you can enter your bid for a single line item at a time. You can also enter identical bids for all selected line items at one time. In this mode, all bids are entered via the Response Entry dialog, which is described in Response Entry Form.
To enter response information using the Advanced Wizard Edit method:
|
Note: Make sure your Response Edit Mode preference is set to Advanced Wizard Edit. For details, see "RFQ Response Edit Mode." |
Open the RFQ Response and go to Responses tab.
Select the line item(s) that you want to work with, and choose Responses > Enter. The Response Entry dialog appears.
Select a different bid decision from the Bid Decision dropdown list, if appropriate.
Enter or change the quantity in the Inventory Available field.
Fill in the Valid From field, if appropriate.
Change the expiration date in the Valid Until field, if appropriate.
For each quantity break, provide the material price and non-material price (if applicable).
The edit function for Material and Non-material prices depends on the Quote As method set by the buyer:
Assembly - You can edit only the Non-material price.
Component - You can edit only the Material price.
Custom Component- You can edit both Material and Non-material prices.
The Fill Right button can save you time. If you want the same value to appear in every column to the right of where you are entering a value, click the Fill Right button. The value is copied into the column to the right.
Click Next to save your entries and go on to the next item in the RFQ Response (if you selected more than one line item on which to bid).
|
Note: To apply your entries to all of the selected response lines, check the box labeled Apply to all the selected response lines and click Finish. |
When you have finished entering or editing the information, click Finish.
The Responses tab appears. The information you entered is included in the table.
|
Note: A question mark icon appears next to any line item that has not been correctly completed. Although all valid fields are saved to the database, you cannot submit a response to the sourcing manager until invalid required fields are correctly completed. To complete an invalid entry, select the line item and then click the question mark icon. The RFQ Response goes into edit/modify mode and any invalid fields are indicated by the invalid icon. |
On this form there is an Apply to all the selected response lines checkbox. When you check this box, the data (Inventory Available, Material Price, Valid Until, etc.) that you fill in for the current item, is applied to all the other response lines that you selected for editing.
This method is similar to the Advanced Wizard Edit method, as described in Advanced Wizard Edit. When you open an RFQ, you only see the Cover Page. You do not see tabs in this mode. To display line items, you must click View Line Items in the list of process flow steps in the left pane. To display the Response Entry dialog, you must click Enter Responses in the left pane.
|
Note: A question mark icon appears next to any line item that has not been correctly completed. Although all valid fields are saved to the database, you cannot submit a response to the sourcing manager until invalid required fields are completed. To complete an invalid entry, select the line item and then click the question mark icon. The RFQ Response goes into edit/modify mode and any invalid fields are indicated by the invalid icon. |
You can specify an expiration date for each line of your response.
|
Note: This option is available only when the RFQ Response uses quantity breaks. This option is not available when the RFQ Response uses price periods. |
To set the expiration date:
Select one or more line items in the RFQ Response Responses tab.
Choose Responses > Bulk Edit Expiration Dates. The Set Expiration Date window appears.
Enter the expiration date in the Date field, or select a date from the calendar.
Click Set.
Suppliers are often requested to quote on parts they are unable to supply for various reasons. For example, the part may be obsolete or on allocation. You can suggest alternate parts in the RFQ Response.
You can add alternate part information for one or more items in an RFQ Response. This alternate part information is visible to the sourcing project manager when you submit your responses. If you propose an alternate part, you can add attachments such as data sheets.
To propose an alternate manufacturer part:
On the Responses tab of the RFQ Response, select the parts for which you want to propose alternates.
|
Note: You can only propose alternates for items with an AML. |
Choose Responses > Propose Alternate Part. The Add Alternate Part dialog appears.
Enter the alternate manufacturer part Number and Description.
Click the Lookup button next to the Manufacturer list to search and select the part's manufacturer. Click Continue.
Fill up all the required information.
Click Save. The added manufacturer part is identified by the Supplier Proposed icon.
|
Note: If the proposed manufacturer is not currently in the Agile database, use the following workaround procedure. |
To propose an alternate manufacturer part for a manufacturer not in the Agile Database:
Create a manufacturer and name it "New". For more information on how to create a manufacturer, see Agile Product Cost Management User Guide.
Follow steps 2 and 3 from the preceding procedure, To Propose an alternate manufacturer part.
Click the button next to the Manufacturer list to search and select the part's manufacturer. (Enter "New" in the search field.)
Click Continue.
Fill up all the required information.
Click Save. The added manufacturer part is identified by the Supplier Proposed icon.
The process of adding an attachment for an alternate part is the same as adding an attachment for any Agile PLM object.
To add an attachment:
On the Responses tab, click on the number of the alternate part to which you want to add an attachment. The Quick View for the part appears.
Click on the Attachments tab.
Click Add > Files, Add > URLs (proceed to step 5), or Add > By Search (proceed to step 6).
If you chose Add > Files, the Add File dialog appears.
|
Note: Before reaching the Add File dialog box, you may see a dialog box asking you to choose between the standard upload method or the advanced Java tool. If you select the Java upload tool, the following steps will be carried out in a Java based dialog box. Otherwise, you will be led to the standard HTML based file search and add window. |
Once you decide on a type of method, select the "Do not show this dialog again" checkbox
a. In the Add File dialog window, use the Browse button to locate the files you want.
b. A file folder containing the attached files is created automatically. To add the selected files in one file folder object, check the Add All Files to a Single File Folder checkbox. (If you do not use this checkbox, a file folder object is created for each file you have selected.)
c. When you have selected the files you want, click Add in the dialog window. The file name and the newly created file folder object are listed in the Attachments table.
If you chose Add > URLs, the Add URLs dialog appears.
a. Enter the URLs. (You can copy a URL from your browser and paste it here.)
b. Click Preview to test each URL.
c. To add the selected URLS in one folder object, check the Add All URLs to a Single File Folder checkbox.
d. When you are through, click Add. The URLs and newly created file folder objects are listed in the Attachments table.
If you chose Add > By Search, the Add Files window appears.
a. Search for and select the file folder you want, then select files or URLs in that file folder that you want.
To return to the Responses tab, click Close in the Quick View window.
You can delete alternate parts that you have proposed.
To delete alternate parts:
On the Responses tab, select the alternate part you want to remove.
When you select an item, all its alternate parts are selected automatically. If an item has multiple alternate parts, you can select the item row itself and then go about deselecting the alternate parts you want to keep.
Choose Responses > Delete Proposed Alternates.
You can verify the existence of a price scenario for a specified period and quantity in the Item Master.
In Agile PCM, there are three types of prices:
Contracts - Predefined agreements for item prices over a specified time period.
Published Prices - Item price information that has been published from other projects to the Item Master.
Quote Histories - Quoted prices that were previously received for an item.
When you look up data for a particular item or manufacturer part, the price and response fields are updated with data that you can leverage in your analysis process.
|
Note: You only have access to prices that are relevant to your organization. You will not be able to look up prices supplied by other suppliers. |
An item can have multiple types of prices. When you do a price lookup for an item, Agile PCM selects a price in the following order of preference: contracts, published prices, and quote histories.
You can look up contract prices, published prices, or quote histories.
|
Note: Selection of the price details depends on the Look Up criteria mentioned. To break ties between prices, the deciding factor can be Lowest Price or Lead Time or Most recent response. |
To look up prices:
Open a RFQ Response and select the Responses tab.
Select the row(s) of the item for which you want to look up contract pricing information.
Choose Responses > Price Lookup. The Price Lookup from Item Master dialog appears.
Select a price scenario from the Base Scenario dropdown list.
Click the button next to the Price Types field. Select either Contract, Published Price, or Quote History or a user-defined price type.
Decide whether to Populate Price to all scenarios or just one.
|
Note: Assume that an RFQ has two price scenarios, Q1 & Q2, and you want to look up prices for Q1. The system will try to find a price based on the base scenario, which is Q1. If the All Price Scenarios option was selected, once the system finds a price, it will use the same price (Q1's price) for Q2 and update both scenarios with the same price. If just one scenario was chosen, only that one is updated. |
Enter the quantity deviation, in percentage, to search for in the Item Master if you select that option, or select the Ignore Quantities button to ignore the quantity.
|
Note: For example, if the quantity in an RFQ is 100 and a user gives a 10% deviation range, the system finds prices for the part that are within the quantity of 90 and 110. |
Enter the number of days from the RFQ date range, plus or minus, within which the quotes have been received or select the Ignore the date ranges button to ignore the date of quote.
Select the Lowest Price, Shortest Lead time, or Most recent response button to filter the results if multiple rows are retrieved.
|
Note: For the Most recent response option to function accurately, the Agile administrator must have enabled the attribute Priceline.DateModified in the Java Client. By default, this attribute is disabled. To use this search option, the Agile administrator must enable the Priceline.DateModified attribute in the Java Client for the privilege (Restricted) Read my Organizations Prices under UserSettings > Privileges > Read. |
Optional
You can narrow down your look up criterion across
a particular Ship To Location
specific Program(s)
specific Customer(s)
Click Look Up.
You can export the items on the Responses tab to prepare a response. When you export items, Agile PLM generates a Comma-delimited text (CSV) file or an Excel workbook. The exported response file is named RFQNumber.csv or RFQNumber.xls.
You can use a spreadsheet program, such as Microsoft Excel, to edit a CSV file. You can also use a quoting tool to complete responses offline. After you complete the fields in a response file, you can import the file back into the Agile PLM system to submit the response to the sourcing manager.
You can export response lines to your local hard drive as a comma-delimited file (CSV) or Excel Workbook (XLS) file.
To export response lines:
Open the RFQ Response.
Click the Responses tab.
Click the row selection cells of the response line items you want to export (use the ctrl keyboard button to select multiple lines) or click the All Rows Selection cell to select all.
Click More > Export (xls) or More > Export (csv). The File Download dialog appears.
Save the file to the desired location.
For more details, see the Import/Export User Guide.
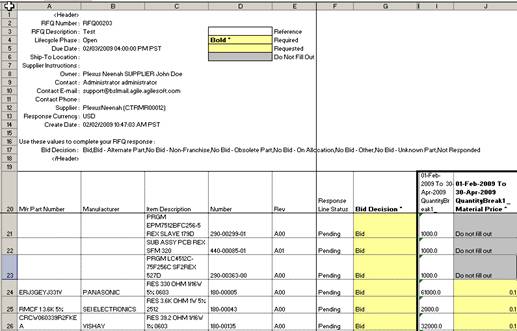
The exported supplier response file can be an Excel spreadsheet with a structured layout of RFQ header information and supplier response fields. The RFQ header rows are collapsible, while row and column headings are frozen panes that enable ease-of-reference to off-view fields.
As shown below in the spreadsheet example, a color legend is used to indicate more information about a field. The following legend is used:
Required fields are shaded yellow, with bold headings and 'must be' filled for the response acceptance.
Requested fields are also shaded yellow, however, they have normal headings and are optional.
Gray shaded fields should not be filled at all, while the white shaded fields are informational.
To successfully import a supplier response text file, you must follow these guidelines when you edit the file:
You can reorder column headings, but do not edit or add any data to the headings. If you modify column headings, the file cannot be imported.
Do not add new columns of data.
Do not modify any date fields except for EOL Date and Expiration Date.
|
Important: If you fail to complete all required fields, you can still successfully import the file. However, you won't be able to submit the responses to the sourcing manager. Required and requested fields are specified by the sourcing manager who set up the project and RFQ. |
Empty fields are not imported. They are not equal to 0. To set a numeric field or a price field to 0, you must explicitly enter the value 0.
If you prefer, you can remove the <HEADER> section at the top of the file since it is not imported. To remove this section, make sure you remove the two rows containing the <HEADER> and </HEADER> tags and all rows in between.
When you import the supplier response file, the imported data replaces existing response field data.
When you edit a supplier response file, make sure you edit only fields you are allowed to edit. Generally, this means the columns from Bid Decision to Material Price, inclusive. Other fields are for viewing only.
You can import the supplier response file multiple times. Each time you import the file, only the editable fields are imported, replacing the previous values. The fields that appear in a supplier response file depend on whether the sourcing manager specified them as requested and required.
Certain supplier response fields require specific values that must be spelled correctly. If you type an invalid value in the field, it won't be imported. The following table shows the valid values for the supplier response fields that require specific values.
|
Note: The header for the supplier response file also lists values for these fields. |
| Field | Valid Values | Note |
|---|---|---|
| Bid Decision | Bid
Bid - Alternate Part No Bid - Non-Franchise No Bid - Obsolete Part No Bid - On Allocation No Bid - Other No Bid - Unknown Part Not responded |
NA |
| Country of Origin | NA | Enter a valid country name. Make sure the spelling is correct. |
| NCNR | Yes, No | Non-Cancellable, Non-Returnable |
| Terms of Sale | CFR | Cost and Freight |
| Terms of Sale | CIF | Cost, Insurance, and Freight |
| Terms of Sale | CIP | Carriage and Insurance Paid To |
| Terms of Sale | CPT | Carriage Paid To |
| Terms of Sale | DAF | Delivered at Frontier |
| Terms of Sale | DDP | Delivered Duty Paid |
| Terms of Sale | DDU | Delivered Duty Unpaid |
| Terms of Sale | DEQ | Delivered Ex Quay (Duty Paid) |
| Terms of Sale | DES | Delivered Ex Ship |
| Terms of Sale | EXW | Ex Works |
| Terms of Sale | FAS | Free Alongside Ship |
| Terms of Sale | FCA | Free Carrier |
| Terms of Sale | FOB | Free on Board Vessel |
|
Note: In addition to the three-letter abbreviations for Terms of Sale, you can enter the full Terms of Sale value, for example, "CFR - COST AND FREIGHT" or "CIF - COST, INSURANCE AND FREIGHT." The value must be all uppercase. |
Unlike other types of objects that you can import, supplier responses do not require that you map import fields to PCM fields. Since the response is a modified version of the exported text file, the mapping is automatic.
To import a RFQ Response file:
Select and open the RFQ Response you want to work with.
Click the Responses tab.
Choose More > Import. The Import dialog appears.
Click Browse; select the file you want to import.
Select the appropriate configuration options.
|
Note: If you are importing a CSV file, you must select the same encoding type used to export the file. |
Click Import.
To view items that are custom components with attached critical documents, use the Content BOM view to expand item attachments to the BOM. This feature needs to be setup by the author of the RFQ. For more information on setting up and enabling suppliers to view the Content BOM, contact the Agile administrator.
|
Note: Some custom components have critical information attached such as Test Specifications and Packaging Specifications that could influence the cost that suppliers will bid. |
A Costed BOM view shows your bids on each item and the rolled up cost for the assembly.
|
Note: The Costed BOM button that displays the Costed BOM view is available if your supplier organization is designated as a partner for the sourcing project or if the buyer has explicitly shared the BOM in order for you to see it. |
To use the Costed BOM View:
Open the RFQ Response.
Go to the Responses tab.
Click View > Costed Bill of Materials.
To view a specific price scenario:
a. Select Selected Price Scenario in the Price Scenarios dropdown list. The Price Scenarios dialog box appears.
b. Select the price scenario information from the Available Values, and then click right arrow to add to the Selected Values list.
c. Click OK.
To return to the Responses tab, click Back.
The Content BOM view will be available on the RFQ Response's Responses tab if configured in the project or RFQ as "data to share with suppliers."
With the Content BOM option available, it permits children nodes in the BOM to show up in the supplier's view. This can be very helpful if some of the BOM's nested items are documents that would influence the supplier's cost bid. Some documents like Test Specs and Packaging Specs will be available in the Content BOM page.
To access the Content BOM view:
Login as the contact person of the supplier, and open the RFQ.
Go to the Responses tab.
Click View > Bill of Materials Structures.
The Bill of Materials Structures page opens, so that you can see all of the BOM items and children nodes, including important documents.
The Assembly Cost (Supplier Response) report shows the costs at each level of the BOM structure for one or more top-level assemblies. The results of the Supplier Assembly Cost report mirror what the sourcing manager sees.
|
Note: The Assembly Cost report is not available in Basic edit mode. |
The following task provides a simple guideline to running and viewing the Assembly Cost (Supplier Response) report. For more information about working with reports, see the Agile Reports section of Getting Started with Agile PLM.
To run the Assembly Cost (Supplier Response) report:
In the navigation pane on the left, click the button that opens the Reports Folders.
Go to Standard Reports > Sourcing Reports.
Click Assembly Cost (Supplier Response). The tabbed report object page appears in the right pane.
To run a report, click the Execute button. The report wizard page appears.
In the Select Layout and Configuration step, select Default Layout from Layout type dropdown list. Click Next.
In the Select Response step, select the RFQ Response you want to use from the dropdown list. Click Next.
|
Note: In order for an RFQ to appear as an option in this step, the buyer must have included "Costed BOM View" as "data to share with suppliers." |
In the Select Items step, click the icon next to the Assembly Lines field to choose the assembly lines (BOMs) you want. Select an assembly line by double-clicking the desired row or by dragging selected table rows to the Assembly Lines cell on the Select Items wizard page.
Click the icon next to the Price Scenarios field to choose the price scenarios you want in the report. Your choices are outlined below. Select a price scenario by double-clicking the desired row or by dragging selected table rows to the Price Scenarios cell on the Select Items wizard page.
When you have completed the Select Items wizard step, click Finish to run the report.
The report is generated and displayed in a separate window. You can use the buttons in the window to print, export, or save the report. Saved reports can be viewed on the Historical Reports tab of the tabbed report object page. For more information about working with reports, see Getting Started with Agile PLM.
You can make changes and resubmit RFQ response lines anytime, and as many times as you wish, until the response line is closed by the sourcing manager.
The system shows you which lines are incomplete. When lines have incomplete information, they appear on the Responses tab with a question mark icon in the Supplier Response Status column to the left of the item number.
To fill in an incomplete response line:
Click the question mark icon in the Response Line Status column to the left of the item number. In Basic and Advanced Wizard Edit mode, the Response Entry dialog for the item appears. The invalid fields are indicated by an invalid icon. For details, see "RFQ Response Edit Mode."
Modify the invalid fields.
When you are finished, click Finish.
When you have finished entering or modifying response lines, you can submit the response.
To submit a line item:
Select one or more RFQ response lines on the Responses tab. If you're using the Basic method, all items are automatically selected.
Click Responses > Submit. If there are lines with incomplete information, an error message appears on the Responses tab. The completed lines are immediately submitted to the sourcing manager. The invalid or incomplete lines are not submitted.
To submit the complete RFQ:
Click Actions > Submit (or the Submit button in Basic response edit mode) to submit a complete RFQ Response. Any response lines that are eligible for submittal will be sent to the buyer.
The Changes tab of an RFQ Response allows you to review RFQ content changes or modifications made by the sourcing manager.
You can see the RFQ line items that have been added or deleted by clicking the Project Item Changes sub-tab. You can use the Views dropdown to see only the items that have been added, deleted, or modified.
You can see changes in response lines by clicking the Supplier Response Changes sub-tab, and then clicking the Response Changes icon at the item level.
After you create responses, you can review them to ensure that all response line items are complete and correct. You can filter the response lines to show only the lines you want to view. The most useful filter options are Decision, which displays the line item details by the bid decision, and Response Status. The RFQ Response lines with a decision of BID are validated to ensure that all required fields have been filled in. Even if you fill in part of the information, the sourcing project manager will not see a line item that is not filled out completely.
Once the sourcing project manager closes a response line, it can no longer be submitted to the buyer.
On the Responses tab of the RFQ Response object, click the View Response Changes icon in the Response Changes column to view changes you have made to the response information for that item.
The price details column is indicated by a Details icon. Click the in the Has Price Information column of the response table to view details about the response line.
If you have the appropriate privileges, you can make changes to submitted line items. Usually, you cannot make changes if the line item or RFQ status is locked or closed. See "Entering and Modifying RFQ Response Information." You cannot submit responses if the RFQ status is locked or closed.
Occasionally, a supplier manager modifies an RFQ Response as a result of the following:
Data correction requirements
Due date changes
Addition of new RFQ line items
Request for requote
You receive notifications, according to notification settings, about changes that have been performed. You can display the Changes tab of an RFQ Response to view the changes. Also, response lines that have been modified or recently added by the buyer are indicated by a star icon in the Response Readiness Status column on the Responses tab.
Based on the type of change, you might need to complete a new response line, provide a requote for an existing line item, or provide additional data.
When you are negotiating with the buyers who send you requests for quotes, you often need to have informal, threaded dialogue to share information and to finalize quotes. You can also carry on discussions with other users in your organization. You can reply to messages and add and remove discussions.
Discussions replace the conventional email messaging service. Like email, discussions have a subject line, message area, priority, and a notification list. You can reply to the discussion as you reply to an email. Recipients receive the discussion as a notification in their inbox. Only Agile PLM users can participate in discussions.
You can add discussions based on different subjects.
To create and add discussions:
Open the RFQ Response and select the Discussion tab.
Click Add. A new row appears in the Discussions table.
Click the Create New button. The Create New dialog appears.
|
Note: You can also add an existing discussion by clicking the Search to Add button and searching for it. |
Select the type of discussion from the Discussion Type field
Enter the subject in the Subject field.
Enter discussion text in the Message field.
Select the priority of the message from the Priority dropdown list.
Click the Address Book button next to the Notify List field, and select the names of recipients.
Click Add. A notification is sent to the users in the Notify List.
You can reply to discussions in which you are included. Replying to a discussion is similar to replying to an email. You can find the discussion notification in your inbox. You need to have the (Restricted) Discussion Participant role assigned to you to reply to a discussion.
You can access a discussion by clicking on the Discussion tab of the RFQ Response that is associated to the discussion. Alternatively, you can access the discussion from your Notifications inbox. From within your inbox, click the subject in the Regarding column to open the discussion.
To reply to discussions:
On the Discussion tab of the discussion object, click Reply. The Reply to Discussion dialog appears.
Enter the reply in the Message field.
To change the list of recipients, click the Address Book button next to the Notify List field. Select the names of recipients.
Click Send.
|
Note: You can send any number of replies in a discussion. |
After you finish all your discussions, you can remove them from the Discussions tab of the RFQ Response object.
To remove discussions from the Discussions tab of an RFQ Response object:
Open the RFQ Response and click the Discussions tab.
Select the row of the discussion you want to remove.
Click Remove on the Discussions tab.
|
Note: The child discussion lines are deleted if parent is deleted. |
|
 Copyright © 2010, 2013, Oracle and/or its affiliates. All rights reserved. Legal Notices |
|