| Agile Product Lifecycle Management ACS User Guide Release 9.3.3 E39294-02 |
|

 Previous |
 Next |
Destinations define which resources can accept the extracted content. These are managed from the Destinations node. With Agile Content Service, you can define the following destination protocols:
Agile
FTP
File
HTTP/HTTPS
JMS Queue or Topic
You can now specify the filename extension at the Destination level. That is, any extract that goes to a given destination will use the specified file extension, if provided. If an extension is not provided, the default is based on the format of the extraction.
Users cannot create destinations. Destinations must be created and assigned by the administrator before a user can create a transfer order. When creating a destination, you can also test the connection to verify that the destination can be located.
The Status column in the Destinations window indicates the status of the last attempted transmission of data to this destination. When a destination is created or reset, the default status is Success, even though no transmission has occurred.
Agile PLM provides an example destination with the file protocol that saves the transfer file to the root directory of the application server. You can use this example destination when creating a subscriber or CTO, if the properties meet your company's needs.
Agile Content Service can publish to another Agile PLM system. Agile Content Service creates a package in the target system using WebServices. After the package is accepted, the data can be directly imported from the Attachments tab of the package. Make sure to use aXML format if you want to directly import the data.
|
Note: To create an Agile destination on your Agile PLM system, you need the following information about the target Agile PLM system: server URL (including the host name, the virtual path name, and the port number), the appropriate username and password to use on the target Agile PLM system, and the name of the package service to select on the target Agile PLM system. To obtain this information, you may need to contact the administrator of the target Agile PLM system. |
For information about how to configure your Agile PLM system to receive data from another Agile PLM system, see Setting and Editing Package Services on page 41. (For information about ACS settings for both source Agile PLM systems and target Agile PLM systems, see Settings Required for Agile-To-Agile Publishing on page 53.)
To create an Agile destination:
Under System Settings > Agile Content Service, double-click Destinations. The Destinations window appears.
Click . The Create Destination dialog box appears.
Type a name and a description of the destination in the Name and Description fields.
Select Agile from the Protocol list.
Select either Yes or No from the Response Expected list.
For information about how to configure your Agile PLM system to send responses from a destination, see Setting and Editing Response Services on page 45.
Click the button next to the Notification User field to display the list of available users. Select the users to be notified if a transfer failure occurs.
Select either HTTP or HTTPS from the Server URL drop-down list.
Type the URL and port of the target Agile PLM application server in the host and port fields, respectively. Type the virtual path name in the virtual path field, which is the last field.
|
Note: The virtual path is determined when an Agile PLM system is installed. For example, if the URL used to log in to the Web Client on the target Agile Application Server is: |
Enter the URL information as shown above, where www.clapton.com is the host name, and Agile is the virtual path name. The field following the colon (:) is reserved for a port number. 80 is usually used for HTTP and 443 is usually used for HTTPS. If a port other then 80 or 443 is being used, the port will appear in the URL used to log in to the Agile Web Client. Omit PLMServlet, which is the application name. Contact the administrator of the target Agile PLM application server if you have questions about the correct URL to use.
Type the username and password of the target Agile PLM application server in the User Name and Password fields. Click Grab Package Services.
If the remote Agile PLM system can be properly contacted, the Package Service list is populated with the package services from the target Agile PLM server.
|
Note: If the user's password in the target Agile PLM system changes, be sure to edit the destination with the new password. |
Select the appropriate Package Service from the drop-down list.
|
Note: You may need to contact the administrator of the target Agile PLM system to determine which package service you should select. |
Edit the following destination parameters, if necessary:
Filename Prefix (default is TO)
File Number (default is 000001)
The name of the transfer order file consists of the Filename Prefix parameter followed by the File Number parameter. The File Number parameter increments by one each time a file is transferred.
Click OK.
You can publish data to an FTP site. Agile Content Service uses the user name and password, if set, to log in to the FTP server. You can also verify the connection to the site during creation to ensure access.
|
Note: If a file with the same name already exists at the FTP site when the transfer order is published, it is overwritten. |
To create an FTP destination:
Under System Settings > Agile Content Service, double-click Destinations. The Destinations window appears.
Click . The Create Destination dialog box appears.
Type a name and a description of the destination in the Name and Description fields.
Select FTP from the Protocol list.
Click the button next to the Notification User field to display the list of available users. Select the users to be notified if a transfer failure occurs.
Type the URL of the FTP site where the transfer order is sent, including port number, if needed, in the URL orTarget Path field.
Type the username and password of the FTP site, if needed, in the User Name and Password fields.
Edit the following destination parameters, if necessary:
Filename Prefix (default is TO)
File Number (default is 000001)
Filename Extension
The name of the transfer order file consists of the Filename Prefix parameter followed by the File Number parameter with the extension of the Filename Extension parameter. The File Number parameter increments by one each time a file is transferred.
Check Enable User-defined Filename Extension to activate the Filename Extension field. Specify the filename extension, either .pdx or .axml. All files extracted with this destination have the same file extension. If no extension is specified, the default is based on the format of the extraction.
Select Binary from the Transfer Mode list.
Click Test to verify the destination.
When testing the connection to the destination, temporary files are created in the destination location. You can delete these files after the connection is verified.
Click OK.
Click OK.
You can publish data to a file system. Agile Content Service must have access to the fully qualified path where the file will be located for a successful transfer. Sufficient disk space must also be available to write the file to the destination. You can verify the connection to the path during creation to ensure access.
|
Note: If a file with the same name already exists at the destination when the Transfer Order is published, it is overwritten. |
To create a file destination:
Under System Settings > Agile Content Service, double-click Destinations. The Destinations window appears.
Click . The Create Destination dialog box appears.
Type a name and a description of the destination in the Name and Description fields.
Select File from the Protocol list.
Click the button next to the Notification User field to display the list of available users. Select the users to be notified if a transfer failure occurs.
In the URL or Target Path field, type the fully qualified path where the transfer order is to be located.
|
Note: You can specify any directory on your network to which the Agile Application Server can write successfully. |
The target path you specify is located on the computer on which the Agile PLM application is installed. It is not located on the logged-on user's computer. For example, if you specify C:\temp the transfer file will be written to the directory named temp on the C drive of the computer where the Agile PLM application is installed. The transfer file will not be written to the C:\temp directory of your computer.
UNIX: File destinations can be located in the /opt/Agile folder and its subfolders. Users may not have write privileges to other folders. Remember to use slashes (/) instead of backslashes (\) in the path.
Edit the following destination parameters, if necessary:
Filename Prefix (default is TO)
File Number (default is 000001)
Filename Extension
The name of the transfer order file consists of the Filename Prefix parameter followed by the File Number parameter with the extension of the Filename Extension parameter. The File Number parameter increments by one each time a file is transferred.
Check Enable User-defined Filename Extension to activate the Filename Extension field. Specify the filename extension, either .pdx or .axml. All files extracted with this destination have the same file extension. If no extension is specified, the default is based on the format of the extraction.
Click Test to verify the destination.
Agile Content Service can publish data to an HTTP server using the POST method. The complete URL entered in the URL or Target Path field gives the location of the server.
To create an HTTP or HTTPS destination:
Under System Settings > Agile Content Service, double-click Destinations. The Destinations window appears.
Click . The Create Destination dialog box appears.
Type a name and a description of the destination in the Name and Description fields.
Select HTTP or HTTPS from the Protocol list.
Select either Yes or No from the Response Expected list.
If Yes is selected, the status of any Transfer Order subscribed with this destination is not changed to Complete until a Success response is returned from this destination. If a Success response is not received, no additional Transfer Orders are sent to the destination.
For information about how to configure your Agile PLM system to send responses from a destination, see Setting and Editing Response Services on page 45.
Click the button next to the Notification User field to display the list of available users. Select the users to be notified if a transfer failure occurs.
Type the URL of the HTTP(S) site where the transfer order is to be sent in the URL or Target Path field.
In the Request File Field field, type the name to use for the MIME part (i.e., section) which will contain the file data.
(If you need information about how the HTTP POST is constructed, contact Agile Support.)
Edit the following destination parameters, if necessary:
Filename Prefix (default is TO)
File Number (default is 000001)
Filename Extension
The name of the transfer order file consists of the Filename Prefix parameter followed by the File Number parameter with the extension of the Filename Extension parameter. The File Number parameter increments by one each time a file is transferred.
Check Enable User-defined Filename Extension to activate the Filename Extension field. Specify the filename extension, either .pdx or .axml. All files extracted with this destination have the same file extension. If no extension is specified, the default is based on the format of the extraction.
|
Note: You cannot remove these parameters. |
Click the button next to the Additional Parameters field to display a dialog box. Click the Add button to enter any additional name/value parameter pairs needed when the URL is submitted. Click OK.
These parameters will be included as named parts of the generated MIME message.
Click Test to verify the destination.
Click OK.
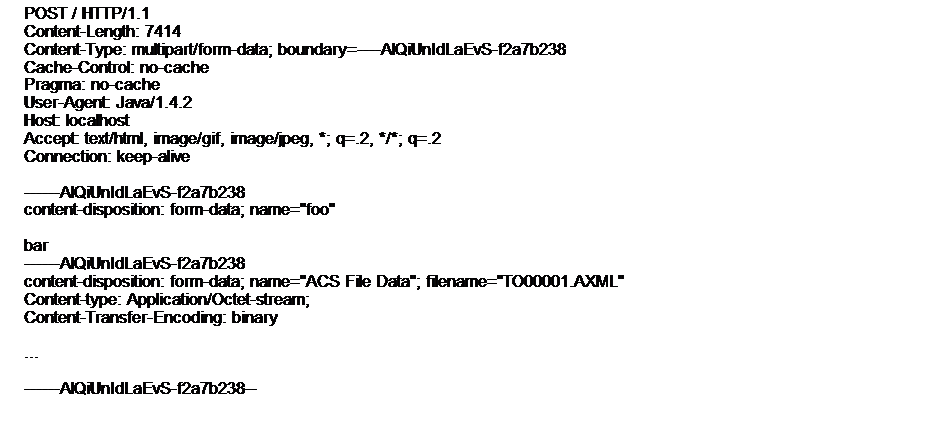
The following example HTTP destination illustrates how the destination settings are used to construct the HTTP POST.
| Destination parameter | Setting |
|---|---|
| Name | HTTP 1 |
| Description | Test HTTP destination |
| Protocol | HTTP |
| Notification User | |
| URL or Target Path Http: | localhost:9522 |
| Request File Field | ACS File Data |
| Filename Prefix | TO |
| File Number | 00001 |
| Additional Parameters | foo=bar |
Agile Content Service can publish data to Java Messaging Service (JMS). The TIBCO Enterprise, WebLogic JMS, WebLogic AQ, Oracle JMS and Oracle AQ are the JMS queues or topics currently supported by Agile Content Service.
|
Note: ACS does not support Topics for Oracle AQ and WebLogic. |
Before configuring the JMS destination, you may need to make some modifications to the JMS installation to connect with Agile Content Service.
To create a JMS destination:
|
Note: You can perform either JMS queue processing or JMS topic processing, depending on the settings of the Connection Factory and Destination Name parameters of the JMS destination. See step 8 and step 10 below. |
Under System Settings > Agile Content Service, double-click Destinations. The Destinations window appears.
Click the New Button put text here. The Create Destination dialog box appears.
Type a name and a description of the destination in the Name and Description fields.
Select JMS from the Protocol list.
Select either Yes or No from the Response Expected list.
If Yes is selected, the status of any Transfer Order subscribed with this destination is not changed to Complete until a Success response is returned from this destination. If a Success response is not received, no additional Transfer Orders are sent to the destination.
For information about how to configure your Agile PLM system to send responses from a destination, see Setting and Editing Response Services on page 45.
Click the button next to the Notification User field to display the list of available users. Select the users to be notified if a transfer failure occurs.
|
Note: For the parameters Provider Context Factory, Connection Factory, and Default Provider URL (in step 7, step 8, and step 9 below), the Agile PLM system fills in the fields with server-specific defaults. For example, if your Agile PLM system is running on an Oracle application server, Oracle defaults are used. Verify whether these defaults are correct for your Agile PLM installation and make any needed modifications. |
Type the name of the context factory class of the JMS server in the Provider Context Factory field. The name of the context factory class should be in a format similar to the following examples:
TIBCO:com.tibco.tibjms.naming.TibjmsInitialContextFactory
Oracle JMS:com.evermind.server.rmi.RMIInitialContextFactory
Oracle AQ:com.evermind.server.rmi.RMIInitialContextFactory
WebLogic JMS:weblogic.jndi.WLInitialContextFactory
WebLogic AQ:weblogic. jndi.WLInitialContextFactory
In the Connection Factory field, enter the name of the connection factory that will be obtained from JNDI tree. This is the name under which the JMS connection factory is registered. Whether queue processing or topic processing is used is determined by the type of connection factory named in the Connection Factory field.
The default TIBCO installation provides the following two sample connection factories:
QueueConnectionFactory (for queue processing)
TopicConnectionFactory (for topic processing)
Example values for Oracle JMS are the following:
QueueConnectionFactory (for queue processing)
TopicConnectionFactory (for topic processing)
Example value for Oracle AQ queue processing is as follows:
java:comp/resource/simpleOemsRP/QueueConnectionFactories/QCF
Example value for WebLogic JMS is as follows:
local JNDI name of Connection Factory as configured in WebLogic
Type the URL, including the address and port, of the host in the Default Provider URL field. The default value that appears in this field should be valid for the application server's built-in JMS provider. Consult your JMS documentation for more information.
For TIBCO, the URL should be in a format similar to the following example:
tcp://JMS_ServerName:7222
For Oracle JMS the URL should be in a format similar to the following example:
ormi://Oracle_JMS_ServerName:12401
For Oracle AQ the URL should be in a format similar to the following example:
ormi://Oracle_Application_ServerName_Where_AQ_IsConfigured:12401
For WebLogic JMS, the URL should be in the format similar to the following example:
t3://weblogic_serverName:7001
|
Note: WebLogic AQ is only supported where Agile PLM is deployed. |
Type the name of the queue or topic in the Destination Name field. The name of the queue or topic depends on how you have configured your JMS server. Consult your JMS documentation for information about creating and configuring queues and topics.
For example, TIBCO provides the following sample queue and topic:
queue.sample
topic.sample
The example values for Oracle JMS are:
Queue: jms/demoQueue
Topic: jms/demoTopic
The example value for Oracle AQ is:
java:comp/resource/simpleOemsRP/Queues/JMSDEMO_QUEUE
The example value for WebLogic JMS with Agile deployed on it is:
Queue: com.agile.jms.AsyncQueue
The example value for WebLogic AQ is:
local JNDI name of destination as configured in WebLogic Admin, for example, TEST_QUEUE which maps to PLM_ECO_QUEUE in AQ.
Type the username and password needed to access the queue in the User Name and Password fields.
Click the button next to the Additional Parameters field to display a dialog box. Click the Add button to enter any additional name/value parameter pairs. Click OK.
|
Note: These parameters are passed as JMS header properties when delivering content to the JMS destination. |
Click Test to verify the destination.
Click OK.
Messages sent to JMS destinations contain the following three components:
message header-used for message identification
properties-contain application-specific fields
body-holds the content of the message.
ACS adds the following properties to its JMS messages:
| Property Name | Property Value |
| ClientName | "Agile Content Service" |
| ServerName | "Agile Product Lifecycle Management" |
| ServerVersion | The specific Agile server version |
| AgileRecordLocator | The key used to identify the Where Sent row from the transfer order |
| TransmissionTimestamp | The timestamp when the JMS message was transmitted displayed as a long number representing the number of milliseconds since January 1, 1970, 00:00:00 GMT. |
| AgileTransferObjectNumber | The transfer order number |
| AgileTransferObjectSelectedContentNumbers | A semicolon delimited list of the object name or number from the Selected Content tab. If the object is an item, then the change number is noted in parenthesis. For example, if the Selected Content tab for the transfer order contains change C1 and item P1 at revision A C2, then this property value would be "C1; P1(C2)". |
| AgileTransferObjectSelectedContentIdentifiers | A semicolon delimited list of the object identifiers from the Selected Content tab. If the object is an item, then the change ID is appended following a colon. For example, if the Selected Content tab for the transfer order contains change C1 with ID 6001 and item P1 with ID 6002 at revision A C2 with ID 6003, then this property value would be "6001;6002;6003". |
After setup for AQ has been completed in the database, the WebLogic application server must be configured.
To configure AQ in WebLogic:
Log in to the WebLogic Administration console.
On the left pane, click agileDomain > Services > JDBC > Data Sources.
Create a new data source for AQ by entering the following information on the General Tab:
a. Name: Enter a name for the data source.
b. JNDI Name: aqjmsds
c. Database Type: Oracle
d. Database Driver: Oracle's Driver (Thin XA) for instance connections; Versions: 9.0.1, 9.2.0, 10,11
Click the Connection Pool tab.
Enter the following values:
a. URL: jdbc:oracle:thin@hostname:port_number:sid
b. Driver Class Name: oracle.jdbc.xa.client.OracleXADataSource
c. Properties: aq_db_username
d. Password: aq_db_password
Click the Targets tab.
On the tab, select the available Agile Server that is deployed on the WebLogic application server.
Click Save.
On the left pane, click agileDomain > Services > Messaging > JMS Modules.
Create a new JMS module with the target as the Agile PLM server:
a. Name: AQJMS Module
b. Target: agilePCServer
70. In the new JMS Module, create a new Foreign Server.
a. Name: AQ
b. Target: agilePCServer
On the newly created Foreign Server, enter values for the following fields on the General tab:
a. JNDI Initial Context Factory: oracle.jms.AQjmsInitialContextFactory
b. JNDI Properties: datasource=aqjmsds
Click the Connection Factories tab.
Create a new connection factory with the following information:
a. Name: CF
b. Local JNDI Name: aqjms
c. Remote JNDI Name: XAQueueConnectionFactory
d. Username: Same name used when you created the new data source.
e. Password
Click the Destination tab.
Create a new destination with the following information:
a. Name: Dest
b. Local JNDI Name: TEST_QUEUE
c. Remote JNDI Name: Queues/PLM_ECO_QUEUE
Click Save.
Restart the WebLogic application server.
After restarting, you can now create a JMS destination for WebLogic AQ.
|
Note: In Oracle AQ, a queue named PLM_ECO_QUEUE should be created in the schema of the user specified in the Username field of the data source. |
You can edit all of the parameters of the destination, except Protocol. Any future Transfer Orders referencing the edited destination use the updated settings.
You cannot edit a destination if it is referenced by an enabled subscriber. You must disable the subscriber before any changes can be made to the destination. See Enabling and Disabling Subscribers on page 39 for more information.
To edit a destination:
Under System Settings > Agile Content Service, double-click Destinations. The Destinations window appears.
Double-click the name of the destination you want to edit.
Edit the General Information tab of the destination to make changes to the necessary fields.
Click Save and Close.
If delivery to a destination fails, the failure appears on the Where Sent tab of the transfer order and in the Transmission Status column on the Destinations window. The Where Sent tab of the transfer order indicates the transmission status and displays an error message in the Transmission Notes column.
On a destination window, the History tab of the destination displays details indicating which transfer order caused the failure. After you make any necessary changes to the transfer order or the destination to correct the problem, you can reset the destination to attempt delivery again.
Once a destination has failed, no other transfer orders can be sent to that destination until it has been reset. Transfer orders for that destination are queued in the order they were scheduled to be transmitted. The Transmission Notes column indicates that the transfer order is waiting for another destination. Once the destination is reset, the transfer orders are transmitted according to their order in the queue.
To reset a destination:
Under System Settings > Agile Content Service, double-click Destinations. The Destinations window appears.
Select the destination to reset.
Click the Reset Button to put text here.
Destinations can be deleted only if they are not currently assigned to a transfer order or subscriber.
To delete a destination:
Under System Settings > Agile Content Service, double-click Destinations. The Destinations window appears.
Select the destination you want to delete.
Click the Delete Button to put text here.
|
 Copyright © 2010, 2013, Oracle and/or its affiliates. All rights reserved. Legal Notices |
|