Release 1.2
Part Number E36380-01
Contents
Previous
Next
| Oracle Pedigree and Serialization Manager Installation Guide Release 1.2 Part Number E36380-01 | Contents | Previous | Next |
This chapter covers the following topics:
The pas.zip contains the following files:
adapters
JmsAdapterPlan.xml: Deployment plan used to update the JmsAdapter resource adapter deployment to include a new outbound connection pool used by the JMS Queue for integrations.
DbAdapterPlan.xml: Deployment plan used to update the DbAdapter resource adapter deployment to include a new outbound connection pool for database connections used in SOA composites.
applications
PasSerializationManager.ear: The main enterprise Oracle Pedigree and Serialization Manager (OPSM) application. This application is deployed into the PAS Managed Server (pas_server1).
PasSerialsService_SerialsServices.ear: Supporting Web Services application for the main OPSM Application. Supports various web service methods for serialization. Deployed into the SOA Server (soa_server1).
PasTransactionsService_TransactionsServices.ear: Supporting Web Services application for the main OPSM Application. Supports various web service methods for serialization and pedigree transactions. Deployed into the SOA Server (soa_server1).
PasEpcServices.ear: Supporting Web Services application for the main OPSM Application. Supports various web service methods for Capture and Query of EPCIS documents, and capture of EPCIS documents via HTTP Servlet. Deployed into the SOA Server (soa_server1).
PasSetupService_SetupServices.ear: Supporting Web Services application for the main OPSM Application. Supports web service methods to create or update the product, product details, and item and item unit of measure details. Deployed into the SOA Server (soa_server1).
atglite
atglite_Rel7_OPSM_ATGPF_11.1.1.7.1_GENERIC_130807.0330.zip: ATGLITE libraries required for the Audit Trail functionality. Deployed into the PAS Managed Server (pas_server1) and SOA Server (soa_server1).
fusion_atglite.dmp: Database dump of the FUSION_ATGLITE schema required for the Audit Trail functionality.
bipublisher
Pedigree.zip: Pre-configured Pedigree report for use by Oracle BI Publisher. Contains two templates (GenericPedigree.rtf and PedigreeFloridaXML.rtf) that are used to retrieve basic information applicable to either California or Florida Pedigree laws.
db
xdbpm.zip: Contains files for installing the XDBPM utilities which are needed for the EPCIS database objects.
EPCIS.zip: Contains the EPCIS Xml Schema Definition (XSD) files which are needed for the EPCIS database objects.
newInstall_step1_fusion_atgliteSchema_createTablespaces.sql: SQL file used to create the tablespaces needed for the FUSION_ATGLITE user.
newInstall_step1_fepasSchema_createUsers.sql: SQL file used to create the PAS and PASJMS users used by the application.
newInstall_step2_fepasSchema_installSchema.sql: SQL file used to create all the OPSM database objects.
The following files are needed for installing EPCIS database objects:
newInstall_step2_pasepcSchema_defineBindVariables.sql
newInstall_step2_pasepcSchema_doSchemaRegistration.sql
newInstall_step2_pasepcSchema_setFolderNames.sql
newInstall_step2_pasepcSchema_setLocalVariables.sql
newInstall_step2_pasepcSchema_setVariables.sql
newInstall_step2_pasepcSchema_unzipArchive.sql
newInstall_step2_pasSchema_installAudit.sql: SQL file having the changes related to audit trail.
newInstall_step2_fepasSchema_errorNotification.sql: SQL file having the changes related to e-mail notification of errors.
newInstall_step2_fusionSchema_createSynonyms.sql: SQL file that creates the synonyms for the PAS database objects in the FUSION_ATGLITE schema.
newInstall_step2_fepasSchema_grantsForFusion.sql: SQL file that grants privileges for the PAS database objects to the FUSION_ATGLITE user.
newInstall_step3_fepasSchema_loadSeedData.sql: SQL file used to load the seed data.
seed_pas_dashboard.sql: SQL file used to load the dashboard table.
seed_pas_dashboard_refresh.sql: SQL file used to load the dashboard refresh table.
seed_pas_languages.sql: SQL file used to load the OPSM languages tables.
seed_pas_lookups.sql: SQL file used to load the OPSM lookup tables.
seed_pas_odi_extract_def.sql: SQL file used to load the Oracle Data Integrator extract definitions table.
seed_pas_serial_type_groups.sql: SQL file used to load the serial type groups table.
seed_pas_serial_types.sql: SQL file used to load the serial types table.
seed_pas_system_parameters.sql: SQL file used to load the system parameters table.
seed_pas_error_messages.sql: SQL file used to load the error messages into the error messages table.
seed_pas_audit.sql: SQL file user to load the application modules for audit trail setup into the FND_AUDIT_WEBAPP_AM table in the FUSION_ATGLITE schema.
upgradeInstall_step1_fusion_atgliteSchema_createTablespaces.sql: SQL file used to create the tablespaces needed for the FUSION_ATGLITE user.
upgradeInstall_step1_fepasSchema_upgradeSchema.sql: SQL file used to upgrade the schema to the latest version.
upgradeInstall_step1_fepasSchema_alterUser.sql: SQL file to alter the PAS user and create the FUSION_ATGLITE user.
The following files are needed for installing EPCIS database objects when upgrading to 1.2.0.0.0:
upgradeInstall_step1_pasepcSchema_defineBindVariables.sql
upgradeInstall_step1_pasepcSchema_doSchemaRegistration.sql
upgradeInstall_step1_pasepcSchema_setFolderNames.sql
upgradeInstall_step1_pasepcSchema_setLocalVariables.sql
upgradeInstall_step1_pasepcSchema_setVariables.sql
upgradeInstall_step1_pasepcSchema_unzipArchive.sql
upgradeInstall_step1_fepasSchema_grantsForFusion.sql: SQL file that grants privileges for the PAS database objects to the FUSION_ATGLITE user.
upgradeInstall_step1_fepasSchema_upgradeCustomSerialGeneration.sql: SQL file for installing database objects needed for the enhanced custom serial generation.
upgradeInstall_step2_fepasSchema_upgradeSeedData.sql: SQL file used to upgrade the seed data used by the application to accommodate schema changes.
upgradeInstall_step3_fepasSchema_upgradeUserData.sql: SQL file used to upgrade the users data used by the application to accommodate schema changes.
odi
commons-codec-1.3.jar: Library used for the integration with Oracle Data Integrator.
commons-httpclient-3.1.jar: Library used for the integration with Oracle Data Integrator.
odi-core.jar: Library used for the integration with Oracle Data Integrator.
soa
configPlan: Directory that contains the configuration plans that are attached to each composite during deployment. The configuration plans set the proper host/port information based on information provided in the properties file used by the installer.
PasSerializationManagerSoa.zip: The SOA composites used to support the main enterprise OPSM application. Contains the PasCreateTransactionsComposite, PasLotSynchronizationComposite, PasSerialGenRequestComposite, PasTransactionsComposite, PasTransmitSerialsViaFileComposite, PasTransmitSerialsViaWebComposite, and PasCaptureEpcisDocComposite. This is a SAR file that is deployed into the SOA Server (soa_server1).
scripts
pasMasterInstall.py: The master installer script.
pasMasterUpgrade.py: The master upgrade script.
pas_install.properties: The properties file used by the installer.
pasPasswordEncoder.py: The password encoder script.
ext_getpass.py: The password retrieval script.
templates
oracle.pas_template_11.1.1.jar: The WebLogic Domain template used to configure a domain for Oracle Pedigree and Serialization Manager.
Perform the following steps before you begin your install, you must:
Install the Oracle 11gR2 (11.2.0.3.0) 64-bit Production Database, Enterprise Edition.
Install WebLogic 11gR1PS6 (10.3.6.0) 64-bit.
Install SOA Suite 11gR1PS6 (11.1.1.7.0) 64-bit, including Enterprise Manager and the Repository Creation Utility (RCU) 11gR1PS6.
Note: RCU is currently only available for Windows and Linux platforms. Download and run RCU from Windows or Linux to install the SOA and MDS schemas required by the SOA Suite installation.
Download and apply the patch 16964825 from support.oracle.com.
Create an additional MDS schema for OPSM to support personalization and customizations within the application. Create the schema using the prefix "OPSM" so it results in an OPSM_MDS schema.
Set the following environment variables:
MW_HOME to your Middleware Home.
For example, MW_HOME=/slot/ems2383/oracle/mwhome
MW_ORA_HOME to your SOA HOME.
For example, MW_ORA_HOME=$MW_HOME/Oracle_SOA1
Set the PATH variable to include $ORACLE_HOME/bin.
For example, export PATH=$ORACLE_HOME/bin:$PATH
Copy the pas.zip file to the location that you’ve set in your MW_ORA_HOME environment variable.
Unzip the pas.zip file using the following command: unzip pas.zip (If you have unzipped the pas.zip elsewhere, move it to the location that you’ve set in your MW_ORA_HOME environment variable).
Create the tablespaces required for creating the FUSION_ATGLITE user by running the "newInstall_step1_fusion_atgliteSchema_createTablespaces.sql" SQL script provided from within the MW_ORA_HOME/pas/db folder.
Important: Open the script and modify the parameters before running. This script should be run while connected to the database as the SYS user.
Import the FUSION_ATGLITE schema by navigating to the MW_ORA_HOME/pas/atglite folder, and running the impdp command. For example, in a Linux environment, the following commands can be run:
sh $ORACLE_HOME/bin/oraenv (to set the environment variables)
create directory mydir as '<MW_ORA_HOME>/pas/atglite' (keeping the quotes, replace <MW_ORA_HOME> with the actual value and run in sqlplus as the SYS user)
cd $ORACLE_HOME/bin
impdp \”sys/<sys password>@<ORACLE_SID> as sysdba\”
DUMPFILE=mydir:fusion_atglite.dmp
LOGFILE=mydir:fusion_atglite.log
Important: This script should be run while connected to the database as the SYS user.
Create database schema user/owners for PAS and PASJMS by running the "newInstall_step1_fepasSchema_createUsers.sql" SQL script provided from within the MW_ORA_HOME/pas/db folder. It also grants additional privileges to the FUSION_ATGLITE user.
Important: This script should be run while connected to the database as the SYS user. In addition, the database schema user/owners will be created locked and password expired. After the script has run successfully, be sure to edit the FUSION_ATGLITE, PAS, and PASJMS owners to unlock them and set a new password.
Install the XDBPM utilities by unzipping xdbpm.zip (in the MW_ORA_HOME/pas/db folder). Change to the xdbpm directory and run the xdbSupport.sql script with $PWD as a parameter. For the Unix/Linux operating systems:
sqlplus <user>/<password>@<database> as sysdba @xdbSupport $PWDImportant: This script should be run while connected to the database as the SYS user.
Register the XML Schema’s used by the database objects by running the "newInstall_step2_pasepcSchema_doSchemaRegistration.sql" SQL script provided within the MW_ORA_HOME/pas/db folder.
sqlplus <user>/<password>@<database> as sysdba @newInstall_step2_pasepcSchema_doSchemaRegistration.sql $PWD
Important: This script should be run while connected to the database as the SYS user.
Install the OPSM database objects (for example, tables, views, and so on) by running the "newInstall_step2_fepasSchema_installSchema.sql" SQL script provided within the MW_ORA_HOME/pas/db folder.
sqlplus <user>/<password>@<database> @ newInstall_step2_fepasSchema_installSchema.sql $PWDImportant: This script should be run while connected to the database as the PAS user.
Create synonyms for the PAS objects in the FUSION_ATGLITE schema by running the "newInstall_step2_fusionSchema_createSynonyms.sql" SQL script provided within the MW_ORA_HOME/pas/db folder.
Important: This script should be run while connected to the database as the FUSION_ATGLITE user.
Grant privileges over PAS objects to the FUSION_ ATGLITE user by running the "newInstall_step2_fepasSchema_grantsForFusion.sql" SQL script provided within the MW_ORA_HOME/pas/db folder.
Important: This script should be run while connected to the database as the SYS user.
Load the seed data by running the "newInstall_step3_fepasSchema_loadSeedData.sql" SQL script provided from within the MW_ORA_HOME/pas/db folder.
Important: This script should be run while connected to the database as the PAS user.
Load the seed data by running the "seed_pas_audit.sql" SQL script provided from within the MW_ORA_HOME/pas/db folder.
Important: This script should be run while connected to the database as the FUSION_ATGLITE user.
Copy the "oracle.pas_template_11.1.1.jar" file from the /pas/templates directory that is provided within pas.zip to the MW_ORA_HOME/common/templates/applications directory.
Run the Domain Configuration wizard to create/extend a domain. The wizard can be accessed by running the config.sh (Unix-based) command that is located in the /common/bin directory for the WebLogic server product directory located in MW_HOME (For Example: $MW_HOME/wlserver_10.3/common/bin).
Important: To install the managed server, datasources, and so on, used by Oracle Pedigree and Serialization Manager (OPSM), you must select the OPSM product during the configuration process. Because the template provided is an extension template, you may either install it during the initial domain creation, or afterwards by extending an existing domain.
Make sure the following products are selected:
Oracle Pedigree and Serialization Manager (Oracle_SOA1)
Oracle SOA Suite (Oracle_SOA1)
Oracle Enterprise Manager (oracle_common)
Oracle WSM Policy Manager (oracle_common)
Oracle JRF WebServices Asynchronous Services (oracle_common)
Oracle JRF (oracle_common)
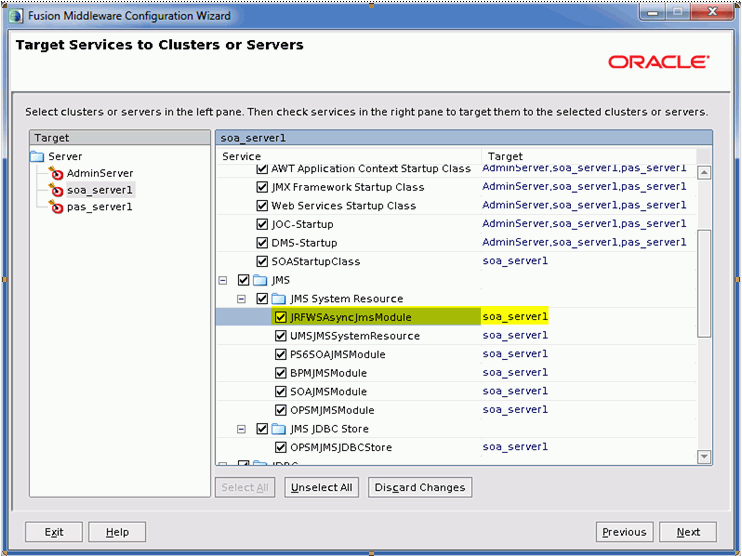
In the Target Services to Clusters or Servers window, target the JRFWSAsyncJmsModule to the soa_server1:
Important: Be aware that naming restrictions exist for integration and multi-domain environments. These restrictions require the use of unique domain names and WebLogic Server names for interoperating WebLogic Server domains. This is true even if they are in two different domains. In cases where multiple WebLogic domains are being utilized, and especially when using AIA integrations between OPSM and existing transactional systems such as, Oracle E-Business Suite, it is important to adhere to these naming restrictions. The domain name and managed server names can be entered during the creation of the domain within the Domain Configuration wizard.
Important: Oracle recommends using SSL in production environments. Refer to the Configuring SSL section within the Securing Oracle WebLogic Server documentation for more information. In addition, the Enterprise Deployment Guide for Oracle SOA Suite should also be reviewed for proper environment configuration.
Move the jar utility from your JDK home folder into the search path. This is needed because the install script uses the jar utility to extract the files and modify the connection parameters.
Replace this line: JAVA_OPTIONS="${JAVA_OPTIONS}" in the setDomainEnv.sh located in $MW_HOME/user_projects/domains/<domain_name>/bin directory with the following: JAVA_OPTIONS="${JAVA_OPTIONS} -DATGLITE=Y -Doracle.jdbc.createDescriptorUseCurrentSchemaForSchemaName=true"
Navigate to $MW_HOME/user_projects/domains/base_domain/bin and startup the WebLogic server and the managed servers using the following command:
./startWebLogic.sh
./startManagedWebLogic.sh soa_server1
./startManagedWebLogic.sh pas_server1
Create the following ATGLITE JDBC datasources in the WebLogic Server Admin Console (e.g. http://<server hostname>:<admin server port>/console):
| Name | JNDI Name | User |
|---|---|---|
| ApplicationDB | jdbc/ApplicationDBDS | FUSION_ATGLITE user with the OPSM database connection properties |
| AppMasterDB | jdbc/AppMasterDBDS | FUSION_ATGLITE user with the OPSM database connection properties |
| mds-ApplicationMDSDB | jdbc/mds/mds-ApplicationMDSDBDS | OPSM MDS user with the OPSM MDS database connection properties |
For the above:
Database type should be Oracle.
The database driver should be Oracles Driver (Thin) for Instance connections: Versions: 9.0.1 and later.
Uncheck Supports Global Transactions under the Transaction Options.
Target the datasources to the application server and SOA server. For example, pas_server1 and soa_server1.
After creating the datasources, modify the following properties under the Connection Pool tab: Initial Capacity = 20, Minimum Capacity = 20, and Maximum Capacity = 4096 (same as the pasDB datasource settings).
Change the Staging Mode property under the server Configuration tab and Deployment sub-tab of the application server and SOA server (for example, pas_server1 and soa_server1) to nostage.
Ensure the Listen Address and Listen Port properties of the servers (for example, AdminServer, pas_server1 and soa_server1) is populated with the host address and the corresponding port for that server, under the server Configuration tab and General sub-tab.
Backup the user_projects directory under the middleware home. This is needed because the install script modifies the domain and if the install fails for any reason, you will need this backup to restore the original domain.
Populate the values in pas_install.properties to ensure that a description of every property is available before the property is referred to. The appropriate parameters are described in the comments of the pas_install.properties file. The pas_install.properties file is located in the MW_ORA_HOME/pas/scripts directory.
Important: The installation script will provide a prompt to ask if you would like to configure the Oracle Pedigree and Serialization Manager application for SSL. Oracles recommendation is to run applications over SSL; therefore, the default is to configure the application for SSL. Be sure to provide the desired SSL port numbers within the pas_install.properties file to ensure the SSL ports are set properly.
Optional Steps
Optional: PROXY_SETTINGS to –Dhttp.proxySet=true –Dhttp.proxyHost=[PROXY_SERVER] –Dhttp.proxyPort=[PROXY_PORT] –Dhttp.nonProxyHosts=localhost|[SOA SERVER HOSTNAME]|*.[your domain]
USER_MEM_ARGS to –Xms512m –Xmx1024m –XX:CompileThreshold=8000 –XX:Permsize=512m –XX:MaxPermSize=1024m
Configure an Access Control List File for Web Service E-mail Notifications (Optional)
If you want the system to send notification e-mails if errors are detected on transactions or transactions that are locked as "In Progress" during the processing of the Transaction Service, Serial Service, and Product Service web services then you must configure an access control list (ACL) file. To configure an ACL file you will need to:
Create an ACL file.
Assign the ACL file to the outgoing SMTP network host for your e-mail server.
Grant permission to use the ACL file.
Before you can use PL/SQL network utility packages such as UTL_SMTP, you must configure an ACL file that enables fine-grained access to external network services.
To Configure an ACL File for Web Service E-mail Notifications:
Log into the database as the "sys" user.
Create an ACL file.
Example for creating an ACL file:
begin

   dbms_network_acl_admin.create_acl (
   acl => 'utl_smtp.xml',
   description => 'Enables mail to be sent',
   principal => 'PAS',is_grant => true,
   privilege => 'connect',
   start_date => TO_DATE('2007-12-27','yyyy-mm-dd'),
   end_date => TO_DATE('2022-12-27','yyyy-mm-dd')
    );

   commit;
  end;
   /
| Name | Parameter |
|---|---|
| acl | The name of the access control list XML file, generated relative to the "/sys/acls" directory in the XML DB Repository. |
| description | A description of the ACL. |
| principal | Principal (database user or role) to whom the privilege is granted or denied. Case sensitive. |
| is_grant | Privilege is granted or not (denied). |
| privilege | Network privilege to be granted or denied - "connect | resolve" (case sensitive). A database user needs the connect privilege to an external network host computer if they are connecting using the UTL_TCP, UTL_HTTP, UTL_SMTP, and UTL_MAIL utility packages. To resolve a host name that was given a host IP address, or the IP address that was given a host name, with the UTL_INADDR package, grant the database user the resolve privilege. |
| start_date | Default value NULL. When entered, the ACL will only be active on or after the entered date. Date formats are:
You can enter date in any format if the valid date format is provided. |
| end_date | An optional end date for the ACL. Date formats are:
You can enter date in any format if the valid date format is provided. |
Assign the ACL to the outgoing SMTP network host for your e-mail server.
Example for assigning ACL to outgoing SMTP network:
begin
   dbms_network_acl_admin.assign_acl (
   acl => 'utl_smtp.xml',
   host => 'your smtp host name',
   lower_port => your smtp port);
   commit;
  end;
/
| Name | Parameter |
|---|---|
| acl | The name of the access control list XML file. |
| host | The hostname, domain, IP address, or subnet to be assigned. Hostnames are case sensitive, and wildcards are allowed for IP addresses and domains. |
| lower_port | Defaults to NULL. Specifies the lower port range for the "connect" privilege. |
| upper_port | Defaults to NULL. If the lower_port is entered, and the upper_port is NULL, it is assumed the upper_port matches the lower_port. |
Grant permission to use the ACL file.
Example for adding the privilege:
begin

   dbms_network_acl_admin.add_privilege (
   acl => 'utl_smtp.xml',
   principal => 'PAS',
   is_grant => TRUE,
   privilege => 'connect',
   start_date => TO_DATE('2007-12-27','yyyy-mm-dd'),
   end_date => TO_DATE('2022-12-27','yyyy-mm-dd')
    );

   commit;
  end;
   /
| Name | Parameter |
|---|---|
| acl | The name of the access control list XML file. |
| principal | Principal (database user or role) to whom the privilege is granted or denied. Case sensitive. |
| is_grant | Network privilege to be granted or denied - "connect | resolve" (case sensitive). A database user needs the connect privilege to an external network host computer if they are connecting using the UTL_TCP, UTL_HTTP, UTL_SMTP, and UTL_MAIL utility packages. To resolve a host name that was given a host IP address, or the IP address that was given a host name, with the UTL_INADDR package, grant the database user the resolve privilege. |
| privilege | Network privilege to be granted or denied. |
| position | Position (1-based) of the access control entry (ACE). If a non-NULL value is given, the privilege will be added in a new ACE at the given position and there should not be another ACE for the principal with the same is_grant (grant or deny). If a NULL value is given, the privilege will be added to the ACE matching the principal and the is_grant if one exists, or to the end of the ACL if the matching ACE does not exist. |
| start_date | Start date of the access control entry (ACE). When entered, the ACE will be valid only on and after the entered date. The start_date will be ignored if the privilege is added to an existing ACE. Date formats are:
You can enter date in any format if the valid date format is provided . |
| end_date | End date of the access control entry (ACE). When entered, the ACE will expire after the entered date. The end_date must be greater than or equal to the start_date. The end_date will be ignored if the privilege is added to an existing ACE. Date formats are:
You can enter date in any format if the valid date format is provided . |
Make sure that the admin server and SOA server are not running.
Navigate to the PAS script directory.
For example, cd MW_ORA_HOME/pas/scripts
Execute the install script to install Oracle Pedigree and Serialization Manager.
For Unix-based installs, utilize the "pasMasterInstall.py" script. Run the installation script using the following command:
$MW_ORA_HOME/common/bin/wlst.sh ./pasMasterInstall.py
Ensure that the terminal on which you are running the install has sufficient scroll-back lines (for example, 2000) to capture all the output from the install activities. This enables you to review all of the install activities later.
Important: The install script attempts to start the Admin Server. It tests in a loop if the server is up before it continues. If you installed your WebLogic Server in Production Mode, the Admin server requires a userid and password to start which the script does not set for security reasons. In this case, you must start a new terminal window to start the Admin Server. After the script detects the server has started, it will continue.
After the Admin Server has been started, the install script will prompt you to start up the managed servers (for example, soa_server1 and pas_server1). To do so, make sure the environment variables are set as described in the Pre-Installation Tasks section, then navigate to MW_HOME/user_projects/domains/base_domain/bin. Using separate terminal windows, startup the PAS and SOA managed servers. Keeping in mind your actual managed server names may be different, use the following commands as examples:
For Unix-based installs:
sh startManagedWebLogic.sh soa_server1
sh startManagedWebLogic.sh pas_server1
After the managed servers are started, press enter in the first terminal where pasMasterInstall.py is run to continue processing the install script.
The OPSM installation output is captured in the scroll buffer of the terminal on which you run the installation. Scroll through the buffer to check for errors.
After the install script has completed successfully, you must restart the Admin Server and managed servers (for example, soa_server1 and pas_server1) for changes made by the install script to take effect.
(Optional) Set up WebLogic components for serial destinations.
Important: If you are not using serial destinations this setup is not required.
For information on how to set up WebLogic components for serial destinations, see Appendix A - Setting Up WebLogic Components for Serial Destinations in this guide.
After installation is complete your domain should be running with at least the following:
AdminServer
SOA Server (for example, soa_server1)
PAS Server (for example, pas_server1)
BIP Server (Optional if you opted to install Oracle BI Publisher for Pedigree)
Login to Enterprise Manager 11g.
Select the appropriate domain from the WebLogic Domain folder.
Example of Oracle Enterprise Manager page
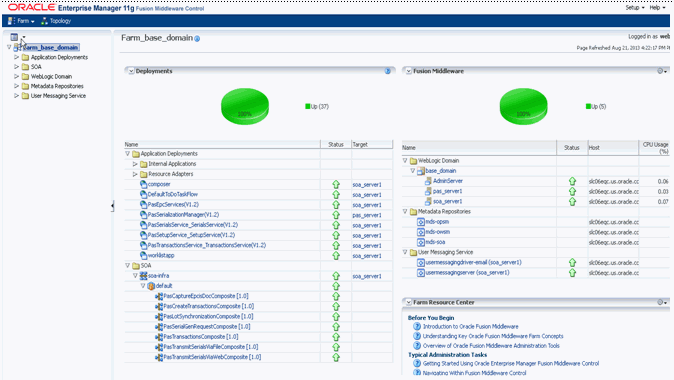
The current statuses are displayed.
The SOA server will have all the PAS composites marked as active. All of the web services are targeted to the SOA server and they should be marked as active. The Oracle Pedigree and Serialization Manager (OPSM) application called PasSerializationManager should be targeted to the PAS server and should be marked as active. There should be a pasDB and pasJMSDB JDBC Data Source that should be targeted to both the PAS and SOA servers.
The following are helpful URLs if the Oracle Pedigree and Serialization Manager application was not configured for SSL:
WLS (WebLogic Server) Console: http://<adminHost>:<adminPort>/console
EM (Enterprise Manager) Console: http://<adminHost>:<adminPort>/em
WorklistApp: http://<soaHost>:<soaPort>/integration/worklistapp
OPSM: http://<pasHost>:<pasPort>/opsm/faces/index.jspx
The following are helpful URLs if the Oracle Pedigree and Serialization Manager application was configured for SSL:
WLS (WebLogic Server) Console: https://<adminHost>:<adminSSLPort>/console
EM (Enterprise Manager) Console: https://<adminHost>:<adminSSLPort>/em
WorklistApp: https://<soaHost>:<soaSSLPort>/integration/worklistapp
OPSM: https://<pasHost>:<pasSSLPort>/opsm/faces/index.jspx
The Oracle Pedigree and Serialization Manager (OPSM) application uses web services that support asynchronous processing. For these web services to function properly, they use the Oracle JRF WebServices Asynchronous Services component within the WebLogic Server. It is important that this component is targeted to the same managed server that is used to run the OPSM web services. In a typical installation, this would be your SOA server (for example, soa_server1).
Login to Oracle WebLogic Administration Console.
Select Persistent Stores from under the Services node in the Navigation Tree.
Verify the target for the JRFWSAsyncFileStore component is your SOA server.
Select JMS Servers from under the Services > Messaging node in the Navigation Tree.
Verify the target for the JRFWSAsyncJmsServer component is your SOA server.
Select JMS Modules from under the Services > Messaging node in the Navigation Tree.
Select the JRFWSAsynchJmsModule component.
Click the Targets tab and verify that your SOA server is the selected target.
Important: If any of the above mentioned JRFWSAsync components are not targeted as described, re-target them. It is normal to receive an error when attempting to re-target these components due to dependencies between them. It is safe to ignore the error because it will clear once all three components have been re-targeted.
After completing all the above post installation tasks, you must configure security for both the application and services. This includes creation of users that are authorized to access the application, as well as, attaching web service security policies to secure all web services and SOA composites that are used within the application. Refer to the Oracle Pedigree and Serialization Manager Security Guide for information on securing both the application and services.
In the event that an installation fails, follow the procedure below to perform a new installation. Keep in mind that your actual managed server names may differ from those used in the sample commands listed below.
Make sure that the environment variables are set as described in Pre-Installation Tasks, and that you are in the DOMAIN_HOME (typically MW_HOME/user_projects/domains/base_domain).
Stop the SOA Server.
Go to DOMAIN_HOME/bin and issue the following command at the prompt:
For Unix-based installs:
sh stopManagedWebLogic.sh soa_server1 t3://<servername>:<adminport>
For example:
sh stopManagedWebLogic.sh soa_server1 t3://host.oracle.com:7001
Stop the PAS Server.
Go to DOMAIN_HOME/bin and issue the following command at the prompt:
For Unix-based installs:
sh stopManagedWebLogic.sh pas_server1 t3://<servername>:<adminport>
For example:
sh stopManagedWebLogic.sh pas_server1 t3://host.oracle.com:7001
Stop the Admin Server.
Go to DOMAIN_HOME/bin and issue the following command at the prompt:
For Unix-based installs:
sh stopWebLogic.sh
Perform cleanup tasks:
Clean up the MW_HOME/user_projects directory and restore from the backup taken before the initial installation.
Delete the pas directory under MW_ORA_HOME.
Delete oracle.pas_template_11.1.1.jar from MW_ORA_HOME/common/templates/applications directory.
Perform step 6 from Pre-Installation Tasks.
Perform step 8 from Pre-Installation Tasks.
Perform step 19 from Pre-Installation Tasks.
Perform a new install.
Follow the steps for a new install starting with step 1 under the section Installation Tasks.
![]()
Copyright © 2013, Oracle and/or its affiliates. All rights reserved.