9 Keys, Key Policies, and Key Groups
What is the difference between Keys, Key Policies, and Key Groups?
Keys are the actual key values (key material) and their associated metadata.
Key policies define parameters that govern keys. This includes lifecycle parameters (such as encryption period and cryptoperiod) and import/export parameters (for example, import allowed, export allowed.)
Key groups associate keys and key policies. Each key group has a key policy and is assigned to agents. Agents are allowed to retrieve only the keys that are assigned to one of the agent's allowed key groups. Agents also have a default key group. When an agent creates a key (assigns it to a data unit), the key is placed into the agent's default key group.
Note:
For the system to function, you must define at least one key policy and one key group (assigned as the default key group) for all agents.OKM Key States and Transitions
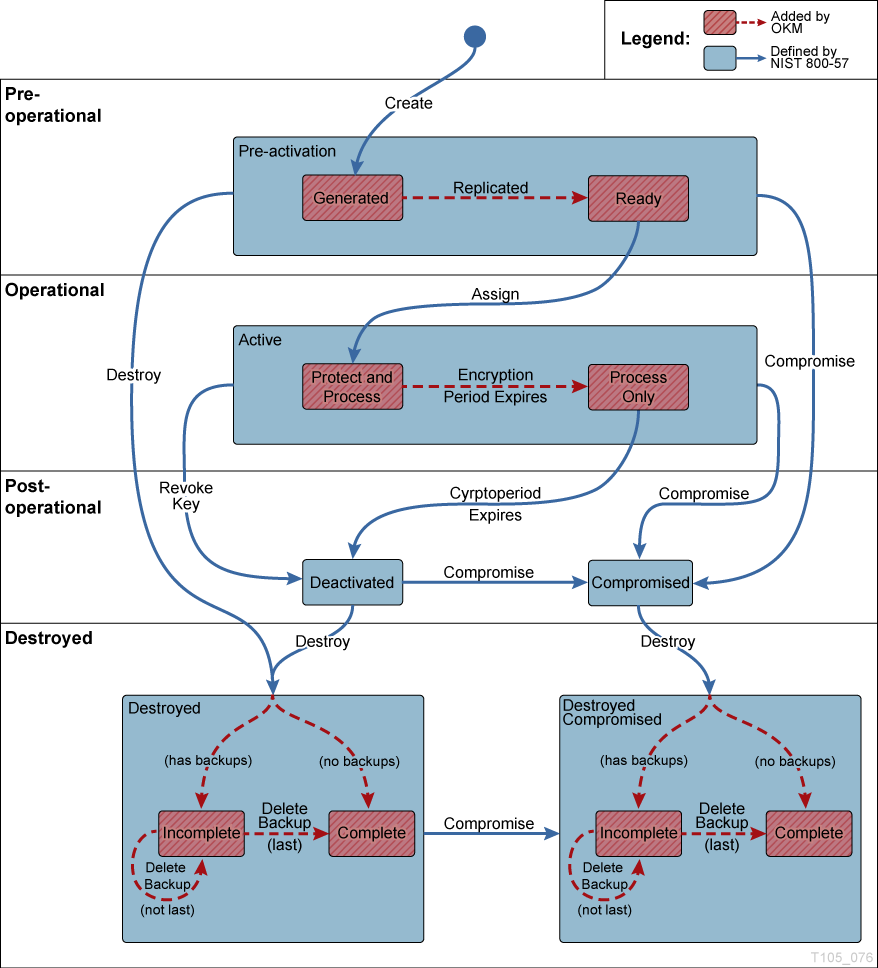
In Figure 9-1, states and transitions shown in red are added by the OKM. When examining keys in the OKM Manager, only the innermost state is listed. OKM states are listed below.
- Pre-activation
-
This state indicates that the key has generated but is not yet available for use. Within the pre-activation state, the key can take two further states:
-
Generated — Indicates a key that has been created on one KMA in a OKM cluster. It remains generated until it has been replicated to at least one other KMA in a multi-OKM cluster. In a cluster with only a single KMA, a key must be recorded in at least one backup to transition out of the generated state.
-
Ready — A ready state indicates that the key has been protected against loss by replication or a backup. A ready key is available for assignment. The "replicated" transition occurs when the key is replicated or (for a single OKM cluster) backed up.
-
- Active
-
This state indicates that the key may be used to protect information (encrypt) or to process previously protected information (decrypt) NIST states that an active key may be designated to protect only, process only, or protect and process. Further, it specifically states that for symmetric data encryption keys, a key may be used for some time period to protect and process information and once this time period expires, the key may continue to be used for processing only.
Within the active state, the OKM adds two substates. These states are described in NIST, but are not specifically identified as states.
-
Protect-and-process — A key in this state can be used for both encryption and decryption. A key is placed into this state when it is assigned. The assignment is done when an encryption agent requests a new key to be created.
-
Process only — A key in this state can be used for decryption but not encryption. When an agent determines that none of the keys available to it for a specific data unit that is being read or written are in the protect-and-process state, it should create a new key.
Keys move from the protect-and-process state to the process only state when the encryption period for the key expires.
-
- Deactivated
-
This state indicates that the key has passed its cryptoperiod but may still be needed to process (decrypt) information. NIST specifically states that keys in this state may be used to process data.
The NIST guidelines state that if post-operational keys, including deactivated and compromised keys, need to remain accessible, they should be archived. This is a key recovery process that allows keys to be recalled from an archive and made available for use.
The OKM provides archives in the form of KMA backups but cannot recall a single key from a backup. Therefore, the OKM retains post-operational phase keys in the OKM cluster and delivers them upon request from an agent.
- Compromised
-
Keys are in the compromised state when they are released to or discovered by an unauthorized entity. Compromised keys should not be used to protect information, but may be used to process information.
- Destroyed/Destroyed Compromised
-
Destroyed and Destroyed Compromised keys (keys that are compromised before or after destruction) no longer exist. However, information about the key may be retained. Key material from destroyed keys is removed from the OKM cluster. Destroyed keys will not be delivered to an agent.
Note:
The only way to destroy a key is through the GUI or the management API.The NIST guidelines do not provide any basis for destroying keys based on time.
Within the Destroyed and Destroyed Compromised states, the OKM defines two substates, incomplete and complete. These states are created because the OKM does not control the backups that it creates. A customer administrator must inform the OKM when a backup has been destroyed. Only after all backups have been destroyed can a key be considered truly destroyed.
-
Incomplete — An Incomplete substate indicates that at least one backup still exists that contains the destroyed key. In this substate, the key does not exist in any KMA in the OKM cluster. Keys in this state cannot be delivered to agents.
-
Complete — A Complete substate indicates that all backups containing the key have been destroyed. The key does not exist in any KMA, nor in any backup. Strictly speaking, backups that contain the key may well still exist. Although the OKM identifies the backups as destroyed, it is the responsibility of the user to ensure these backups have actually been destroyed.
It is worth noting again that the "destroyed" transition occurs only as the result of an administrative command. Further, keys may still be delivered to an encryption agent when the key is in the post-operational phase (Deactivated and Compromised states). This interpretation is consistent with NIST's descriptions for the post-operational phase. The NIST guidelines specify that a post-operational key should be destroyed when it is "no longer needed." We believe that only you can determine when a key is "no longer needed," so only an external entity can initiate the destroyed transition.
-
Key Lifecycle
Keys undergo a lifecycle based on the key policy. The lifecycle imposed by the OKM is based on the NIST 800-57 guidelines. A few additional states are added to deal with nuances of the OKM.
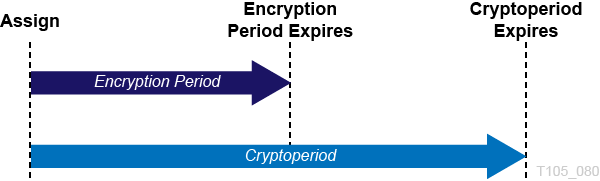
The key lifecycle is based on two time periods defined in the key policies:
-
Encryption period
-
Cryptoperiod
The encryption period is the period after a key is assigned that can be used to encrypt data. The cryptoperiod is the period that can be used for decryption. The two periods start at the same time when the key is assigned.
Figure 9-2 shows the time periods in a key lifecycle.
Manage Key Policies
Key policies provide guidance for managing data. OKM uses key policies to determine how data is protected and destroyed. You must create key policies before creating and delivering keys to agents.
Only a Compliance Officer can create and modify key policies. This ensures that the data complies with a policy throughout the data's lifetime.
View Key Policies
Available to:
All roles
Procedures:
In the left navigation menu, expand Secure Information Management, and then select Key Policy List. See "Filtering Lists" to filter the list.
Create a Key Policy
Available to:
Compliance Officer
Procedures:
-
In the left navigation menu, expand Secure Information Management, and then select Key Policy List. Click Create...
-
Complete the following:
-
Key Policy ID — Identifies the policy (can be between 1 and 64 characters).
-
Description — Describes the policy (can be between 1 and 64 characters, or leave this field blank).
-
Encryption Period — How long keys associated with this key policy can be used to encrypt or decrypt data. The time interval units are: minutes, hours, days, week, months, or years.
-
Cryptoperiod — How long keys associated with this key policy can be used to decrypt (but not encrypt) data. The time interval units are: minutes, hours, days, week, months, or years.
Note:
Encryption Period and Cryptoperiod begin when the key is first given to an agent. Encryption period and Cryptoperiod cannot be changed for a policy. This is to avoid a change in the key policy from affecting large numbers of keys. -
Allow Export From — When checked, data unit keys associated with this key policy can be exported.
-
Allow Import To — When checked, data unit keys associated with this key policy can be imported.
-
Allow Agents To Revoke Keys — When checked, allows agents using a key group that specifies this key policy can deactivate (revoke) the keys associated with them, even if the keys are in an operational state such as protect-and-process.
The OKM cluster must use Replication Version 14 or later before this attribute can be set to True.
Tape drive agents should use the default value (False).
Applications using a pkcs11_kms provider (see "OKM PKCS#11 Provider") should be configured to use an agent with a default key policy set to True if they want to call to revoke a key they will no longer use, such as in a re-key operation. ZFS encryption is an example of a pkcs11_kms application.
-
-
ClickSave. Key groups can now use the new key policy.
Modify a Key Policy
Available to:
Compliance Officer
Procedures:
-
In the left navigation menu, expand Secure Information Management, and then select Key Policy List.
-
Double-click a key policy (or highlight a key policy and click Details...)
-
Change the information as required. Click Save.
Delete a Key Policy
You can only delete a key policy if it is not used by any key group or key.
Available to:
Compliance Officer
Procedures:
-
In the left navigation menu, expand Secure Information Management, and then select Key Policy List.
-
Select the key policy, and then click Delete.
-
To confirm the deletion, click Yes.
Manage Key Groups
When you create a key group, you must select a key policy. OKM applies the selected key policy to keys in that key group. You can associate agents with key groups. An agent can only retrieve keys belonging to key groups it is allowed to access. An agent may also have a default key group. When an agent allocates a new key, the key is placed in the agent's default key group. An agent can only allocate new keys if it has a default key group.
View Key Groups
Available to:
All roles
Procedures:
In the left navigation area, expand Key Groups, and then select Key Group List.
Create a Key Group
Available to:
Compliance Officer
Procedures:
-
In the left navigation area, expand Key Groups, and then select Key Group List.
-
Complete the following:
Key Group ID — Identifies the key group (can be between 1 and 64 characters).
Description — Describes the key group (can be between 1 and 64 characters)
Key Policy ID — The key policy to associate with this key group.
-
Click Save. Data units, agents, and so forth can now use the key group.
Modify a Key Group's Details
Note:
If you are not a Compliance Officer, when you view a key group's detailed information, all fields, including the Save button are disabled.Available to:
Compliance Officer
Procedures:
-
In the left navigation area, expand Key Groups, and then select Key Group List.
-
Double-click a key group (or highlight a key group, and click Details...).
-
Modify the fields as desired. Click Save.
Delete a Key Group
Note:
You cannot delete a key group if it is active. You can only delete a key group if it is not used by any key and is not associated with any agent.Available to:
Compliance Officer
Procedures:
-
In the left navigation area, expand Key Groups, and then select Key Group List.
-
Highlight the key group, and then click Delete.
-
To confirm the deletion, click Yes.
Assign Agents to Key Groups
Assigning an agent to key groups determines the storage devices the agent can access. This process accomplishes the same result as "Assign Key Groups to an Agent".
Available to:
Compliance Officer
Operator (can view-only)
Procedures:
-
In the left navigation area, expand Key Groups, and then select Agent Assignment to Key Groups.
-
In the "Key Groups" column, highlight a key group.
-
Move agents between the "Agents Allowed Access" or the "Agents Not Allowed Access" column. To move, highlight the agent and then click < or > to add or remove agent access.
Note:
You must set a default key group for an agent before that agent can allocate keys. -
To assign a default key group, select an agent and then click < Default Key Group.
Assign a Transfer Partner to a Key Group
This process accomplishes the same result as "Assign Key Groups to a Transfer Partner".
Available to:
Compliance Officer
Operator (can view-only)
Procedures:
-
In the left navigation menu, expand Key Groups, and then select Transfer Partner Assignment to Key Groups.
-
Select a Key Group from the "Key Groups" column.
-
Move key groups between the "Transfer Partners Allowed Access" or the "Transfer Partners Not Allowed Access" column. To move, highlight the transfer partner, and then click < or > to allow or disallow access.
Import a KMS 1.0 Key Export File
Available to:
Compliance Officer
Procedures:
-
Go to the KMS 1.2 system and export the keys into a file. Only keys exported from KMS 1.2 systems can be imported. KMS 1.0 and 1.1 systems must be upgraded to 1.2 before exporting keys.
-
From the Secure Information Management menu, select Import 1.0 Keys.
-
Select the Destination Key Group into which these keys will be imported.
-
Click Browse, and then locate the KMS 1.0 Key Export file.
-
Click Start to upload the KMS 1.0 keys file to the KMA. A new key is created for each key the file contains. Each new key is associated with the key group you selected.
Manage Keys
Query Keys
Available to:
Operator
Compliance Officer
Procedures:
-
From the System Management menu, select Key List. See "Filtering Lists" to filter the list.
-
To view detailed information, select a key in the list, and then click Details... (or double-click a key).
A Compliance Officer can change the key group this key is associated with. An Operator can change the In Use By Data Unit flag, which indicates whether this key is associated with a data unit.
-
Click the Data Unit Info tab to display information about the data unit that is associated with this key (if any).
Compromise Keys
Available to:
Compliance Officer
Procedures:
-
From the Data Units menu, select Data Unit List.
-
Select a data unit to modify, and then click Details...
-
Click the Key List tab.
-
Select the key(s) to compromise, and then click Compromise.
-
Click the Yes to confirm.
-
Type a comment about the compromise of the selected key(s). Click Compromise.
-
Click the Yes to confirm.
Transfer Keys Between Clusters
Key Transfer allows keys and associated data units to be securely exchanged from one OKM cluster to another. Typically, you can use key transfer to exchange tapes between companies or within a company with multiple clusters. The Key Transfer process involves the following steps:
-
Configure Key Transfer Partners — Each OKM cluster configures the other cluster as a transfer partner. This requires each party to establish a public/private key pair and then provide the public key to the other party.
-
Export a Transfer Partner Key/Import Transfer Partner Keys — The user exports keys from one OKM cluster and imports them into the other. This step can be done many times.The transfer file is signed using the sending party's private key and encrypted using the receiving party's public key. This allows only the receiving party to decrypt the transfer file using their own private key. The receiving party can verify the file was in fact produced by the expected sender by using the sender's public key.
Configure Key Transfer Partners
You must configure a key transfer partner for both OKM clusters participating in key movement. Both partners must complete the following steps to configure the other cluster as a partner:
Create and Send a Key Transfer Public Key
OKM signs any new Key Transfer files (those created after you created the new Key Transfer Public Key) with the new Key Transfer Public Key. Therefore, you must provide partners with the new Key Transfer Public Key before they can import the new Key Transfer files.
Available to:
Security Officer
Procedures:
-
In the left navigation tree, expand System Management, and then select Key Transfer Public Key List.
-
Click Create...
-
Provide the new key to all existing transfer partners:
-
Select a Public Key in the list, and then click Details...
-
Send this information to other cluster's administrator. Cut and paste the Public Key ID and Public Key into an e-mail or other agreed-upon form of communication. The exact communication method should be sufficiently secure.
-
Create the Transfer Partner
In the partner cluster, the administrator must enter the Public Key information sent in the procedures of "Create and Send a Key Transfer Public Key".
Available to:
Security Officer (requires a quorum)
-
In the partner cluster, in the left navigation tree, expand Secure Information Management, an then select Transfer Partner List. Click Create...
-
Complete the following on the General tab:
Transfer Partner ID — Identifies the transfer partner (1 to 64 characters).
Description (optional) — Describes the transfer partner (1 to 64 characters).
Contact Information (optional) — Contact information about the transfer partner.
Export Format —The format you should select depends on the software version and FIPS Mode Only settings. To view the FIPS setting, see "Review and Modify the Cluster Security Parameters").
Table 9-1 Determining Export Format
Software Version— Importing KMA FIPS Mode Only— Exporting Cluster FIPS Mode Only— Importing Cluster Export Format 2.0.2 or lower
Off
N/A
v2.0 or Default
2.0.2 or lower
On
N/A
v2.0
2.1 or higher
Off
Off
v2.1 (FIPS)
2.1 or higher
On
Off
v2.1 (FIPS)
2.1 or higher
Off
On
v2.1 (FIPS)
2.1 or higher
On
On
v2.1 (FIPS) or Default
-
v2.0 —This transfer partner does not wrap keys when it exports them.
-
v2.1 (FIPS) —This transfer partner wraps keys when it exports them.
-
Default — Enables sharing keys between a cluster running KMS 2.1+ and another cluster in which all KMAs run KMS 2.0.x. This value effectively uses either "v2.0" or "v2.1 (FIPS)" behavior depending on the software version of the KMA importing the keys and the settings of the "FIPS Mode Only" security parameter on the exporting and importing OKM clusters.
"Default" allows you to alter the format of the transfer partner's transfer files simply by changing the FIPS Mode Only security parameter instead of editing the transfer partner's Export Format setting directly, which requires a quorum.
Flags - Enabled — When selected, this transfer partner can share keys.
Flags - Allow Export To — When selected, you can export keys to the transfer partner.
Flags - Allow Import From — When selected, you can import keys from this transfer partner.
-
-
Complete the following on the Public Keys tab:
New Public Key ID — Enter the Public Key ID provided to you by the transfer partner.
New Public Key — Enter the Public Key provided to you by the transfer partner.
New Public Key Fingerprint — This read-only field shows the fingerprint, or hash value, of the new Public Key. Verify this fingerprint with the Partner to ensure the Public Key has not been tampered with, accidentally or deliberately, during transmission.
-
As you enter the Public Key, the system computes the fingerprint. Communicate with the partner cluster administrator using a different method than was used for the transfer of the key itself.
Both administrators should look at their OKM and verify the fingerprint matches. A mismatch indicates the key has been damaged or modified during the transfer.
-
If the fingerprint is correct, click Save.
-
Within the Key Split Quorum Authentication dialog, the quorum must type their usernames and passphrases to authenticate the operation. See "Key Split Quorum Authentication" for more information.
Assign Key Groups to a Transfer Partner
Each administrator must assign key groups for transfer partner. This process accomplishes the same result as "Assign a Transfer Partner to a Key Group".
Available to:
Compliance Officer
Operator (can view-only)
Procedures:
-
In the left navigation area, expand Transfer Partners, and then select Key Group Assignment to Transfer Partners.
-
Select a Transfer Partner in the "Transfer Partner" column.
-
Move key groups between the "Allowed Key Groups" or the "Disalowed Key Group" column. To move, highlight the key group, and then click < or > to allow or disallow access.
Export a Transfer Partner Key
Available to:
Operator
Procedures:
-
Before exporting, verify the key meets the following requirements:
Table 9-2 Required Settings for Exporting a Key
Component Values Required How to Verify/Change Key Policy
Allow Export From = True
Key transfer partner
Enabled = True
Allow Export To = True
Export Format properly set for software version and FIPS settings (see Table 9-1, "Determining Export Format")
Key Group
Transfer partner is associated with the key's key group
Key State
Must not Protect and Process, Process Only, Deactivated, or Compromised
Must be activated (Activation Date not empty) and not destroyed (Destroyed Date empty)
-
From the Data Units menu, select Data Unit List.
-
Select one or more data units (tapes) to be sent to the partner cluster. The External Tag is the barcode on the tapes.
Keys associated with the selected data units must belong to key groups associated with key policies that have their
Allow Export Fromflag set to "True." These keys must also be activated (their Activation Date is not empty) and not destroyed (their Destroyed Date is empty). See "View and Modify Data Unit Details". -
Click Export Keys.
-
Select the destination transfer partner, select the Export Keys file name if necessary, and click Start.
OKM only exports the Keys belonging to the key groups assigned to the partner cluster. See "Assign a Transfer Partner to a Key Group".
-
Send the Transfer File to the partner cluster's administrator by e-mail or another agreed-upon form of communication or mechanism to move files.
Import Transfer Partner Keys
You can import keys and data units to an OKM cluster. The keys and data unit information are contained in a key transfer file exported from another OKM cluster (see "Export a Transfer Partner Key" above).
Available to:
Operator
Procedures:
-
From the Transfer Partners menu, select Import Keys.
-
Select the Destination Key Group into which these keys will be imported.
The "Allow Imports" flag for this key group's key policy must be selected. This key group must be an allowed key group for the selected sending transfer partner.
-
Select the Sending Transfer Partner which exported these keys.
The transfer partner must have Enabled = True, Allow Import From = True, proper Export Format (see Table 9-1, "Determining Export Format"), and proper key group assigned.
-
Click Browse, and locate the Key Transfer file.
-
Click Start.
View the Transfer Partner List
Available to:
Security Officer
Compliance Officer
Operator
Procedures:
In the left navigation tree, expand Secure Information Management, select Transfer Partner List. See "Filtering Lists" to filter the list.
If the Export Format column shows N/A, the connected KMA runs KMS 2.0.x software and therefore does not allow the user to specify the Export Format setting.
View the Key Transfer Public Key List
Available to:
Security Officer
Procedures:
In the left navigation tree, expand System Management, and then select Key Transfer Public Key List. See "Filtering Lists" to filter the list.
To view details, select a public key from the list, and then click the Details...
Modify Transfer Partner Details
Available to:
Security Officer (requires a quorum)
Procedures:
-
In the left navigation tree, expand Secure Information Management, select Transfer Partner List.
-
Highlight a transfer partner ID, and then click Details...
-
Modify the information as required.
-
Click Save.
-
Within the Key Split Quorum Authentication dialog, the quorum must type their usernames and passphrases to authenticate the operation. See "Key Split Quorum Authentication" for more information.
Delete a Transfer Partner
Available to:
Security Officer
Procedures:
-
In the left navigation tree, expand Secure Information Management, select Transfer Partner List.
-
Highlight a transfer partner ID, and then click Delete.
-
Confirm the deletion by clicking Yes.
Share Keys with Older Clusters
OKM_3.1+ KMAs generate key transfer keys that are a different length than those generated by KMAs running a previous OKM release. In addition, OKM 3.3 KMAs that have a nCipher nShield Solo module generate key transfer keys that are longer than those that do not have a nCipher nShield Solo module. Such changes introduce a compatibility concern with previous OKM releases.
The OKM 3.3 GUI supports key transfer keys of any of these lengths. Thus, it can be used to configure transfer partners while connected to KMAs running either the OKM 3.3 release or a previous OKM release. It cannot, however, configure a pre-OKM 3.1 KMA Transfer Partner using the longer key length.
Compatibility Restrictions for Transfer Partners
-
You must use the OKM 3.1 or later GUI to configure Transfer Partners on OKM clusters where OKM 3.1 or later KMAs reside.
-
You cannot configure Transfer Partners for key sharing between an OKM cluster where OKM 3.1 or later KMAs reside and an OKM cluster where only OKM 2.5.3 (or lower) or OKM 3.0.2 (or lower) KMAs reside.
Transferring Keys in Mixed Clusters
If you add an OKM 3.1+ KMA to a cluster with OKM 2.x or 3.0.2 KMAs:
-
Existing KMA transfer partner activities would remain unchanged and the transfer partners exchanges with older (earlier than OKM 3.1) clusters would not be affected.
-
When sending a new transfer key, if the new key transfer key is generated on a KMA (earlier than OKM 3.1), then the new key would be accepted in pre-3.1 clusters. If the new transfer key is generated on the OKM 3.1 or later KMA, then it would be rejected by any pre-3.1 cluster.
Once a transfer partnership is established between two OKM clusters, customers can perform export key and import key operations on any KMA in the OKM cluster, even after a KMA in these OKM clusters is upgraded to the OKM 3.3 release. However, the compatibility issues described above are exposed when the customer attempts to create or modify a Transfer Partner. Also, customers must take these issues into consideration when a new key transfer key must be generated, and choose the correct KMA when generating this key.Key Transfer Keys can be used any KMA in an OKM cluster. Thus, when an OKM 3.1 or later KMA is added to a down-level OKM cluster, it uses any (smaller) Key Transfer Keys that have already been generated there. If the customer uses the OKM 3.1 or later KMA to create a new Key Transfer Key, then this KMA generates a Key Transfer Key with a longer length.
Mitigation when Transferring Keys in Mixed Clusters
If an OKM 3.1 or later cluster needs to exchange keys with a down-level OKM 3.x cluster:
-
If possible, upgrade the other KMAs in this cluster to OKM 3.1 or later. (Upgrading all KMAs might not be possible if they are Sun Fire X86 KMAs).
If an OKM 3.1 or later cluster needs to exchange keys with an OKM 2.x cluster:
-
If possible, add an OKM 3.1 or later KMA to the OKM 2.x cluster to create Transfer Partners using longer Key Transfer Keys.