2 Secure Installation and Configuration
This section outlines the planning process for a secure installation and describes several recommended deployment topologies for the systems.
Understanding Your Environment
To better understand your security needs, ask yourself the following questions:
Which resources am I protecting?
Many resources in the production environment can be protected. Consider the resources you want to protect when deciding the level of security you must provide.
The primary resource to be protected is typically your data. Other resources are outlined here because they are associated with managing and protecting your data.Various concerns with protecting data include data loss (that is, data being unavailable) and data being compromised or disclosed to unauthorized parties.
Cryptographic keys are often used to protect data from unauthorized disclosure. Thus, they are another resource to be protected. Highly reliable key management is essential to maintaining highly available data.Another layer of resources to be protected includes the assets within the Oracle Key Manager Cluster itself, including the Key Management Appliances.
From whom am I protecting the resources?
These resources must be protected from everyone who does not have authority to access them. These resources should be physically protected. You should consider which of your employees should have access to these resources. Then identify which types of operations each employee should be able to issue in the Oracle Key Manager environment?
What will happen if the protections on strategic resources fail?
In some cases, a fault in your security scheme is easily detected and considered nothing more than an inconvenience. In other cases, a fault might cause great damage to companies or individual clients that use your resources. Understanding the security ramifications of each resource will help you protect it properly.
Recommended Deployment Topologies
The following figure shows a typical deployment of an Oracle Key Manager solution.
Figure 2-1 Typical Deployment of OKM Solution
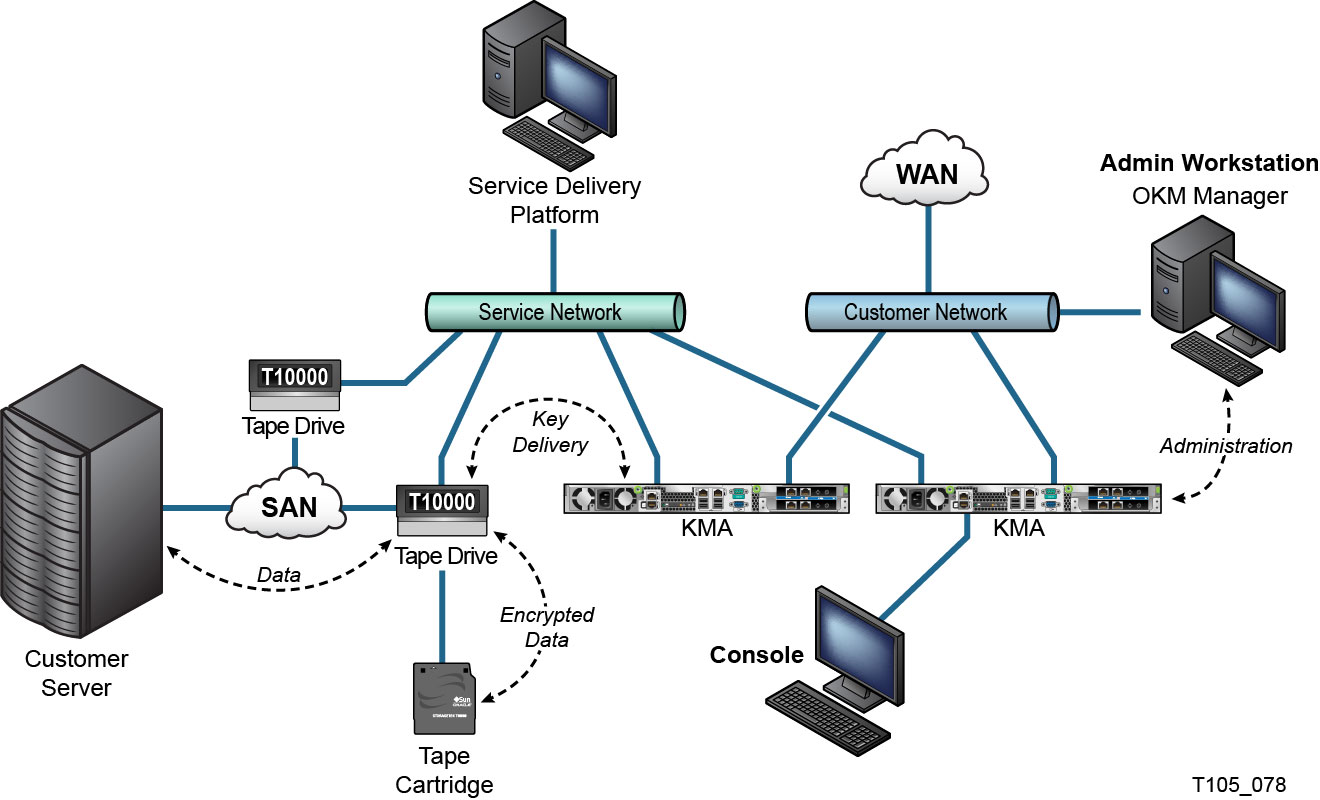
Description of ''Figure 2-1 Typical Deployment of OKM Solution''
Installing a Key Management Appliance
This section describes how to install and configure an OKM Key Management Appliance securely.
KMAs are manufactured as hardened appliances with Oracle Key Manager functionality already available on them.
Installing and configuring KMAs in an OKM Cluster include the following steps:
-
For each KMA, install it in a rack.
-
For each KMA, secure its ILOM.
-
Configure the first KMA in the OKM Cluster.
-
Add additional KMAs to the OKM Cluster.
More information about planning the deployment of an OKM Cluster appears in the Oracle Key Manager 3 Administration Guide.
Installing a KMA in a Rack
An Oracle Customer Service Engineer installs a KMA in a rack according to procedures outlined in the Oracle Key Manager 3 Installation and Service Manual. Oracle service personnel may refer to this manual for more detailed information.
Securing the ILOM of a KMA
Oracle Key Manager KMAs are manufactured with recent ILOM firmware. The ILOM of a KMA should be secured by the customer (possibly with guidance from an Oracle Customer Service Engineer). The ILOM should also be secured after the ILOM firmware is upgraded.
Securing the ILOM consists of setting particular ILOM settings to prevent changes to the ILOM that may compromise security. For instructions, see "ILOM Security Hardening" in the Service Processor Procedures appendix of the Oracle Key Manager 3 Administration Guide.
Securing the OpenBoot PROM or BIOS of a KMA
Oracle Key Manager KMAs are manufactured with recent OpenBoot PROM or BIOS firmware. The OpenBoot PROM or BIOS of a KMA should be secured by the customer (possibly with guidance from an Oracle Customer Service Engineer). It should also be secured after the firmware is upgraded.
Securing the OpenBoot PROM or BIOS consists of setting particular settings to prevent changes that may compromise security. For instructions, see the Service Processor Procedures appendix of the Oracle Key Manager 3 Administration Guide.
Configuring the First KMA in an OKM Cluster
Before configuring the first KMA, first identify key split credentials and user IDs and passphrases to be defined in this OKM Cluster. You can use a worksheet for this purpose, such as the one found in the Oracle Key Manager 3 Installation and Service Manual (internal-only) — ask your Oracle support representative.
Provide these key split credentials and user IDs and passphrases to the appropriate personnel. Refer to "Quorum Protection" later in this document for more information.
Note:
Retain and protect these key split credentials and user IDs and passphrases!Launch the host console of your SPARC KMA from its Service Processor web interface or CLI, depending on the server type of your KMA. Then launch the OKM QuickStart utility within the host console. To initialize the OKM Cluster on this KMA, follow the Initialize Cluster procedure described in the Oracle Key Manager 3 Administration Guide included in the Oracle Key Manager documentation libraries.
The key split credentials and a user with Security Officer privileges are defined during this procedure. After the QuickStart procedure is completed, the Security Officer must log in to the KMA and define additional OKM users.
Considerations When Defining Key Split Credentials
Defining fewer key split user IDs and passphrases and a lower threshold is more convenient but is less secure. Defining more key split user IDs and passphrases and a higher threshold is less convenient but is more secure.
Considerations When Defining Additional OKM Users
Defining fewer OKM users, some of whom have multiple roles assigned to them, is more convenient but is less secure. Defining more OKM users, most of whom have only one role assigned to them, is less convenient but is more secure as it facilitates tracking operations performed by a given OKM user.
Adding Additional KMAs to the OKM Cluster
-
Launch the host console of your SPARC KMA from its Service Processor web interface or CLI, depending on the server type of your KMA.
-
Launch the OKM QuickStart utility within the host console.
-
To add this KMA to the OKM Cluster, follow the Join Cluster procedure described in the Oracle Key Manager 3 Administration Guide.
Considerations When Configuring KMAs
Oracle Key Manager offers the convenient option of Autonomous Unlock for each KMA. This option is defined during the QuickStart procedure for the first and additional KMAs in a Cluster, and the Security Officer can modified it later.
If Autonomous Unlock is enabled, then the KMA will automatically unlock itself at startup and will be ready to provide keys without requiring quorum approval. If Autonomous Unlock is disabled, then the KMA will remain locked at startup and will not provide keys until the Security Officer issues a request to unlock it and a quorum approves this request.
For maximum security Oracle discourages enabling autonomous unlock. For more information about the Autonomous Unlock option, refer to the Oracle Key Manager Version 2.x Security and Authentication White Paper at:
http://www.oracle.com/technetwork/articles/systems-hardware-architecture/okm-security-auth-300497.pdf
Characteristics of Hardened KMAs
As stated above, KMAs are manufactured as hardened appliances with Oracle Key Manager functionality already available on them. As hardened appliances, they have the following characteristics:
-
Unneeded network services are not enabled. For example, ftp and telnet access is not provided.
-
A host-based firewall is installed and pre-configured for intrusion prevention.
-
KMAs do not produce core files.
-
Users are not permitted to log in to the KMA. Attempting to log in through the system console brings up the OKM Console utility.
-
The ssh service is disabled by default. For customer support purposes, the Security Officer can enable the ssh service and define a support account for a limited amount of time. This support account is the only available account and has limited access and permissions. Solaris auditing tracks commands that the support account invokes.
-
The DVD drive in a SPARC KMA is uncabled. Sun Fire KMAs are not equipped with a DVD drive.
-
USB ports are disabled when a KMA is booted up.
-
Non-executable stacks are enabled.
-
Address space lookup randomization is configured.
-
Non-executable heaps are enabled.
-
Filesystem-level encryption is used for security sensitive filesystems.
-
Solaris is configured in accordance with the Security Compliance Automation Protocol (SCAP) Basic Solaris and PCI-DSS benchmarks. Solaris is also configured for compliance with a current version of the Solaris 11 DISA STIG. See the OKM Administration Guide for how to produce STIG reports for compliance auditing.
-
Unnecessary Solaris services are disabled.
-
The optional nCipher nShield Solo Module – a Hardware Security Module – is certified to FIPS 140-2 Level 3, therefore providing both tamper evident and tamper resistant features in addition to certified cryptographic algorithms.
-
Oracle Solaris Verified Boot is configurable on SPARC T7-1 based KMAs to secure the system boot process. You can configure this feature in the ILOM to warn about or prevent the loading of corrupted kernel modules, insertion of other malicious programs masquerading as legitimate kernel modules, or installation of unauthorized kernel modules. Refer to the Oracle ILOM Administrators's Guide for Configuration and Maintenance Firmware Release 3.2 for more information about this feature.
-
The newer KMAs based on SPARC T7-1 and Netra SPARC T4-1 servers are tamper evident (ILOM fault) when the chassis door is accessed while power is applied.
-
The ILOM 3.2 firmware is FIPS 140-2 Level 1 certified and may be configured in FIPS mode.
-
The Solaris Basic Audit and Report Tool (BART) runs periodically to aid with forensics. These reports are included in OKM system dumps.
-
The Solaris Cryptographic Security Framework is configured per the FIPS 140-2 Level 1 security policies (documented for Solaris 11.3) with or without the presence of a Hardware Security Module.
TCP/IP Connections and the KMA
If a firewall exists between the entities (OKM Manager, agents, and other KMAs in the same cluster) and the KMA, the firewall must allow the entity to establish TCP/IP connections with the KMA on the following ports:
-
OKM Manager-to-KMA communication requires ports 3331, 3332, 3333, 3335.
-
Agent-to-KMA communication requires ports 3331, 3332, 3334, 3335.
-
KMA-to-KMA communication requires ports 3331, 3332, 3336.
Note:
For users who configure their KMAs to use IPv6 addresses, configure IPv4-based edge firewalls to drop all outbound IPv4 protocol 41 packets and UDP port 3544 packets to prevent internet hosts from using any IPv6-over-IPv4 tunnelled traffic to reach internal hosts.Refer to your firewall configuration documentation for details. Table 2-1 lists ports KMAs explicitly use or ports at which KMAs provide services.
Table 2-1 KMA Port Connections
| Port Number | Protocol | Direction | Description |
|---|---|---|---|
|
22 |
TCP |
Listening |
SSH (only when Technical Support is enabled) |
|
123 |
TCP/UDP |
Listening |
NTP |
|
3331 |
TCP |
Listening |
OKM CA Service |
|
3332 |
TCP |
Listening |
OKM Certificate Service |
|
3333 |
TCP |
Listening |
OKM Management Service |
|
3334 |
TCP |
Listening |
OKM Agent Service |
|
3335 |
TCP |
Listening |
OKM Discovery Service |
|
3336 |
TCP |
Listening |
OKM Replication Service |
Table 2-2 shows other services listening at ports that might not be used.
| Port Number | Protocol | Direction | Description |
|---|---|---|---|
|
53 |
TCP/UDP |
Connecting |
DNS (only when KMA is configured to use DNS) |
|
68 |
UDP |
Connecting |
DHCP (only when KMA is configured to use DHCP) |
|
111 |
TCP/UDP |
Listening |
RPC (KMAs respond to rpcinfo queries). This port is open to external requests only on KMS 2.1 and earlier |
|
161 |
UDP |
Connecting |
SNMP (only when SNMP Managers are defined) |
|
161 |
UDP |
Listening |
SNMP (only when Hardware Management Pack is enabled) |
|
514 |
TCP |
Connecting |
Remote syslog (only when remote syslog servers are defined and configured to use TCP unencrypted) |
|
546 |
UDP |
Connecting |
DHCPv6 (only when KMA is configured to use DHCP and IPv6) |
|
4045 |
TCP/UDP |
Listening |
NFS lock daemon (KMS 2.0 only) |
|
6514 |
TLS over TCP |
Connecting |
Remote syslog (only when remote syslog servers are defined and configured to use TLS) |
Note:
Port 443 must be open to enable customers to access the Service Processor web interface and the OKM Console through the firewall. Refer to the Oracle Key Manager 3 Installation and Service Manual (internal only) to see ELOM and ILOM ports.Table 2-3 lists the KMA ELOM/ILOM ports. These ports would be enabled if access to the ELOM/ILOM is required from outside the firewall; otherwise, they do not need to be enabled for the ELOM/ILOM IP address:
| Port Number | Protocol | Direction | Description |
|---|---|---|---|
|
22 |
TCP |
Listening |
SSH (for ELOM/ILOM command-line interface) |
|
53 |
TCP/UDP |
Connecting |
DNS (only needed when DNS is configured) |
|
68 |
UDP |
Connecting |
If DHCP is needed for the ELOM/ILOM. Note: Documentation for DHCP and the ELOM/ILOM is not available; although, it is supported. |
|
80 |
TCP |
Listening |
HTTP (for the ELOM/ILOM web interface) If HTTP is needed; otherwise, users can see instructions for how to connect to the remote console at: ELOM:
ILOM: |
|
161 |
UDP |
Listening /Connecting |
SNMPv3 (configurable, this is the default port) |
|
443 |
TCP /TLS |
Listening |
Embedded/Integrated Lights Out Manager Desktop Management Task Force (DMTF) Web services for Management Protocol (WS-Man) over Transport Layer Security (TLS) |
|
623 |
UDP |
Listening |
Intelligent Platform Management Interface (IPMI) |