Oracle® Insurance Rules Palette
This business rule controls the layout and functionality of OICE's Policy screen, which is used to define the foundational information on which a policy is based. PolicyScreen can also be used to configure OICE's Application screen by using a system code-level override.
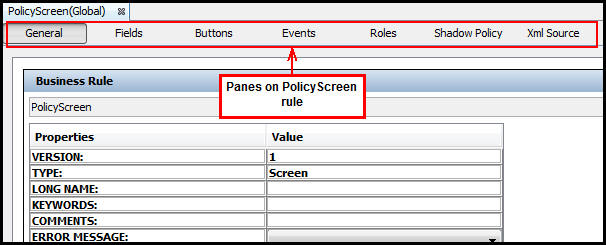
The PolicyScreen rule has seven panes available for configuration and is a required rule for a plan to run in OICE. The General, Fields, Buttons and Events panes offer visual configuration editing tools.
There are also two unique visual configuration panes: Roles and Shadow Policy. The Roles pane is used to define the roles that are available to assign to a specific plan. The Shadow Policy pane defines the criteria OICE uses when shadowing (or canceling) a policy.
The final pane, the XML Source pane, can be used to configure the Policy screen using XML.
PolicyScreen Panes for Configuration
The General pane displays specific properties that are configurable for the Policy screen. The Policy screen General pane Segments section lists the properties and an editable value field to use for configuration.
|
Property |
Definition |
|---|---|
|
Segments Allowed |
Specifies the number of segments that are allowed on the policy. |
|
Minimum Segments |
Specifies the minimum number of segments that are required for the policy. |
|
ShowSegmentRoles |
Yes allows Segment roles to display on the Segment tab of the policy and in the Client drop down box. No restricts the Segment roles from displaying on the Segment tab of the policy or in the Client drop down box. |
|
Automatic Policy Number |
System will generate an automatic policy number. |
|
Disabled Status |
Indicates which applicable status(es) will disable otherwise editable fields. |
|
Segment Count |
Total number of segments that are assigned to a policy. |
The Fields pane is used to create fields that will display on the Policy screen. The top section of the visual configuration area is for fixed fields. Drag and drop the available fixed fields from the Palette. Custom fields cannot be created for this section, but the display names of fixed fields can be changed as needed. Configure dynamic fields in the section under fixed fields. The functionality is exactly the same as the configuration for other fields panes. Please see the Fields Pane for more information.
Note: The Cut, Copy and Paste buttons available in Fields and Math panes are not supported for the PolicyScreen's Fixed Fields.
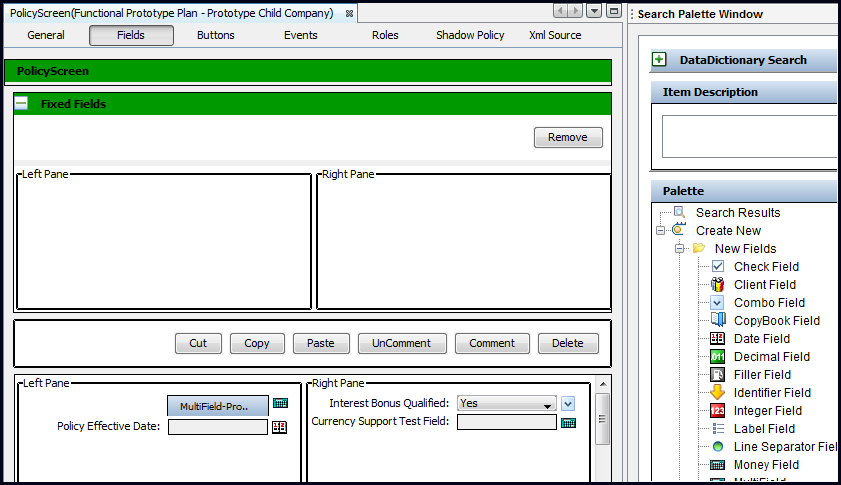
PolicyScreen Fields Pane
The Buttons pane allows the selection of the type of button displayed on the Policy screen.
The Preview section along the bottom of the Button Pane provides a preview of the appearance of the buttons in OICE.
The Order section along the right side of the Button Pane allows the user to control the order the buttons will display in OICE.
The following buttons are supported on the Policy screen.
Activity
Add
Allocate
Calculate
Close
Find
The Allocation, Values, Activity and Withholding buttons are configured through the Button pane on the Policy screen business rule in the Global Explorer. The Save, Inquiry and Add Activity buttons will only become visible on the Policy screen if security is set for them through the Admin Explorer. The Shadow Policy button will only become visible if the Shadow Policy section is configured and security is applied through the Admin Explorer.
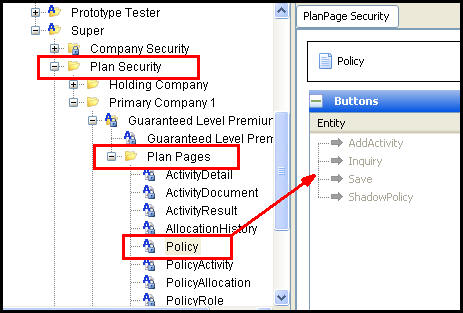
PolicyScreen Button Security in Admin Explorer
Security is applied to the buttons on the Policy screen in the Admin Explorer. Open the Security folder to reveal the options for applying security.
The Save, Inquiry, and Add Activity buttons are dependent on security and also on what has been entered for the policy. The security group has four buttons for the Policy screen. If all of these buttons are checked in the security group, then before the Policy screen is saved in OICE, only the Save button are present. Once it has been saved, then the Inquiry Screen button is present if a policy level Inquiry screen has been configured. The AddActivity button is present after the segment is calculated if the MinimumSegments configuration tags are present and the value is greater than zero. The Shadow Policy button will only become visible if the Shadow Policy section is configured and security is applied through the Admin Explorer.
This pane is used to identify the type of event that needs to occur in order to invoke a set of actions. It also identifies the field that is connected to the event. The functionality is exactly the same as described in the transactions section. Please see Events for more information.
This pane is used to set up conditions for shadowing (deleting) a policy. It allows a user to identify the policy statuses that are valid for shadowing, as well as the status a shadowed policy is assigned. Please see Shadow Policy Pane for more information.
The Roles pane is used to add, edit, or remove roles that are associated with a policy.
Select the Roles pane.
Right-click on the Roles node in the Navigator menu and select Add Role.
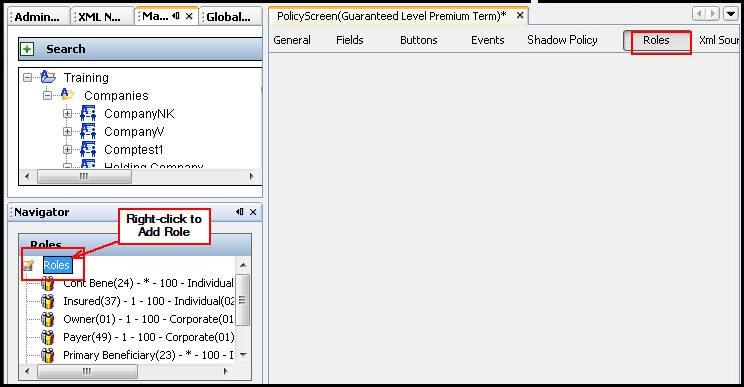
Role Node in Navigator Window
Role options are populated by AsCodeRole, which can be updated through the Codes Names folder in Admin Explorer.
Select Yes or No in the Allow Zero Percent drop down box. If Yes is selected, then the Allow Percent drop down box will be disabled.
If applicable, select a ClientType. This selection defines the client types that can be assigned to the role. Only these client types will be displayed in the client type drop-down box on the Client screen for the specific role. For example, an insured may need to be an Individual client type for a particular plan.
Using an asterisk in the Role Percent field will generate a warning message at the bottom of the Roles pane.
If applicable, enter an expression in the Test field. This allows configuration of a test condition. The evaluation of the condition determines whether the particular role section can be executed or not. Enter an expression to determine if the role should be displayed/allowed for the policy.
Select the Save button at the bottom of the Roles pane when finished.
To add multiple new roles, select Add Role from the Navigator window before each new role is entered. This clears the fields. CTRL + click deselects the options if they are already selected in a drop down list.
Click the Roles pane.
Click the role to be removed from the Roles section of the Navigator window. The role will appear highlighted in blue.
Right-click the role and select Delete.
Select the Roles pane.
Select a role from the Navigator window. The role will appear in the Configuration Area.
Click Save at the bottom of the Roles pane.
The XML Source pane includes XML Editor functionality that enhances the configuration experience. More detailed information on configuration using the XML Source pane can be found in the XML Source Editing section.
Please see the XML Configuration Guide topic in this help system for a list of all elements, attributes and values needed for configuration. View Business Rules | Plan Rules | Policy Screen.
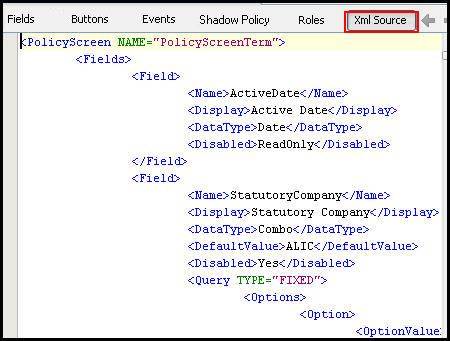
PolicyScreen XML Source Pane
In addition to its use in configuring the Policy screen, the PolicyScreen business rule can also be used to configure the Application screen in OICE. To configure the Application screen, the PolicyScreen rule needs to be overridden at the system code level, using the NBU (New Business Unit) system code. See Creating the Application Screen for more information.
In OICE, the Application screen is accessible through the Application node in the menu on the left side of the Case screen.
Copyright © 2009, 2013, Oracle and/or its affiliates. All rights reserved. Legal Notices