4 Performing Post-Installation System Setup Tasks
This chapter provides instructions for performing post-installation system setup tasks.
This chapter contains the following topics:
-
Section 4.1, "Setting the Business Analytics Warehouse Connection in Oracle Data Integrator"
-
Section 4.2, "Performing Setup Steps for On-Premise Fusion Applications Sources"
-
Section 4.5, "Setting Languages for Data Load into the Business Analytics Warehouse"
-
Section 4.8, "Granting Users Access to Configuration Manager, FSM and Oracle Data Integrator"
-
Section 4.9, "Editing Preferred Currency Display Names and Enabling Document Currency"
-
Section 4.12, "Setting Up Fusion Applications Cloud Data Sources"
4.1 Setting the Business Analytics Warehouse Connection in Oracle Data Integrator
Use ODI Studio to set the connection properties in the Oracle Data Integrator Repository of the physical schema associated with the 'BIAPPS_DW_FILE' physical server.
To set the Business Analytics Warehouse physical schema connection in Oracle Data Integrator:
-
Log into ODI Studio using the BI Applications Administrator credentials.
-
In the navigation pane, go to Topology, and expand Technologies, and then expand File.
-
Double-click BIAPPS_DW_FILE.
-
In the Definition pane, for the Directory (Schema) and Directory (Work Schema) properties, specify the directory where you copied source files to in Section 3.3.11, "Copying Source Files," and include the sub-folders data_files/src_files/BIA_11.
For example:
<source file home>/biapps/etl/data_files/src_files/BIA_11
4.2 Performing Setup Steps for On-Premise Fusion Applications Sources
The following procedures apply to on-premise Oracle Fusion Applications sources:
4.2.1 Creating a User for ETL
This procedure applies only to on-premise Fusion Applications sources.
The ETL process must be run by a user with appropriate data security privileges granted on the Fusion Applications tables from which data is extracted into Oracle Business Analytics Warehouse. For this purpose, the enterprise role named FUSION_APPS_OBIA_BIEE_APPID is provisioned during the installation of Fusion Applications with the appropriate ETL security privileges.
Work with your security administrator for Fusion Applications to complete the steps below.
To create a user for ETL:
-
In the Fusion Applications LDAP system, create a new user.
For example, you might create a new user named OBIA_ETL_USER.
-
Make the user a member of the Enterprise Role FUSION_APPS_OBIA_BIEE_APPID.
-
Make a note of the user credentials.
4.2.2 Configuring the Oracle BI Repository for ETL
This procedure applies only to on-premise Fusion Applications sources.
To configure the RPD for ETL against on-premise Fusion Applications sources:
-
Log into the Oracle BI Administration Tool.
-
Open the Oracle BI repository for Oracle BI Applications in offline mode.
-
In the Physical layer, configure a connection to the BIEE broker for each of the Fusion Applications pillar domains. Set the connection for each of the following Physical layer objects:
Pillar Physical Layer Object CRM oracle.apps.crm.model.analytics.applicationModule.CrmAnalyticsAM_CrmAnalyticsAMLocal FSCM oracle.apps.fscm.model.analytics.applicationModule.FscmTopModelAM_FscmTopModelAMLocal HCM oracle.apps.hcm.model.analytics.applicationModule.HcmTopModelAnalyticsGlobalAM_HcmTopModelGlobalAMLocal -
Right-click one of the pillar objects, and select Properties.
-
In the General tab of the Database dialog, select Allow direct database requests by default.
-
Expand the pillar object, and double-click Connection Pool.
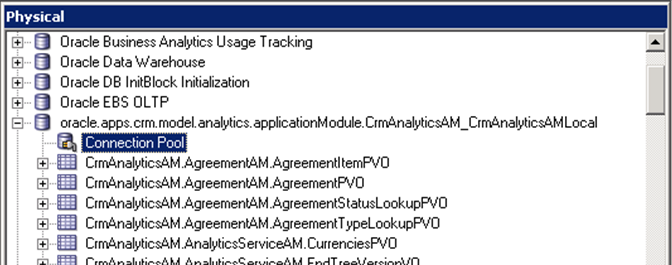
The Connection Pool dialog opens.
-
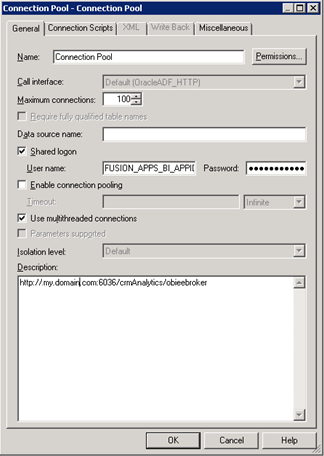
In the General tab, enter FUSION_APPS_BI_APPID as the data source user name, and enter the password for this user.
You can obtain the password for the FUSION_APPS_BI_APPID user from your Fusion Applications administrator.
-
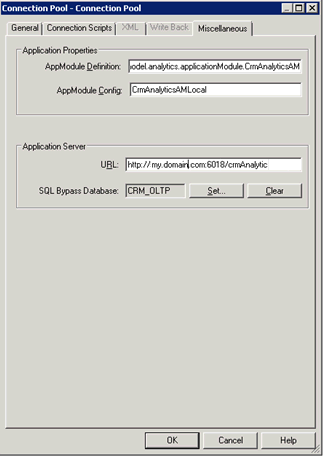
In the Miscellaneous tab, in the Application Server URL field, enter the URL for the BIEE broker for the appropriate pillar, in the format:
Http://<host>.<domain>:<port>/<pillar>Analytics/obieebroker
For example:
Http://machineName.myDomain.com:30615/crmAnalytics/obieebroker
-
In the SQL Bypass Database field, enter <PILLAR>_OLTP.
For example: CRM_OLTP.
-
Repeat steps 3a through 3e for each of the three pillars.
-
-
Set the value for the following DSN variables. These variables specify the connection to the Fusion Applications transactional database.
-
CRM_OLTP_DSN
-
FSCM_OLTP_DSN
-
FBI_OLTP_DSN
-
HCM_OLTP_DSN
-
OLTP_DSN (used by the Marketing OLTP data source)
-
In the menu bar, select Manage, Variables.
-
In the Variable Manager dialog, scroll down to locate the <PILLAR>_OLTP_DSN variable.
-
Double-click the <PILLAR>_OLTP_DSN variable.
The Static Repository Variable dialog opens.
-
In the Default Initializer text box, enter the connection information to the Fusion Applications transactional database in the tnsnames.ora format.
For example:
'(DESCRIPTION=(ADDRESS=(PROTOCOL=TCP)
 (HOST=db_host_machine.domain.com)
 (PORT=<port>))(CONNECT_DATA =
 (SERVICE_NAME=<service_name>)))'
-
Repeat steps 4a through 4e for each DSN.
-
-
Set the value for the following user variables. These variables specify the Fusion Applications transactional database user.
-
CRM_OLTP_USER
-
FSCM_OLTP_USER
-
FBI_OLTP_USER
-
HCM_OLTP_USER
-
OLTP_USER (used by the Marketing OLTP data source)
-
Obtain the user name for the users listed above from the RPD for Oracle Transactional Business Intelligence.
-
Obtain the password for the users from the Fusion Applications administrator. You will need this password in a later step.
-
In the menu bar, select Manage, Variables.
-
In the menu bar of the Variable Manager dialog, select Action, New, Repository, Variable.
-
In the Variable Manager dialog, scroll down to locate the <PILLAR>_OLTP_USER and OLTP_USER variables.
-
Double-click the variable.
The Static Repository Variable dialog opens.
-
In the Default Initializer text box, enter the user name.
-
Repeat steps 4a through 4e for each user.
-
-
Configure the connection pool for each of the following OLTP objects listed in the Physical layer:
-
CRM_OLTP
-
FSCM_OLTP
-
FBI_OLTP
-
HCM_OLTP
-
Marketing OLTP
-
Expand the object.
-
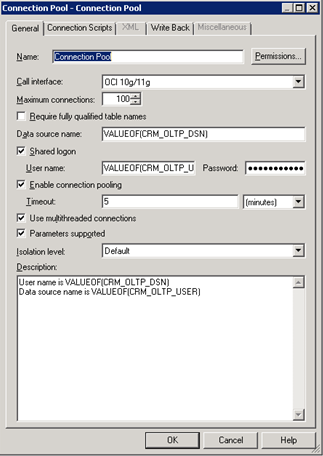
Double-click Connection Pool.
For Marketing OLTP, double-click Fusion OLTP Connection Pool.
The Connection Pool dialog opens.
-
In the Data source name field, enter VALUEOF(<PILLAR>_OLTP_DSN).
For example:
VALUEOF(CRM_OLTP_DSN).For Marketing OLTP, enter
VALUEOF(OLTP_DSN) -
In the User name field, enter VALUEOF(<PILLAR>_OLTP_USER).
For example:
VALUEOF(CRM_OLTP_USER).For Marketing OLTP enter
VALUEOF(OLTP_USER).Note: The user for CRM_OLTP, FSCM_OLTP, FBI_OLTP, and HCM_OLTP is the same. The user for Marketing OLTP is the value of OLTP_USER, which is different from the user for the other pillars.
-
In the Password field, enter the password for the user. Obtain this password from the Fusion Applications administrator.
-
Repeat steps 6a through 6e for each of the OLTP objects.
-
4.3 Registering Source Systems and Propagating Connection Details to Oracle Data Integrator
Follow this procedure to register a source system and propagate the connection details to Oracle Data Integrator.
To register a source system:
-
Launch Oracle BI Applications Configuration Manager using the URL http://<host>:<port>/biacm, and log in as the BI Applications Administrator user. Note: This user was created in the procedure Section 3.3.7, "Configuring Oracle BI Applications."
-
In the navigation pane, select the Define Business Intelligence Applications Instance link, which appears under System Setups.
The Source Systems tab is displayed.
-
Click the Add icon.
The Register Source dialog is displayed.
-
To register the source in Configuration Manager, specify the following properties:
Property Description Product Line Select the source instance product line. For Oracle Fusion sources, select Oracle Fusion.
Product Line Version Select the version number of the source instance product line. Source Instance Name Specify a name for the source instance. This is the name given by the BI Applications System Administrator to a transactional system that serves as a source of data for BI Applications data load. The source instance is important because functional setup tasks, and the setting of values for objects such as parameters and domain maps are performed in relation to a source instance.
Description (Optional) Enter additional information about the source instance. Data Source Number Enter a unique number to identify the source instance. The Data Source Number value specifies a data source so that the data can be identified in the Oracle Business Analytics Warehouse. Each source instance must have a unique Data Source Number.
Data Server For all sources except PeopleSoft sources, a read-only list of data servers is displayed. For PeopleSoft Enterprise sources, in the Data Server Details window, select the appropriate data server for the source instance.
Click Next. The Register Source in Oracle Data Integrator Topology page is active.
-
To register the source in Oracle Data Integrator, do the following:
-
Select Global from the Context drop-down list.
The Global value is required because the Oracle BI Applications interfaces are designed to use this value.
-
In the Technology: Oracle tab, specify the following properties:
Property Description ODI Data Server Name Specify a name for the ODI Data Server that indicates the transactional OLTP database (source database). This ODI Data Server Name must be unique across all ODI data servers in the ODI Repository. JDBC Driver The name of the JDBC driver for the transactional OLTP database (source database) connection. For Oracle Fusion sources, this property indicates the name of the JDBC driver for the Oracle BI Server. For example:
oracle.bi.jdbc.AnaJdbcDriver.Note: Data from the Fusion Applications transactional system is retrieved from the Oracle BI Server.
Oracle recommends that you use the default value.
JDBC URL Specify the JDBC URL for the transactional OLTP database (source database) connection. The format for the URL is the following: jdbc:oracle:thin:@<host>:<port>:<sid>For Oracle Fusion sources, specify the JDBC URL for the Oracle BI Server. The format is jdbc:oraclebi://<sid>:<port>.
Database Username Specify the database user name for the transactional OLTP database (source database). For Oracle Fusion sources, specify the user name of the ETL user. This is the user created in Section 4.2.1, "Creating a User for ETL."
Database Password Specify the password for the transactional OLTP database (source database). For Oracle Fusion sources, specify the password for the ETL user.
Test Use this button to test the connection to the transactional OLTP database (source database). -
In the Technology: File System tab, specify the following properties:
Property Description ODI Data Server Name Specify a name for the file system data server. This ODI Data Server Name must be unique across all ODI data servers in the ODI Repository. Host Name Specify the name of the host machine where the file system (source files used for ETL) resides. This is the machine to which you copied the source files in the procedure Section 3.3.11, "Copying Source Files." Path To File Specify the directory where you copied the source files in Section 3.3.11, "Copying Source Files." The directory path must include the appropriate source-specific folder for your environment. The source-specific folders are located in /biapps/etl/data_files/src_files.
For example, if your source system is Oracle EBS 12.1.1, the directory path would be:
<source file home>/biapps/etl/data_ files/src_files/EBS_12_1_1
Array Fetch Size The number of rows requested by ODI on each communication with the data server. Note: This column may be hidden. To view this column, click View, Columns, Show All.
Batch Update Size The number of rows in a single INSERT command. Note: This column may be hidden. To view this column, click View, Columns, Show All.
JDBC Driver Oracle recommends that you use the default value. Note: This column may be hidden. To view this column, click View, Columns, Show All.
JDBC URL Oracle recommends that you use the default value. Note: This column may be hidden. To view this column, click View, Columns, Show All.
-
Click Save and Close.
This information is passed to ODI where the connections are created.
-
Note:
The connection details are not propagated to the ODI Repository until you have entered and saved the information on both the Register Source in Configuration Manager page and the Register Source in Oracle Data Integrator Topology page.4.4 Enabling Offerings for Deployment
Use Oracle BI Applications Configuration Manager to enable the Oracle BI Applications offerings that you have purchased and are deploying. The setup data relating to offerings is made visible in Configuration Manager when you enable the offering.
By default, if you have multiple source instances and you enable an offering, the offering is enabled for all source instances. If an offering will not source from all source instances, then you can disable the source instances from which the offering will not source. For example, suppose you have two source instances, Oracle EBS and PeopleSoft, and you are deploying Financial Analytics. If Financial Analytics will only source from PeopleSoft, then you would disable the Oracle EBS source instance for the Financial Analytics offering.
To enable Oracle BI Applications offerings for deployment:
-
Log in to Oracle BI Applications Configuration Manager as the BI Applications Administrator user.
-
Select the Manage Business Intelligence Applications link to display the Manage Business Intelligence Applications dialog.
-
Select the Business Intelligence Application Offerings tab.
-
Select the Enabled check box next to each offering you want to deploy.
Enabling an offering makes the setup data associated with that offering available in Configuration Manager.
-
Click Save to save your changes.
-
To exit this dialog, click Done.
To disable a source instance from which an offering will not source:
-
Go to the Business Intelligence Application Offerings and Associated Sources tab.
-
Expand the appropriate offering.
-
Deselect the Enabled check box for the source you want to disable.
-
Click Save.
4.5 Setting Languages for Data Load into the Business Analytics Warehouse
Oracle BI Applications supports data loads in multiple languages. You specify the languages for data loads in Oracle BI Applications Configuration Manager.
To specify Oracle Business Analytics Warehouse languages:
-
Log in to Oracle BI Applications Configuration Manager as a user with the Business Intelligence Applications Administrator duty role.
-
Select the Manage Warehouse Languages link to display the Manage Warehouse Languages page.
-
In the Manage Business Analytics Warehouse Languages tab, specify the languages from which data is to be extracted from the list of languages displayed in the table by selecting Yes from the Installed drop down.
Note that American English is the default installed language. All other languages are disabled.
Note:
When you specify a language as being Installed, the Data Load Parameter LANGUAGE_LIST is populated internally with the list of selected languages. This parameter list is used during data extraction to extract data in the selected languages. -
Click Save to save your changes.
4.6 Running the Domains Load Plan
You must define, generate, and run a domains load plan to load source-specific data into Oracle BI Applications Configuration Manager tables. This enables Configuration Manager to display the appropriate source-specific values as choices in drop-down lists for setup objects.
Note: Before you perform this step you must have completed the procedure Section 4.3, "Registering Source Systems and Propagating Connection Details to Oracle Data Integrator," including registering the source in the Register Source in Oracle Data Integrator Topology page, as described in step 5 in the procedure.
To define, generate and run the domains load plan:
-
Define the domains load plan:
-
In the Tasks pane of Oracle BI Applications Configuration Manager, select Manage Load Plans, which appears under the Load Plans Administration heading.
The Manage Load Plans page is displayed.
-
In the Load Plans toolbar, click the Add icon.
The Create Load Plan page is displayed.
-
On the first page of the Create Load Plan series, specify the following information:
Field Description Name Enter a unique name for the load plan. Description (Optional) Enter additional information about the load plan. Load Plan Type Select Domain-only Extract and Load (SDE and SIL). Source Instances Select a source instance. If you do not select an instance, then all instances are selected by default. -
Click Next.
The second page of the Create Load Plan series is displayed.
-
In the Available Fact Groups tab, select the fact groups you want to include in the domains load plan definition.
Note that fact groups may belong to a hierarchy of fact groups. You can select only the top level parent fact group and not a child fact group.
A load plan must contain at least one fact group. Multiple fact groups may be selected from one or more data sources.
-
Click Save. A submenu is displayed with the following options:
Click Save to save the load plan. After a load plan is saved, it is displayed in the Load Plans master list.
Click Save and Generate Load Plan to save the load plan and immediately generate it.
Note that the generation process in Oracle BI Applications Configuration Manager propagates the load plan properties to the ODI Repository, where the load plan is built
-
-
If you did not generate the load plan upon saving in the previous step, then generate it by doing the following:
-
In the Load Plans master list, select the domains load plan you defined in step 1.
-
In the Load Plans toolbar, click the Generate icon.
The Generation Status column indicates the progress of the generation process. The process must complete successfully before you can move on to the next step. Click the Refresh icon to refresh the display.
-
-
Run the domains load plan by selecting it in the master list, and clicking the Execute icon on the toolbar.
4.7 Mapping Externally Conformed Domains
After you run the domains load plan, as described in Section 4.6, "Running the Domains Load Plan," you must complete the mapping of externally conformed domains to point to a particular source (even if you have only one source), using the Manage Externally Conformed Domains dialog in Oracle BI Applications Configuration Manager. You must perform the mapping configuration for each domain listed in the Manage Externally Conformed Domains dialog.
For instructions on mapping the externally conformed domains, see 'How to Configure Externally Conformed Domains' in Oracle Business Intelligence Applications Configuration Guide.
4.8 Granting Users Access to Configuration Manager, FSM and Oracle Data Integrator
Note: On installation the Oracle BI Applications system is configured to use WebLogic Server embedded LDAP for authentication.
Work with your security administrator to grant users access to Oracle BI Applications Configuration Manager, Functional Setup Manager, and Oracle Data Integrator.
Access to Configuration Manager and Functional Setup Manager is controlled through the following duty roles.
-
BI Applications Administrator Duty
-
BI Applications Functional Developer Duty
-
BI Applications Implementation Manager Duty
-
Load Plan Operator Duty
-
Load Plan Administrator Duty
The security administrator must grant the appropriate duty roles to a user based on the user's job responsibilities. For information on the Configuration Manager and Functional Setup Manager screens that each duty role has access to, see 'Security Overview of Oracle BI Applications Configuration Manager and Functional Setup Manager' in Oracle Business Intelligence Applications Security Guide.
The BI Applications administrator, load plan operator, and load plan administrator users will require appropriate access to Oracle Data Integrator. In addition to these users being created in the LDAP system, you must create these users in the ODI Repository and grant them the Supervisor profile or an appropriate ODI profile. The BI Applications administrator must be granted the Supervisor role in Oracle Data Integrator. Work with your security administrator to grant the duty roles.
For more information about managing security in Oracle Data Integrator, see Oracle Fusion Middleware Developer's Guide for Oracle Data Integrator.
4.9 Editing Preferred Currency Display Names and Enabling Document Currency
Oracle Business Intelligence is installed with a set of preferred currencies with pre-configured preferred currency names and preferred currency codes. Preferred currency names are used on Oracle Business Intelligence dashboards in the Currency drop-down on the My Account dialog\Preferences tab for a user logged into Oracle Business Intelligence.
You can use the Manage Preferred Currencies dialog to edit the default currency display names. You edit preferred currency name values to change the currency labels that are displayed in all modules associated with BI dashboards. For example, you might want to change the 'Local Currency' label from 'Ledger Currency' to 'Local Currency'.
To edit currency display names:
-
Login to Oracle BI Applications Configuration Manager as the BI Applications Administrator user.
-
Under System Setups, select Manage Preferred Currencies to display the Manage Preferred Currencies dialog.
-
Select a currency in the Preferred Currencies list. Selecting the currency displays the associated modules in the bottom table.
-
Click the value in the Preferred Currency Name column (or click the Edit icon) to display the Preferred Currency Name dialog.
-
In the Preferred Currency Name field, specify a currency name. This is the name that will appear for end users in the Currency drop-down list, located in Preferences tab of the My Accounts dialog of Oracle Business Intelligence.
-
Click Save and Close.
By default, document currency is excluded from the Currency drop-down list (located in the Preferences tab of the My Accounts dialog in Oracle Business Intelligence). To include Document currency in the Currency drop-down list, you must remove a specific filter from all of the following security groups in the BI metadata repository (RPD):
-
OBIA_PROJECT_CURRENCY_PREFERENCES
-
OBIA_HCM_CURRENCY_PREFERENCES
-
OBIA_SCM_CURRENCY_PREFERENCES
-
OBIA_FINANCIAL_CURRENCY_PREFERENCES
-
OBIA_MFG_CURRENCY_PRFERENCES
-
OBIA_PROCUREMENT_CURRENCY_PREFERENCES
-
OBIA_MARKETING_CURRENCY_PREFERENCES
-
OBIA_PARTNER_CURRENCY_PREFERENCES
-
OBIA_CRM_CURRENCY_PREFERENCES
-
OBIA_SALES_CURRENCY_PREFERENCES
Note: The security groups listed above are displayed in Oracle BI Administration Tool on the Application Roles tab on the Identity Manager dialog.
To enable document currencies:
-
In Oracle BI Administration Tool, click Manage, then Identity, to display the Identity Manager dialog.
-
In the Identity Manager dialog, click BI Repository.
-
Display the Application Roles tab.
-
For each of the security groups in the RPD list above, do the following:
-
Double-click the security group to display the Application Role - <Name> dialog.
-
Click Permissions, and then display the Data Filters tab.
-
In the Data Filter column, remove the following filter:
AND "Core"."Fact - Preference List"."Currency Preference Code" <> 'Document Currency'For example, the filter before editing:
"Core"."Fact - Preference List"."Module Code" = 'PROJECT_AN' AND "Core"."Fact - Preference List"."Currency Preference Flag" in ('W', 'B') AND "Core"."Fact - Preference List"."Currency Preference Code" <> 'Document Currency'For example, the filter after editing:
"Core"."Fact - Preference List"."Module Code" = 'PROJECT_AN' AND "Core"."Fact - Preference List"."Currency Preference Flag" in ('W', 'B')
-
-
Save the changes.
If you edited the metadata repository in Offline mode, then you must use Oracle Fusion Middleware Control to upload the RPD file.
Tip: In Oracle Fusion Middleware Control, use the Upload BI Server Repository area on the Business Intelligence\coreapplication\Deployment\Repository tab. For detailed instructions on how to upload an RPD file, see Section 10.2 'Using Fusion Middleware Control to Upload a Repository and Set the Oracle BI Presentation Catalog Location' in Oracle Business Intelligence Suite Enterprise Edition System Administrator's Guide.
4.10 Enabling Initialization Blocks
For all source systems other than Oracle Fusion Applications, you need to enable initialization blocks. Initialization blocks are enabled for Oracle Fusion Applications by default.
Note: This procedure uses forward slashes to separate directories, indicating the UNIX/Linux directory structure. For Windows, substitute a backslash; the directory structure is the same as that for UNIX/Linux.
To enable initialization blocks:
-
Copy the sample config.txt file from
<BI_ORACLE_HOME>/biapps/biarpdutil/bin to
<BI_ORACLE_HOME>/biapps/biarpdutil/lib. -
Copy the Oracle BI repository file for BI Applications from <BI_ORACLE_HOME>/biapps/admin\provisioning/OracleBIServerComponent to <BI_ORACLE_HOME>/biapps/biarpdutil/lib.
-
Add <BI_ORACLE_HOME>/bifoundation/server/bin to the PATH system variable.
-
Execute the bi-init command to display a command prompt that is initialized to your Oracle instance. The bi-init file is located in ORACLE_INSTANCE/bifoundation/OracleBIApplication/coreapplication/setup.
-
For Windows, execute bi-init.cmd.
-
For UNIX/Linux, do the following:
-
Go to ORACLE_INSTANCE/bifoundation/OracleBIApplication/coreapplication/setup.
-
Switch to bash mode.
-
Execute bi-init.sh.
-
-
-
Edit the config.txt file that you copied to BI_ORACLE_HOME>/biapps/biarpdutil/lib, as follows:
RPD File Name <RPD file name>
RPD Password <RPD pasword>
RPD Database List <Comma separated list of database names in RPD physical layer for which the initialization block has to be enabled>
Note: The values in the RPD Database List must include all initialization blocks related to the source system that need to be enabled. "Oracle BI Server" must be included as a value in the RPD Database List if an initialization block that needs to be refreshed from the Oracle BI EE Server is to be enabled.
-
Execute the ManageInitBlock.jar utility, located in <BI_ORACLE_HOME>/biapps/biarpdutil/lib, using the following command:
java -classpath ManageInitBlock.jar oracle.apps.biarpdutil.ManageInitBlock >log.txt
An output RPD is generated. The file is named Output_RPD.rpd. All relevant initialization blocks are enabled in Output_RPD.rpd.
-
Deploy the Output_RPD.rpd to Oracle BI EE.
For instructions on deploying an Oracle BI repository, see 'Configuring Repositories' in Oracle Business Intelligence Suite Enterprise Edition System Administrator's Guide.
4.11 Trimming the RPD
Oracle BI Applications release 11.1.1.8.1 delivers a full RPD file with projects for all the BI Applications modules. This full RPD is deployed to the BI Server. You can trim the RPD so that it includes only the projects that are relevant to your deployment. Although optional, trimming the RPD makes the BI Server startup process faster and also makes patching quicker.
Note: The RPD should not be trimmed for on-premise Fusion Applications sources. The full RPD is required for ETL in these environments.
The steps for trimming the RPD depend on the status of your deployment:
-
If the RPD has not been customized for your deployment: Extract the projects for the products that your organization has purchased. You do not need to perform a merge. See section Section 4.11.1, "Extracting Projects From Full RPD," for instructions.
-
If the RPD has been customized for your deployment: Extract the applicable projects from the full (delivered) RPD for release 11.1.1.8.1, and, additionally, merge that RPD with your customized release 11.1.1.8.1 RPD. See Section 4.11.1, "Extracting Projects From Full RPD," and Section 4.11.2, "Merging Repositories," for instructions.
4.11.1 Extracting Projects From Full RPD
Follow this procedure to extract projects from the full RPD. The end result of this process is a trimmed RPD.
To extract from the RPD the projects for the products you have purchased:
-
Open a Command window on the computer where the BI Administration Tool is installed.
-
If you installed Oracle BI EE on Windows, then run bi-init.cmd to launch a Command prompt that is initialized to your Oracle instance. This utility is located in:
<MiddlewareHome>\instances\instance<n>\bifoundation\OracleBIApplication\coreapplication\setup
If you installed the BI Administration Tool using the BI Client installer, then run bi_init.bat to launch a Command prompt that is initialized your Oracle instance. This file is located in:
<Oracle BI Home>\oraclebi\orahome\bifoundation\server\bin
-
In a Command prompt window, run ExtractProjects, as described below:
-
If you installed Oracle BI EE on Windows, ExtractProjects.exe is located in
<Oracle Home for BI>\bifoundation\server\bin. -
If you installed BI Administration Tool using the BI Client installer, ExtractProjects.exe is located in
<Oracle BI Home>\oraclebi\orahome\bifoundation\server\bin.
Run one of the following commands:
For extracting a single project:
ExtractProjects -B input_rpd -O output_rpd -I "project_name"
For extracting multiple projects:
ExtractProjects -B input_rpd -O output_rpd -I "project_name1" -I "project_name2"-I "project_name3" (and so on)
where:
input_rpdis the name and path of the full (delivered) release 11.1.1.8.1 RPD and from which you want to extract the project or projects (for example, OracleBIApps.rpd).output_rpdis the name and path of the RPD you want to create with the extracted projects (for example, OracleBIAppsTrimmed.rpd).project_nameis the name of the RPD project you want to extract.You will be prompted to enter the encryption password for the RPD (input_rpd ).
The list of projects in the 11.1.1.8.1 RPD includes the following:
-
Financial Analytics Fusion Edition
-
Human Resources Analytics Fusion Edition
-
Marketing Analytics Fusion Edition
-
Partner Analytics Fusion Edition
-
Project Analytics Fusion Edition
-
Sales Analytics Fusion Edition
-
Supply Chain and Order Management Analytics Fusion Edition
-
Student Information Analytics
-
Service Analytics
-
Price Analytics
-
Manufacturing Analytics
-
DataLineage_Project
Note: The RPD contains projects in addition to those listed above. These projects are included for future content delivery and upgrade support. To determine the BI Applications available in this release, see "System Requirements and Supported Platforms," for Oracle BI Applications release 11.1.1.8.1 at
http://www.oracle.com/technetwork/middleware/ias/downloads/fusion-certification-100350.html. -
-
Save and rename the trimmed RPD. Make sure the name identifies this RPD as one that has been trimmed, for example, OracleBIAppsTrimmed.rpd.
4.11.2 Merging Repositories
Follow this procedure only if you have customized the RPD and are subsequently trimming the RPD.
To merge repositories:
-
In the Oracle BI Administration Tool, open in offline mode the trimmed Oracle BI RPD that you created in the procedure Section 4.11.1, "Extracting Projects From Full RPD," for example, OracleBIAppsTrimmed.rpd.
-
On the menu bar, click File, and then click Merge.
-
In the Select Original Repository dialog box, select the repository OracleBIApps.rpd, which is the full RPD.
-
Enter the password for the original repository, and then click OK.
-
Click Select for the Modified Repository field. The Select Modified Repository dialog box opens.
The Select Modified Repository dialog opens.
-
Select the repository that contains the customizations you made to the RPD file, for example, OracleBIAppsCustom.rpd.
-
Click Open, and enter the password for the previously customized RPD file, and then click OK.
-
In the Decision drop-down list, select the action you want to take regarding the repository change, or accept the default action.
-
To locate subsequent rows with empty Decision fields, click the Decision header cell. After all rows have a value in the Decision field, the Merge button becomes enabled.
-
Click Merge.
A message appears after the merge concludes successfully.
-
On the menu bar, click File, and then click Save As. Save the current repository using a new name, such as OracleBIAppsFinal.rpd.
4.12 Setting Up Fusion Applications Cloud Data Sources
This section explains how to deploy Oracle BI Applications with a Fusion Applications Cloud data source, and contains the following topics:
-
Section 4.12.3, "About the Cloud Adaptor Deployment Process"
-
Section 4.12.5, "Create a Service Request to Deploy Fusion Cloud Adaptor"
-
Section 4.12.6, "Provision a User For Export and Import of BI Data"
-
Section 4.12.10, "Configure Proxy Settings for WebLogic Server"
4.12.1 Overview
The Oracle Fusion Applications Cloud Service Adaptor for Oracle Business Intelligence Applications enables your on-premise deployment of Oracle BI Applications to consume data from your Fusion Cloud Services, providing you with a comprehensive set of analytics that span your on-premise and cloud service systems to give you a complete view of your business.
The Oracle Fusion Applications Cloud Service Adaptor for Oracle Business Intelligence Applications extends the capability of your Oracle Business Intelligence Applications deployment to consume data from your Fusion Cloud Service subscriptions. Along with the many supported on-premise source business systems, support for Fusion Application Cloud Services enables a robust hybrid analytics solution to deliver the complete picture regardless of where the data originates.
Oracle Fusion Applications Cloud Service Adaptor for Oracle Business Intelligence Applications provides a seamless hybrid analytics solution to provide the complete picture for your enterprise analytics.
The Oracle Fusion Applications Cloud Service Adaptor for Oracle Business Intelligence Applications securely connects your on-premise Oracle BI Applications deployment to your Oracle Fusion Applications Cloud Service and automates the flow of data from your source system to your Oracle Business Analytics Warehouse, enabling your hybrid analytics solution.
Cloud Adaptor key features include:
-
Extracts are from VOs and not direct from DB.
-
Leverages Standard Security Methods of Source Cloud Systems to secure data in-transit.
4.12.3 About the Cloud Adaptor Deployment Process
The diagram below shows the tasks and process handshakes required to deploy a Fusion Applications Cloud data source using Cloud Adaptor.
4.12.4 Cloud Adaptor Deployment Roadmap
-
Oracle BI Applications 11.1.1.8.1, plus latest Patch Bundles
-
Oracle Cloud Applications Release 8, Patch Bundle 10 or later
To deploy a Fusion Applications Cloud Data Source, do the following:
-
Create a Service Request to Deploy Fusion Cloud Adaptor by following the steps in Section 4.12.5, "Create a Service Request to Deploy Fusion Cloud Adaptor".
-
Provision a new or existing Fusion Applications user with export and import privileges using the Application Role name 'Upload and Download Business Intelligence Data', by following the steps in Section 4.12.6, "Provision a User For Export and Import of BI Data".
-
Register the Fusion Applications Source by following the steps in Section 4.12.7, "Register the Fusion Applications Source".
-
Create FA SDS Schema by following the steps in Section 4.12.8, "Create FA SDS Schema".
-
Configure UCM Server in ODI by following the steps in Section 4.12.9, "Configure UCM Server in ODI".
-
Configure proxy settings for WebLogic Server by following the steps in Section 4.12.10, "Configure Proxy Settings for WebLogic Server".
If you have already configured WebLogic Server to allow any external connection, then you can skip this step.
-
If you are deploying Key Flex Fields for Financials, then before you execute this Load Plan you must follow the steps in Chapter 5, "Setting Up Key Flex Fields for Financials Cloud Adaptor".
4.12.5 Create a Service Request to Deploy Fusion Cloud Adaptor
These steps form high-level Step 1 in Section 4.12.4, "Cloud Adaptor Deployment Roadmap".
Log into My Oracle Support (support.oracle.com) and create the following Service Request.
When the SR is resolved, Oracle Cloud Services provides you with a UCM Server URL and a set of login credentials.
4.12.6 Provision a User For Export and Import of BI Data
These steps form high-level Step 2 in Section 4.12.4, "Cloud Adaptor Deployment Roadmap".
Provision a new or existing user in Fusion Applications with privileges to download data from Fusion UCM:
-
Create a new user, or use an existing user in Fusion Applications, that has privileges to download data from Fusion UCM.
-
Assign the Application Role 'Upload and Download Business Intelligence Data' to an Enterprise role to which the user is already assigned.
The screen shot below shows an example of how to apply the Application Role Name OBIA_EXTRACTTRANSFORMLOAD_RWD (Display Name 'Upload and Download Business Intelligence Data') to an Enterprise Role.
4.12.7 Register the Fusion Applications Source
These steps form high-level Step 3 in Section 4.12.4, "Cloud Adaptor Deployment Roadmap".
Register the Fusion Applications Source
Login to BI Applications Configuration Manager as a user that has Enterprise Role -'ASM_APPLICATION_IMPLEMENTATION_ADMIN_ABSTRACT'.
-
In the Tasks pane under System Setups, select the Define Business Intelligence Applications Instance link to display the Source Systems tab.
-
Click the Add icon (+) to display the Register Source dialog.
-
In the 'Register Source in Configuration Manager' page, specify:
- In the Product Line drop down list, select Oracle Fusion.
- In the Product Line Version, select the Oracle Fusion version being used.
- In the Source Instance Name field, specify a unique name to identify the source system.
- In the Data Source Number field, specify 200.
-
Click Next to display the 'Edit Source in Oracle Data Integrator Topology' page.
-
Choose the context as Global from the dropdown and specify an ODI data server, jdbc details and host details of BI server.
Note: Enter dummy values as these are not needed for Cloud Adaptor based ETL.
-
Display the File Technology tab and provide details for ETL Source Files.
The default Source File Connection location is <MW_HOME>/Oracle_BI1/biapps/etl/data_files/src_files/FUSION_1_0.
-
Add JDBC URL column from the 'View' menu and change the JDBC URL value from 'jdbc:snps:dbfile?OPT=TRUE' to 'jdbc:snps:dbfile?ENCODING=UTF-8&OPT=TRUE' to File connection.
-
Save the details.
Register file system location for download and staging the files from FA UCM server in ODI studio
While registering Fusion Data Source in BIACM, an ODI data server is created for File technology (see example screen shot FS_FA_DS in Step 1 below). Create two new physical schemas in ODI Topology under the existing data server, as follows:
-
In ODI Studio, create the physical schema for download, upload, and enter the folder location in the Definition tab.
Map to 'DS_FUSION10_DOWNLOAD_FILES' in 'Global' Context in the Context tab. (add using '+' icon on right).

-
Create Physical schema for staging and map to logical schema 'DS_FUSION10_REPLSTG_FILES'. Refer to the screen shot below for download physical schema.
-
Open 'Global' context and map the logical schema 'DS_FUSION10_UPLOAD_FILES' to newly created physical schema for download.
Note: These folders should will be used by ODI Agent to download files and should be accessible to the ODI_server1.
-
Add 'jdbc:snps:dbfile?ENCODING=UTF-8&OPT=TRUE' to all File connection 'BIAPPS_DW_FILE' in Physical architecture.
-
Update logical schema for 'DS_FUSION10_CRMSRCFILES, 'DS_FUSION10_HCMSRCFILES', 'DS_FUSION10_DOWNLOAD_FILES','DS_FUSION10_REPLSTG_FILES' and 'DS_FUSION10_UPLOAD_FILES' to 200.
Verify that the IS_SDS_DEPLOYED variable is set to true for FUSION.
-
In the Tasks pane, select the Manage Data Load Parameters link to display the Manage Data Load Parameters dialog.
-
Use the Search area to locate the IS_SDS_DEPLOYED parameter for the Fusion source, as follows:
-
In the Source Instance drop down, select the Fusion source that you have created.
-
In the Parameter Code field, specify 'IS_SDS_DEPLOYED'.
-
Click Search.
The IS_SDS_DEPLOYED parameter is displayed in the Data Load Parameters list.
In the Data Load Parameters list, view the parameter returned by the search, and verify that the value is 'Yes'.
-
-
If the value is not Yes, then click Edit, and in the Parameter Value drop down list, select 'YES', and save the details.
Create a Load Plan and Specify Offerings and Fact Groups to Load
-
In the Tasks pane, click Manage Load Plans to display the Load Plans dialog.
-
Click Add (+) to display the Define Load Plan dialog.
-
Use the Name field to specify a unique name, and in the Source Instances drop down list select the Fusion source, then click Next to display the Select Fact Groups page.
-
Select applicable offerings and fact groups.
-
Click Save.
-
In the list of Load Plans, select the new load plan, and click Generate.
4.12.8 Create FA SDS Schema
These steps form high-level Step 4 in Section 4.12.4, "Cloud Adaptor Deployment Roadmap".
Follow this procedure to create the SDS schema.
To create the SDS schema:
-
Log into the Business Analytics Warehouse database as SYS.
-
Create a new user for the SDS schema.
-
Grant DBA privileges to the new SDS schema user and to DW_SCHEMA.
-
Log into ODI Studio.
-
Confirm the DSN value for the logical schema, as follows.
-
Display the Topology tab, and navigate to the Physical Architecture tab.
-
Edit the Logical Schemas DS_OBIEECRM, DS_OBIEEHCM, and DS_OBIEEFSCM).
-
On the Flexfields tab for each Logical Schema, make sure that the DATASOURCE_NUM_ID value is 200.

-
-
Create the SDS physical schema and define the Flexfields value for DATASOURCE_NUM_ID as 200.
-
Display the Topology tab, and navigate to the Physical Architecture tab, and expand the Oracle\BIAPPS_DW node.
-
Create an SDS Physical Schema named BIAPPS_DW.FUSION_SDS.
-
On the Definition tab, set the Schema and Work Schema drop down list values to FUSION_SDS.
-
On the Flexfields tab, set the DATASOURCE_NUM_ID to 200.
-
-
Create a new data server under Oracle technology to configure/register SDS Physical schema details to be used with SDS DDL procedure and SDS FTS maps, as shown in the three example screen shots below.
The screen shot below shows the Definition configuration settings for DS_FUSION10_SDS_SERVER.
The screen shot below shows the Definition configuration settings for DS_FUSION10_SDS_SERVER.FUSION_SDS.
The screen shot below shows the Context configuration settings for DS_FUSION10_SDS_SERVER.FUSION_SDS.
-
Create the Data Server (DS_FUSION10_SDS_SERVER) and Physical schema (FUSION_SDS) under that Data Server, as follows:
Note: On the Variable values dialog, for each scenario, specify the following values:
- BIAPPS.UTIL_GENDDL_EXCLUDE_MARKED_COLUMNS = Y
- BIAPPS.UTIL_GENDDL_SDS_LSCHEMA = DS_FUSION10_SDS.
- BIAPPS.UTIL_GENDDL_GG_USER_DW = FUSION_DW- BIAPPS.UTIL_GENDDL_GG_USER_DW = FUSION_SDS
Then execute the GENERATE_SDS_DDL scenario that is located in Components\SDS\Oracle\Generate SDS DLL\Scenarios:
-
Set the SDS_MODEL value to point to 'Oracle Fusion 1.0 CRM', and execute the GENERATE_SDS_DDL scenario.
-
Set the SDS_MODEL value to point to 'Oracle Fusion 1.0 HCM', and execute the GENERATE_SDS_DDL scenario.
-
Set the SDS_MODEL value to point to 'Oracle Fusion 1.0 FSCM', and execute the GENERATE_SDS_DDL scenario.
-
4.12.9 Configure UCM Server in ODI
These steps form high-level Step 5 in Section 4.12.4, "Cloud Adaptor Deployment Roadmap".
When the SR that you logged in Step 2 is resolved, Oracle Cloud Services provides you with a UCM Server URL and a set of login credentials.
-
Configure the UCM server URL in ODI Topology:
-
In ODI Studio, navigate to the Topology tab, and in the Physical Architecture pane, create a data server named 'Fusion_UCM' on the Oracle UCM node.
Use the Upload Web Services by FTP fields to specify the Fusion UCM Server URL and login credentials for the user that you provisioned in step 1 Section 4.12.6, "Provision a User For Export and Import of BI Data".
-
Create the physical schema: FUSION_UCM_Default under FUSION_UCM.
-
For the FUSION_UCM schema, use the FTP Server URL field on the Definition tab to specify the UCM Server URL supplied to you by Oracle Cloud Services.
-
Use the Flexfields tab to specify the Map/Key pair.
Whatever Map/Key pair you specify here, make sure that the same pair exist in the EM url of this host (ODI).
Note: Use the user name and password that you specified in Step 1a for the Upload Web Services by FTP fields.
-
-
Configure DS_FUSION10_DOWNLOAD_FILES to the newly created physical schema.
-
On the Operator tab, open the generated Load Plan and execute it.
It will first copy files from UCM server to 'down' folder, then will move them to 'cloudFiles' folder. After that it will run FTS mappings to populate SDS schema where csv files act as source. Then it will run warehouse mappings that will populate the DW schema, and where the SDS schema acts as a source.
Note:
If you are deploying Key Flex Fields for Financials, then before you execute this Load Plan you must follow the steps in Chapter 5, "Setting Up Key Flex Fields for Financials Cloud Adaptor". -
Configure the user name and password in credential store in BI Domain.
In Enterprise Manager, create a credential key 'FUSION_APPS_OBIA_UCM_USER-KEY' with the username/password under map 'oracle.apps.security'. Note: username/password is the user that has security group 'OBIAExport' assigned in FA SAAs environment.
-
If HTTPS is enabled for the UCM Server, configure SSL.
Certificates on FA Saas PODs are CA signed, so there is no need to import the certificates as long as DemoTrust.jks is defined as the trust store in weblogic.
Add the following JAVA OPTION in setDomainEnv.sh:
Dweblogic.security.SSL.trustedCAkeystore=${WL_HOME}/server/lib/DemoTrust.jks
4.12.10 Configure Proxy Settings for WebLogic Server
These steps form high-level Step 6 in Section 4.12.4, "Cloud Adaptor Deployment Roadmap".
To use external Web Services or HTTP data sources when Oracle BI Applications is configured behind a firewall or requires a proxy to access the internet, you must configure Oracle WebLogic Server to allow the Web service requests and to be aware of the proxy. Define the proxy host and the non-proxy hosts to WebLogic ODI managed server (ODI_server1) by setting the following parameters:
-
-Dhttp.proxyHost - specifies the proxy host. For example:
-Dhttp.proxyHost=www-proxy.example.com -
-Dhttp.proxyPort - specifies the proxy host port. For example:
-Dhttp.proxyPort=80 -
-Dhttp.nonProxyHosts - specifies the hosts to connect to directly, not through the proxy. Specify the list of hosts, each separated by a "|" character; a wildcard character (*) can be used for matching. For example:
-Dhttp.nonProxyHosts="localhost|*.example1.com|*.example2.com
To set these proxy parameters and the Web service configuration for your WebLogic Server, update the WebLogic setDomainEnv script as follows:
-
Open the setDomainEnv script (.sh or .bat) in the MW_HOME/user_projects/domains/DOMAIN_NAME/bin/ directory.
-
Enter the following parameters:
EXTRA_JAVA_PROPERTIES="-Dhttp.proxyHost=www-proxy.example.com -Dhttp.proxyPort=80 -Dhttp.nonProxyHosts=localhost|*.mycompany.com|*.mycorporation.com|*.otherhost.com ${EXTRA_JAVA_PROPERTIES}"
export EXTRA_JAVA_PROPERTIES


EXTRA_JAVA_PROPERTIES="-Djavax.xml.soap.MessageFactory=oracle.j2ee.ws.saaj.soap.MessageFactoryImpl
-Djavax.xml.soap.SOAPFactory=oracle.j2ee.ws.saaj.SOAPFactoryImpl -Djavax.xml.soap.SOAPConnectionFactory=oracle.j2ee.ws.saaj.client.p2p.HttpSOAPConnectionFactory  ${EXTRA_JAVA_PROPERTIES}"
export EXTRA_JAVA_PROPERTIES
where:
www-proxy.example.comis an example proxy host.80 is the example proxy port.
localhost|*.mycompany.com|*.mycorporation.com|*.otherhost.comare example non-proxy hosts.
4.13 Next Steps
After you complete the setup tasks described above, Oracle BI Applications is ready for functional configuration, which is accomplished using Oracle BI Applications Configuration Manager and Functional Setup Manager. To enable functional configuration, you must provide the Oracle BI Applications Configuration Manager URL to your implementation managers and functional developers. To learn about the functional configuration process for Oracle BI Applications, see Oracle Business Intelligence Applications Configuration Guide.
In addition, for Oracle Fusion Applications sources, after Oracle BI Applications analyses and dashboards have been tested and the data validated, the Oracle BI Applications system administrator will need to inform the Fusion Applications Administrator to enable the appropriate embedded analyses and dashboard (ADR) regions in Fusion Applications. The ADR regions are enabled using Functional Setup Manager for Fusion Applications.