5 Setting Up Key Flex Fields for Financials Cloud Adaptor
This section explains how to load the financial KFF data for GL#, CAT# and LOC# KFFs into Oracle Business Analytics Warehouse.
Note:
In order to source data from Oracle Fusion Applications using the Cloud Adaptor, you must have applied Patch Bundle 3.Note: These instructions only apply if you are deploying a Fusion Applications cloud data source.
To set up Key Flex Fields, do the following:
-
Enable and setup the VOs for extraction in Oracle BI Applications Configuration Manager, as specified in Section 5.1, "Using Oracle BI Applications Configuration Manager to Configure Cloud Extract".
-
Configure the ODI repository in Oracle Data Integrator, as specified in Section 5.2, "Using ODI to Set Up Key Flex Fields".
-
If you are deploying Fusion Financials, then perform the additional configuration steps in Section 5.3, "Additional Steps for Fusion Financials Implementations".
5.1 Using Oracle BI Applications Configuration Manager to Configure Cloud Extract
When you have completed the KFF setup in Fusion and deployed the Flexfield, VOs are generated for each segment that you have enabled for BI. Each VO must be seeded and enabled for BI extraction so that it can be loaded into Oracle Business Analytics Warehouse.
To seed an enable VOs for extraction, follow these steps:
-
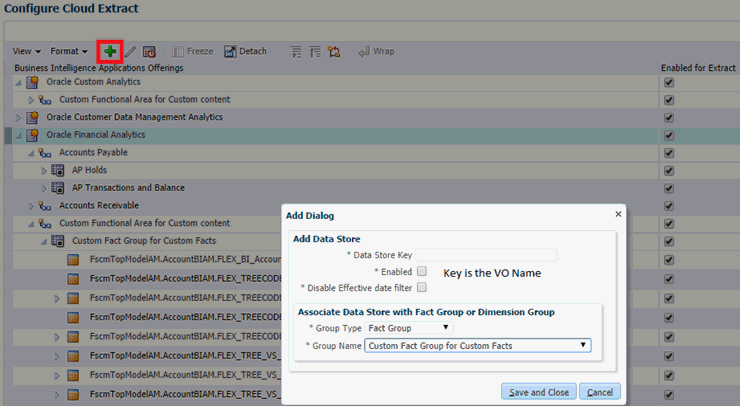
In Oracle BI Applications Configuration Manager, navigate to Configure Cloud Extract, and add the VOs mentioned in step 3 and enable them for BI extraction.
You must add VOs under the 'Custom Fact Group for Custom Facts' under 'Custom Functional Area for Custom Content' under the Oracle Financial Analytics Offering, as shown in the example screen shots below.
Note: VO names are case sensitive.
-
Click Add to display the Add Data Store dialog, specify the details, then click Save and Close.
-
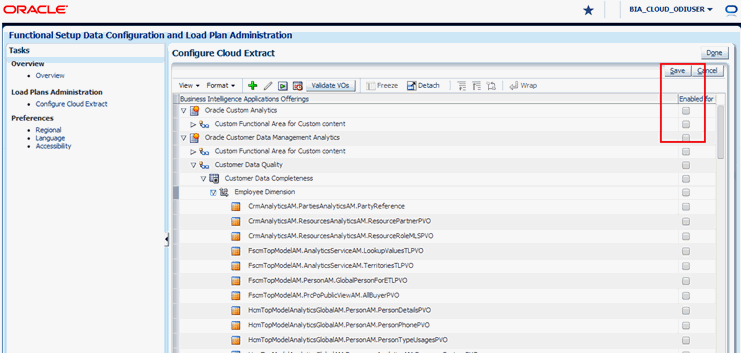
To enable VOs for extraction, select the parent Offering, Functional Area, FG/DG, or individual VO.
For example, the screenshot below shows the parent Oracle Custom Analytics.
-
The following VOs must be added and enabled for extraction:
-
For the GL# KFF, you must add the BI Flattened VO along with the segment VOs generated for the segment labels mapped to BI Objects in your Fusion setup.
The BI Flattened VO name for GL# that needs to be added is FscmTopModelAM.AccountBIAM.FLEX_BI_Account_VI.
-
The VOs generated for segment labels FA_COST_CTR (mapped to Dim – Cost Center), GL_ACCOUNT (mapped to Dim – Natural Account Segment), and GL_BALANCING (mapped to Dim – Balancing Segment) are known prior. You must add the following VOs:
FscmTopModelAM.AccountBIAM.FLEX_TREE_VS_FA_COST_CTR_VI
FscmTopModelAM.AccountBIAM.FLEX_TREECODE_VS_FA_COST_CTR_VI
FscmTopModelAM.AccountBIAM.FLEX_TREE_VS_GL_BALANCING_VI
FscmTopModelAM.AccountBIAM.FLEX_TREECODE_VS_GL_BALANCING_VI
FscmTopModelAM.AccountBIAM.FLEX_TREE_VS_GL_ACCOUNT_VI
FscmTopModelAM.AccountBIAM.FLEX_TREECODE_VS_GL_ACCOUNT_VI
Note: When you add the TREECODE VOs listed above, you must enable the 'Disable Effective date filter' option.
-
The VOs generated for any segment label apart from the 3 mentioned in the previous point and mapped to the BI Object Dim – GL Segmentx are not known before hand as the VO names depends on the segment label. Therefore, you must add the VO names based on the naming pattern given below.
If the segment is a tree segment (if you have created hierarchies for value sets used for those segments), then the VOs are named as follows:
- FscmTopModelAM.AccountBIAM.FLEX_TREE_VS_<segment label>_VI
- FscmTopModelAM.AccountBIAM.FLEX_TREECODE_VS_<segment label>_VI
If the segment is a non tree segment (if you have NOT created hierarchies for value sets used for those segments), then the VOs are named as follows:
FscmTopModelAM.AccountBIAM.FLEX_VS_<segment label>_VI
For example:
Table 5-1 Example segment labels and VO Names
Segment Label Tree v/s Non Tree VO Name PRODUCT
Tree
FscmTopModelAM.AccountBIAM.FLEX_TREE_VS_PRODUCT_VI
FscmTopModelAM.AccountBIAM.FLEX_TREECODE_VS_PRODUCT_VI
ORG
Non Tree
FscmTopModelAM.AccountBIAM.FLEX_VS_ORG_VI
Note: When you add TREECODE VOs, you must enable the 'Disable Effective date filter' option.
-
For the CAT# and LOC# KFFs, you will need to add the BI Flattened VO for each KFF.
The BI Flattened VO name for CAT# that needs to be added is FscmTopModelAM.CategoryBIAM.FLEX_BI_Category_VI.The BI Flattened VO name for LOC# that needs to be added is FscmTopModelAM.LocationBIAM.FLEX_BI_Location_VI.
-
-
Once you have added these VOs and completed the extraction process, the data files for these VOs will be downloaded into the physical location configured for DS_FUSION10_REPLSTG_FILES logical schema in ODI.

-
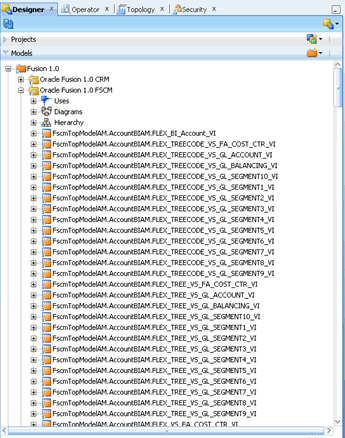
The files generated for GL# segment labels mapped to Dim – GL Segmentx (Dim – GL Segment 1-10) will have corresponding pre seeded data stores using a generic naming convention in ODI. The next step is to rename the corresponding files with appropriate file names so that they can load the corresponding data stores. For reference, the data stores seeded in ODI are shown in the screenshot below.
-
The mapping between the files generated and the new file names corresponding to the data stores is based on the segment label to BI Object mapping and setup for that segment (tree v/s non tree).
Taking the same example as mentioned in the previous steps – PRODUCT label is mapped to Dim – GL Segment 1 and is a tree segment and ORG label is mapped to Dim – GL Segment2 and is a non tree segment, then the mapping between the generated files and the new files will be:
File Generated New File Name File_FscmTopModelAM.AccountBIAM.FLEX_TREE_VS_PRODUCT_VI
File_FscmTopModelAM.AccountBIAM.FLEX_TREE_VS_GL_SEGMENT1_VI
File_FscmTopModelAM.AccountBIAM.FLEX_TREECODE_VS_PRODUCT_VI
File_FscmTopModelAM.AccountBIAM.FLEX_TREECODE_VS_GL_SEGMENT1_VI
File_FscmTopModelAM.AccountBIAM.FLEX_VS_ORG_VI
File_FscmTopModelAM.AccountBIAM.FLEX_VS_GL_SEGMENT2_VI
-
This mapping has to be provided in a configuration file named FinKFFFileRename.cfg which will be used in the downstream processes to load the data from those files. Create and save this config file in the same location where all the data files generated above are present (step 4)
The configuration file has to be created as a comma delimited file and the format of the entries in the file has to be as shown below. Save the file when you are done making the entries.
<Generated File Name>,<New File Name based on the pre seeded data store>
A sample entry in the file would look like:
file_fscmtopmodelam_accountbiam_flex_vs_gl_management_vi,file_fscmtopmodelam_accountbiam_flex_vs_gl_segment2_vi
Note: Create the config file in the same platform (Windows or Linux) where you will be eventually saving this file. Avoid copy and paste from one platform to the other. This will avoid issues regarding special characters in text files when crossing different platforms.
5.2 Using ODI to Set Up Key Flex Fields
The BI flattened VO generated for each KFF has columns relating to each segment label. Follow the steps below to set up the mappings for these columns.
Use ODI to set up Key Flex Fields:
-
For GL# KFF, check the csv file generated for the BI Flattened VO for the list of additional columns for each segment - ’file_fscmtopmodelam_accountbiam_flex_bi_account_vi%.csv'.
These segment columns end with ’_' or ’_c'. For example, FA_COST_CTR_ and FA_COST_CTR_c, PRODUCT_ and PRODUCT_c.
You need to add these new columns in the file data store and the VO data store in ODI.
The file data store is located in the path shown in the screen shot below.

-
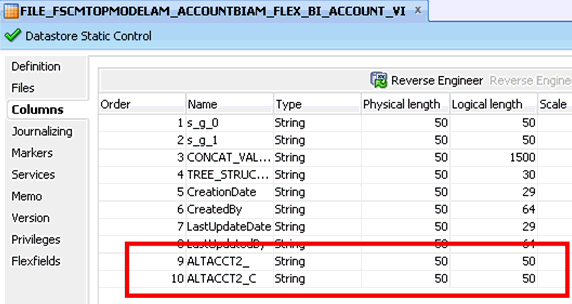
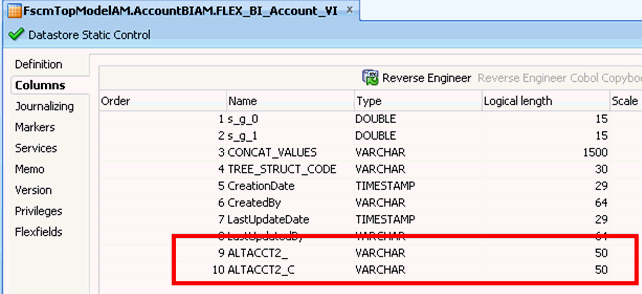
Add the new columns to the data store with the default data type of String (50,50) for all columns.
For example, new columns added in FILE_FSCMTOPMODELAM_ACCOUNTBIAM_FLEX_BI_ACCOUNT_VI.
-
Similarly, if you have CAT# KFF or LOC# KFF, then make equivalent updates.
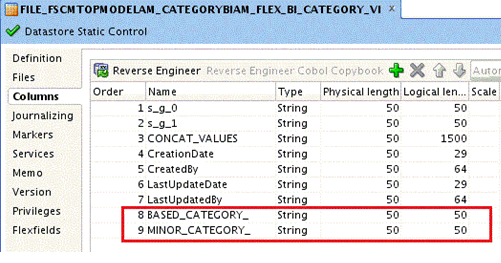
For CAT# KFF, check the csv file generated for the BI Flattened VO for the list of additional columns for each segment - ’file_fscmtopmodelam_categorybiam_flex_bi_category_vi%.csv'. These segment columns end with ’_' or ’_c'. For example, BASED_CATEGORY_, MINOR_CATEGORY_.
For LOC# KFF, check the csv file generated for the BI Flattened VO for the list of additional columns for each segment - ’file_fscmtopmodelam_locationbiam_flex_bi_location_vi%.csv'. These segment columns end with ’_' or ’_c'.
-
The corresponding file data stores for CAT# and LOC# are given below.
CAT#KFF file data store: FILE_FSCMTOPMODELAM_CATEGORYBIAM_FLEX_BI_CATEGORY_VI
LOC#KFF file data store: FILE_FSCMTOPMODELAM_LOCATIONBIAM_FLEX_BI_LOCATION_VI
For example, new columns added in FILE_FSCMTOPMODELAM_CATEGORYBIAM_FLEX_BI_CATEGORY_VI
-
Repeat the configuration steps for the corresponding VO data stores in ODI as listed below.
The VO data stores are in the path shown in the screenshot below. Use the default data type of Varchar(50,50).
- GL# KFF VO data store: FscmTopModelAM.AccountBIAM.FLEX_BI_Account_VI
- CAT#KFF VO data store: FscmTopModelAM.CategoryBIAM.FLEX_BI_Category_VI
- LOC#KFF VO data store: FscmTopModelAM.LocationBIAM.FLEX_BI_Location_VI

-
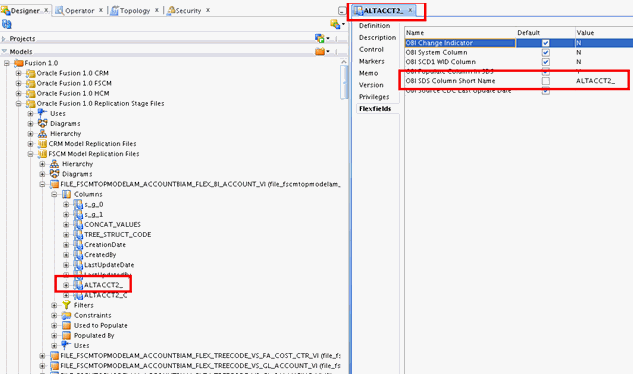
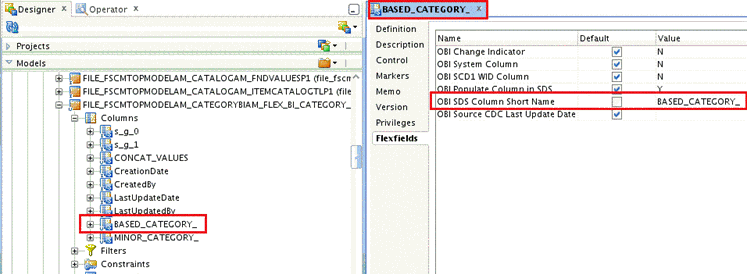
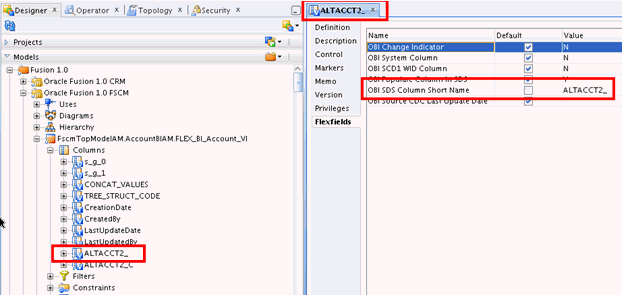
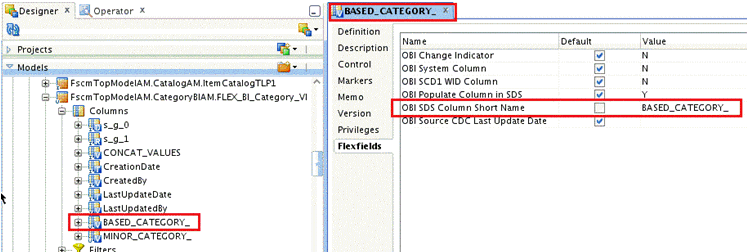
For newly added columns in both the file data store and VO data store, set the Flexfield value for 'OBI SDS Column Short Name'.
The value should be the same as the column name. Also ensure that the Flexfield value ’Odi Populate Column in SDS' is set to ’Y' for these columns.
-
The screen shots below show example Flexfield values.
For example, GL# KFF File Data Store Column:
For example, CAT# KFF File Data Store Column:
For example, GL# KFF VO Data store Column:
For example, CAT# KFF VO Data store Column:
-
Execute GENERATE_SDS_DDL in INCR_REFRESH_MODE.
This process updates the SDS table to include the new extended columns.
-
When you have added the columns in the appropriate data stores, map the columns in the corresponding ODI mappings to load the data.
-
For the GL# KFF, edit the FTS mapping shown below to map these new columns.
The FTS mapping is be located under the folder SDE_FUSION_V1_ADAPTOR.

-
Create a one-to-one mapping between the segment columns as shown below.
For example, Column mappings in FTS_FUSION_FscmTopModelAM.AccountBIAM.FLEX_BI_Account_VI.

-
Save the changes, then regenerate the underlying scenario for the package.
-
Similarly, if you have CAT# KFF or LOC# KFF, then edit the corresponding FTS mappings to map the new columns:
CAT#KFF FTS mapping: FTS_FUSION_FscmTopModelAM.CategoryBIAM.FLEX_BI_Category_VI
LOC#KFF FTS mapping: FTS_FUSION_FscmTopModelAM.LocationBIAM.FLEX_BI_Location_VI
For example, Column mappings in FTS_FUSION_FscmTopModelAM.CategoryBIAM.FLEX_BI_Category_VI

-
Save the changes, and regenerate the underlying scenarios for the packages.
-
Edit the SDE mapping for GL# KFF to map these new columns to corresponding columns in the staging table as shown below.
The SDE mapping is located in the same SDE_FUSION_V1_Adaptor folder.

-
The column mapping is based on the segment label to BI Object mapping done in your Fusion setup.
For GL#KFF, the mappings for FA_COST_CTR, GL_ACCOUNT and GL_BALANCING labels are known and should be mapped as shown below.
Table 5-3 Example column names and mappings
Target Column Name Mapping COST_CENTER_ATTRIB
CCIDVO.FA_COST_CTR_c
COST_CENTER_NUM
CCIDVO.FA_COST_CTR_
BALANCING_SEGMENT_ATTRIB
CCIDVO.GL_BALANCING_c
BALANCING_SEGMENT_NUM
CCIDVO.GL_BALANCING_
NATURAL_ACCOUNT_ATTRIB
CCIDVO.GL_ACCOUNT_c
NATURAL_ACCOUNT_NUM
CCIDVO.GL_ACCOUNT_
-
The column mapping for the other segment labels is based on the corresponding BI Objects mapped in your Fusion setup.
For example, assuming that you have mapped PRODUCT label to Dim – GL Segment1 and ORG label to Dim – GL Segment2, the column mapping will look like:
Table 5-4 Example column names and mappings
Target Column Name Mapping ACCOUNT_SEG1_ATTRIB
CCIDVO.PRODUCT_c
ACCOUNT_SEG1_CODE
CCIDVO.PRODUCT_
ACCOUNT_SEG2_ATTRIB
CCIDVO.ORG_c
ACCOUNT_SEG2_CODE
CCIDVO.ORG_
For example, assuming that you have mapped ALTACCT label to Dim – GL Segment3 and GL_MANAGEMENT label to Dim – GL Segment5, then the column mapping will look like:
-
Save the changes, regenerate the underlying scenario for the package.
-
If applicable, then make equivalent updates for CAT# and LOC#.
The corresponding mappings for both are given below.
CAT#KFF
a.SDE mapping: SDE_FUSION_FixedAssetCategoryDimension
b.Staging table: W_ASSET_CATEGORY_DS
LOC#KFF:
a.SDE mapping: SDE_FUSION_FixedAssetLocationDimension
b.Staging table: W_ASSET_LOCATION_DS
-
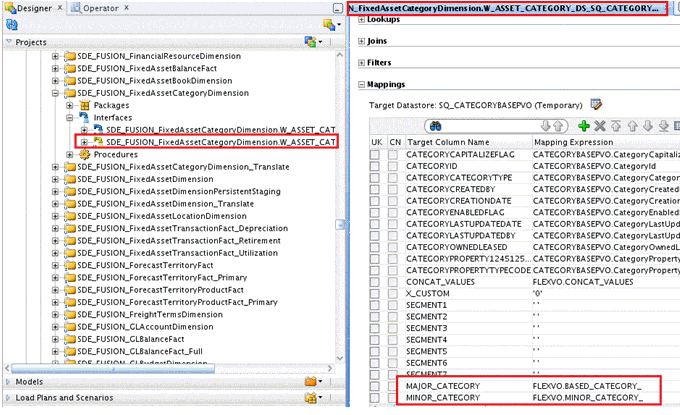
For CAT#KFF, if you have mapped BASED_CATEGORY and MINOR_CATEGORY and would like to use them as the Major and Minor Category, then the column mapping is as follows:
Table 5-6 Example column names and mappings
Target Column Name Mapping MAJOR_CATEGORY
FLEXVO.BASED_CATEGORY_
MINOR_CATEGORY
FLEXVO.MINOR_CATEGORY_
-
Save the changes, and regenerate the underlying scenarios for the packages.
-
Before generating a load plan for execution, enable FTS and SDE scenarios corresponding to GL Segment 1-10 in load plan components so that they are included in the final generated load plan.
For FTS scenarios, you can edit any ONE of the following FTS load plan components. These LP components will be located in BIAPPS Load Plan – Load Plan Dev Components –FTS:
- 3 FTS Fact BUDGET_FG FUSION_1_0
- 3 FTS Fact GLBAL_FG FUSION_1_0
- 3 FTS Fact GLCOGS_FG FUSION_1_0
- 3 FTS Fact GLJRNLS_FG FUSION_1_0
- 3 FTS Fact GLREVN_FG FUSION_1_0
-
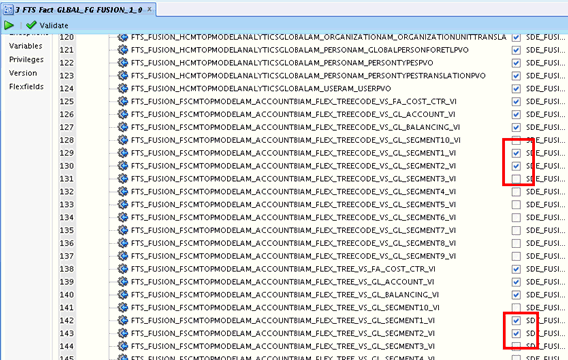
Enable the FTS scenarios based on your Fusion setup. For example, if your PRODUCT label is mapped to Dim – GL Segment 1 and is a tree segment and ORG label is mapped to Dim – GL Segment 2 and is a non tree segment, then enable the following scenarios:
- FTS_FUSION_FSCMTOPMODELAM_ACCOUNTBIAM_FLEX_TREE_VS_GL_SEGMENT1_VI
- FTS_FUSION_FSCMTOPMODELAM_ACCOUNTBIAM_FLEX_TREECODE_VS_GL_SEGMENT1_VI
- FTS_ FUSION_FSCMTOPMODELAM_ACCOUNTBIAM_FLEX_VS_GL_SEGMENT2_VI
For SDE scenarios, edit the 3 SDE Dims GLSEG_DIM FUSION_1_0 load plan component. This load plan component will be located in the path BIAPPS Load Plan – Load Plan Dev Components –SDE – FUSION_1_0.
-
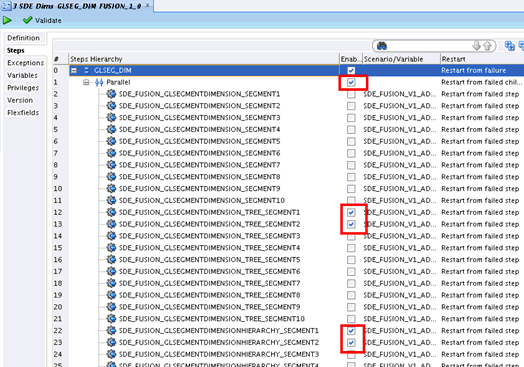
For this load plan component, enable the main ’Parallel' branch and then disable the steps that are not required.
-
If your Segment 1 is a tree segment and Segment2 is a non tree segment, then you enable the following scenarios in the LP component and disable the remaining steps:
- SDE_FUSION_GLSEGMENTDIMENSIONHIERARCHY_SEGMENT1
- SDE_FUSION_GLSEGMENTDIMENSION_TREE_SEGMENT1
- SDE_FUSION_GLSEGMENTDIMENSION_SEGMENT2
If Dim – GL Segmentx is mapped to a tree segment label in Fusion, then you enable:
- SDE_FUSION_GLSEGMENTDIMENSIONHIERARCHY_SEGMENTx
- SDE_FUSION_GLSEGMENTDIMENSION_TREE_SEGMENTx
If Dim – GL Segmentx is mapped to a non tree segment label in Fusion, then you enable:
- SDE_FUSION_GLSEGMENTDIMENSION_SEGMENTx
The screen shot below shows an example modified Load Plan Component.
-
Generate a load plan based on your offering and the modules implemented.
In the generated load plan, verify that your settings on the FTS and SDE load plan components were carried over accordingly.
5.3 Additional Steps for Fusion Financials Implementations
If you are deploying Fusion Financials on Oracle Cloud, then you need to make the additional modifications to FTS Fusion mappings related to GL Balances, as described in this section.
Note: This section is only applicable if you have an Oracle Fusion implementation on Oracle Cloud.
-
In ODI Studio, locate the following two FTS Fusion mappings in the ODI Repository:
FTS_FUSION_FscmTopModelAM.FinGlInquiryBalancesAM.BalanceFullPVOFTS_FUSION_FscmTopModelAM.FinGlInquiryBalancesAM.BalancePVOThe FTS mappings are located in the ODI repository under the folder Mappings - SDE_FUSION_V1_ADAPTOR.

-
Edit the packages in the two folders.
Before the change, the IS_INCREMENTAL variable should be displayed as in the example screenshot below.

-
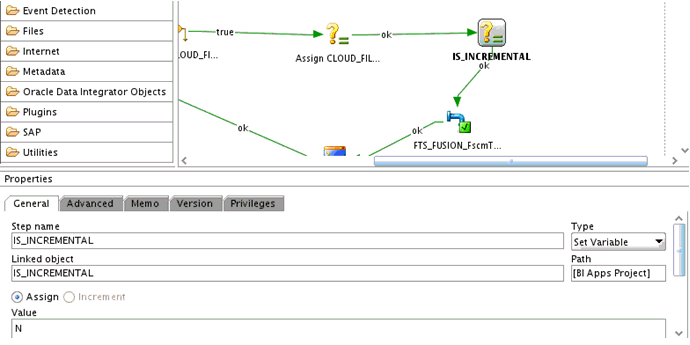
For each package, click on the IS_INCREMENTAL variable to display the Properties dialog, and change the Type value from 'Refresh Variable' to 'Set Variable', and set the Value to 'N', as shown in the example screenshot below.
-
Save the changes to the packages and regenerate the scenario for both packages.