6 Deploying the ODI Repository for Non-Oracle Source Databases
This chapter provides information about deploying the ODI Repository for non-Oracle source databases.
During installation and setup of Oracle BI Applications, if your source database is Oracle, then an instance of the ODI Repository is automatically deployed and no further setup steps are required. If your source database is MS SQL Server, UDB DB2, or UDB 400, then you must perform the configuration steps in this section to deploy a new instance of the ODI Repository.
If you have multiple sources and one or more of the source databases is non-Oracle, you need to follow the procedures in this section for all source databases, including any Oracle source databases.
Follow these steps in the order specified:
-
Export security settings from the original ODI repository by following the steps in Section 6.1, "Exporting Security Settings from Original ODI Repository".
-
Create a new master ODI repository by following the steps in Section 6.2, "Creating a New Master Repository".
-
Connect to the new master ODI repository by following the steps in Section 6.3, "Connecting to the New Master Repository".
-
Create a new work repository by following the steps in Section 6.4, "Creating a New Work Repository".
-
Import source adapter metadata content by following the steps in Section 6.5, "Importing Source Adapter Metadata Content into the New ODI Repository".
-
Enable external security authentication by following the steps in Section 6.6, "Enabling External Authentication".
-
Import security settings into the ODI repository by following the steps in Section 6.7, "Importing Security Settings Into the ODI Repository".
-
Configure the servers by following the steps in Section 6.8, "Configure the Data Servers".
-
Next Steps: In Oracle BI Applications Configuration Manager, register sources, configure parameters, and generate load plans.
Note:
After you perform these procedures for a particular source and you then want to add a new source, you only need to perform the steps in Section 6.5, "Importing Source Adapter Metadata Content into the New ODI Repository." This is true regardless of the database technology of the second source.For example, if you have a PeopleSoft 9.0 source on a SQL Server database, then you would perform the steps in Section 6.1 through Section 6.8. If you then wanted to add a second source, for example Siebel 8.1 (on an Oracle, DB2, or SQL Server database), you would only need to perform the steps in Section 6.5.
6.1 Exporting Security Settings from Original ODI Repository
You need to export the security settings from the ODI Repository that were created using the Oracle Business Analytics Suite RCU.
To export security settings from the original ODI Repository:
-
Log into ODI Studio.
-
Navigate to Topology, and select Export Security Settings.
-
Save the export file to a local directory.
You will use this export file to import the security settings in a later step.
6.2 Creating a New Master Repository
In this procedure, you use ODI Studio to create a new Master Repository.
To create a new Master Repository:
-
Launch ODI Studio.
-
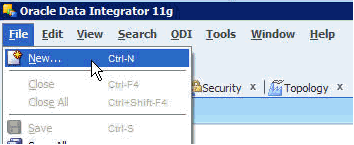
Open the New Gallery by selecting File and then New.
-
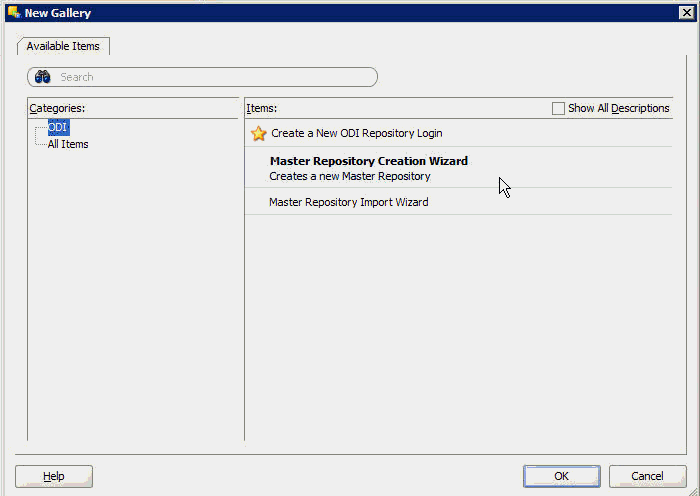
In the Categories tree of the New Gallery, select ODI.
-
From the Items list, select Master Repository Creation Wizard, and click OK.
The Master Repository Creation Wizard opens.
-
Specify the Database Connection properties, as follows:
Property Description Technology Select the technology that will host your Master Repository. JDBC Driver The driver used to access the technology that will host the repository. JDBC URL The URL used to establish the JDBC connection to the database. Note that the JDBC Driver and URL properties are synchronized and the default values are technology dependent.
User The name of the schema where the Master Repository will be stored. Password The password for the schema. DBA User The user ID on the database with DBA privileges such as SYSTEM. Do not use SYS, which requires logging in as SYSDBA.
DBA Password The password for the DBA User. 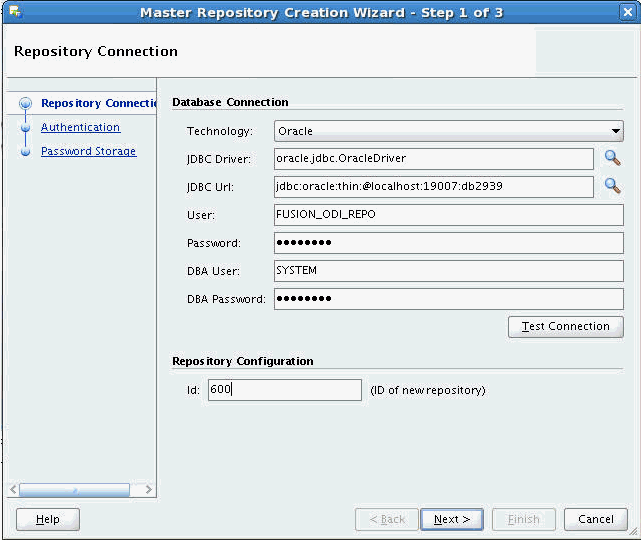
-
In the Repository Configuration area, enter a unique, three-digit numeric ID.
-
(Optional) Click Test Connection to test the connection to the Master Repository.
-
Click Next.
-
In the Authentication screen, select Use External Authentication, and specify the following:
Property Description Supervisor User The user name of the ODI Supervisor that was specified during the initial Oracle BI Applications installation. Supervisor Password The Supervisor User's password that was specified during the initial Oracle BI Applications installation. 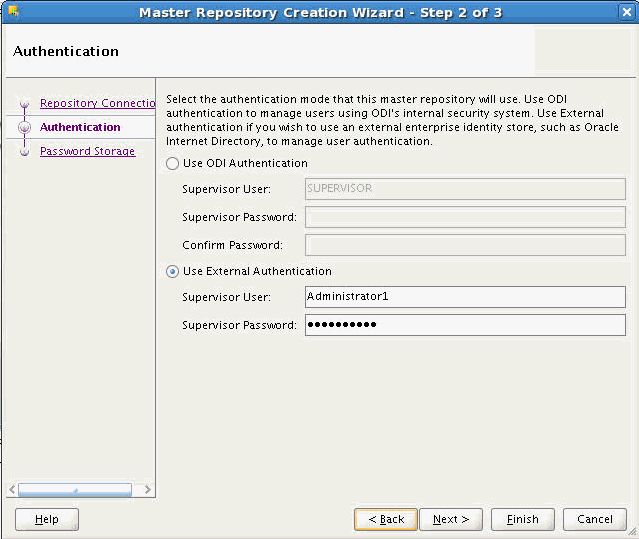
-
Click Next.
-
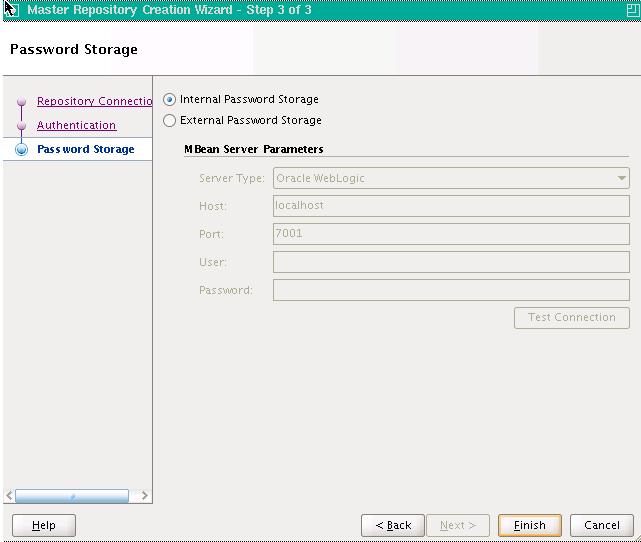
In the Password Storage screen, select Internal Password Storage.
-
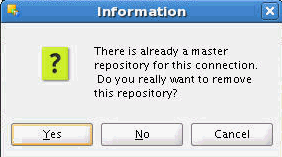
Click Yes to indicate you want to remove the existing repository.
-
In the Master Repository Creation Wizard, click Finish.
6.3 Connecting to the New Master Repository
In this procedure, you create a new Master Repository login connection.
To connect to the new Master Repository:
-
Open the New Gallery by selecting File and then New.
-
In the Categories tree of the New Gallery, select ODI.
-
From the Items list, select Create a New ODI Repository Login.
-
Click OK.
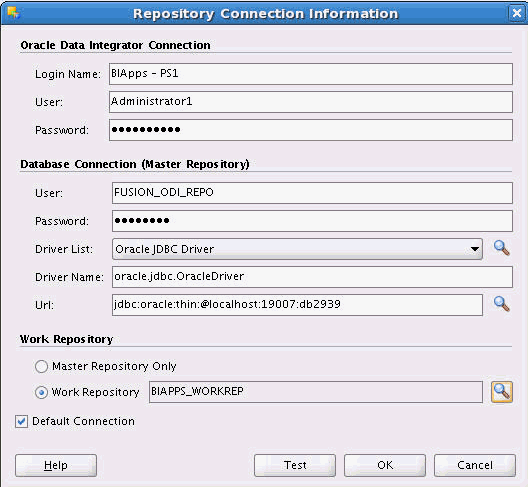
The Repository Connection Information dialog opens.
-
Specify the ODI connection details, as follows:
Property Description Login name A connection alias. User The ODI Supervisor user name that was defined during the Oracle BI Applications installation. Note that the Supervisor user name is case sensitive and must be entered exactly as previously defined.
Password The ODI Supervisor password that was defined during the Oracle BI Applications installation. 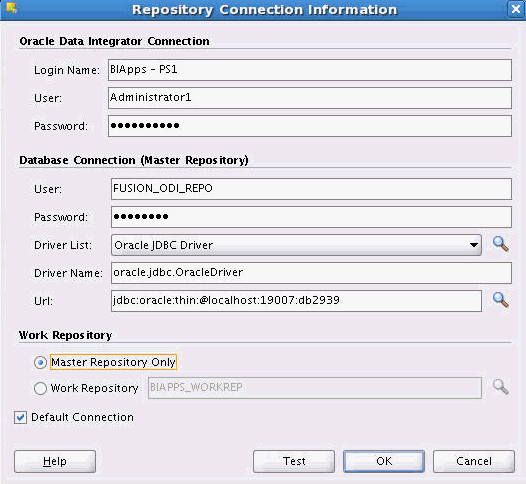
-
Specify the Database Connection (Master Repository) details, as follows:
Property Description User The database user login of the schema that contains the Master Repository. Password The User password. Driver List Select the driver required to connect to the database supporting the Master Repository. Driver Name The complete driver name. URL The URL used to establish the JDBC connection to the database hosting the repository. -
In the Work Repository area, select Master Repository Only.
-
(Optional) Click Test to verify that the connection is working.
-
Click OK.
6.4 Creating a New Work Repository
To create a new Work Repository:
-
In the Topology Navigator, go to the Repositories panel.
-
Right-click the Work Repositories node, and select New Work Repository.
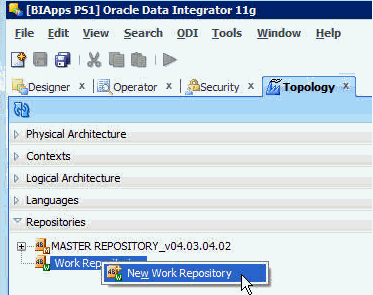
The Create Work Repository Wizard opens.
-
Specify the ODI Work Repository connection details. Note that the Work Repository needs to be in the same schema as the Master Repository. Provide the same credentials used to create the Master Repository.
Property Description Technology Select the technology that will host your Work Repository. JDBC Driver The driver used to access the technology that will host the repository. JDBC URL The complete path of the data server to host the Work Repository. Note that the JDBC Driver and URL properties are synchronized and the default values are technology dependent.
User The name of the schema where the Work Repository will be stored. Password The password for the schema. 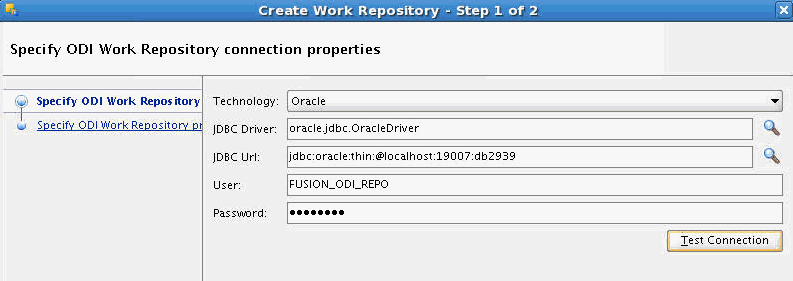
-
(Optional) Click Test Connection to verify the connection is working.
-
Click Next.
An informational dialog notifies you that a Work Repository already exists.

-
Click No to overwrite the existing repository.
-
Specify the Work Repository properties, as follows:
Property Description ID Enter the same ID used when creating the new Master Repository. Name A name for the Work Repository. Password This field is optional. The value can be any value. It does not correspond to the ODI Supervisor or database passwords. Work Repository Type Select Development. 
-
Click Finish.
A message dialog asks if you would like to create a login for the Work Repository.

-
The Confirmation dialog asks if you would like to create a login for the Work Repository. Click No.
-
Edit the repository connection details to connect to the Work Repository by doing the following:
-
Log off of the Work Repository.
-
Open the Repository Connection Information dialog.
-
In the Work Repository area, select the Work Repository option, and then select the name of the Work Repository you just created.
-
Click OK.
-
6.5 Importing Source Adapter Metadata Content into the New ODI Repository
In this procedure, you import source-specific metadata content into the new ODI Repository by running the command line utility.
This procedure contains the following sections:
-
Section 6.5.1, "Preparing to Import Source Adapter Metadata Content"
-
Section 6.5.2, "Running the Command Line Utility to Import Source Adapter Metadata Content"
6.5.1 Preparing to Import Source Adapter Metadata Content
In preparation to import source-specific metadata content into the new ODI Repository, do the following:
-
Locate the directory <BI_ORACLE_HOME>\biapps\admin\provisioning\odi.
The .zip files in this directory contain the source-specific metadata content you will import into the new repository. The naming convention for the .zip files is <Source adapter>_<database technology>_ODI_Metadata.zip.
-
Unzip the appropriate metadata content file for your source adapter and database technology.
-
Locate the file bia-odi-util.jar, which is stored in C:\<Middleware Home>\<BI_ORACLE_HOME>\biapps\biaodiutil\lib.
-
Locate the file jps-config-jse.xml, which is stored in C:\<Middleware Home>\user_projects\domains\bifoundation_domain\odi-client-config\embedded.
In the command, this file is referred to as
JPSCONFIGFILE. -
Create a logs directory to store the logs of the import process.
In the command, this directory is referred to as
LOGDIR. -
Locate the ODI Home directory.
In the command, this directory is referred to as
ODI_HOME. -
Obtain the following ODI Repository connection details:
-
JDBC URL for the ODI Repository database
-
JDBC driver
-
Work Repository name
-
ODI Repository database user name and password
-
ODI user and password
This connection information is displayed in ODI Studio in the Repository Connection Details dialog.
-
6.5.2 Running the Command Line Utility to Import Source Adapter Metadata Content
Follow this procedure to import the metadata content files into the new ODI Repository. You will first import the metadata for Oracle BI Applications, after which you will import the metadata for the appropriate source adapters.
For potential performance enhancement, Oracle recommends running the command line utility on the database server machine.
To import metadata content by running the command line utility:
-
Open a command line utility.
-
Navigate to the C:\<Middleware Home>\<BI_ORACLE_HOME>\biapps\biaodiutil\lib directory.
-
Run the following command to import the Oracle BI Applications metadata. The PLV code for this adapter is BIA_11.
On Windows:
<JAVA_HOME>\bin\java.exe \-client \-Xms32m \-Xmx1024m \-classpath <ODI_HOME>\oracledi.sdk\lib\*;<ODI_HOME>\inventory\Scripts\ext\jlib\*;<ODI_HOME>\modules\oracle.idm_11.1.1\*;<ODI_HOME>\modules\oracle.jps_11.1.1\*;<BIAODIUTIL_HOME>\import\core\import\*;<BIAODIUTIL_HOME>\import\core\lib\bia-odi-util.jar oracle.apps.biaodiutil.Import MODE=IMPREGEN FILEDIR=<EXP_FILE_DIR> PLV=<PLV_CODE> JPSCONFIGFILE=<JPS_CONFIG_FILE> LOGDIR=<LOG_DIR>For example:
C:\Java64\jdk1.6.0_35\bin\java.exe \-client \-Xms32m \-Xmx1024m \-classpath C:\oracle\product\odi11.1.1.7\oracledi.sdk\lib\*;C:\oracle\product\odi11.1.1.7\inventory\Scripts\ext\jlib\*;C:\oracle\product\odi11.1.1.7\modules\oracle.idm_11.1.1\*;C:\oracle\product\odi11.1.1.7\modules\oracle.jps_11.1.1\*;C:\temp\biaodiutil\import\core\import\*;C:\temp\biaodiutil\import\core\lib\bia-odi-util.jar oracle.apps.biaodiutil.Import MODE=IMPREGEN FILEDIR=c:/temp/export2/ PLV=BIA_11On UNIX/Linux:
<JAVA_HOME>\bin\java.exe \-client \-Xms32m \-Xmx1024m \-classpath "<ODI_HOME>/oracledi.sdk/lib/*:<ODI_HOME>/inventory/Scripts/ext/jlib/*:<ODI_HOME>/modules/oracle.idm_11.1.1/*:<ODI_HOME>/modules/oracle.jps_11.1.1/*:<BIAODIUTIL_HOME>/import/core/import/*:<BIAODIUTIL_HOME>/import/core/lib/bia-odi-util.jar" oracle.apps.biaodiutil.Import MODE=IMPREGEN FILEDIR=<EXP_FILE_DIR> PLV=<PLV_CODE> JPSCONFIGFILE=<JPS_CONFIG_FILE> LOGDIR=<LOG_DIR>For example:
java \-client \-Xms32m \-Xmx1024m \-classpath "/scratch/aime/oracle/product/11.1.1/Oracle_ODI_1/oracledi.sdk/lib/*:/scratch/aime/oracle/product/11.1.1/Oracle_ODI_1/inventory/Scripts/ext/jlib/*:/scratch/aime/oracle/product/11.1.1/Oracle_ODI_1/modules/oracle.idm_11.1.1/*:/scratch/aime/oracle/product/11.1.1/Oracle_ODI_1/modules/oracle.jps_11.1.1/*:/scratch/aime/biaodiutil/import/core/import/*:/scratch/aime/biaodiutil/import/core/lib/bia-odi-util.jar" oracle.apps.biaodiutil.Import MODE=IMPREGEN FILEDIR=c:/temp/export2/ PLV=BIA_11A description of the parameters follows:
Parameter Description MODE (Mandatory) Possible values: -
IMPREGEN - Use this mode to import the adapter metadata content and generate scenarios for that adapter.
-
IMPORT - Use this mode to import metadata content only, without generating scenarios. A parameter file is generated that allows you to do the scenario generation at a later time.
-
SCEREGEN - Use this mode to generate scenarios only. Before running this mode, you need to have imported content using the IMPORT mode so that the parameter file required for scenario generation is already present.
FILEDIR (Mandatory) The complete path for the export file directory files. CONNFILE (Optional) The complete path of the file containing the Connection Details. If this parameter is not used, the utility will prompt for the connection details. An example of a connection file is as follows:
# ===============================
# ODI Connection Information
# ================================
# Connection Information for Destination Oracle Data #Integrator Repository
MasterJDBCDriver=oracle.jdbc.OracleDriver
MasterJDBCUrl=jdbc:oracle:thin:@<host>:1521:orcl
MasterJDBCUser=ODI_REP
MasterJDBCPass=odirep
WorkName=BIAPPS_WORKREP
ODIUser=SUPERVISOR
ODIPass=odipass
LOGLEVEL (Optional) Possible values are 1, 3, or 5. The default value is 1, with 5 being the most verbose. LOGDIR The complete path for the log directory. The following log files are created:
-
Summary - Contains high level log information. The naming convention is Summary_ImportUtility_<DATE_TIME><ADAPTOR><SRCTECH>_log.
-
Import - Contains details about the import. Has a log and error file. The naming convention is BasicImport_<DATE_TIME>_<ADAPTOR>_log.
-
Scenario Generation - Contains details about the scenario generation. Has a log and error file. The naming convention is RegenScen_<DATE_TIME>_<ADAPTOR_MAPPING_FOLDER>_log.
PLV (Mandatory) The PLV code for the adapter being imported. Possible values:
-
AGILE_PLM_9_3_1
-
AGPLM_9_3_2
-
AILE_GILE_PLM_PROC_6_1
-
EBS_11_5_10
-
EBS_12_0
-
EBS_12_1_1
-
EBS_12_1_2
-
EBS_12_1_3
-
EBS_12_2
-
JDE_9_0
-
JDE_9_1
-
PSFT_9_0
-
PSFT_9_1
-
PSFT_9_2
-
SEBL_8_1_1
-
SEBL_8_2_2
SRCTECH (Mandatory) The source technology for the adapter being imported. Possible values:
-
For IBM DB2/400: IBM_DB2_400
-
For IBM DB2 UDB: IBM_DB2_UDB
-
For SQL Server: MICROSOFT_SQL_SERVER
-
For ORACLE: ORACLE
-
For Oracle Fusion (via BI Server): ORACLE_BI
Note: If you have multiple sources on both Oracle and non-Oracle databases, you need to import the PLV metadata for the Oracle database using ORACLE (or ORACLE_BI for Oracle Fusion sources) as the SRCTECH value.
JPSCONFIGFILE (Mandatory if the repository has already been enabled for external authentication.) The path and name of the JPSCONFIGFILE. SSOFILE (Optional) The path and name of the SSO file. -
-
Enter the ODI Repository connection details when prompted.
-
Monitor the process by viewing the command line window or the log files being written to the logs directory.
Note that this process can be lengthy and can last from 45 minutes to three hours, depending on the number of adapters for which you are importing metadata content.
-
When the import process is complete, log into ODI Studio and verify the data stores and mappings for the new adapter are present.
-
Repeat steps 1 through 6 for each adapter you need to import, substituting the appropriate PLV code.
6.6 Enabling External Authentication
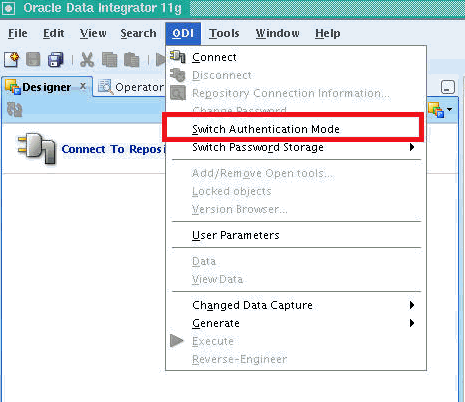
In this procedure, you enable external authentication in ODI using the Switch Authentication Mode wizard in ODI Studio.
To enable external authentication:
-
Launch ODI Studio.
-
Disconnect ODI Studio from the ODI Repository.
-
Shut down all components using the ODI Repository.
-
From the ODI menu, select Switch Authentication Mode.
-
Enter the appropriate values in the Login and Credentials screens, and click Finish.
Access the online help if you need assistance in the Login and Credentials screens.
6.7 Importing Security Settings Into the ODI Repository
In this procedure you will import the security settings that you exported in Section 6.1, "Exporting Security Settings from Original ODI Repository."
To import security settings:
-
Log into ODI Studio.
-
Navigate to Topology, and select Import Security Settings.
-
In the Import Security Settings dialog, select Import From a Folder, and browse for the export file.
-
Click Yes in the Confirmation dialog,
You can now log into the ODI Repository with the security settings configured when the ODI Repository was created using the Oracle Business Analytics Suite RCU.
6.8 Configure the Data Servers
Follow this procedure to perform post-import configurations.
To perform post-import configurations:
-
Log into ODI Studio using the BI Applications Administrator user.
-
Configure the BIAPPS_DW data server:
-
In ODI Studio, navigate to Topology, Physical Architecture, Oracle, BIAPPS_DW.
-
On the Definition tab, in the Connection area, enter the following:
Field Description User User name of the <prefix>_DW schema user. Password Password for the <prefix>_DW schema user. -
On the JDBC tab, enter the JDBC URL for the <prefix>_DW schema.
For example:
jdbc:oracle:thin:@myhost:1521/orcl -
In the Physical Architecture pane, expand the BIAPPS_DW data server and double-click BIAPPS_DW.BIAPPS_DW.
-
Enter the DW schema user for both Schema(Schema) and Schema(Work) fields.
-
-
Configure the BIAPPS_BIACOMP data server:
-
In ODI Studio, navigate to Topology, Physical Architecture, Oracle, BIAPPS_BAICOMP.
-
On the Definition tab, in the Connection area, enter the following:
Field Description User User name of the <prefix>_BIACM_IO schema user. Password Password for the <prefix>_BIACM_IO schema user. -
On the JDBC tab, enter the JDBC URL for BIACM_IO (the same as that for <prefix>_BIACOMP).
For example:
jdbc:oracle:thin:@myhost:1521/orcl -
In the Physical Architecture pane, expand the BIAPPS_BIACOMP data server and choose the Physical Schema under it, and double-click. double-click BIAPPS_DW.BIAPPS_DW.
-
Enter <prefix>_BIACM_IO user for both Schema(Schema) and Schema(Work) fields.
-