| Oracle® Fusion Middleware Upgrade Guide for Oracle Identity and Access Management 11g Release 1 (11.1.1.7.0) Part Number E27996-01 |
|
|
PDF · Mobi · ePub |
| Oracle® Fusion Middleware Upgrade Guide for Oracle Identity and Access Management 11g Release 1 (11.1.1.7.0) Part Number E27996-01 |
|
|
PDF · Mobi · ePub |
This chapter describes how to upgrade your existing Oracle Single Sign-On 10g to Oracle Access Manager 11g Release 1 (11.1.1.7.0).
This chapter contains the following sections:
Installing and Configuring the Oracle Access Manager 11.1.1.7.0 Middle Tier
Upgrading Oracle Access Manager 11.1.1.7.0 Middle Tier Using Upgrade Assistant
The process of upgrading Oracle Single Sign-On 10g to Oracle Access Manager 11.1.1.7.0 involves installing Oracle Identity and Access Management 11.1.1.7.0, configuring Oracle Access Manager 11.1.1.7.0, and upgrading the Oracle Access Manager middle tier. Oracle Single Sign-On 10g to Oracle Access Manager 11.1.1.7.0 upgrade has three scenarios:
Oracle Delegated Administration Services required after upgrading Oracle Single Sign-On 10g to Oracle Access Manager 11.1.1.7.0
Oracle Delegated Administration Services required, but Oracle Single Sign-On admin not required after upgrading Oracle Single Sign-On 10g to Oracle Access Manager 11.1.1.7.0
Oracle Delegated Administration Services not required after upgrading Oracle Single Sign-On 10g to 11.1.1.7.0
Depending upon the scenario you choose, you must perform the corresponding tasks listed in Upgrade Roadmap.
You can use Oracle Fusion Middleware Upgrade Assistant to upgrade the following:
Oracle Single Sign-On 10g configurations and artifacts
Partner metadata stored by Oracle Single Sign-On 10g Server
Partners registered with Oracle Single Sign-On 10g Server
The following components are not upgraded to Oracle Access Manager 11.1.1.7.0 environment when you run Upgrade Assistant to upgrade from Oracle Single Sign-On 10g:
Oracle Single Sign-On 10g with Window Native Authentication integration. For more information, see "Configuring Oracle Access Manager to use Windows Native Authentication" in the Oracle Fusion Middleware Integration Guide for Oracle Access Manager.
Logging configuration. For more information see "Logging Component Event Messages" in the Oracle Fusion Middleware Administrator's Guide for Oracle Access Management.
Oracle Single Sign-On 10g with Oracle Identity Federation integration. For more information, see "Integrating Oracle Identity Federation" in the Oracle Fusion Middleware Integration Guide for Oracle Access Manager.
Custom authentication.
X509 configurations. For more information, see Oracle Fusion Middleware Administrator's Guide for Oracle Access Management.
External Application.
Policy stores.
Multirealm configuration.
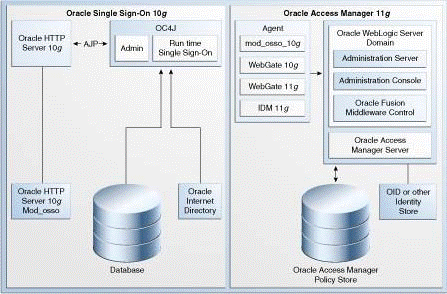
Figure 3-1 compares a typical Oracle Single Sign-On topology in Oracle Application Server 10g with a Oracle Access Manager topology in Oracle Fusion Middleware 11g.
Figure 3-1 Comparison of Typical Oracle Single Sign-On Topologies in Oracle Application Server 10g and Oracle Fusion Middleware 11g
Before you upgrade Oracle Single Sign-On 10g to Oracle Access Manager 11.1.1.7.0, you must consider your Oracle Single Sign-On 10g infrastructure (Figure 3-2) and depending on the functionality you choose to retain, you must select one of the following scenarios:
Oracle Single Sign-On 10g Infrastructure Before Upgrade
Figure 3-2 illustrates the Oracle Single Sign-On 10g topology.
Figure 3-2 Oracle Single Sign-On 10g Infrastructure
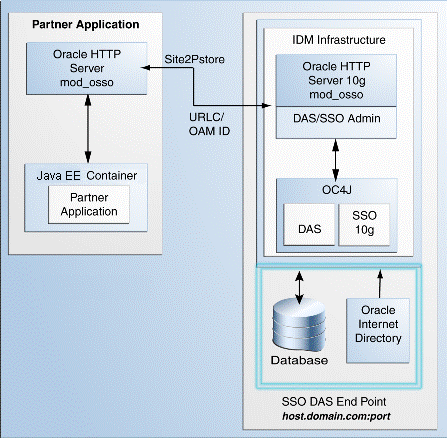
The topology comprises the following:
Partner applications in a Java EE container front-ended by Oracle HTTP Server to communicate with the Oracle Single Sign-On infrastructure
Oracle Identity Management infrastructure that includes the Oracle HTTP Server 10g front-ending the Oracle Delegated Administration Services application and the Oracle Single Sign-On Server
The Oracle Single Sign-On endpoint, which consists of a host name and a port number, represents the URL that Oracle Single Sign-On users can use to access the Oracle Single Sign-On Server and the Oracle Delegated Administration Services application.
An example of Oracle Single Sign-On endpoint is host.domain.com:port.
Note:
The example is used in this section to illustrate different upgrade scenarios and their Oracle Single Sign-On endpoints.
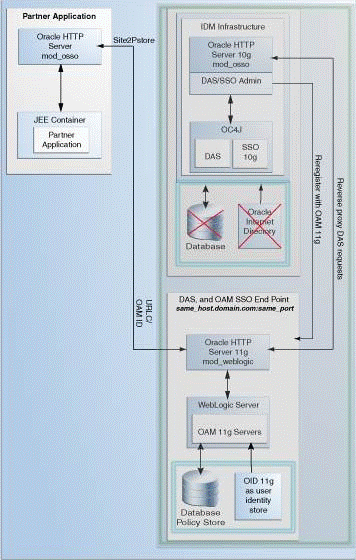
Use this upgrade scenario if you want to continue to use the Oracle Delegated Administration Services (DAS) application and the Oracle Single Sign-On Admin tool after upgrading from Oracle Single Sign-On 10g to Oracle Access Manager 11.1.1.7.0. Figure 3-3 illustrates the scenario.
Note the following points when using this upgrade scenario:
Use this scenario if you are using Oracle Portal partner applications because you require Oracle Delegated Administration Services and Oracle Single Sign-On Administration. Upgrade all the partner applications at once.
You are using the same Oracle HTTP Server 10g port that front-ended Oracle Single Sign-On 10g as the new port for Oracle Access Manager 11.1.1.7.0. Therefore, the Oracle Single Sign-On 10g server is no longer accessed. Instead, partner applications use Oracle Access Manager 11.1.1.7.0.
The Oracle Delegated Administration Services (DAS) application runs on a new port.
Any Oracle Delegated Administration Services requests from partner applications, such as Oracle Portal, arrive at the Oracle HTTP Server 11g and are redirected to Oracle HTTP Server 10g, which front-ends the Oracle Delegated Administration Services 10g application.
Note:
You must reregister Oracle Delegated Administration Services and Oracle Single Sign-On Admin with Oracle Access Manager 11.1.1.7.0 because their port is changed.
The Oracle Single Sign-On-Oracle Delegated Administration Services endpoint (same_host.domain.com:same_port) remains the same for all the partner applications.
After you perform the upgrade, Oracle Internet Directory is selected as the user identity store automatically.
Figure 3-3 Oracle Delegated Administration Services Required After Upgrading from Oracle Single Sign-On
To use this upgrade scenario, follow the steps listed in Table 3-1.
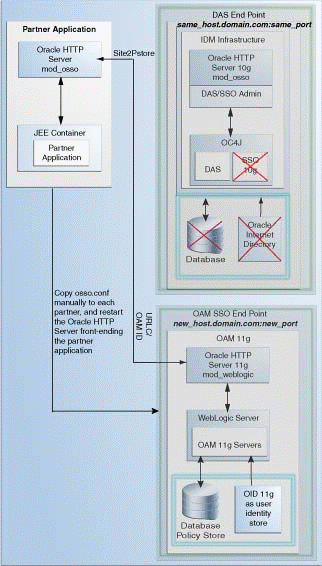
Use this upgrade scenario if you do not require the Oracle Single Sign-On Admin tool application, but you require the Oracle Delegated Administration Services application after upgrading from Oracle Single Sign-On 10g to Oracle Access Manager 11.1.1.7.0. Figure 3-4 illustrates the scenario.
Note the following points when using this upgrade scenario:
You are using the OHS 10g port for Oracle Delegated Administration Services. Therefore, you must install Oracle Access Manager 11.1.1.7.0 on a different machine.
Upgrade your partner applications in a phased manner.
Oracle Single Sign-On will no longer work after the upgrade. However, Oracle Delegated Administration Services will continue to work.
You must copy the osso.conf files generated during the upgrade, manually for each OHS/mod_osso fronting a set of partner applications. This step associates these applications with Oracle Access Manager 11.1.1.7.0 as their new Oracle Single Sign-On provider. This step is also necessary for Oracle Delegated Administration Services.
The Oracle Delegated Administration Services endpoint (same_host.domain.com:same_port) remains the same for all the partner applications.
The Oracle Access Manager-Oracle Single Sign-On endpoint is new, such as new_host.domain.com:new_port.
After you perform the upgrade, Oracle Internet Directory is selected as the user identity store automatically.
Figure 3-4 Oracle Single Sign-On Administration Server Not required
To use this upgrade scenario, follow the steps listed in Table 3-1.
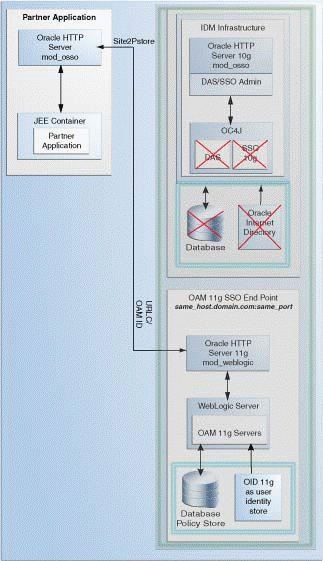
Use this upgrade scenario if you do not require the Oracle Delegated Administration Services application or the Oracle Single Sign-On Admin tool. Figure 3-5 illustrates the scenario.
Note the following points when using this upgrade scenario:
Oracle Single Sign-On and Oracle Delegated Administration Services will no longer work after the upgrade.
Upgrade all the partner applications at once.
You are using the same OHS 10g port that front-ended Oracle Single Sign-On 10g as the new port for Oracle Access Manager 11.1.1.7.0. Therefore, the Oracle Single Sign-On 10g server as well as the Oracle Delegated Administration Services application cannot be accessed.
The Oracle Single Sign-On endpoint (same_host.domain.com:same_port) remains the same for all the partner applications.
After you perform the upgrade, Oracle Internet Directory is selected as the user identity store automatically.
Figure 3-5 Oracle Delegated Administration Services Not Required
To use this upgrade scenario, follow the steps listed in Table 3-1.
Table 3-1 describes the tasks that should be completed for each of the Oracle Single Sign-On 10g upgrade scenarios.
Table 3-1 Upgrade Scenarios and Tasks
| Scenario | Tasks to be Completed |
|---|---|
You must complete the following prerequisites for upgrading Oracle Single Sign-On 10g to Oracle Access Manager 11.1.1.7.0:
Read the Oracle Fusion Middleware System Requirements and Specifications document to ensure that your environment meets the minimum requirements for the products you are installing, upgrading, and upgrading.
Note:
For information about Oracle Fusion Middleware concepts and directory structure, see "Understanding Oracle Fusion Middleware Concepts and Directory Structure" in the Oracle Fusion Middleware Installation Planning Guide for Oracle Identity and Access Management.
Verify that the Oracle Single Sign-On 10g version that you are using is supported for upgrade. For information about supported starting points for Oracle Single Sign-On 10g upgrade, see Section 2, "Upgrade Starting Points".
Before you begin the upgrade process, get familiar with the topology of Oracle Access Manager 11.1.1.7.0.
For more information, see Section 3.3, "Topology Comparison".
When you are upgrade an Oracle Single Sign-On environment to Oracle Access Manager 11.1.1.7.0, you must ensure that the version of the database where you plan to install the Oracle Access Manager and Oracle Platform Security Services (OPSS) schemas is supported by Oracle Fusion Middleware 11g.
You can install a new database, or upgrade your existing database to a supported version.
You must create the necessary schemas in the database in order to configure Oracle Access Manager 11.1.1.7.0. To create schemas, you must run the Repository Creation Utility (RCU). However, you do not need to create all the schemas specified in the RCU, unless you plan to install a complete Oracle Fusion Middleware environment and you plan to use the same database for all the Oracle Fusion Middleware component schemas.
For more information about the running the RCU to create necessary schemas for Oracle Access Manager 11.1.1.7.0, see "Creating Database Schema Using the Oracle Fusion Middleware Repository Creation Utility (RCU)" in the Oracle Fusion Middleware Installation Guide for Oracle Identity and Access Management.:
Depending on the upgrade scenario you choose, you must complete one of the following tasks:
Table 3-2 lists the steps to install and configure the Oracle Access Manager 11.1.1.7.0 middle tier for using the Oracle Delegated Administration Services application and the Oracle Single Sign-On Admin tool after upgrade from Oracle Single Sign-On 10g to Oracle Access Manager 11.1.1.7.0.
Table 3-2 Steps to Install and Configure the Oracle Access Manager Middle Tier
| No | Task | For More Information |
|---|---|---|
|
1 |
Installing Oracle WebLogic Server 10.3.6, and Creating the Oracle Middleware Home |
See, "Preparing for Installation" and "Running the Installation Program in Graphical Mode" in the Oracle Fusion Middleware Installation Guide for Oracle WebLogic Server. |
|
2 |
Stopping and Configuring the Oracle HTTP Server 10g |
|
|
3 |
Installing Oracle HTTP Server 11g |
Install Oracle HTTP Server 11g and specify the Oracle HTTP Server 10g port number. For more information, see Oracle Fusion Middleware Installation Guide for Oracle Web Tier. |
|
4 |
Installing Oracle Identity and Access Management 11.1.1.7.0 |
See, "Installing and Configuring Oracle Identity and Access Management (11.1.1.7.0)" in the Oracle Fusion Middleware Installation Guide for Oracle Identity and Access Management. |
|
5 |
Configuring Oracle Access Manager 11.1.1.7.0. |
See, "Configuring Oracle Access Management" in the Oracle Fusion Middleware Installation Guide for Oracle Identity and Access Management. |
|
6 |
Configuring Node Manager to Start Managed Servers |
See, "Configuring Node Manager to Start Managed Servers" in the Oracle Fusion Middleware Administrator's Guide. |
|
7 |
Starting the Oracle WebLogic Server domain |
See, section "Starting the Stack" in the Oracle Fusion Middleware Installation Guide for Oracle Identity and Access Management. |
|
8 |
Front-ending the Oracle Access Manager 11.1.1.7.0 Managed Server with the Oracle HTTP Server 11g |
See, Front-Ending Oracle Access Manager 11.1.1.7.0 Managed Server with Oracle HTTP Server 11g |
|
9 |
Registering the Oracle HTTP Server 10g as a Partner Application |
See, Registering Your Applications as Partner Applications of Oracle Access Manager 11g. |
|
10 |
Redirecting the OIDDAS Request to the Oracle HTTP Server 10g server |
See, Redirecting the Partner Application Request to Oracle HTTP Server 10g server. |
|
11 |
Verifying the installation |
See, "Verifying the Oracle Access Management Installation" in the Oracle Fusion Middleware Installation Guide for Oracle Identity and Access Management. |
Reconfiguring Oracle HTTP Server 10g
Perform the following steps:
Open the httpd.conf file from the directory ORACLE_HOME\Apache\Apache\conf on Windows, or ORACLE_HOME/Apache/Apache/conf (on UNIX) in a text editor and change the existing port number to a new port number.
Stop Oracle HTTP Server 10g by running the opmnctl command-line tool (located at ORACLE_HOME\opmn\bin) as follows:
opmnctl stopproc ias-component=<name_of_the_OHS_instance>
Restart Oracle HTTP Server 10g by running the following opmnctl commands:
OHS_INSTANCE_HOME/bin/opmnctl stopall
OHS_INSTANCE_HOME/bin/opmnctl startall
Front-Ending Oracle Access Manager 11.1.1.7.0 Managed Server with Oracle HTTP Server 11g
You must use mod_wl_ohs to front-end Oracle Access Manager 11.1.1.7.0 Managed Server with Oracle HTTP Server 11g. To do so, complete the following steps:
Open the mod_wl_ohs.conf file from the directory OHS_INSTANCE_HOME/config/OHS/ohs_instance_name (On UNIX), or OHS_INSTANCE_HOME\config\OHS\ohs_instance_name (on Windows) in a text editor, and edit as follows:
<IfModule weblogic_module>
             WebLogicHost <OAM Managed Server Host>
             WebLogicPort <OAM Managed Server Port>
             Debug ON
            WLLogFile /tmp/weblogic.log
           MatchExpression *.jsp
      </IfModule>
      <Location />
            SetHandler weblogic-handler
            PathTrim /
            ErrorPage  http://WEBLOGIC_HOST:WEBLOGIC_PORT/
      </Location>
Restart Oracle HTTP Server 11g by running the following opmnctl commands from the location ORACLE_INSTANCE\bin directory on Windows, or ORACLE_INSTANCE/bin directory on UNIX:
opmnctl stopall
opmnctl startall
Open the oam-config.xml file from the MW_HOME\user_projects\domains\domain_name\config\fmwconfig directory on Windows, or MW_HOME/user_projects/domains/domain_name/config/fmwconfig directory on UNIX in a text editor, and edit the serverhost and serverport entries, as shown in the following example:
<Setting Name="OAMSERVER" Type="htf:map">
    <Setting Name="serverhost" Type="xsd:string"><OHS 11G HOST></Setting>
    <Setting Name="serverprotocol" Type="xsd:string">http</Setting>
    <Setting Name="serverport" Type="xsd:string"><OHS 11G PORT></Setting>
    <Setting Name="MaxRetryLimit" Type="xsd:integer">5</Setting>
</Setting>
Restart the WebLogic Administration Server and Oracle Access Manager 11.1.1.7.0 Managed server. To restart the servers, you must first stop them, and then start.
For more information about starting and stopping the servers, see "Starting and Stopping Administration Servers" and "Starting and Stopping Oracle Fusion Middleware" in the Oracle Fusion Middleware Administrator's Guide.
Registering Your Applications as Partner Applications of Oracle Access Manager 11g
You must register the Oracle Internet Directory and Oracle Delegated Administration Services deployed on Oracle HTTP Server 10g partners with Oracle Access Manager 11.1.1.7.0. To do so, complete the following steps:
Log in to the Oracle Access Management 11.1.1.7.0 console.
Click the System Configuration tab.
In the Welcome page, select Add OSSO Agents.
In the Create OSSO Agent page, enter the following details:
Agent Name: The identifying name for the mod_osso Agent.
Agent Base URL: The required protocol, host, and port of the computer on which the Web server for the agent is installed. For example, http://ohs_host:ohs_port
Click Apply.
The agent is created and the osso.conf file is generated at DOMAIN_HOME/output/AGENT_NAME (on UNIX) and DOMAIN_HOME\output\AGENT_NAME (on Windows).
Copy the newly generated agent file to Oracle HTTP Server 10g at OHS_Config\osso.
Restart Oracle HTTP Server 10g by running the following opmnctl commands:
OHS_INSTANCE_HOME/bin/opmnctl stopall
OHS_INSTANCE_HOME/bin/opmnctl startall
Redirecting the Partner Application Request to Oracle HTTP Server 10g server
You must use mod_proxy to redirect Oracle Internet Directory and Oracle Delegated Administration Services requests to Oracle HTTP Server 10g.
Open the Oracle HTTP Server 11g httpd.conf file in a text editor and add entries of OHS 10g host name and post name front-ending Oracle Internet Directory and Oracle Delegated Administration Services, as shown in the following example:
ProxyPass         /oiddas http://pdcasqa14-3.us.abc.com:8888/oiddas
ProxyPassReverse  /oiddas http://pdcasqa14-3.us.abc.com:8888/oiddas
Note:
The above example is using the OHS 10g port number.
Restart Oracle HTTP Server 11g by running the following opmnctl commands:
ORACLE_HOME/opmn/bin/opmnctl stopall
ORACLE_HOME/opmn/bin/opmnctl startall
If your Oracle HTTP Server 10g is SSL enabled, you must complete the following:
Create a wallet for the proxy.
If the root certificate of Oracle HTTP Server 10g is not well-known, you must import it into the above created wallet as a trusted certificate.
Open the Oracle HTTP Server 11g ssl.conf file (located in <ORACLE_INSTANCE>/config/OHS/<COMPONENT_NAME>/) in a text editor and add the following line under <VirtualHost *:PORTNUMBER><IfModule ossl_module>:
SSLProxyEngine On
SSLProxyWallet <PATH of the wallet created above>
Restart Oracle HTTP Server 11g by running the following opmnctl commands:
OHS_INSTANCE_HOME/bin/opmnctl stopall
OHS_INSTANCE_HOME/bin/opmnctl startall
Table 3-3 lists the steps you must perform when installing and configuring the Oracle Access Manager 11.1.1.7.0 middle tier, using a new host name or port number for Oracle Access Manager.
Table 3-3 Steps to Install and Configure the Oracle Access Manager Middle Tier
| No | Task | For More Information |
|---|---|---|
|
1 |
Installing Oracle WebLogic Server 10.3.6, and Creating the Oracle Middleware Home |
See, "Preparing for Installation" and "Running the Installation Program in Graphical Mode" in the Oracle Fusion Middleware Installation Guide for Oracle WebLogic Server. |
|
2 |
Installing Oracle Identity and Access Management 11g Release 1 (11.1.1.7.0) |
See, "Installing and Configuring Oracle Identity and Access Management (11.1.1.7.0)" in the Oracle Fusion Middleware Installation Guide for Oracle Identity and Access Management. |
|
3 |
Configuring Oracle Access Manager 11.1.1.7.0 |
See, "Configuring Oracle Access Management" in the Oracle Fusion Middleware Installation Guide for Oracle Identity and Access Management. |
|
4 |
Configuring Node Manager to Start Managed Servers |
See, "Configuring Node Manager to Start Managed Servers" in the Oracle Fusion Middleware Administrator's Guide. |
|
5 |
Starting the Oracle WebLogic Server domain |
See, section "Starting the Stack" in the Oracle Fusion Middleware Installation Guide for Oracle Identity and Access Management. |
|
6 |
Verifying the installation |
See, "Verifying the Oracle Access Management Installation" in the Oracle Fusion Middleware Installation Guide for Oracle Identity and Access Management. |
When you install Oracle Access Manager 11.1.1.7.0, Upgrade Assistant is installed automatically into the bin directory of your Oracle home.
You run Upgrade Assistant once for each Oracle home that you are upgrading. For example, if you are upgrading two different 10g Release 2 (10.1.2) Oracle homes that are part of the same 10g Release 2 (10.1.2) farm, then you must run Upgrade Assistant two times, once for each of the 10g Release 2 (10.1.2) Oracle homes.
To upgrade the middle tier, complete the following steps:
Launch the Upgrade Assistant by doing the following:
On UNIX:
Move from your present working directory to the MW_HOME/IAM_HOME/bin directory using the following command:
cd MW_HOME/IAM_HOME/bin
Run the following command:
./ua
On Windows:
Move from the present working directory to the MW_HOME\IAM_HOME\bin directory using the following command on the command line:
cd MW_HOME\IAM_HOME\bin
Run the following command:
ua.bat
The Oracle Fusion Middleware Upgrade Assistant Welcome screen is displayed.
Click Next.
The Specify Operation screen is displayed.
Select Upgrade Oracle Access Manager Middle Tier.
The options available in Upgrade Assistant are specific to the Oracle home from which it started. When you start Upgrade Assistant from an Oracle Application Server Identity Management Oracle home, the options shown on the Specify Operation screen are the valid options for an Oracle Application Server Identity Management Oracle home.
Click Next.
The Specify Source Details screen is displayed.
Enter the following information:
Properties File: Click Browse and specify the path to the Oracle Single Sign-On 10g policy.properties file.
If your Oracle Access Manager 11.1.1.7.0 installation is on a separate host from the Oracle Single Sign-On 10g installation, you must copy the 10g policy.properties file to a temporary directory on the Oracle Access Manager 11.1.1.7.0 host. Then specify the path to the policy.properties file located in your temporary folder.
Database Host: Enter the database host name that contains the Oracle Single Sign-On schema.
Database Port: Enter the database port number.
Database Service: Enter the database service name.
SYS Password: Enter the password for the SYS database account of the database that you selected from the Database drop-down menu. Upgrade Assistant requires these login credentials before it can upgrade the 10g components schemas.
Note:
Ensure that you enter database details for the Oracle Single Sign-On 10g database configuration.
Click Next.
The Specify OID Details screen is displayed.
Enter the following information:
OID Host: Enter the host name of the Oracle Internet Directory server.
OID SSL Port: Enter your Oracle Internet Directory port number.
OID Password: Enter the password for the Oracle Internet Directory administration account (cn=orcladmin).
Click Next.
The Specify WebLogic Server screen is displayed.
Enter the following information:
Host: Enter the host name of the Oracle WebLogic Server domain.
Port: Enter the listening port of the Administration Server. The default server port is 7001.
Username: The user name that is used to log in to the Administration Server. This is the same user name you use to log in to the Administration Console for the domain.
Password: The password for the administrator account that is used to log in to the Administration Server. This is the same password you use to log in to the Administration Console for the domain.
Click Next.
The Specify Upgrade Options screen is displayed
Select Start destination components after successful upgrade, and click Next.
Note:
If you are using external application, select Upgrade even with external applications.
The Examining Components screen is displayed.
Click Next.
The Upgrade Summary screen is displayed.
Click Upgrade.
The Upgrade Progress screen is displayed. This screen provides the following information:
The status of the upgrade
Any errors or problems that occur during the upgrade
Click Next.
The Upgrade Complete screen is displayed. This screen confirms that the upgrade was complete.
Click Close.
The following sections describe the manual steps that you must perform after upgrading Oracle Single Sign-On 10g to Oracle Access Manager 11.1.1.7.0:
Configuring Oracle Access Manager 11.1.1.7.0 Administration Console to Align Roles
Configuring Oracle Business Intelligence Discoverer 11g with Oracle Access Manager 11.1.1.7.0
Setting the Headers in the Authentication Policy for the Protected DAS Resources
Additional Step for Oracle Internet Directory Configured in SSL Server Authentication Mode
After upgrading the Oracle Portal's Oracle Single Sign-On Server to the Oracle Access Manager 11.1.1.7.0 Server, you must update the Oracle Portal schema with information about the Oracle Access Manager 11.1.1.7.0 server. To do so, you must update the wwsec_enabler_config_info$ table as follows:
Retrieve the Portal schema password by running the following command:
ldapsearch -v -D "cn=orcladmin" -w "orcladminpassword" -h OIDHost -p OIDPort -s sub -b "cn=IAS Infrastructure Databases, cn=IAS, cn=Products, cn=OracleContext" "orclresourcename=PORTAL" orclpasswordattribute
Connect to the database hosting the Oracle Portal schema, and log in with the Portal schema user name and password.
Run the portal_post_upgrade.sql script (located at <ORACLE_HOME>\oam\server\upgrade\sql).
When prompted, enter your Oracle Access Manager 11.1.1.7.0 Managed Server host name and port number.
After upgrading, the Oracle Access Manager 11.1.1.7.0 Administration console uses the system identity store for run-time authentication and authorization. To align the existing roles, do the following:
Run the following command to launch the WebLogic Scripting Tool (WLST):
On UNIX:
Move from your present working directory to the IAM_HOME/common/bin directory by running the following command on the command line:
cd IAM_HOME/common/bin
Run the following command to launch the WebLogic Scripting Tool (WLST):
./wlst.sh
On Windows:
Move from your present working directory to the IAM_HOME\common\bin directory by running the following command on the command line:
cd IAM_HOME\common\bin
Run the following command to launch the WebLogic Scripting Tool (WLST):
wlst.cmd
In the WLST shell, enter the following command:
editUserIdentityStore(name="UserIdentityStoreName",roleSecAdmin="SecurityAdminRoleName")
Example:
(name="MigratedUserIdentityStore",roleSecAdmin="Administrators")
If you want to configure a group for Oracle Access Manager 11.1.1.7.0 Administrator for the Oracle Access Manager 11.1.1.7.0 Administration console, complete the following steps:
Create a group for example Administrators in the Oracle Internet Directory.
Add the fully qualified domain name for Oracle Access Manager 11.1.1.7.0 Administrator privileges. For example, enter the following as the unique member of the group:
cn=orcladmin,cn=users,dc=us,dc=abc,dc=com
Run the following command to launch the WebLogic Scripting Tool (WLST):
On UNIX:
Move from your present working directory to the IAM_HOME/common/bin directory by running the following command on the command line:
cd IAM_HOME/common/bin
Run the following command to launch the WebLogic Scripting Tool (WLST):
./wlst.sh
On Windows:
Move from your present working directory to the IAM_HOME\common\bin directory by running the following command on the command line:
cd IAM_HOME\common\bin
Run the following command to launch the WebLogic Scripting Tool (WLST):
wlst.cmd
In the WLST shell, enter the following command:
editUserIdentityStore(name="MigratedUserIdentityStore",roleSecAdmin="SecurityAdminRoleName")
Example:
editUserIdentityStore(name="MigratedUserIdentityStore",roleSecAdmin="Administrators")
Depending on the upgrade scenario selected, the Oracle Upgrade Assistant may generate a new file named osso.conf for each partner application in the Oracle_Home/upgrade/temp directory. You must copy this osso.conf file to the location of the partner application registered with Oracle Access Manager 11.1.1.7.0.
You must identify the correct osso.conf file associated with the partner application.
Example:
F78CFE57-dadvmb0097.us.abc.com_22776_769_osso.conf
To identify the correct osso.conf file, see the oam-config.xml file (located at, IDM_HOME/oam/server/config). The oam-config.xml file provides the partner application details and the Oracle HTTP Server host address and port number.
After upgrading the Oracle Business Intelligence Discoverer's Oracle Single Sign-On server to the Oracle Access Manager 11.1.1.7.0 server, you must update the Oracle Business Intelligence Discoverer Single Sign-On configuration as follows:
Open the mod_osso.conf file (Located at, ORACLE_INSTANCE/config/OHS/<COMPONENT_NAME>/moduleconf in the Oracle Business Intelligence Discoverer instance) in a text editor.
Add the following line in the <IfModule mod_osso.c>:
OssoHTTPOnly Off
Restart Oracle HTTP Server by running the following opmnctl command:
OHS_INSTANCE_HOME/bin/opmnctl stopall
OHS_INSTANCE_HOME/bin/opmnctl startall
After upgrading, you must set the headers in the authentication policy for protected Oracle Delegated Administration Services using the Oracle Access Management 11.1.1.7.0 console. To do this, complete the following steps:
Log in to the Oracle Access Manager 11.1.1.7.0 console using the following URL:
http://host:port/oamconsole
In this URL,
host refers to the fully qualified domain name of the machine hosting the Oracle Access Manager 11.1.1.7.0 console
port refers to the designated bind port for the Oracle Access Manager 11.1.1.7.0 console, which is the same as the bind port for the Administration Server
Go to the Policy Configuration tab.
Expand Application Domains.
Expand the agent that you created while performing the step Registering Your Applications as Partner Applications of Oracle Access Manager 11g.
Expand Authentication Policies.
Double-click on Protected Resource Policy.
Go to the Responses tab in the Protected Resource Policy page.
Click on the + symbol, to add responses.
Add the three headers listed in Table 3-4 with the right values for Name, Type, and Value fields as specified in the table. Click Add after adding each header.
After upgrading, the default authentication scheme remains to be LDAPScheme. You must change this to SSOCoexistMigrateScheme. Therefore, after upgrading, you must set SSOCoexistMigrateScheme as the default authentication scheme using the Oracle Access Management 11.1.1.7.0 console. To do this, complete the following steps:
Log in to the Oracle Access Management 11.1.1.7.0 console using the following URL:
http://host:port/oamconsole
In this URL,
host refers to the fully qualified domain name of the machine hosting the Oracle Access Management 11.1.1.7.0 administration console
port refers to the designated bind port for the Oracle Access Management 11.1.1.7.0 console, which is the same as the bind port for the Administration Server
Go to the Policy Configuration tab.
Expand Shared Components on the left navigation pane.
Expand Authentication Schemes.
Double-click on SSOCoexistMigrateScheme.
Click Set as Default, and click Apply.
After you upgrade Oracle Single Sign-On 10g to Oracle Access Manager 11.1.1.7.0, you must explicitly set the migratedUserIdentityStore as the Default Store and System Store for Oracle Access Manager 11.1.1.7.0. To do this, refer to "Setting the Default Store and System Store" in the Oracle Fusion Middleware Administrator's Guide for Oracle Access Management.
If the Oracle Internet Directory (OID) used by Oracle Single Sign-On 10g is configured in SSL server authentication mode, you must complete the following steps:
Add the Oracle Internet Directory self-signed to the cacerts file for the JVM that is running the Oracle Access Manager 11.1.1.7.0 Server by running the following command:
<JRE_HOME>/lib/security > ../../../bin/keytool -import -trustcacerts -keystore <location of cacerts in jvm> -storepass changeit -noprompt -alias <cert-name> -file <cert-file-path>
Restart the WebLogic Administration Server and the Oracle Access Manager 11.1.1.7.0 Managed Servers. To do this, follow Step-10 in Section 3.12.5, "Setting the Headers in the Authentication Policy for the Protected DAS Resources".
Log in to the Oracle Access Manager 11.1.1.7.0 console using the following URL:
http://host:port/oamconsole
Go to the System Configuration tab.
Expand Data Sources under Common Configuration on the left navigation pane.
Click User Identity Stores, and then click Create.
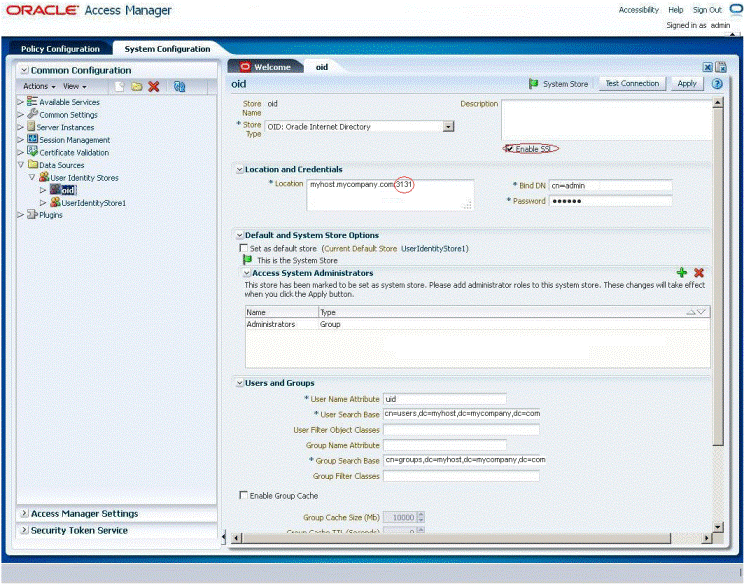
Specify the required details, and ensure that you select Enable SSL.
Ensure that you have specified the right SSL port in the Location field.
Click Apply.
Figure 3-6 shows the Oracle Access Manager console where you create new User Identity Store.
Figure 3-6 Creating New User Identity Store
You must perform the following additional post-upgrade tasks after upgrading to Oracle Access Manager 11.1.1.7.0:
If the destination topology is front-ended by Oracle HTTP server 11g (installed through the 11g companion CD) on the same machine as the source, then you can run Upgrade Assistant from the Oracle HTTP server 11g installation directory to upgrade the Oracle HTTP server that front-ends Oracle Single Sign-On. In such cases, if you use the Upgrade Assistant retain port option, then no re-association of mod_osso partners with Oracle Access Manager is required.
If you are using Oracle Portal 11g that you have upgraded from Oracle Portal 10g, then you must run the portal_post_upgrade.sql script (Located at Oracle_IDM1/oam/server/upgrade/sql) to update the Oracle Single Sign-On configuration and to use Oracle Access Manager 11.1.1.7.0 for Single Sign-On authentication.
In all other cases, the post-upgrade step of re-associating mod_osso partners with the newly upgraded Oracle Access Manager 11.1.1.7.0 is required. The mod_osso configurations generated as part of the upgrade can be used for this purpose.
Before logging in to the Oracle Portal, you must restart Oracle Web Cache by running the following opmnctl command (located at <ORACLE_INSTANCE>\bin directory on Windows, or <ORACLE_INSTANCE>/bin directory on UNIX):
opmnctl stopall
opmnctl startall
After upgrading to Oracle Access Manager 11.1.1.7.0, if you are not using Oracle Single Sign-On 10g on Oracle Internet Directory 10g or Oracle Delegated Administration Services 10g, then you can deinstall Oracle Single Sign-On 10g. To do so, undeploy the Oracle Single Sign-On 10g server from the Oracle Identity Management 10g Server (OC4J_SECURITY) by running the following command on the command line:
java -jar admin_client.jar <uri> <adminId> <adminPassword> -undeploy sso
After the upgrade is complete, the Oracle Access Manager will be in the co-existence mode, by default. To verify that your Oracle Access Manager upgrade was successful:
Run the Upgrade Assistant again, and select Verify Instance on the Specify Operation screen.
Follow the instructions on the screen for information on how to verify that specific Oracle Fusion Middleware components are up and running.
To verify that Oracle Access Manager 11.1.1.7.0 Administration Server is up and running, log in to the Oracle Access Management 11.1.1.7.0 console using the URL:
http://host:port/oamconsole
In this URL,
host refers to the fully qualified domain name of the machine hosting the Oracle Access Manager 11.1.1.7.0 administration console.
port refers to the designated bind port for the Oracle Access Manager 11.1.1.7.0 console, which is the same as the bind port for the Administration Server.
To verify that the Oracle Access Manager 11.1.1.7.0 Managed Server is up and running, do the following:
Log in to Oracle WebLogic Server Administration Console using the required Administrator credentials.
Expand Domain Structure on the left pane, and select Deployments.
Verify that your Managed Server is listed in the Summary of Deployments page.
Alternatively, you can check the upgrade log file for any error messages or use Fusion Middleware Control to verify that Oracle Access Manager 11.1.1.7.0 and any other Oracle Identity Management components are up and running in the Oracle Fusion Middleware environment.
For more information, see "Getting Started Using Oracle Enterprise Manager Fusion Middleware Control" in the Oracle Fusion Middleware Administrator's Guide.