| Oracle® Fusion Middleware Installation Guide for Oracle Mobile Security Suite Release 3.0.1 Part Number E51930-03 |
|
|
PDF · Mobi · ePub |
| Oracle® Fusion Middleware Installation Guide for Oracle Mobile Security Suite Release 3.0.1 Part Number E51930-03 |
|
|
PDF · Mobi · ePub |
This chapter describes how to install Oracle Mobile Security Suite on Windows.
It contains the following sections:
Section 4.4, "Mobile Security Access Server Information Screen"
Section 4.5, "Oracle Access Manager Authentication Information Screen"
Section 4.8, "File Manager and Notification Server Information Screen"
Section 4.9, "Notification Server Credential Information Screen"
Section 4.10, "Mobile Security Administrative Console Screen"
Section 4.12, "Oracle Database Credential Information Screen"
Section 4.14, "SQL Server DB Access Credential Information Screen"
Section 4.18, "Administrative Console Access Credential Information Screen"
After you execute the Mobile Security Access Server setup program, the Welcome screen appears.
Click Next.

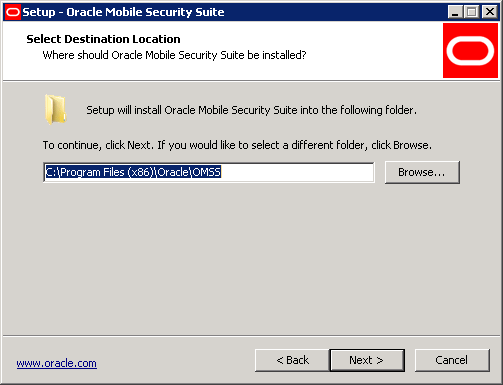
Select the destination location where the Mobile Security Access Server will be installed by clicking Browse button and selecting the appropriate location.
Click Next.
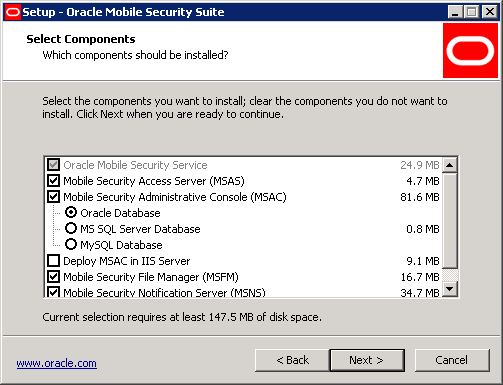
Select the components you want to install. Based upon the components selected, the installer will show further screens.
Mobile Security Service is required for all of the components.
Mobile Security Access Server should be installed on a server in the DMZ. It should not be installed for a standalone installation of Mobile Security Administrative Console on a separate server from the Mobile Security Access Server.
Mobile Security Administrative Console can be installed on the same server as the Mobile Security Access Server, on a different server inside your network, or not at all (in this last case, client containers can point to the Mobile Security-hosted service). When installed on a different server than the Mobile Security Access Server it can optionally be installed using IIS.
The database for Mobile Security Administrative Console can be either a remote Oracle Database or Microsoft SQL server instance, MYSQL, or Microsoft SQL Server on the same server as the Mobile Security Administrative Console for the embedded MySQL. The Mobile Security Access Server Setup Wizard installs the drivers to connect to Oracle Database or Microsoft SQL Server and creates Mobile Security Administrative Console information in the database but does not install the database server itself.
Mobile Security File Manager can be installed on the same server as Mobile Security Administrative Console or on a different server inside your network.
Mobile Security Notification Server can be installed on the same server as Mobile Security Administrative Console or on a different server inside your network.
Mobile Security Administrative Console can use Oracle Unified Directory or Active Directory groups for access to the Mobile Security Administrative Console console using SSO when deploying Mobile Security Administrative Console.
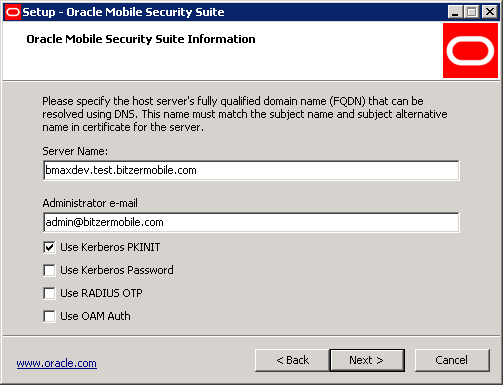
Enter the server name and administrator email address. By default, the installer fetches this information from the machine where it is running. If the machine is not part of an Active Directory domain, the domain information will not appear in the server name and email ID information. The server name must match the certificate subject name or subject alternative name present in the Mobile Security Access Server certificate. The server name need not be the host name of the Mobile Security Access Server, but it must be resolvable in DNS by the mobile clients.
Select the authentication methods that the Mobile Security Access Server will support. Select OAM Auth if you are using an Oracle Access Manager user name and password. Select Kerberos PKINIT if you are using PKI certificates, Kerberos Password if you are using a Windows user name and password, and RADIUS One Time Password for OTP tokens as optional primary authentication methods. Each authentication option will generate a Mobile Security Container configuration file that the devices can use during the registration process to be configured for the corresponding authentication method.
Click Next.
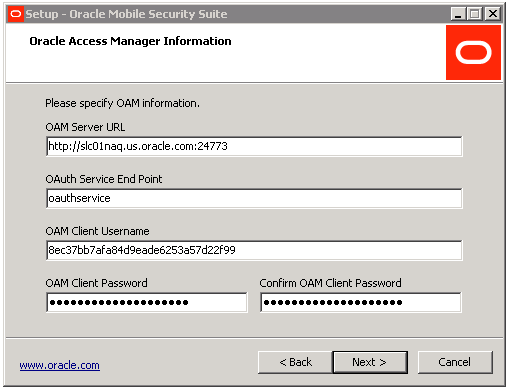
The following screen appears if the Mobile Security Access Server was selected with Oracle Access Manager authentication. Enter the Oracle Access Manager Server URL including scheme (http or https), OAuth Service End Point, and the Username and Password that was previously configured for the Mobile Security Access Server when it was registered as an OAuth Confidential Client with the Oracle Access Manager OAuth Service. Refer to Section A.1 for the associated Oracle Access Manager Configuration:
Click Next.
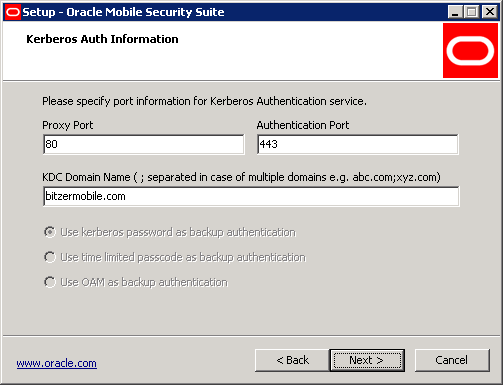
Enter the Proxy Port, Authentication Port, and KDC Domain Names for user authentication. By default, the proxy port is 80 and the authentication port is 443. If the machine is not part of a domain, it will not show Active Directory domain information in the KDC Domain Name field. You must enter valid Active Directory domain names (Kerberos realms). Multiple domains can be added by separating them with semicolons. After the installation is completed, more domains can be added later to the installation_directory/gateway/conf/krb5.conf file manually.
If you have chosen Kerberos PKINIT as your primary authentication method with user certificate provisioning, then you must choose Time Limited Passcode for backup authentication. You can choose either backup authentication method if you have chosen Kerberos PKINIT as your primary authentication method and are using an alternate user certificate provisioning mechanism.
When you click on Next, the installer validates the provided information. The installer tests whether the proxy port and authentication port are free, as well as whether the domain name is valid and the Mobile Security Access Server can resolve the domain name in DNS. Click on Next to start the validation. The installer will notify you if an issue is found. Refer to the Oracle Mobile Security Suite Troubleshooting Guide if you need help resolving an issue.
Click Next.
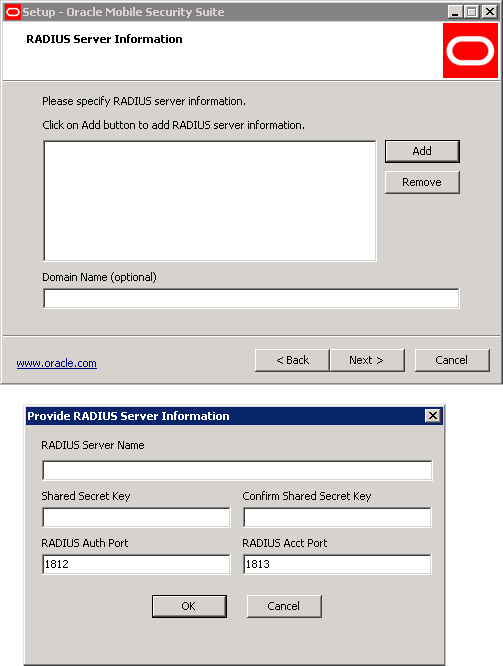
If RADIUS OTP authentication is selected, the following screen will be shown. Mobile Security Access Server supports the standard RADIUS protocol as an addition to Kerberos passwords for two-factor authentication. Enter the RADIUS Server Name, optionally specify a default domain depending on the configuration of the RADIUS server, and select the appropriate Shared Secret Key for the RADIUS server.
Click Next.
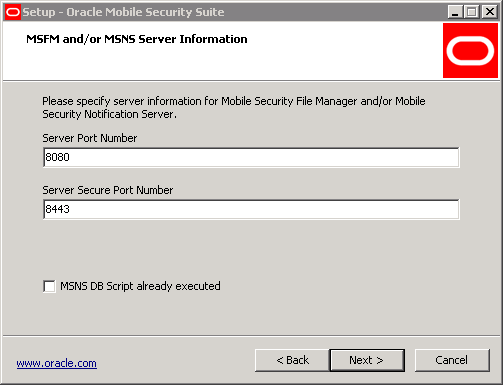
If File Manager or Notification Server is chosen then the following screen will be shown. Only the Ports are required to be configured at installation time for Mobile Security File Manager.
If Mobile Security Notification Server is chosen then the additional information shown below must be configured. If the database scripts were run prior to setup, select MSNS DB Script already executed.
Refer to the Mobile Security Administrative Console administration guide for configuration. The choice of database does not appear if installed on the same machine as Administrative Console, and the Administrative Console database selection is used instead.
Click Next.
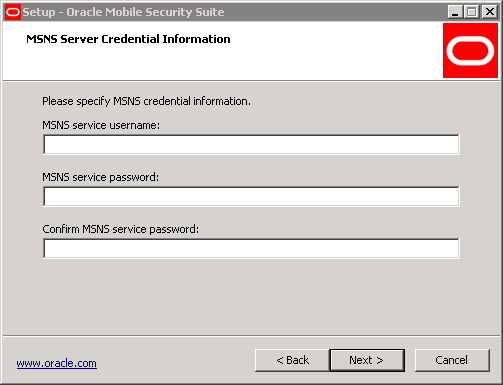
If Mobile Security Notification Server is chosen, then the following screen will be shown. Enter a service account that has the rights to run as a service.
Click Next.
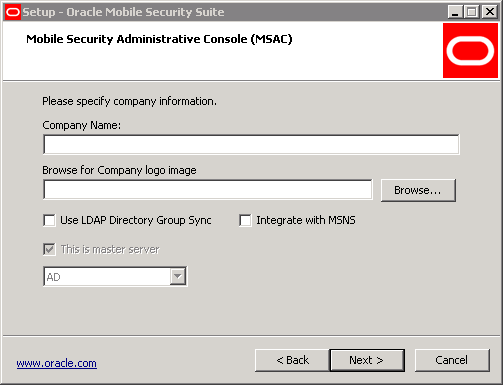
If the Mobile Security Administrative Console component was selected, then the following screen will be shown.
Enter the Company Name and browse for a Company Logo image. By default, the screen will show Oracle as the company name. If you do not select a company logo image, then Mobile Security Administrative Console will show the Oracle logo in the Mobile Security Administrative Console.
Enter the Product Key that was provided by Oracle, based on your license agreement. In order to receive a Product Key, you must provide Oracle with the exact Company Name that you will use to install the Mobile Security Administrative Console. This Company Name must be entered exactly as it was communicated, including case and white space, for it to match the Product Key.
Select Use LDAP Directory Group Sync to map Mobile Security Administrative Console groups to Oracle Unified Directory or Microsoft Active Directory groups. Users or nested groups are supported. When this option is selected, only users with membership in a selected LDAP control group will be allowed to register their mobile device for use with the Mobile Security Suite solution. The frequency with which groups are synchronized can be modified after the installation using Microsoft Tasks Scheduler administration tool. If this option is selected then the Mobile Security Administrative Console LDAP Group Sync screen will be shown.
Select DB Scripts Already Executed if your database administrator has manually run the database creation or upgrade scripts prior to the installation. The installer will only run scripts that populate the database with information from the options chosen during installation.
Select Integrate with MSNS if the Mobile Security Notification Server is being installed on a separate system.
Select This is master server if this is the first Mobile Security Administrative Console server in a replicated configuration of multiple instances of the Administrative Console database.
Click Next.
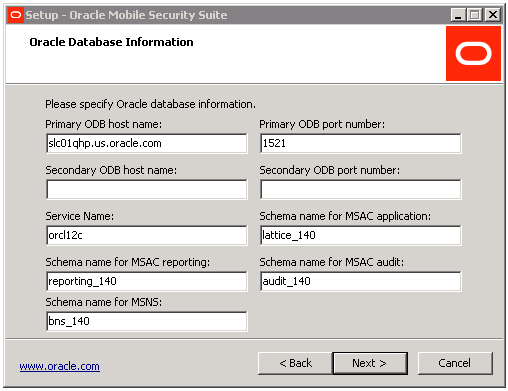
the following screen appears if the Mobile Security Administrative Console component was selected with the Oracle Database. Enter the primary, and optionally secondary, Oracle Database host name(s) and port number(s), as well as the chosen service name. The Oracle Database host should be remote from the Mobile Security Administrative Console component and have been previously installed at an accessible location. The selected Oracle Database service name must exist prior to Mobile Security Administrative Console installation.
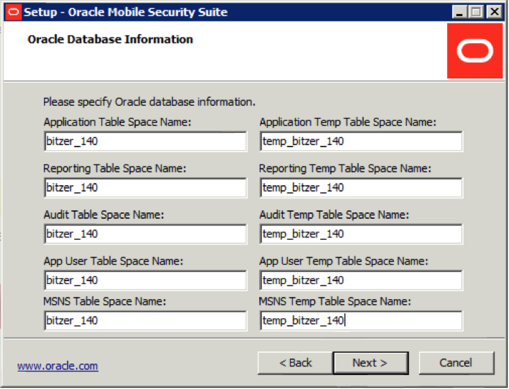
There is no need to change the database schemas or table space names unless there is a specific business requirement or database naming standard. If the database scripts are modified and run prior to installation, then the corresponding fields should be changed in this dialog. A dialog message will appear if the names do not match what is entered in this dialog box or new schemas are created for the first time. Choose the type of DBA credentials to be used to create the databases.
Click Next.
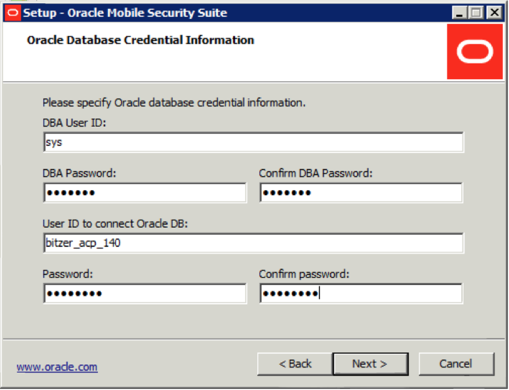
This screen appears if the Mobile Security Administrative Console component was selected with the Oracle Database.
The DBA credentials are never stored on the file system and are only used to run database scripts and assign ownership to the service account specified in this screen. The Mobile Security Administrative Console uses the service account credentials to connect to the Oracle Database. The DBA and service accounts must be defined prior to running the Oracle Mobile Security Suite installer.
Click Next.
Note:
Microsoft SQL Server support has been deprecated and might not be supported in future releases. It is not recommended for new installs
If the Mobile Security Administrative Console component was selected with Microsoft SQL Server, then the following screen will be shown. Enter the SQL Server DB host name and port number. The SQL Server host can be either local or remote from the Mobile Security Administrative Console component as long as Microsoft SQL Server has been previously installed at an accessible location. However, it is best practice to have the database on a separate database server behind a firewall. The SQL Server instance will use the default instance if left blank; otherwise the specified SQL instance must exist prior to Mobile Security Administrative Console installation.
There is no need to change the database schema or database names unless there is a specific business requirement or database naming standard. If the database scripts are modified and run prior to installation, then the corresponding fields should be changed in this dialog. A dialog message will appear if the database name does match what is entered in this dialog box, or a new database is created for the first time. Choose the type of DBA credentials to be used to create the databases.
Click Next.
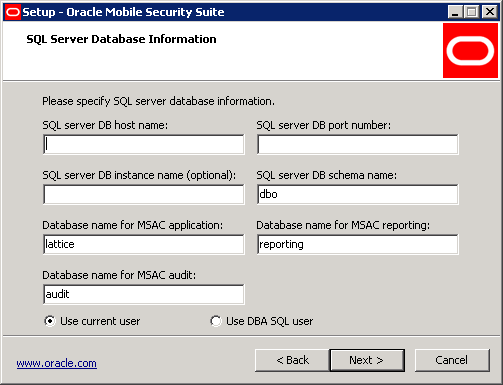
If Mobile Security Notification Server is chosen then the Database Information screen will have an additional field to specify a name for the Mobile Security Notification Server database.
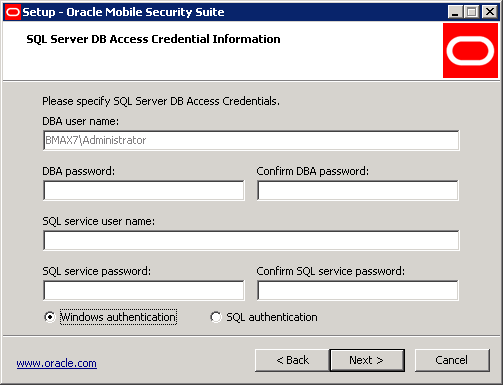
If the Mobile Security Administrative Console component was selected with Microsoft SQL Server, then the following screen will be shown.
In this example, on the prior screen the current user was selected for DBA credentials in order to leverage the privileges of the currently logged on Windows account. The password fields are disabled for the DBA credentials. If on the previous dialog DBA SQL user had been chosen then the fields would have been enabled for input of the DBA credentials. The DBA password is never stored on the file system and is only used to run database scripts and assign dbowner to the SQL account specified in this screen.
The SQL account can be either a Windows account or a native SQL account. The syntax used for this field is domain\user for Windows authentication, and user for native SQL account. This is the same behavior and syntax used in the Microsoft SQL Management Console. The installer supports a SQL account (Windows or SQL type) that is defined on the database server and not on a specific database instance. The SQL account must be defined prior to running the Oracle Mobile Security Suite installer.
Click Next.
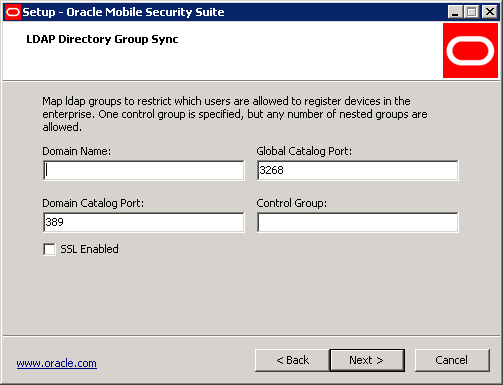
The following screen appears if the Mobile Security Administrative Console component was selected with Oracle Unified Directory Sync.
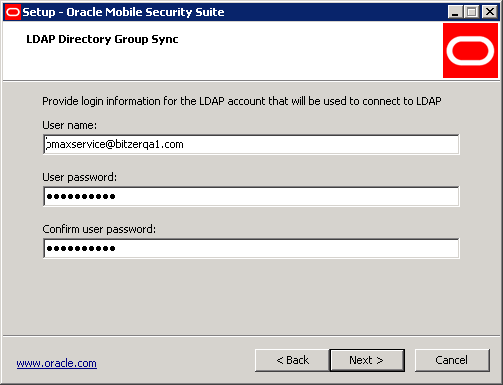
Enter the host name of the LDAP server, associated port, whether SSL is enabled, and the Base DN with the LDAP directory. The LDAP control group can be any type of LDAP group (static or dynamic). Please refer to Oracle Unified Directory documentation for more information. The control group can contain users or groups, and static groups can contain nested groups. As long as a user's group membership resolves with at least one group underneath the control group, they will be allowed to register their device with the Mobile Security Access Server solution.
This option requires an LDAP account with read access for Oracle Unified Directory users and groups. The account password is encrypted on the file system.
Click Next.
If the Mobile Security Administrative Console component was selected with Active Directory Sync, the following screen will be shown.
This option will automatically be selected when Mobile Security Administrative Console is installed on IIS or when User Certificate Provisioning is chosen.
Enter the domain where the control group is located. The AD control group can be any type of Windows group (Global, Local, or Universal). Please refer to Microsoft documentation on Windows groups for more information. The control group can contain users or groups, and groups can be nested. As long as a user's group membership resolves with at least one group underneath the control group, they will be allowed to register their device with the Mobile Security Access Server solution.
This option requires Windows credentials for an account with read access for Active Directory groups. Either service account User Principal Name (UPN) or the fully qualified DN (FQDN) of the user account is required. The user password is encrypted on the file system if this option is chosen.
Click Next.


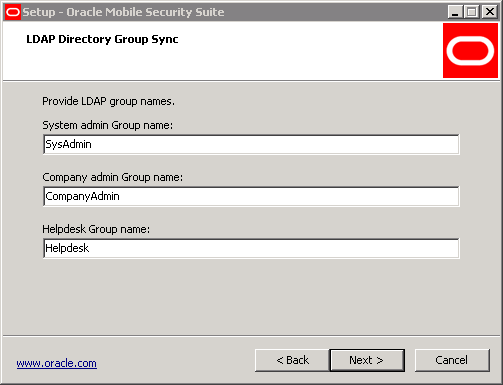
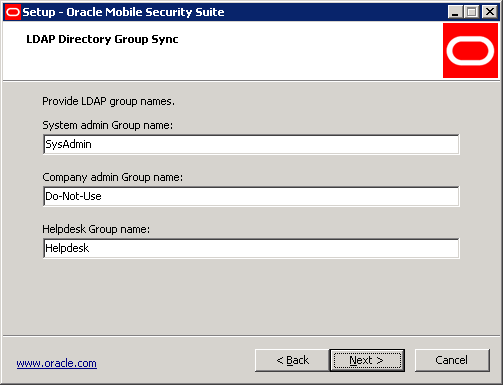
If the Mobile Security Administrative Console component was selected and the LDAP Sync option was chosen then the following screen will be shown.
Enter the LDAP group name that you wish to associate with the system administrator, company administrator, and help-desk roles within Mobile Security Administrative Console. If you wish to use only two roles, enter a group that does not exist, for example Do-Not-Use as shown in the second screen.
Click Next.
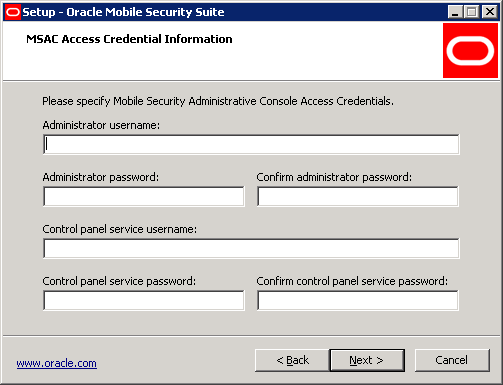
Enter the desired credential information for the initial administrator user that will manage Mobile Security Administrative Console. Also enter the credentials that the Mobile Security Access Server will use to access the Administrative Console Service.
Click Next.
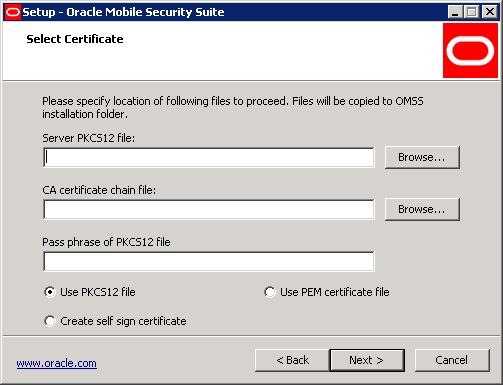
There are three options for providing certificates to the Mobile Security Access Server installer:
Create separate files with the server certificate, the server private key, and the CA certificate chain for the client certificates. All three should be in PEM format.
Use one file that contains both the server certificate and the server private key in PKCS12 format and another can contain the CA certificate chain for the client certificates in PEM format.
Use the Windows certificate store which is part of the Windows operating system using the Cryptographic Application Programming Interface (CAPI). The certificate should already be installed prior to the installation. In addition, the CA certificate chain for the client certificates in PEM format is required.
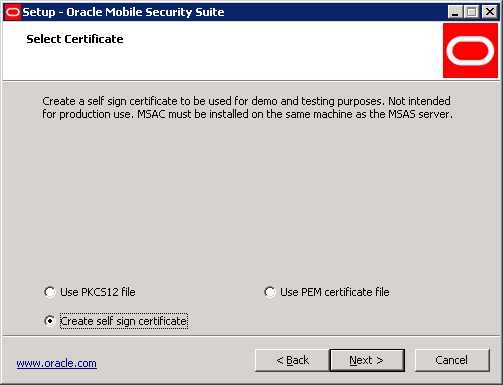
Generate a self-signed certificate for the Mobile Security Access Server. If using a self-signed certificate it must be explicitly trusted on the mobile device after it is generated in order for the Mobile Security Container to trust the Mobile Security Access Server.
The CA certificate chain file should contain the full chain for all certificate authorities that the Mobile Security Access Server needs to trust. This should include:
The CA certificate chain for the Active Directory domain controllers.
The CA certificate chain for the user certificate if using PKINIT.
The CA certificate chain for the Mobile Security Access Server certificate itself.
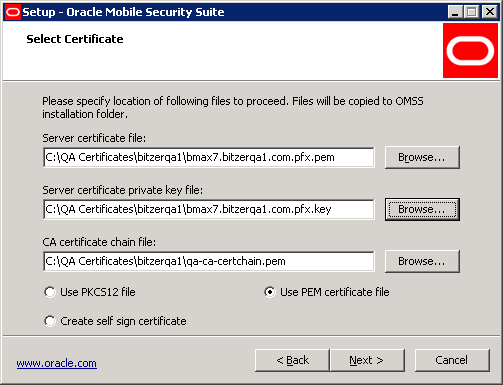
Select a server PKCS12 file ending with .pfx or .p12 and provide the pass phrase that was used to export the certificates/keys. Select the file in PEM format that contains the CA certificate chain for the client certificates.
Click Next.
Select the files for the server certificate, server private key, and CA certificate chain for the client certificates by clicking Browse next to the text field.
Note:
This Option Is Not Available if Mobile Security Notification Server is selected.
Click Next.
Enter the common name (subject name) of the server certificate, and then the CA certificate chain for the client certificates by clicking on the Browse button. Choose either service account or Local System account from the Select account type list. The account must have rights to access the certificate in the corresponding Microsoft cryptographic store and use the private key.
It is recommended to use a service account. The advantages of using a service account personal store over the Local System account store are:
Only the service account has access to the private key.
Accessing the private key in the Local System store requires local administrator privileges.
Refer to Section A.10, "Configuring Certificates for Service Accounts" for more information.
Note:
This Option Is Not Available if Mobile Security Notification Server is selected.
Click Next.
When Oracle Access Manager or KINIT is the primary authentication method, it is possible to use a self-signed certificate. This should be used only for proof of concepts and in labs, not in production. This certificate will need to be installed on the device to trust the Mobile Security Access Server.
Click Next.
This screen summarizes all of the information provided so far. Review the information and select Back to make any changes. If everything is correct, click Install to perform the installation.


Click Finish to complete the installation. If the you select Yes, restart the computer now, the machine will restart. If you select No, I will restart the computer later, the installation ends.