1 Installing Oracle RTD Decision Management
Terminology:
The term reference implementation is used in this chapter to refer to the specific Oracle RTD Decision Management application Oracle RTD for Marketing Optimization (also referred to as the RTD for Marketing Optimization application) released with Oracle RTD Base Application.This chapter contains the following topics:
1.1 Installation Overview
The steps that lead to the deployment of a Oracle RTD Decision Management application are as follows:
-
Using Oracle JDeveloper, a developer configures the Oracle RTD Decision Manager application and then creates an Oracle RTD Decision Manager application EAR file, preparing for the file to be deployed. For more information, see Section 2.2, "Configuring Oracle RTD Decision Management".
-
The developer or domain administrator deploys the EAR file to the RTD Decision Manager environment that was setup following either Section 1.2, "Installing Oracle RTD Decision Management" or Section 1.3, "Installing RTD Decision Manager with OBIEE Integration".
1.2 Installing Oracle RTD Decision Management
This section contains the following topics:
1.2.1 Preparing for Installation
Oracle RTD Server must be installed prior to installing Oracle RTD Decision Manager. For information on how to install Oracle RTD Server, see the Oracle Fusion Middleware Administrator's Guide for Oracle Real-Time Decisions. To prepare to install Oracle RTD Decision Management, use the following steps:
-
Install Oracle Database.
-
Install Oracle WebLogic Server 11gR1. Oracle RTD Decision Manager will be installed in a different middleware home and domain than Oracle RTD Server.
Oracle Coherence and Oracle Enterprise Pack for Eclipse do not need to be installed and can be deselected during install.
-
Install Application Development Runtime.
-
Create a WebLogic domain with a Managed Server, as explained in Section 1.2.2, "Creating a WebLogic Domain."
-
Modify
nodemanager.propertiesin<middleware_home>/wlserver_10.3/common/nodemanagerand setStartScriptEnabledandStopScriptEnabledto true (you have to start Node Manager once for this file to exist).
1.2.2 Creating a WebLogic Domain
For conceptual information about WebLogic domains, see Understanding Oracle WebLogic Server Domains in Oracle Fusion Middleware Understanding Domain Configuration for Oracle WebLogic Server.
For general information about creating WebLogic domains, see Oracle Fusion Middleware Creating Domains Using the Configuration Wizard and in particular, the following sections:
For a basic WebLogic system, the domain to be created consists of:
-
One Administration Server
-
One machine
-
One cluster (with one Managed Server)
There are several ways to create a WebLogic domain. The following description assumes that you use the graphical mode available through the Configuration Wizard.
You can launch the Configuration Wizard either as described in Starting the Configuration Wizard or by using QuickStart (select Getting Started with WebLogic Server 10.3.6).
Then follow the instructions as described in Creating a WebLogic Domain in Graphical Mode.
The following table describes the Configuration Wizard Screens and the options you will use to create a simple, single-cluster WebLogic domain.
| Step | Screen | Notes |
|---|---|---|
| 1 | Welcome | Create a new Weblogic Domain. |
| 2 | Select Domain Source | Select Generate a domain configured automatically to support the following products and select the following options.
|
| 3 | Specify Domain Name and Location | Domain name (suggestion): DM_Domain
Domain location: (Goes under |
| 4 | Configure Administrator User Name and Password | Used for all WebLogic administrator processes. |
| 5 | Configure Server Start Mode and JDK | Generally Production Mode. For JDK, select either the bundled JDK or the local JDK as previously set up. |
| 6 | Select Optional Configuration | Select:
|
| 7 | Configure the Administration Server | Optionally change the values as required for your environment.
Example: Administration Server (AS1) listens on 7001. |
| 8 | Configure Managed Servers | Example: Managed Server (MS1) listens on 7003. |
| 9 | Configure Clusters | Configure Clusters ("C1") for general information about creating cluster. |
| 10 | Assign Servers to Clusters | Assign MS1 to C1. |
| 11 | Configure Machines | Example: Machine Name MC1. |
| 12 | Assign Servers to Machines | Assign MS1 to MC1. |
| 13 | Target Deployments to Clusters or Servers window | Select:
|
| 14 | Target Services to Clusters or Servers | Specify that all the services should be targeted to the cluster. |
| 15 | Configuration Summary and create domain | Review the domain configuration details and create domain. |
Your own installation might have a different configuration based on your topology. For example:
-
You can have the Administration Server on a different machine.
-
You can have multiple Managed Servers.
-
You can use a cluster
-
You can enable SSL (see Section 1.4.2, "Using SSL with Oracle RTD Decision Manager Applications")
1.2.2.1 Scaling Up
Scaling up is the process of adding more managed servers to your system, on the same machine where you set up your basic system. You can do this by adding extra managed servers to the cluster set up in the basic system.
This section describes the process of adding extra managed servers to a cluster.
To create an extra managed server, first clone an existing server, specifying the new Server Listen Address and Server Listen Port.
-
Login to Weblogic Admin console.
-
Select Domain then Environment then Servers. The Summary of Servers page appears.
-
Select existing managed server form the servers table and click on clone button. Clone a Server page would be displayed.
-
Specify the new server name, Server Listen Address and Server Listen Port; click OK.
-
Start the new managed server.
When all the new managed server startups have completed successfully, you can log into em and verify Domain (domain name) then Cluster (cluster name) then Managed servers.
1.2.2.2 Scaling Out
To scale out to another (target) machine, perform the following steps:
-
Install WebLogic on the second (target) machine.
-
In
nodemanager.properties, provide the full hostname forListenAddress. -
Start Node Manager on the target machine.
-
On the source machine:
-
Create a Domain Template
-
Navigate to
weblogic-install-dir:cd weblogic-install-dir
-
Run:
weblogic-install-dir/wlserver_10.3/common/bin/pack.sh -domain=weblogic-install-dir/user_projects/domains/<dm_domain> -managed=true -template=<dm_domain>_template.jar -template_name=<dm_domain>
This command creates
<dm_domain>_template.jarinweblogic-install-dir/user_projects/domains/. -
Copy that JAR file to the target server in
weblogic-install-dir/.
-
-
On the target machine:
-
Navigate to
weblogic-install-dir/user_projects/domains and unpack the domain by running this command:weblogic-install-dir/wlserver_10.3/common/bin/unpack.sh -domain=weblogic-install-dir/user_projects/domains/<dm_domain> -template=<dm_domain>_template.ja -
Start the WebLogic Scripting Tool (
wlst.shorwlst.cmd). -
Connect to the first (source) machine.
connect('weblogic','weblogic','t3://admin-server-host:7001')For example:
wls:/offline> connect('weblogic','weblogic','t3://myHostName.myCompany.com:7001') -
Enroll the second (target) machine in the existing domain (use
nmEnroll), as shown here:nmEnroll('weblogic-install-dir/user_projects/domains/DM_domain', 'weblogic-install-dir/wlserver_10.3/common/nodemanager')For example:
wls:/oraclertd_domain/serverConfig> nmEnroll('C:/bea/user_projects/domains/DM_domain', 'C:/bea/wlserver_10.3/common/nodemanager') -
Disconnect from the first machine. by running
disconnect(). -
Quit the WebLogic Scripting Tool by running
exit().
-
-
On the source machine:
-
Clone the existing machine, specifying a new name and new host name or IP address values
-
Clone the existing server and specify that the new server is on the cloned machine.
-
-
Start the cloned server.
1.2.3 Installing Oracle RTD Decision Management
After you have created the WebLogic domain and configured Oracle RTD to run on the managed server you are ready to install Oracle RTD Decision Management.
This section contains the following topics:
-
Section 1.2.3.1, "Preparing Your Application for Deployment"
-
Section 1.2.3.2, "Oracle RTD Decision Management Database Creation"
-
Section 1.2.3.3, "Oracle RTD Decision Management Data Source Setup"
-
Section 1.2.3.4, "Storing Credentials to Enable Web Service Calls"
-
Section 1.2.3.5, "Oracle RTD Decision Management Application Deployment"
1.2.3.1 Preparing Your Application for Deployment
RTD_Designer.zip contains the Base Marketing reference application. If you skip this section, you will install that application.
For instructions on creating your own application and configuring Oracle RTD Decision Manager for your needs, see Chapter 2, "Configuring Oracle RTD Decision Management"
After you have finished configuring Oracle RTD Decision Manager for your needs, you will have generated the proper database schema files and the EAR file that will be deployed to the application server.
1.2.3.2 Oracle RTD Decision Management Database Creation
Note:
For running the SQL commands and SQL scripts specified in this section, use SQL*Plus or an equivalent tool that can run on your database.To create an Oracle RTD Decision Management database, perform the following steps:
-
Create a database user for the Oracle RTD Decision Management schema.
CREATE USER<username>IDENTIFIED BY<password>DEFAULT TABLESPACE users TEMPORARY TABLESPACE temp QUOTA UNLIMITED ON users;GRANT CREATE VIEW, CONNECT, RESOURCE TO<username>;Note:
Make sure your database uses the AL32UTF8 character set. -
Create the schema, by performing the following steps:
-
Go to the subfolder
clm\Database\sql, then run the fileload core.sql.
Note:
The fileload core.sqlcontains generic commands, required for all Oracle RTD Decision Manager applications. The commands inload ils.sql, are specific to the application. By default they will contain the commands for the RTD for Marketing Optimization application; however, they would be different if you configured another application.-
Go to the subfolder
clm\Database\sql\ilsand run the fileload ils.sql.Make sure you have committed your changes.
-
1.2.3.3 Oracle RTD Decision Management Data Source Setup
To set up an Oracle RTD Decision Management data source, perform the following steps:
-
Start the Administration Server.
-
Enter the administrator username and password, which was specified during domain creation (see Section 1.2.2, "Creating a WebLogic Domain").
-
Open the Admin Server Console.
-
Log in with the administrator username and password.
-
Click Lock & Edit to make change.
-
Navigate the path Services then Data Sources then New then Generic Data Source, then enter:
-
Name: DM_DS or a similar value
-
JNDI Name: Enter the proper JNDI name.
The JNDI name must be the JNDI name you specify in config.xml and in your Inline Service application parameter, CLMDS by default.
-
Database Type: Oracle
Click Next.
-
-
For the database driver, use either Oracle's Driver (Thin) for Instance connections; Versions: 9.0.1 and later or Oracle's Driver (Thin) for Service connections; Versions: 9.0.1 and later. Note that, however, for 12c databases you can only use the latter. Click Next.
-
In the Transaction Options window, deselect Supports Global Transactions, then click Next.
-
For the Connection Properties:
-
Specify the database settings that match your configuration, for example:
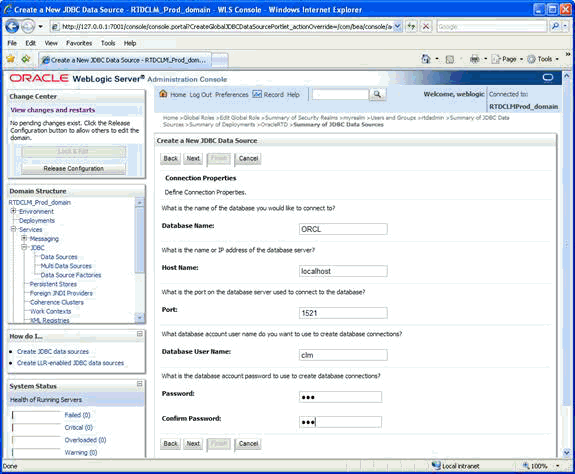
Description of the illustration data_prod_src.gif
Ensure that the Database User name and Password match the values that you set up in step 1 of Section 1.2.3.2, "Oracle RTD Decision Management Database Creation."
-
Click Next.
-
-
Leave all the settings already filled, except enter CHOICE for the Test Table Name, and click Test Configuration. Then click Next.
-
Select the Managed Server that you created in Section 1.2.2, "Creating a WebLogic Domain" as the target, then click Finish.
-
Open the data source and select the Connection Pool tab.
-
Go to Advanced Section and deselect Wrap Data Types and save.
-
Select Activate Changes and then restart servers, if necessary.
1.2.3.4 Storing Credentials to Enable Web Service Calls
Oracle RTD Decision Manager makes web service calls from the Decision Manager server side to Oracle RTD.
On the Oracle RTD side (named RTD_Domain below), we define a user and make him part of an Oracle RTD group, granting him access to Oracle RTD.
On the Decision Manager side (named DM_Domain below), we store the username and password for that user in the WebLogic credential store. It will be used to make calls to Oracle RTD.
Create the User in the RTD_Domain
To create the user in the RTD_Domain, do the following
-
Open the Admin Server Console in the RTD_Domain.
-
Log in with the administrator username and password.
-
Select Security Realms and select the security realm you are using (myrealm by default).
-
Select the Users and Groups tab, and create a new user by clicking New.
-
Specify a username and password.
-
Click OK.
-
Select the user that you just created and then select the Groups tab.
-
Select the RTDDCUserGroup group and shuttle it to the right.
-
Click Save.
Store User Credentials In the DM_Domain Weblogic Credential Store
To store the user credentials in the WebLogic credential store in the DM_Domain, do the following:
-
Open the Enterprise Manager.
-
Log in with the administrator username and password.
-
In the Target Navigation Pane, select WebLogic Domain then DM_Domain.
-
In the DM_Domain window, open the DM_Domain dropdown menu and select Security then Credentials.
-
In the Credentials area, click Create Map.
-
In the Create Map window, enter
oracle.rtd.clmand click OK. -
Click Create Key then, in the Create Key window:
-
Enter the Key
clm.clientfor the map that you just created. -
Enter the same user name and password you created in the RTD_Domain.
-
Click OK
-
This completes the set up of the credentials for accessing Oracle RTD from Oracle RTD Decision Management.
1.2.3.5 Oracle RTD Decision Management Application Deployment
The final step is to deploy the Oracle RTD Decision Manager application. This is done by deploying the clm.ear file in the clm/deploy folder.
Note:
Enterprise Manager must be used to deploy the Oracle RTD Decision Management application, Weblogic Admin console cannot be used.-
Start Node Manager.
-
Open the Enterprise Manager on the Administration Server.
-
Log in with the administrator username and password.
-
In the Target Navigation Pane, select WebLogic Domain then DM_Domain.
-
In the DM_Domain window, from the WebLogic Domain dropdown menu, select Control then Start Up.
-
In the DM_Domain window, from the WebLogic Domain dropdown menu, select Application Deployment then Deploy....
-
In the Select Archive window, select the EAR file that was originally generated in the development environment.
-
In the Select Target window, select the managed server only.
-
In the Application Attributes window, do not alter any values.
-
In the Deployment Settings window, click Configure Application Security.
-
In the Configure Application Security window, for your first deployment, select Append for the Application Policy Migration and click Apply.
Note:
Use the Append options for first-time deployment only. For subsequent deployments:-
For Application Policy Migration, select Overwrite.
-
-
Back in the Deployment Settings window, click Deploy.
The Oracle RTD Decision Management application is now deployed and accessible at the URL:
http://<server>:<port>/dm.
1.2.3.6 Inline Service Deployment
The application that you deployed requires a specific Inline Service to be running in the Oracle RTD instance on the same server as Oracle RTD Decision Management.
Using Decision Studio, deploy that Inline Service to the Oracle RTD instance running on the same server as Oracle RTD Decision Management.
1.3 Installing RTD Decision Manager with OBIEE Integration
This chapter contains the following topics.
1.3.1 Prerequisites
Before you can install Decision Manager with OBIEE, you must met the following prerequisites:
-
Install Oracle Database.
-
Install Oracle JDeveloper 11g.
-
Install and configure Oracle RTD. For instructions on how to install Oracle RTD Server, see the Oracle® Real-Time Decisions Installation and Administration Guide.
-
Install and configure Oracle BIEE 11g. Decision Manager will be deployed in the OBIEE domain and can be integrated with an OBIEE single instance or clustered environment. Configuration in Decision Manager for OBIEE integration is common for OBIEE single instance/OBIEE cluster.
1.3.2 Configuring OBIEE for Decision Manager
The OBIEE integration setup for Decision Manager consists of RPD and Web Catalog.
RPD that contains physical/model/presentation layer for the report schema. This RPD also contains marketing specific measures such as acceptance rate and conversion rate. The RPD contains 2 entries in the physical layer, one containing the model snapshot physical schema and one containing the decision analytics report schema. Two variables are used to define the connection to the report schema: RTD_REPORT_DSN and RTD_REPORT_USERNAME. The password for the RPD is Admin123.
For instructions on configuring OBIEE for Decision Manager, see Section 18.3, "Installation" in Oracle Real-Time Decisions Platform Developer's Guide.
1.3.3 BI Analytics Security Configuration
Security configuration needs to be done in BI analytics to ensure that a logged-in user in Decision Manager can access BI analytics through impersonation which would secure an application that uses an Oracle BI EE Presentation Services connection and includes Oracle BI EE objects.
Create a user in the OBIEE domain that will be used for impersonation, as described in Section 1.9.1 "How to Create and Use Impersonate User" in the Oracle Fusion Middleware Developer's Guide for Oracle Business Intelligence Enterprise Edition.
1.3.4 BI Dashboard Metadata
The Decision Manager metadata has been enhanced to allow specifying integrating a BI dashboard within a tab. The syntax is:
<bi-dashboard path="<path>">
     <parameter name="<name>" value="<value>"/>
              …
</bi-dashboard>
Where <path> is the path to the dashboard in the web catalog; for example, path="/<shared/Decision Analytics - Base Marketing/Creatives/_portal/Creative Performance Dashboard".
Decision Manager supports multiple parameter name/value pairs.
| Name | Value (example) | Description |
|---|---|---|
Applications."App Name" |
#{biParameters.serviceName} |
The inline service name, app_name_id in the reporting schema |
Choices.CHOICE_ID |
#{biParameters.choiceId} (when looking at a creative choice) |
The creative id, choice_id in the reporting schema |
Choices.HIERARCHY_ID_1 |
#{biParameters.choiceId} (when looking at a campaign choice) |
The campaign id, hierarchy_id_1 in the reporting schema |
Choices.HIERARCHY_ID_2 |
#{biParameters.choiceId} (when looking at a offer choice) |
The offer id, hierarchy_id_2 in the reporting schema |
Choices.HIERARCHY_ID_3 |
#{biParameters.choiceId} (when looking at a channel choice) |
The channel id, hierarchy_id_3 in the reporting schema |
Choices.HIERARCHY_ID_4 |
#{biParameters.choiceId} (when looking at a placement choice) |
The placement id, hierarchy_id_4 in the reporting schema |
Choices.HIERARCHY_ID_5 |
#{biParameters.choiceId} (when looking at a slot choice) |
The slot id, hierarchy_id_5 in the reporting schema |
Choices.HIERARCHY_ID_6 |
#{biParameters.choiceId} (when looking at a slot type choice) |
The slot type id, hierarchy_id_6 in the reporting schema |
dashboard.variables["DMFrequency"] |
#{biParameters.timeInterval} |
The time interval of the report |
| Time."Calendar Date” | #{biParameters.localizedStartDateString},#{biParameters.localizedEndDateString}" |
The start and end dates of the report |
1.3.5 Decision Manager Configuration Metadata
The following metadata has been added to the metadata module's config/config.xml:
<bi-server url="http://<server>:<port>/analytics" wsdl-context="analytics-ws" />
To use SSL between Decision Manager and the OBIEE server, specify the URL as "https://<server>:<secure port>/analytics".
This metadata is optional. For more information, see Section 2.2.2.1, "Config XML File".
If you do not have a <bi-server> element, any page that contains a <bi-dashboard> element will be hidden.
1.3.6 Configure the BI Connection Credentials
Configure the BI connection credentials before deploying the Decision Manager application:
-
Open Enterprise Manager in the Decision Manager domain, select Credentials for the domain, as shown in the following illustration:
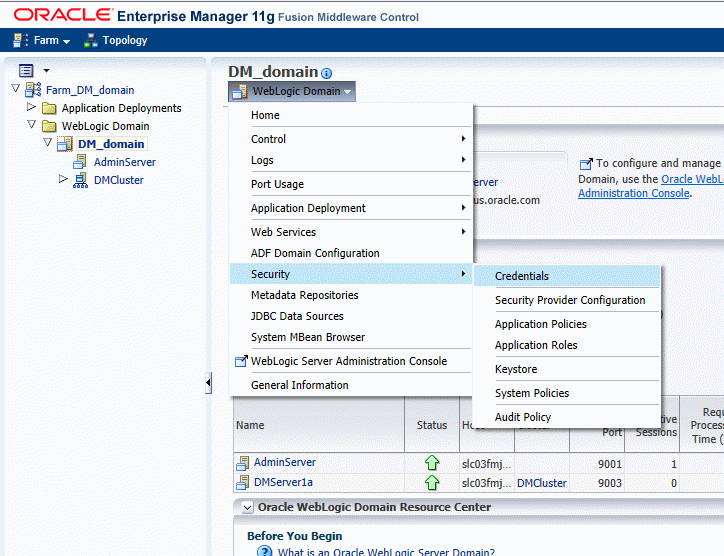
Description of the illustration slices03.gif
-
Create a map called
clm.oracle.rtd.clm. -
In that map, create a key called
anonymous#bi, specify its type to be Generic, and add two rows for the following two properties corresponding to the impersonated user created in Section 1.3.3, "BI Analytics Security Configuration":-
un: username -
pw: password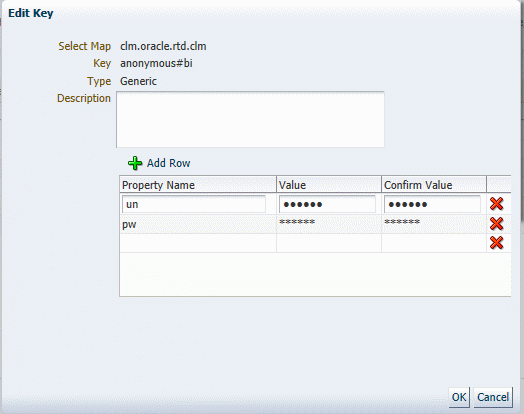
Description of the illustration slices04.gif
-
1.3.7 Deploy Decision Manager
This section explains how to develop, configure and deploy Decision Manager with a BI dashboard by using Enterprise Manager EM.
Before deploying Decision Manager, be aware that you will need to do the following the following:
-
Database setup
-
Data source creation
-
Storing credentials for a web service call
-
Inline Service deployment
For instructions, see the Section 1.2.3, "Installing Oracle RTD Decision Management".
After that, log in to the Enterprise Manager console and select Domain then Cluster/Server.
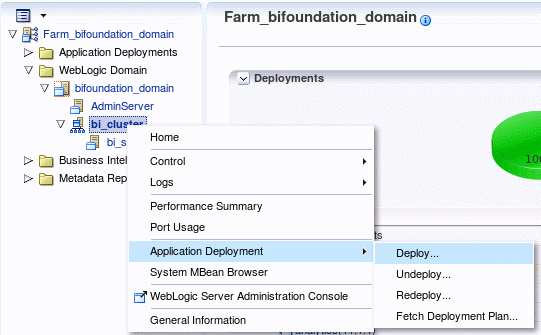
Description of the illustration slices05.gif
Now, deploy Decision Manager by doing the following:
-
Select the
clm.earlocation, as shown in the following example, and click Next.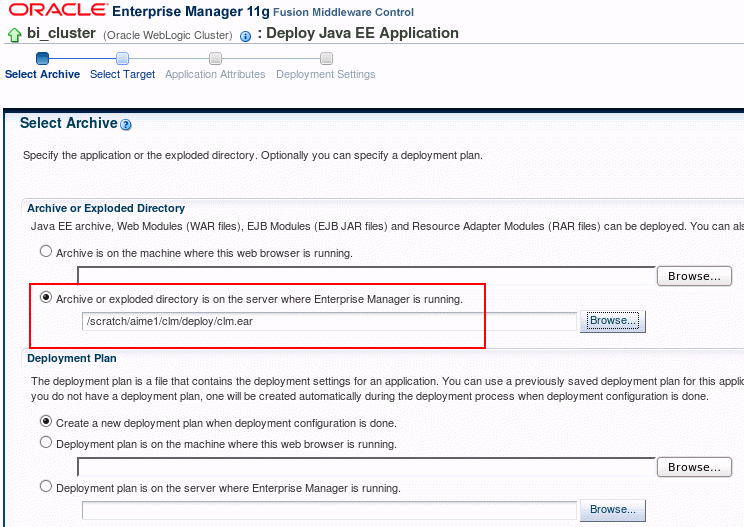
Description of the illustration slices06.gif
-
Select the cluster to which the EAR needs to be deployed and click Next.
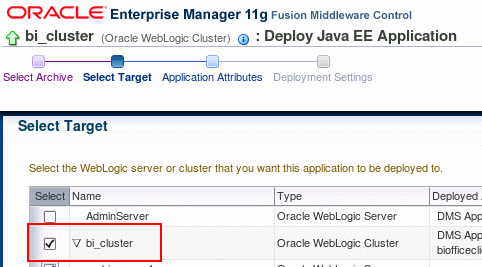
Description of the illustration slices07.gif
-
Use the default selection or make the necessary changes and click Next.
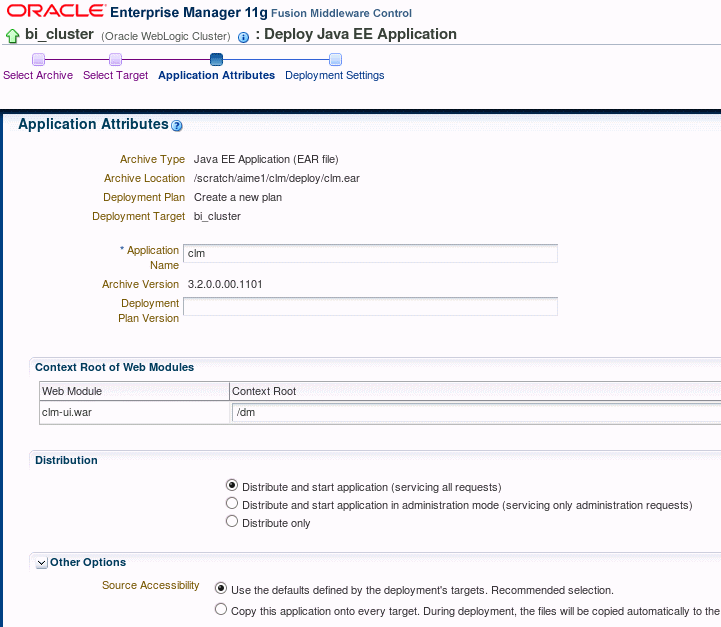
Description of the illustration slices08.gif
-
On the Deployment Settings screen, edit Configure Application Security by clicking
 in the Go To Task column.
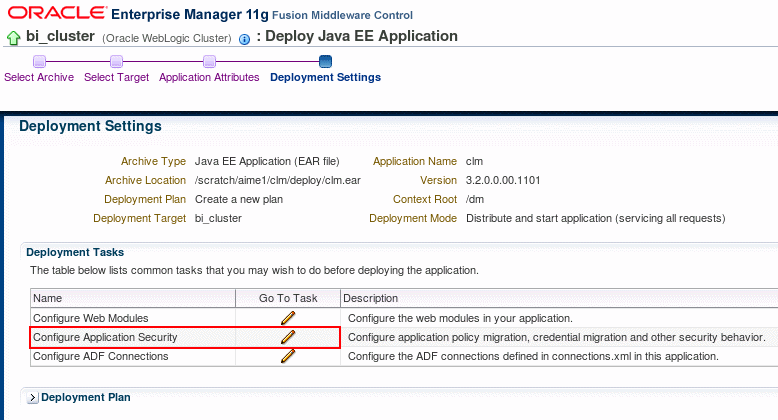
Description of the illustration slices09.gif
-
For Migration, in Application Policy, select Append (rather than Overwrite) and click Apply. Use the Append options for first-time deployment only; for subsequent deployments, select Overwrite.
-
Depending on the specific circumstances, do the following:
-
If
cwallet.ssois deployed throughclm.earthen following page would be displayed:
Description of the illustration slices10.gif
-
If credentials are not configured and
cwallet.ssois not deployed throughclm.earthen following page would appear; note that Application Credential Migration option does not occur. Select Append and click Apply.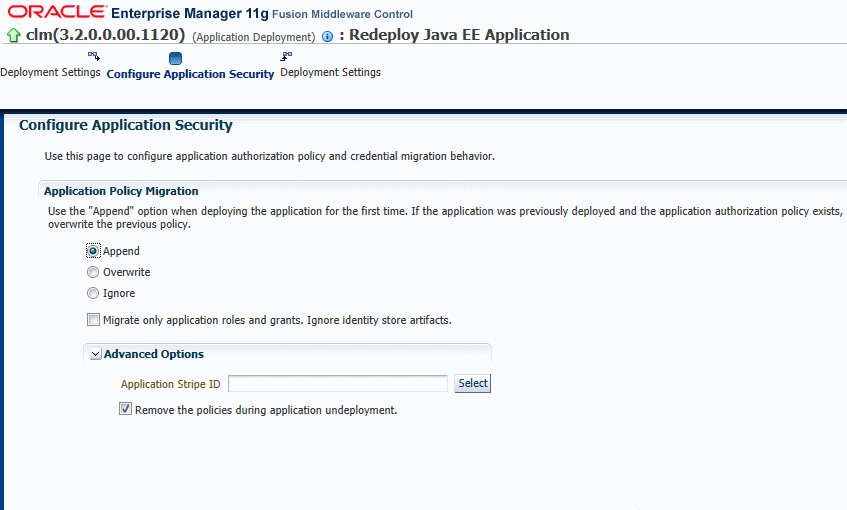
Description of the illustration slices11.gif
-
If the credentials option is not available in Configure Application Security, click Edit Deployment Plan.
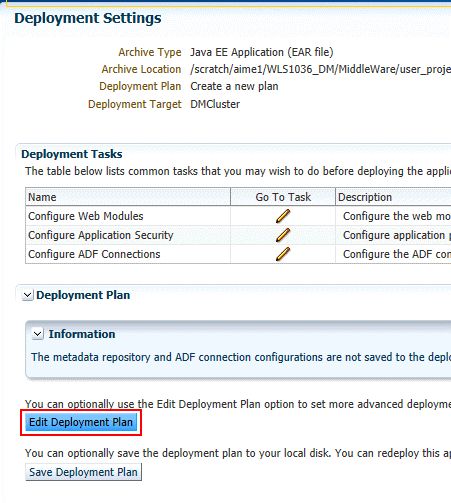
Description of the illustration slices12.gif
-
Set Credential Store migration parameter value to OFF as shown in the following illustration and click Apply.
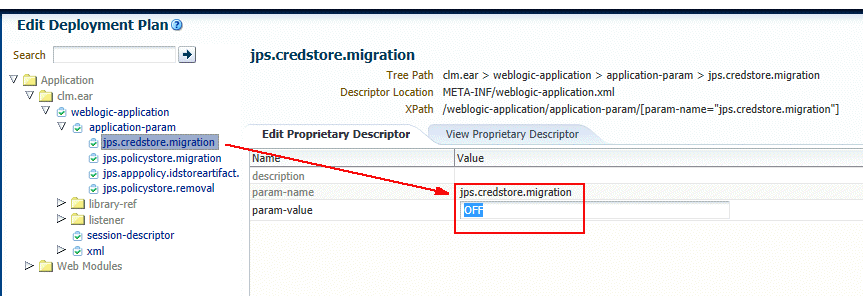
Description of the illustration slices13.gif
This saves the settings and the following screen appears:
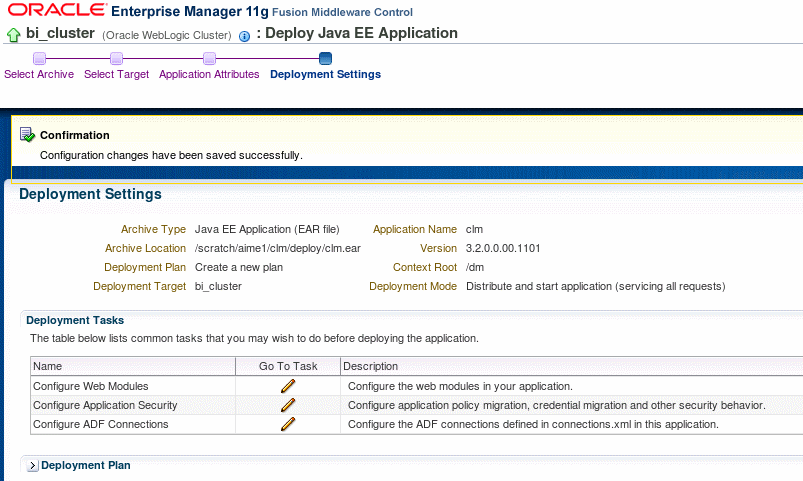
Description of the illustration slices14.gif
-
-
Click Deploy.
clm.eardeployment starts. If it succeeds, a screen similar to this example appears: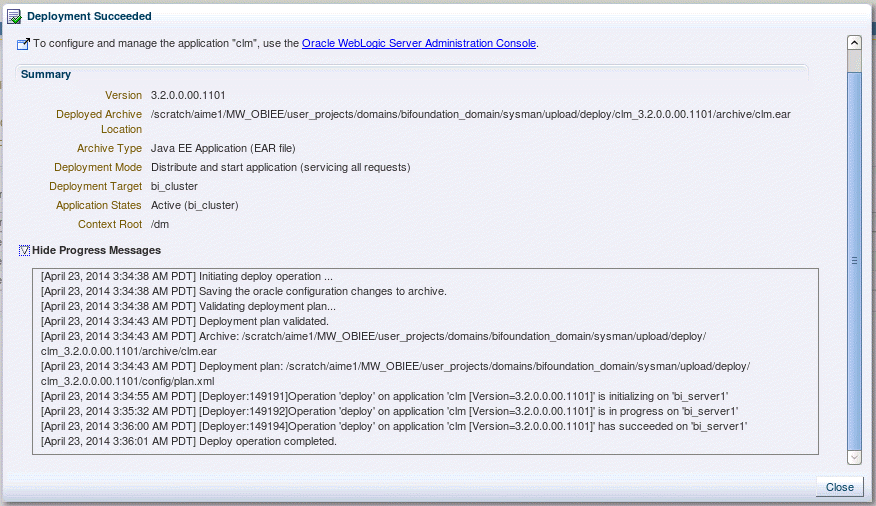
Description of the illustration slices15.gif
-
Using your Decision Manager log-in credentials, access the Decision Manager application.
Oracle RTD Decision Manager is now deployed and accessible at this URL:
http://<server>:<port>/dm.
1.4 Security Configuration
This section describes how to map your enterprise users and groups to Decision Manager application roles using Enterprise Manager. It also describes how to setup SSL to secure connections between the end user browser and the application server. Setting up SSL is recommended but not required.
This section contains the following topics:
-
Section 1.4.1, "Mapping Users or Groups to Application Roles"
-
Section 1.4.2, "Using SSL with Oracle RTD Decision Manager Applications"
1.4.1 Mapping Users or Groups to Application Roles
In a WebLogic production environment, you typically manage your enterprise users and groups outside of Oracle RTD Decision Management, and only map these users and groups to Decision Management application roles.
To map users or groups to Decision Management application roles, perform the following steps:
-
Open the Enterprise Manager on the Administration Server.
-
Log in with the administrator username and password.
-
In the Target Navigation pane, select your Decision Manager deployment: Application Deployments then Internal Applications then the name of your Decision Manager application.
-
In the application window, from the Application Deployment dropdown menu, select Security then Application Roles and click Search application roles.
-
Click CLMAdministrator, CLMAuthor, CLMConsumer or the customer roles you have created, depending on what permissions you want to give to this user.
-
Click Edit the selected application role.
-
Click Add roles.
-
Change Application role to User in the Type dropdown list.
-
Search for your user and click OK.
-
To add a group, click Add roles and change Application role to Group in the Type dropdown list.
-
Search for your group and click OK.
-
Click OK.
1.4.2 Using SSL with Oracle RTD Decision Manager Applications
Depending on your configuration, do the following:
1.4.2.1 Using SSL without BI Dashboards
To use SSL with your Oracle RTD Decision Manager applications, do the following:
-
Configure Oracle RTD Server to use SSL (see Section 2.5, "Using SSL with Oracle Real-Time Decisions” and Section 3.5, "Configuring SSL for Real-Time Decision Server" of the Oracle Fusion Middleware Administrator's Guide for Oracle Real-Time Decisions).
-
Configure SSL on the Decision Manager Weblogic domain, as described in Oracle Fusion Middleware Securing Oracle WebLogic Server.
-
Make sure the Decision Manager JVM trust store trusts the certificate authority that Oracle RTD Server uses.
Note:
Use a real certificate and not the one in the RTD demo trust store. Configure Decision Studio, Load Generator and other RTD clients to use the right trust store by specifying thejavax.net.ssl.trustStoreas a Java command-line argument. -
Use HTTPS instead of HTTP in the Inline Service configuration (either in the configuration file, see Section 2.2.2.1, "Config XML File", or in the Inline Service Configuration Dialog, see Section A.12.1, "Inline Service Configuration" in the Oracle Real-Time Decisions Base Application Decision Management Applications User's Guide).
1.4.2.2 Using SSL with BI Dashboards
To use SSL with your Oracle RTD Decision Manager applications, do the following:
-
Configure Oracle RTD Server to use SSL (see Section 2.5, "Using SSL with Oracle Real-Time Decisions” and Section 3.5, "Configuring SSL for Real-Time Decision Server" of Oracle Fusion Middleware Administrator's Guide for Oracle Real-Time Decisions).
-
Configure Oracle BIEE Server to use SSL (see Chapter 5, ”SSL Configuration in Oracle Business Intelligence” in Oracle Fusion Middleware Security Guide for Oracle Business Intelligence Enterprise Edition.
-
Configure SSL on the Decision Manager Weblogic domain, see the Oracle Fusion Middleware Securing Oracle WebLogic Server.
-
Make sure the Decision Manager JVM trust store trusts the certificate authority that Oracle RTD Server uses.
Note:
Use a real certificate and not the one in the RTD demo trust store. Configure Decision Studio, Load Generator and other RTD clients to use the right trust store by specifying thejavax.net.ssl.trustStoreas a Java command line argument. -
Make sure the Decision Manager JVM trust store trusts the certificate authority that Oracle BIEE Server uses.
Note:
In case the OBIEE server key is 512 bits only, the Decision Manager JVM may reject it for being too short. Either change the size of the OBIEE server key, or specify in the Decision Manager JVM that 512 bit keys are acceptable. -
See ”Default x.509 Certificates Have Longer Key Length” in the Java™ SE Development Kit 7, Update 40 (JDK 7u40) Release Notes.
-
Use HTTPS instead of HTTP in the Inline Service configuration (either in the configuration file, see Section 2.2.2.1, "Config XML File" or in the Inline Service Configuration dialog, see Section A.12.1, "Inline Service Configuration" in the Oracle® Real-Time Decisions Base Application Decision Management Applications User's Guide).
-
Use HTTPS instead of HTTP in the BI Server configuration (in
<bi-server>the configuration file, see Section 2.2.2.1, "Config XML File").