13 Configuring High Availability for Oracle Mobile Security Suite
This chapter describes how to configure high availability for Oracle Mobile Security Suite server components.
This chapter includes the following topics:
-
Section 13.1, "About Oracle Mobile Security Suite High Availability"
-
Section 13.2, "Oracle Mobile Security Suite High Availability Architecture"
-
Section 13.3, "Required Installations for Oracle Mobile Security Suite"
-
Section 13.4, "Configuring High Availability for Oracle Mobile Security Manager"
-
Section 13.5, "Configuring High Availability for Oracle Mobile Security Access Server"
See the following documents for information on Oracle Mobile Security Suite.
Table 13-1 Oracle Mobile Security Suite
| Product | Resource |
|---|---|
|
Oracle Mobile Security Suite |
Installing Oracle Mobile Security Access Server Oracle Fusion Middleware Installation Guide for Oracle Identity Management |
|
Mobile Security Manager |
Administering Oracle Mobile Security Suite |
|
Mobile Security Access Server |
Administering Mobile Security Access Server |
13.1 About Oracle Mobile Security Suite High Availability
There are two server components in the Oracle Mobile Security Suite that you configure for high availability.
-
Mobile Security Manager (OMSM) running in WLS
-
Mobile Security Access Server (MSAS) running as a standalone application
OMSS requires Oracle Access Manager (OAM) for user authentication and SSO support. OMSS also requires the Policy Manager Console. See Chapter 6, "Configuring High Availability for Oracle Access Management Access Manager Components." for more information.
For more information on OMSS, see "Understanding Oracle Mobile Security Suite" in Administering Oracle Mobile Security.
For more information on high availability, see Section 1.1, "What is High Availability".
13.2 Oracle Mobile Security Suite High Availability Architecture
The following figure shows Oracle Mobile Security Suite in a high availability architecture:
Figure 13-1 OMSS High Availability Architecture
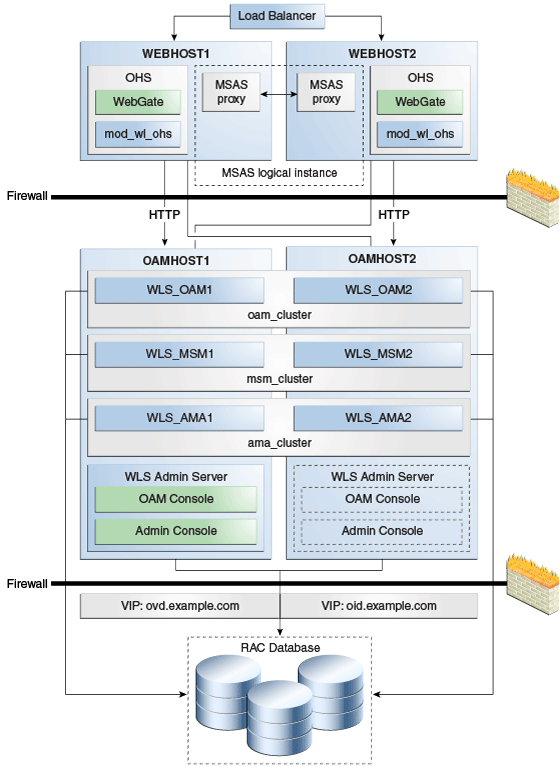
Description of "Figure 13-1 OMSS High Availability Architecture"
In this architecture, the Web Tier has one logical Mobile Security Access Server (MSAS) instance that includes multiple physical MSAS instances. The physical instances can run on different hosts, or on one host on different ports. Each physical instance has the same MSAS ID so that the instances can synchronize. MSAS synchronization occurs over HTTP(S).
Oracle Mobile Security Manager
In this configuration, the Mobile Security Manager (OMSM) Servers are part of the same domain and use the same RAC database.
This configuration has two Managed Servers that Mobile Security Manager (OMSM) is deployed to. Both Managed Servers are part of msm_cluster and they connect to same RAC database.
OAMHOST1 has the following installations
-
An OAM Managed Server instance, WLS_OAM1.
-
An Oracle Mobile Security Manager instance, WLS_MSM1.
-
An OAM Policy Manager instance, WLS_AMA1.
-
The Oracle RAC database is configured in a JDBC multi data source or GridLink data source to protect the instance from Oracle RAC node failure.
-
An Administration Server. Under normal operations, this is the active Administration Server.
OAMHOST2 has the following installations:
-
An OAM Managed Server instance, WLS_OAM2.
WLS_OAM1 and WLS_OAM2 Managed Servers are configured as a cluster.
-
An MSM Managed Server instance, WLS_MSM2.
WLS_MSM1 and WLS_MSM2 Managed Servers are configured as a cluster.
-
An OAM Policy Manager instance, WLS_AMA2.
WLS_AMA1 and WLS_AMA2 Managed Servers are configured as a cluster.
-
The Oracle RAC database is configured in a JDBC multi data source tor GridLink data source to protect the instance from Oracle RAC node failure.
-
A WebLogic Server Administration Server. Under normal operations, this is the passive Administration Server. You make this Administration Server active if the Administration Server on OAMHOST1 becomes unavailable.
13.3 Required Installations for Oracle Mobile Security Suite
You must install the following components on host systems before you configure OMSS:
-
Oracle WebLogic Server
-
Oracle Access Manager
-
Oracle Mobile Security Manager
-
Oracle Mobile Security Access Server
Note:
MW_HOME and ORACLE_HOME must be in identical locations on both OAMHOST1 and OAMHOST2.| Product Installation | See this resource |
|---|---|
| WebLogic Server | "Installing Oracle WebLogic Server and Creating a Middleware Home" in Installation Guide for Oracle Identity and Access Management |
| Oracle Access Manager | Installation Guide for Oracle Identity and Access Management |
| Oracle Mobile Security Manager | Installation Guide for Oracle Identity and Access Management |
| Oracle Mobile Security Access Server | Installing Mobile Security Access Server (MSAS) |
13.4 Configuring High Availability for Oracle Mobile Security Manager
This section includes the following procedures to configure Oracle Mobile Security Manager (OMSM) high availability.
-
Section 13.4.1, "Configuring Oracle Mobile Security Manager on OAMHOST1"
-
Section 13.4.3, "Starting Oracle Mobile Security Manager on OAMHOST1"
-
Section 13.4.5, "Starting Managed Servers and Node Manager on OAMHOST2"
13.4.1 Configuring Oracle Mobile Security Manager on OAMHOST1
In this procedure, you create the Oracle Mobile Security Manager (OMSM) Managed Servers, cluster, and machine.
To configure OMSM on OAMHOST1:
-
Install Oracle WebLogic Server and create a Middleware Home. See WebLogic Server and Middleware Home Requirements in Oracle Fusion Middleware Installation Guide for Oracle Identity and Access Management for more information.
-
Install the Oracle Mobile Security Manager software. See Installation Guide for Oracle Identity and Access Management for more information.
-
Start the Configuration Wizard by running this command:
ORACLE_HOME/oracle_common/common/bin/config.shNote:
You must run the config.sh script from your Oracle Identity and Access Management Home directory that contains Access Manager. -
On the Welcome screen, select Create a new WebLogic domain. Click Next.
-
On the Select Domain Source page, ensure that Generate a domain configured automatically to support the following products: is selected. Select Oracle Access Management and Mobile Security Suite - 11.1.2.3.0 and click Next.
Note:
Selecting Oracle Access Management and Mobile Security Suite - 11.1.2.3.0 option selects the following options by default:-
Oracle Enterprise Manager
-
Oracle WSM Policy Manager
-
Oracle JRF
-
Oracle Platform Security Service
-
Oracle OPSS Metadata for JRF
Click Next.
-
-
Enter the domain name, such as MSM_Domain. Keep the default Domain Location and Application Directory. Click Next.
-
Configure a user name and a password for the administrator in the Configure Administrator User Name and Password screen. The default user name is weblogic. Click Next.
-
Choose the JRE/JDK and Production Mode in the Configure Server Start Mode and JDK screen.
-
Enter database schema details for the OMSM, OAM Infrastructure, and OPSS schemas in the Configure JDBC Component Schema screen.
Note:
You can also use GridLink data sources. See Section 3.13, "GridLink Data Sources" for more information.(Optional) Select an option for RAC configuration for component schemas.
Click Next.
-
On the Test Component Schema screen, the Configuration Wizard validates the data sources. Verify that the test for all schemas completes successfully.
If data source validation succeeds, click Next.
If data source validation fails, click Previous, correct the issue, then try again.
-
On the Select Optional Configuration screen, select the following:
-
Administration Server
-
Managed Servers, Clusters, and Machines
-
Deployments and Services
-
RDBMS Security Store (Optional)
Click Next.
-
-
In the Customize Server and Cluster configuration screen, select Yes then Next.
-
In the Configure the Administration Server screen, enter these values:
-
Name:
AdminServer -
Listen address:
HOST1.example.com -
Listen port:
7001Do not set or change the following parameters:
-
SSL listen port: Not applicable
-
SSL enabled or disabled
Click Next.
-
-
On the Configure Managed Servers screen, create the following entries for each host in the topology.
Select the
WLS_MSM1entry and change it to the following values:-
Name:
WLS_MSM1 -
Listen Address:
HOST1.example.com -
Listen Port:
14180 -
SSL Port:
14181
For the second server, WLS_MSM2, click Add and enter the following values:
-
Name:
WLS_MSM2 -
Listen Address:
HOST2.example.com -
Listen Port:
14180 -
SSL Listen Port:
14181
Select the
WLS_OAM1entry and change the entry to the following values:-
Name:
WLS_OAM1 -
Listen Address:
HOST1.example.com -
Listen Port:
14100
For the second server, WLS_OAM2, click Add and enter the following values:
-
Name:
WLS_OAM2 -
Listen Address:
HOST2.example.com -
Listen Port:
14100
Select the
WLS_ama1entry and change the entry to the following values:-
Name:
WLS_AMA1 -
Listen Address:
HOST1.example.com -
Listen Port:
14150
For the second server, WLS_AMA2, click Add and enter the following values:
-
Name:
WLS_AMA2 -
Listen Address:
HOST2.example.com -
Listen Port:
14150
Click Next.
-
-
In the Configure Clusters screen, click Add to create a cluster.
Enter names for each cluster, such as
msm_cluster,oam_cluster,ama_cluster. Leave all other fields at their default setting.Click Next.
-
On the Assign Servers to Clusters screen, associate Managed servers with the cluster:
Click on the cluster name msm_cluster in the right window.
For each MSM Managed Server, click on the Managed Server name then click the arrow to assign it to the cluster.
Repeat the preceding steps for oam_cluster and ama_cluster, assigning the appropriate Managed Servers to each cluster.
Click Next.
-
On the Configure Machines screen, create a machine for each host in the topology.
Click on the Unix tab if your hosts use a Unix operating system or click Machines.
Provide the following information:
-
Name: Host name. A good practice is to use the DNS name.
-
Node Manager Listen Address:
HOST1.example.com -
Node Manager Port: Port for Node Manager to use.
Repeat the preceding steps for OAMHOST2 and enter these values:
-
Name: Host name. A good practice is to use the DNS name,
HOST2 -
Node Manager Listen Address: Machine DNS name,
HOST2.example.com -
Node Manager Port: Port for Node Manager to use.
Click Next.
-
-
On the Assign Servers to Machines screen, assign Managed Servers to run on the machines you just created:
Select a machine in the right window.
Select Managed Servers you want to run on that machine in the left window.
Click the arrow to assign managed servers to the machine.
Repeat these steps until you assign:
-
AdminServer to Machine 1
-
Managed Servers
WLS_OAM1,WLS_MSM1, andWLS_AMA1to Machine 1 -
Managed Servers
WLS_OAM2,WLS_MSM2, andWLS_AMA2to Machine 2
Click Next.
-
-
Review Configuration Summary screen selections then click Create.
-
Configure the security store. See "Configuring Database Security Store for an Oracle Identity and Access Management Domain" in Oracle Fusion Middleware Installation Guide for Oracle Identity and Access Management.
-
Start the Administration Server.
-
Run the idmConfigTool configuration commands located in IAM_HOME/
idmtools/binas "Running IDM Configuration Tool to Configure Oracle Access Manager" describes in Oracle Fusion Middleware Installation Guide for Oracle Identity ManagementNote:
For more information on idmConfigTool, see "Using the idmConfigTool Command" in Oracle Fusion Middleware Integration Guide for Oracle Identity Management Suite. -
Run the IdmConfigTool OMSM
configOMSScommand as "Configuring Oracle Mobile Security Manager Using IDM Configuration Tool" describes in Oracle Fusion Middleware Installation Guide for Oracle Identity Management. You must enter the following properties for a high availability set up; see configOMSS Command for information on configOMSS syntax and properties:Property Value OMSS_OMSM_FRONT_END_URL OHS URL, for example, http://host:port/OMSS_MANAGED_SERVER_NAME Comma-separated names of all MSM Managed Servers, for example WLS_MSM1,WLS_MSM2OMSS_OAM_POLICY_MGR_SERVER_NAME Comma-separated names of all Policy Manager Managed Servers, for example, WLS_AMA1,WLS_AMA2 -
Stop the Administration Server.
-
Verify that WebLogic Server and OAM are installed on OAMHOST2, and that the MW_HOME and
ORACLE_HOMEdirectory structure is identical to theOAMHOST1directory structure. See "Running the Environment Health Check Utility to Verify Oracle Access Manager" in Installation Guide for Oracle Identity and Access Management for more information. -
Copy the domain you created on OAMHOST1 to OAMHOST2. Run the pack command on OAMHOST1 to pack the domain directory. For example, the following command packs the domain in
omsm_packed.jar.ORACLE_HOME is the home directory where you installed the Identity Management product.
$ORACLE_HOME/common/bin/pack.sh -domain=$MW_HOME/user_projects/domains/new_domain -template=/scratch/omsm_packed.jar -template_name="Oracle Mobile Security Manager" -managed=true
-
Use the
sftporscpcommand to copy the template file that the domain was packed in from OAMHOST1 to OAMHOST2. -
On OAMHOST2, create a domain using the template file that you copied from OAMHOST1. This is the file that you unpacked on OAMHOST2. Run the unpack command to copy the template jar to OAMHOST (for example, to the directory
/scratch/omsm_packed.jar). In the following example, the unpack command creates a domain on OAMHOST2.$ORACLE_HOME/common/bin/unpack.sh -domain=$MW_HOME/user_projects/domains/new_domain -template=/scratch/omsm_packed.jar
13.4.2 Starting OAMHOST1
To start OAMHOST1:
-
Before you start Managed Servers from the console, you must create a Node Manager property file. Run
setNMProps.shlocated in the MW_HOME/oracle_common/common/bindirectory. -
Start Node Manager with the command MW_HOME
/wlserver_10.3/server/bin/startNodeManager.sh.
13.4.3 Starting Oracle Mobile Security Manager on OAMHOST1
To start Oracle Mobile Security Manager on OAMHOST1:
-
Start Administration Server using Node Manager or the startWebLogic.sh script:
DOMAIN_HOME/bin/startWebLogic.shSee Starting and Stopping Administration Servers in Administrator's Guide for details on the Administration Server.
-
Log into the Administration Console using this URL:
http://host1.example.com:7001/console -
Enter the WebLogic administrator username and password.
-
Select Environment - Servers from the Domain Structure menu.
-
Click the Control tab.
-
Click the server WLS_MSM1.
-
Click Start then click OK.
Note:
After you start WLS_MSM, you must also start the Managed Servers WLS_OAM and WLS_AMA.13.4.4 Configuring Oracle HTTP Server
Oracle HTTP Server front ends the clusters. You configure OHS instead of using a Proxy Server.
Run these steps on each of the web tier hosts on which Oracle HTTP Server is installed (for example, WEBHOST1 and WEBHOST2)
To configure Oracle HTTP Server:
-
Verify that OHS is installed on the system.
-
Stop OHS using the command:
OHS_INSTANCE_HOME/bin/opmnctl stopall -
Copy ORACLE_HOME
/omss/omsm/config/omss.confto OHS_INSTANCE_HOME/config/OHS/ohs instance name/module.conf -
Open the file OHS_INSTANCE_HOME
/config/ohs/config/OHS/instance name/moduleconf/omss.conf.Change all instances of the line
WebLogicClusterHOST1:port,HOST2:portto reflect your installation, for example:WeblogicCluster host1.example.com:14180,host2.example.com:14180
Note:
The Oracle HTTP Server should not run OAM WebGate.The following example shows lines you must add to the file for OMSS:
<Location /msm>
    SetHandler weblogic-handler
    WebLogicCluster host1.example.com:14180,host2.example.com:14180
    WLLogFile "$ORACLE_INSTANCE/diagnostics/logs/mod_wl/msm_component.log"
</Location>

# MSM runtime services for MAM
<Location /ecp> SetHandler weblogic-handler WebLogicCluster host1.example.com:14180,host2.example.com:14180 WLLogFile "$ORACLE_INSTANCE/diagnostics/logs/mod_wl/msm_component.log" </Location> # Mobile File Manager<Location /mfm> SetHandler weblogic-handler WebLogicCluster host1.example.com:14180,host2.example.com:14180 WLLogFile "$ORACLE_INSTANCE/diagnostics/logs/mod_wl/msm_component.log" </Location> # MSAS management services<Location /gms-rest> SetHandler weblogic-handler WebLogicCluster host1.example.com:14180,host2.example.com:14180 WLLogFile "$ORACLE_INSTANCE/diagnostics/logs/mod_wl/msm_component.log" </Location> # MSAS management rest services<Location /msm-mgmt> SetHandler weblogic-handler WebLogicCluster host1.example.com:14180,host2.example.com:14180 WLLogFile "$ORACLE_INSTANCE/diagnostics/logs/mod_wl/msm_component.log" </Location> # MSM console <Location /msmconsole> SetHandler weblogic-handler WebLogicCluster host1.example.com:14180,host2.example.com:14180 WLLogFile "$ORACLE_INSTANCE/diagnostics/logs/mod_wl/msm_component.log" </Location> <Location /ms_oauth> SetHandler weblogic-handler Debug ON WLLogFile /tmp/weblogic.log WLProxySSL ON WLProxySSLPassThrough ON # WLCookieName OAM_JSESSIONID WLCookieName OAMSESSIONID WebLogicCluster host1:14100,host2:14100 </Location> -
Save the file.
-
Start OHS on both hosts.
OHS_INSTANCE_HOME/bin/opmnctl startall
13.4.5 Starting Managed Servers and Node Manager on OAMHOST2
To start Managed Servers and Node Manager on OAMHOST2:
-
Start Node Manager on OAMHOST2.
WL_HOME/server/bin/startNodeManager.sh
-
Start Administration Server using Node Manager or the startWebLogic.sh script:
DOMAIN_HOME/bin/startWebLogic.shSee Starting and Stopping Administration Servers in Administrator's Guide for details on the Administration Server.
-
Log into the Administration Console using this URL:
http://host2.example.com:7001/console
-
Enter the WebLogic administrator username and password.
-
Select Environment - Servers from the Domain Structure menu.
-
Click the Control tab.
-
Click the server msm_server2.
-
Click Start then click OK.
13.5 Configuring High Availability for Oracle Mobile Security Access Server
Mobile Security Access Server (MSAS), a component in the Oracle Mobile Security Suite, provides a central access point for securing traffic from mobile devices to intranet resources. MSAS is an application running its own server process in the Web Tier. You manage it with OMSM.
MSAS continues to operate even if MSM is down. If MSM is down, MSAS does not retrieve completed management/artifact changes by means of the user interface or WLST in MSM. However, MSAS does continue to enforce security.
Note:
MSM must be running the first time you start MSAS so that it can retrieve initial artifacts.MSAS has a persistent local file based cache so that it can continue to run if you take it down and bring it back up.
See the following topics to configure MSAS high availability:
13.5.1 High Availability Requirements
Before you start configuring high availability, you must have at least two instances of MSAS installed on the Web Tier. You can have these instances on different hosts or on the same host on different ports. MSAS supports both configurations.
To install MSAS, see Oracle Fusion Middleware Installing Oracle Mobile Security Access Server.
For information on MSAS administration and tools, see "MSAS Administration Tools" in Oracle Fusion Middleware Administering Mobile Security Access Server.
13.5.2 Starting OMSM Managed Server
You must start OMSM to configure MSAS because MSAS must connect to OMSM at least once to create a new instance.
To start an OMSM Managed Server, run the following command or see Section 13.4.3, "Starting Oracle Mobile Security Manager on OAMHOST1" to use the Administration Console:
DOMAIN_HOME/bin/startManagedWebLogic.sh WLS_MSM1 t3://admin:adminport
13.5.3 Configuring Physical MSAS Instances
To set up high availability, you create multiple physical MSAS instances that are part of one logical instance. This is similar to creating one cluster that includes multiple Managed Servers.
To configure MSAS instances for high availability, see "Configuring an MSAS Instance" in Installing Oracle Mobile Security Access Server. You must configure the physical MSAS instances with identical parameters.
Note:
For high availability, the physical MSAS instances must be identical for all instances. The MSAS Instance ID must be identical so that all artifacts that MSAS pulls from MSM are the same, allowing both MSAS instances behave the same way. These artifacts include:-
MSAS applications
-
MSAS policies
-
MSAS keys/certificates
-
MSAS credentials
13.5.4 Starting MSAS Instances
You must start the physical MSAS instances to configure a high availability setup.
To start a physical MSAS instance:
-
Change to the MW_HOME
/instances/instance_name/bindirectory, where MW_HOME is the Middleware home directory in which you installed MSAS andinstance_nameis the name of the MSAS instance you want to start -
To start the instance, enter the following command:
./startServer.sh
13.5.5 Configuring the Load Balancer for MSAS
Mobile Security Access Server (MSAS) supports load balancing across a cluster of multiple Mobile Security Access Servers. Clustering allows multiple MSAS instances to share authentication state so that any MSAS instance can verify a secure token generated by another MSAS (at the conclusion of the authentication process).
This section contains the following topics:
13.5.5.1 Requirements
Load balancing requirements include:
-
Source or SSL session 'stickiness' configured on the load balancer so that all client requests during the authentication process hit the same MSAS. After the authentication process, subsequent requests can hit any MSAS instance.
-
Oracle recommends that the load balancer pass through SSL connections so that the MSAS instances terminate SSL communication.
-
All load balancing algorithms (such as round-robin, least busy) are supported.
13.5.5.2 Updating the MSAS SSL Certificate
To prepare MSAS for high availability, you must update the MSAS SSL certificate with the load balancer alias.
To update the SSL certificate with the load balancer alias:
-
Verify that your current configuration works properly without a load balancer.
-
Run the following command to export the existing keystore entry.
msas-id is the MSAS Instance ID.
MW_HOME/common/bin/wlst.sh
connect(username='username', password='password', url='http://host.example.com:7001')
svc = getOpssService(name='KeyStoreService')
svc.exportKeyStore(appStripe='msas-id', name='sslkeystore', password='password', aliases='msas-id_msasidentity', keypasswords='keypasswords', type='JKS',filepath='/tmp/msas-id_keystore.jks')
-
Generate the new certificate request with the following command:
keytool -keystore /tmp/msas-id_keystore.jks -storepass password -alias
msas-id_msasidentity -certreq -file /tmp/msasidentity.csr -keypass password
-
Sign the new certificate request with the certificate authority (CA) key and add the load balancer's hostname in the certificate's subject alternate name (SAN). Use the load balancer's fully-qualified domain name, such as
lbrhost.example.com.Enter the following command:
keytool -gencert -keystore MSM_DOMAIN/config/fmwconfig/server-identity.jks -storepass password -alias ca -ext san=dns:lbrhost.example.com -infile/tmp/msasidentity.csr -outfile /tmp/msasidentity.crt
-
Update the MSAS identity certificate. First, update the JKS keystore you exported in Step 2. Then you import the updated JKS keystore into the KSS keystore:
-
Export the root CA by running the following command:
keytool -export -alias ca -file /tmp/ca.crt -keystore MSM_DOMAIN/config/fmwconfig/server-identity.jks -
Import the certificate into the keystore that you just exported (in step 2) (
/tmp/msas_id_keystore.jks) by running the following command:keytool -keystore /tmp/msas_id_keystore.jks -import -file /tmp/ca.crt -alias ca -storepass password keytool -keystore /tmp/msas_id_keystore.jks -import -file /tmp/msasidentity.crt -alias msas-id_msasidentity -storepass password
-
Import the new certificate into MSAS SSL keystore (KSS keystore) by running the following:
MW_HOME/common/bin/wlst.shconnect(username='username', password='password', url='t3://host.example.com:7001') svc = getOpssService(name='KeyStoreService') svc.deleteKeyStoreEntry(appStripe='msas-id',name='sslkeystore',password='', alias='msas-id_msasidentity', keypassword='') svc.importKeyStore(appStripe='msas-id',name='sslkeystore',password='password',aliases='msas-id_msasidentity',keypasswords="password", type='JKS',permission=true,filepath='/tmp/msas-id_keystore.jks')
-
13.5.5.3 Configuring Load Balancing
To configure load balancing:
-
Configure MSAS to share the same secure token public key infrastructure (PKI) certificate by taking one of these steps:
-
Provision a separate PKI certificate specifically for use as the shared secure token PKI certificate.
-
Use the existing SSL certificate from one of the Mobile Security Access Servers in the cluster as the shared secure token PKI certificate.
Note:
Multiple Mobile Security Access Servers that serve the same authenticated requests must share the same secure token PKI certificate. During installation, the secure token PKI certificate is set to be identical to the SSL certificate. However, you can configure MSAS to use a different PKI certificate for the secure token function from that used for SSL. Oracle recommends enabling key usage for both signature and encryption for the PKI certificate. -
-
Ensure that all Mobile Security Access Servers in the cluster can communicate with each other at their IP addresses over SSL.
-
Update the MSAS instance load balancer SSL URL to
http://lbrhost.example.com:port:-
Log in to the Access Console.
-
Navigate to Mobile Security. Under Mobile Security Access Server, click Environments.
-
Click on MSAS then the MSAS Gateway ID.
-
Go to System Settings and expand Server Settings.
-
Update the Load Balancer SSL URL to the following:
https://lbrhost.example.com:port
-
Navigate to Configuration. Under Settings, click View then click Mobile Security Manager Settings.
-
Click Server Settings.
-
Update MSAS Host to the load balancer host.
-
Update MSAS Port to the load balancer port.
-
-
Restart the MSAS instances.