12 Configuring High Availability for Oracle Privileged Account Manager Components
This chapter describes the Oracle Privileged Account Manager high availability framework. Topics include the following:
Oracle Privileged Account Manager manages privileged accounts that are not being managed by any other Oracle Identity Management components. Accounts are considered privileged if they can access sensitive data, can grant access to sensitive data, or can both access and grant access to that data.
For a more detailed overview of Oracle Privileged Account Manager and its features, see "Understanding Oracle Privileged Account Manager" in the Oracle Fusion Middleware Administrator's Guide for Oracle Privileged Account Manager.
-
Section 12.1, "Oracle Privileged Account Manager Component Architecture"
-
Section 12.2, "Oracle Privileged Account Manager High Availability Concepts"
-
Section 12.3, "Oracle Privileged Account Manager High Availability Architecture"
-
Section 12.4, "Oracle Privileged Account Manager High Availability and Node Failure"
-
Section 12.5, "Oracle Privileged Account Manager High Availability Configuration"
12.1 Oracle Privileged Account Manager Component Architecture
Oracle Privileged Account Manager (OPAM) consists of a server, user interface, and session manager component that run as web applications. The server and user interface are web applications. Session Manager is a standard J2EE application with no web interface at this time. The OPAM server runs in a WebLogic Managed Server. The OPAM user interface is part of Oracle Identity Navigator (OIN) and also runs on the OPAM WebLogic Managed Server. OPAM Session Manager also runs on the Managed Server
The default and most simple configuration of OPAM deployment involves running a single OPAM managed server in a WebLogic domain. OPAM uses its own schema to store passwords to targets, accounts, and other items.
The following diagram illustrates Oracle Privileged Account Manager's architecture and topology:
Figure 12-1 Oracle Privileged Account Manager Component Architecture
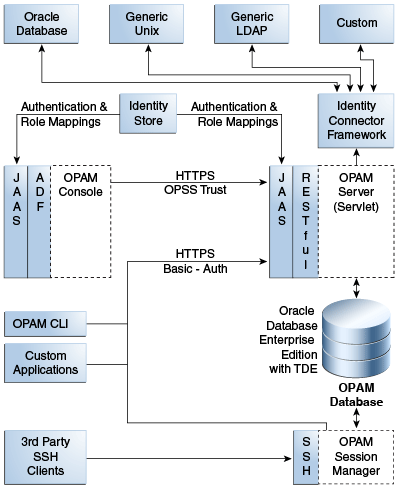
Description of "Figure 12-1 Oracle Privileged Account Manager Component Architecture"
Note the following features of this architecture:
-
All of Oracle Privileged Account Manager's core logic resides on the Oracle Privileged Account Manager Server. This functionality is exposed through a Representational state transfer (REST or RESTful) service, where the data is encoded as JavaScript Object Notation (JSON).
Note:
Oracle Privileged Account Manager provides a Web-based user interface in Oracle Identity Navigator and an Oracle Privileged Account Manager Command Line Tool. Both interfaces are essentially clients of the Oracle Privileged Account Manager Server.However, third parties can write their own clients, such as custom applications, by leveraging the open RESTful service. For more information, refer to Working with Oracle Privileged Account Manager's RESTful Interface in Oracle Fusion Middleware Administrator's Guide for Oracle Privileged Account Manager.
-
OPAM Session Manager is an OPAM sub-component that empowers OPAM Session Management capabilities. It is a J2EE application that interacts with the OPAM server by means of the OPAM RESTful interfaces, and shares the same database that OPAM Server uses. In addition, the OPAM Session Manager listens and responds to SSH traffic to establish privileged sessions against SSH capable OPAM targets.
-
Oracle Privileged Account Manager authentication relies on Java Authentication & Authorization Service (JAAS) support in WebLogic. Refer to "WebLogic Security Service Architecture" in Oracle® Fusion Middleware Understanding Security for Oracle WebLogic Server for more information about JAAS support in WebLogic.
-
All communication with, and between, Oracle Privileged Account Manager-related components (including Oracle Privileged Account Manager's Web-based user interface, command-line interface, and server) all occur over SSL
-
Oracle Privileged Account Manager relies on and transparently uses the ID Store and Policy Store configured for the WebLogic domain in which Oracle Privileged Account Manager is deployed.
See How Oracle Privileged Account Manager is Deployed in Oracle Fusion Middleware in Oracle Fusion Middleware Administrator's Guide for Oracle Privileged Account Manager for more information.
-
The Oracle Privileged Account Manager Web-based user interface leverages, and is rendered by, Oracle Application Development Framework (ADF).
-
Oracle Privileged Account Manager connects to targets by using Identity Connector Framework (ICF) connectors. For additional information, see Understanding the Identity Connector Framework in the Oracle® Fusion Middleware Developer's Guide for Oracle Identity Manager.
This section includes the following topics:
12.1.1 Runtime Processes
OPAM server is the server component that runs WebLogic Managed Server. The OPAM Session Manager is a component that also runs on the OPAM Weblogic Managed Server. The OPAM user interface is a component that runs on the OPAM WebLogic Managed Server. OPAM server uses the REST protocol to communicate with clients including OPAM user interface and command line client. OPAM server uses the OPAM database as its data store. You can deploy OPAM server and the user interface in a WebLogic cluster with multiple servers and use WebLogic Console to manage the processes.
12.1.2 Process Lifecycle
OPAM server and OPAM Session Manager are J2EE applications deployed in WebLogic server.
During startup, the OPAM Lifecycle Listener checks whether the keystore is present for that domain.
-
If the keystore is not present, OPAM Lifecycle Listener creates a keystore using a randomly-generated keystore password, creates a keystore entry with domain name as alias, and updates the CSF with the keystore password.
-
If the keystore is present, it retrieves the keystore password from CSF and checks whether an entry is present with domain name as alias.
Because there is no operation if the keystore and required keystore CSF entry are present, a high availability environment for OPAM does not affect the process lifecycle.
OPAM Server uses a servlets model in which RESTful interfaces service clients. Therefore, the component lifecycle does not affect other running instances.
For more information on CSF, see Oracle Privileged Account Manager-Managed CSF Credentials in the Oracle Fusion Middleware Administrator's Guide for Oracle Privileged Account Manager.
12.1.3 Session State
OPAM server uses the REST-based communication; clients use HTTPS URLs. Session state information is not stored. Each communication completes an operation; sessions are not preserved.
OPAM Session Manager maintains the session state for each privileged session that it facilitates. After a session is established, the OPAM Session Manager instance used at session initiation time must continue it. If the OPAM Session Manager fails mid-session, a background thread cleans up orphaned sessions periodically.
12.1.4 External Dependencies
OPAM server dependencies include the following:
-
ICF Connectors, for communication with target systems
-
External ID stores, for authentication (configurable in WebLogic)
The OPAM user interface and OPAM Command Line tool depend on the OPAM server. Client connections, which are REST using HTTPS URL, are short lived.
12.1.5 Deployment Artifacts
When you deploy OPAM to a managed server, Oracle Identity Navigator deploys to the Administration Server. The Oracle JRF deploys to both the Administration Server and Managed Server. Table 12-1 describes where OPAM product artifacts deploy.
12.1.6 Log File Locations
WebLogic Server Logs and Audit Logs save to the DOMAIN_HOME.
Audit Logs, if configured in WebLogic, save to the Audit database.
12.2 Oracle Privileged Account Manager High Availability Concepts
At the cluster level, you can change OPAM properties such as connector directory and time limits.
All servers connect to a common domain OPAM data store, where configuration is maintained. Therefore, all connected servers pick up the shared data.
12.3 Oracle Privileged Account Manager High Availability Architecture
Figure 12-2 shows Oracle Privileged Account Manager deployed in a high availability architecture in an active-active configuration.
Figure 12-2 Oracle Privileged Account Manager in a High Availability Architecture
Description of "Figure 12-2 Oracle Privileged Account Manager in a High Availability Architecture"
In this configuration, the Oracle Privileged Account Manager Servers are part of the same domain and use the same OPSS security store. Because multiple servers interact with the OPSS security store, Oracle recommends using the database as the OPSS backend.
In this cluster configuration, the same data is available from the different servers in the cluster. Each managed server has its own port configuration. The configuration includes a load balancer.
OPAMHOST1 has the following installations
-
An Oracle Privileged Account Manager instance in the WLS_OPAM1 Managed Server. The Oracle RAC database has been configured in a JDBC multi data source or GridLink data source to protect the instance from Oracle RAC node failure.
-
A WebLogic Server Administration Server. Under normal operations, this is the active Administration Server.
OPAMHOST2 has the following installations:
-
An Oracle Privileged Account Manager in the WLS_OPAM2 Managed Server. The Oracle RAC database is configured in a JDBC multi data source tor GridLink data source to protect the instance from Oracle RAC node failure.
The instances in the WLS_OPAM2 Managed Server and the instances in the WLS_OPAM1 Managed Server are configured as the CLUSTER_OPAM cluster.
-
A WebLogic Server Administration Server. Under normal operations, this is the passive Administration Server. You make this Administration Server active if the Administration Server on HOST1 becomes unavailable.
12.3.1 Starting and Stopping the Cluster
By default, WebLogic Server starts stops, monitors, and manages lifecycle events for the application. The Oracle Privileged Account Manager application leverages the high availability features of the underlying Oracle WebLogic Clusters. In case of hardware or other failures, session state is available to other cluster nodes that can resume the work of the failed node.
In a high availability environment, WebLogic Node Manager is configured to monitor the WebLogic Servers. In case of failure, Node Manager restarts the WebLogic Server.
In high availability environments, the state and configuration information is stored a database that is shared by all the members of the cluster.
12.4 Oracle Privileged Account Manager High Availability and Node Failure
Note the following characteristics about Oracle Privileged Account Manager node failure in a high availability configuration:
-
Node failure does not affect clients.
-
If a server fails, ongoing REST-based operations stop; they do not fail over. Clients can connect to available servers and retry or continue with their requests. If you include a load balancer in the deployment, it directs requests to available servers.
12.5 Oracle Privileged Account Manager High Availability Configuration
This section provides high-level instructions for setting up a maximum high availability deployment for Oracle Privileged Account Manager High Availability. Topics in this section include the following:
12.5.1 Appropriate Development Environment
Perform the configuration in this topic if you want to configure Oracle Privileged Account Manager with Oracle Identity Navigator in a new WebLogic domain and then run the Oracle Identity Navigator discovery feature. This feature populates links to the product consoles for Oracle Identity Manager, Oracle Access Management, Oracle Adaptive Access Manager, and Oracle Privileged Account Manager. You can then access those product consoles from within the Oracle Identity Navigator interface, without having to remember the individual console URLs.
12.5.2 Components Deployed
Performing the configuration in this section deploys the Oracle Privileged Account Manager and Oracle Identity Navigator applications on a new WebLogic Administration Server.
12.5.3 Dependencies
The configuration in this section depends on the following:
-
Oracle WebLogic Server
-
Installation of the Oracle Identity and Access Management 11g software
For more information, see Installing and Configuring Oracle Identity and Access Management in the Oracle Fusion Middleware Installation Guide for Oracle Identity and Access Management.
12.5.4 High Availability Configuration Procedure
This section includes the following steps:
12.5.4.1 Configuring Oracle Identity and Access Management on OPAMHOST1
To configure Oracle Privileged Account Manager and Oracle Identity Navigator for maximum high availability:
-
Install Oracle WebLogic Server and create a Middleware Home. See WebLogic Server and Middleware Home Requirements in Oracle Fusion Middleware Installation Guide for Oracle Identity and Access Management for more information.
-
Install the Oracle Identity and Access Management 11g software. See Installing Oracle Identity and Access Management in Oracle Fusion Middleware Installation Guide for Oracle Identity and Access Management for more information.
Optionally, Oracle Privileged Account Manager can operate with Oracle Database TDE (Transparent Data Encryption) mode. For more information, see "Optional: Enabling TDE in Oracle Privileged Account Manager Data Store" in the Installation Guide for Oracle Identity and Access Management.
-
Start the Configuration Wizard by running this command:
ORACLE_HOME/oracle_common/common/bin/config.shNote:
You must run the config.sh script from your Oracle Identity and Access Management Home directory that contains Oracle Identity Manager, Access Manager, Oracle Adaptive Access Manager, Oracle Entitlements Server, Oracle Privileged Account Manager, Mobile and Social, and Oracle Identity Navigator. -
On the Welcome screen, select Create a new WebLogic domain and click Next. The Select Domain Source screen appears.
-
On the Select Domain Source screen, ensure that the Generate a domain configured automatically to support the following products: option is selected. Select Oracle Privileged Account Manager - 11.1.2.0.0 [IAM_Home].
Note:
When you select the Oracle Privileged Account Manager - 11.1.2.0.0 [IAM_Home] option, the Oracle Identity Navigator, Oracle JRF, and Oracle Platform Security Service options are also selected by default.Click Next. The Specify Domain Name and Location screen appears.
-
Enter the domain name IDM_Domain. Keep the default Domain Location and Application Directory. Click Next. The Configure Administrator User Name and Password screen appears.
-
Configure a user name and a password for the administrator. The default user name is weblogic. Click Next.
-
Choose the JRE/JDK and Production Mode in the Configure Server Start Mode and JDK screen of the Oracle Fusion Middleware Configuration Wizard.
-
In the Configure JDBC Component Schema screen, enter the database schema details for the OPAM and OPSS schema.
Note:
You can also use GridLink data sources. See Section 3.13, "GridLink Data Sources" for more information.(Optional) Select an option for RAC configuration for component schemas.
Click Next.
-
On the Test Component Schema screen, the Configuration Wizard tries to validate the data sources. Validate that the test for all schemas completes successfully.
If the data source validation succeeds, click Next.
If the data source validation fails, click Previous, correct the issue, then try again.
-
On the Select Optional Configuration screen, select the following:
-
Administration Server
-
Managed Servers, Clusters, and Machines
-
Deployments and Services
Click Next.
-
-
In the Customize Server and Cluster configuration screen, select Yes then Next.
-
In the Configure the Administration Server screen, enter the following values:
-
Name:
AdminServer -
Listen address:
OPAMHOST1.example.com -
Listen port:
7001Do not set or change the following parameters:
-
SSL listen port: Not applicable
-
SSL enabled or disabled
Click Next.
-
-
On the Configure Managed Servers screen, create an entry for each OPAMHOST in the topology, that is, one entry for the OPAM server running on OPAMHOST1 and one entry for the OPAM server running on OPAMHOST2.
Select the OPAM_SERVER entry and change the entry to the following values:
-
Name:
opamserver1 -
Listen Address:
OPAMHOST1.example.com -
Listen Port:
18101 -
SSL Port:
18102
For the second OPAM_SERVER, click Add and enter the following values:
-
Name:
opam_server2 -
Listen Address:
OPAMHOST2.example.com -
Listen Port:
18101 -
SSL Port:
18102
Click Next.
-
-
In the Configure Clusters screen, click Add to create a cluster.
Enter a name for the cluster, such as
OPAM_Cluster. Leave all other fields at their default setting.Click Next.
-
On the Assign Servers to Clusters screen, associate the managed servers with the cluster:
Click on the cluster name OPAM_Cluster in the right window.
Click on the managed server opam_server1 then click the arrow to assign it to the cluster.
Repeat the preceding steps for the managed server opam_server2.
Click Next.
-
On the Configure Machines screen, create a machine for each host in the topology.
Click on the Unix tab if your hosts use a Unix operating system or click Machines.
Provide the following information:
-
Name: Name of the host. A good practice is to use the DNS name here.
-
Node Manager Listen Address: Enter the DNS name of the machine here.
-
Node Manager Port: Enter a port for Node Manager to use.
Repeat the preceding steps for OPAMHOST2 and enter the following values:
-
Name: Name of the host. A good practice is to use the DNS name,
OPAMHOST2 -
Node Manager Listen Address: Enter the DNS name of the machine,
OPAMHOST.example.com -
Node Manager Port: Enter a port for Node Manager to use.
Click Next.
-
-
On the Assign Servers to Machines screen, assign the managed servers that will run on the machines you just created. Follow these steps:
Click on a machine in the right hand window.
Click on the managed servers you want to run on that machine in the left window.
Click on the arrow to assign the managed servers to the machine.
Repeat these steps until all managed servers are assigned to the appropriate machine.
For example:
-
Host1: Admin Server, OPAMHOST1, and opam_server1
-
Host2: OPAMHOST2 and opam_server2
Click Next.
-
-
On the Configuration Summary screen, click Create.
12.5.4.1.1 Configuring the Database Security Store
You must configure the Database Security Store after you configure the domain but before you start the Administration Server. See Section 12.5.4.1.1, "Configuring the Database Security Store" for more information.
12.5.4.1.2 Starting Administration Server on OPAMHOST1
To start the Administration Server:
-
Go to
DOMAIN_HOME/bindirectory. RunstartWeblogic.sh. -
At the prompt, enter the WebLogic administrator username and password.
Note:
You perform the following steps when you start the Administration Server for the first time only.Note:
Before proceeding to the next step to runopam-config.sh, you must set theORACLE_HOME,JAVA_HOMEandANT_HOMEenvironment variables.ANT_HOMEmust point to a location that contains Ant and JAR binary files such as middleware_home/modules/org.apache.ant_1.7.1. -
After the Administration Server is running, go to
ORACLE_HOME/opam/bindirectory. Runopam-config.sh. -
At the prompt, enter the WebLogic username, password, URL, domain name, and middleware home.
-
Restart the Administration Server after
opam-config.sh.
12.5.4.2 Starting OPAMHOST1
This section describes the steps for starting OPAMHOST1:
-
Before you can start managed servers from the console, you must create a Node Manager property file. Run
setNMProps.shlocated in the following directory.cdMW_HOME/oracle_common/common/bin -
Start Node Manager with the command MW_HOME
/wlserver_10.3/server/bin/startNodeManager.sh.
12.5.4.2.1 Starting Oracle Privileged Account Manager on OPAMHOST1
To start Oracle Privileged Account Manager on OPAMHOST1:
-
Log into the Administration Console using this URL:
http://opamhost1.example.com:7001/console -
Enter the WebLogic administrator username and password.
-
Select Environment - Servers from the Domain Structure menu.
-
Click the Control tab.
-
Click the server opam_server1.
-
Click Start.
-
Click OK.
For more information, see "Assigning the Application Configurator Role to a User" and "Optional: Setting Up Non-TDE Mode" in Installation Guide for Oracle Identity and Access Management. Setting up non-TDE mode is required only if you did not set up TDE as Installation Guide for Oracle Identity and Access Management explains.
12.5.4.3 Configuring OPAM on OPAMHOST2
After configuration succeeds on OPAMHOST1, you can propagate it to OPAMHOST2. You do this by packing the domain using the pack script on OPAMHOST1 and unpacking the domain using the unpack script on OPAMHOST2.
Both scripts reside in the MW_HOME/oracle_common/common/bin directory.
-
Verify that MW_HOME and
ORACLE_HOMEdirectory structure is identical to theOPAMHOST1directory structure. -
Enter the following on OPAMHOST1 to create the file
idm_domain.jarin the/tmpdirectory:pack.sh -domain=$MW_HOME/user_projects/domains/IDM_Domain
-template=/tmp/idm_domain.jar -template_name="OPAM Domain" -managed=true
-
The previous step created the
idm_domain.jarfile in the/tmpdirectory.Copy the
idm_domain.jarfile from OPAMHOST1 to a temporary directory on OPAMHOST2. -
To copy
idm_domain.jarto OPAMHOST2, enter the following:unpack.sh -domain=MW_HOME/user_projects/domains/IDM_Domain -template=/tmp/idm_domain.jar
-
Copy
jps-wls-trustprovider.jarfrom MW_HOME/oracle_common/modules/oracle.jps_11.1.1toWLS_SERVER_HOME/server/lib/mbeantypes.
12.5.4.4 Starting OPAMHOST2
This section describes the steps for starting OPAMHOST2.
-
Before you can start managed servers from the console, you must create a Node Manager property file. Run the script
setNMProps.shlocated in the following directory:MW_HOME/oracle_common/common/bin
-
Start Node Manager with the command MW_HOME
/wlserver_10.3/server/bin/startNodeManager.sh -
Start Oracle Privileged Account Manager on OPAMHOST2. See Section 12.5.4.2.1, "Starting Oracle Privileged Account Manager on OPAMHOST1" and replace HOST1 and server1 with HOST2 and server2.
12.5.5 OHS Load Balancer Configuration
You can load balance OPAM servers using Oracle HTTP Server (OHS). This section provides the steps to configure OPAM to work with OHS. Topics include the following:
12.5.5.1 Configure SSL
Because OPAM servers use SSL for communication, you must configure SSL options in the OHS Load Balancer. Follow these steps:
-
Enable the outbound SSL connections from OHS so that they can communicate with the OPAM managed/Administration servers. To do this, see Enable SSL for Outbound Requests from Oracle HTTP Server in the Oracle Fusion Middleware Administrator's Guide.
-
Enable inbound SSL connections into the OPAM managed/Administration servers. See Inbound SSL to Oracle WebLogic Server in the Oracle Fusion Middleware Administrator's Guide.
12.5.5.2 Update the Oracle HTTP Server Configuration
On the host where OHS is installed, create a file named opam.conf in the following directory:
ORACLE_INSTANCE/config/OHS/ohs1/moduleconf
Create the file with the following lines:
NameVirtualHost *:4443
<VirtualHost *:4443>

  ServerName http://opam.example.com:4443
  ServerAdmin user@example.com
  RewriteEngine On
  RewriteOptions inherit

   <Location /opam>
    SetHandler weblogic-handler
    WebLogicCluster opamhost1.example.com:18102,opamhost2.example.com:18102
    WLCookieName OPAMSESSIONID
    WlSSLWallet "${ORACLE_INSTANCE}/config/${COMPONENT_TYPE}/${COMPONENT_
    NAME}/keystores/ohs_wallet"
    WLProxySSL ON
    WLProxySSLPassThrough ON
    SecureProxy On
  </Location>

</VirtualHost>

  <Location /oinav>
    SetHandler weblogic-handler
    WebLogicCluster opamhost1.example.com:18102,opamhost2.example.com:18102
    WLCookieName OPAMSESSIONID
    WlSSLWallet "${ORACLE_INSTANCE}/config/${COMPONENT_TYPE}/${COMPONENT_
    NAME}/keystores/ohs_wallet"
    WLProxySSL ON
    WLProxySSLPassThrough ON
    SecureProxy On
  </Location>

</VirtualHost>
To configure OHS for the OPAM console, update the opam.conf file with the following lines:
NameVirtualHost *:7777
<VirtualHost *:7777>

  ServerName http://opam.example.com:7777
  ServerAdmin user@example.com
  RewriteEngine On
  RewriteOptions inherit

   <Location /oinav>
    SetHandler weblogic-handler
    WebLogicCluster opamhost1.example.com:18101,opamhost2.example.com:18101
    WLCookieName OPAMSESSIONID
   </Location>

</VirtualHost>
12.5.5.3 Restart the Oracle HTTP Server
To restart Oracle HTTP Server, run the following commands from ORACLE_INSTANCE/bin:
opmnctl stopall
opmnctl startall