20 Upgrading Oracle Identity Manager Highly Available Environments
This chapter describes how to upgrade Oracle Identity Manager highly available environments to 11g Release 2 (11.1.2.3.0) on Oracle WebLogic Server, using the manual upgrade procedure.
Note:
If your existing Oracle Identity and Access Management environment was deployed using the Life Cycle Management (LCM) Tools, you must use the automated upgrade procedure to upgrade to Oracle Identity and Access Management 11g Release 2 (11.1.2.3.0).For information about automated upgrade procedure, supported starting points and topologies, see Chapter 2, "Understanding the Oracle Identity and Access Management Automated Upgrade".
Note:
Before you proceed, check if your existing Oracle Access Management version is supported for high availability upgrade. For more information on supported starting points for high availability upgrade, see Section 3.3, "Supported Starting Points for Oracle Identity and Access Management Manual Upgrade".This chapter includes the following sections:
-
Section 20.2, "Understanding Oracle Identity Manager High Availability Upgrade Topology"
-
Section 20.4, "Upgrading Oracle Home on OIMHOST1 and OIMHOST2"
-
Section 20.6, "Performing OIM Middle Tier Upgrade Offline on OIMHOST1"
-
Section 20.7, "Replicating Domain Configuration on OIMHOST2"
-
Section 20.8, "Performing OIM Middle Tier Upgrade Online on OIMHOST1"
-
Section 20.10, "Upgrading Other OIM Installed Components on OIMHOST1"
20.1 Upgrade Roadmap
Table 20-1 lists the steps to upgrade Oracle Identity Manager high availability environment illustrated in Figure 20-1 to 11.1.2.3.0.
Table 20-1 Oracle Identity Manager High Availability Upgrade Roadmap
| Task No | Task | For More Information |
|---|---|---|
|
1 |
Review the Oracle Identity Manager high availability upgrade topology, and identify |
See, Understanding Oracle Identity Manager High Availability Upgrade Topology |
|
2 |
Perform the necessary pre-upgrade tasks. |
|
|
3 |
Upgrade the binaries of Oracle WebLogic Server, Oracle SOA Suite, and Oracle Identity Manager on both OIMHOST1 and OIMHOST2. |
|
|
4 |
Upgrade the Database schemas and create necessary schemas. |
|
|
5 |
Perform the Oracle Identity Manager middle tier upgrade offline on |
|
|
6 |
Replicate the domain configuration on |
|
|
7 |
Perform the Oracle Identity Manager middle tier upgrade online on |
|
|
8 |
Scale out the BI Publisher for high availability setup. |
|
|
9 |
Upgrade the Oracle Identity Manager Design Console and the Oracle Identity Manager Remote Manager to 11.1.2.3.0 on |
|
|
10 |
Perform the necessary post-upgrade tasks. |
|
|
11 |
Verify the upgrade. |
20.2 Understanding Oracle Identity Manager High Availability Upgrade Topology
Figure 20-1 shows the Oracle Identity Manager cluster set up that can be upgraded to 11.1.2.3.0 by following the procedure described in this chapter.
Figure 20-1 Oracle Identity Manager High Availability Upgrade Topology
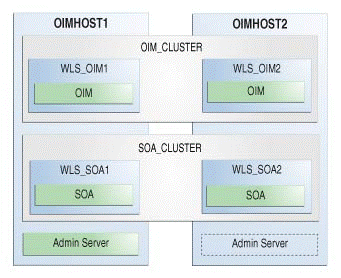
Description of ''Figure 20-1 Oracle Identity Manager High Availability Upgrade Topology''
On OIMHOST1, the following installations have been performed:
-
An Oracle Identity Manager instance has been installed in the
WLS_OIM1Managed Server and a SOA instance has been installed in theWLS_SOA1Managed Server. -
A WebLogic Server Administration Server has been installed. Under normal operations, this is the active Administration Server.
On OIMHOST2, the following installations have been performed:
-
An Oracle Identity Manager instance has been installed in the
WLS_OIM2Managed Server and a SOA instance has been installed in theWLS_SOA2Managed Server. -
A WebLogic Server Administration Server has been installed. Under normal operations, this is the passive Administration Server. You make this Administration Server active if the Administration Server on
OIMHOST1becomes unavailable.
The instances in the WLS_OIM1 and WLS_OIM2 Managed Servers on OIMHOST1 and OIMHOST2 are configured as the OIM_CLUSTER cluster.
The instances in the WLS_SOA1 and WLS_SOA2 Managed Servers on OIMHOST1 and OIMHOST2 are configured as the SOA_CLUSTER cluster.
20.3 Performing the Pre-Upgrade Tasks
Before you begin with the upgrade process, you must perform necessary pre-upgrade tasks on OIMHOST1. It includes reviewing the features of 11.1.2.3.0, reviewing system requirements and certifications, generating and analyzing the pre-upgrade report, backing up the existing environment, and other specific tasks required for your starting point.
If your starting point is Oracle Identity Manager 11g Release 2 (11.1.2.2.0), 11g Release 2 (11.1.2.1.0), or 11g Release 2 (11.1.2), perform the pre-upgrade tasks described in Section 10.2, "Performing the Required Pre-Upgrade Tasks".
If your starting point is Oracle Identity Manager 11g Release 1 (11.1.1.5.0), perform the pre-upgrade tasks described in Section 14.2, "Performing the Required Pre-Upgrade Tasks".
20.4 Upgrading Oracle Home on OIMHOST1 and OIMHOST2
You must upgrade the Oracle Home on both OIMHOST1 and OIMHOST2 by upgrading the binaries of Oracle WebLogic Server, Oracle SOA Suite, and Oracle Identity Manager to 10.3.6, 11.1.1.9.0, and 11.1.2.3.0 versions respectively.
Note:
If you are using a shared file system, binary upgrade is not required onOIMHOST2.If your starting point is Oracle Identity Manager 11g Release 2 (11.1.2.2.0), 11g Release 2 (11.1.2.1.0), or 11g Release 2 (11.1.2), follow the instructions described in Section 10.3, "Upgrading Oracle Home" to upgrade Oracle Home.
If your starting point is Oracle Identity Manager 11g Release 1 (11.1.1.5.0), follow the instructions described in Section 14.3, "Upgrading Oracle Home" to upgrade Oracle Home.
20.5 Upgrading Database Schemas on OIMHOST1
After you upgrade the Oracle Home, you must upgrade the Database schemas on OIMHOST1. Also, you must create Oracle BI Publisher (BIP) schemas.
If your starting point is Oracle Identity Manager 11g Release 2 (11.1.2.2.0), 11g Release 2 (11.1.2.1.0), or 11g Release 2 (11.1.2), follow the instructions described in Section 10.4, "Creating Necessary Schemas and Upgrading Existing Schemas" to upgrade Database schemas.
If your starting point is Oracle Identity Manager 11g Release 1 (11.1.1.5.0), follow the instructions described in Section 14.4, "Creating Necessary Schemas and Upgrading the Existing Schemas" to upgrade Database schemas.
20.6 Performing OIM Middle Tier Upgrade Offline on OIMHOST1
After you upgrade Oracle Home and Database schemas, you must perform Oracle Identity Manager middle tier upgrade offline. This is done by running the middle tier offline script.
To perform the Oracle Identity Manager middle tier upgrade offline, complete the following tasks described in Section 24.2.4, "Upgrading Oracle Identity Manager Middle Tier":
20.7 Replicating Domain Configuration on OIMHOST2
You must replicate the domain configuration on OIMHOST2. This task involves packing the upgraded domain on OIMHOST1 and unpacking it on OIMHOST2.
Note:
Make sure that the Managed Servers are stopped before you perform this step. Do not start the Managed Servers until you complete this task.To do this, complete the following steps:
-
On
OIMHOST1, run the following command from the location$MW_HOME/oracle_common/common/binto pack the upgraded domain:On UNIX:
sh pack.sh -domain=<Location_of_OIM_domain>-template=<Location_where_domain_configuration_jar_to_be_created>-template_name="OIM Domain" -managed=trueOn Windows:
pack.cmd -domain=<Location_of_OIM_domain>-template=<Location_where_domain_configuration_jar_needs_to_be_created>-template_name="OIM Domain" -managed=true -
Copy the domain configuration jar file created by the
packcommand onOIMHOST1to any accessible location onOIMHOST2. -
On
OIMHOST2, run the following command from the location$MW_HOME/oracle_common/common/binto unpack the domain:On UNIX:
sh unpack.sh -domain=<Location_of_OIM_domain>-template=<Location_on_OIMHOST2_where _you_copied_jar_file_created_by_pack_command>-overwrite_domain=trueOn Windows:
unpack.cmd -domain=<Location_of_OIM_domain>-template=<Location_on_OIMHOST2_where _you_copied_jar_file_created_by_pack_command>-overwrite_domain=true -
After you unpack the domain, copy the content of the following directory on
OIMHOST1to the same directory onOIMHOST2:DOMAIN_HOME/soa/autodeploy
20.8 Performing OIM Middle Tier Upgrade Online on OIMHOST1
After you replicate the domain configuration on OIMHOST2, you must perform the Oracle Identity Manager middle tier upgrade online on OIMHOST1. This is done by running the middle tier online upgrade script.
To perform the Oracle Identity Manager middle tier upgrade online, complete the following tasks described in Section 24.2.4, "Upgrading Oracle Identity Manager Middle Tier":
-
Starting Administration Server and SOA Managed Server(s) - Start the WebLogic Administration Server and SOA Managed Server(s) on
OIMHOST1. -
Performing Oracle Identity Manager Middle Tier Upgrade Online
-
Starting the Oracle Identity Manager Managed Server(s) and the BIP Server - Start the Oracle Identity Manager Managed Server(s) on both
OIMHOST1andOIMHOST2, BIP Managed Server(s) onOIMHOST1, and the SOA Managed Server onOIMHOST2. -
Changing the Deployment Order of Oracle Identity Manager EAR - Perform this step only if you are upgrading Oracle Identity Manager 11g Release 1 (11.1.1.5.0) environments.
20.9 Scaling out Oracle BI Publisher
This is an optional step.
After you upgrade the Oracle Identity Manager middle tier, if you wish to scale out the Oracle BI Publisher (BIP), complete the following steps:
20.9.1 Creating a new BIP Server on OIMHOST2
To create a new BIP server on OIMHOST2 and add it to the existing BIP cluster, do the following:
-
Log in to the WebLogic Administration Server using the following URL:
http://host:port/console -
Create a new BIP Server on
OIMHOST2and add it to the existing BIP cluster by completing the following steps:-
Click Lock & Edit next to Change Center on the upper left of the WebLogic Administration Console screen.
-
Expand Environment under Domain Structure.
-
Click Servers. The Summary of Servers page is displayed.
-
Click New.
-
Specify the server name. For example,
bi_server2. -
Specify the Server Listen Address and Server Listen Port.
-
Select Yes for Make this server a member of an existing cluster, and select the BIP cluster.
-
Click Next, and then click Finish.
-
Click Activate Changes.
-
-
If you wish to start the BIP server on
OIMHOST2using the Node Manager, you must assign a machine to the BIP server. To do this, complete the following steps:-
Click Lock & Edit next to Change Center on the upper left of the WebLogic Administration Console screen.
-
Expand Environment under Domain Structure.
-
Click Servers. The Summary of Servers page is displayed.
-
Select the BIP Server that you created on
OIMHOST2. -
Go to the General tab under Configuration.
-
Select the Machine name from the Machine drop-down list.
-
Click Save.
-
Click Activate Changes.
-
20.9.2 Setting the Location of the Shared BI Publisher Configuration Folder
After creating a new BIP server on OIMHOST2, you must set the server configuration options for Oracle BI Publisher.
Note:
If you are upgrading an Oracle Identity Manager, Access Manager, Oracle Adaptive Access Manager integrated environment, where the Administration Server and the Managed Servers have different domain location, follow the instructions described in Steps for Setting Location of the Shared BI Publisher Configuration Folder in Case of an Integrated Environment to set the shared BIP configuration folder location.To set the server configuration options for Oracle BI Publisher, complete the following steps:
-
Copy the contents of the
DOMAIN_HOME/config/bipublisher/repositorydirectory to the shared configuration folder location. -
On
APPHOST1, log in to the BI Publisher using administrator's credentials. -
Go to the Administration tab.
-
Select Server Configuration under System Maintenance.
-
Enter the shared location for the configuration folder in the Path field under Configuration Folder.
-
Enter the shared location for the BI Publisher Repository in the BI Publisher Repository field under Catalog.
-
Apply your changes.
-
Restart the BI Publisher application by doing the following:
-
Log in to the WebLogic Administration Console using the following URL:
http://host:port/console -
Expand Deployments under Domain Structure.
-
Click bipublisher(11.1.1.).
-
Click Stop and then select When work completes or Force Stop Now.
-
After the application has stopped, click Start and then select servicing all requests.
-
Steps for Setting Location of the Shared BI Publisher Configuration Folder in Case of an Integrated Environment
If you are upgrading an Oracle Identity Manager, Access Manager, Oracle Adaptive Access Manager integrated environment, where the Administration Server and the Managed Servers have different domain location, complete the following steps to set the location of the shared BIP configuration folder:
-
Stop the BIP Managed Server(s) on
OIMHOST1andOIMHOST2. For information about stopping the servers, see Section 24.1.9.1, "Stopping the Managed Server(s)". -
Copy the contents of the
DOMAIN_HOME/config/bipublisher/repositorydirectory to the shared configuration folder location. -
Open the
xmlp-server-config.xmlfile available in the Admin domain at the location atDOMAIN_HOME/config/bipublisher/onOIMHOST1. -
Update the
file pathin thexmlp-server-config.xmlfile with the shared configuration folder location shown in the following example:<?xml version = '1.0' encoding = 'UTF-8'?> <xmlpConfig xmlns="http://xmlns.example.com/oxp/xmlp"> <resource> <file path="<shared configuration folder location>/repository"/> </resource> <config> <file path="<shared configuration folder location>/repository"/> </config> </xmlpConfig>
-
Start the BI Managed Server(s) on
OIMHOST1andOIMHOST2.
20.9.3 Setting Scheduler Configuration Options
To set the scheduler configuration options, complete the following steps:
-
On
APPHOST1, log in to the BI Publisher using administrator's credentials. -
Go to the Administration tab.
-
Select Scheduler Configuration under System Maintenance.
-
Select Quartz Clustering under Scheduler Selection.
-
Click Apply.
20.9.4 Configuring JMS for BI Publisher
You must configure the location for all persistence stores to a directory that is accessible from both OIMHOST1 and OIMHSOT2. This can be done by changing all persistent stores to use this shared base directory. To do this, complete the following steps:
-
Log in to the WebLogic Administration Console using the following URL:
http://host:port/console -
Expand Services under Domain Structure.
-
Click Persistent Stores. The Summary of Persistent Stores page is displayed.
-
Click Lock & Edit under Change Center.
-
Click on an existing File Store (for example,
BipJmsStore), and verify the target. If the target isbi_server2, then you must target the new File Store that you will be creating in the next step, tobi_server1. -
Click New and then click Create File Store.
-
Enter a name for the new file store (for example,
ORACLE_BASE/admin/domain_name/bi_cluster/jms". Is this an example of the directory path?BipJmsStore1), and specifybi_server1as the Target. Specify the directory that is located in the shared storage which is accessible from bothAPPHOST1andAPPHOST2. -
Click OK, and then click Activate Changes.
-
Go back to the home page of the WebLogic Administration Console, and expand Services under Domain Structure.
-
Click Messaging, and then select JMS Servers. The Summary of JMS Servers page is displayed.
-
Click Lock & Edit under Change Center.
-
Click New.
-
Enter a name for the JMS Server (for example,
BipJmsServer1). -
In the Persistent Store drop-down list, select the file store that you just created (for example,
BipJmsStore1). -
Click Next.
-
Select
bi_server1as the Target. -
Click Finish, and then click Activate Changes.
-
Go back to the home page of the WebLogic Administration console, and expand Services under Domain Structure.
-
Click Messaging, and select JMS Modules.
-
Click Lock & Edit under Change Center.
-
Click BipJmsResource, and go to the Subdeployments tab.
-
Select BipJmsSubDeployment under Subdeployments.
-
Add the newly created JMS Server (
BipJmsServer1), as an additional target for the subdeployment. -
Click Save, and then click Activate Changes.
To validate the JMS configuration for BI Publisher, complete the steps described in Updating the BI Publisher Scheduler Configuration.
Updating the BI Publisher Scheduler Configuration
This section describes how to update the JMS Shared Temp directory for the BI Publisher Scheduler. Complete the following steps on only one host, either APPHOST1 or APPHOST2:
-
Log in to BI Publisher using the following URL:
http://host:port/xmlpserverFor example:
http://APPHOST1VHN1:9704/xmlpserver -
Go to the Administration tab.
-
Click Scheduler Configuration under System Maintenance. The Scheduler Configuration screen is displayed.
-
Update Shared Directory with the directory that is located in the shared storage. This shared storage must be accessible from both
APPHOST1andAPPHOST2. -
Click Test JMS.
Note:
When you click Test JMS, a confirmation message is displayed indicating that the JMS was tested successfully.If you do not see a confirmation message for a successful test, verify if the JDNI URL is set to the following:
cluster:t3://bi_cluster -
Click Apply.
-
Go to the Scheduler Diagnostics tab, and check the Scheduler status.
-
Restart
bi_server1andbi_server2.
Note:
For more information about scaling out BI Publisher, see "Scaling Out the Oracle Business Intelligence System" in the Oracle Fusion Middleware Enterprise Deployment Guide for Oracle Business Intelligence for 11g Release 1 (11.1.1.7.0).20.9.5 Verifying the BIP Server Scale Out
Verify that you have successfully scaled out Oracle BI Publisher by starting the Node Manager, WebLogic Administration Server, SOA Managed Server, OIM Managed Server, and BIP Server on OIMHOST2, and checking the status of the servers in the WebLogic Administration console.
Verify that you can access BIP links on both OIMHOST1 and OIMHOST2 using the following URL:
http://host:port/xmlpserver
20.10 Upgrading Other OIM Installed Components on OIMHOST1
After you complete the middle tier upgrade, you must upgrade the Oracle Identity Manager Design Console and the Oracle Identity Manager Remote Manager to 11.1.2.3.0 on OIMHOST1.
For information about upgrading the Design Console and Remote Manager, see Section 24.2.5, "Upgrading Other Oracle Identity Manager Installed Components".
20.11 Performing Post-Upgrade Tasks
After you upgrade Oracle Identity Manager high availability environments to 11.1.2.3.0, you must perform the necessary post-upgrade tasks described in Section 24.2.6, "Performing Oracle Identity Manager Post-Upgrade Tasks".
20.12 Verifying the Upgrade
This section describes how to verify the upgrade.
If your starting point is Oracle Identity Manager 11g Release 2 (11.1.2.2.0), 11g Release 2 (11.1.2.1.0), or 11g Release 2 (11.1.2), you must complete the steps described in Section 10.8, "Verifying the Oracle Identity Manager Upgrade" to verify the upgrade.
If your starting point is Oracle Identity Manager 11g Release 1 (11.1.1.5.0), you must complete the steps described in Section 14.8, "Verifying the Oracle Identity Manager Upgrade" to verify the upgrade.
20.13 Troubleshooting
For the list of common issues that you might encounter during the Oracle Identity Manager upgrade process, and their workaround, see Section 25.1, "Troubleshooting Oracle Identity Manager Upgrade Issues".
For the list of known issues related to upgrade, and their workaround, see "Upgrade and Migration Issues for Oracle Identity and Access Management" in the Oracle Fusion Middleware Release Notes for Identity Management.