14 Configuring the Oracle Web Tier
This chapter describes how to configure the Web Tier for an Oracle Identity and Access Manager enterprise deployment. There are two possible Web tier configurations, Oracle HTTP Server, or Oracle Traffic Director.
This chapter contains the following sections:
14.1 Configuring Oracle HTTP Server
This section describes how to associate the Oracle HTTP Server with the WebLogic Server domain. Once the Oracle HTTP Server is associated with the WebLogic Server, you can monitor it using the Oracle Fusion Middleware Console.
You then configure the load balancer to route all HTTP requests to WEBHOST1 and WEBHOST2.
The last section describes how to define the Oracle HTTP Server directives to route requests to the load balancer virtual hosts.
This section contains the following topics:
14.1.1 Running the Configuration Wizard to Configure the HTTP Server
The steps for configuring the Oracle Web Tier are the same for WEBHOST1 and WEBHOST2.
Oracle HTTP Server is installed by default on port 7777. Ensure that port 7777 is not used by any other service on the nodes. To check if this port is in use, run the following command before configuring Oracle HTTP Server. You must free the port if it is in use.
netstat -an | grep 7777
Create a file containing the ports used by Oracle HTTP Server. On Disk1 of the installation media, locate the staticports.ini file located in the following directory:
stage/Response
Copy it to a file called ohs_ports.ini. Delete all entries in ohs_ports.ini except for OHS PORT and OPMN Local Port. Change the values of those ports to 7777 and 6700, respectively. Or different ports if you prefer to use the standard ones.
Note:
If the port names in the file are slightly different fromOHS PORT and OPMN Local Port, use the names in the file.To configure the Oracle Web tier, do the following:
-
Change the directory to the location of the Oracle Fusion Middleware Configuration Wizard:
cd OHS_ORACLE_HOME/bin -
Start the Configuration Wizard:
./config.sh
Enter the following information into the configuration wizard:
-
On the Welcome screen, click Next.
-
On the Configure Component screen, select: Oracle HTTP Server.
Ensure that Associate Selected Components with WebLogic Domain and Oracle Web Cache are NOT selected.
Click Next.
-
On the Specify Component Details screen, specify the following values:
Enter the following values for WEBHOST1:
-
Instance Home Location:LOCAL_CONFIG_DIR/instances/ohs1 -
Instance Name:ohs1 -
OHS Component Name:ohs1
Click Next.
-
-
On the Configure Ports screen, you use the
ohs_ports.inifile you created above to specify the ports to be used. This enables you to bypass automatic port configuration.-
Select Specify Ports using a Configuration File.
-
In the file name field specify the absolute path to the
ohs_ports.inifile. You can use the Browse button to locate the file, and then click Open. -
Click Save, then click Next.
-
-
On the Specify Security Updates screen, choose whether to skip updates, or enter your Oracle Support Details to be notified of security updates.
Click Next.
-
On the Installation Summary screen, review the selections to ensure that they are correct. If they are not, click Back to modify selections on previous screens.
Click Configure.
-
On the Configuration screen, the wizard launches multiple configuration assistants. This process can be lengthy. When it completes, click Next.
-
On the Installation Complete screen, click Finish to confirm your choice to exit.
-
Repeat for WEBHOST2 using Instance/component name
ohs2.
After the installation is completed, check that you can access the Oracle HTTP Server home page using the following URLs:
http://WEBHOST1.example.com:7777/
http://WEBHOST2.example.com:7777/
14.1.2 Configuring Virtual Hosts
To configure the virtual hosts complete the following tasks as described in this section.
-
Section 14.1.2.2, "Configuring Oracle HTTP Server to Run as Software Owner"
-
Section 14.1.2.3, "Updating Oracle HTTP Server Runtime Parameters"
14.1.2.1 Configuring Virtual Hosts
This section includes all of the Web tier configurations for all products covered in the Enterprise Deployment Blueprint. If you are only configuring a subset of the topology then include only those entries suitable for your topology.
Create an OHS configuration file for each virtual host within the deployment, in the following location
OHS_ORACLE_INSTANCE/config/OHS/<component>/moduleconf.
Note:
The following sections show all entries for all components. If you are only deploying a subset of the components you only need to include those entries.NameVirtualHost is only required in the first file that is read. You can either put this entry into the first file name alphabetically, or directly into the httpd.conf file.These files should appear as following
NameVirtualHost *:7777
<VirtualHost *:7777>
   ServerName http://iadadmin.example.com:80
   RewriteEngine On
   RewriteOptions inherit
   RewriteRule ^/console/jsp/common/logout.jsp "/oamsso/logout.html?end_url=/console" [R]
   RewriteRule ^/em/targetauth/emaslogout.jsp "/oamsso/logout.html?end_url=/em" [R]
   UseCanonicalName On
   ServerAdmin you@your.address
#Weblogic related entries
# Admin Server and EM

<Location /console>
   WLSRequest ON
   WebLogicHost iadadminvhn.example.com
   WeblogicPort 7001
</Location>

<Location /consolehelp>
   WLSRequest ON
   WebLogicHost iadadminvhn.example.com
   WeblogicPort 7001
</Location>

<Location /em>
   WLSRequest ON
   WebLogicHost iadadminvhn.example.com
   WeblogicPort 7001
</Location>

<Location /oamconsole>
   WLSRequest ON
    WebLogicHost iadadminvhn.example.com
    WeblogicPort 7001
</Location>

<Location /apm>
   WLSRequest ON
   WebLogicHost iadadminvhn.example.com
   WeblogicPort 7001
</Location>

<Location /access>
   WLSRequest ON
   WebLogicCluster oamhost1.example.com:14150,oamhost2.example.com:14150
   WLCookieName OAMJSESSIONID
</Location>

<Location /gms-rest>
    WLSRequest ON
    WebLogicCluster oamhost1.example.com:14180,oamhost2.example.com:14180
    WLLogFile "${ORACLE_INSTANCE}/diagnostics/logs/mod_wl/msm_component.log"
</Location>

<Location /msm-mgmt>
    WLSRequest ON
    WLCookieName OAMJSESSIONID
    WebLogicCluster oamhost1.example.com:14180,oamhost2.example.com:14180
    WLLogFile "${ORACLE_INSTANCE}/diagnostics/logs/mod_wl/msm_component.log"
</Location>
</VirtualHost>
igdadmin_vh.conf (if using a split domain topology)
NameVirtualHost *:7777
<VirtualHost *:7777>
   ServerName http://igdadmin.example.com:80
   RewriteEngine On
   RewriteOptions inherit
   RewriteRule ^/console/jsp/common/logout.jsp "/oamsso/logout.html?end_url=/console" [R]
   RewriteRule ^/em/targetauth/emaslogout.jsp "/oamsso/logout.html?end_url=/em" [R]
   UseCanonicalName On
   ServerAdmin you@your.address
   # Weblogic Admin Server and EM

   <Location /console>
      WLSRequest ON
      WebLogicHost igdadminvhn.example.com
      WeblogicPort 7101
   </Location>

    <Location /consolehelp>
      WLSRequest ON
      WebLogicHost igdadminvhn.example.com
      WeblogicPort 7101
   </Location>

  <Location /em>
      WLSRequest ON
      WebLogicHost igdadminvhn.example.com
      WeblogicPort 7101
   </Location>

###################################################
## Entries Required by Oracle Entitlements Server
###################################################
   # APM
<Location /apm>
   WLSRequest ON
   WebLogicHost igdadminvhn.example.com
   WeblogicPort 7101
</Location>

################################################
## Entries Required by Oracle Identity Manager
################################################
<Location /oim>
      WLSRequest ON
      WLCookieName    oimjsessionid
      WebLogicCluster
 oimhost1vhn1.example.com:14000,oimhost2vhn1.example.com:14000
      WLLogFile "${ORACLE_INSTANCE}/diagnostics/logs/mod_wl/oim_component.log"
   </Location>

   <Location /sysadmin>
      WLSRequest ON
      WLCookieName    oimjsessionid
      WebLogicCluster
 oimhost1vhn1.example.com:14000,oimhost2vhn1.example.com:14000
      WLLogFile "${ORACLE_INSTANCE}/diagnostics/logs/mod_wl/oim_component.log"
   </Location>

# xlWebApp - Legacy 9.x webapp (struts based)
   <Location /xlWebApp>
      WLSRequest ON
      WLCookieName    oimjsessionid
      WebLogicCluster
 oimhost1vhn1.example.com:14000,oimhost2vhn1.example.com:14000
      WLLogFile "${ORACLE_INSTANCE}/diagnostics/logs/mod_wl/oim_component.log"
   </Location>

# OIM self service console
   <Location /identity>
      WLSRequest ON
      WLCookieName    oimjsessionid
      WebLogicCluster
 oimhost1vhn1.example.com:14000,oimhost2vhn1.example.com:14000
      WLLogFile "${ORACLE_INSTANCE}/diagnostics/logs/mod_wl/oim_component.log"
   </Location>

# Nexaweb WebApp - used for workflow designer and DM
   <Location /Nexaweb>
      WLSRequest ON
      WLCookieName    oimjsessionid
      WebLogicCluster
 oimhost1vhn1.example.com:14000,oimhost2vhn1.example.com:14000
      WLLogFile "${ORACLE_INSTANCE}/diagnostics/logs/mod_wl/oim_component.log"
   </Location>

# Scheduler webservice URL
   <Location /SchedulerService-web>
      WLSRequest ON
      WLCookieName    oimjsessionid
      WebLogicCluster
 oimhost1vhn1.example.com:14000,oimhost2vhn1.example.com:14000
      WLLogFile "${ORACLE_INSTANCE}/diagnostics/logs/mod_wl/oim_component.log"
   </Location>

# Oracle BIP console
   <Location /xmlpserver>
      WLSRequest ON
      WLCookieName   JSESSIONID
      WebLogicCluster oimhost1vhn3.example.com:9704,oimhost2vhn3.example.com:9704
      WLLogFile "${ORACLE_INSTANCE}/diagnostics/logs/mod_wl/oim_component.log"
   </Location>
</VirtualHost>
NameVirtualHost *:7777
<VirtualHost *:7777>
   ServerName https://login.example.com:443
   RewriteEngine On
   RewriteOptions inherit
   RewriteRule ^/console/jsp/common/logout.jsp "/oamsso/logout.html?end
_url=/console" [R]
   RewriteRule ^/em/targetauth/emaslogout.jsp "/oamsso/logout.html?end_url=/em"
 [R]
   UseCanonicalName On
   ServerAdmin you@your.address

   #OAM Entries
   <Location /oam>
       WLSRequest ON
       WLProxySSL ON
       WLProxySSLPassThrough ON
       WLCookieName OAMJSESSIONID
       WebLogicCluster oamhost1.example.com:14100,oamhost2.example.com:14100
   </Location>

   <Location /oamfed>
       WLSRequest ON
       WebLogicCluster oamhost1.example.com:14100,oamhost2.example.com:14100
       WLCookieName OAMJSESSIONID
      WLProxySSL ON
      WLProxySSLPassThrough ON
  </Location>

  <Location /ms_oauth >
       WLSRequest ON
       WebLogicCluster oamhost1.example.com:14100,oamhost2.example.com:14100
       WLCookieName OAMJSESSIONID
       WLProxySSL ON
    WLProxySSLPassThrough ON
  </Location>
</VirtualHost>
NameVirtualHost *:7777
<VirtualHost *:7777>
   ServerName https://prov.example.com:443
   RewriteEngine On
   RewriteOptions inherit
   RewriteRule ^/console/jsp/common/logout.jsp "/oamsso/logout.html?end
_url=/console" [R]
   RewriteRule ^/em/targetauth/emaslogout.jsp "/oamsso/logout.html?end_url=/em" [R]
   UseCanonicalName On
   ServerAdmin you@your.address
  <Location /identity>
    WLSRequest ON
    WLCookieName    oimjsessionid
    WebLogicCluster oimhost1vhn1.example.com:14000,oimhost2vhn1.example.com:14000
    WLLogFile "${ORACLE_INSTANCE}/diagnostics/logs/mod_wl/oim_component.log"
    WLProxySSL ON
    WLProxySSLPassThrough ON
    </Location>

# xlWebApp - Legacy 9.x webapp (struts based)
   <Location /xlWebApp>
    WLSRequest ON
    WLCookieName    oimjsessionid
    WebLogicCluster oimhost1vhn1.example.com:14000,oimhost2vhn1.example.com:14000
    WLLogFile "${ORACLE_INSTANCE}/diagnostics/logs/mod_wl/oim_component.log"
    WLProxySSL ON
    WLProxySSLPassThrough ON
  </Location>

<Location /HTTPClnt>
    WLSRequest ON
    WLCookieName    oimjsessionid
    WebLogicCluster oimhost1vhn1.example.com:14000,oimhost2vhn1.example.com:14000
    WLLogFile "${ORACLE_INSTANCE}/diagnostics/logs/mod_wl/oim_component.log"
    WLProxySSL ON
    WLProxySSLPassThrough ON
  </Location>

# Requests webservice URL
  <Location /reqsvc>
    WLSRequest ON
    WLCookieName    oimjsessionid
    WebLogicCluster oimhost1vhn1.example.com:14000,oimhost2vhn1.example.com:14000
    WLProxySSL ON
    WLProxySSLPassThrough ON
    WLLogFile "${ORACLE_INSTANCE}/diagnostics/logs/mod_wl/oim_component.log"
  </Location>
</VirtualHost>
NameVirtualHost *:7777
<VirtualHost *:7777>
   ServerName http://iadinternal.example.com:7777
   RewriteEngine On
   RewriteOptions inherit
   RewriteRule ^/console/jsp/common/logout.jsp "/oamsso/logout.html?end
_url=/console" [R]
   RewriteRule ^/em/targetauth/emaslogout.jsp "/oamsso/logout.html?end_url=/em"
 [R]
   UseCanonicalName On
   ServerAdmin you@your.address
#MSM Entries

<Location /msm>
    WLSRequest ON
    WebLogicCluster oamhost1.example.com:14180,oamhost2.example.com:14180
           WLCookieName OAMJSESSIONID
    WLLogFile "${ORACLE_INSTANCE}/diagnostics/logs/mod_wl/msm_component.log"
   </Location>

# MSM runtime services for MAM
<Location /ecp>
    WLSRequest ON
           WLCookieName OAMJSESSIONID
    WebLogicCluster oamhost1.example.com:14180,oamhost2.example.com:14180
    WLLogFile "${ORACLE_INSTANCE}/diagnostics/logs/mod_wl/msm_component.log"
</Location>

# Mobile File manager
<Location /mfm>
    WLSRequest ON
           WLCookieName OAMJSESSIONID
              WebLogicCluster
 oamhost1.example.com:14180,oamhost2.example.com:14180
    WLLogFile "${ORACLE_INSTANCE}/diagnostics/logs/mod_wl/msm_component.log"
</Location>

# MSAS management services
<Location /gms-rest>
    WLSRequest ON
    WLCookieName OAMJSESSIONID
    WebLogicCluster oamhost1.example.com:14180,oamhost2.example.com:14180
    WLLogFile "${ORACLE_INSTANCE}/diagnostics/logs/mod_wl/msm_component.log"
</Location>

# MSM management rest services
<Location /msm-mgmt>
    WLSRequest ON
    WLCookieName OAMJSESSIONID
    WebLogicCluster oamhost1.example.com:14180,oamhost2.example.com:14180
    WLLogFile "${ORACLE_INSTANCE}/diagnostics/logs/mod_wl/msm_component.log"
</Location>
</VirtualHost>
NameVirtualHost *:7777
<VirtualHost *:7777>
   ServerName http://igdinternal.example.com:7777
   RewriteEngine On
   RewriteOptions inherit
   RewriteRule ^/console/jsp/common/logout.jsp "/oamsso/logout.html?end_url=/console" [R]
   RewriteRule ^/em/targetauth/emaslogout.jsp "/oamsso/logout.html?end_url=/em" [R]
   UseCanonicalName On
   ServerAdmin you@your.address

##################################################
## Entries Required by Oracle Identity Manager
#################################################
#SOA Callback webservice for SOD - Provide the SOA Managed Server Ports

 <Location /sodcheck>
    WLSRequest ON
    WLCookieName    oimjsessionid
    WebLogicCluster oimhost1vhn2.example.com:8001,oimhost2vhn2.example.com:8001
    WLLogFile "${ORACLE_INSTANCE}/diagnostics/logs/mod_wl/soa_component.log"
  </Location>

# OIM, role-sod profile
  <Location /role-sod>
    WLSRequest ON
    WLCookieName    oimjsessionid
    WebLogicCluster oimhost1vhn1.example.com:14000,oimhost2vhn1.example.com:14000
    WLLogFile "${ORACLE_INSTANCE}/diagnostics/logs/mod_wl/oim_component.log"
  </Location>

# Callback webservice for SOA. SOA calls this when a request is approved/rejected
# Provide the SOA Managed Server Port
  <Location /workflowservice>
    WLSRequest ON
    WLCookieName    oimjsessionid
    WebLogicCluster oimhost1vhn1.example.com:14000,oimhost2vhn1.example.com:14000
    WLLogFile "${ORACLE_INSTANCE}/diagnostics/logs/mod_wl/soa_component.log"
  </Location>

# used for FA Callback service.
  <Location /callbackResponseService>
    WLSRequest ON
    WLCookieName    oimjsessionid
    WebLogicCluster oimhost1vhn1.example.com:14000,oimhost2vhn1.example.com:14000
    WLLogFile "${ORACLE_INSTANCE}/diagnostics/logs/mod_wl/oim_component.log"
  </Location>

# spml xsd profile
  <Location /spml-xsd>
    WLSRequest ON
    WLCookieName    oimjsessionid
    WebLogicCluster oimhost1vhn1.example.com:14000,oimhost2vhn1.example.com:14000
    WLLogFile "${ORACLE_INSTANCE}/diagnostics/logs/mod_wl/oim_component.log"
  </Location>

# OIM, spml dsml profile
  <Location /spmlws>
    WLSRequest ON
    PathTrim /weblogic
    WLCookieName oimjsessionid
    WebLogicCluster oimhost1vhn1.example.com:14000,oimhost2vhn1.example.com:14000
    WLLogFile "${ORACLE_INSTANCE}/diagnostics/logs/mod_wl/oim_component.log"
  </Location>

  <Location /reqsvc>
    WLSRequest ON
    WLCookieName    oimjsessionid
    WebLogicCluster oimhost1vhn1.example.com:14000,oimhost2vhn1.example.com:14000
    WLLogFile "${ORACLE_INSTANCE}/diagnostics/logs/mod_wl/soa_component.log"
  </Location>

  <Location /integration>
    WLSRequest ON
    WLCookieName    oimjsessionid
    WebLogicCluster oimhost1vhn2.example.com:8001,oimhost2vhn2.example.com:8001
  </Location>

 # SOA Infra
  <Location /soa-infra>
    WLSRequest ON
    WLCookieName oimjsessionid
    WebLogicCluster OIMHOST1VHN2.example.com:8001,OIMHOST2VHN2.example.com:8001
    WLLogFile "${ORACLE_INSTANCE}/diagnostics/logs/OHS/component/oim_component.log"
  </Location>

# UMS Email Support
  <Location /ucs>
    WLSRequest ON
    WLCookieName oimjsessionid
    WebLogicCluster OIMHOST1VHN2.example.com:8001,OIMHOST2VHN2.example.com:8001
    WLLogFile "${ORACLE_INSTANCE}/diagnostics/logs/OHS/component/oim_component.log"
  </Location>

  <Location /provisioning-callback>
    WLSRequest ON
    WLCookieName    oimjsessionid
    WebLogicCluster oimhost1vhn1.example.com:14000,oimhost2vhn1.example.com:14000
    WLLogFile "${ORACLE_INSTANCE}/diagnostics/logs/mod_wl/oim_component.log"
  </Location>

<Location /CertificationCallbackService>
   WLSRequest ON
   WLCookieName    oimjsessionid
   WebLogicCluster oimhost1vhn1.example.com:14000,oimhost2vhn1.example.com:14000
   WLLogFile "${ORACLE_INSTANCE}/diagnostics/logs/mod_wl/oim_component.log"
</Location>
</VirtualHost>
Restart OHS on WEBHOST1 and WEBHOST2 using the procedures in Section 31.1.3, "Starting and Stopping Directory Services."
14.1.2.2 Configuring Oracle HTTP Server to Run as Software Owner
By default, the Oracle HTTP server runs as the user nobody. In the Identity Management installation, the Oracle HTTP server should run as the Software owner and group.
To cause it to run as the appropriate user and group, edit the file httpd.conf, which is located in OHS_ORACLE_INSTANCE/config/OHS/component_name.
Find the section in httpd.conf where User is defined.
Change this section to read:
User User_who_installed_the_software
Group Group_under_which_the_HTTP_server_runs
Group is typically the default user group, for example: oinstall.
For example:
<IfModule !mpm_winnt_module>
#
# If you wish httpd to run as a different user or group, you must run
# httpd as root initially and it will switch.
#
# User/Group: The name (or #number) of the user/group to run httpd as.
# . On SCO (ODT 3) use "User nouser" and "Group nogroup".
# . On HPUX you may not be able to use shared memory as nobody, and the
# suggested workaround is to create a user www and use that user.
# NOTE that some kernels refuse to setgid(Group) or semctl(IPC_SET)
# when the value of (unsigned)Group is above 60000;
# don't use Group #-1 on these systems!
#
User oracle
Group oinstall
</IfModule>
14.1.2.3 Updating Oracle HTTP Server Runtime Parameters
By default, the Oracle HTTP Server contains parameter values that are suitable for most applications. These values, however, must be adjusted in IDM Deployments.
Proceed as follows:
Edit the file httpd.conf, which is located in:
OHS_ORACLE_INSTANCE/config/OHS/component_name
Find the entry that looks like this:
<IfModule mpm_worker_module>
Update the values in this section as follows:
<IfModule mpm_worker_module>
  ServerLimit       20
  StartServers      10
  MaxClients      1000
  MinSpareThreads  200
  MaxSpareThreads  800
  ThreadsPerChild   50
  ThreadLimit       50
  MaxRequestsPerChild  1000
  AcceptMutex fcntl
  LockFile "${ORACLE_INSTANCE}/diagnostics/logs/${COMPONENT_TYPE}/${COMPONENT_NAME}/http_lock"
</IfModule>
Save the file.
Restart the OHS servers using the following commands:
ORACLE_INSTANCE/bin/opmnctl stopall
ORACLE_INSTANCE/bin/opmnctl startall
14.1.2.4 Validating the Configuration
Once the installation is completed check that the it is possible to access the Oracle HTTP Server through the following URLs.
http://WEBHOST1.example.com:7777/
http://WEBHOST2.example.com:7777/
https://prov.example.com
https://login.example.com
http://iadadmin.example.com
http://igdadmin.example.com
http://igdinternal.example.com:7777
http://iadinternal.com:7777
14.1.2.5 Backing Up the Web Tier Configuration
It is an Oracle best practices recommendation to create a backup after successfully completing the installation and configuration of each tier, or at another logical point. Create a backup after verifying that the installation so far is successful.
14.2 Configuring Oracle Traffic Director
Oracle Traffic Director is a software load balancer for load balancing HTTP/S and TCP traffic to servers in the backend. These backend servers, which are referred to as origin servers within Oracle Traffic Director, can be application servers, web servers, or LDAP servers.
Installing and configuring Oracle Traffic Director for an enterprise deployment involves performing the steps shown in Table 14-1.
Table 14-1 Overview of Installing and Configuring Oracle Traffic Director for an Enterprise Deployment
| Task | Description | More Information |
|---|---|---|
|
Review Oracle Traffic Director prerequisites. |
For example, be sure that you have set up the required virtual IP addresses, that the user account has root permission on the storage appliance, and that you have already created the initial Oracle WebLogic Server domain for the Oracle Identity Management topology. |
"Prerequisites" in the Oracle Traffic Director Installation Guide |
|
Install the Oracle Traffic Director software. |
You install the software using the directories and mount points you created in Section 7.5.5, "Recommended Directory Locations." |
|
|
Create and start an Oracle Traffic Director Administration Server. |
The Oracle Traffic Director administration server hosts the administration console and command-line interface, through which you can create Oracle Traffic Director configurations, deploy them as instances on administration nodes, and manage the instances. |
Section 14.2.1, "Creating and Starting the Traffic Director Administration Server" |
|
Verify the installation. |
Be sure that the installation was successful before you continue configuring the environment. |
"Verifying the Installation" in the Oracle Traffic Director Installation Guide |
|
Register WEBHOST2 as administration node. |
This ensures that Oracle Traffic Director is up and running on both WEBHOST1 and WEBHOST2. |
Section 14.2.2, "Registering WEBHOST2 with the Administration Node" |
|
Create a configuration |
The configuration should route requests from the Oracle Traffic Director instances to the managed servers in the Oracle WebLogic Server domain. The configuration should also define the required origin-server pools to which requests should be routed. |
|
|
Start the Oracle Traffic Director instances |
Start the instances on WEBHOST1 and WEBHOST2, based on the configuration you created earlier in this procedure. |
Section 14.2.4, "Starting, Stopping, and Restarting Oracle Traffic Director" |
|
Define the virtual servers. |
Define the virtual servers required for accessing the various management tools and login screens for the topology. |
|
|
Create Routes |
Adding routes allows a virtual server to direct requests to different server pools depending on what is contained within the URI. |
|
|
Enable SSL Passthrough for login.example.com |
Perform extra configuration steps to ensure that any application redirects occur correctly. |
|
|
Deploy and test the configuration. |
Deploy the configuration and test the virtual server URLs to be sure you have configured the Oracle Traffic Director instances successfully. |
Section 14.2.9, "Deploying the Configuration and Testing the Virtual Server Addresses" |
|
Create an active-passive failover group. |
Create a failover group to ensure that requests will continue to be served if WEBHOST1 or WEBHOST2 become unavailable. |
Section 14.2.10, "Creating a Failover Group for Virtual Hosts" |
This section contains the following topics:
-
Section 14.2.1, "Creating and Starting the Traffic Director Administration Server"
-
Section 14.2.2, "Registering WEBHOST2 with the Administration Node"
-
Section 14.2.4, "Starting, Stopping, and Restarting Oracle Traffic Director"
-
Section 14.2.8, "Workaround for Issues caused by TMPWATCH cleanup"
-
Section 14.2.9, "Deploying the Configuration and Testing the Virtual Server Addresses"
-
Section 14.2.10, "Creating a Failover Group for Virtual Hosts"
14.2.1 Creating and Starting the Traffic Director Administration Server
After you install Oracle Traffic Director on WEBHOST1 and WEBHOST2, you can then create an Oracle Traffic Director administration server.
You can configure Oracle Traffic Director to run either as root or as a non-privileged user. Oracle recommends configuring it to run as root although instructions for both are included in this chapter. Running Oracle Traffic Director as root allows all administrative tasks such as starting and stopping instances to be run from the Oracle Traffic Director administration console.
If you decide not to configure Oracle Traffic Director to run as root, additional steps are required outside of the Oracle Traffic Director console using the root account. This is because failover groups (discussed later) require the running of processes to which only root has access.
For more information, see "Managing the Administration Server" in the Oracle Traffic Director Administrator's Guide
To create the Oracle Traffic Director administration server on WEBHOST1 run the tadm command from the OTD_ORACLE_HOME/bin directory, as follows:
-
On WEBHOST1 enter the following command:
OTD_ORACLE_HOME/bin/tadm configure-server --port=OTD_ADMIN_PORT \
--user=otdadmin --instance-home=OTD_ORACLE_INSTANCE --host=OTDADMINVHN  --server-user=root
Where:
-
OTD_ORACLE_HOMEthe Oracle Home location you entered in the Oracle Traffic Director installer. -
OTD_ORACLE_INSTANCEis the recommended value listed in Table 7-4, "Private Storage Directories - Distributed Topology". -
OTDADMINVHNis the virtual host name to be used for the Oracle Traffic Director administration server and console.
For example:
OTD_ORACLE_HOME/web/bin/tadm configure-server --port=8800 --user=otdadmin \
--instance-home=/u02/private/oracle/config/instances/otd1 --host=OTDADMINVHN.example.com
Note:
If you want to run Oracle Traffic Director as the root user, which is necessary if you want Oracle Traffic Director to work using ports <1024, you must add the following additional parameter to the command:--server-user=root
-
-
Enter the administrator password.
You will later use this password to log in to the Oracle Traffic Director administration console.
A prompt to re-enter the administrator password is displayed, as follows:
Please enter admin-user-password again>
-
Confirm the administrator password by entering it again.
An Administration Server instance of Oracle Traffic Director is created and deployed on the local host in a directory named
admin-serverwithin the OTD_ORACLE_INSTANCE directory that you specified in step 1. -
Start the Administration Server by running the following command on WEBHOST1:
WEB_INSTANCE_HOME/admin-server/bin/startservIf you want the server to run as
root, start it asroot. -
Log in to the Administration Server using the following URL:
https://OTDADMINVHN:8800
where 8800 is
OTD_ADMIN_PORT.Use the password provided above and verify that you can see the Oracle Traffic Director main page.
14.2.2 Registering WEBHOST2 with the Administration Node
This section assumes you have installed Oracle Traffic Director, started the Administration Server, and verified the installation.
WEBHOST1 and WEBHOST2 have IP over InfiniBand (IPoIB) addresses. For example, 192.168.10.5 and 192.168.10.6.
You can now register WEBHOST2 with the Oracle Traffic Director Administration Server using the tadm command from the OTD_ORACLE_HOME/bin directory, as follows:
-
On the WEBHOST2, run the
configure-servercommand to register the host with the remote Administration Server as an administration node../tadm configure-server --user=otdadmin --port=OTD_ADMIN_PORT --host=OTDADMINVHN \ --admin-node --node-port=OTD_NODE_PORT --instance-home=OTD_ORACLE_INSTANCE --node-host=WEBHOST2 --server-user=root
Where:
-
OTD_ORACLE_HOMEis the path to the Oracle Traffic Director Oracle home on WEBHOST2. -
WEB_INSTANCE_HOME is the recommended directory path listed in Table 7-4, "Private Storage Directories - Distributed Topology"
-
node-hostis the name of the machine that this instance is running on (IAMHOST1, IAMHOST2, or WEBHOST2).
For example:
./tadm configure-server --user=otdadmin --port=8800 --host=OTDADMINVHN --admin-node \
--node-port=8900 --instance-home=/u02/private/oracle/config/instances/otd2 --node-host=WEBHOST2
Note:
If you want to run Oracle Traffic Director as the root user, which is necessary if you want Oracle Traffic Director to work using ports <1024, you must add the following additional parameter to the command:--server-user=root
For more information, see "configure-server" in the Oracle Traffic Director Command-Line Reference or use the
configure-server --helpcommand to see an explanation of the command line options.The following prompt appears after you run
configure-servercommand:This command creates an Administration Node and register it with the following remote Administration Server: https://WEBHOST1.example.com Enter admin-user password>
-
-
Enter the admin-user password for the Oracle Traffic Director Administration Server.
The
configure-servercommand attempts to connect to the remote administration server by using the specified administration server host, port, user, and password. The Administration Server on WEBHOST1 must be up and running.If this is the first time that the host on which you are creating the administration node is attempting to connect to the administration server, the server certificate of the administration server is displayed.
-
Enter
yto trust the certificate.The following message is displayed:
OTD-70215 The administration node has been configured successfully.The node can be started by executing: OTD_ORACLE_INSTANCE/admin-server/bin/startserv -
Start the Oracle Traffic Director Server by running the following command on WEBHOST2:
WEB_INSTANCE_HOME/admin-server/bin/startservIf you want the server to run as
root, start it asroot.
After you start the administration node, you can create instances of Oracle Traffic Director configurations on the administration node. Note that on each administration node, you can create only one instance of a configuration.
14.2.3 Creating a Configuration
The next step in installing and configuring Oracle Traffic Director for an enterprise deployment is to create a configuration that will route requests to a server pool that consists of the managed servers in your Oracle WebLogic Server domain.
When creating a new configuration, you are required to provide the host and port information for the origin server, which in turn automatically creates (and names) an origin-server pool called origin-server-pool-1. This is the default origin-server pool and this pool can be found when you click the Server Pools option in the administration console. You cannot rename the default origin-server pool.
To create a configuration named IAM by using the administration console:
-
Log in to the OTD administration console using the URL specified in Section 31.2, "About Identity and Access Management Console URLs."
-
In the Common Tasks pane, click New Configuration.
The New Configuration wizard starts.
-
In the Step 1 Configuration Information screen, enter the following information:
-
Name:
login.example.com -
Server User:
oracle(orroot, if you want the server instances to run asroot). -
Origin Server Type: Make sure HTTP is selected.
Click Next.
-
-
On the Configure Listener Information Screen, set the listener port to the
WEB_HTTP_PORT. For example:7777.Note:
If you are deploying Oracle Identity and Access Management using the IDM LCM tool, the listener port should be set to a temporary value such as6666. This is because, the automation tool install Oracle HTTP server on theWEB_HTTP_PORT. Once the IDMLCM installation is completed, you will disable the Oracle HTTP servers and update the OTD listen port to the WEB_HTTP_PORT value. This ensures that, when IDMLCM performs its inter-application writing, it does so using theWEB_HTTP_PORT. When the Oracle HTTP servers are disabled, OTD will then assume the role of the Web Server.Accept the other default values and click Next.
-
In the Step 3 Server Pool Information screen:
-
In the Origin Servers: Host: field, enter OAMHOST1
.example.com, the port14100(OAM_PORT), and click Add Server. -
Enter OAMHOST2
.example.comand port14100, click Add Server and click Next.
-
-
In the Step 4 Deployment Information screen, select the Administration Server and WEBHOST2 and click Next.
The Review screen appears.
-
Review the information and click Create Configuration.
The Results screen appears.
After the configuration is created, the Results screen of the New Configuration wizard displays a message confirming successful creation of the configuration. If you chose to create instances of the configuration, then a message confirming successful creation of the instances is also displayed.
-
Click Close on the Results screen.
In the New Configuration wizard, if you chose not to create an instance of the configuration, the message Undeployed Configuration is displayed, indicating that the configuration that you just created is yet to be deployed.
14.2.4 Starting, Stopping, and Restarting Oracle Traffic Director
To start and stop Oracle Traffic Director instances see Section 31.1.7.2, "Starting the Oracle Traffic Director Instances"
14.2.5 Defining the Required Oracle Traffic Director Virtual Servers for an Enterprise Deployment
Create and configure the virtual servers for the Oracle Traffic Director configuration. In this section you create the following Oracle Traffic Director virtual servers for your Oracle Identity and Access Management deployment. If External Oracle HTTP Servers are being used then several of these virtual servers should not be enabled on the Oracle Traffic Director.
Table 14-2 Defining OTD Virtual Servers
| Virtual Server | Purpose | Creating the Virtual Server | Required with OHS |
|---|---|---|---|
|
login.example.com |
Acts as the access point for all HTTP traffic that gets directed to the single sign on services. |
This virtual server is created through administration console in Section 14.2.5.2, "Creating Virtual Servers.". |
No |
|
prov.example.com |
Acts as the access point for all HTTP traffic that gets directed to the provisioning applications. |
The virtual server is created through the administration console in Section 14.2.5.2, "Creating Virtual Servers." |
No |
|
iadadmin.example.com |
Acts as the access point for all internal HTTP traffic that gets directed to the IAMAccessDomain administration services. |
This virtual server is created through administration console in Section 14.2.5.2, "Creating Virtual Servers.". |
No |
|
igdadmin.example.com |
Acts as the access point for all internal HTTP traffic that gets directed to the IAMGovernanceDomain administration services. |
This virtual server is created through administration console in Section 14.2.5.2, "Creating Virtual Servers." |
No |
|
iadinternal.example.com |
Acts as the access point for all internal HTTP traffic requests that get directed to Mobile Security Manager (MSM). |
The virtual server is created through the administration console in Section 14.2.5.2, "Creating Virtual Servers.". |
No |
|
igdinternal.example.com |
Acts as the access point for all internal HTTP traffic requests that get directed to OIM and SOA. |
This virtual server is created through administration console in Section 14.2.5.2, "Creating Virtual Servers.". |
Yes |
|
idstore.example.com |
Acts as the access point for all Identity Store LDAP traffic. |
This virtual server is created when you configure the TCP Proxy for OUD in Section 14.2.5.3, "Creating a TCP Proxy and Listener for idstore.example.com.". |
Yes |
To create and configure virtual servers using the administration console complete the steps in the following sections:
14.2.5.1 Creating OTD Origin Server Pools
A server pool is a group of one or more virtualization hosts with the same processor architecture that have access to the same virtual and physical networks, and storage resources. Server pools provide load balancing, high availability capabilities, and sharing of some resources for all members of the pool.
In this section, create the Oracle Traffic Director origin-server pools listed in Table 14-3.
Table 14-3 Origin-Server Pools and Origin Servers for Physical Exalogic
| Origin-Server Pool | Origin Server Type | Origin Servers | Port |
|---|---|---|---|
|
iadadmin-pool |
HTTP |
IADADMINVHN.example.com |
7001 ( |
|
igdadmin-pool |
HTTP |
IGDADMINVHN.example.com |
7101 ( |
|
ldap-pool |
TCP |
IAMHOST1.example.com, IAMHOST2.example.com |
1389 ( |
|
oim-pool |
HTTP |
OIMHOST1VHN1.example.com, OIMHOST2VHN1.example.com |
14000 ( |
|
ama-pool |
HTTP |
IAMHOST1.example.com, IAMHOST2.example.com |
14150 ( |
|
msm-pool |
HTTP |
IAMHOST1.example.com, IAMHOST2.example.com |
14180 ( |
|
origin-server-pool-1 |
HTTP |
IAMHOST1.example.com, IAMHOST2.example.com |
14100 ( |
|
soa-pool |
HTTP |
OIMHOST1VHN2.example.com, OIMHOST2VHN2.example.com |
8001 ( |
|
bi-pool |
HTTP |
OIMHOST1VHN3.example.com, OIMHOST2VHN3.example.com |
9704 ( |
Table 14-4 Origin-Server Pools and Origin Servers for Virtual Exalogic
| Origin-Server Pool | Origin Server Type | Origin Servers | Port |
|---|---|---|---|
|
iadadmin-pool |
HTTP |
IADADMINVHN.example.com |
7001 ( |
|
igdadmin-pool |
HTTP |
IGDADMINVHN.example.com |
7101 ( |
|
ldap-pool |
TCP |
LDAPHOST1.example.com, LDAPHOST2.example.com |
1389 ( |
|
oim-pool |
HTTP |
OIMHOST1VHN1.example.com, OIMHOST2VHN1.example.com |
14000 ( |
|
origin-server-pool-1 |
HTTP |
OAMHOST1.example.com, OAMHOST2.example.com |
14100 ( |
|
soa-pool |
HTTP |
OIMHOST1VHN2.example.com, OIMHOST2VHN2.example.com |
8001 ( |
|
bi-pool |
HTTP |
OIMHOST1VHN3.example.com, OIMHOST2VHN3.example.com |
9704 ( |
|
ama-pool |
HTTP |
OAMHOST1.example.com,OAMHOST2.example.com |
14150 ( |
|
msm-pool |
HTTP |
OAMHOST1.example.com,OAMHOST2.example.com |
14180 ( |
Table 14-5 Origin-Server Pools and Origin Servers for External OHS Servers
| Origin-Server Pool | Origin Server Type | Origin Servers | Port |
|---|---|---|---|
|
iadadmin-pool |
HTTP |
IADADMINVHN.example.com |
7001 ( |
|
igdadmin-pool |
HTTP |
IGDADMINVHN.example.com |
7101 ( |
|
ldap-pool |
TCP |
IAMHOST1-EXT.example.com, IAMHOST2-EXT.example.com |
1389 ( |
|
oim-pool |
HTTP |
OIMHOST1VHN2-EXT.example.com OIMHOST2VHN2-EXT.example.com |
14000 ( |
|
bi-pool |
HTTP |
OIMHOST1VHN3-EXT.example.com, OIMHOST2VHN3-EXT.example.com |
9704 ( |
|
origin-server-pool-1 |
HTTP |
IAMHOST1-EXT.example.com, IAMHOST2-EXT.example.com |
14100 ( |
|
soa-pool |
HTTP |
OIMHOST1VHN2.example.com, OIMHOST2VHN2.example.com |
8001 ( |
|
ama-pool |
HTTP |
IAMHOST1-EXT.example.com, IAMHOST2-EXT.example.com |
14150 ( |
|
msm-pool |
HTTP |
IAMHOST1-EXT.example.com, IAMHOST2-EXT.example.com |
14180 ( |
Note:
Theorigin-server-pool-1 is created automatically for you when you created the configuration.To create an origin-server pool:
-
Log in to the Administration Console using the following URL:
https://OTDADMINVHN:OTD_ADMIN_PORTwhere
OTD_ADMIN_PORTis defined in Section 8.1, "Summary of Virtual IP Addresses Required." -
Click the Configurations button that is situated at the upper left corner of the page.
A list of the available configurations is displayed.
-
Select the configuration for which you want to create a server pool. For example,
login.example.com. -
In the Common Tasks pane, click New Server Pool.
The New Origin-Server Pool wizard starts.
Figure 14-2 New Origin-Server Pool Wizard

Description of ''Figure 14-2 New Origin-Server Pool Wizard''
-
Enter the following information in the Server Pool Information screen:
-
Name: Name of the server pool. For example,
oim-pool -
Origin Server Type: The type of requests the pool handles. For example,
HTTP. -
Address Family: The way OTD communicates with the origin servers. This is normally set to
inet.
Click Next.
-
-
Enter the following information in the Origin Server Information screen:
-
Origin Server Host:
OIMHOST1VHN1.example.com -
Port:
14000(OIM_PORT)
Click Add Server.
-
-
Enter the information for any other servers. For example:
-
Origin Server Host:
OIMHOST2VHN1.example.com -
Port:
14000(OIM_PORT)
Click Next.
Review the information on the Review screen. If the information is correct, click Create Server Pool.
-
-
For each HTTP pool that was created and has more than one origin server, perform the additional configuration steps:
-
Click on the newly create server pool name, for example
oim-pool.The pool properties appear.
-
Expand the Advanced Settings.
-
Enable the check box Dynamic Discovery
This ensures that any new cluster members added at a later date are automatically added to the OTD server pool without you having to add them manually, although it is still good practice.
Note:
You cannot use Dynamic Discovery for the OUD origin server pool (oud-pool) -
Click Save.
-
-
Click Close on the Results screen.
-
The details of the origin-server pool that you just created are displayed on the Origin-Server Pools page.
-
In addition, the Deployment Pending message is displayed at the top of the main pane. You can either deploy the updated configuration immediately by clicking Deploy Changes, or you can do so later after making further changes as described in Section 14.2.9, "Deploying the Configuration and Testing the Virtual Server Addresses."
-
-
Repeat these steps for the origin-server pool listed in Table 14-3.
14.2.5.2 Creating Virtual Servers
Create virtual servers using the information in Table 14-7, "Routes and Conditions".
Table 14-6 Virtual Server Information
| Name | Host | Pool |
|---|---|---|
|
login.example.com |
login.example.com |
origin-server-pool-1 |
|
prov.example.com |
prov.example.com |
soa-pool |
|
iadadmin.example.com |
iadadmin.example.com |
iadadmin-pool |
|
igdadmin.example.com |
igdadmin.example.com |
igdadmin-pool |
|
igdinternal.example.com |
igdinternal.example.com |
oim-pool |
|
iadinternal.example.com |
iadinternal.example.com |
msm-pool |
Note:
Thelogin.example.com virtual server is created automatically when you created the configuration.To create a virtual server using the administration console:
-
Log in to the OTD administration console using the URL specified in Section 31.2, "About Identity and Access Management Console URLs.":
-
Click the Configurations button that is situated at the upper left corner of the page.
A list of the available configurations is displayed.
-
Select the configuration for which you want to create a virtual server, for example
login.example.com. -
In the Common Tasks pane, click New Virtual Server.
The New Virtual Server wizard starts.
-
On the Virtual Server Information Page enter the following information:
-
Name: The name describing the virtual server. For example,
login.example.com -
Host: The name in the DNS/Hosts which is used to access this virtual server. For example,
login.example.com
Click Next.
-
-
On the HTTP Listener Information screen, select the existing Listener.
Click Next.
-
On the server Pool Information Screen, enter the following information:
-
Select: Select a pool of origin servers.
-
Name: Select the name of one of the server pools you created in 0, "Creating OTD Origin Server Pools".
Click Next.
-
-
Review the supplied information in the Review screen and click Create Virtual Server.
-
Repeat steps 4-6 for each virtual server in Table 14-6.

14.2.5.3 Creating a TCP Proxy and Listener for idstore.example.com
Create a TCP Proxy using the administration console.
To create a TCP Proxy:
-
Log in to the OTD administration console using the URL specified in Section 31.2, "About Identity and Access Management Console URLs.":
-
Click the Configurations button that is situated at the upper left corner of the page.
A list of the available configurations is displayed.
-
Select the configuration for which you want to create a TCP Proxy, for example
login.example.com. -
In the Common Tasks pane, click New TCP Proxy.
The New TCP Proxy wizard starts.
-
In the Step 1: TCP Proxy Information screen, enter the following information and click Next:
-
Name:
idstore.example.com -
Listener Name:
listener-oud -
Port:
1389(LDAP_LBR_PORT)Note:
If your LDAP server is running on the same host as your OTD instance, then the LDAP port (LDAP_PORT) and your OTD LDAP port (LDAP_LBR_PORT) must be different. -
In the IP Address field, enter
*.
-
-
In the Step 2: Server Pool Information screen, click Select a pool of origin servers.
-
In the drop-down list, select ldap-pool and click Next.
The Review screen appears.
-
Review the details and click Create TCP Proxy.
-
Click Close on the Results screen.
-
The details of the TCP Proxies that you just created are displayed on the TCP proxies page.
-
In addition, the Deployment Pending message is displayed at the top of the main pane. You can either deploy the updated configuration immediately by clicking Deploy Changes, or you can do so later after making further changes, as described in Section 14.2.9, "Deploying the Configuration and Testing the Virtual Server Addresses."
-
14.2.6 Creating Routes
Note:
This section is only relevant when Oracle Traffic Director is used as a web server.Routes are similar to an Oracle HTTP location directives. Any requests received for a specific URI inside a virtual server are directed to the appropriate server pool. Adding routes allows a virtual server to direct requests to different server pools depending on what is contained within the URI.
Create the routes listed in Table 14-7using the administration console. If External Oracle HTTP Servers are being used, then routes only required for IGDINTERNAL.example.com. All other routing will take place on the Oracle HTTP Server.
Table 14-7 Routes and Conditions
| Virtual Host | Route | Origin-Server Pool | Conditions | Cookie Name |
|---|---|---|---|---|
|
iadadmin.example.com |
default |
iadadmin-pool |
N/A |
|
|
amaadmin-route |
ama-pool |
$uri= ~'/access' |
||
|
igdadmin.example.com |
default |
igdadmin-pool |
NA |
|
|
bi-route |
bi-pool |
$usr= ~'/xmlpserver' |
oimjsessionid |
|
|
oim-admin-route |
oim-pool |
$uri =~ '/oim' or |
||
|
$uri =~ '/identity' or |
||||
|
$uri =~ '/sysadmin' or |
||||
|
$uri =~ '/xlWebApp' or |
||||
|
$uri =~ '/Nexaweb' |
||||
|
login.example.com |
default |
origin-server-pool-1 |
N/A |
OAM_JSESSIONID |
|
prov.example.com |
default |
soa_pool |
N/A |
oimjsessionid |
|
oim-prov-route |
oim-pool |
$uri =~ '/identity' or |
oimjsessionid |
|
|
$uri =~ '/xlWebApp' or |
||||
|
$uri =~ '/HTTPClnt' or |
||||
|
$uri =~ '/reqsvc' |
||||
|
igdinternal.example.com |
default |
oim-pool |
N/A |
oimjsessionid |
|
soa-igdinternal-route |
soa-pool |
$uri =~ '/soa-infra' or |
oimjsessionid |
|
|
$uri =~ '/sodcheck' or |
||||
|
$uri =~ '/integration' or |
||||
|
$uri =~ '/ucs' |
||||
|
iadinternal.example.com |
default |
iammsm-pool |
N/A |
To create virtual server routes:
-
Log in to the OTD administration console using the URL specified in Section 31.2, "About Identity and Access Management Console URLs.":
-
Click the Configurations button that is situated at the upper left corner of the page.
A list of the available configurations is displayed.
-
Select the configuration for which you want to configure routes, for example
login.example.com. -
In the navigation pane, expand Virtual Servers, expand the login.example.com virtual server, and select Routes.
The Routes page is displayed. It lists the routes that are currently defined for the virtual server.
Creating a Route
-
Click New Route.
The New Route dialog box is displayed.
-
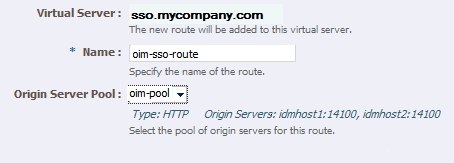
In the Step 1: Route Properties screen, in the Name field, enter
oim-sso-route -
In the Origin Server Pool drop-down select
oim-pool, and click Next. -
In the Step 2: Condition Information screen, select the $uri variable from the Variable/Function drop-down list. Select the Operator ('= ~ ' in your example). And enter the value in the Value field.
Note:
Joiner, such asandoror, cannot be used for the first expression in the sequence.Figure 14-6 New Route Condition Expressions
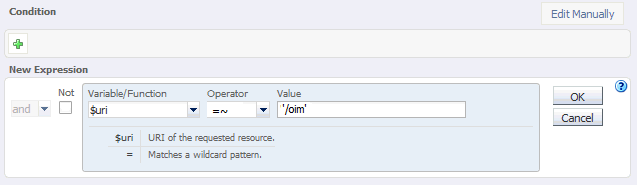
Description of ''Figure 14-6 New Route Condition Expressions''
-
Click OK and click the Plus button to add the next expression.
Figure 14-7 New Route Condition Information

Description of ''Figure 14-7 New Route Condition Information''
-
Select the Variable/Function, Operator, and Value and click OK.
Figure 14-8 New Route Condition Information
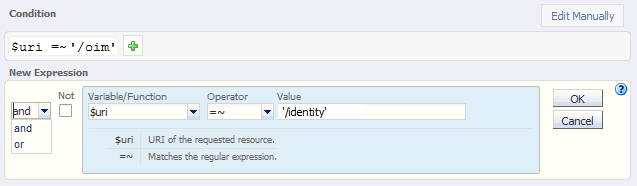
Description of ''Figure 14-8 New Route Condition Information''
Note the joiner 'or' can now be selected.
-
Perform steps d to g until you have added all the required values
You can also click the Edit Manually button to edit the expressions in a text field. Note that going into the manual mode, it is not possible to go back to the default edit mode. You must continue in the manual edit mode and save the condition.
-
-
Click Next, and then Create Route.
The route that you just created is displayed on the Routes page.
In addition, the Deployment Pending message is displayed at the top of the main pane. You can either deploy the updated configuration immediately by clicking Deploy Changes, or you can do so later after making further changes as described in Section 14.2.9, "Deploying the Configuration and Testing the Virtual Server Addresses."
-
Update the cookie name of the newly created route and the default route:
-
Click on the newly created route.
-
Expand the Advanced Settings
-
Set Sticky Cookie to the cookie name from table Table 14-7.
-
Set the Sticky URI Parameter to the cookie name from Table 14-7.
-
Repeat these steps for the values listed in Table 14-7.
Click Save.
-
14.2.7 Enabling SSL Passthrough
In the enterprise deployment, Topology SSL is terminated at the hardware load balancer and passed through to Oracle Traffic Director using the HTTP protocol. If an external HTTP server is being used, this section is not applicable.
Oracle Traffic Director requires extra configuration steps to ensure that any application redirects occur correctly.
To ensure application redirects occur correctly:
-
Log in to the OTD administration console using the URL specified in Section 31.2, "About Identity and Access Management Console URLs.":
-
Click the Configurations button at the upper left corner of the page.
A list of the available configurations is displayed.
-
Select the configuration for which you want to configure routes, for example
login.example.com. -
In the Navigation Pane, expand Virtual Servers and select the virtual server login.example.com.
-
Click Routes.
The defined routes appear.
-
Click a route, for example, default-route.
The Route Properties screen appears.
-
Expand Advanced Settings.
-
In the Route Properties section, remove any content in the box labeled Rewrite Headers.
-
In the Parameters Forwarded to Origin Servers section, deselect the following:
-
SSL
-
Cipher
-
Key Size
-
Secret Key Size
-
SSL/TLS Session ID
-
Certificate
-
User DN
-
Issuer DN
Click Save.
-
-
Repeat for each route associated with the virtual server
login.example.com. -
Repeat for each route associated with the virtual server
prov.example.com
14.2.8 Workaround for Issues caused by TMPWATCH cleanup
When OTD runs, it creates files in /tmp. The UNIX process TMPWATCH, which cleans up the temporary directory, can delete these files. This effects OTD's operation.
To avoid this issue, Oracle Traffic Director must be told to place its files in a location other than /tmp.
To do direct OTD to do this:
-
Create a directory named
tmpinLOCAL_CONFIG_DIR, with the user same as the one that is used for running OTD Server.For example:
mkdir LOCAL_CONFIG_DIR/tmpCreate this directory on each OTD host.
-
Log in to the OTD Administration Console using the URL specified in Section 31.2, "About Identity and Access Management Console URLs."
-
Click Advanced Settings from the Configuration menu.
-
In the General Configuration settings, update the value of Temporary Directory to
LOCAL_CONFIG_DIR/tmp. -
Click Save.
14.2.9 Deploying the Configuration and Testing the Virtual Server Addresses
Deploy the configuration to create an instance of it on an administration node. When you deploy a configuration, the running instances are reconfigured to reflect the configuration changes.
Deploying a Configuration Using the Administration Console
To deploy a configuration by using the administration console, do the following:
-
Log in to the OTD administration console using the URL specified in Section 31.2, "About Identity and Access Management Console URLs.":
-
Click the Configurations button at the upper left corner of the page.
A list of the available configurations is displayed.
-
Select login.example.com.
-
Click Deploy.
A message is displayed confirming that the updated configuration was successfully deployed.
-
Click Close.
14.2.10 Creating a Failover Group for Virtual Hosts
When a request is sent to one of the virtual hosts idstore.example.com and IGDINTERNAL.example.com it is directed to the IP address associated with the virtual host name. This IP address is enabled on one of the OTD instances. In the case of failure, IP address is moved to an OTD instance that is still available.
Each OTD instance maintains a heart beat with each other OTD instance. If that heartbeat fails then OTD moves active IP addresses on the downed instance to one of the named failover instances. You do this by creating an active-passive failover group for the IP address. This failover group lists a primary and a number of secondary instances.
The enterprise deployment on Exalogic uses the following four failover groups:
-
A failover group for distributing internal LDAP requests among the OUD servers.
-
A failover group for internal inter-app requests.
-
Two failover groups to allow the external load balancer requests among Oracle Traffic Director servers. This failover group is optional, as the load balancer could point to the OTD instances directly. The benefit of using an Oracle Traffic Director failover group is that failures are detected and resolved faster using the failover group resulting in a reduced recovery time from failed servers.
The steps below show you how to create failover groups with the information in Table 14-8.
Table 14-8 Failover Group Details
| Virtual Host | Router ID | Network Prefix | Primary Node | Primary Network Interface | Secondary Node | Secondary Network Interface |
|---|---|---|---|---|---|---|
|
idstore.example.com |
50 |
19 |
Admin Node |
bond0 |
WEBHOST2 |
bond0 |
|
iadinternal.example.com |
52 |
19 |
WEBHOST2 |
bond0 |
Admin Node |
bond0 |
|
igdinternal.example.com |
53 |
19 |
Admin Node |
bond0 |
WEBHOST2 |
bond0 |
|
webhost1vhn1.example.com |
54 |
19 |
Admin Node |
bond1 |
WEBHOST2 |
bond1 |
|
webhost2vhn1.example.com |
55 |
19 |
WEBHOST2 |
bond1 |
Admin Node |
bond1 |
Note:
The failover groups for the external virtual IP addresses are optional since the load balancer fails over requests between the two Oracle Traffic Director instances. However, they will provide faster failure detection and failover than the typical load balancer monitors.Note:
The router ID is a unique number you assign to the routing. The number must be between 1 and 244.The Network Prefix is the subnet mask in the CIDR format.
The primary node is the node where the Failover group is initially active.
The Primary Network Interface is the interface on the host where the failover group is bound.
The Secondary Node is the Node on which the failover group can be started if the Primary node is unavailable.
The Secondary Network interface is the Network Interface used on the Secondary node.
To create a failover group by using the administration console, do the following:
-
Log in to the OTD administration console using the URL specified in Section 31.2, "About Identity and Access Management Console URLs.":
-
Click the Configurations button at the upper left corner of the page.
A list of the available configurations appears.
-
Select the configuration for which you want to create a failover group, for example
login.example.com. -
In the navigation pane, click Failover Groups.
The Failover Groups page is displayed.
-
Click New Failover Group.
The New Failover Group wizard is displayed.
-
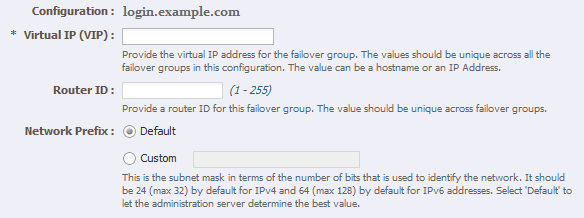
In the Virtual IP (VIP) field, enter the virtual IP address associated with
idstore.example.com. For example, 192.168.50.2. Click Next.To create the failover group for the
igdinternal.example.comuse the VIP associated with theigdinternal.example.comas shown in the workbook. For example, 192.168.50.1. -
In the Step 2: Failover Nodes Information screen, select the Primary and Backup nodes, (OTDADMIN, WEBHOST2), and click Next.
The details of the failover group that you just created are displayed on the Failover Groups page.
Note:
Generally it is sufficient to leave Network Interface (NIC) at the default value ofAuto Detect. If you leave the default, Oracle Traffic Director (OTD) determines which network interface card to use based on the IP address of the failover group. If, however, this is not easily derivable, for example, if you have not used a standard CIDR associated with the IP address, you may have to manually tell OTD the network interface to which the failover group should be attached.For example, if your internal IP address is 192.168.1.1, and it is associated with
bond0, and uses a valid net mask (CIDR), and your IP address of the failover group is 192.168.50.1, OTD knows to use network interfacebond0. If, however, OTD cannot determine the appropriate interface, you are required to specify it in this field.Oracle Traffic Director validates the information before creating the failover group.
If you receive a validation error similar to the following, the IP Address you are trying to assign is incompatible with the current configuration of the network card. If you see this error you will have to choose a different IP Address/netmask:
OTD-67322 The specified virtual IP 'x.x.x.x' cannot be bound to any of the network interfaces on the node 'hostname'.
The IP addresses bound to the node are [......] check if the specified virtual IP is in the proper subnet.
This error could also be caused if either the network interfaces on the node are not configured correctly or if the network prefix
length is incorrect.
-
Click Close on the Results screen.
The details of the failover group that you just created are displayed on the Failover Groups page.
Note:
A message may be displayed indicating that the failover group could not be started in the involved nodes due to insufficient privileges. To resolve this, log in to each node as root and run the following command:OTD_ORACLE_HOME/bin/tadm start-failover --instance-home=WEB_INSTANCE_HOME/ --config=login.example.com
14.3 Backing up the Web Tier Configuration
It is an Oracle best practices recommendation to create a backup after successfully completing the installation and configuration of each tier, or at another logical point. Create a backup after verifying that the installation so far is successful. This is a quick backup for the express purpose of immediate restoration in case of problems in later steps. The backup destination is the local disk. You can discard this backup when the enterprise deployment setup is complete. After the enterprise deployment setup is complete, you can initiate the regular deployment-specific Backup and Recovery process. For more details, see the Oracle Fusion Middleware Administrator's Guide.
To back up the web tier installation, follow these steps,
-
Shut down the instance as described in Section 31.1, "Starting and Stopping Enterprise Deployment Components."
-
Back up the Middleware home on the web tier. On Linux, use the following command, as
root:tar -cvpf BACKUP_LOCATION/web.tar MW_HOME
-
Back up the Instance home on the web tier using the following command, as
root:tar -cvpf BACKUP_LOCATION/web_instance.tar ORACLE_INSTANCE
-
Start the instance as described in Section 31.1, "Starting and Stopping Enterprise Deployment Components."
Note:
Create backups on all machines in the web tier by following the steps shown.Back up the Oracle Traffic director configuration. For more information, see Section 31.5, "Performing Backups and Recoveries."