5 Installing Provisioning Gateway
This section describes the steps necessary for installing Provisioning Gateway.
It covers the following topics:
-
Configuring IIS for Provisioning Gateway on Windows Server 2008/2008 R2
-
Configuring IIS for Provisioning Gateway on Windows Server 2012
-
(Optional) Installing the Client-Side Provisioning Gateway Command-Line Interface (CLI)
5.1 Prerequisites for Installing Provisioning Gateway
Before you install Provisioning Gateway, ensure the following prerequisites have been satisfied:
Note:
When installing on Windows XP, you must install the latest root certificate update from Microsoft, otherwise the installation will fail.For details and instructions, see the following Microsoft Knowledge Base article:
http://support.microsoft.com/kb/931125
Please refer to the latest release notes to find out about last-minute requirements or changes that might affect your installation.
-
In order to install the Provisioning Gateway server-side component, you must run the installer as a user with administrative privileges; otherwise, the installer will fail.
-
Provisioning Gateway Server at the very minimum requires the following software to function:
-
Microsoft Windows Server 2008/2008 R2, or Windows Server 2012.
-
Microsoft Internet Information Server version 7.0 or later. Provisioning Gateway uses the IIS Web server to provide a browser-based interface for user enrollment, general setup, and administrative tasks.
-
Microsoft Active Directory®, Microsoft AD LDS (ADAM), Oracle Directory Server Enterprise Edition, Oracle Unified Directory, Oracle Virtual Directory, IBM LDAP Directory, Oracle Internet Directory, Novell eDirectory Server.
Note:
If Active Directory or AD LDS (ADAM) is used, the anonymous account used in IIS must have administrative privileges and the server must be joined to the domain. -
Microsoft SQL Server 2000, Microsoft SQL Server 2000 Desktop Engine (MSDE 2000), Microsoft SQL Server 2005 Express Edition, or Microsoft SQL Server 2005 (only required if you are using event logging) , or
-
Oracle database
-
-
You must configure a data repository as described in the guide Deploying Logon Manager with a Directory-Based Repository. This repository will store Provisioning Gateway data. If you have already deployed Logon Manager, you can use the existing Logon Manager repository with Provisioning Gateway.
-
During the installation of Provisioning Gateway, you must provide the following information to set up a connection to your Provisioning Gateway repository:
host Name of the server hosting the directory server instance. port Port number of directory server instance. name1[name2, name3] Distinguished name of the directory server domain root. -
An X.509 Certificate for SSL must be obtained from a certificate authority (CA). A trusted root CA certificate should also be downloaded from your certificate authority into the list of trusted root CA certificates on the local computer. For more information, see Configuring Provisioning Gateway for SSL Connectivity.
If you do not have a certificate authority in place and want to use Microsoft Certificate Services to obtain certificates, refer to the Oracle Enterprise Single Sign-On Suite Administrator's Guide, which explains how to obtain the necessary certificates using Microsoft Certificate Services. The guide also explains how to set up Provisioning Gateway to use a certificate.
5.1.1 Prerequisites for Unattended ("Silent") Installations
In order to successfully install Logon Manager, Provisioning Gateway Client, and Password Reset Client in unattended ("silent") mode, the Windows Management Instrumentation (WMI) service must be running before the installer is executed.
To check whether the WMI service is running, and start it if necessary, do the following on each target machine:
-
Open the System Management Console.
-
Open the Services snap-in.
-
Navigate to the Windows Management Instrumentation service and check its status and startup mode.
Depending on the status, do one of the following:
-
If the status is Started, the WMI service is running; proceed to the next section.
-
If the status is blank, check the service's startup type and start it as follows:
-
Double-click the service.
-
In the properties box that appears, set the startup type to Manual or Automatic, as dictated by your environment and click Apply.
-
Click Start. The status changes to Started.
-
Click OK to close the service properties dialog box.
-
5.2 Configuring IIS for Provisioning Gateway on Windows Server 2008/2008 R2
Prior to installing the Provisioning Gateway server, you must install Microsoft Internet Information Services as follows:
-
In the Windows Server Manager, select Roles>Add Roles.
-
In the Add Roles Wizard, select the Web Server (IIS) role.
-
In the popup window that appears, confirm that you want to add the required features.
-
Click Next.
-
In the "Role Services" window, select the following roles, if they are not already selected:
-
Application Development: ASP .NET and its required features
-
Common HTTP Features: Static Content, Default Content, Directory Browsing, HTTP Errors
-
Health and Diagnostics: HTTP Logging, Request Monitor
-
Security: Windows Authentication, Digest Authentication, IP and Domain Restrictions, Request Filtering
-
Performance: Static Content Compression
-
Management Tools: IIS Management Console, IIS Management Scripts and Tools, Management Service, IIS 6 Management Compatibility (with all sub-components)
-
-
Click Next.
-
In the confirmation window, verify your installation selections. Click Back if you want to change any of your selections. Click Install when you are ready to begin installation.
After the installation completes, continue to Installing the Provisioning Gateway Server-Side Component.
5.3 Configuring IIS for Provisioning Gateway on Windows Server 2012
Prior to installing the Provisioning Gateway server, you must install Microsoft Internet Information Services as follows:
-
In the Windows Server Manager, click Manage in the upper-right corner, and select Add Roles or Features. from the menu that appears.
-
In the Add Roles and Features Wizard, click Next.
-
In the "Select installation type" screen, select Role-based or feature-based installation and click Next.
-
In the "Select destination server" screen, select the Select a server from the server pool option, then select the target server from the list and click Next.
-
In the "Select server roles" screen, select Web Server (IIS); in the pop-up requesting to add features required by IIS, click Add Features; click Next.
-
In the "Web server role (IIS)" screen, click Next.
-
In the "Features" screen, click Next.
-
In the "Role services" screen, select the following and accept any prompts for installing features related to your selections:
-
Common HTTP Features: Default Document, Directory Browsing, HTTP Errors, Static Content, HTTP Redirection
-
Health and Diagnostics: HTTP Logging, Logging Tools, Request Monitor, Tracing
-
Performance: Static Content Compression
-
Security: Request Filtering, Digest Authentication, IP and Domain Restrictions, Windows Authentication
-
Application Development: .NET 3.5 Extensibility, .NET 4.5 Extensibility, ASP.NET 3.5, ASP.NET 4.5, ISAPI Extensions, ISAPI Filters
-
Management Tools: IIS Management Console, IIS 6 Management Compatibility (with all sub-components), IIS 6 Management Scripts and Tools
-
-
Click Next.
-
In the "Summary" screen, confirm your selections, click Install, and wait for the installation to complete.
After the installation completes, continue to Installing the Provisioning Gateway Server-Side Component.
5.4 Upgrading an Existing Provisioning Gateway Installation
If you are upgrading from an earlier version of Provisioning Gateway, perform the following procedures:
-
Provisioning Gateway Server. Follow the instructions in Installing the Provisioning Gateway Server-Side Component to install Provisioning Gateway Server. After running the installer, reset Microsoft IIS and verify that the anonymous service accounts are still assigned.
-
Provisioning Gateway Agent. The Agent has been integrated into Logon Manager and is installed with it automatically. To upgrade, uninstall all previous versions of Provisioning Gateway Agent, shut down the Logon Manager, then follow the instructions in Upgrading an Existing Logon Manager Installation. Restart Logon Manager when done.
5.5 Installing the Provisioning Gateway Server-Side Component
To install and configure the Provisioning Gateway Server:
-
Close all programs.
-
Launch the ESSO-PG_Server.msi installer file.
-
On the Welcome Panel, click Next.
-
On the Setup Type screen, select Complete or Custom. Complete installs all program files. Custom allows you to choose which program files are installed and where they are installed. Custom installations are only recommended for advanced users. Click Next.
-
Provisioning Gateway is ready to be installed. Click Install. Wait for the installation to complete. When it is done, click Finish.
5.6 (Optional) Installing the Client-Side Provisioning Gateway Command-Line Interface (CLI)
Note:
This installation procedure is optional. The Provisioning Gateway Client CLI SDK is supplied as an integration component for Provisioning Solutions.This software requires that a Java runtime environment version 1.6 or later is installed on the target machine.
The Provisioning Gateway Server provides a Web service that allows integration with other third-party provisioning systems. The Provisioning Gateway CLI is used to communicate with this Web service. You can use it as a traditional scripting tool or, if you prefer, you can use the SDK library to develop more complex integration solutions and connectors for the Provisioning Gateway Server.
Complete the following procedure to install and configure the Provisioning Gateway CLI. For more information on the CLI syntax and usage, refer to the Provisioning Gateway CLI Guide.
-
Close all programs.
-
Launch the ESSO-PG_ClientCLI.msi installer file.
-
On the Welcome Panel, click Next.
-
The Setup Type panel appears. Select Complete or Custom. Complete installs all program files; Custom allows you to choose what program files are installed and the location. Custom installations are only recommended for advanced users. To install the Java CLI, you must choose the custom panel.
-
Select the proper setup options and click Next.
-
Provisioning Gateway is ready to be installed. Click Install.
-
When the installation is complete, click Finish.
5.7 Completing the Installation of Provisioning Gateway
This section describes the tasks necessary to create a fully functional Provisioning Gateway deployment. It covers the following topics:
5.7.1 Granting the Required Permissions to the PMSERVICE Account
You must grant the permissions required by Provisioning Gateway to each repository container holding user data to the PMSERVICE account as follows:
-
In the repository, navigate to the Logon Manager configuration data container (usually named
SSOConfig) and open its permission dialog, then do the following:-
Select This object and all child objects from the Apply onto: drop-down list.
-
Grant the
PMSERVICEaccount read-only access to theSSOConfigcontainer.
-
-
Navigate to the Users container and open its permissions dialog and do the following:
-
Select User Objects from the Apply Onto: drop-down list.
-
Grant the
PMSERVICEaccount the followingALLOWprivileges:Create vGOConfig Objects, Delete vGOConfig Objects, Create vGOUserData Objects, Delete vGOUserData Objects, List Contents, Read All Properties, Read Permissions.
-
-
Grant the
PMSERVICEaccount the Full Control privilege overvGOConfigobjects: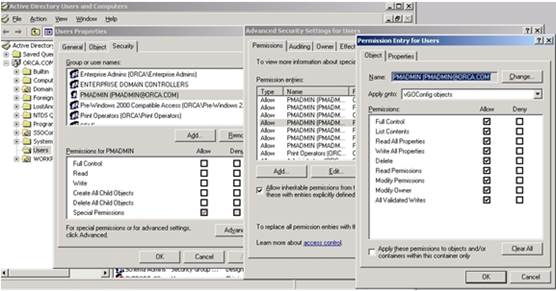
-
Grant the
PMSERVICEaccount the Full Control privilege overvGOLocatorClassobjects: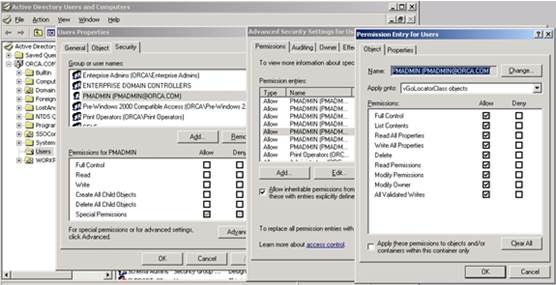
-
Grant the
PMSERVICEaccount the Full Control privilege overvGOUserDataobjects: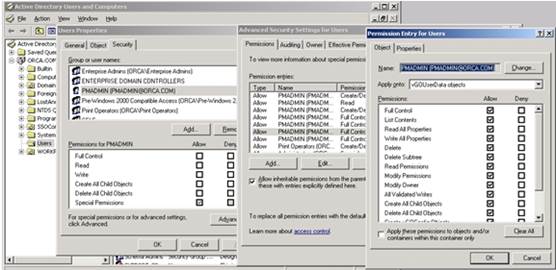
-
Grant the
PMSERVICEaccount the Full Control privilege overvGOSecretobjects: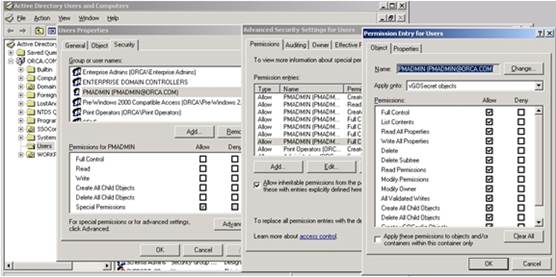
5.7.2 Setting the Automatic Resynchronization Interval
In order for Provisioning Gateway to function properly, the Provisioning Gateway Agent must synchronize to retrieve the provisioning instructions from the directory.
When you deploy Provisioning Gateway, you must decide on the synchronization interval. If this is not set to a non-zero value, synchronization only occurs upon user activity. Oracle recommends that this key be set to a value, for example, 15 minutes. This setting would guarantee that the provisioning instructions are pulled down from the directory within 15 minutes (or whatever interval is set) of when they are put there by the Provisioning Gateway Server.
-
Launch the Oracle Enterprise Single Sign-On Administrative Console.
-
Expand Logon Manager > Global Agent Settings > [Target Settings Set] > Synchronization.
-
Select the check box next to the Interval for automatic resynchronization option and enter the desired value into the field.
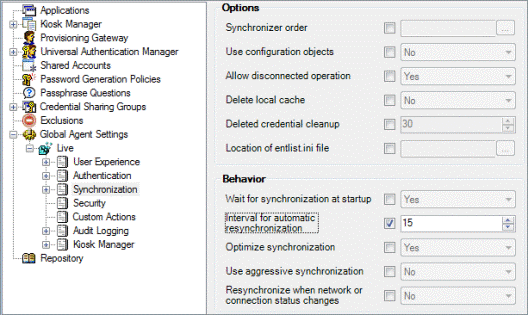
-
Publish your changes to the repository.
Note:
This procedure applies only to running Logon Manager agents. If a user does not have Logon Manager running, the provisioning instructions are not processed until the user starts Logon Manager.Processing the provisioning instructions requires that the user be authenticated to Provisioning Gateway. If the user is not authenticated to Provisioning Gateway (for example, the timeout expired) then an authentication UI is presented and the synchronization process is blocked until the user authenticates.
5.7.3 Granting Provisioning Rights to Domain Users
If you want an ordinary domain user to have the ability provision Logon Manager credentials via Provisioning Gateway, do the following:
-
Create a user group and add the desired domain user accounts to it.
-
Grant the permissions described in Granting the Required Permissions to the PMSERVICE Account to the group.
-
Add the PMSERVICE account to the group.
5.7.4 Configuring Syslog
After Provisioning Gateway installation is complete, you must configure Syslog:
-
Click the Settings option, then click Event Log.
-
From the Database Type drop-down list, select Syslog Daemon.
-
Click Save Changes.
-
Complete the following changes in the registry:
-
Open regedit and navigate to the following location:
HKEY_LOCAL_MACHINE\SOFTWARE\Passlogix\Extensions\

EventManager\Syslog -
Enter the IP address of your Syslog server in the
RemoteAddresskey.Note:
If you are using a non-standard Syslog port, enter the correct port number of your Syslog server in the RemotePort key.
-
5.7.5 Creating or Identifying a User Account for Anonymous Logon
You must create or identify a dedicated Anonymous User account through which Provisioning Gateway users and administrators access Provisioning Gateway Web Services. This Anonymous User account should be a member of the Administrators group.
Note:
Because the default Anonymous User account in IIS, IUSR_MACHINE_NAME, is not a member of the Administrator group, you must create or choose a domain user account that is an Administrator; this will allow the account to perform the following tasks:-
Change which Web service account to use from the management console
-
Read from and write to the directory service (if Active Directory or AD LDS (ADAM))
-
Write to the local-machine registry (HKLM).
-
To create a new user account or assign Administrator rights to an existing account, use the Active Directory Users and Computers console (for an Active Directory domain) or the Computer Management console (for non-Active Directory domains)
The user account you create or choose is specified as the Anonymous User dialog of the Services tool during this step.
-
Launch the Microsoft IIS Manager.
-
In the left-hand tree, drill down to <Server> > Sites > Default Web Site and select the v-GO PM Service node.
-
In the IIS section of the center pane, double-click Authentication.
-
In the Authentication pane, right-click Anonymous Authentication and select Edit.
-
In the dialog box that appears, select Specific User and click Set.
-
In the dialog box that appears, enter the name of the anonymous access user account in the
<DOMAIN>\<user>form, and the appropriate password, then click OK. -
Click OK in the "Edit Anonymous Access" dialog to dismiss it.
-
When you have finished, restart Microsoft IIS to apply your changes.
Note:
By default, the Provisioning Gateway Management Console is not restricted. Any user with a credential in the backend storage can log in. If you want to restrict access to a particular group, please see the "Additional Security Settings" in the Provisioning Gateway section of the Enterprise Single Sign-On Suite Administrator's Guide.5.7.6 Granting the IIS Anonymous Account Access to AD LDS (ADAM)
Note:
This step only applies to AD LDS (ADAM) users. Use the account chosen in Step 4 above.-
Launch the AD LDS (ADAM) command line interface.
-
Enter:
dsacls [\\SERVER:PORT\DISTINGUISHED_NAME] /g [USER]:ga /i:t"For example:
dsacls \\localhost:50000\ou=pm,dc=passlogix,dc=com /g PLX\PMWeb:ga /i:t -
To verify that the account was given access, type:
dsacls \\SERVER:PORT\DISTINGUISHED_NAMEThe output shows the security information for the directory object. The Anonymous Account should appear in the list with full access.
5.7.7 Configuring Provisioning Gateway for SSL Connectivity
Before configuring Provisioning Gateway for SSL connectivity on Windows Server 2008/2008 R2 or Windows Server 2012, you must obtain an X.509 Certificate from a trusted certificate authority (CA). This trusted CA must be installed in the list of trusted Root CAs. The certificate must be valid for the current date and its subject must exactly match the network name (either its host name or fully qualified URL containing a host name and domain suffix) that Provisioning Gateway client instances will use when connecting to the Password Reset server instance. The instructions in this section assume that a valid certificate has been obtained and is ready to be installed.
Note:
The following articles from the Microsoft Web site can be referred to for information on installing certificates and setting up SSL:· "How to: Obtain an X.509 Certificate" http://msdn2.microsoft.com/en-us/library/ms819929.aspx
· "How to: Set Up SSL on a Web Server" http://msdn2.microsoft.com/en-us/library/aa302411.aspx
If you use Microsoft Certificate Services to obtain the X.509 certificate, choose a Server Authentication Certificate. Also, enable the Mark keys as exportable and Use local machine store options under the Key Options section.
The steps required to enforce SSL-only connections to the Provisioning Gateway server are as follows:
5.7.7.1 Installing the X.509 Certificate in Microsoft IIS
-
Launch Microsoft IIS Manager.
-
In the Connections pane on the left, select the target server instance.
-
In the Home pane in the center, double-click the Server Certificates icon.
-
In the Actions pane on the right, click Complete Certificate Request....
-
In the Complete Certificate Request dialog that appears, do the following:
-
In the File name containing the certificate authority's response field, browse to or provide the full path and file name of the target X.509 certificate.
-
In the Friendly name field, enter a descriptive name for the certificate.
-
Click OK.
The certificate appears in the target machine's Server Certificates list.
-
-
Bind the installed certificate to the https protocol for the selected site. In the Connections pane on the left, expand the target machine node and drill down to and select the Default Web Site node.
-
In the Edit Site section in the Actions pane on the right, click Bindings.
-
In the "Site Bindings" dialog that appears, click Add.
-
In the "Add Site Binding" dialog that appears, do the following:
-
From the Type drop-down list, select https.
-
From the Certificate drop-down list, select the certificate you installed earlier in this procedure.
-
Leave the remaining settings at their defaults.
-
Click OK to save your changes and dismiss the Add Site Binding dialog.
-
-
Click Close to dismiss the Site Bindings dialog.
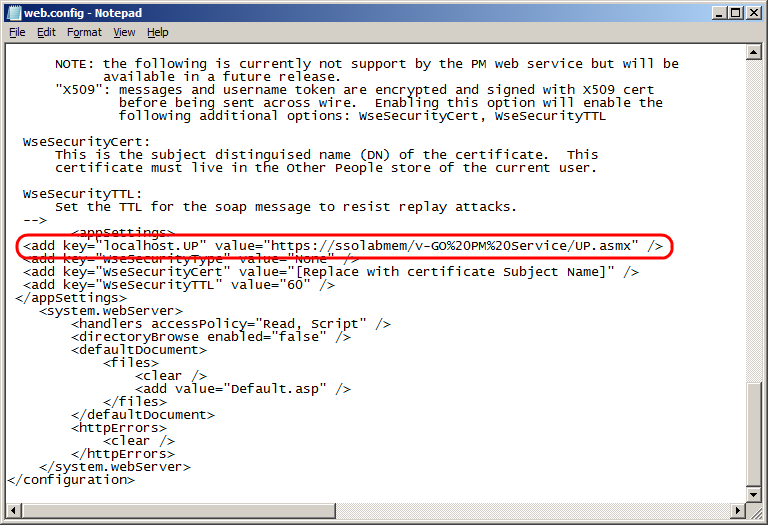
5.7.7.2 Modifying the Provisioning Gateway Server Configuration File
You must update the following configuration file to use the HTTP-over-SSL (HTTPS) protocol when calling the Provisioning Gateway Web pages:
%PROGRAMFILES%\Passlogix\v-GO PM\Console\web.config
-
Locate the
<appSettings>section. -
Modify the
localhost.UPkey value as follows:-
Change
httptohttps. -
Replace
localhostwith the Issued To value from your X.509 certificate. (You recorded this value in the previous part of this procedure.) -
(Optional) If you are using a custom port to connect to this service, append the port number at the end of the host name, separated by a semicolon.
For example:https://sssolabmem.ssolab.com:1880.
-
-
Save and close the file.
5.7.7.3 Restricting Provisioning Gateway Connectivity to SSL Only
-
Launch Microsoft IIS Manager if it's not already open.
-
In the Connections pane on the left, select the target machine node.
-
Under the target machine node, drill down to and select the Sites > Default Web Site node.
-
In the center pane, double-click the SSL Settings icon.
-
In the SSL Settings screen in the center pane, select the Require SSL check box and leave the Client certificates option at its default value.
-
In the Actions pane on the right, click Apply to save your changes.
5.7.7.4 Testing the New Connectivity Configuration
Using a Web browser directly on the Provisioning Gateway server machine (do not perform this test from a remote machine), access the Provisioning Gateway Web service using the new SSL-enabled URL (i.e., using the https protocol header in place of http).
Note that you must have been granted the appropriate administrative privileges in order to actually log on to the Provisioning Gateway Console; instructions for granting the required priviledges are provided in the Provisioning Gateway section of the Enterprise Single Sign-On Suite Administrator's Guide.
The URL is follows:
https://<new_host_name>:<new_port>/vGo%20PM%20Console/logon.aspx
If the URL fails to load, or a certificate error is displayed, check your configuration, such as virtual directory permissions and certificate options, and correct it if necessary, then try again.
5.7.8 Configuring Provisioning Gateway Server for Connectivity with Oracle Privileged Account Manager
Provisioning Gateway server acts as an adapter between Oracle Privileged Account Manager (OPAM) and Logon Manager and is required if you chose to install the "Privileged Accounts" component of the Provisioning Gateway client that enables single sign-on functionality for OPAM-protected resources.
Before you complete the steps below, you must import the OPAM SSL certificate into the Trusted Root Certification Authorities store of the Provisioning Gateway server. This certificate is required to enable SSL connectivity between the OPAM instance and Provisioning Gateway, as OPAM does not allow unencrypted (non-SSL) connectivity.
Note:
When importing the certificate, you must install the certificate for the computer account, and not the currently logged in user account.The certificate's location on the OPAM server is:
<Middleware>\wlserver_10.3\server\lib\CertGenCA.der
You can also create and use a custom certificate, if your environment requires it.
To enable this integration, you must configure Provisioning Gateway server to connect to the desired OPAM server in order to perform account checkin and checkout. Do the following:
-
Open the
web.config filelocated in the<PG_Server_Install_Directory>\Servicedirectory. -
Locate the <appsettings> section and add the following lines at the end of it (but before the closing </appsettings>) tag:
<add key="OpamUrl" value ="<OPAM_Server_URL>" /><add key="OpamUsername" value="<OPAM_Account_Name>" /><add key="OpamPassword" value="<OPAM_Account_Password>" />where:
<OPAM_Server_URL>is the full URL of the OPAM server you want to use,<OPAM_Account_Name>is the user name of the OPAM account you wish to use to connect to the OPAM server.<OPAM_Account_Password>is the password for the above OPAM account. -
Save and close the
web.configfile. -
Encrypt the modified web.config file by executing the following commands from the command prompt:
aspnet_regiis.exe -pe "appSettings" -app "/v-go pm service"aspnet_regiis.exe -pa "NetFrameworkConfigurationKey" "NT Authority\Network Service"
5.7.9 Configuring Oracle Internet Directory for Provisioning Gateway
If you are deploying Provisioning Gateway with Oracle Internet Directory as the repository, you must perform the following tasks before you install Provisioning Gateway:
-
Create a user group in Oracle Internet Directory for Provisioning Gateway administrators and add the Provisioning Gateway administrators' accounts to that group.
-
Add the
orclPrivilegeGroupobject class to the group. -
For each
Peoplecontainer in your repository, grant read, write, modify, and delete permissions to the group.