6 Installing Universal Authentication Manager
This section describes the steps necessary for installing Universal Authentication Manager.
It covers the following topics:
-
Prerequisites for Installing Universal Authentication Manager
-
Configuring Universal Authentication Manager for Synchronization with Microsoft Active Directory
-
Configuring Universal Authentication Manager for Synchronization with Microsoft AD LDS (ADAM)
-
Upgrading an Existing Universal Authentication Manager Installation
-
Installing the Universal Authentication Manager Client-Side Software
-
Completing the Installation of Universal Authentication Manager
6.1 Prerequisites for Installing Universal Authentication Manager
Before you install Universal Authentication Manager, ensure the prerequisites listed in this section have been satisfied.
6.1.1 Prepare the Universal Authentication Manager Repository
Before installing Universal Authentication Manager in enterprise mode, you must prepare your repository for use with Universal Authentication Manager as described in one of the following sections:
6.1.2 Prerequisites for Universal Authentication Manager Logon Methods
Universal Authentication Manager requires and supports various third-party software, hardware, and middleware for the logon methods. The general prerequisites are listed below. For a detailed list of supported and versions for this release, refer to the Oracle Enterprise Single Sign-On Suite Release Notes.
6.1.2.1 Prerequisites for Using Smart Cards
The following third-party software and hardware components are required to use smart cards with Universal Authentication Manager:
-
Supported smart card middleware software (PKCS#11, MiniDriver/Base CSP, .NET)
-
Supported smart card readers and drivers
-
Supported smart cards
-
Each card must have an embedded serial number.
-
If using Smart Card PIN mode, each card must have a valid digital certificate and a key pair, which can be generated either by third-party tools or Universal Authentication Manager. Oracle recommends using the method that conforms more closely to your organization's security policies. Cards without a valid certificate and key pair can only be used with a Universal Authentication Manager-generated PIN.
Note:
To have Universal Authentication Manager generate a key pair, you must configure it to do so via Universal Authentication Manager registry settings, as described in the Universal Authentication Manager chapter of the Oracle Enterprise Single Sign-On Suite Administrator's Guide. Universal Authentication Manager does not generate digital certificates and one is not required in such scenario. -
Your card's middleware must conform to the Microsoft Base CSP standard or be both fully PKCS#11-compliant and provide a CSP module.
-
After the smart card middleware is installed, you must merge the appropriate registry file with it. The registry files are available in the Universal Authentication Manager installation folder in the /SmartCard subfolder. Double-click the registry file to merge it. The files are compatible with both 32-bit and 64-bit systems; do not use files from a release earlier than 11.1.2.2.0 on 64-bit systems, as they will not work. The following table displays the registry file for each supported smart card:
Card Family/Type Middleware Registry File RSA smart card 5200 PKCS11 RSA Authentication Client 2.0 smart_providers_pkcs11_ rsa.reg NetMaker Net iD - CardOS 1 PKCS11 NetMaker Net iD 4.6 smart_providers_pkcs11_ netid.reg ORGA JCOP21 v2.2 PKCS11 SafeSign/RaakSign Standard 3.0.23 smart_providers_pkcs11_ safesign.reg Oberthur ID-ONE Cosmo PKCS11 SafeSign/RaakSign Standard 3.0.23 smart_providers_pkcs11_ safesign.reg Athena IDProtect PKCS11 SafeSign/RaakSign Standard 3.0.23 smart_providers_pkcs11_ safesign.reg Athena ASECard Crypto PKCS11 Athena ASECard Crypto 4.33 smart_providers_pkcs11_ athena.reg HID Crescendo 700 PKCS11 HID RaakSign Standard 2.3 smart_providers_pkcs11_ raaksign.reg Gemalto Cyberflex 64K (v2c) SPE Required / SPE Optional PKCS11 Gemalto Access Client 5.5 Xiring CCID Driver version 1.00.0002 or later / XISIGN reader
Gemalto PC-PinPad version 4.0.7.5 or later / PC PinPad reader
smart_providers_pkcs11_ gemalto.reg IBM JCOP21id PKCS11 SafeSign Identity Client 2.2.0 smart_providers_pkcs11_ safesign.reg DigiSign JCOP with MyEID Applet PKCS11 Fujitsu mPollux DigiSign Client 1.3.2-34 (1671) smart_providers_pkcs11_ fujitsu.reg Oberthur ID-One Cosmo 64 v5.2D Fast ATR with PIV application SDK PKCS11 ActivIdentity ActivClient 6.1 smart_providers_pkcs11_ actividentity.reg Cyberflex 64K PKCS11 Gemalto Access Client 5.5 smart_providers_pkcs11_ gemalto.reg HID Crescendo 200 MS Base CSP/MiniDriver HID Global MiniDriver for MS Base smart card CSP smart_providers_ basecsp.reg Oberthur ID-ONE Cosmo MS Base CSP/MiniDriver Oberthur ID-ONE MiniDriver for MS Base smart card CSP smart_providers_ basecsp.reg Athena ASECard Crypto ILM MS Base CSP/MiniDriver Athena ASECard Crypto ILM MiniDriver for MS Base smart card smart_providers_ basecsp.reg
6.1.2.2 Prerequisites for Using Proximity Cards
The following third-party hardware components are required to use Proximity Cards with Universal Authentication Manager.
-
Supported Proximity Card readers and drivers
-
Supported Proximity or Contactless Cards and tokens
6.1.2.3 Prerequisites for Using Fingerprint Readers
The following third-party hardware components are required to use a fingerprint reader with Universal Authentication Manager.
-
Supported fingerprint readers and drivers
-
For the Fingerprint logon method, BIO-key BSP version 1.12 or later must be installed. If you are using an earlier version of the BIO-key BSP, you must upgrade it to version 1.12 before installing Universal Authentication Manager or you will not be able to use your biometric devices.
Note:
You must obtain a license for using the BIO-key BSP directly from BIO-key. Oracle does not provide licensed copies of the BIO-key BSP.For the latest list of supported cards and readers, please contact BIO-key directly.
6.1.3 Prerequisites for Unattended ("Silent") Installations
In order to successfully install Universal Authentication Manager in unattended ("silent") mode, the Windows Management Instrumentation (WMI) service must be running before the installer is executed.
To check whether the WMI service is running, and start it if necessary, do the following on each target machine:
-
Open the System Management Console.
-
Open the Services snap-in.
-
Navigate to the Windows Management Instrumentation service and check its status and startup mode.
Depending on the status, do one of the following:
-
If the status is Started, the WMI service is running; proceed to the next section.
-
If the status is blank, check the service's startup type and start it as follows:
-
Double-click the service.
-
In the properties box that appears, set the startup type to Manual or Automatic, as dictated by your environment and click Apply.
-
Click Start. The status changes to Started.
-
Click OK to close the service properties dialog box.
-
6.2 Configuring Universal Authentication Manager for Synchronization with Microsoft Active Directory
Note:
Before completing the procedures in this section, note that:-
Oracle recommends that you install Universal Authentication Manager in local mode and switch it to enterprise (synchronization) mode (as described in the Oracle Enterprise Single Sign-On Universal Authentication Manager Administrator's Guide) only after you have prepared the repository and configured synchronization settings. Otherwise, Universal Authentication Manager data structures may not be correctly created or permissions correctly set within the repository.
-
When deploying Universal Authentication Manager in enterprise mode, users must not enroll in any logon methods until synchronization with the repository has been properly configured and tested. Otherwise, enrollment data will be lost.
-
Only Microsoft Active Directory and Microsoft AD LDS (ADAM) are supported as repositories.
In order to allow Universal Authentication Manager to centrally store and manage policies and enrollment data, you must prepare an Active Directory-based repository and configure Universal Authentication Manager for synchronization with that repository by performing the following tasks:
-
Preparing the Repository when Logon Manager is Already Deployed
-
Understanding the Universal Authentication Manager Repository Data Structures and Permissions
-
Configuring the Universal Authentication Manager Synchronizer
-
Configuring Universal Authentication Manager Synchronization for Administrative Users
When assigning user groups, keep the following in mind:
-
User groups used should be in the same domain,
-
Use security groups, not distribution groups,
-
Universal Authentication Manager will only support a single Active Directory domain.
6.2.1 Preparing the Repository when Logon Manager is Already Deployed
If Logon Manager is already installed and synchronizing with your Active Directory-based repository, Universal Authentication Manager will be sharing Logon Manager's repository container to store its own policies and settings. In such cases, you do not need to extend the schema or enable data storage under user objects. Instead, complete the following steps:
-
Complete the steps in Initializing Universal Authentication Manager Storage.
-
Complete the steps in Configuring the Universal Authentication Manager Synchronizer.
6.2.2 Creating a Universal Authentication Manager Service Account
In order for Universal Authentication Manager to read and write data in the repository, you must give it the privileges to do so. This is accomplished by creating a service account that Universal Authentication Manager uses to interact with its repository. This account should be a standard domain account (member of Domain Users); no other permissions are necessary.
-
On the workstation that will serve as your domain controller, launch Active Directory Users and Computers.
-
Right-click in the Users container and select New > User. The User account is a regular member of the Domain Users group.

-
Enter a name for the user or group account (for this example, the name is
uamservice) and click Next.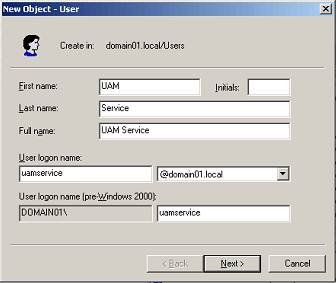
-
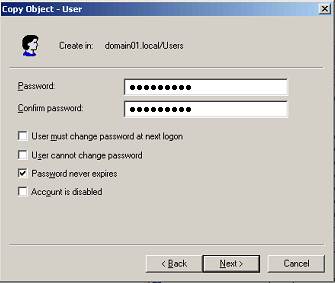
Enter a password, select the Password never expires box, and deselect the User must change password at next logon box.
6.2.3 Extending the Schema
Note:
If you are not sure whether you have already extended the schema, simply complete the steps below; performing the schema extension multiple times will not harm your repository or the data it contains.-
Launch the Oracle Enterprise Single Sign-On Administrative Console.
-
From the Repository menu, select Extend Schema.
-
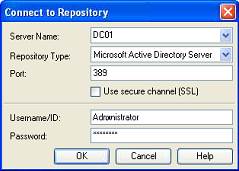
In the "Connect to Repository" dialog box, do the following:
-
Enter a Server Name (for this example, the name is
DC01). -
Select Microsoft Active Directory Server from the drop-down menu.
-
Select the Use secure channel (SSL) check box if your environment is configured for SSL connectivity.
-
Enter the Port number (default SSL port is 636; default non-SSL port is 389).
-
Enter the Username/ID and Password of an administrative account with Domain and Schema Administrator permissions.
-
Click OK when finished.
-
6.2.4 Enabling Data Storage Under User Objects
After extending the schema, you must allow Universal Authentication Manager to store enrollment data under each respective user's user object within the repository. To do so, complete the following steps:
Note:
If Logon Manager is already installed and synchronizing with your repository, you do not need to enable this option, as it is already enabled; proceed to the next section.-
In the left-hand tree, right-click the Repository node and select Connect To... from the context menu.
-
In the "Connect to Repository" dialog box, do the following:
-
Enter a Server Name (for this example, the name is
DC01). -
Select Microsoft Active Directory Server from the drop-down menu.
-
Select the Use secure channel (SSL) check box if your environment is configured for SSL connectivity.
-
Enter the Port number (default SSL port is 636; default non-SSL port is 389).
-
Enter the Username/ID and Password of an administrative account with Domain and Schema Administrator permissions.
-
Click OK when finished.
-
-
From the Repository menu, select Enable Storing Credentials Under User Object.
-
In the prompt that appears, click OK.
-
In the confirmation dialog that appears, click OK to dismiss it.
The data structures have now been created and the required permissions set. For more information on what's done in the repository during this step, see the next section.
Note:
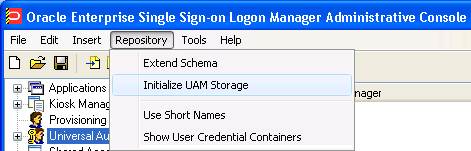
Once the Universal Authentication Manager service account has been created, it can also be configured manually or automatically on multiple end-user machines using the command-line toolDeployTool.exe. For more information, see the Universal Authentication Manager section of the Administering Oracle Enterprise Single Sign-On Suite.6.2.5 Initializing Universal Authentication Manager Storage
-
After successfully extending the schema, return to the Repository menu and select Initialize UAM Storage.
-
From the drop-down menu, select the server that you just created. The other fields are filled in automatically.
-
Click OK.
-
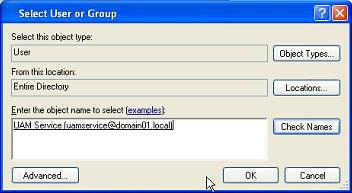
In the Select User or Group window, start typing the name of your service account, then click Check Names. The service account name is filled in automatically.
-
Click OK and wait for the success message.

6.2.6 Understanding the Universal Authentication Manager Repository Data Structures and Permissions
When you invoke the Initialize UAM Storage command described earlier, Universal Authentication Manager does the following within your repository:
-
Modifies the schema to ensure that vgoUser and
vgoConfigclasses may be placed insideContainerobjects. -
Builds the default container structure
Program Data/Passlogix/UAMwith subcontainersPoliciesandIndexas shown below: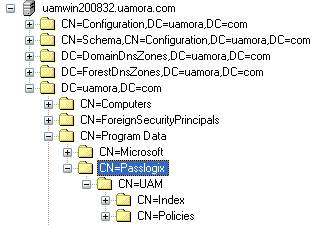
Note:
Never manually modify the contents of the index and policies containers.The containers can be named differently if your environment requires so; however, you will need to manually configure all Universal Authentication Manager client instances to point to the custom-named containers. Oracle highly recommends you leave the container names at their defaults.
-
Grants the Universal Authentication Manager service account generic read, write, modify, and delete permissions to the index container (as well as all other permissions inherited from its parent) so that the Universal Authentication Manager service can read, create, modify, and delete objects in the index container.
-
Grants the Universal Authentication Manager service account generic read permissions (as well as any permissions inherited from its parent) so that the Universal Authentication Manager service can read objects within the policies container.
-
Updates the domain root DSE object to grant the Universal Authentication Manager service account permissions to create and delete
vgoConfigandvGoUserobjects underUserobjects across the entire domain. (If the user objects have been relocated to a custom location, the permissions can be set directly at the target container instead of at the root.) -
Updates the domain root DSE object to grant the Universal Authentication Manager service account generic read permissions to all
vgoConfigobjects across the domain so that the Universal Authentication Manager service can read allvgoConfigobjects regardless of their location in the repository.
6.2.7 Configuring the Universal Authentication Manager Synchronizer
You are now ready to configure the Universal Authentication Manager to allow Universal Authentication Manager to synchronize with the repository. Complete the following steps:
-
Launch the Oracle Enterprise Single Sign-On Administrative Console.
-
In the left-hand tree navigate to Global Agent Settings > [TargetSettingsSet>] > Synchronization.
-
If Logon Manager is not installed and synchronizing with the repository, add a configuration node for the Active Directory synchronizer to your settings set as follows (otherwise skip to the next step):
-
Right-click the Synchronization node and select Manage synchronizers from the context menu.
-
In the window that appears, click Add.
-
In the list of available synchronizers, select Active Directory, enter
ADEXTas the name, and click OK. -
Click OK to dismiss the dialog. The ADEXT node appears under the Synchronization node.
-
-
Do one of the following:
-
If Logon Manager is installed and synchronizing with the repository, do not modify the value of the Base location(s) for configuration objects field; instead, skip to the next step.
-
If Logon Manager is not installed and synchronizing with the repository, in the Base location(s) for configuration objects field, select the check box, click the ... button, enter the fully qualified DN of the Universal Authentication Manager policies container in the window that appears, then click OK to save your changes.
-
-
In the Base location(s) for UAM storage index field, select the check box, click the ... button, and enter the fully qualified DN of the Universal Authentication Manager index container, then click OK.
-
If it is not already set, select the check box next to the Location to store user credentials option and select Under respective directory user objects from the drop-down list.
-
Configure other synchronization settings as desired; for more information on each setting, see the Console help.
-
Export your settings to a
.REGfile for distribution to end-user workstations:-
From the File menu, select Export.
-
In the dialog that appears, click HKLM Registry Format.
-
In the "Save" dialog that appears, navigate to the desired location and provide a name for the
.REGfile, then click Save.
-
-
Distribute the
.REGfile to your Universal Authentication Manager workstations and merge it into their Windows registries.Note:
The Console produces a.REGfile compatible only with 32-bit systems. If you are merging the.REGfile on a 64-bit system, you must include the/reg:32switch in your import command to merge the registry data into the correct location within the registry; otherwise, Universal Authentication Manager will not function. For example:reg.exe import MyRegistryFile.reg /reg:32
6.2.8 Configuring Universal Authentication Manager Synchronization for Administrative Users
The rights necessary to store credentials under user objects are granted at the tree root and inherited down to user objects. If you are deploying Universal Authentication Manager in enterprise mode in an environment where members of protected user groups, such as Administrators, will be using it, you must grant the Universal Authentication Manager service account through the AdminSDHolder object the permissions necessary to create and delete vGOUserData and vGOSecret objects.
Note:
If Logon Manager is already installed and synchronizing with the same repository that Universal Authentication Manager is utilizing, you will also need to grant these permissions to theAdminSDHolder object itself, which was most likely done during Logon Manager deployment. This granting will appear as "SELF" in the affected administrative user's permissions list, as well as in the AdminSDHolder object's permissions list.Without this explicit permission application, administrative users will be blocked from storing their Universal Authentication Manager data in the repository due to automatic inheritance of restrictive rights from the AdminSDHolder object. This is because the object's ACL, which governs the ACLs of all protected groups, prohibits rights inheritance by default. More information about this issue is available in the following MS Knowledge Base article: http://support.microsoft.com/kb/817433.
The following protected user groups are known to be affected by this problem:
-
Enterprise Admins
-
Schema Admins
-
Domain Admins
-
Administrators
-
Account Operators
-
Server Operators
-
Print Operators
-
Backup Operators
-
Cert Publishers
To verify that you are experiencing this particular issue, do the following:
-
Log in to the primary domain controller as a domain administrator.
-
Open the "Active Directory Users and Computers" MMC snap-in.
-
From the View menu, select Advanced Features.
-
Navigate to the affected user object, right-click it, and select Properties.
-
In the dialog that appears, select the Security tab.
-
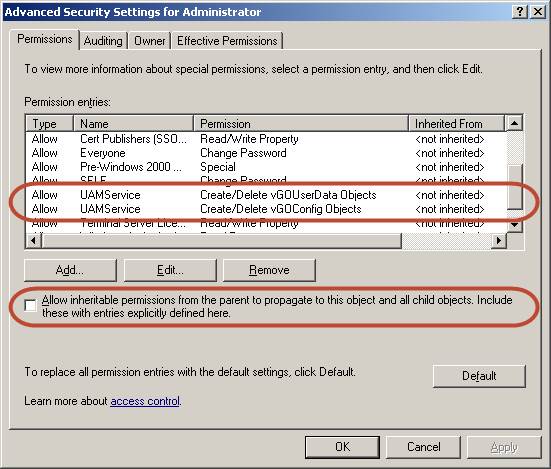
Click Advanced. The "Advanced Security Settings" dialog appears:
-
In the dialog, check whether:
-
The Allow inheritable permissions…check box is not selected.
-
The permissions highlighted in the figure in step 6 are not present in the list.
If the above conditions are true, the user object is not inheriting the necessary permissions from the directory root.
-
To rectify this issue, you must manually modify the ACL of the AdminSDHolder object to grant the right to create objects of type vGOConfig and vGOUserData. The steps are as follows:
-
Log in to the primary domain controller as a domain administrator.
-
In the Microsoft Management Console, open the "Active Directory Users and Computers" snap-in.
-
From the View menu, select Advanced Features.
-
Navigate to the AdminSDHolder container located in
cn=AdminSDHolder,cn=System,dc=<domainName>,dc=<domainSuffix> -
Right-click the AdminSDHolder container and select Properties.
-
In the "Properties" dialog, select the Security tab and click Advanced.
-
In the "Advanced Security Settings" dialog, click Add… .
-
In the "Select User, Computer, or Group" dialog, enter the name of the Universal Authentication Managerservice account and click OK.
-
In the "Permission Entry" dialog, do the following:
-
From the Apply onto: drop-down list, select This object and all child objects.
Note:
If the create and delete permissions forvGOUserDataobjects do not appear in the permissions list, select User objects from the Apply onto: drop-down list instead. This variation occurs between different versions and patches of Active Directory and the underlying operating system. -
In the list of permissions, select the Allow check box for the permissions shown below:
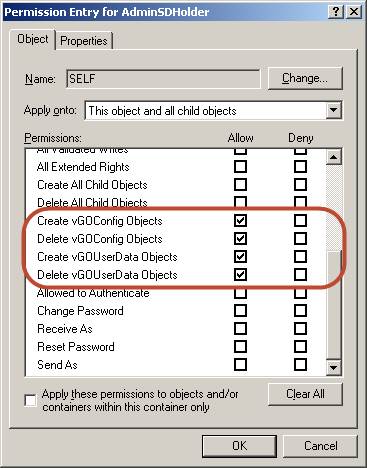
-
Click OK.
-
-
Trigger the SD propagator (SDPROP) process to immediately propagate the changes throughout the network. Instructions for launching the SD propagator process are provided in the following Microsoft Knowledge Base article:
http://support.microsoft.com/kb/251343.
Note:
If you encounter a version of this procedure that calls to apply the above permissions onto "This object only," disregard it. It is deprecated and has been superseded by the steps above.You can trigger the SD propagator process by kicking off the RunProtectAdminGroupsTask task.
6.3 Configuring Universal Authentication Manager for Synchronization with Microsoft AD LDS (ADAM)
Note:
Before completing the procedures in this section, note that:-
Oracle recommends that you install Universal Authentication Manager in local mode and switch it to enterprise (synchronization) mode (as described in the Universal Authentication Manager section of the Oracle Enterprise Single Sign-On Suite Administrator's Guide) only after you have prepared the repository and configured synchronization settings. Otherwise, Universal Authentication Manager data structures may not be correctly created or permissions correctly set within the repository.
-
When deploying Universal Authentication Manager in enterprise mode, users must not enroll in any logon methods until synchronization with the repository has been properly configured and tested. Otherwise, enrollment data will be lost.
-
Only Microsoft Active Directory and Microsoft AD LDS (ADAM) are supported as repositories.
In order to allow Universal Authentication Manager to centrally store and manage policies and enrollment data in Microsoft AD LDS (ADAM), you must prepare a Microsoft AD LDS (ADAM) instance and configure Universal Authentication Manager for synchronization with that repository by performing the following tasks:
-
Preparing the Repository when Logon Manager is Already Deployed
-
Understanding the Universal Authentication Manager Repository Data Structures and Permissions
-
Configuring the Universal Authentication Manager Synchronizer
When assigning user groups, keep the following in mind:
-
User groups used should be in the same domain,
-
Use security groups, not distribution groups,
-
Universal Authentication Manager will only support a single Active Directory domain.
6.3.1 Preparing the Repository when Logon Manager is Already Deployed
If Logon Manager is already installed and synchronizing with your AD LDS (ADAM)-based repository, Universal Authentication Manager will be sharing Logon Manager's repository container to store its own policies and settings. In such cases, you do not need to extend the schema or create the People container. Instead, complete the following steps:
-
Complete the steps in Initializing Universal Authentication Manager Storage.
-
Complete the steps in Configuring the Universal Authentication Manager Synchronizer.
Universal Authentication Manager requires that the People container is located in its default location. If you have configured Logon Manager to use a People container located elsewhere (e.g. not in the root of the AD LDS (ADAM) partition), Universal Authentication Manager will not be able to share that container with Logon Manager; you will need to create a separate People container at the root of the AD LDS (ADAM) partition for Universal Authentication Manager.
6.3.2 Creating the AD LDS (ADAM) Instance and Partition
If you have not already done so, create an AD LDS (ADAM) instance and partition by following the steps in the "Creating an AD LDS (ADAM) Instance" section of the guide Deploying Logon Manager with a Directory-Based Repository.
6.3.3 Configuring the AD LDS (ADAM) Default Naming Context
After you have created your AD LDS (ADAM) instance and partition, you must point the instance's default naming context to the target partition so that Universal Authentication Manager is able to locate its data within the repository.
-
Launch the ADSIEdit tool and connect to the "Configuration" context of the target AD LDS (ADAM) instance.
-
In the left-hand tree, navigate to Configuration > CN=Sites > CN=SiteName > CN=InstanceName .
-
Under the instance node, double-click the CN=NTDS Settings child node.
-
In the properties dialog that appears, select the msDS-DefaultNamingContext attribute and click Edit.
-
In the editor dialog that appears, enter the fully qualified distinguished name of the target AD LDS (ADAM) partition, then click OK to save your changes.
-
Click OK to save your changes and dismiss the properties dialog.
-
Restart the affected AD LDS (ADAM) instance by restarting the corresponding service in the Windows Services Manager.
6.3.4 Creating a Universal Authentication Manager Service Account
In order for Universal Authentication Manager to read and write data in the repository, you must give it the privileges to do so. This is accomplished by creating a service account that Universal Authentication Manager uses to interact with its repository. This account should be a standard domain account (member of Domain Users); no other permissions are necessary. However, you must add the account to the target AD LDS (ADAM) instance's "Readers" group.
-
On the workstation that will serve as your domain controller, launch Active Directory Users and Computers.
-
Right-click the
Userscontainer and select New > User. TheUseraccount is a regular member of theDomain Usersgroup.
-
Enter a name for the user or group account (for this example, the name is uamservice) and click Next.
-
-
Enter a password, select the Password never expires box, and deselect the User must change password at next logon box.
-
Add the Universal Authentication Manager service account to the AD LDS (ADAM) instance's
Readersgroup:-
Start the
ADSIEdittool (available from the Microsoft Web site) and connect to the data partition of the target AD LDS (ADAM) instance. -
In the left-hand tree, expand the target partition and select the CN=Roles node.
-
In the right-hand pane, double-click the CN=Readers role.
-
In the properties dialog that appears, select the member attribute and click Edit.
-
In the attribute editor dialog that appears, click Add Windows Account.
-
In the dialog that appears, enter the name of the Universal Authentication Manager service account and click Check Names.
-
Once the name validates successfully, click OK to dismiss the account selection dialog.
-
Click OK to save your changes and dismiss the attribute editor dialog.
-
Click OK to save your changes and dismiss the properties dialog.
-
6.3.5 Extending the Schema
Note:
If you are not sure whether you have already extended the schema, simply complete the steps below; performing the schema extension multiple times will not harm your repository or the data it contains.-
Launch the Oracle Enterprise Single Sign-On Administrative Console.
-
From the Repository menu, select Extend Schema.
-
In the "Connect to Repository" dialog box, do the following:
-
Enter a Server Name.
-
Select Microsoft AD LDS (ADAM) from the drop-down menu.
-
Select the Use secure channel (SSL) check box if your environment is configured for SSL connectivity.
-
Enter the Port number (default SSL port is 636; default non-SSL port is 389).
-
Enter the Username/ID and Password of an administrative account with Domain and Schema Administrator permissions.
-
Click OK when finished.
-
6.3.6 Creating the People Container
In order to allow Universal Authentication Manager to store enrollment data in AD LDS (ADAM), you must create an OU named People at the root of your AD LDS (ADAM) partition. You must not rename or move this container or Universal Authentication Manager synchronization will not function.
If Logon Manager is already installed and synchronizing with the repository and it is using a custom People container location, you must still create the People container for Universal Authentication Manager at the root of the AD LDS (ADAM) partition.
Oracle recommends that you maintain separate People containers for Logon Manager and Universal Authentication Manager when sharing an AD LDS (ADAM) instance.
-
In the ESSO Suite Administrative Console, select the Repository node in the tree.
-
Click the Click here to connect link in the right-hand pane. The Console displays the "Connect to Repository" dialog. Fill in the fields as explained in step 3 in the previous section and click OK to connect.
-
In the tree, right-click the root of the target AD LDS (ADAM) instance, and select Create People Container from the context menu.
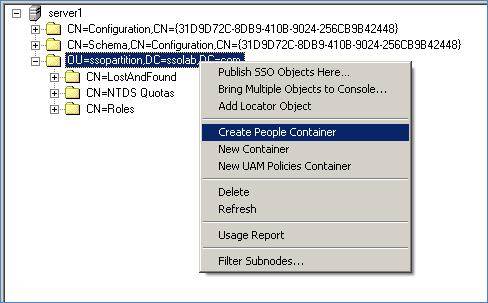
-
Verify that the
Peoplecontainer now exists at the root of the AD LDS (ADAM) instance's sub-tree.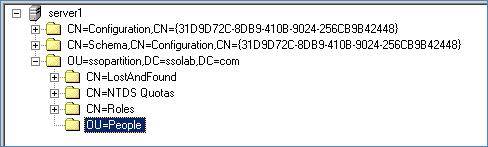
6.3.7 Initializing Universal Authentication Manager Storage
-
After successfully extending the schema, return to the Repository menu and select Initialize UAM Storage.

-
From the drop-down menu, select the server that you just created and click OK. (The other fields are filled in automatically. )
-
In the "Select User or Group" window, start typing the name of your service account, then click Check Names. The service account name is filled in automatically.
-
Click OK and wait for the success message.
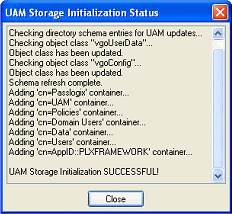
The data structures have now been created and the required permissions set. For more information on what's done in the repository during this step, see the next section.
6.3.8 Understanding the Universal Authentication Manager Repository Data Structures and Permissions
When you invoke the Initialize UAM Storage command described earlier, Universal Authentication Manager does the following within your repository:
-
Modifies the schema to ensure that vgoUser and
vgoConfigclasses may be placed insideContainerobjects. -
Builds the default container structure
Program Data/Passlogix/UAMwith subcontainersPoliciesandIndexas shown below:
Note:
Never manually modify the contents of the index and policies containers.The containers can be named differently if your environment requires so; however, you will need to manually configure all Universal Authentication Manager client instances to point to the custom-named containers. Oracle highly recommends you leave the container names at their defaults.
-
Grants the Universal Authentication Manager service account generic read, write, modify, and delete permissions to the index container (as well as all other permissions inherited from its parent) so that the Universal Authentication Manager service can read, create, modify, and delete objects in the index container.
-
Grants the Universal Authentication Manager service account generic read permissions (as well as any permissions inherited from its parent) so that the Universal Authentication Manager service can read objects within the policies container.
-
Updates the root DSE object of the AD LDS (ADAM) partition to grant the Universal Authentication Manager service account permissions to create and delete
vgoConfigandvGoUserobjects under User objects across the entire AD LDS (ADAM) partition. (If the user objects have been relocated to a custom location, the permissions can be set directly at the target container instead of at the root.) -
Updates the root DSE object of the AD LDS (ADAM) partition to grant the Universal Authentication Manager service account generic read permissions to all
vgoConfigobjects across the AD LDS (ADAM) partition so that the Universal Authentication Manager service can read allvgoConfigobjects regardless of their location in the repository.
6.3.9 Configuring the Universal Authentication Manager Synchronizer
You are now ready to configure the Universal Authentication Manager to allow Universal Authentication Manager to synchronize with the repository. Complete the following steps:
-
Launch the Oracle Enterprise Single Sign-On Administrative Console.
-
In the left-hand tree navigate to Global Agent Settings > [TargetSettingsSet>] > Synchronization.
-
If Logon Manager is not installed and synchronizing with the repository, add a configuration node for the AD LDS (ADAM) synchronizer to your settings set as follows (otherwise skip to the next step):
-
Right-click the Synchronization node and select Manage synchronizers from the context menu.
-
In the window that appears, click Add.
-
In the list of available synchronizers, select Microsoft AD LDS (ADAM), enter
ADAMSyncExtas the name, and click OK. -
Click
OKto dismiss the dialog. The ADAMSyncExt node appears under the Synchronization node.
-
-
If Logon Manager is installed and synchronizing with the repository, do not modify the value of the Servers, SSL, or Base location(s) for configuration objects fields; instead, skip to the next step. If Logon Manager is not installed and synchronizing with the repository, do the following:
-
In the Servers field, select the check box.
-
Click the ... button.
-
In the window that appears, enter the full address(es) and port(s) of your AD LDS (ADAM) instances, one per line, in the format
<server>:<port>. -
Click OK.
-
In the Base location(s) for configuration objects field, select the check box.
-
Click the ... button.
-
In the window that appears, enter the fully qualified DN of the Universal Authentication Manager Policies container.
-
Click OK.
-
If your environment is not using SSL, select the check box next to the SSL field and select No from the drop-down field. Oracle highly recommends utilizing SSL in your environment for maximum security.
-
-
In the Base location(s) for UAM storage index field, select the check box, click the ... button, and enter the fully qualified DN of the Index container, then click OK.
-
In the Prepend Domain field, select the check box and select Yes from the drop-down menu.
-
Configure other synchronization settings as desired; for more information on each setting, see the Console help.
-
Export your settings to a
.REGfile for distribution to end-user workstations:-
From the File menu, select Export.
-
In the dialog that appears, click HKLM Registry Format.
-
In the "Save" dialog that appears, navigate to the desired location and provide a name for the
.REGfile, then click Save.
-
-
Distribute the .REG file to your Universal Authentication Manager workstations and merge it into their Windows registries.
Note:
The Console produces a.REGfile compatible only with 32-bit systems. If you are merging the.REGfile on a 64-bit system, you must include the/reg:32switch in your import command to merge the registry data into the correct location within the registry; otherwise, Universal Authentication Manager will not function. For example:reg.exe import MyRegistryFile.reg /reg:32
6.4 Upgrading an Existing Universal Authentication Manager Installation
Upgrading from versions of Universal Authentication Manager earlier than 11.1.2.2.0 to version 11.1.2.3.0 is not supported. You must fully uninstall any such versions of Universal Authentication Manager before installing the current version. The new version will ignore all repository data stored by any earlier versions, thus deletion of the old data is not required
Upgrading from version 11.1.2.2.0 to version 11.1.2.3.0 is fully supported and does not require any special actions.
6.4.1 Migrating from Logon Manager with Strong Authenticators to Universal Authentication Manager
Each client workstation with Logon Manager may only be configured to use one primary logon method. Logon Manager supports several native primary logon methods, including strong authenticators such as smart cards or proximity cards. If a strong authenticator is deployed and configured as the Logon Manager primary logon method, each end user must convert to using Universal Authentication Manager as the primary logon method.
End users must manually change the Logon Manager Primary Logon Method from the strong authenticator to the Universal Authentication Manager Authenticator using the Logon Manager Agent Settings tab to Change Primary Logon Method.
6.5 Installing the Universal Authentication Manager Client-Side Software
Note:
Oracle recommends that you install any hardware devices, middleware, and drivers prior to installing Universal Authentication Manager.Oracle recommends against installing Universal Authentication Manager on the same workstation as the Oracle Enterprise Single Sign-On Administrative Console to avoid lockout due to the "Logon Method Enabled" policy, which can prevent you from logging on to the machine running the Console once Universal Authentication Manager is installed. You should have at least one workstation running the Oracle Enterprise Single Sign-On Administrative Console without Universal Authentication Manager.
Installing Universal Authentication Manager requires you to have local administrator permissions.
During the installation, you will be prompted to select a client mode (local or enterprise). For more information on the Universal Authentication Manager client modes, see the Universal Authentication Manager section of the Enterprise Single Sign-On Suite Administrator's Guide.)
If you are installing Universal Authentication Manager on Windows 7, the Microsoft Windows Password and PKI smart card credential providers will be disabled and the Universal Authentication Manager credential provider will be enabled in their place.
If you want to perform an unattended ("silent") installation, see Performing an Unattended (Silent) Installation.
To install and configure Universal Authentication Manager:
-
Close all programs.
-
Launch the installer file appropriate to your platform.
Note:
If you are installing in a language other than English and would like to launch the installer in the desired language, execute the following command:msiexec /I <packagename>.msi TRANSFORMS=<language>.mstwhere
<packagename>is the name of the Universal Authentication Manager installer MSI package, and<language>.mstis the name of the corresponding language transform file (included in the installer archive). -
On the Welcome Panel, click Next.
-
The "Program Features" screen prompts you to select the features to install. Select the features you want by clicking the red [x] next to the feature and clicking This feature will be installed on local hard drive. You must select at least one Logon Method to proceed with the installation. The available options are:
-
Application - the core application.
-
Logon Methods - supported authentication methods and individual authenticator plug-ins for Logon Manager. Unlike the ESSO-UAM Authenticator for ESSO-LM plug-in, which supports all Universal Authentication Manager logon methods, the individual authenticator plug-ins only support a single logon method.
The authenticator plug-ins only appear if the installer detects Logon Manager on the machine. If Kiosk Manager is also present on the machine, only one authenticator plug-in can be installed at a time.
It is not possible to install an authenticator plug-in without its corresponding logon method.
-
ESSO-UAM Authenticator for ESSO-LM - authenticator plug-in for Logon Manager allowing integration between Logon Manager and Universal Authentication Manager. This plug-in supports all Universal Authentication Manager logon methods simultaneously.
-
Languages - localizes the user interface into the selected language(s).
To change the destination folder, click Change and navigate to the desired location.
-
-
Select the desired client mode. (For more information on the client modes, see the Universal Authentication Manager section of the Enterprise Single Sign-On Suite Administrator's Guide.)
-
Local Client Mode. Universal Authentication Manager runs locally and does not synchronize with the repository.
-
Enterprise Client Mode. Universal Authentication Manager runs in an Enterprise environment and synchronizes with the repository.
-
-
In the "Summary" screen, click Install.
-
When the "Completed" screen appears, click Finish.
-
After installation is complete, you will be prompted to restart the machine. Do one of the following:
-
If you installed the Client in Local Mode, click Yes now.
-
If you installed the Client in Enterprise Mode, click No and proceed to Configuring the Universal Authentication Manager Service Account to configure the required service accounts.
-
6.6 Performing an Unattended (Silent) Installation
In order to install Oracle Enterprise Single Sign-On products successfully in unattended ("silent") mode, the Windows Management Instrumentation (WMI) service must be running before you execute the installer. To check whether it is running and start if it is not, see Prerequisites for Unattended ("Silent") Installations.
6.6.1 Command Line Syntax
Universal Authentication Manager supports standard MSIEXEC.exe command line parameters. The command line to perform an unattended installation uses the following sequence:
MSIEXEC.exe [Install Flag] [MSI Installer Filename] [Custom Properties] [User Interface Level Flag]
Where:
Install Flag. /i = install, /x = uninstall, /a = admin install
Filename. Name of the MSI package to install
6.6.2 Custom Universal Authentication Manager Installer Properties
The custom installer includes the ability to configure the following options:
-
Option to select local (default) or enterprise mode
-
Option to configure Logon Manager to use Universal Authentication Manager as its Primary Logon Method
-
Ability to configure custom features to install
-
Ability to install in the desired language
Use the following custom parameters to configure these installer options:
-
CLIENTMODE-
0= Local Client Mode (default) -
1= Enterprise Client Mode
-
-
ADDLOCAL-
"Application"(Required) -
"SmartCard" -
"ProximityCard" -
"Fingerprint" -
"ChallengeQuestions" -
"UAMAuth" -
"WinPwdAuth" -
"WinPwdAdapter" -
"ChallengeQuestionsAdapter" -
"SmartCardAdapter" -
"ProximityCardAdapter" -
"FingerPrintAdapter"
-
To configure which features are installed, use the standard "ADDLOCAL" command line option.
Note:
Do NOT use theADDLOCAL property with ORCA, which is command-line only.Installable Language Packs (English is always installed)
-
English
-
Brazilian Portuguese
-
French
-
French (Canada)
-
German
-
Italian
-
Japanese
-
Korean
-
Simplified Chinese
-
Spanish
-
Czech
-
Finnish
-
Dutch
-
Polish
-
Portuguese
-
Traditional Chinese
-
Danish
-
Greek
-
Hungarian
-
Norwegian
-
Romanian
-
Russian
-
Slovak
-
Swedish
-
Thai
-
Turkish
6.6.3 Examples
To install Universal Authentication Manager with Smart Card and Proximity Card, in enterprise mode, with the German, Norwegian, and Turkish language packs:
msiexec /i "ESSO-UAM.msi" ADDLOCAL ="Application,SmartCard,ProximityCard,German,Norwegian,Turkish" CLIENTMODE=1
To install Universal Authentication Manager with Smart Card only, in Local Client mode:
msiexec /qn /i "ESSO-UAM.msi" ADDLOCAL ="Application,SmartCard" CLIENTMODE=0
To install Universal Authentication Manager with Fingerprint only, in Local Client mode:
msiexec /qn /i "ESSO-UAM.msi" ADDLOCAL ="Application,Fingerprint" CLIENTMODE=0
To install Universal Authentication Manager with Challenge Questions, Proximity Card, Smart Card, and Fingerprint, in Enterprise Client mode:
msiexec /i "ESSO-UAM.msi" ADDLOCAL="Application,ChallengeQuestions,ProximityCard,SmartCard,Fingerprint" CLIENTMODE=1
6.7 Completing the Installation of Universal Authentication Manager
You must complete the tasks listed below in order to successfully configure Universal Authentication Manager.
6.7.1 Configuring the Universal Authentication Manager Service Account
When running the Client in Enterprise mode, you must follow the instructions in this section to configure each Universal Authentication Manager client so that they will be able to synchronize with an Enterprise repository.
Note:
Some steps in this section need to only be performed once. Other steps must be performed every time Universal Authentication Manager is installed or upgraded.6.7.1.1 Step 1: Grant the Service Account Local Administrator Privileges
The Universal Authentication Manager service account must be a Local Administrator on each client system. This step only needs to be done once per client, and should be done immediately after the client has been installed. These steps can be done before or after rebooting the system. You can add the Universal Authentication Manager Service Account to the local Administrators group on each workstation. Complete the following steps:
-
Click Start > Run, enter
compmgmt.mscand click OK. The Computer Management console opens. -
Expand Systems Tools, then expand Local Users and Groups, and select Groups.
-
In the right pane, right-click Administrators and select Add to Group....
-
Click Add. Enter the user name of the Universal Authentication Manager service account that you created, and click OK.
6.7.1.2 Step 2: Configure the Service
You must configure the Universal Authentication Manager authentication service to run under the Universal Authentication Manager service account, and to automatically grant the account the Log On As Service local privilege. This step must be performed after every Universal Authentication Manager installation. Complete the following steps:
-
Click Start > Run and type
services.mscand click OK. The Services console opens. -
Double-click the ESSO-UAM Authentication Service.
-
In the properties dialog that appears , select the Log On tab, then select This account. Enter the name of the Universal Authentication Manager service account into the This account field, then enter and confirm the password.
-
Click Apply. The first time this step is done, you will receive a message that the Log On As Service right has been granted.
6.7.1.3 Step 3: Restart the Service
Restart the service to verify the new settings are working and the ESSO-UAM Authentication Service can start. If the service cannot start, you can try to revert to the Local System, restart the service, review and correct the settings, and try again.
To restart the service, right-click the service and click Restart.
Note:
Do not leave the service in a stopped state. If the service is left in a stopped state, users may not be able to log on.6.7.1.4 Reverting Your Changes After Uninstalling Universal Authentication Manager
To undo these steps and return to a clean system:
-
Uninstall Universal Authentication Manager or set the ESSO-UAM Authentication Service back to Local System and restart.
-
Click Start > Run, enter
compmgmt.mscand click OK. The Computer Management console opens. -
Expand Systems Tools, then expand Local Users and Groups and select Groups.
-
In the right pane, right-click Administrators and select Add to Group....
-
Highlight the Universal Authentication Manager service account and click Remove.
-
Click Start > Run, enter
secpol.mscand click OK. The Local Security Policy console appears. -
Double-click the Universal Authentication Manager service account.
-
In the properties dialog that appears, expand Local Policies and expand User Rights Assignment.
-
Double-click the Log on as a Service policy.
-
Select the Universal Authentication Manager service account and click Remove.
6.7.2 First-Time Logon for Enterprise Mode Users
It is recommended that you require Enterprise Mode users to perform their first-time logon in connected mode. If the workstation is not connected to the Active Directory Domain Controller, users will be able to log on but not enroll, because Windows cannot resolve the user name while disconnected.
If users perform a first-time logon in disconnected mode, they might receive the following message when attempting to access to the Client application: "You cannot enroll in Universal Authentication Manager until you log on to Windows with the computer connected to the Windows network."