3 Configuring and Diagnosing
Mainframe Application Templates
This part explains the concepts necessary to understand how and why you should configure mainframe application templates to solve specific sign-on scenarios, as well as the recommended best-practice procedures for configuring and testing mainframe application forms, and diagnosis and resolution steps for the most common issues that may cause the Agent to erratically detect and/or respond to application forms.
It covers the following topics:
Tip:
If the steps presented in this chapter do not resolve your issue, you can troubleshoot further by tracing and logging the activity of Logon Manager and submitting the logged information to Oracle Support for analysis. For this purpose, Oracle Support provides the Trace Controller utility. For information on how to use the utility, see the "Using the Trace Controller Utility" topic in the Enterprise Single Sign-On Suite Administrator's Guide.3.1 Overview of a Sign-On Event
Logon Manager can provide single sign-on capability for mainframe/host applications accessed via a terminal emulator. A terminal emulator is an application that establishes a terminal session from the user's Windows workstation to a multi-user mainframe system over a variety of protocols, including IBM 5270/5050, Telnet, SSH, and so on. Logon Manager can be configured to detect and respond to a wide range of sign-on events, such as logon, password change, and variations of thereof; support is provided for a diverse range of forms, fields, controls, and event flows.
Note:
The list of currently supported emulators can be found in the release notes for your version of Logon Manager. You can also find out whether an emulator is supported by viewing the contents of the mrfmlist.ini file using the Logon Manager Administrative Console. See Viewing and Modifying Emulator Configuration for instructions.In order to recognize text-based mainframe application forms displayed within supported Windows-based terminal emulators, Logon Manager does the following:
-
Detects the emulator's HLLAPI interface, window, terminal session, and target form:
-
At startup, loads the emulator detection data specified in the mfrmlist.ini file and begins monitoring all HLLAPI interfaces detected on the system for new terminal sessions. (If the emulator does not provide HLLAPI notifications and polling is enabled, Logon Manager queries those emulators via HLLAPI every 700ms, by default).
Note:
The mfrmlist.ini file contains detection data (such as HLLAPI interface library name and path, window title, class, and any required custom configuration parameters) for supported terminal emulators. This data allows Logon Manager to identify and interact with emulators and the terminal sessions they display. -
When a running emulator notifies Logon Manager via HLLAPI that a new terminal session has been opened (or, if polling is enabled, Logon Manager detects a new session in the emulator), Logon Manager searches through all available mainframe application templates for a template containing a form definition that matches the text displayed in the terminal session.
-
Once per each detected HLLAPI event (keystroke, screen update, and so on), rescans the available mainframe application templates and re-detects the specified match text.
-
-
Responds to the detected form and completes the logon:
-
Retrieves the associated credentials from the user's store (if they exist) and injects them at field coordinates defined in the template. (If the credentials don't exist, the Agent prompts the user to store them.)
-
Submit the credentials to the application for processing.
-
(Optional) Detects any follow-up forms or dialogs, such as new password change success or failure, and performs the required action.
-
3.2 Understanding Form Detection and Response
Logon Manager uses the Mainframe Helper Object (MHO), instantiated as a background process named ssomho.exe, to interact with terminal emulators via the High-Level Language API (HLLAPI). This allows Logon Manager to programmatically detect an emulator's HLLAPI interface, monitor (or query) the emulator for session instantiation, screen updates, and other events, and interact with the emulator to detect the match text, inject credentials, and submit them to the application for processing.
The MHO directly interfaces with most modern 32-bit emulators via HLLAPI. Additionally, Oracle provides support for some common non-HLLAPI emulators and 16-bit emulators, for which you need to install additional helper objects listed below (available under the Extensions >Mainframe Support node in the Logon Manager installer):
-
Console windows - supports Windows command-line console windows instantiated by the cmd.exe interpreter and running 32-bit applications, such as the Microsoft Telnet client.
-
PuTTY - supports the PuTTY terminal emulator.
Note:
If you need a Telnet, SSH, or RS-232 connection to an application and your current terminal emulator only supports HLLAPI for IBM 5270/5050 connections, Oracle supports and highly recommends using the free PuTTY terminal emulator for connecting via those protocols.When Logon Manager starts, the MHO reads the contents of the mfrmlist.ini file (located in %PROGRAMFILES%\Passlogix\v-GO SSO\Helper\Emulator), which contains detection data (such as HLLAPI interface library name and location, window title and class, executable name, and any custom configuration options required to support the emulator) for the supported emulators.
Note:
While Logon Manager ships with a "factory" mfrmlist.ini file, you also have the ability to add an unlisted emulator to the file in order to permit Logon Manager to detect and interact with that emulator. For more information, see Viewing and Modifying Emulator Configuration.The MHO then parses the configuration data for each emulator present in the mfrmlist.ini file and begins monitoring (or polling, if configured as such) each registered HLLAPI interface it detects. Once the configuration data has been loaded, the MHO monitors the detected HLLAPI interfaces for new session short-names.
For each new detected terminal session short-name, the MHO queries the emulator via HLLAPI for more information, such as the title and class of the session window. This information is matched against the window title and class present in the emulator's entry in the mfrmlist.ini file.
While HLLAPI in itself is an open standard, emulator vendors often implement terminal emulators to varying degrees of adherence and/or completeness. Because of this, some HLLAPI-enabled emulators do not properly notify Logon Manager of session events, such as session instantiation, screen updates, and so on. For those emulators, the ChangeNotificationBroken=1 configuration parameter, which enables polling, must be present within their entries in the mfrmlist.ini file.
Note:
See Viewing and Modifying Emulator Configuration for instructions on how to view an emulator entry in the mfrmlist.ini file and add this parameter, if necessary. (Oracle-tested emulators that require this parameter are preconfigured to include it in the mfrmlist.ini file "out of the box.")Once the emulator has been positively identified, the MHO examines all available mainframe application templates for matches against the text displayed in the terminal session and loads the first template that is a positive match against the detected form text. The MHO also rescans all mainframe templates and re-detects the match text every time new HLLAPI event is detected in the emulator.
Note:
An application template is a set of configuration options that instruct the Logon Manager Agent how to detect and respond to application windows and the forms they contain.Mainframe applications operate in text-mode, i.e., they use a set of monospaced characters displayed on a known-size grid - typically 80 rows by 25 columns - that comprises the terminal screen. Because of this, each character on the screen can be uniquely identified by a set of vertical and horizontal coordinates. When defining a mainframe application form, you provide v Logon Manager with the starting coordinates of each target field (i.e., the coordinates where Logon Manager should begin injection).
For example, the Username field begins at column 10, row 15 (i.e., Logon Manager will inject the user name starting after the semicolon in row 15), while the password field begins two rows lower, at column 10, row 17, after the Password: field text:
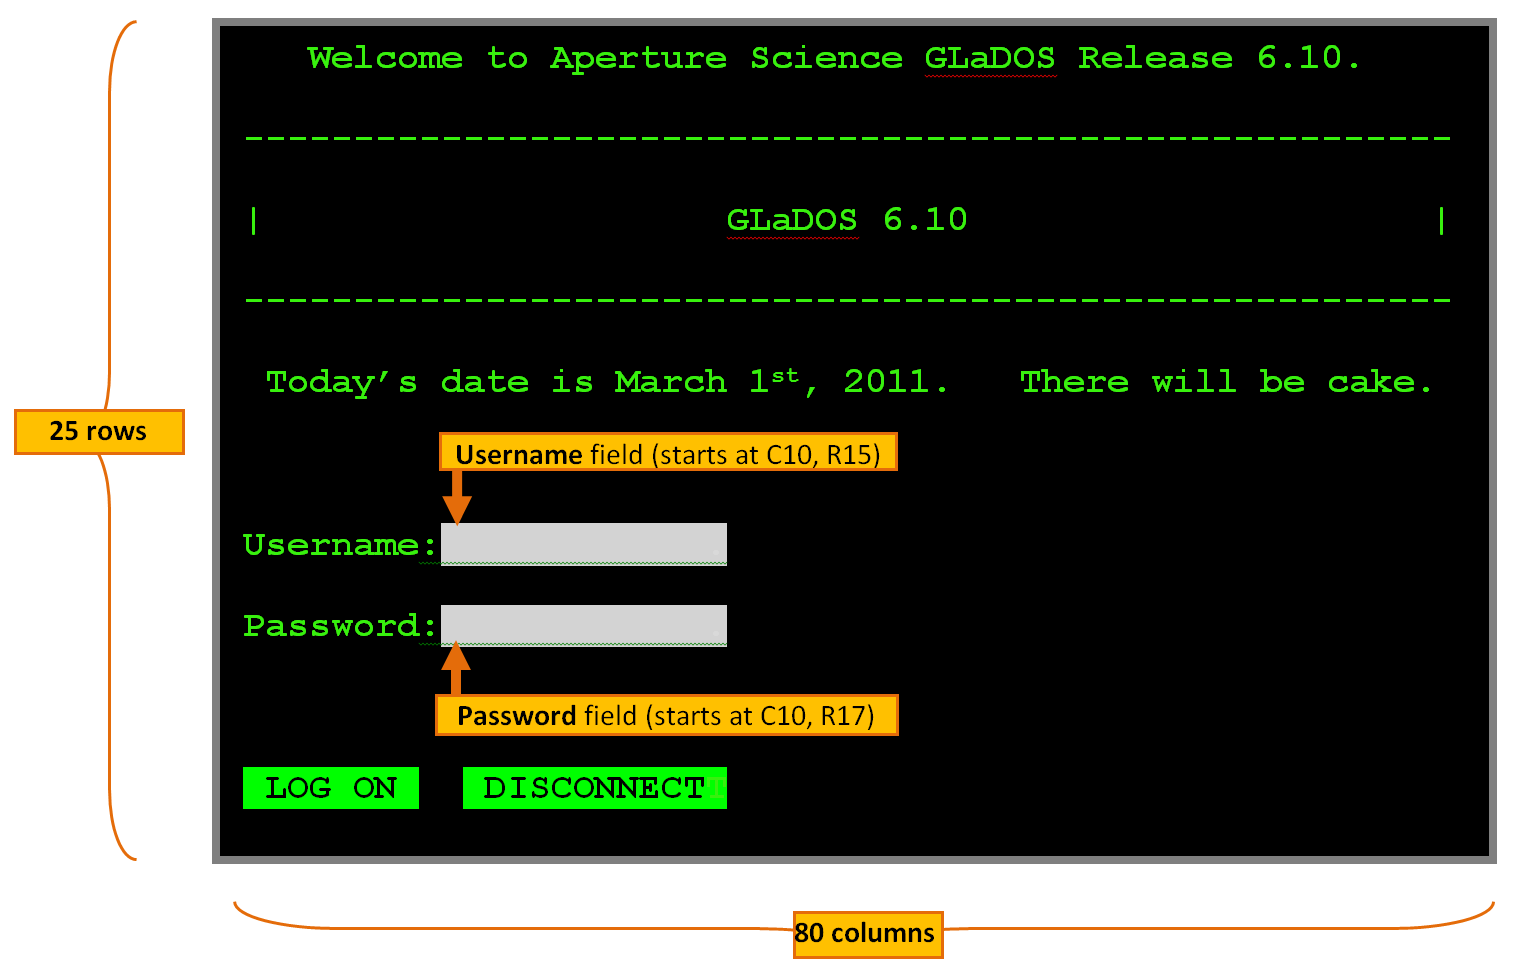
Note:
Logon Manager supports terminal displays of any size, and a single template will provide response to an application running in different sizes, as long as the absolute coordinates of the configured match text and fields remain the same when the screen size changes.Tip:
Most emulators display the coordinates of the terminal cursor in their status bar. To quickly determine the coordinates of a field, position the terminal cursor at the beginning of the field and check the position displayed in the emulator's status bar.During detection, Logon Manager retrieves the coordinates of the specified match text and checks whether that text exists at the specified coordinates, while during response, Logon Manager locates the specified field coordinates and injects credentials into those screen locations.
3.2.1 Fixed Screen Forms vs. Scrolling Screen Forms
The example shown and described earlier in this section portrays a fixed-screen application, which is the most commonly encountered type of application. However, some applications, such as Telnet clients, may utilize a scrolling-screen display. The differences are as follows:
-
Fixed-screen. The application screen has a fixed horizontal (number of columns) and vertical (number of rows) size, i.e., it does not scroll vertically. Most mainframe applications, such as inventory or machine control systems, fall into this category. In a fixed-screen session, every character displayed in the session has a static position, i.e. its coordinates do not change.
-
Scrolling-screen. The application screen has a fixed horizontal size (number columns) but an unlimited, or continuous, vertical size (number of rows). In a scrolling-screen session, fields do not have static coordinates; in order to locate them, Logon Manager requires you to specify the column position of the cursor (i.e., where the cursor is expected to be found horizontally after completing each step in the logon sequence), as well as the sequence of fields and actions required to complete the logon. Logon Manager can detect via HLLAPI whenever the screen has scrolled and by how much, and advance to the next field or action in the sequence as necessary.
Note:
For scrolling-screen forms Logon Manager also supports fields that have dynamic horizontal coordinates, allowing you to input a regular expression as the horizontal coordinate. For more information, see Configuring a Form.
3.2.2 Supported Form Types
As of the release date of this document, Logon Manager supports the following types of forms in mainframe applications:
-
Logon
-
Logon success (a message confirming successful logon)
-
Logon failure (a message indicating the injected credentials have been rejected)
-
Password change
-
Password change success (a dialog confirming successful password change)
-
Password change failure (a dialog indicating the new password was rejected)
A mainframe logon form, for example, typically contains at least a user name field, a password field, and, sometimes, additional controls that permit Logon Manager to navigate the screen. Usually credentials are submitted via the default Logon Manager "submit" action, the Enter keystroke (which should not be explicitly specified in the form definition).
Note:
Some non-HLLAPI emulators may provide a scripting language that allows you to display a Windows-style logon dialog. In such cases, you can create a Windows application template for the scripted logon dialog and use SendKeys to inject credentials and complete the logon. For instructions on creating the required script, consult the emulator documentation provided by its vendor; for instructions on creating a Windows application template, see Configuring and Diagnosing Windows Application Templates.When defining a form in a mainframe application template, you must identify the coordinates of the target fields in the application's display. Since Logon Manager detects the emulator window before it detects the form displayed in the session screen, a single application template will work for all supported emulators that behave identically to the original emulator used to create the template. Thanks to HLLAPI, Logon Manager does not need to perform screen scraping nor does it need to analyze entire screens of text for a match - instead, Logon Manager re-detects the defined match text every time a new HLLAPI event is detected within the emulator.
The same terminal session may display different forms depending on the invoked function (i.e., logon or password change); thus, a single template can contain definitions for the multiple forms that the window can display. For most applications, you need to only define the forms to which you want Logon Manager to respond. Logon Manager can automatically populate the appropriate fields in a form with credentials retrieved from the user's credential store, as well as submit the credentials to the application for processing. Defining a form comprises providing unique identification criteria, specifying the action to take when the form is detected, and the specific way in which the action (e.g., injecting credentials) should be performed.
Note:
Logon Manager is unable to differentiate between multiple sessions of an application if the application display does not contain unique session identification information (such as a host name). For example, if you open two sessions to two mainframe hosts running the same application but each requiring different credentials, Logon Manager will attempt to complete the logon (or password change) with the credentials stored in the template for both sessions. In such cases Oracle recommends storing credentials for all possible sessions for an application within a single template and using the "Logon Chooser" feature to prompt the user to manually select the credentials for each session.3.2.3 Supported Credential Injection Methods
Depending on the design of the target application, Logon Manager can use one of the following methods to interact with the fields and controls in the target form:
-
HLLAPI - This is the default and preferred form interaction method for most mainframe applications, particularly those using the IBM 5270/5050 protocols. This method uses the HLLAPI interface to programmatically inject credentials at the specified coordinates.
-
SendKeys - This method injects credentials by emulating keystrokes. Use this method if the emulator does not support HLLAPI or when special actions are required to complete the logon sequence - for example, the application requires the user to manually advance to the next field via a keystroke, and the field remains disabled until the user navigates to it. Oracle recommends using HLLAPI whenever possible for a more robust configuration.
Note:
: When configuring a mainframe application template, as soon as you begin adding additional fields or actions to the form definition after completing the wizard, Logon Manager switches from HLLAPI to SendKeys-based injection. -
SendKeys as a Windows Application - recommended only when no other injection method works, you may attempt to configure your mainframe as a Windows application and use SendKeys to both navigate the application's logon screen and inject credentials. This method is very limited in scope, as Logon Manager is unable to detect any screen updates - actions are sent to the application "blindly." For this reason, this method will only work for the application's initial screen (usually, the logon screen) and no subsequent screens that appear once logged in.
3.3 Determining the Optimal Configuration for a Form
When Configuring a Form, use the information in this section to determine its optimal configuration based on the requirements and features of the target application.
3.3.1 Determining the Optimal Configuration for a Logon Form
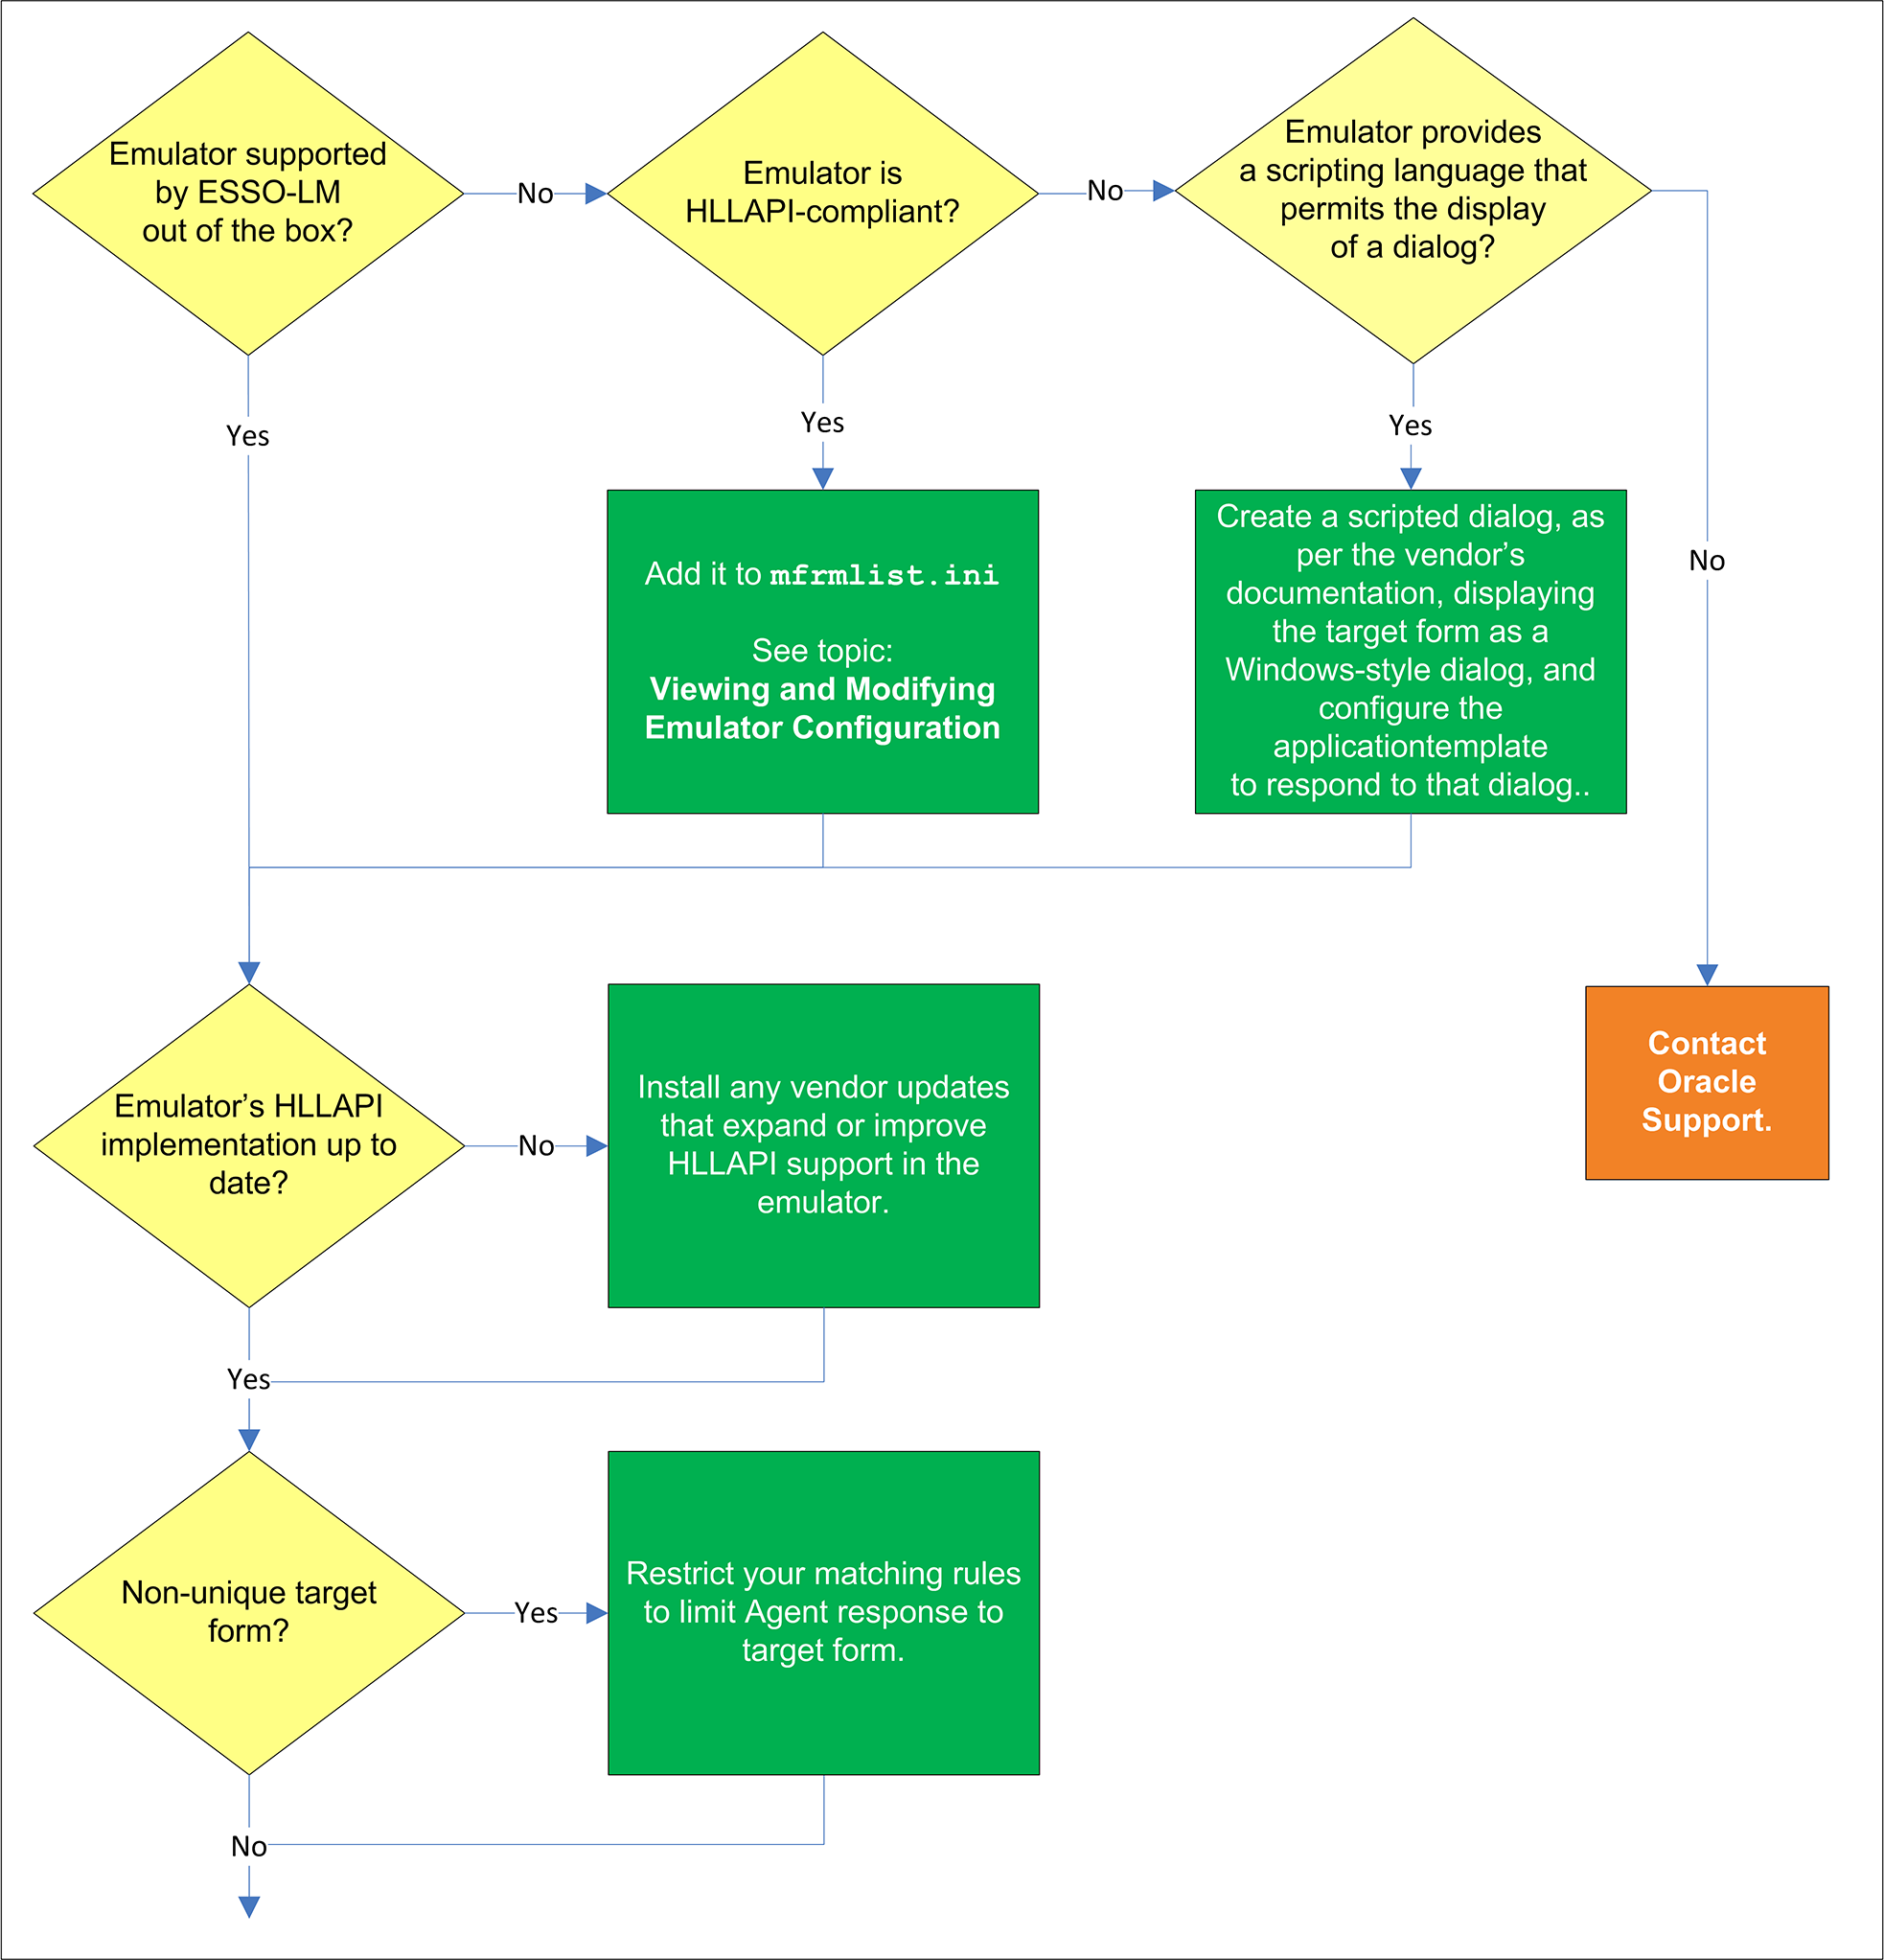
3.3.1.1 Emulator supported by Logon Manager out of the box?
If the emulator has been tested by Oracle and found to be compatible with Logon Manager, it is supported by Logon Manager out of the box and a corresponding entry exists for the emulator in the mfrmlist.ini file. The list of currently supported emulators can be found in the latest application release notes. It can also be determined by looking for an entry for the emulator in question in the mfrmlist.ini file, as described in Viewing and Modifying Emulator Configuration.
If the emulator is not supported by Logon Manager out of the box and it is HLLAPI-compliant, you may add it to the mfrmlist.ini file (as described in Viewing and Modifying Emulator Configuration) in order to determine whether it is fully compatible with Logon Manager. While Oracle Support will aid you in this effort should you run into configuration issues, Oracle is unable to guarantee that an untested emulator will properly function with Logon Manager in all expected capacities.
Note:
If you add an unlisted emulator to the mfrmlist.ini file and find it to be fully functional with Logon Manager, Oracle requests that you submit the emulator name and version to Oracle Support so that we can consider including official support for that emulator in the next release of Logon Manager.3.3.1.2 Is the emulator HLLAPI-compliant?
Depending on whether the emulator is HLLAPI-compliant, do one of the following:
-
If the emulator is HLLAPI-compliant but is not officially supported by Logon Manager, you can manually add the emulator to the mfrmlist.ini file to allow Logon Manager to interact with it and determine whether Logon Manager's response to the target application via that emulator is reliable.
For instructions, see Viewing and Modifying Emulator Configuration.
-
If the emulator does not support HLLAPI, check whether it provides a scripting language that allows you to code a script that will display the application's logon and password-change forms as Windows-style dialogs.
If the emulator has this scripting capability, write the script according to the vendor's documentation, then configure a Windows application template to respond to the Windows-style dialogs.
For more information on creating Windows application templates, see Configuring and Diagnosing Windows Application Templates.
Note:
For assistance in writing the script, consult the emulator's vendor. Oracle is unable to provide help in the writing and/or troubleshooting of third-party scripts.If neither of the above options is available, contact Oracle Support for assistance.
3.3.1.3 Is the emulator's HLLAPI implementation up to date?
In some cases, the emulator's initial HLLAPI implementation might be incomplete or defective. If possible, Oracle recommends researching and applying any vendor updates that improve or expand the emulator's HLLAPI implementation in a way that improves the emulator's compatibility with Logon Manager. For more information on the level of your emulator's HLLAPI implementation, consult the emulator vendor.
3.3.1.4 Non-unique target form?
When configuring the form, you must select a match text string within the form that does not appear anywhere else within the application; otherwise, Logon Manager may respond to screens that contain the non-unique match text even though they are not the target form. If a unique match text string is not present in the target form, investigate the possibility of modifying the application in order to add a piece of unique text to the form.
If modifying the application is not an option, configure the "logon chooser" feature in the template and instruct users to select the desired credentials when logging on to the affected application. For information on the "logon chooser" feature, see the Console help.
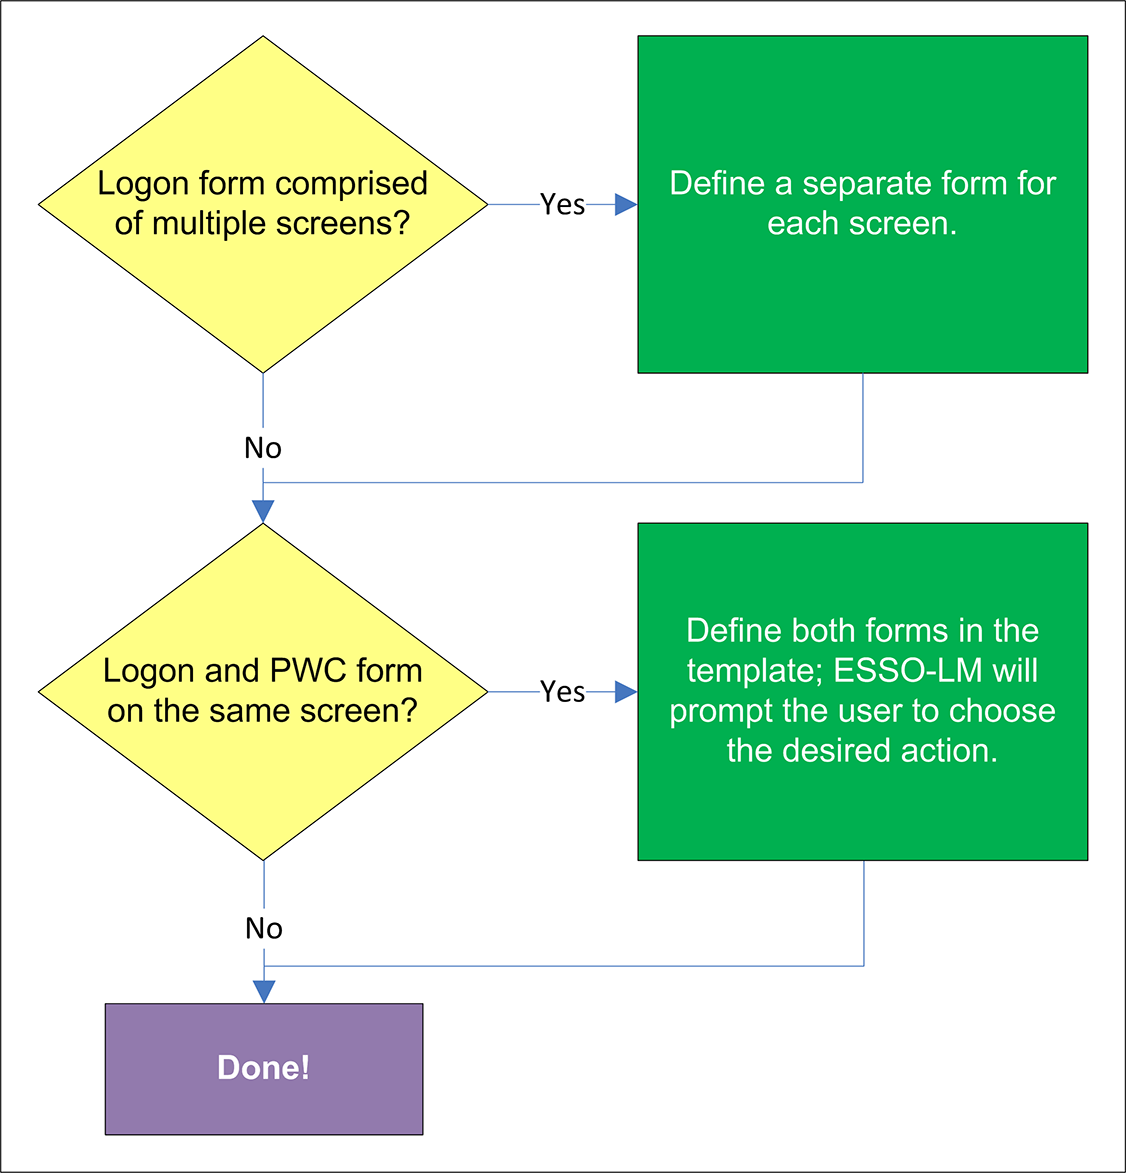
3.3.1.5 Logon form comprised of multiple screens?
Since Logon Manager treats each new screen as a separate form, if the target form is comprised of multiple screens,( i.e., the user name field is displayed, then the screen is cleared and the password field is displayed on a brand new screen), define a separate form for each of the screens.
3.3.1.6 Logon and password change (PWC) forms on the same screen?
Some applications display logon and password change fields and/or controls on the same screen. In such cases, if the Auto Submit feature is enabled and the Agent responds to such application, the user is logged in automatically without being given the option to change the password. To allow the users to choose the desired action, define the logon and password change forms in the template. The Agent will prompt the user for the desired course of action (logon or password change) when it responds to an application with consolidated logon and password change forms.
Note:
You also have the option to configure a grace period for the "action chooser" feature, during which the Agent will automatically assume that logon is the preferred action and log the user on without prompting to choose the desired action. This option, named Action Chooser Grace Period, is available in the Miscellaneous tab in the application template.3.3.2 Determining the Optimal Configuration for a Password Change Form
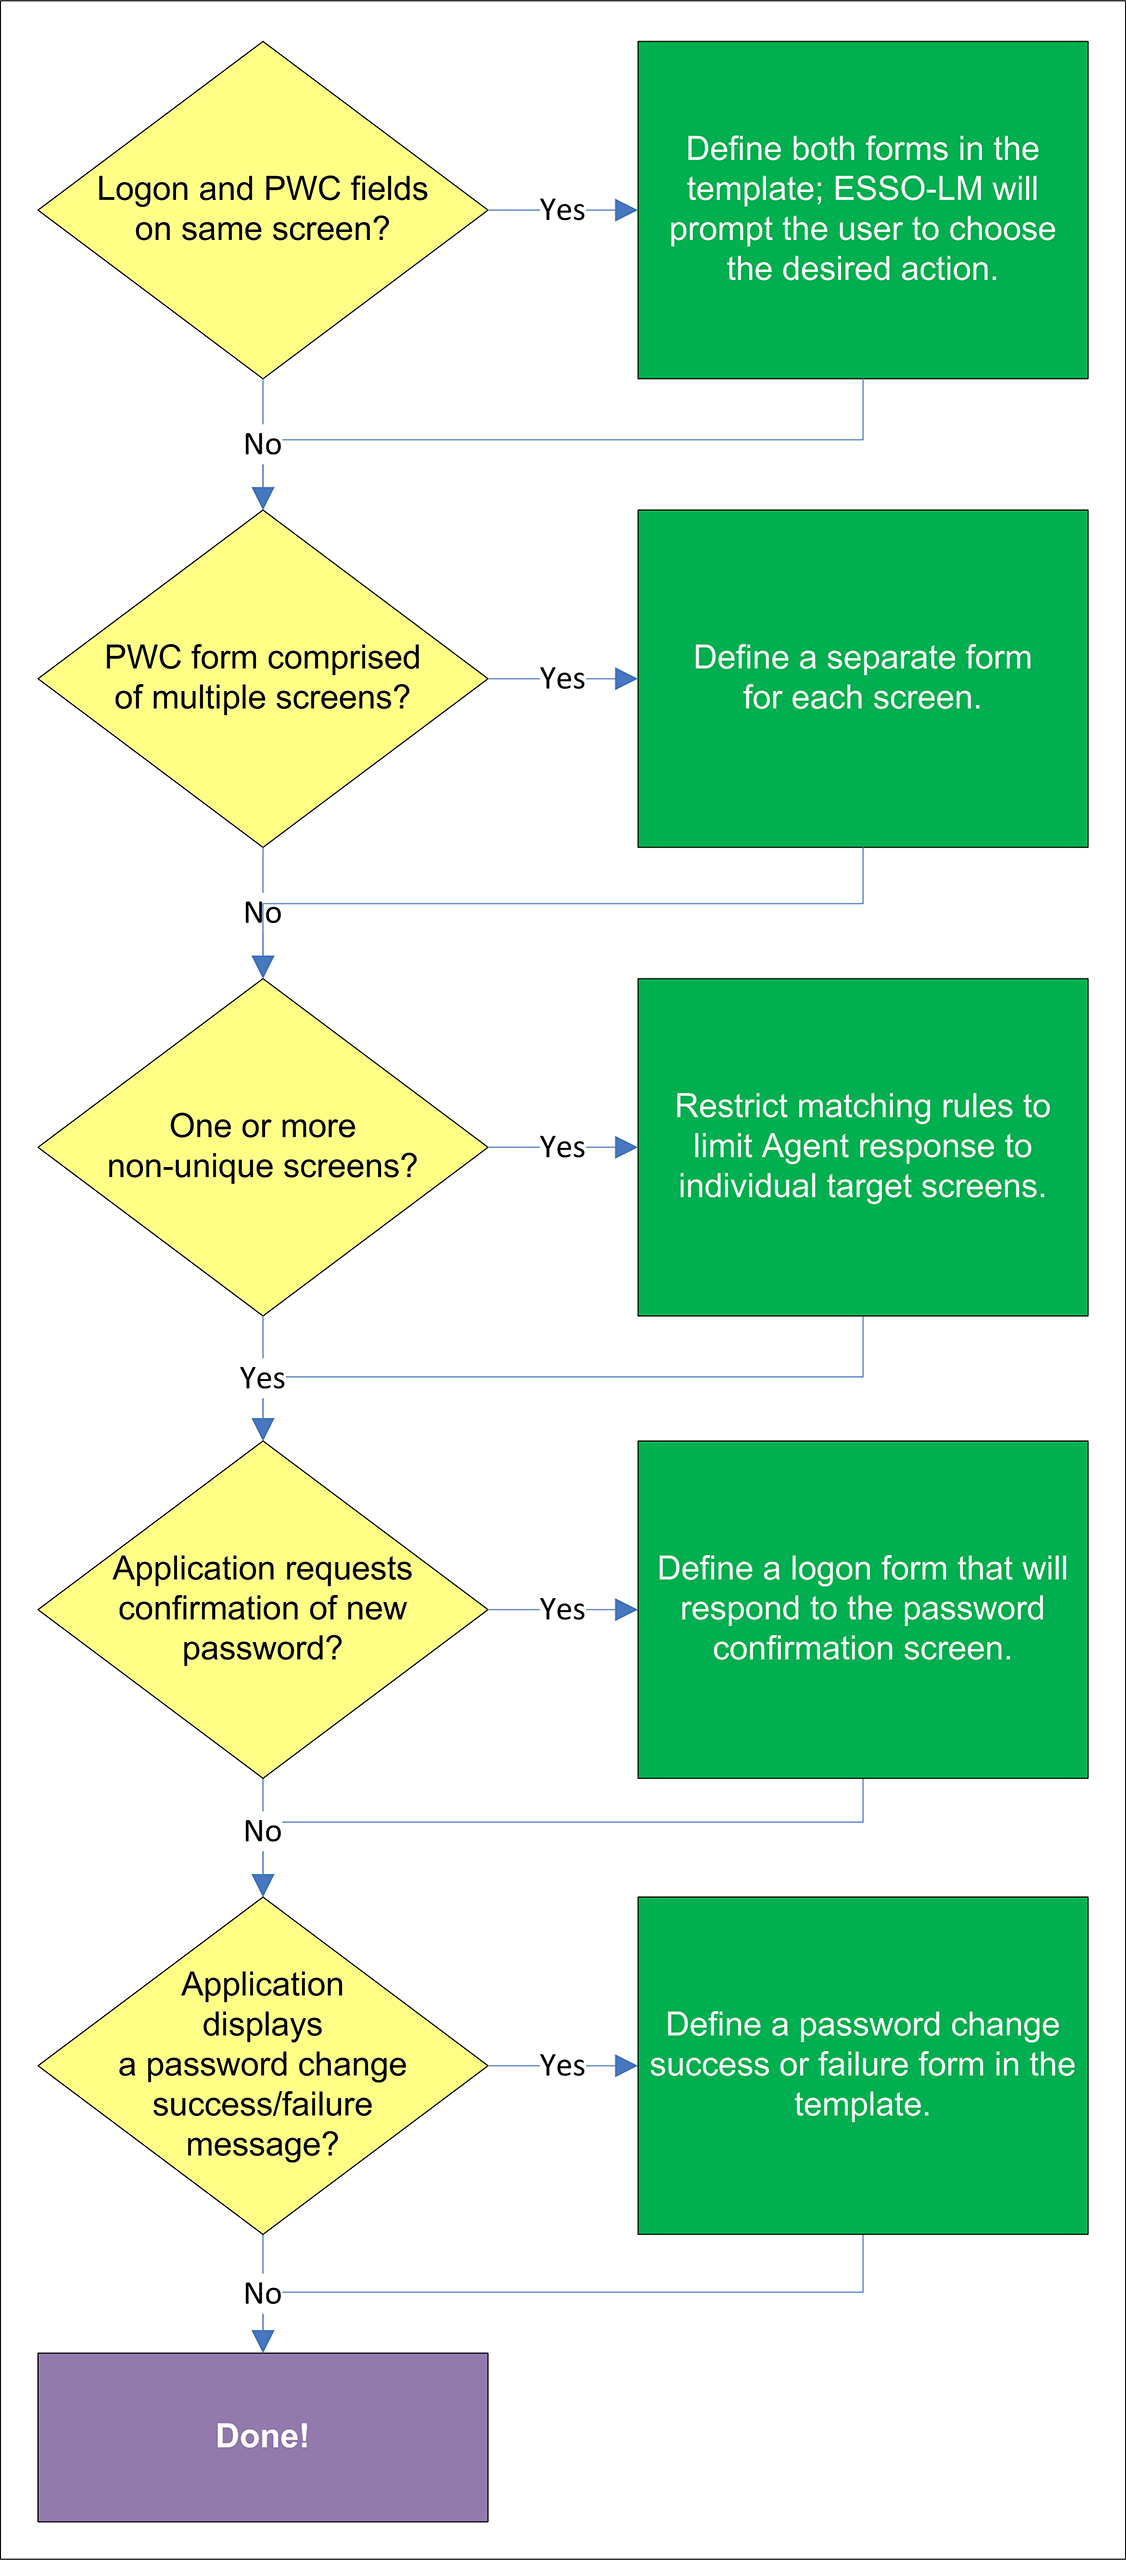
3.3.2.1 Logon and password change (PWC) forms on the same screen?
Some applications display logon and password change fields and/or controls on the same screen. In such cases, if the Auto Submit feature is enabled and the Agent responds to such application, the user is logged in automatically without being given the option to change the password. To allow the users to choose the desired action, define the logon and password change forms in the template. The Agent will prompt the user for the desired course of action (logon or password change) when it responds to an application with consolidated logon and password change forms.
Note:
You also have the option to configure a grace period for the "action chooser" feature, during which the Agent will automatically assume that logon is the preferred action and log the user on without prompting to choose the desired action. This option, named Action Chooser Grace Period, is available in the Miscellaneous tab in the application template.3.3.2.2 PWC form comprised of multiple screens?
Since Logon Manager treats each new screen as a separate form, if the target form is comprised of multiple screens,( i.e., the application prompts the user to enter the old password, clears the screen, then prompts for the new password, clears the screen again, and then prompts for confirmation of the new password), define a separate form for each of the screens.
3.3.2.3 One or more non-unique screens?
If one or more screens in a multiple-screen form are non-unique (i.e., Logon Manager cannot distinguish between them), response to those screens will be erroneous. When configuring the form, you must select a match text string within the form that does not appear anywhere else within the application; otherwise, Logon Manager may respond to screens that contain the non-unique match text even though they are not the target form. If a unique match text string is not present in the target form, investigate the possibility of modifying the application in order to add a piece of unique text to the form. If modifying the application is not an option, configure the "logon chooser" feature in the template and instruct users to select the desired credentials when logging on to the affected application.
3.3.2.4 Application requests confirmation of new password?
If the application requests the users to confirm (re-enter) the new password during password change, define a logon form that will respond to the password confirmation screen (define only the password field in this secondary logon form).
3.3.2.5 Application displays a password change success or failure message?
If the application displays a success or failure message after password change, define a password change success or a password change failure form in the template. For instructions, see Testing the Configuration of a Password Change Form.
3.4 Configuring a Form
The procedures in this section use concepts and terminology explained earlier in this guide. When performing the procedures in this section, refer to Configuring a Form to make configuration decisions that best suit the target application.
Before configuring a form, launch the desired terminal emulator, connect to the target application, and make sure its target form is displayed.
3.4.1 Basic Configuration of a Fixed-Screen Form
To complete a basic configuration of a fixed-screen form, do the following:
-
Open the Logon Manager Administrative Console. By default, the shortcut is located in Start > Programs > Oracle > Logon Manager Console.
-
In the left-hand tree, select the Applications node, then do one of the following:
-
If you want to create a new template and define the logon form, click Add in the right-hand pane; then, in the New Application dialog, that appears, enter a descriptive name for the template and click Finish. The new template appears in the list of stored templates.
Caution:
If two or more application templates are named such that the name of one of the templates occurs in the beginning of the name of another template, the Agent will erroneously use the template with the shortest name to respond to all of the affected applications. To avoid this behavior, ensure that your template names do not begin with the same string of text.
-
If you want to add a logon form definition to an existing template, expand the Applications node and select the desired template (the template appears in the right-hand pane), then click Add at the bottom of the pane.
-
-
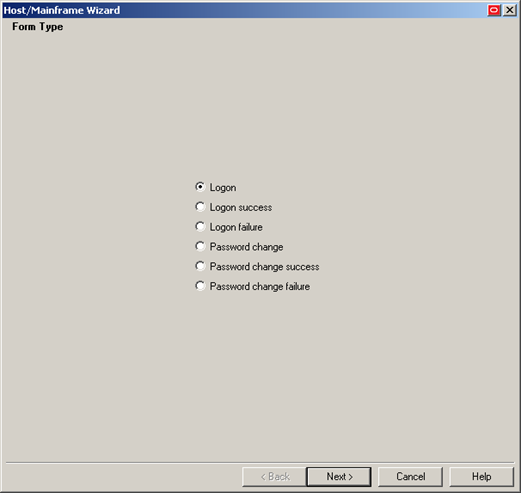
In the wizard that appears, define the match text and fields that you want Logon Manager to interact with when logging on to the application. In the "Form Type"screen, select the desired form type and click Next.

-
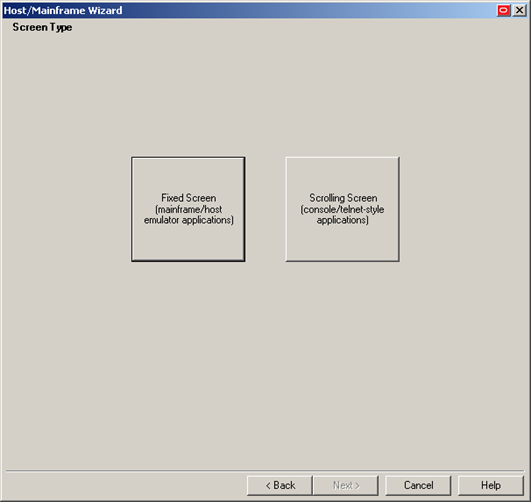
In the "Screen Type" screen, click Fixed Screen.
-
When the "Paste Screen Text" screen appears, copy the entire text that comprises the target form in the emulator window to the clipboard and click Paste Text to paste it into the wizard. When you have pasted the text, click Next.

-
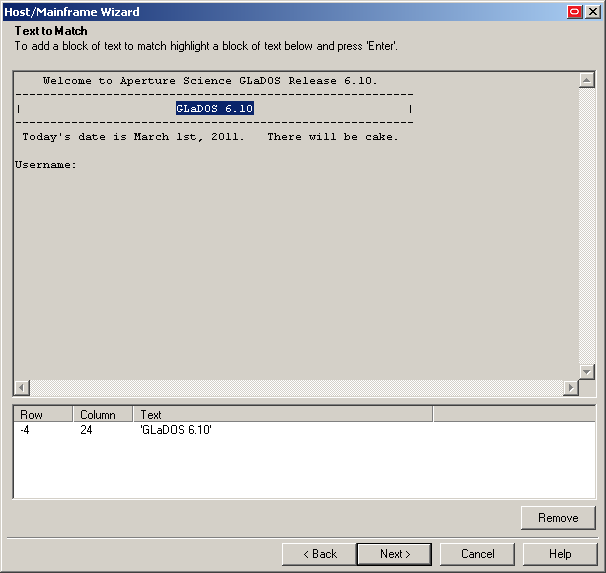
In the "Text to Match" screen, define the text that Logon Manager will look for in the form to uniquely identify it and match it to the template:
Note:
Oracle recommends keeping your matching rules to a minimum while retaining the desired matching behavior. Matching on large portions of text can slow down the logon process.-
Highlight the desired match text block.
-
Press Enter to add the text matching rule.
-
Repeat steps i-ii to define additional text matching rules.
-
When you have defined the desired rules, click Next.
-
-
In the "Fields" screen, define the target fields into which Logon Manager will inject credentials:
-
(Optional) If your form requires the injection of the same data into multiple fields (e.g., injecting the password into a Password and a Confirm Password field), enable the Allow multiple field designation option.
-
Place the cursor at the beginning of the field into which you want Logon Manager to inject a credential.
-
Press Enter.
-
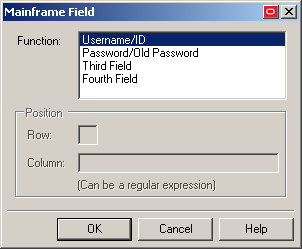
In the context menu that appears, select the desired field type.
-
Repeat steps i-iii to define additional fields.
-
When you have defined all desired fields, click Next.
-
-
In the summary screen that appears, review your configuration choices. If any of the choices seem erroneous, click Back and correct them; otherwise, click Finish.
-
In the form properties dialog that appears, do one of the following:
-
If you need to perform additional configuration, do so now.
-
If you are satisfied with the configuration, click OK to dismiss the dialog.
-
-
Publish your changes to the repository as described in Publishing a Template to the Repository, if applicable.
3.4.2 Basic Configuration of a Scrolling-Screen Form
To complete a basic configuration of a scrolling-screen form, do the following:
-
Open the Logon Manager Administrative Console. By default, the shortcut is located in Start > Programs > Oracle > Logon Manager Console.
-
In the left-hand tree, select the Applications node and do one of the following:
-
If you want to create a new template and define the logon form, click Add in the right-hand pane, then, in the New Application dialog that appears, enter a descriptive name for the template and click Finish. The new template appears in the list of stored templates
Caution:
If two or more application templates are named such that the name of one of the templates occurs in the beginning of the name of another template, the Agent will erroneously use the template with the shortest name to respond to all of the affected applications. To avoid this behavior, ensure that your template names do not begin with the same string of text.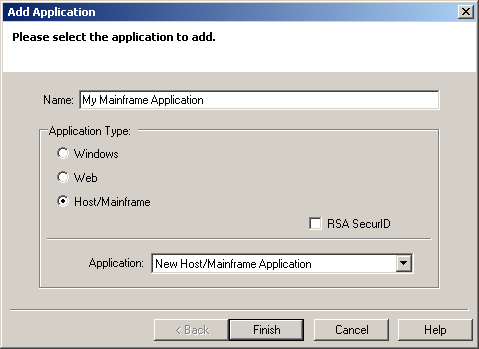
-
If you want to add a logon form definition to an existing template, expand the Applications node and select the desired template (the template appears in the right-hand pane), then click Add at the bottom of the pane.
-
-
In the wizard that appears, define the match text and fields that you want Logon Manager to interact with when logging on to the application. In the "Form Type"screen, select the desired form type and click Next.
-
In the "Screen Type" screen, click Scrolling Screen.
-
When the "Paste Screen Text" screen appears, copy the entire text that comprises the target form in the emulator window to the clipboard and click Paste Text to paste it into the wizard. When you have pasted the text, click Next.

-
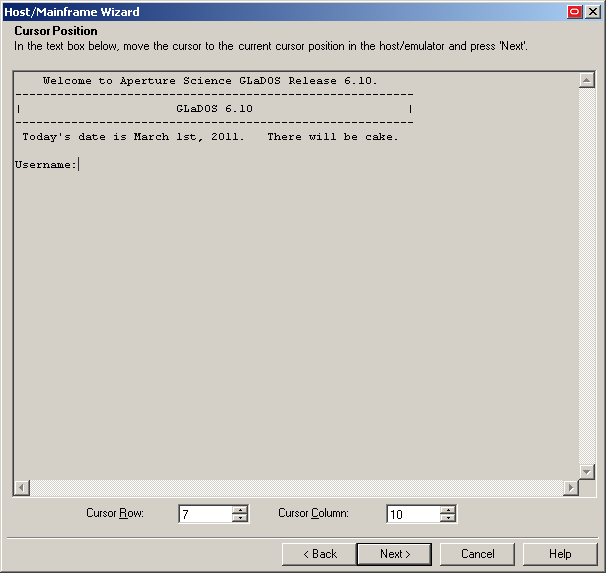
In the "Cursor Position" screen, specify the current position of the cursor in the emulator display as follows:
-
Click the desired location in the screen text. (You can also enter the vertical and horizontal coordinates in the Cursor Row and Cursor Column fields.)
-
Click Next.
-
-
In the "Text to Match" screen, define the text that Logon Manager will look for in the form to uniquely identify it and match it to the template:
Note:
Oracle recommends keeping your matching rules to a minimum while retaining the desired matching behavior. Matching on large portions of text can slow down the logon process.-
Highlight the desired match text block.
-
Press Enter to add the text matching rule.
-
Repeat steps i-ii to define additional text matching rules.
-
When you have defined the desired rules, click Next.
-
-
In the "Fields" screen, define the target fields into which Logon Manager will inject credentials, in the order they appear in the application's logon sequence:
-
(Optional) If your form requires the injection of the same data into multiple fields (e.g., injecting the password into a Password and a Confirm Password field), enable the Allow multiple field designation option.
-
In the Tab Character field, select the keystroke Logon Manager will send to submit the data injected into the field to the application and advance to the next field.
-
Click Add.
-
In the dialog that appears, select the field type and click OK.
-
Repeat steps a-d to define additional fields.
-
When you have defined all desired fields, click Next.
-
-
In the summary screen that appears, review your configuration choices. If any of the choices seem erroneous, click Back and correct them; otherwise, click Finish.
-
In the form properties dialog that appears, do one of the following:
-
If you need to perform additional configuration, see Advanced Form Configuration.
-
If you are satisfied with the configuration, click OK to dismiss the dialog.
-
-
Publish your changes to the repository as described in Publishing a Template to the Repository, if applicable.
3.4.3 Advanced Form Configuration
This section describes the additional configuration you can perform after you have defined a form using the wizard. These are:
Before starting the procedures below, open the properties dialog for the desired form as follows:
-
In the Logon Manager Administrative Console's left-hand tree, expand the Applicationspane and select the desired template.
-
In the right-hand pane, select the General tab.
-
In the General tab, double-click the desired form definition.
-
Continue to the desired procedure.
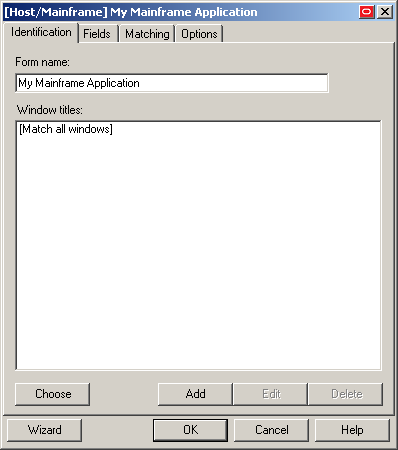
3.4.3.1 Defining Window Title Matching Rules
To limit Agent response to a specific window title (or multiple variations of thereof), define one or more specific window title matching rules as follows:
Note:
Oracle recommends keeping your matching rules to a minimum while retaining the desired matching behavior. Matching on large portions of text can slow down the logon process.-
In the Identification tab of the form properties dialog, click Add.
-
In the "Window Title" dialog that appears, do the following:
-
Select the desired matching type.
-
Enter the desired match value.
-
Click OK to save your changes.
-
-
When you have finished, click OK to dismiss the form properties dialog.
3.4.3.2 Defining Additional Text Matching Rules
To define additional text matching rules, do the following:
Note:
Oracle recommends keeping your matching rules to a minimum while retaining the desired matching behavior. Matching on large portions of text can slow down the logon process.-
In the Matching tab of the form properties dialog, click Add.
-
In the dialog that appears, enter the desired match text and its starting coordinates.
-
Repeat steps 1-2 for each additional rule you want to define.
-
When you have finished, click OK to dismiss the form properties dialog and Publishing a Template to the Repository if applicable.
3.4.3.3 Defining Additional Fields
To define fields additional to the ones you have configured in the wizard, do the following:
WARNING:
If you begin this procedure, the template will be converted from a native HLLAPI template to a SendKeys template - in other words, Logon Manager will no longer inject credentials programmatically via HLLAPI, but instead will emulate user input by sending keystrokes to the emulator. This conversion is not reversible - to revert to native HLLAPI injection, you must delete the template and re-create it. For more information on native HLLAPI vs. SendKeys-based injection, see Supported Credential Injection Methods.
-
In the Fields tab of the form properties dialog, click Edit.
-
In the dialog that appears, select the Fields tab.
-
In the tab, select the desired field type, and enter its coordinates (fixed-screen only).
-
Use the up/down arrows to adjust the order of the logon sequence.
-
Repeat steps 2-3 for each additional field.
-
When you have finished, click OK to dismiss the form properties dialog and Publishing a Template to the Repository, if applicable.
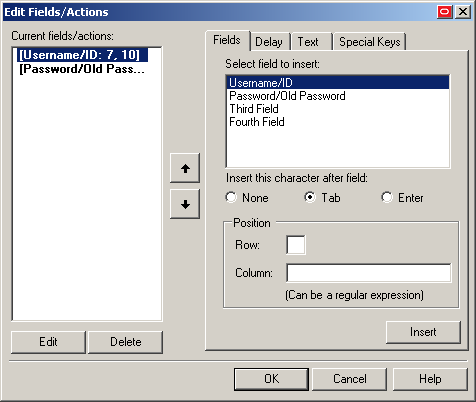
3.4.3.4 Adding Keystrokes, Pauses, or Text to the Logon Sequence
To add keystrokes, pauses, or text to the logon sequence, do the following:
WARNING:
If you begin this procedure, the template will be converted from a native HLLAPI template to a SendKeys template - in other words, Logon Manager will no longer inject credentials programmatically via HLLAPI, but instead will emulate user input by sending keystrokes to the emulator. This conversion is not reversible - to revert to native HLLAPI injection, you must delete the template and re-create it. For more information on native HLLAPI vs. SendKeys-based injection, see Supported Credential Injection Methods.
-
In the General tab of the form properties dialog, click Edit in the "Fields" section.
-
In the dialog that appears, do one of the following:
-
To add a keystroke, select the Special Keys tab, select the keystroke category and then the keystroke itself, and click Insert.
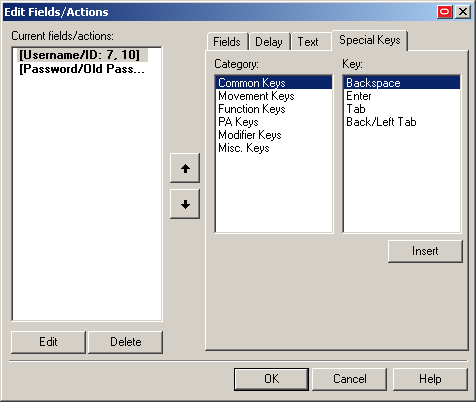
-
To add a pause, select the Delay tab, specify the length of the pause in seconds, and click Insert.
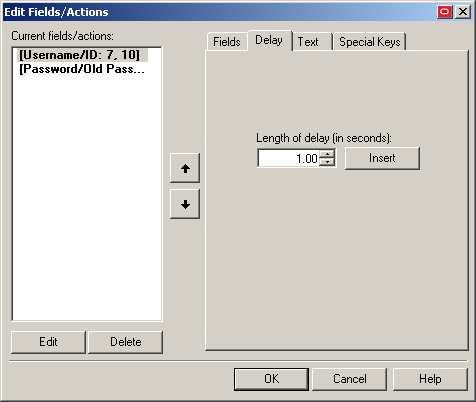
-
To add text, select the Text tab, enter the desired text string, and click Insert.
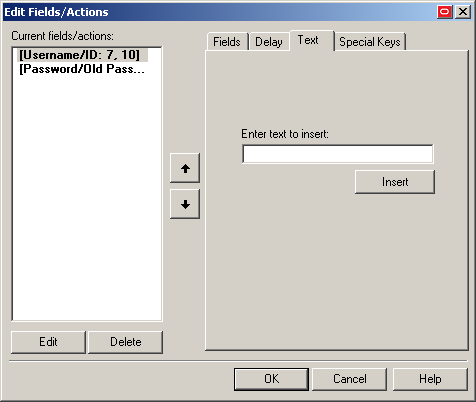
-
-
Select the newly inserted action(s) and use the up/down arrows to adjust their order in the logon sequence.
-
Repeat steps 2-3 for each additional field.
-
When you have finished, click OK to dismiss the form properties dialog and Publishing a Template to the Repository, if applicable.
3.4.3.5 Configuring a Form for Dynamic Column Positioning (Scrolling-Screen Only)
To configure a scrolling-screen form for dynamic column positioning, do the following:
-
Select the Options tab of the form properties dialog.
-
In the Column position of cursor field, enter a number or regular expression that defines the possible horizontal position(s) of the cursor in the form.
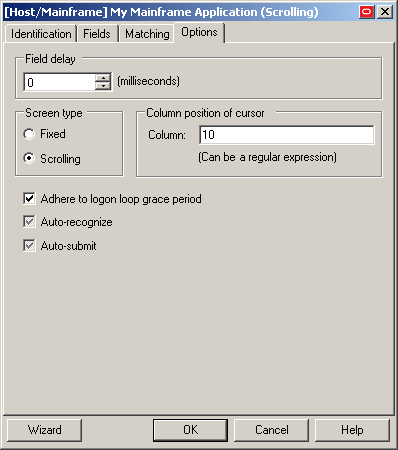
-
When you have finished, click OK to dismiss the form properties dialog and Publishing a Template to the Repository, if applicable.
3.4.3.6 Reducing Injection Speed
By default, Logon Manager injects and submits credentials with no delay between those actions. To reduce the injection speed, do the following:
-
Select the Options tab of the form properties dialog.
-
In the Field Delay field, enter the desired amount of time Logon Manager should wait after populating each field, in milliseconds.
-
When you have finished, click OK to dismiss the form properties dialog and Publishing a Template to the Repository, if applicable.
3.4.3.7 Adjusting the Emulator Polling Interval
By default, if polling is enabled, Logon Manager queries the emulator via HLLAPI for new events every 700 ms. To adjust the length of this polling interval, do the following:
-
Open the Logon Manager Administrative Console and load the current set of your global Agent settings.
-
In the left-hand tree, expand Global Agent Settings > <current settings set> > End-User Experience > Response > Host Mainframe Apps.
-
In the right-hand pane, select the check box next to the Polling Interval option and enter the desired interval length, in milliseconds, into the field.
-
When you have finished, Publishing a Template to the Repository, if applicable.
3.4.3.8 Adjusting the Credential Request Delay Interval
When a user logs on to a mainframe application for which a template exists but no credentials have yet been stored, Logon Manager prompts the user to store the credentials. If the user dismisses the dialog without storing the credentials, Logon Manager will wait for a default of 60 seconds and the next time the user interacts with the application, Logon Manager will prompt the user to store the credentials again. To change how long Logon Manager waits before re-prompting the user to store credentials for the application, do the following:
-
Open the Logon Manager Administrative Console and load the current set of your global Agent settings.
-
In the left-hand tree, expand Global Agent Settings > <current settings set> > End-User Experience > Response > Host Mainframe Apps.
-
In the right-hand pane, select the check box next to the Credential Request Interval option and enter the desired interval length, in milliseconds, into the field.
-
When you have finished, Publishing a Template to the Repository, if applicable.
3.5 Testing the Configuration of a Form
Once you have created and configured a form, complete the following steps to test it before publishing:
-
In the left-hand tree, expand the Applications node and navigate to the target template.
-
Right-click the target template and select Test from the context menu.
-
In the "Logon Manager Template Test Manager" window that appears, select the target form in the Forms pane, then follow the instructions displayed in the Interactions pane.
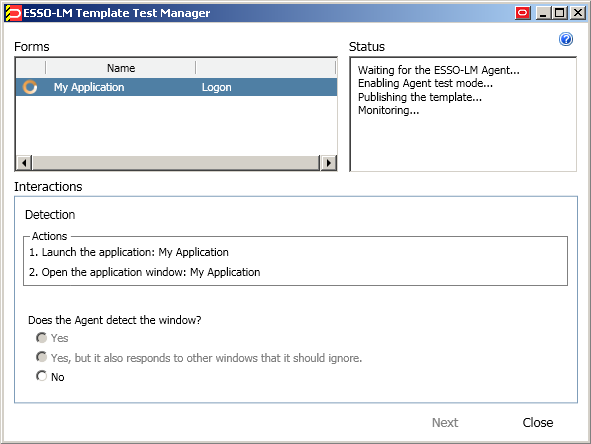
-
Do one of the following:
-
If the Agent responds to the application as desired and the test has completed successfully, click Finish.
-
If the Agent is not responding to the application as desired, click Close and follow the troubleshooting flowcharts in this section to determine and correct the problem, then repeat steps 1-3 to test the corrected configuration.
-
3.5.1 Testing the Configuration of a Logon Form
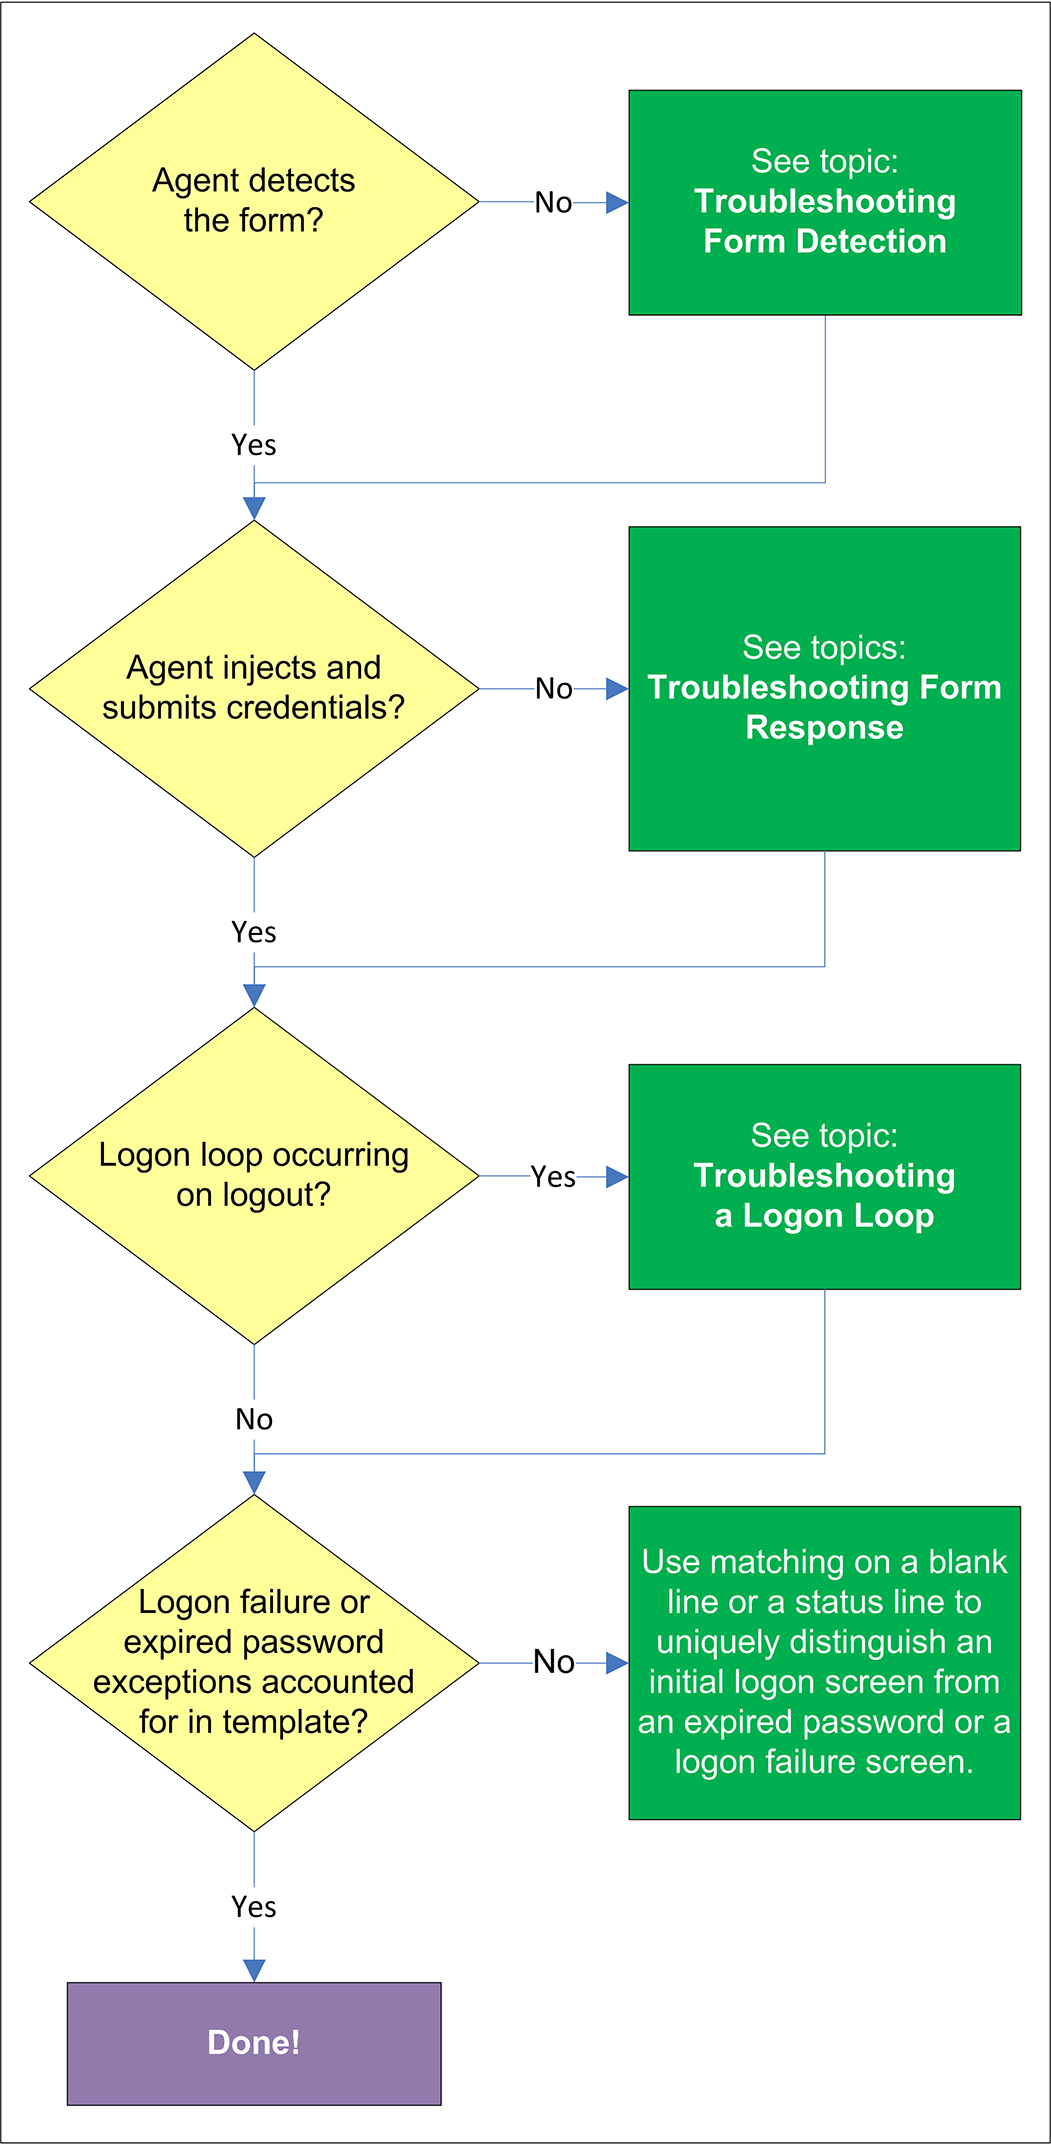
3.5.1.1 Agent detects the form?
Once the Agent has been provided with the template, it will automatically respond to the target application, unless the automatic response feature has been explicitly disabled. If the Agent fails to respond to the application, see Troubleshooting Form Detection.
3.5.1.2 Agent injects credentials?
If credentials have been stored for the target application in the user's store, the Agent will inject them into the appropriate fields upon successful application detection. The Agent will also automatically submit the credentials unless the "Auto-Submit" feature has been explicitly disabled. If credential injection fails, see Troubleshooting Form Response .
3.5.1.3 Logon loop occurring on logout?
Some applications display their logon screen upon logout, which causes the Agent to enter a logon loop and effectively prevents the user from logging out of the application unless the Agent is shut down. If this happens, see Troubleshooting a Logon Loop.
3.5.1.4 Logon failure or expired password exceptions accounted for in the template?
If the logon attempt fails, (for example, due to bad credentials), or the stored password has expired, most applications will display an appropriate message, but Logon Manager will not be by default aware of what happened and will attempt to log on again. In order to avoid this, set up a matching rule that will expect either a blank (no text) or space characters in the exact location of the error message. This way, whenever the message is displayed, the match rule will not be satisfied and Logon Manager will not attempt logon.
3.5.2 Testing the Configuration of a Password Change Form
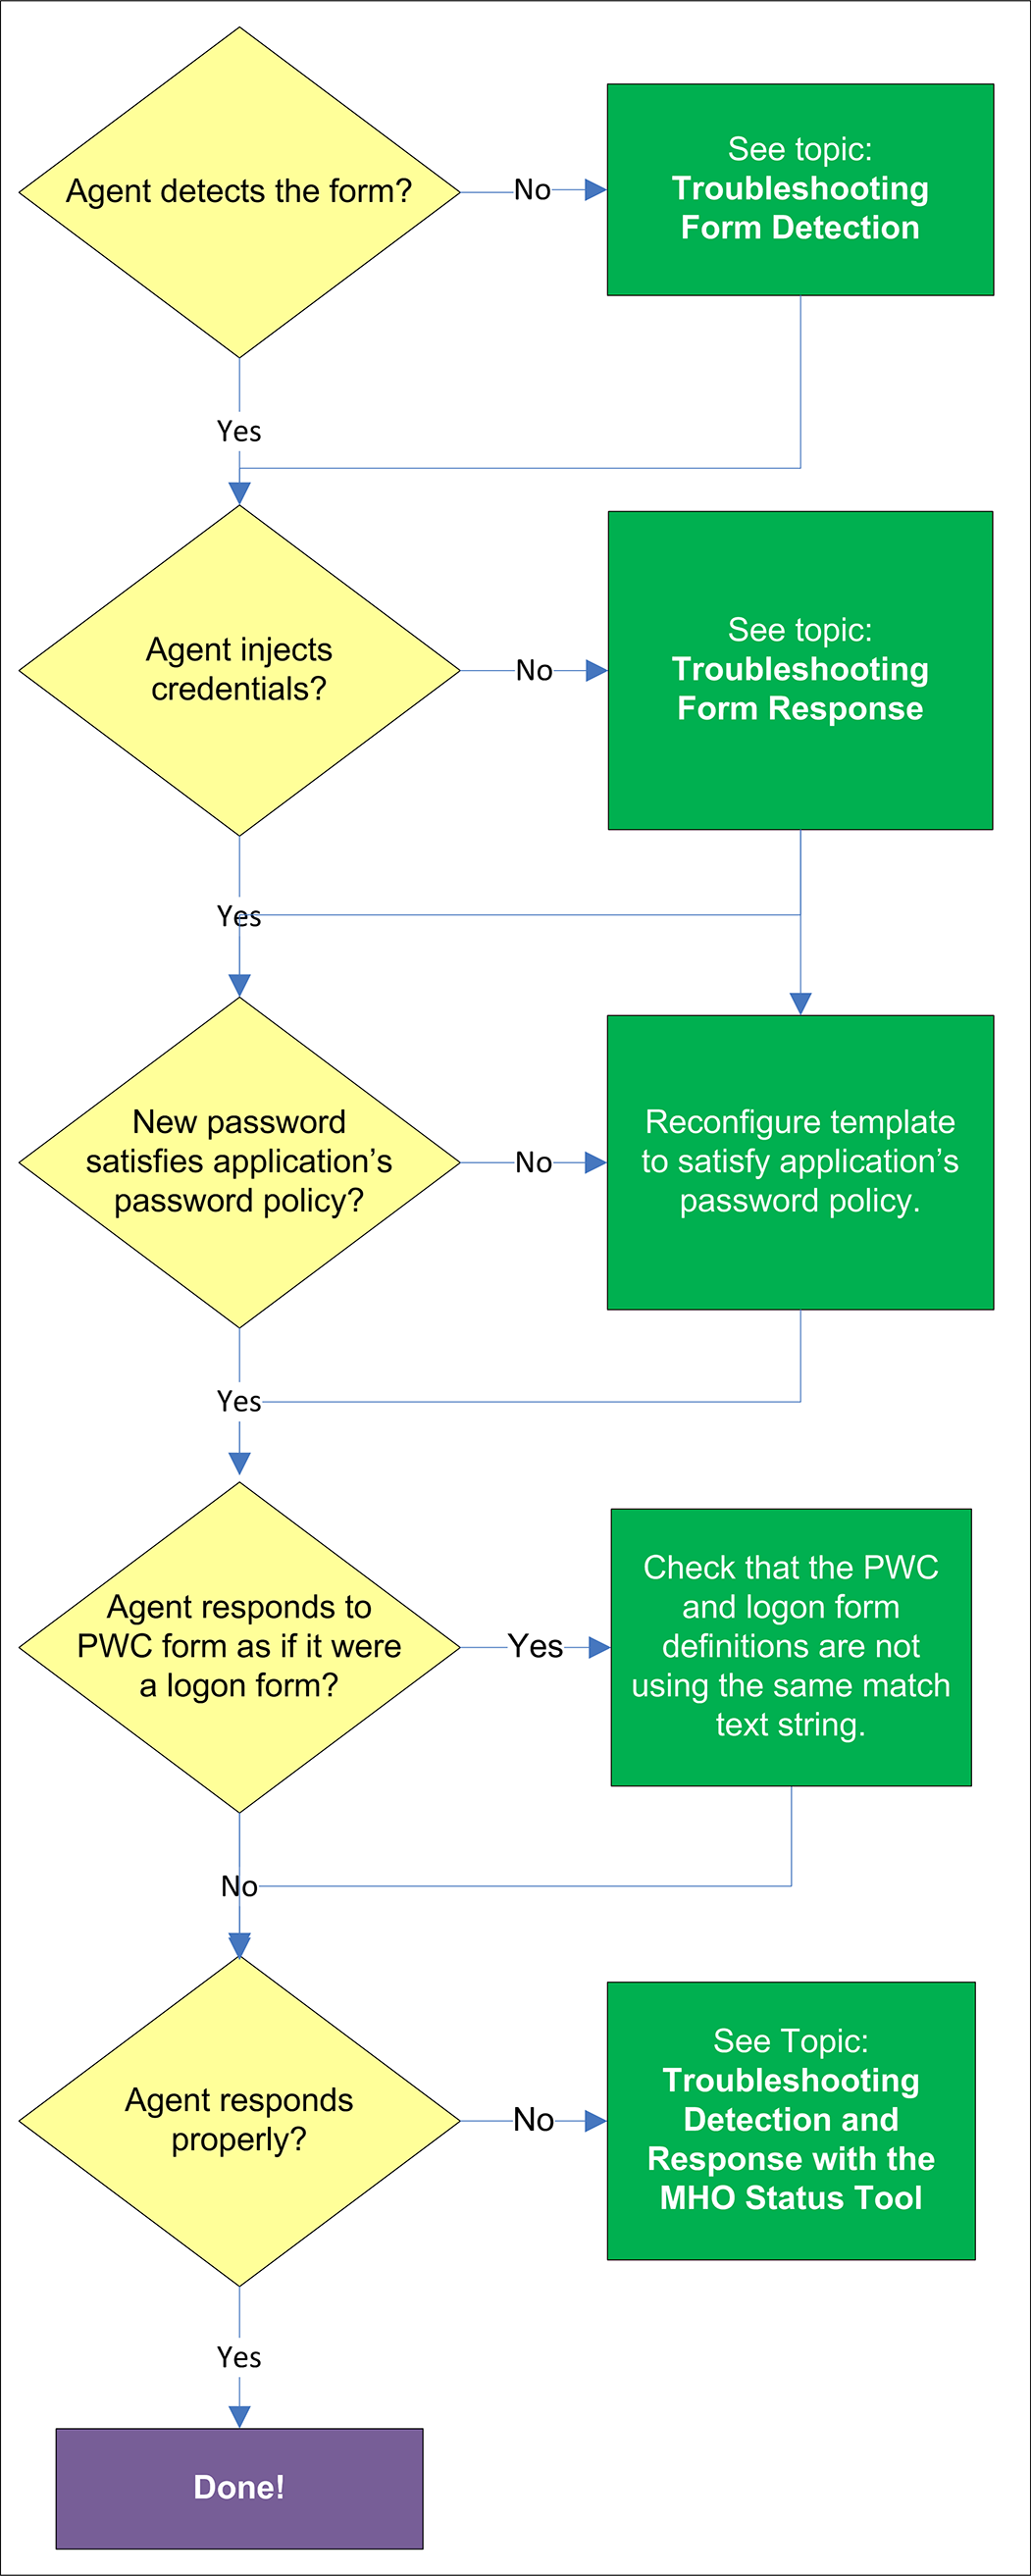
3.5.2.1 Agent detects the form?
Once the Agent has been provided with the template, it will automatically respond to the target application, unless the automatic response feature has been explicitly disabled. If the Agent fails to respond to the application, seeTroubleshooting Form Detection.
3.5.2.2 Agent injects and submits credentials?
When the Agent detects the password change, it injects credentials into the appropriate fields and submits them to the application, unless the Auto Submit feature has been explicitly disabled. If credential injection is erratic or does not occur at all, see Troubleshooting Form Response.
3.5.2.3 New password satisfies application's password policy?
If the new password generated by Logon Manager does not satisfy the application's own password policy, password change will be unsuccessful. If you determine this to be the case, compare the password generation policy currently deployed to the Agent with the password policy of the target application and correct any inconsistencies that may cause password change failure.
3.5.2.4 Agent responds to password change form as if it were a logon?
If the Agent responds to the password change form as if it were a logon form (i.e., Agent injects and submits the user's currently stored credentials), make sure that your password change form definition is not using the same match text string as your logon form definition - if it does, either match on a different string of text or, if possible, modify either of the application screens to include a piece of text against which Logon Manager can match uniquely.
If the Agent is still not responding to the form, see Troubleshooting Detection and Response with the SSO MHO Status Tool.
3.6 Publishing a Template to the Repository
Once you have successfully tested your application template, you can distribute it to end-user machines by publishing it to the selected target container within your repository, either in a directory-style hierarchy (default), or as a flat configuration file.
Note:
For more information on deploying Logon Manager with a repository and best practices for structuring the repository tree, see the Logon Manager Best Practices guide for your platform.Before performing this procedure, make sure you are familiar with the structure and configuration of your repository.
To select and publish the desired templates and other configuration objects to the repository:
-
Launch the Logon Manager Administrative Console.
-
Right-click the Applications node and select Publish… from the context menu. The "Publish to Repository" dialog appears.
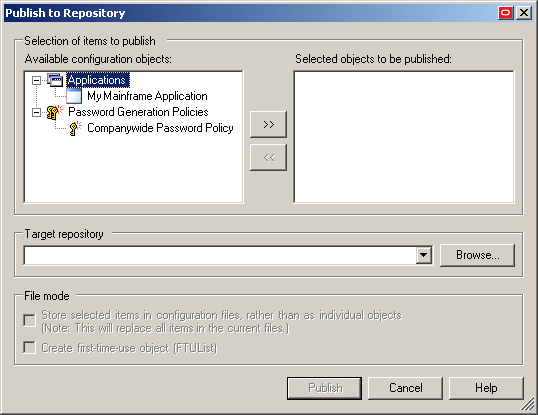
-
In the Available configuration objects list, navigate to and select the desired objects.
Note:
Only categories for which objects have been configured will appear in this list. For example, if no password generation policies exist, the corresponding category will not appear in this list. -
Click >> to move the selected objects to the Selected objects to be published list. (To remove an object from this list and not publish it, select the object and click <<.)
-
-
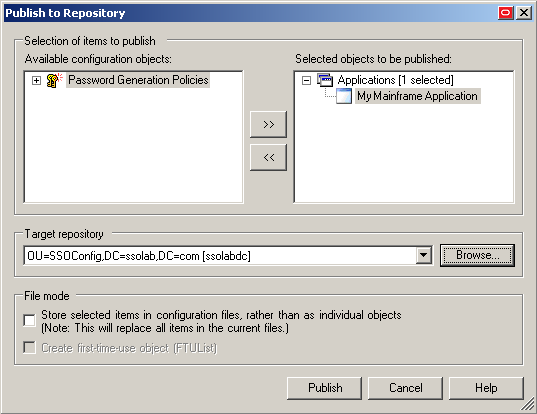
Select the target container to which you want to publish the selected objects.
If you have previously published to the desired container, select it from the Target Repository drop-down list.
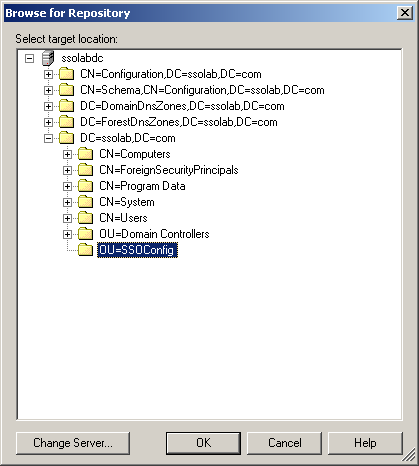
If you have not previously published to the desired container, or if the target container path does not appear in the Target Repository drop-down list, you must use the Browse feature to find and select the target container:
-
Click Browse to browse the directory tree.
Note:
If you are not already connected to the directory, the Console will prompt you to provide the required connection information. -
In the "Browse for Repository" dialog that appears, navigate to and select the target container.
Note:
If you want to create a new container, right-click the desired parent container, select New Container from the context menu, enter the desired name for the new container, and click OK to complete the process.
-
-
(Optional) If your environment calls for storing configuration objects in flat-format, select the check box Store selected items in configuration files, rather than as individual objects.
Selecting this option will overwrite all items stored in existing configuration files, if present in the target container.
-
(Optional) If you want to create the first-time use object (FTUList), select the corresponding check box.
This option only becomes active if you choose to store your configuration objects in flat format in step 6.
-
Click Publish. The Console publishes the selected objects to the target repository.
Caution:
Do not attempt to dismiss the dialog or close the Console until the publishing process completes. The dialog will disappear automatically when the objects have been published.
For more information on the publishing process, see the Logon Manager Administrative Console help.
3.7 Viewing and Modifying Emulator Configuration
The mfrmlist.ini file contains configuration information that allows it to detect and interact with terminal emulators.
Note:
This mfrmlist.ini file is located in: %PROGRAMFILES%\Passlogix\v-GO SSO\Helper\EmulatorThe most important configuration parameters for each emulator are:
-
Full path and file name of the HLLAPI library file
-
Session short -name
-
Window title
-
Window class
-
Polling toggle (for emulators that do not properly notify the MHO of HLLAPI events)
For a full list of parameters and their descriptions, see Emulator Configuration Parameter Reference.
To view or edit an emulator's configuration stored in the mfrmlist.ini file, do the following:
WARNING:
Do not modify the mfrmlist.ini file in an external editor - doing so will render mainframe support inoperable for any emulator whose configuration you edit in the external editor. This is because the Console's built-in editor automatically recalculates and updates the "magic number" stored in the Context parameter for each emulator when that emulator's configuration changes - an external editor will not update this magic number.
-
Launch the Logon Manager Administrative Console.
-
From the Tools menu, select ModifyConfiguration > MfrmList.
The Console displays the mfrmlist.ini in a built-in editor.
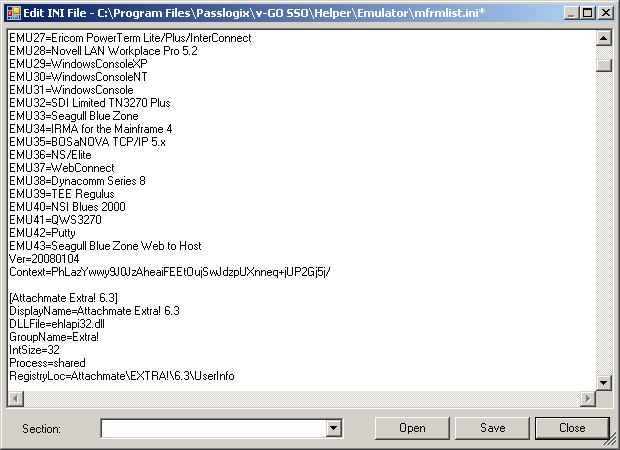
At the top of the file there is a list of all emulators whose configuration data is stored as sections in the remainder of the file.
-
To modify existing configuration data, navigate to that section (to quickly jump to a specific section, select it from the Section drop-down list), locate the desired parameter and modify its value as desired.
WARNING:
Do not modify the value of the Context parameter.
To add a section for a new emulator, do the following:
-
Add an entry at the end of the list at the top of the file in the following format:
EMUxx=NewSectionName
where xx is one more than the number of the last entry in the list.
-
Create the new section in the following format:
[NewSectionName]
Parameter1=Value1
Parameter2=Value1
…
ParameterN=ValueN
Caution:
The name of the new section must match the name you specified in the EMUxx entry at the top of the file in step 2a.
-
-
When you have finished, click Save to commit your changes and recalculate the Context parameters for all entries in the file.
-
Launch the newly added emulator and connect to an application session.
-
Use the MHO Status Tool to confirm that the MHO has successfully attached to the emulator's HLLAPI interface and detected the open session. See Troubleshooting Detection and Response with the SSO MHO Status Tool for instructions.
3.7.1 Emulator Configuration Parameter Reference
The table below lists the available emulator configuration parameters (and their values) that you can use to create an entry in the mfrmlist.ini file.
Note:
Boolean-type parameters support the following values: true, y, yes, 1, false, n, no, 0.| Setting | Description |
|---|---|
| GroupName
Type: text |
(Groups emulator definitions and only allows one in a group to load
Type: text |
| DisplayName
Type: text |
Used internally on the command line to other MHO processes |
| RegistryName
Type: text |
Specifies an INI file name to check.
Windows directory will be searched first, then the PATH variable. If this value is specified, RegistryLoc specifies a section name and ValueName specifies an entry name in the section and must not be omitted. Special Values: WinIni - Indicates that the Windows INI file should be checked. |
| RegistryLoc
Type: text |
Registry location path (see also: RegistryName, ValueName)
Specifies a registry location to search for ValueName in HKEY_LOCAL_MACHINE\Software tree. Special Values: \HKEY_CURRENT_USER\Software\"- If the entry starts with this text (case-sensitive), HKEY_CURRENT_USER\Software will be searched instead of HKEY_LOCAL_MACHINE\Software. |
| ValueName
Type: text |
Registry key name (see also: RegistryName, StripFileName, DLLFile)
The value that specifies a registry or section name that specified the location of DLLFile. If RegistryLoc is omitted, this value directly specifies where to load DLLFile from. Special Values: WinDir - Load dll from Windows directory. SysDir - Load dll from Windows System directory. HomeDir - Load dll from Logon Manager Installation directory. EmulDir - Load dll from Logon Manager Emulator Installation directory. "\" - If the path starts with this value, load dll from the specified directory on the drive where Windows is installed. |
| DLLFile
Type: text |
Name of the dll to load. |
| StripFileName
Type: boolean |
Strip the filename from the retrieved registry string. |
| PresentationSpaceSharing
Type: special |
SUPER_WRITE to put emulator in a supervisor mode (not all emulators support this) |
| Process
Type: special |
shared causes the emulator to be loaded in the original copy of the mho. Anything else and a new process is spawned. |
| ConvertPosType
Type: special |
long, short - Use enhanced or standard HLLAPI interface for Convert Position and Convert RowCol (99) function.
Default: HLLAPIType setting. |
| QuerySessionsType
Type: special |
long32, long, short, both - short and long will use standard or enhanced HLLAPI interface for Query Sessions (10) function. both will attempt to use enhanced HLLAPI interface first and then standard, if enhanced fails (doesn't always work, specifying correct value is better.) long32 is used for the Windows command prompt HLLAPI emulation.
Default: HLLAPIType setting. |
| ValidateQuerySessionsData
Type: boolean |
Validates the data returned from QuerySessions before using it. |
| QuerySessionStatusType
Type: special |
long, short - Use enhanced or standard HLLAPI interface for Query Session Status (22) function.
Default: HLLAPIType setting. |
| QueryHostUpdateType
Type: special |
long, short - Use enhanced or standard HLLAPI interface for Query Host Update (24) function.
Default: HLLAPIType setting. |
| StartNotificationType
Type: special |
long, short - Use enhanced or standard HLLAPI interface for Start Host Notification (23) function.
Default: HLLAPIType setting. |
| PlatformSize
Type: numeric |
16, 32 - 16-bit or 32-bit HLLAPI.
Default: 32 |
| IntSize
Type: numeric |
16, 32 - Integer size used by the emulator.
Default: 32 |
| QuerySystemType
Type: special |
long, short - Use enhanced or standard HLLAPI interface for Connect Presentation Space (20) function.
Default: HLLAPIType setting. |
| UpdateNotificationHandling
Type: special |
Special handling for return codes when update notification has occurred.
For example: 1.ReconnectSession for return code 1, call internal function ReconnectSession Functions available: RecheckResetConnection - Calls reset, reattempts login CheckLoginStatusAndReset - If no logins are pending, reset HLLAPI subsystem ReconnectSession - Attempt to connect to the session FirstLogin - Some emulators refuse to admit the screen has changed when first connecting StartNotification - Attempt a login to the current session |
| WindowClass
Type: regexlist |
Semicolon-separated list of regular expressions.
Window class matching. Includes regular expressions. Matches substrings. |
| WindowTitle
Type: regexlist |
Semicolon-separated list of regular expressions.
Window title matching. Matches substrings. Special Values: $s - substituted by a session's short name. Substitution occurs before regular expression matching. |
| UseSendKeys
Type: regexlist |
Use HLLAPI Send Key (3) to send keystrokes to the emulator (not to be confused with Windows SendKeys) instead of HLLAPI Copy String to Presentation Space (15) |
| QuerySystemRequired
Type: boolean |
Make sure that the system is queried before doing a reset. |
| ChangeNotiticationBroken
Type: boolean |
Some emulators did not implement change notification. |
| RequireVisibleWindow
Type: boolean |
Don't log in if the window is hidden. |
| EmulatorFixedRowWidth
Type: boolean |
Some emulators are incapable of determining how wide a row is. |
| HllapiExportedCallName
Type: text |
The DLL's exported function name. Required if it's not "hllapi." |
| LogonUsingTimeout
Type: numeric |
How long to wait for logon screen to appear in milliseconds.
Default: 1000 |
| LoginDelay
Type: numeric |
Do not log in sooner than this many milliseconds following the last attempt.
Default: 1 |
| WinHLLAPIStartup
Type: version |
If specified, calls WinHLLAPIStartup with specified requested version after loading the DLL. Calls WinHLLAPICleanup before unloading the dll.
If the call fails, dll will not be loaded. Ex: 1.0 or 1.1 |
| HllapiParamCommand
Type: boolean |
Emulator requires all settings to be passed to it |
| IgnoreErrorCount
Type: boolean |
After a few errors, some emulators need to be reset, others stop working if you do [true, false] |
| SupportsHwnd
Type: boolean |
Logon Manager extension to HLLAPI spec. Only implemented in SsoConNT and SSoConCP [true, false] |
| HLLAPIType
Type: special |
long, short - Use enhanced or standard HLLAPI interface for all HLLAPI functions.
Default: short |
| ConnectSessionType
Type: special |
long, short - Use enhanced or standard HLLAPI interface for Connect Presentation Space (5) function.
Default: HLLAPIType setting. |
3.8 Troubleshooting Form Detection
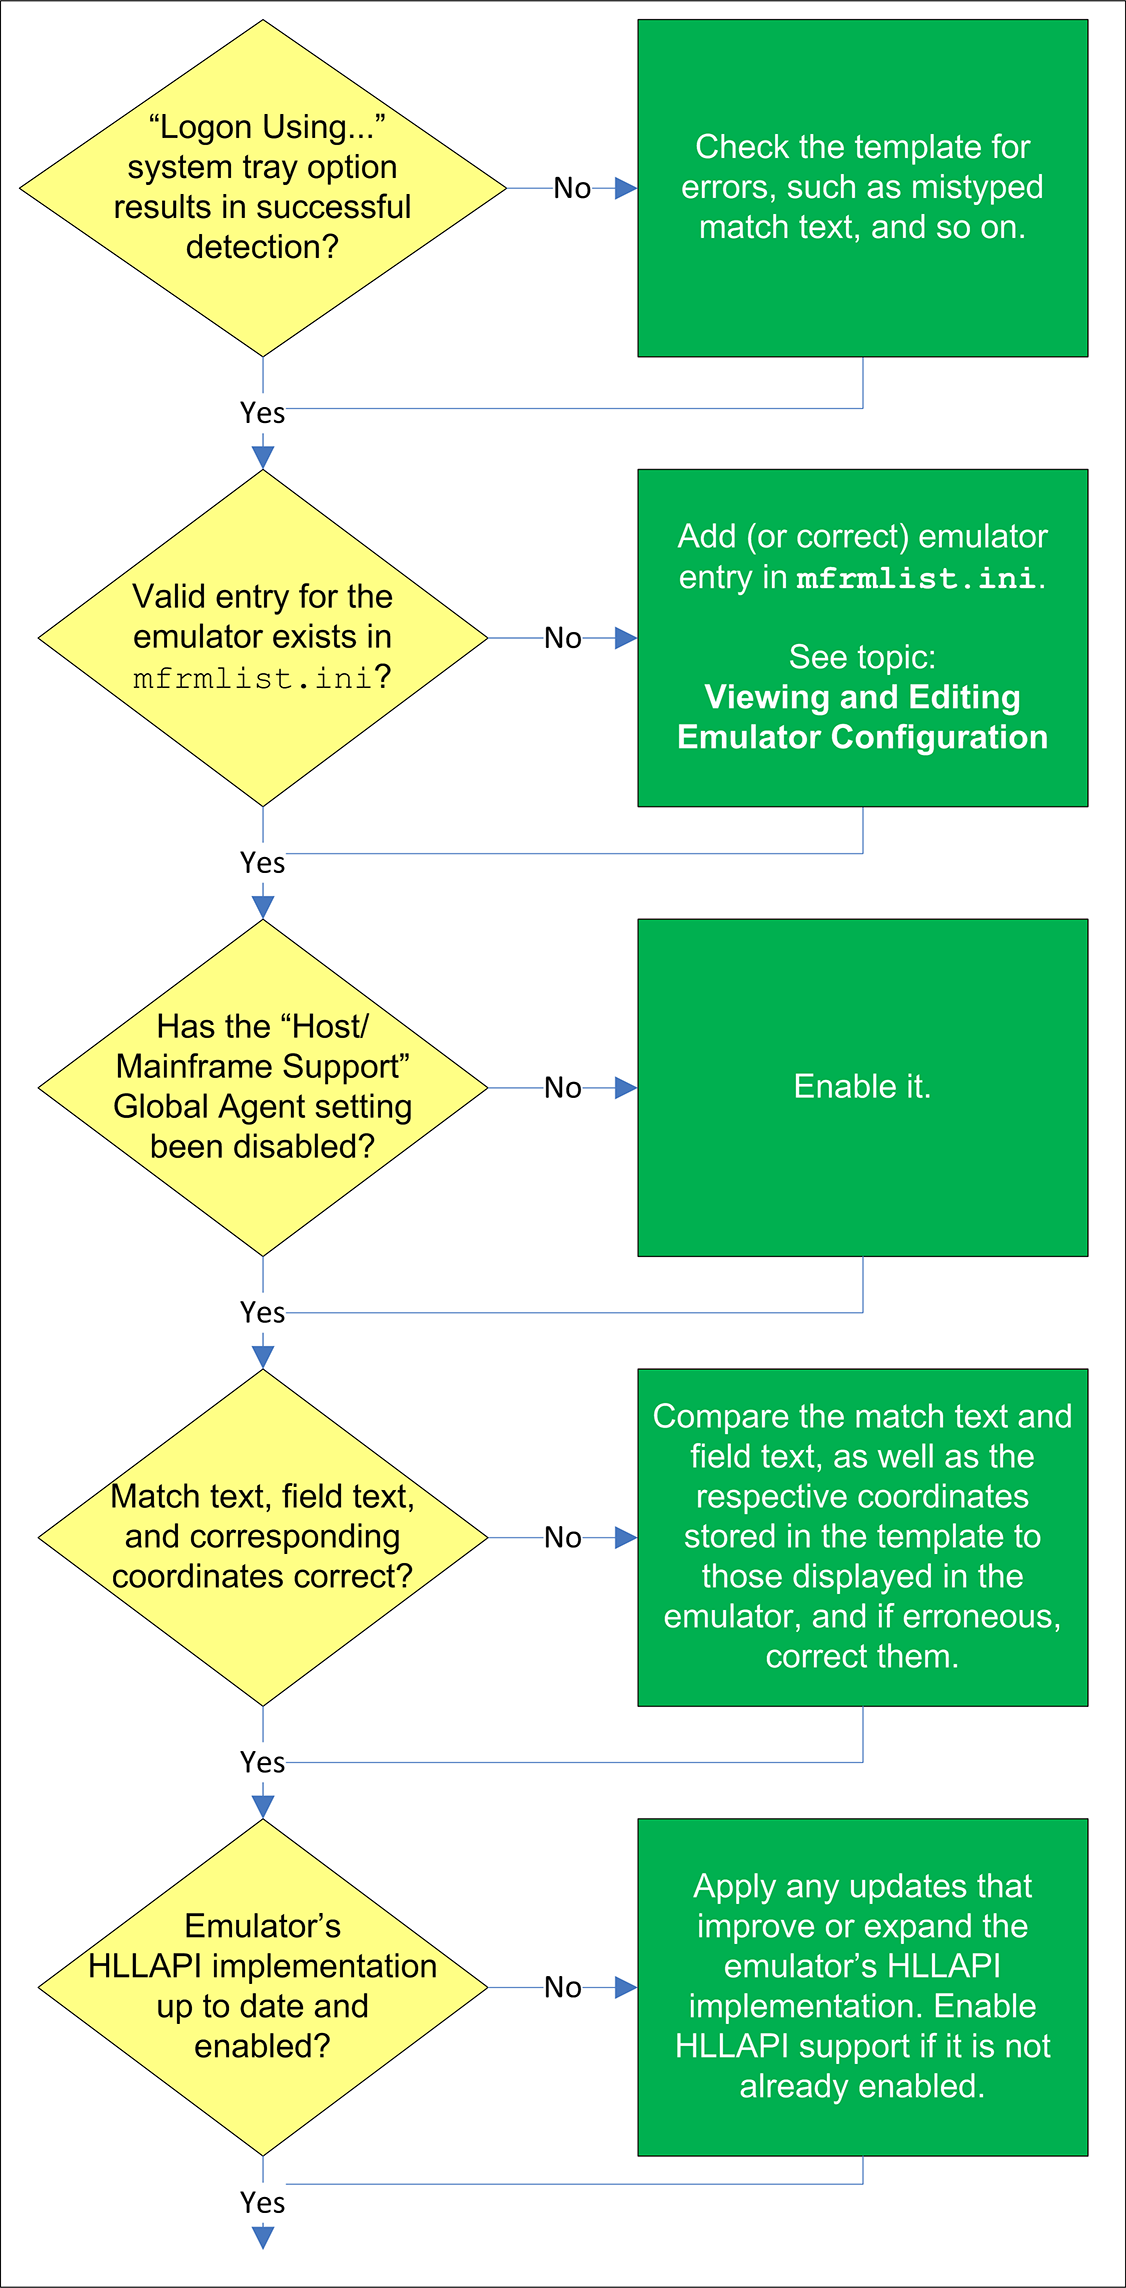
3.8.1 Agent detects the form when invoking the "Logon Using Logon Manager" tray icon option?
Manually invoke window detection by using the Logon Using Logon Manager option from the Agent's system tray icon, then do one of the following:
-
If the Agent detects the window, the configuration data for your emulator may be missing from the mfrmlist.ini file, or it might be erroneous. See Viewing and Modifying Emulator Configuration for instructions on understanding and editing the contents of the mfrmlist.ini file.
-
If the Agent does not detect the target window even when you manually invoke detection by using the Logon Using Logon Manager option from the Agent's tray icon, do the following:
-
Make sure that the Auto-recognize option in the form definition's Options tab is enabled.
-
Review the template for common configuration errors, such as a mistyped window title or class; also, determine whether the window title and/or class are dynamic, and reconfigure the template as appropriate.
-
3.8.2 Valid entry for the emulator exists in mfrmlist.ini?
If the emulator has been tested by Oracle and found to be compatible with Logon Manager, it is supported by Logon Manager out of the box and a corresponding entry exists for the emulator in the mfrmlist.ini file. The list of currently supported emulators can be found in the latest Logon Manager release notes, and can also be determined by looking for an entry for the emulator in question in the mfrmlist.ini file, as described in Viewing and Modifying Emulator Configuration.
If the emulator is not supported by Logon Manager out of the box and it is HLLAPI-compliant, you may add it to the mfrmlist.ini file (as described in Viewing and Modifying Emulator Configuration) in order to determine whether it is fully compatible with Logon Manager. While Oracle Support will aid you in this effort should you run into configuration issues, Oracle is unable to guarantee that an untested emulator will properly function with Logon Manager in all expected capacities.
Note:
If you add an unlisted emulator to the mfrmlist.ini file and find it to be fully functional with Logon Manager, Oracle requests that you submit the emulator name and version to Oracle Support so that we can consider including official support for that emulator in the next release of Oracle.3.8.3 Has "Host/Mainframe Support" global Agent setting been disabled?
Check whether previously made changes to Logon Manager's configuration erroneously disabled the "Host/Mainframe Support" global Agent setting, located in the Logon Manager Administrative Console tree under Global Agent Settings > End-User Experience > Response > Host/Mainframe Apps. If the option is disabled, re-enable it and Publishing a Template to the Repository, if applicable.
3.8.4 Match text, field text, and corresponding coordinates correct?
Check whether the match text, field text, and the respective coordinates stored in the template match what's displayed by the application and correct any mismatches, if found. For more information Understanding Form Detection and Response.
3.8.5 Emulator's HLLAPI implementation up to date and enabled?
In some cases, the emulator's initial HLLAPI implementation might be incomplete or defective. If possible, Oracle recommends researching and applying any vendor updates that improve or expand the emulator's HLLAPI implementation in a way that improves the emulator's compatibility with Logon Manager. Also, make sure that the emulator's HLLAPI support is enabled and that the emulator is exposing session short-names via HLLAPI. If it doesn't, Logon Manager will be unable to detect a session within the emulator.
For more information on the level of your emulator's HLLAPI implementation, as well as instructions for configuring it, consult the emulator vendor. The Console help also provides quick tips on enabling HLLAPI support in most commonly used emulators.
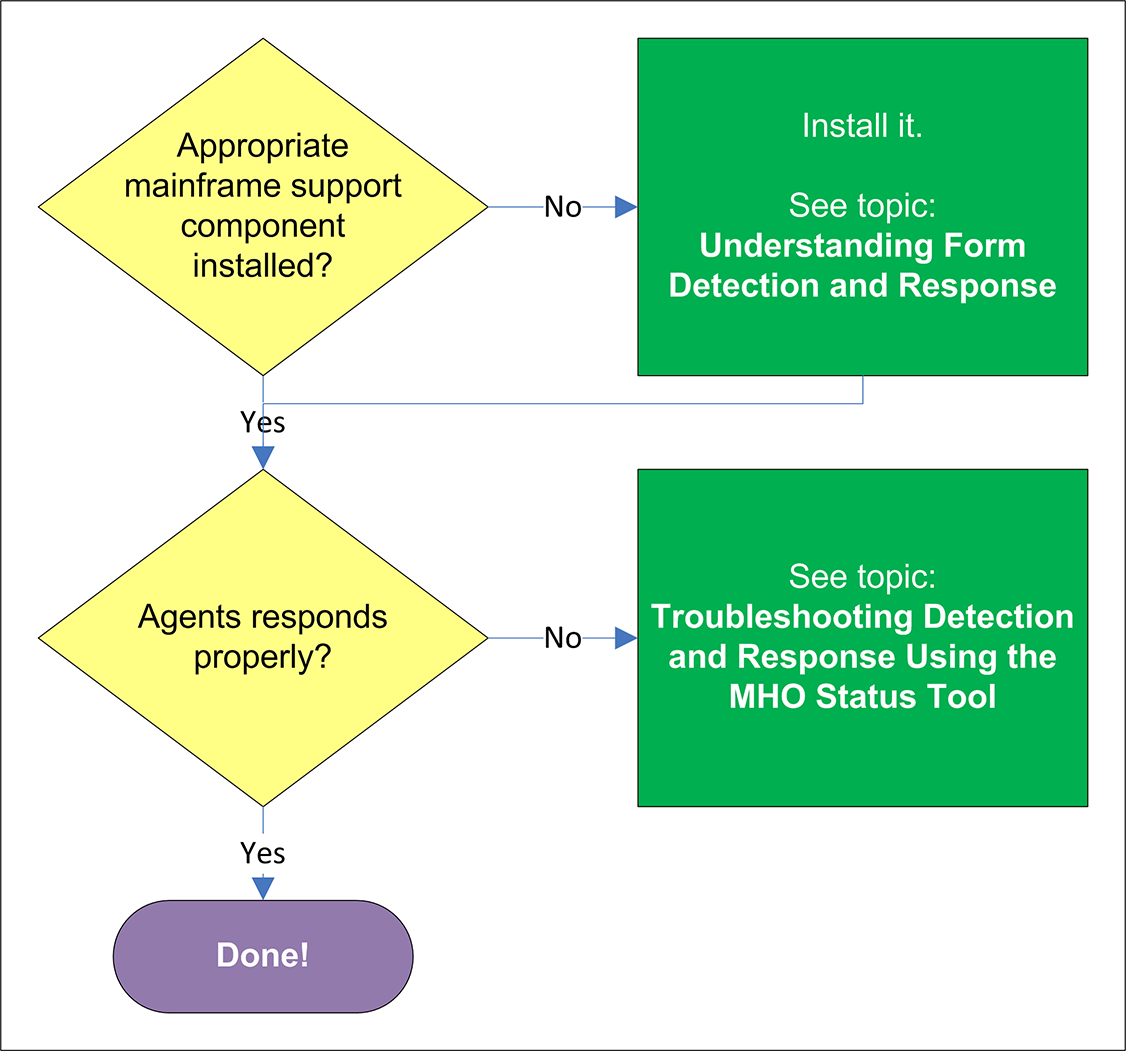
3.8.6 Appropriate mainframe support component installed?
In order to interface with terminal emulators via HLLAPI, Logon Manager requires that the Mainframe Support (available under the Extensions node in the Logon Manager installer) is installed. Additionally, depending on your emulator, you might have to install additional helper components to fully enable Logon Manager with the emulator. (For more information on these helper components, see Understanding Form Detection and Response.)
If the Agent still does not detect the form, see Troubleshooting Detection and Response with the SSO MHO Status Tool.
3.9 Troubleshooting Form Response
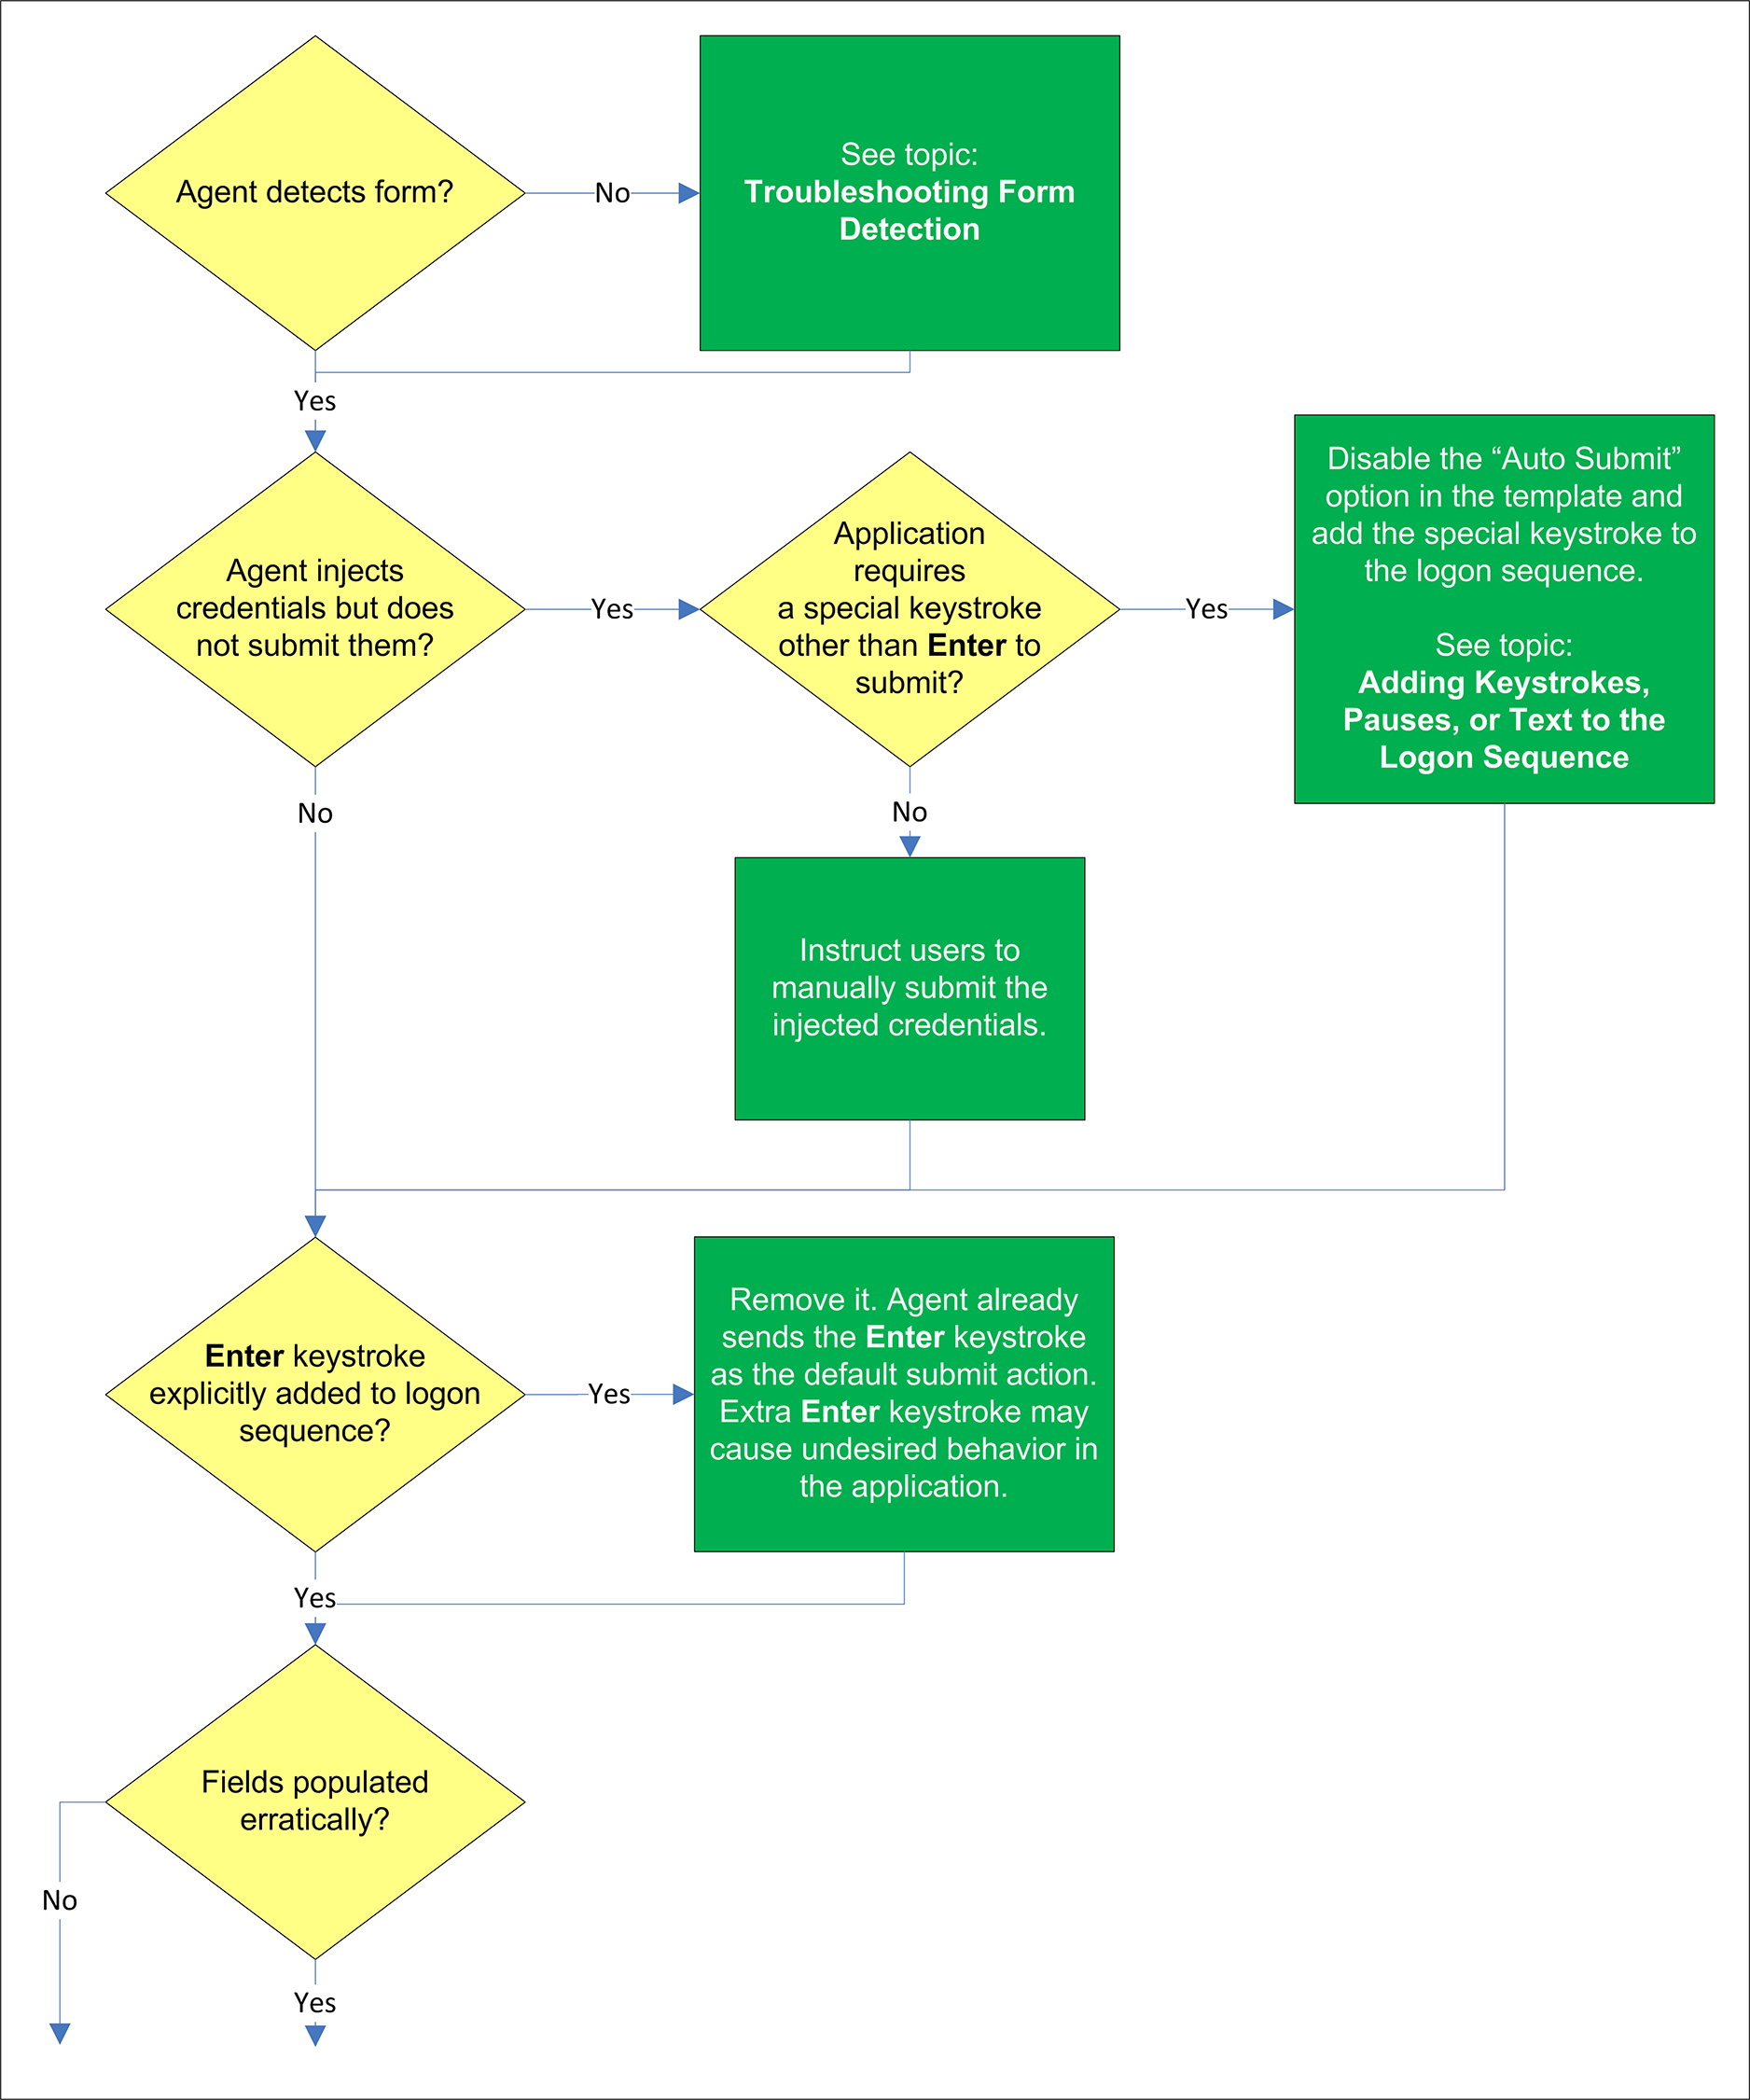
3.9.1 Agent detects the form?
If the Agent does not detect the form, check whether the Auto-Recognize feature has been disabled, and if so, re-enable it. If the feature has not been disabled, see Troubleshooting Form Detection.
3.9.2 Agent injects credentials but does not submit them?
If the credentials are injected not automatically submitted, first check that the Auto-Submit option is enabled for the application - this causes the Agent to send the Enter keystroke as the default submit action. If Auto Submit is enabled but the Agent still does not submit them to the application, the application might require a special keystroke other than Enter (such as PF4) in order to submit the credentials. In such case, disable the Auto Submit feature and add the special keystroke to the logon sequence as described in Adding Keystrokes, Pauses, or Text to the Logon Sequence.
3.9.3 Enter keystroke explicitly added to the logon sequence?
If you have explicitly added the Enter keystroke to the logon sequence and the application is exhibiting erroneous behavior during logon, remove the Enter keystroke from the logon sequence. When the Auto Submit feature is enabled, the Agent automatically sends the Enter keystroke as the default submit action - together with the explicit Enter keystroke you have added, the application is receiving two Enter keystrokes instead of the expected one, which causes undesired behavior after logon.
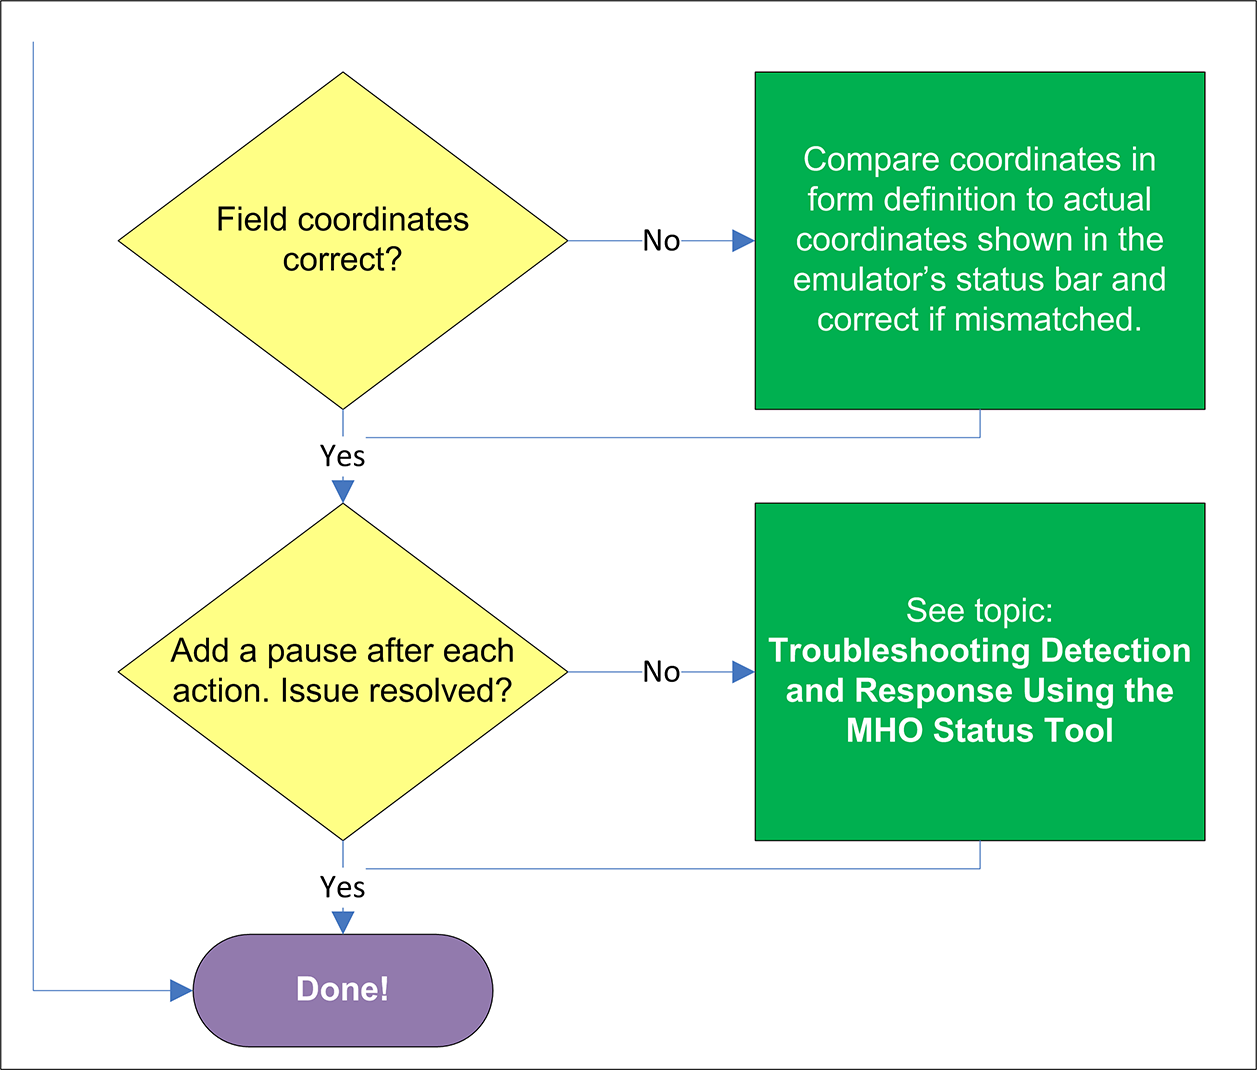
3.9.4 Fields populated erratically?
If the Agent populates the fields erratically, i.e., inserts wrong, truncated, garbled, or blank values, check whether the field coordinates defined in the template are correct (by comparing them to the actual display shown in the emulator), and if not, correct them. If the coordinates are correct, add a pause after each action, as described in Adding Keystrokes, Pauses, or Text to the Logon Sequence. If the issue persists even after adding the pauses, see Troubleshooting Detection and Response with the SSO MHO Status Tool to determine the point of failure.
3.10 Troubleshooting a Logon Loop
Some applications display their logon form upon logout, which causes Logon Manager to recognize the logon form and automatically log you back on to the application. This creates an endless "logon loop" preventing you from logging out of the application. To prevent this loop from occurring, the administrator may choose to enable the logon grace period feature which forbids Logon Manager from logging on to an application within set time period since the last logon.
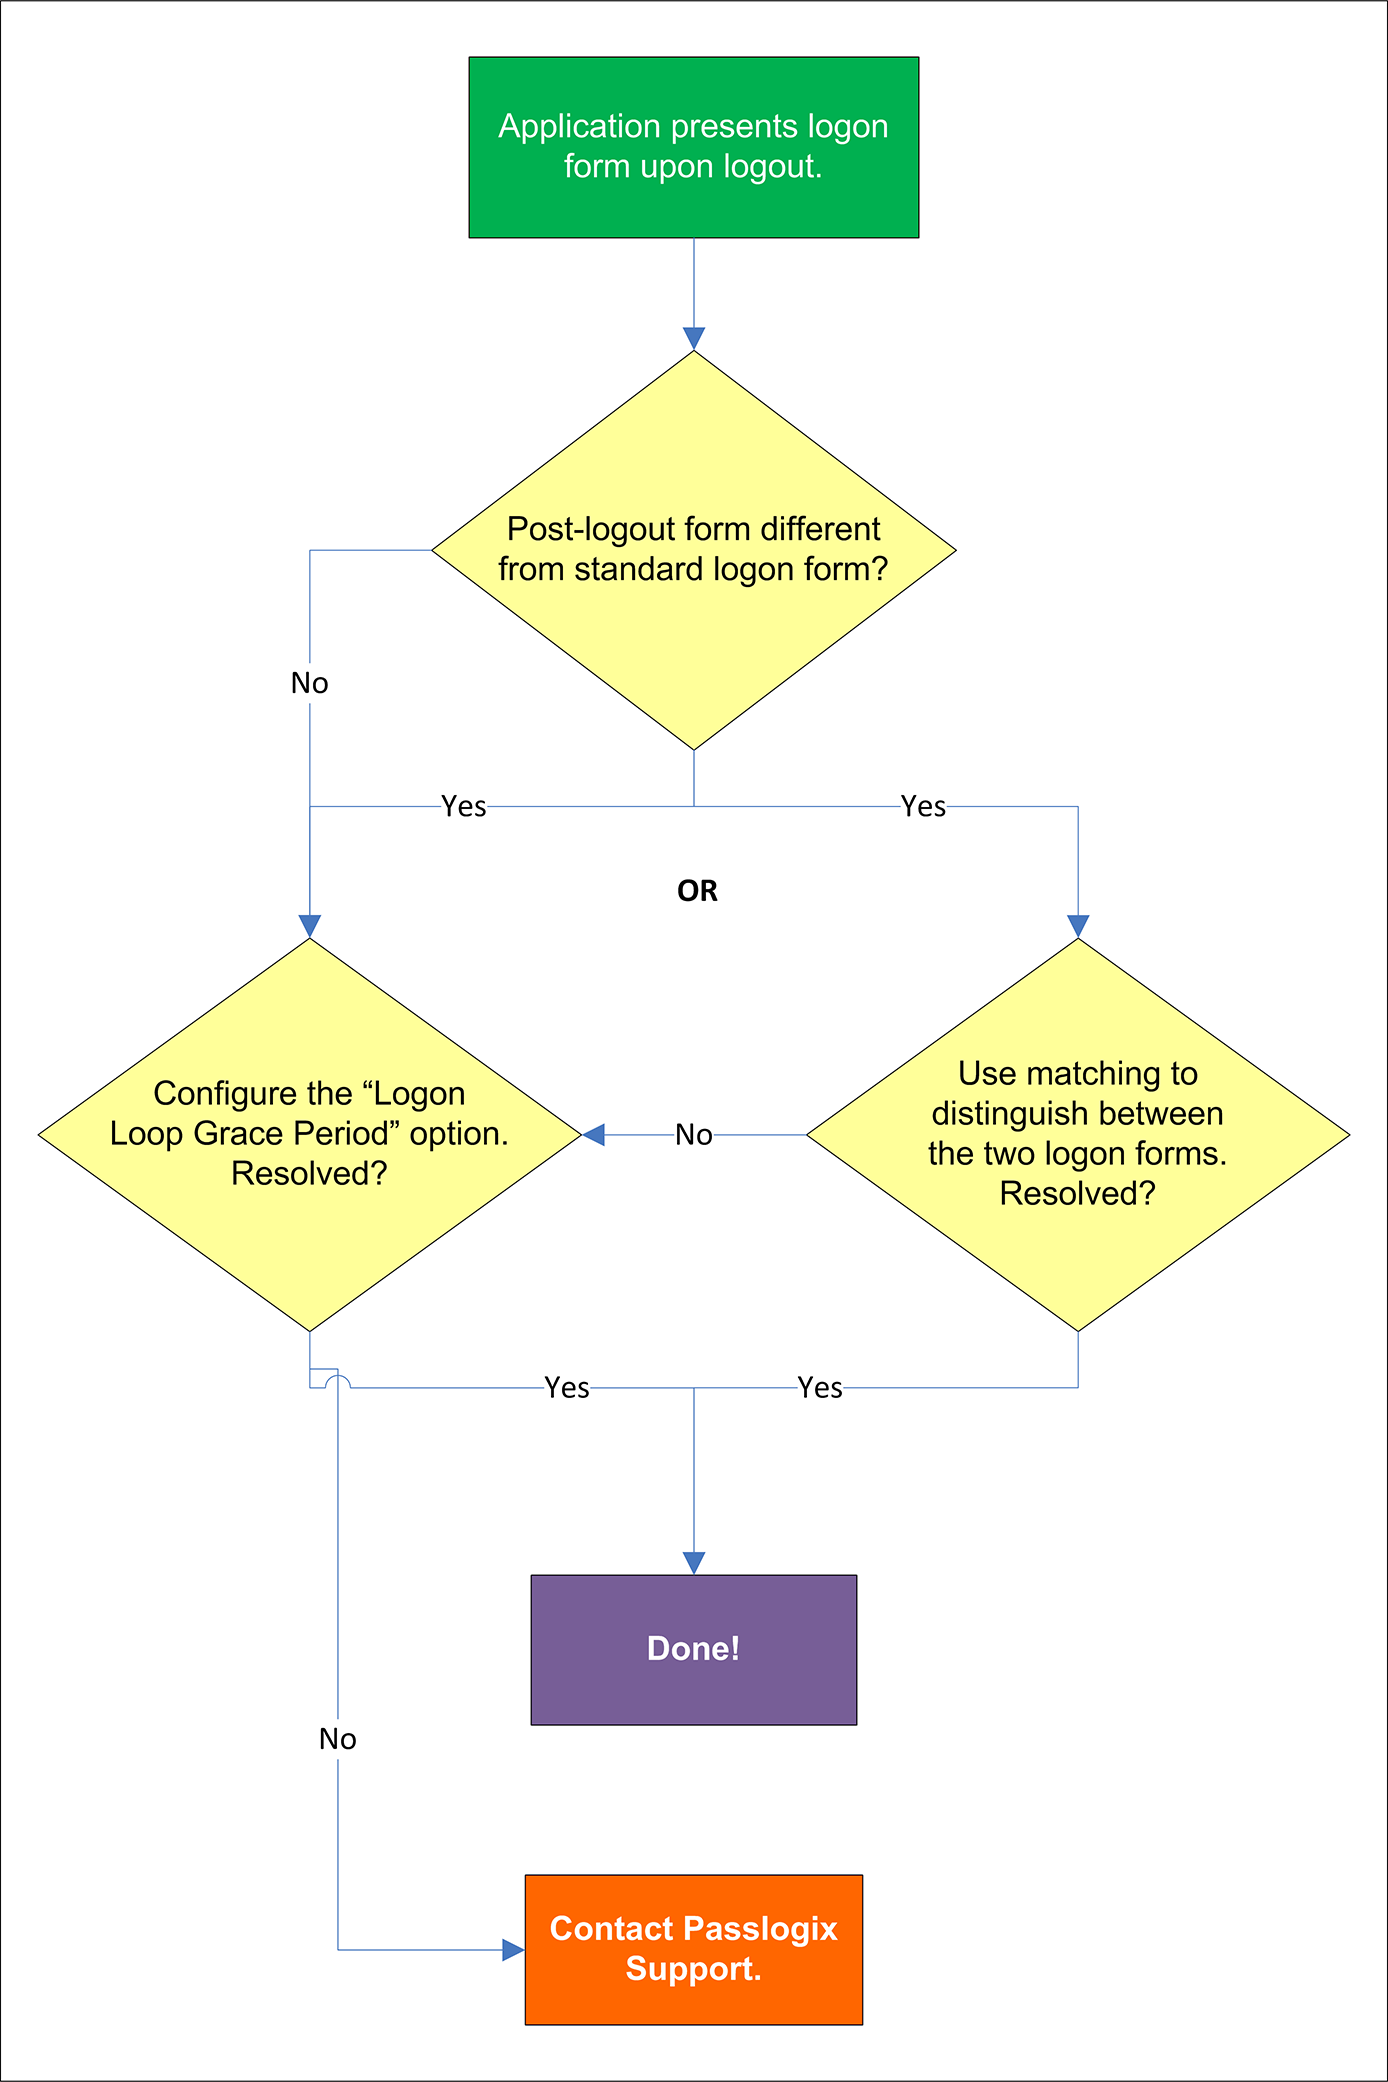
3.10.1 Post-logout form different from standard logon form?
Oracle recommends that you consider the "Logon Loop Grace Period" as well as matching if the logon form presented upon logout is sufficiently different from the application's standard logon form. If the forms cannot be uniquely distinguished, use the "Logon Loop Grace Period" feature described below.
3.10.2 Configuring the "Logon Loop Grace Period" option resolves logon loop?
If the post-logout form cannot be uniquely distinguished from the standard logon form, configure a grace period that will prevent the Agent from automatically logging on to the same application if the specified grace period has not fully elapsed.
To configure the logon loop grace period timer, do the following:
-
In the Logon Manager Administrative Console, open the desired template and select the Miscellaneous tab.
-
In the Logon Loop Grace Period field, select the desired mode of operation from the drop-down list:
-
Prompt - if the Agent detects the application's logon form while the grace period is in effect, the Agent will prompt the user whether to complete the logon or ignore the application.
-
Silent - if the Agent detects the application's logon form while the grace period is in effect, the Agent will ignore the application and not log the user on.
-
None - deactivates the grace period timer. Agent will respond to the application every time it detects the application's logon form.
-
-
Do one of the following, depending on what you want the Agent to do while the grace period is in effect:
-
If you want the Agent to log the user on each time the launch of the application's executable is detected, select the Reset for each process check box.
-
If you would like the Agent to ignore the application until the grace period has expired, leave the Reset for each process check box blank.
-
-
Save your changes and commit them to your repository, if applicable.
Note:
If you have configured the logon grace period timer, and logon loop is still occurring for a specific form definition, make sure that the Adhere to logon loop grace period option in the form definition's Options tab is enabled.
If this does not resolve the logon loop for the application, contact Oracle Support for assistance.
3.11 Troubleshooting Detection and Response with the SSO MHO Status Tool
The MHO provides a HLLAPI status interface that displays real-time information describing MHO's interaction with terminal emulators. To display this interface, execute the MHO executable (ssomho.exe) with the /showmho switch:
<program_files_folder>\Passlogix\v-GO-SSO\Helper\Emulator\ssomho.exe /showmho
Oracle highly recommends creating a desktop shortcut to the tool so that you can launch the tool easily at your convenience without having to remember the exact syntax.
Note:
If the MHO does not detect at least one active HLLAPI interface on the system, it will shut down to conserve resources, which may impair the troubleshooting process. In order to keep the MHO running continuously, install the "DOS Window Support" component (described in Understanding Form Detection and Response), which will always expose its active HLLAPI interface to the MHO.3.11.1 Understanding the MHO Status Tool Interface
The MHO status interface looks as follows:
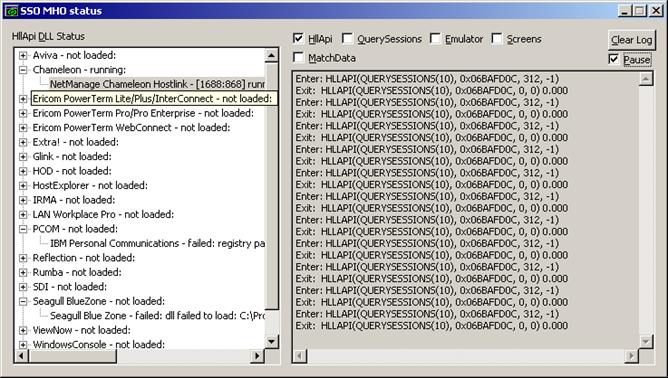
The interface is comprised of the following sections:
-
HLLAPI DLL Status pane - displays all the emulator entries present in the mfrmlist.ini file and the status of the associated HLLAPI interfaces: o Running - the emulator's interface has been detected and hooked on to by the MHO. Expanding a node with a Running status displays the detected session. In our example above, the NetManage Chameleon Hostlink emulator is in this state.
-
Not loaded - the emulator's interface was not detected by the MHO. Expand this node to view the reason for the load failure is displayed as a sub-node under the emulator node. Typical reasons include:
-
Registry path not found - the registry key which defines the path to the emulator's HLLAPI Dynamically Linked Library (DLL) cannot be found at the location specified in the mfrmlist.ini file. Consult the emulator vendor to obtain the correct value for this parameter and modify the mfrmlist.ini file entry for the emulator to correct this problem. In our example above, the IBM Personal Communications emulator is showing this error.
-
DLL failed to load - the emulator's HLLAPI library was not found at the location specified by the registry path described above, or the file that exists at the specified location is corrupted and cannot be hooked on to by the MHO. In our example above, the Seagull BlueZone emulator is showing this error.
-
-
Log data pane - this pane displays real-time information describing the interaction between the MHO and the emulator selected in the "HLLAPI DLL Status" pane.
The check boxes above the log data pane enable or disable the display of the following classes of events:
-
HLLAPI - all HLLAPI communication between the MHO and the detected emulator interfaces. Leave this checked at all times or no log data will be captured.
-
Emulator - emulator events such as user input or window instantiation.
-
QuerySessions - session-related events, such as list of open sessions, detected session short-names, and so on.
-
Screens - content of the emulator's display. Every time the MHO receives (or detects, if polling is enabled) a screen update event, the contents of the updated screen are captured.
-
MatchData - attempted matches against the match text defined in the template, as well as the outcome of those attempts.
As the information displayed in the log data pane scrolls by quickly, whenever you notice something of interest, select the Pause check box to temporarily pause the data capture and copy the data in question into a text editor for more thorough analysis.
3.11.2 Using the MHO Status Tool to Diagnose Session Detection and Response
If you have created a mainframe application template but Logon Manager is not detecting the terminal session, the most common causes are:
-
The emulator is not exposing a session short-name via HLLAPI. Logon Manager uses the session short-name to detect the session and initiate text matching. Some emulators require explicit configuration to expose the session short-name, either globally, or on a per-session basis. In this case, you would see the emulator listed in the "HLLAPI DLL Status" pane as Running but expanding the emulator's node would reveal no active session even though the session was connected in the emulator itself. Consult the vendor's documentation for information on how to enable this required feature.
-
The emulator's HLLAPI support is disabled or not installed. In this case, you would see the emulator listed in the "HLLAPI DLL Status" pane as "Not loaded" and expanding its node would reveal either the "Registry path not found" or the "DLL failed to load" error described in the previous section. Consult the vendor's documentation for information on how to enable or install HLLAPI support.
-
Bug or HLLAPI-noncompliance in the emulator's code. Consult the vendor to determine if an update is available. For example, with all event types enabled in the "Log data pane," you would not see any screen update events or session-related information (such as session opening or closing) even though the emulator would appear as "Running" in the "HLLAPI DLL Status" pane and expanding its node revealed a detected session.