15 Configuring an Oracle RAC Disaster Recovery Solution
The Oracle Fusion Middleware Disaster Recovery solution for enterprise deployments makes use of storage replication technology using Oracle Data Guard. An Oracle Data Guard configuration can consist of any combination of single-instance and Oracle Real Application Clusters (Oracle RAC) multiple-instance databases.
This chapter describes how to set up Oracle Entitlements Server to use Oracle Data Guard with Oracle RAC databases to synchronize data for disaster recovery in a multi-site deployment.
This chapter contains the following sections:
-
Section 15.1, "Multi-Site Oracle Data Guard with Oracle RAC Database Deployment Topology"
-
Section 15.2, "Oracle RAC Primary to Oracle RAC Standby Data Guard"
-
Section 15.3, "Setting Up Data Guard for Oracle RAC Databases"
-
Section 15.4, "Configuring Oracle Entitlements Server for High Availability Disaster Recovery"
15.1 Multi-Site Oracle Data Guard with Oracle RAC Database Deployment Topology
In this release, the following configuration is required:
-
One site is acting as master at any time. All the write operations are against the policy store configured for the current master site.
-
All Security Modules are configured in controlled-pull mode in this Oracle RAC and Data Guard disaster recovery solution. Non-controlled and controlled push modes are not supported.
-
A policy store configured in mixed mode is not supported.
-
Primary and standby databases are set up with Oracle Active Data Guard.
-
Oracle Clusterware is installed and active on the primary and standby sites for Oracle RAC Databases.
Figure 15-1 illustrates the relationship between the Oracle Entitlements Server components when configured in a multi-site deployment:
Figure 15-1 Multi-Site Deployment Topology
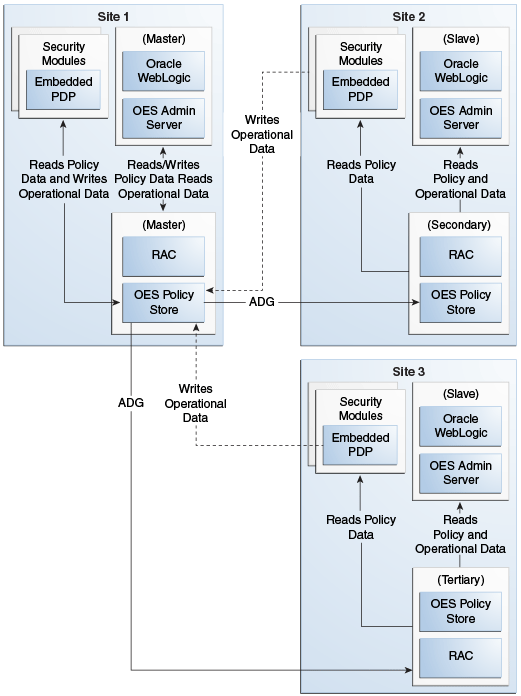
Description of "Figure 15-1 Multi-Site Deployment Topology"
As seen in the figure, when in a multi-site deployment the following relationships exist:
-
Policy Distribution: Security Modules are configured in controlled-pull mode on all the sites. The snapshot is generated by the Administration Server at the master site and replicated to the secondary and tertiary sites using Oracle Data Guard. The PDP on the secondary and tertiary sites retrieve the snapshot from the local policy store.
-
Configuration: PDP are configured with multiple JDBC URL's. The primary JDBC URL is configured to the local policy store. In an event of failure to connect to the local Policy Store, a connection attempt to the secondary JDBC URL is made. This ensures that the policy store is accessible in an event of a failure.
-
SM ConfigUI: Can be used to configure the JDBC URLs that are required to support failover functionality.
15.2 Oracle RAC Primary to Oracle RAC Standby Data Guard
In the following sections it is assumed that a primary Oracle RAC database has already been created and is up and running. The configuration is for a 2-node Oracle RAC Primary Database with a 2-node Oracle RAC Physical Standby Data Guard.
15.2.1 Installing Oracle Clusterware
To perform Oracle Clusterware and Oracle Automatic Storage Management installation and to perform the preinstallation steps for Oracle RAC, see Oracle Grid Infrastructure Installation Guide for Linux.
Prerequisites and steps for installing the Oracle Grid infrastructure software are as follows:
-
Verifying system requirements
-
Identifying and checking software requirements
-
Installing the Linux operating system on all the Oracle RAC nodes and the DNS host
-
Checking network requirements/configuration for Oracle RAC nodes, other servers, and DNS host
-
Configuring the DNS server for SCAN VIPs, Node VIPs and Node IPs
-
Enabling the Name Service Cache Daemon
-
Creating Oracle Users, Groups, Permissions, and Installation Paths on all the Oracle RAC nodes
-
Setting the Network Time Protocol on all Oracle RAC nodes
-
Configuring shared storage for Oracle Grid infrastructure for a cluster and Oracle RAC
-
Configuring the disk devices for Oracle ASM with ASMLib
-
Configuring the Oracle Grid infrastructure
15.2.2 Installing Oracle Real Application Clusters
Install Oracle Real Application Clusters by following the instructions in Oracle Real Application Clusters Installation Guide. For information on Oracle RAC architecture, administration, and deployment, see Oracle Real Application Clusters Administration and Deployment Guide.
A cluster is a set of processes running on a single or multiple computers that share the same workload. After system components have been clustered, they are viewed functionally as a single entity from the perspective of a client for runtime processing and manageability. There is a close correlation between clustering and redundancy. A cluster provides redundancy for a system. With a load-balancing mechanism in place, the instances are redundant. If any of the instances fail, requests to the failed instance can be sent to the surviving instances. If failover occurs during a transaction in a clustered environment, the session data is retained as long as there is at least one surviving instance available in the cluster.
15.3 Setting Up Data Guard for Oracle RAC Databases
The primary database can be a single instance database or an Oracle Real Application Clusters (Oracle RAC) database. The standby databases can be single instance databases or Oracle RAC databases. See Oracle Database High Availability Overview for an overview of configuring and using Oracle Data Guard with Oracle RAC.
For information on setting up Data Guard for Oracle RAC Databases, see "Data Guard and Oracle Real Application Clusters" in Oracle Data Guard Concepts and Administration.
15.3.1 Preparing the Primary Database for Standby Database Creation
Before you create a standby database you must first ensure the primary database is properly configured. The tasks you must complete are listed below:
-
Place the primary database in
FORCE LOGGINGmode. You can do this after database creation using the following SQL statement:SQL> ALTER DATABASE FORCE LOGGING;
-
Set the initialization parameters for the primary database.
Configure each instance of the Oracle RAC primary database to send its redo data to the Oracle RAC standby database (set up the
log_archive_dest_nparameter on all primary instances.For details, see "Configuring an Oracle RAC Primary Database to Send Redo Data" in Oracle Data Guard Concepts and Administration.
Ensure you use the correct format for archived redo log filenames as specified in "Format for Archived Redo Log Filenames" in Oracle Data Guard Concepts and Administration.
There are additional parameters you must add that control the receipt of the redo data and apply services when the primary database is transitioned to the standby role.
-
Put the primary database in
ARCHIVELOGmode and enable automatic archiving.See "Managing Archived Redo Logs" in Oracle Database Administrator's Guide for more information.
For details on preparing the primary database for standby database creation, see "Preparing the Primary Database for Standby Database Creation" in Oracle Data Guard Concepts and Administration.
For information on Oracle RAC-specific configuration consideration, see "Configuration Considerations in an Oracle RAC Environment" in Oracle Data Guard Concepts and Administration.
15.3.2 Creating a Physical Standby Database
Tasks you perform to create a physical standby database are as follows:
-
Create a backup of the primary database.
See Oracle Database Backup and Recovery User's Guide for information about how to perform a database backup operation.
-
Connect to the primary database and create a control file for the standby database.
-
Create the standby initialization parameter file and set the initialization parameters for each instance of the standby database. Depending on your configuration, you may need to set filename conversion parameters.
You must set up the appropriate parameters in the parameter file for each instance. For example, you must configure standby redo log archival on each standby database instance.
-
Copy files from the primary system to the standby system.
Copy the backup data files, standby control file, all available archived redo logs, and online redo logs from the primary site to the standby site. Copying of the online redo logs is necessary to facilitate switchover.
-
Set up the environment to support the standby database.
-
Create a Windows-based service if the standby database will be hosted on a Windows system.
-
Copy the remote login password file from the primary database system to the standby database system (all nodes).
-
Configure listeners for the primary and standby databases.
-
Create Oracle Net service names.
See the Oracle Database Net Services Administrator's Guide and the Oracle Database Administrator's Guide.
-
Create a server parameter file for the standby database.
-
Copy the primary database encryption wallet to the standby database system.
-
-
Start the physical standby database.
-
Start the physical standby database.
-
Configure an Oracle RAC standby database to receive redo data from a primary database.
For details, see "Configuring an Oracle RAC Standby Database to Receive Redo Data" in Oracle Data Guard Concepts and Administration.
-
Create an online redo log on the standby database.
-
Start Redo Apply.
See "Starting Redo Apply" in Oracle Data Guard Concepts and Administration.
-
-
Verify the physical standby database is performing properly.
-
Identify the existing archived redo log files.
-
Force a log switch to archive the current online redo log file.
-
Verify the new redo data was archived on the standby database.
-
Verify that received redo has been applied.
-
For details, see "Creating a Physical Standby Database" in Oracle Data Guard Concepts and Administration.
For information on Oracle RAC-specific configuration consideration, see "Configuration Considerations in an Oracle RAC Environment" in Oracle Data Guard Concepts and Administration.
15.3.3 Configuring the Oracle Data Guard Broker
To configure the Oracle Data Guard broker, refer to "Managing Broker Configurations" in Oracle Data Guard Broker.
15.3.4 Performing Switchover and Failover Operations with Data Guard Broker
To test the manual switchover and failover, refer to "Switchover and Failover Operations" in Oracle Data Guard Broker.
15.4 Configuring Oracle Entitlements Server for High Availability Disaster Recovery
This section provides instructions to set up Oracle Entitlements Server for high availability and disaster recovery. It contains the following sections:
-
Section 15.4.2, "Prerequisites for Installing Oracle Entitlements Server"
-
Section 15.4.5, "Installing Oracle Entitlements Server Client in High Availability Environment"
-
Section 15.4.7, "Installing Oracle Entitlements Server Administration Server Cluster"
15.4.1 Oracle Entitlements Server High Availability Disaster Recovery Configuration Roadmap
Table 15-1 lists the configuration tasks for Oracle Entitlements Server high availability disaster recovery.
Table 15-1 Oracle Entitlements Server Disaster Recovery Configuration Flow
| No. | Task | Description |
|---|---|---|
|
1 |
Verify that all prerequisites are met. |
See Section 15.4.2, "Prerequisites for Installing Oracle Entitlements Server.". |
|
2 |
Install OPSS Schema. |
For more information, see Section 15.4.3, "Installing OPSS Schema". |
|
3 |
Install Oracle Entitlements Server Administration Server Cluster on master policy store on OESHOST1. |
For more information, see Section 15.4.4, "Installing Oracle Entitlements Server Administration Server Cluster on Master Policy Store on OESHOST1" |
|
4 |
Install Oracle Entitlements Server Client in high availability environment. |
For more information, see Section 15.4.5, "Installing Oracle Entitlements Server Client in High Availability Environment". |
|
5 |
Configuring WebLogic Security Module cluster in controlled-pull distribution mode with JDBC URL with master Oracle RAC Database policy store. |
For more information, see Section 15.4.6, "Configuring WebLogic Security Module Cluster in Controlled-Pull Distribution Mode with JDBC URL with Master Oracle RAC Database Policy Store". |
|
6 |
Install Oracle Entitlements Server Administration Server Cluster on secondary policy store. |
For more information, see Section 15.4.7, "Installing Oracle Entitlements Server Administration Server Cluster". |
|
7 |
Configuring WebLogic Security Module Cluster in controlled-pull distribution mode with JDBC URL with secondary Oracle RAC Database policy store. |
For more information, see Section 15.4.8, "Configuring WebLogic Security Module Cluster in Controlled-Pull Distribution Mode with JDBC URL with Secondary Oracle RAC Database Policy Store". |
15.4.2 Prerequisites for Installing Oracle Entitlements Server
You must have two groups of Oracle RAC Databases with
-
Two instances for Active Data Guard primary Oracle RAC Database
-
Two instances for Active Data Guard standby Oracle RAC Database
15.4.3 Installing OPSS Schema
Run Oracle Fusion Middleware Repository Creation Utility (RCU) against the primary database. After it is finished, the OPSS schema can be propagated to the standby database. For more information about using RCU, see "Database Requirements" section in Installation Guide for Oracle Identity and Access Management.
15.4.4 Installing Oracle Entitlements Server Administration Server Cluster on Master Policy Store on OESHOST1
Primary Administration Server cluster must have two OES Managed Servers for MAPI Create, Update and Delete (CUD) operations.
15.4.4.1 Install Oracle Entitlements Server Administration Server with Primary Oracle RAC Database
Install the Oracle Entitlements Server Administration Server with the primary Oracle RAC Database Policy Store.
Oracle Entitlements Server is included in the Oracle Identity and Access Management Suite. Use the Oracle Identity and Access Management 11g Installer to install Oracle Identity and Access Management Suite.
For information about installing the Oracle Entitlements Server Administration Console, see "Installing and Configuring Oracle Entitlements Server" in Installation Guide for Oracle Identity and Access Management.
15.4.4.2 Create the Oracle Entitlements Server Administration Server Domain with WebLogic Server Cluster
Run the Oracle Fusion Middleware Configuration Wizard to create a domain containing the Administration Server.
-
Run the
MW_HOME/oracle_common/common/bin/config.shscript. -
On the Welcome screen, select Create a new WebLogic domain and click Next. The Select Extension Source screen appears.
-
On the Select Extension Source screen, select Oracle Entitlements Server for Managed Server. The Configuration Wizard automatically selects Oracle JRF, Oracle Platform Security Service, and Basic WebLogic Server Domain.
-
In the Specify Domain Name and Location screen, enter the domain name for the domain you are creating and the domain location.
-
Configure a user name and a password for the administrator.
-
Choose the WebLogic domain startup mode and JDK in the Configure Server Start Mode and JDK screen.
-
For data source configuration, choose GridLink to create the data source.
-
When inputting listeners for the GridLink data source, add the primary Oracle RAC Database as the first listener and the service name as
manage.example.com. -
On the Select Optional Configuration screen, select Administration Server and Managed Servers, Clusters and Machines.
-
In the Configure the Administration Server screen, enter the following values:
-
Name: AdminServer
-
Listen address: All Local Addresses
-
Listen port: 7001
-
SSL listen port: 7002
-
Select SSL enabled
-
-
On the Configure Managed Servers screen, when you first enter the screen, one Managed Server called
oes_server1is created automatically. You can renameoes_server1and update its attributes for this entry.For example:
-
Name: oes_server1
-
Listen Address: hostname of the server on which
oes_server1is running -
Listen Port: 14600
-
SSL Port: 14601
For the second Managed Server, click Add and enter the following values:
-
Name: oes_server2
-
Listen Address: hostname of the machine on which
oes_server2is running. -
Listen Port: 14600
-
SSL Port: 14601
-
-
In the Configure Clusters screen, click Add to create a cluster.
Enter the name
oes_cluster. Select unicast for the Cluster messaging mode, then enter the Cluster address in the format listen address or DNS name ofoes_server1:port,listen addressor DNS name ofoes_server2:portmanaged server1:port,managed server2: port. -
On the Assign Servers to Clusters screen, associate the Managed Servers with the cluster:
Click on the cluster name oes_cluster in the right window.
Click on the Managed Server oes_server1 then click the arrow to assign it to the cluster.
Repeat the preceding steps for the Managed Server
oes_server2. -
On the Configure Machines screen, create a machine for each host in the topology.
For Administration Server Host:
-
Name: Name of your host. Use the DNS name here.
-
Node Manager Listen Address: Oracle recommends that the machine IP address be identical to the DNS name of the machine.
-
Node Manager Listen Port: Enter a port for Node Manager to use.
Leave all other values at the default settings.
Repeat the preceding steps for
OESHOST1andOESHOST2and enter the following values. Leave all other values at the default settings.-
Name: Name of the host. A good practice is to use the DNS name.
-
Node Manager Listen Address: Oracle recommends that the machine IP address be identical to the DNS name of the machine.
-
Node Manager Listen Port: Enter a port for Node Manager to use.
-
-
On the Assign Servers to Machines screen, you assign the Managed Servers that will run on the machines you just created. Follow these steps:
-
Click a machine in the right hand window.
-
Click the Managed Servers you want to run on that machine in the left window.
-
Click the arrow to assign the Managed Servers to the machine.
-
Repeat these steps until you assign all Managed Servers to the appropriate machine.
ADMINHOST: AdminServer
OESHOST1: oes_server1
OESHOST2: oes_server2
-
On the Configuration Summary screen, click Create.
-
Configure the OPSS Security Store. See "Configuring the Database Security Store for Oracle Entitlements Server Administration Server" in Installation Guide for Oracle Identity and Access Management.
-
15.4.4.3 Configuring Security Store for Oracle Entitlements Server Administration Server
-
Run
configureSecurityStore.pyto configure the database policy store. For example:MW_HOME/oracle_common/common/bin/wlst.sh MW_HOME/Oracle_IDM1/common/tools/configureSecurityStore.py -d /scratch/example_user/Oracle/Middleware/user_projects/domains/oesserver2/ -t database_ORACLE -j cn=jpsroot -m create -p password -
Start the Administration Server and Managed Servers.
15.4.4.4 Configuring Oracle HTTP Server for Oracle Entitlements Server Administration Console HTTP Request Distribution
To configure Oracle HTTP Server for Oracle Entitlements Server Administration Console HTTP request distribution, proceed as follows:
-
Open the
mod_wl_ohs.conffile in a text editor. The file is located in the following directory:ORACLE_INSTANCE/config/OHS/ohs1/ -
Specify the details of the destination cluster within a new
<location>element.# OES admin console <Location /apm> SetHandler weblogic-handler WebLogicCluster apmhost1:port1, apmhost2:port2 </Location>
-
Restart Oracle HTTP Server instance.
15.4.4.5 Access the Oracle Entitlements Server Administration Console
Access the Oracle Entitlements Server Administration Console at the master site:
http://ohs_host:port/apm
The OES folder is located in the MW_HOME/IDM_HOME directory.
Log in to the Oracle Entitlements Server Administration Console at
-
http://
hostname1:port/apm -
http://
hostname2:port/apm -
http://
ohs_host:port/apm
15.4.5 Installing Oracle Entitlements Server Client in High Availability Environment
For instructions on how to install the Oracle Entitlements Server Client, see "Installing Oracle Entitlements Server Client" in Installation Guide for Oracle Identity and Access Management.
Verify that the installation was successful and the oessm directory was created under OES_CLIENT_HOME.
15.4.6 Configuring WebLogic Security Module Cluster in Controlled-Pull Distribution Mode with JDBC URL with Master Oracle RAC Database Policy Store
The WebLogic Security Module cluster must have two WebLogic Security Module Managed Servers against the primary Oracle RAC Database.
Note:
All Security Modules are configured in controlled-pull mode in this Oracle RAC and Data Guard disaster recovery solution. Non-controlled and controlled push modes are not supported.To configure the Oracle Entitlements Server Client, see the following sections in Installation Guide for Oracle Identity and Access Management:
Important configuration details are listed as follows:
-
Edit
smconfig.prpto modify the properties for the following:-
oracle.security.jps.runtime.policyDistributionMode -
jdbc.url -
oracle.security.jps.runtime.pd.client.multisite.primaryJdbcUrl -
oracle.security.jps.runtime.pd.client.multisite.onsserver
For example:
-
oracle.security.jps.runtime.policyDistributionMode=controlled-pull
-
jdbc.url=jdbc:oracle:thin:@(DESCRIPTION_LIST = (LOAD_BALANCE = off) (FAILOVER = on)(DESCRIPTION = (ADDRESS_LIST = (ADDRESS = (PROTOCOL = TCP)(HOST =racpri_scan_ip)(PORT =racpri_scan_listenerport)))(CONNECT_DATA = (SERVICE_NAME = manage.example.com)))(DESCRIPTION = (ADDRESS_LIST = (ADDRESS = (PROTOCOL = TCP)(HOST =racstby_scan_ip)(PORT =racstby_scan_listenerport)))(CONNECT_DATA = (SERVICE_NAME = manage.example.com)))) -
oracle.security.jps.runtime.pd.client.multisite.primaryJdbcUrl=jdbc:oracle:thin:@(DESCRIPTION_LIST = (LOAD_BALANCE = off) (FAILOVER = on)(DESCRIPTION = (ADDRESS_LIST = (ADDRESS = (PROTOCOL = TCP)(HOST =racpri_scan_ip)(PORT =racpri_scan_listenerport)))(CONNECT_DATA = (SERVICE_NAME = manage.example.com)))(DESCRIPTION = (ADDRESS_LIST = (ADDRESS = (PROTOCOL=TCP)(HOST =racstby_scan_ip)(PORT =racstby_scan_listenerport)))(CONNECT_DATA = (SERVICE_NAME = manage.example.com)))) -
oracle.security.jps.runtime.pd.client.multisite.onsserver= nodes=racpri_scan_ip:onsport, racstby_scan_ip: onsport
-
-
Create a controlled-pull WebLogic Security Module instance and configure the WebLogic Security Module cluster domain:
$OES_CLIENT_HOME/oessm/bin/config.sh -multisite-
Note: Use the OPSS schema for the Oracle Entitlements Server Policy Store user name
-
Add a parameter
-multisiteto enable multi-site configuration. -
Select Oracle Entitlements Server WebLogic Security Module On WebLogic Managed Server template.
-
Create the
wlssm_clusterwithwlssm_server1,wlssm_server2.
-
-
Check the WebLogic Server controlled-pull Security Module
jps-config.xmlfile of each Managed Server in the WebLogic Security Module domain to confirm Oracle RAC Database URL tojdbc.url, for example,{{jdbc:oracle:thin@(DESCRIPTION= }} (LOAD_BALANCE=on) {{ (ADDRESS=(PROTOCOL=TCP)(HOST=racnode1) (PORT=1521)) }} {{ (ADDRESS=(PROTOCOL=TCP)(HOST=racnode2) (PORT=1521)) }} (CONNECT_DATA=(SERVICE_NAME=service_name)))" -
Start WebLogic Server controlled-pull Security Module Administration Server and Managed Servers
-
Verify the following:
-
The controlled-pull WebLogic Security Module instance is created under
OES_CLIENT_HOME/oes_sm_instances. -
The WebLogic Security Module domain is created.
-
The controlled-pull WebLogic Security Module Cluster started successfully.
-
Log in is successful to the WebLogic Security Module Administration Console at:
http://WLSSM_host:port/console
-
15.4.7 Installing Oracle Entitlements Server Administration Server Cluster
The secondary Administration Server cluster must have two OES Managed Servers for MAPI query operations.
15.4.7.1 Install Oracle Entitlements Server Administration Server with Secondary Oracle RAC Database
Install Oracle Entitlements Server Administration Server with the primary Oracle RAC Database policy store.
Oracle Entitlements Server is included in the Oracle Identity and Access Management Suite. Use the Oracle Identity and Access Management 11g Installer to install Oracle Identity and Access Management Suite.
For information about installing the Oracle Entitlements Server Administration Console, see "Installing and Configuring Oracle Entitlements Server" in Installation Guide for Oracle Identity and Access Management.
15.4.7.2 Create the Oracle Entitlements Server Administration Server Domain with WebLogic Server Cluster
Run Oracle Fusion Middleware Configuration Wizard to create a domain containing the Administration Server.
-
Run the
MW_HOME/oracle_common/common/bin/config.shscript. -
On the Welcome screen, select Create a new WebLogic domain and click Next. The Select Extension Source screen appears.
-
On the Select Extension Source screen, select Oracle Entitlements Server for Managed Server. The Configuration Wizard automatically selects Oracle JRF, Oracle Platform Security Service, and Basic WebLogic Server Domain.
-
In the Specify Domain Name and Location screen, enter the domain name for the domain you are creating and the domain location.
-
Configure a user name and a password for the administrator.
-
Choose the Weblogic domain startup mode and JDK in the Configure Server Start Mode and JDK screen.
-
For data source configuration, choose GridLink to create data source.
-
When inputting listeners for GridLink data source, add the primary Oracle RAC Database as the first listener and service name as
distribution.example.com. -
On the Select Optional Configuration screen, select Administration Server and Managed Servers, Clusters and Machines.
-
In the Configure the Administration Server screen, enter the following values:
-
Name: AdminServer
-
Listen address: All Local Addresses
-
Listen port: 7001
-
SSL listen port: 7002
-
Select SSL enabled
-
-
On the Configure Managed Servers screen, when you first enter the screen, one Managed Server called
oes_server1is created automatically. You can renameoes_server1and update its attributes for this entry.For example:
-
Name: oes_server1
-
Listen Address: host name of the machine on which
oes_server1is running. -
Listen Port: 14600
-
SSL Port: 14601
For the second Managed Server, click Add and enter the following values:
-
Name: oes_server2
-
Listen Address: host name of machine on which
oes_server2is running. -
Listen Port: 14600
-
SSL Port: 14601
-
-
In the Configure Clusters screen, click Add to create a cluster.
Enter the name
oes_cluster. Select unicast for Cluster messaging mode, then enter the Cluster address in the format listen address or DNS name ofoes_server1:port,listen addressorDNSname ofoes_server2:portmanaged server1:port,managed server2: port. -
On the Assign Servers to Clusters screen, associate the Managed Servers with the cluster:
Click on the cluster name oes_cluster in the right window.
Click on the Managed Server oes_server1 then click the arrow to assign it to the cluster.
Repeat the preceding steps for the Managed Server oes_server2.
-
On the Configure Machines screen, create a machine for each host in the topology.
For Administration Server Host:
-
Name: Name of your host. Use the
DNSname here. -
Node Manager Listen Address: Oracle recommends that the machine IP address be identical to the
DNSname of the machine. -
Node Manager Listen Port: Enter a port for Node Manager to use.
Leave all other values at the default settings.
Repeat the preceding steps for
OESHOST1andOESHOST2and enter the following values. Leave all other values at the default settings.-
Name: Name of the host. A good practice is to use the DNS name.
-
Node Manager Listen Address: Oracle recommends that the machine IP address be identical to the DNS name of the machine.
-
Node Manager Listen Port: Enter a port for Node Manager to use.
-
-
On the Assign Servers to Machines screen, you assign the Managed Servers that will run on the machines you just created. Follow these steps:
-
Click on a machine in the right hand window.
-
Click on the Managed Servers you want to run on that machine in the left window.
-
Click on the arrow to assign the Managed Servers to the machine.
-
Repeat these steps until you assign all Managed Servers to the appropriate machine.
ADMINHOST: Administration Server
OESHOST1: oes_server1
OESHOST2: oes_server2
-
On the Configuration Summary screen, click Create.
-
Configure the OPSS Security Store. See "Configuring the Database Security Store for Oracle Entitlements Server Administration Server" in Installation Guide for Oracle Identity and Access Management.
-
15.4.7.3 Export Encryption Key from Primary Domain
Export EncryptionKey from the primary domain.
exportEncryptionKey(jpsConfigFile="/scratch/example_user/Oracle/Middleware/ user_projects/domains/domainname/config/fmwconfig/jps-config.xml",keyFilePath="/net/ standby_host/scratch/example_user/keydir",keyFilePassword="welcome1")
15.4.7.4 Configuring Security Store for Oracle Entitlements Server Administration Server
-
Run
configureSecurityStore.pyto configure the database policy store. For example:MW_HOME/oracle_common/common/bin/wlst.sh MW_HOME/Oracle_IDM1/common/tools/configureSecurityStore.py -d /scratch/example_user/Oracle/Middleware/user_projects/domains/oesserver2/ -t database_ORACLE -j cn=jpsroot -m join -f oesserver2 -p password -k /net/standby_host/scratch/example_user/keydir -w password
-
Start up the Administration Server and Managed Servers.
15.4.7.5 Configuring Oracle HTTP Server for Oracle Entitlements Server Administration Console HTTP Request Distribution
To configure Oracle HTTP Server for Oracle Entitlements Server Administration Console HTTP request distribution:
-
Open the
mod_wl_ohs.conffile, which is located in the following directory, in a text editor:ORACLE_INSTANCE/config/OHS/ohs1/ -
Specify the details of the destination cluster within a new <location> element.
# OES admin console
<Location /apm>
SetHandler weblogic-handler
WebLogicCluster apmhost1:port1, apmhost2:port2
</Location>
-
Restart Oracle HTTP Server instance.
15.4.7.6 Access the Oracle Entitlements Server Administration Console
Log in to the Oracle Entitlements Server Administration Console at the master site:
http://ohs_host:port/apm
Log in to Oracle Entitlements Server Administration Console at
-
http://
hostname1:port/apm -
http://
hostname2:port/apm -
http://
ohs_host:port/apm
15.4.8 Configuring WebLogic Security Module Cluster in Controlled-Pull Distribution Mode with JDBC URL with Secondary Oracle RAC Database Policy Store
The WebLogic Security Module cluster must have two WebLogic Security Module Managed Servers against a standby Oracle RAC Database.
Note:
All Security Modules are configured in controlled-pull mode in this Oracle RAC and Data Guard disaster recovery solution. Non-controlled and controlled push modes are not supported.To configure the Oracle Entitlements Server Client, see the following sections in Installation Guide for Oracle Identity and Access Management:
Important configuration details are listed as follows:
-
Edit
smconfig.prpto modify the properties for the following:-
jdbc.url
-
oracle.security.jps.runtime.pd.client.multisite.primaryJdbcUrl
-
oracle.security.jps.runtime.pd.client.multisite.onsserver
For example:
-
jdbc.url=jdbc:oracle:thin:@(DESCRIPTION_LIST = (LOAD_BALANCE = off) (FAILOVER = on)(DESCRIPTION = (ADDRESS_LIST = (ADDRESS = (PROTOCOL = TCP)(HOST =racstby_scan_ip)(PORT =racstby_scan_listenerport)))(CONNECT_DATA = (SERVICE_NAME = manage.example.com)))(DESCRIPTION = (ADDRESS_LIST = (ADDRESS = (PROTOCOL = TCP)(HOST =racpri_scan_ip)(PORT =racpri_scan_listenerport)))(CONNECT_DATA = (SERVICE_NAME = distribution.example.com)))) -
oracle.security.jps.runtime.pd.client.multisite.primaryJdbcUrl=jdbc:oracle:thin:@(DESCRIPTION_LIST = (LOAD_BALANCE = off) (FAILOVER = on)(DESCRIPTION = (ADDRESS_LIST = (ADDRESS = (PROTOCOL = TCP)(HOST =racpri_scan_ip)(PORT =racpri_scan_listenerport)))(CONNECT_DATA = (SERVICE_NAME = manage.example.com)))(DESCRIPTION = (ADDRESS_LIST = (ADDRESS = (PROTOCOL=TCP)(HOST =racstby_scan_ip)(PORT =racstby_scan_listenerport)))(CONNECT_DATA = (SERVICE_NAME = manage.example.com)))) -
oracle.security.jps.runtime.pd.client.multisite.onsserver= nodes=
racpri_scan_ip:onsport, racstby_scan_ip: onsportNOTE: the service name for parameter
jdbc.urlis "distribution.example.com" instead of "manage.example.com"
-
-
Create a controlled-pull WebLogic Security Module instance and configure WebLogic Security Module cluster domain.
$OES_CLIENT_HOME/oessm/bin/config.sh -multisiteNote: Use the OPSS schema for the Oracle Entitlements Server Policy Store user name
Add a parameter
-multisiteto enable multi-site configuration. -
Select Oracle Entitlements Server WebLogic Security Module On WebLogic Managed Server template.
-
Create the
wlssm_clusterwithwlssm_server1,wlssm_server2. -
Check WebLogic Server controlled-pull Security Module jps-config.xml file in the WebLogic Security Module domain to confirm Oracle RAC Database URL to jdbc.url, for example,
{{jdbc:oracle:thin@(DESCRIPTION= }} (LOAD_BALANCE=on) {{ (ADDRESS=(PROTOCOL=TCP)(HOST=racnode1) (PORT=1521)) }} {{ (ADDRESS=(PROTOCOL=TCP)(HOST=racnode2) (PORT=1521)) }} (CONNECT_DATA=(SERVICE_NAME=service_name)))" -
Start the WebLogic Server controlled-pull Security Module.
-
Verify the following:
-
The controlled-pull WebLogic Security Module instance is created under
OES_CLIENT_HOME/oes_sm_instances. -
The WebLogic Security Module domain is created.
-
The controlled-pull WebLogic Security Module Cluster started successfully.
-
Log in is successful to the WebLogic Security Module Administration Console at:
http://WLSSM_host:port/console
-