10 Configuring High Availability for Oracle Entitlements Server
This chapter introduces Oracle Entitlements Server and describes how to set up a high availability environment for Oracle Entitlements Server components.
Oracle Entitlements Server is a fine-grained authorization product that allows an organization to protect its resources by defining and managing policies that control access to, and usage of, these resources. A policy defines access privileges by specifying who can do what to which resource, when it can be done, and how. The policy can enforce controls on all types of resources including software components and business objects.
-
See "Overview of the Oracle Entitlements Server Architecture" in the Oracle Fusion Middleware Administrator's Guide for Oracle Entitlements Server for an illustration and description of the Oracle Entitlements Server component architecture.
-
See "Features of Oracle Entitlements Server 11gR2" in the Oracle Fusion Middleware Administrator's Guide for Oracle Entitlements Server for more information on Oracle Entitlements Server features.
This chapter includes the following topics:
-
Section 10.1, "Oracle Entitlements Server High Availability Concepts"
-
Section 10.2, "Configuring Oracle Entitlements Server High Availability"
10.1 Oracle Entitlements Server High Availability Concepts
This section provides conceptual information about using Oracle Entitlements Server in a high availability two-node cluster.
This section includes the following topics:
-
Section 10.1.1, "Oracle Entitlements Server High Availability Architecture"
-
Section 10.1.2, "Oracle Entitlements Server Security Module High Availability"
-
Section 10.1.5, "Protection from Failures and Expected Behaviors"
-
Section 10.1.6, "Starting and Stopping the Oracle Entitlements Server Cluster"
-
Section 10.1.8, "Considerations for Synchronizing with LDAP"
10.1.1 Oracle Entitlements Server High Availability Architecture
This section describes the following high availability architecture scenarios for Oracle Entitlements Server components.
This section includes the following topics:
-
Section 10.1.1.1, "Oracle Entitlements Server Administration Server High Availability"
-
Section 10.1.1.2, "Security Module (OES Client)/Policy Information Point High Availability"
-
Section 10.1.1.5, "Oracle Entitlements Server WebLogic Server Security Module High Availability"
10.1.1.1 Oracle Entitlements Server Administration Server High Availability
Figure 10-1 shows the Oracle Entitlements Server Administration Server deployed in a high availability architecture in an active-active configuration.
Figure 10-1 Oracle Entitlements Server Administration Server High Availability Architecture
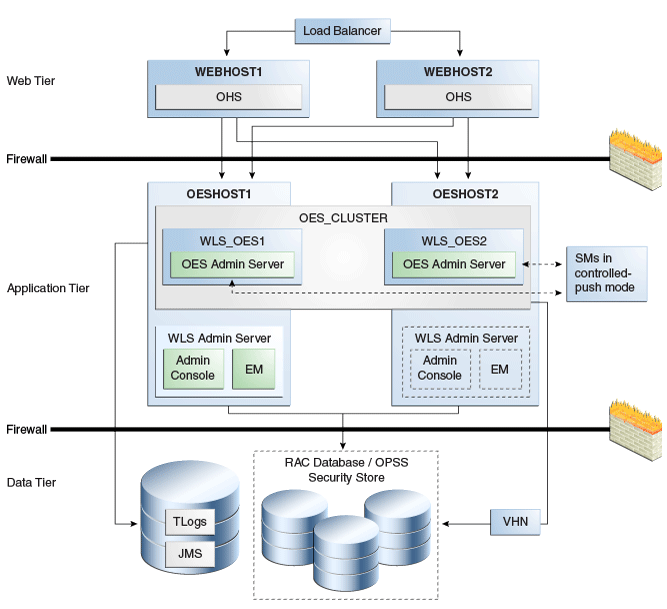
Description of "Figure 10-1 Oracle Entitlements Server Administration Server High Availability Architecture"
On OESHOST1, you see the following installations:
-
An Oracle Entitlements Server instance is installed in the WLS_OES1 Managed Server and a APM instance is installed in the WLS_OES1 Managed Server.
-
The Oracle RAC database is configured in a JDBC multi data source or GridLink Data source to protect the instance from Oracle RAC node failure.
-
A WebLogic Server Administration Server is installed. Under normal operations, this is the active Administration Server.
On OESHOST2, you see the following installations:
-
An Oracle Entitlements Server instance is installed in the WLS_OES2 Managed Server and an APM instance is installed in the WLS_OES2 Managed Server.
-
The Oracle RAC database is configured in a JDBC multi data source to protect the instance from Oracle RAC node failure.
-
The instances in the WLS_OES1 and WLS_OES2 Managed Servers on OESHOST1 and OESHOST2 are configured as the OES_CLUSTER cluster.
-
A WebLogic Server Administration Server is installed. Under normal operations, this is the passive Administration Server. You make this Administration Server active if the Administration Server on OESHOST1 becomes unavailable.
You can configure Oracle Entitlements Server Security Modules in controlled-push mode so that two Oracle Entitlements Server Administration Servers function as a registration server and backup registration server. The Oracle Entitlements Server Security Modules can switch to a backup server and get distributed policy from the Oracle Entitlements Server Administration Server if the registration server is down. See Section 10.1.4, "Failover Considerations" for information about failover scenarios and behavior.
10.1.1.2 Security Module (OES Client)/Policy Information Point High Availability
You can deploy the Security Module so that it is embedded and configure it to failover between different Policy Information Points (PIP). A PIP is a data repository, a source from which information can be retrieved for use when evaluating policies for an authorization decision. For more information on PIP, see The Policy Information Point in the Oracle Fusion Middleware Administrator's Guide for Oracle Entitlements Server.
See the following topics for deployment options:
Oracle Entitlements Server PIP with Multiple LDAP/JDBC URLs
Figure 10-2 shows an embedded Security Module instance in a high availability deployment. With both LDAP and DB-based PIP, you can configure multiple endpoints for external sources to failover between them. For DB-based PIP, you can also configure a multi-source datasource.
Figure 10-2 Security Module / Policy Information Point Configuration
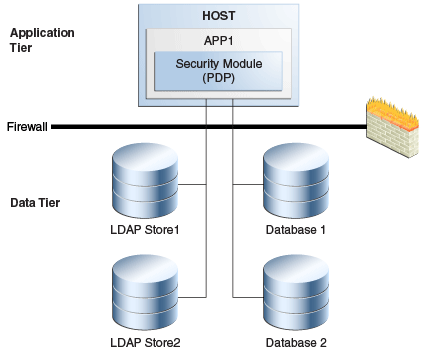
Description of "Figure 10-2 Security Module / Policy Information Point Configuration"
In Figure 10-2, the Security Module (PDP) uses LDAP 1 or Database 1 as its primary PIP. In the case of failover, the Security Module fails over to LDAP2 and Database 2.
Oracle Entitlements Server PIP with RAC and Load Balancer
Another high availability deployment option for Oracle Entitlements Server is one in which the Security Module (PDP) uses the RAC database or LDAP servers with a load balancer. In the case of failover, the Security Module fails over to the RAC, as Figure 10-3 shows.
Figure 10-3 Oracle Entitlements Server PIP with RAC and Load Balancer
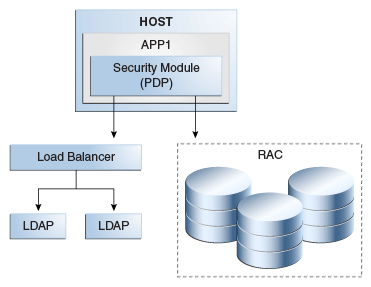
Description of "Figure 10-3 Oracle Entitlements Server PIP with RAC and Load Balancer"
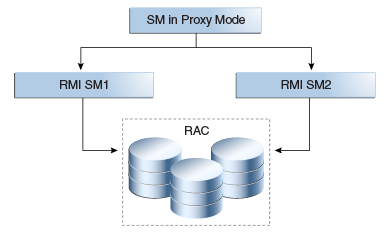
10.1.1.3 Security Module in Proxy Mode Working Against Web Service / RMI Security Module in Controlled-Push Mode High Availability
Oracle Entitlements Server supports a proxy mode that allows clients to invoke authorization services remotely. See Using the Security Module Proxy Mode of the Oracle Fusion Middleware Administrator's Guide for Oracle Entitlements Server.There are three deployment options for deploying Security Module in proxy mode:
Web Service Security Module on WebLogic Server Deployment
Figure 10-4 shows a Web Service Security Module on WebLogic Server.
Figure 10-4 Web Service Security Module on WebLogic Server Deployment

Description of "Figure 10-4 Web Service Security Module on WebLogic Server Deployment"
Standalone Web Service Security Module Deployment
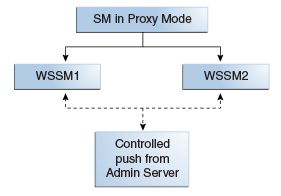
Figure 10-5 shows a standalone Web Service Security Module deployment.
Figure 10-5 Standalone Web Service Security Module Deployment
Description of "Figure 10-5 Standalone Web Service Security Module Deployment"
RMI Security Module Deployment
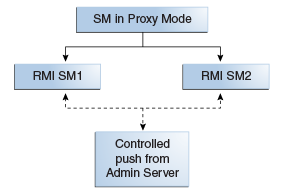
Figure 10-6 shows a RMI Security Module deployment.
Figure 10-6 RMI Security Module Deployment
Description of "Figure 10-6 RMI Security Module Deployment"
10.1.1.4 Security Module in Proxy Mode Working Against Web Service / RMI Security Module in Controlled Pull Mode High Availability
Options to deploy Security Module in proxy mode working against Web Service/RMI Security Modules in controlled-pull mode include the following:
Web Service Security Module on WebLogic Server
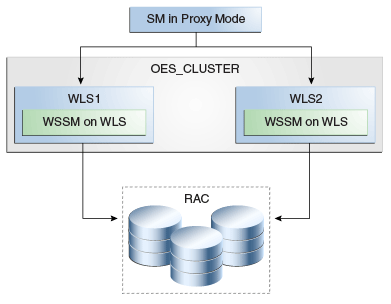
Figure 10-7 shows Web Service Security Module on WebLogic Server.
Figure 10-7 Web Service Security Module on WebLogic Server
Description of "Figure 10-7 Web Service Security Module on WebLogic Server "
Standalone Web Service Security Module
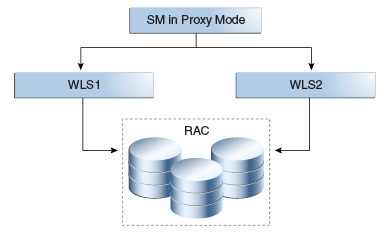
Figure 10-8 shows a standalone Web Service Security Module deployment.
Figure 10-8 Standalone Web Service Security Module
Description of "Figure 10-8 Standalone Web Service Security Module"
Figure 10-9 shows a RMI Security Module deployment.
See PDP Proxy in the Oracle Fusion Middleware Administrator's Guide for Oracle Entitlements Server for more information on configuring the Web Services Security Module proxy client and the RMI Security Module proxy client.
10.1.1.5 Oracle Entitlements Server WebLogic Server Security Module High Availability
There are two deployment options for OES WebLogic Server high availability:
Oracle Entitlements Server WebLogic Server Security Module, Controlled-push Mode
The following graphic shows Oracle Entitlements Server WebLogic Server Security Module in controlled-push mode.
Figure 10-10 Oracle Entitlements Server WebLogic Server Security Module, Controlled-push Mode
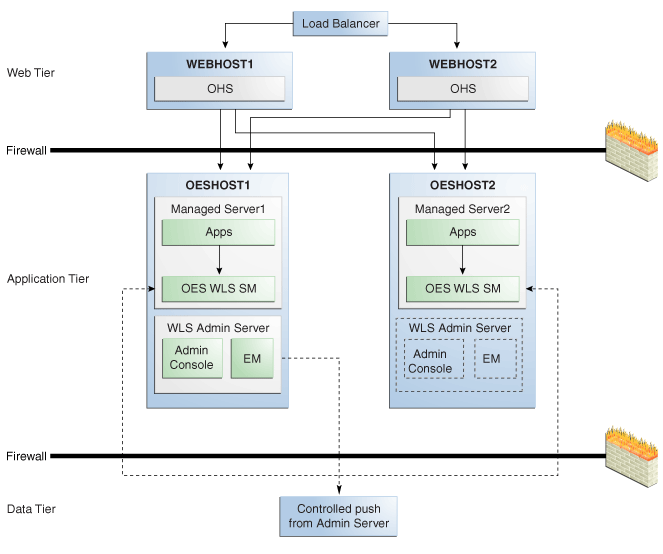
Description of "Figure 10-10 Oracle Entitlements Server WebLogic Server Security Module, Controlled-push Mode"
Oracle Entitlements Server WebLogic Server Security Module High Availability, Controlled-pull or Non-Controlled Mode
The following figure shows an Oracle Entitlements Server with WebLogic Server Security Module in controlled-pull/non-controlled mode.
Figure 10-11 Oracle Entitlements Server WebLogic Server Security Module Controlled-pull/Non-Controlled Mode
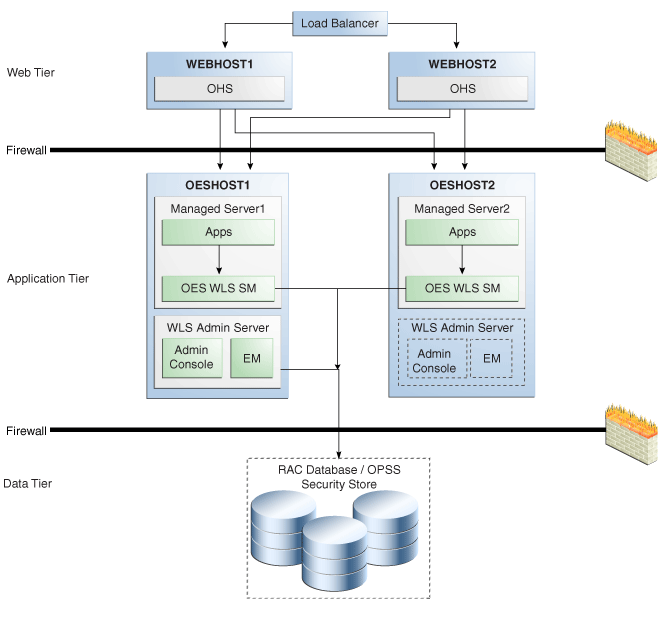
Description of "Figure 10-11 Oracle Entitlements Server WebLogic Server Security Module Controlled-pull/Non-Controlled Mode"
10.1.2 Oracle Entitlements Server Security Module High Availability
When the Security Module reads policy from the OPSS security store for controlled-pull or non-controlled distribution, use Oracle-recommended high availability methods for an application accessing a database.
10.1.3 Load Balancing
For all high availability scenarios, you can deploy the load balancer:
-
In front of Authorization Policy Manager (APM) for user-to-APM communication. Oracle recommends a sticky connection to avoid losing data that does not persist to the policy store.
-
In front of the Web Service Security Module for client-to-Security Module communication. Oracle recommends a sticky connection to maximize cache usage.
Note:
Oracle Entitlements Server does not have any timeout requirements for the load balancer.10.1.4 Failover Considerations
This section describes Oracle Entitlements Server failover considerations.
Table 10-1 Oracle Entitlements Server Failover Scenarios and Behavior
| Failover Scenario | Failover Behavior |
|---|---|
|
OES Policy Store fails |
APM and Security Module in controlled-pull and uncontrolled mode switch to a working instance if multi-source data source is used. If the policy store instance is lost while the transaction is being processed:
|
|
OES Admin Server fails |
|
|
Web Service Security Module or RMI Security Module fails |
Security Module Proxy retries requests until it reaches the configured number of retries. |
|
DB or LDAP attribute source fails |
Security Module (OES Client) continues to try to read data until it reaches the configured number of retries. |
10.1.5 Protection from Failures and Expected Behaviors
This section describes protection from different types of failure in an Oracle Entitlements Server active-active cluster.
10.1.5.1 Expected Client Application Behavior When Failure Occurs
Oracle Entitlements Server failover is not transparent. You must reestablish the connection during a WebLogic Server instance failover using Oracle Entitlements Server.
10.1.5.2 Node failure
Node failures are treated in the same way as WebLogic Server crashes.
10.1.5.3 Database failure
Oracle Entitlements Server is protected against failures in the database by using multi data sources, which you configure during the initial system set up. The multi data sources guarantee that when an Oracle RAC database instance fails, the connections reestablish with available database instances. The multi data source allows you to configure connections to multiple instances in an Oracle RAC database.
10.1.6 Starting and Stopping the Oracle Entitlements Server Cluster
In a high availability architecture, you deploy Oracle Entitlements Server on a WebLogic cluster, which has at least two servers as part of the cluster.
By default, WebLogic Server starts, stops, monitors, and manages the various lifecycle events for the application. The Oracle Identity Manager application leverages the high availability features of the underlying Oracle WebLogic clusters. In case of hardware or other failures, session state is available to other cluster nodes that can resume the work of the failed node.
Use one or more of the following command line tools and consoles to manage Oracle Entitlements Server lifecycle events:
-
WebLogic Server Administration Console
-
Oracle Enterprise Manager Fusion Middleware Control
-
Oracle WebLogic Scripting Tool (WLST)
10.1.7 Cluster-Wide Configuration Changes
For high availability environments, changing the configuration of one Oracle Entitlements Server instance changes the configuration of all the other instances, because all the Oracle Entitlements Server instances share the same configuration repository. Nearly all Oracle Entitlements Server deployments use cluster configurations. The only exception is Oracle Entitlements Server Administration Server, which is usually not clustered.
10.1.8 Considerations for Synchronizing with LDAP
Synchronization between LDAP and the Oracle Entitlements Server database is handled by a process called Reconciliation, which is a scheduled process that runs in the background primarily. You can also run this process manually.
If an LDAP outage occurs during the Synchronization process, the data which did not get into Oracle Entitlements Server is picked up during the next run of the reconciliation task.
10.2 Configuring Oracle Entitlements Server High Availability
This section provides high-level instructions for setting up a high availability deployment for Oracle Entitlements Server.
The Oracle Entitlements Server Administration Server high availability deployment is the same as a typical Oracle application.
To set up high availability for users accessing the Oracle Entitlements Server Administration Server user interface, use a WebLogic cluster.
To set up a high availability database for Administration Server user interface, you use multi source data source, Oracle RAC, and other typical elements.
This section includes the following topics:
-
Section 10.2.1, "Prerequisites for Oracle Entitlements Server Configuration"
-
Section 10.2.2, "Configure Weblogic Domain for OES Administration Server on OESHOST1"
-
Section 10.2.8, "Configuring Oracle Entitlements Server WebLogic Security Module High Availability"
-
Section 10.2.10, "Configuring Oracle Entitlements Server to Work with the Web Tier"
10.2.1 Prerequisites for Oracle Entitlements Server Configuration
Complete the following steps before you configure Oracle Entitlements Server high availability:
-
Use the Repository Creation Utility to create the Oracle Entitlements Server schemas in the Oracle RAC database. See Installation and Configuration Roadmap for Oracle Entitlements Server in the Oracle Fusion Middleware Installation Guide for Oracle Identity and Access Management for information on creating schemas.
-
Install Weblogic Server on OESHOST1 and OESHOST2. See Section 5.4.1.2, "Installing Oracle WebLogic Server" for more information.
-
Install the Oracle Entitlements Server Administration software on OESHOST1 and OESHOST2. See Installing Oracle Entitlements Server Administration Server in the Oracle Fusion Middleware Installation Guide for Oracle Identity and Access Management for more information.
-
Install the Oracle Entitlements Server Client. See Installing Oracle Entitlements Client in the Oracle Fusion Middleware Installation Guide for Oracle Identity and Access Management for more information.
10.2.2 Configure Weblogic Domain for OES Administration Server on OESHOST1
To configure a WebLogic domain for the OES Administration Server on OESHOST1, perform these steps:
-
Run the MW_HOME
/oracle_common/common/bin/config.shscript. -
On the Welcome screen, select Create a new WebLogic domain and click Next. The Select Extension Source screen appears.
-
On the Select Extension Source screen, select Oracle Entitlements Server for Managed Server - 11.1.1.0[Oracle_IDM1. The Configuration Wizard automatically selects Oracle JRF, Oracle Platform Security Service, and Basic WebLogic Server Domain.
Click Next.
-
In the Specify Domain Name and Location screen, enter the domain name for the domain you are creating and the domain location. Click Next. The Configure Administrator User Name and Password screen appears.
-
Configure a user name and a password for the administrator. The default user name is
weblogic. Click Next. -
Choose the Weblogic domain startup mode and JDK in the Configure Server Start Mode and JDK screen.
-
In the Configure JDBC Component Schema screen, configure JDBC properties for all of the schemas then click Next.
-
On the Test JDBC Component Schema screen, click Select All then Test Connections. Click Next.
If the data source validation succeeds, click Next.
If the data source validation fails, click Previous, correct the issue, then try again.
-
On the Select Optional Configuration screen, select Administration Server and Managed Servers, Clusters and Machines. Click Next.
-
In the Configure the Administration Server screen, enter the following values:
-
Name:
AdminServer -
Listen address:
All Local Addresses -
Listen port:
7001 -
SSL listen port:
7002 -
Select SSL enabled
Click Next.
-
-
On the Configure Managed Servers screen, when you first enter the screen, one managed server called
oes_server1is created automatically. You can rename oes_server1 and update its attributes for this entry.For example:
-
Name: oes_server1
-
Listen Address: OESHOST1.example.com
-
Listen Port: 14600
-
SSL Port: 14601
For the second OES_SERVER, click Add and enter the following values:
-
Name: oes_server2
-
Listen Address: OESHOST2.example.com
-
Listen Port: 14600
-
SSL Port: 14601
-
Select SSL enabled
Click Next.
-
-
In the Configure Clusters screen, click Add to create a cluster.
Enter the name
oes_cluster. Select unicast for Cluster messaging mode, then enter the Cluster address in the format listen address or DNS name of oes_server1:port,listen address or DNS name of oes_server2:portmanaged server1:port,managed server2: port.Click Next.
-
On the Assign Servers to Clusters screen, associate the managed servers with the cluster:
Click on the cluster name oes_cluster in the right window.
Click on the managed server oes_server1 then click the arrow to assign it to the cluster.
Repeat the preceding steps for the managed server oes_server2.
Click Next.
-
On the Configure Machines screen, create a machine for each host in the topology.
Click on the Unix tab.
For Admin Server Host:
-
Name: Name of your host. Use the DNS name here.
-
Node Manager Listen Address: Oracle recommends that the machine IP address be identical to the DNS name of the machine.
-
Node Manager Listen Port: Enter a port for Node Manager to use.
Leave all other values at the default settings.
Repeat the preceding steps for OESHOST1 and OESHOST2 and enter the following values. Leave all other values at the default settings.
-
Name: Name of the host. A good practice is to use the DNS name.
-
Node Manager Listen Address: Oracle recommends that the machine IP address be identical to the DNS name of the machine.
-
Node Manager Listen Port: Enter a port for Node Manager to use.
For Unix operating systems, delete the default local machine entry under the Machines tab.
Click Next.
-
-
On the Assign Servers to Machines screen, you assign the managed servers that will run on the machines you just created. Follow these steps:
Click on a machine in the right hand window.
Click on the managed servers you want to run on that machine in the left window.
Click on the arrow to assign the managed servers to the machine.
Repeat these steps until you assign all managed servers to the appropriate machine.
Assign servers to machines as follows:
-
ADMINHOST: Admin Server
-
OESHOST1: oes_server1
-
OESHOST2: oes_server2
Click Next.
-
-
On the Configuration Summary screen, click Create.
-
Verify that the first RAC database instance in the OPSS security store configuration is running.
-
Configure the OPSS Security Store. See Configuring Security Store for OES Administration Server in the Oracle Fusion Middleware Installation Guide for Oracle Identity and Access Management.
10.2.3 Post-Configuration and Verification
This section includes the following topics:
10.2.3.1 Starting Node Manager
Perform these steps to start Node Manager on the administration host, for example, OESHOST1.
-
Run the
startNodeManager.shscript located in the MW_HOME/wlserver_10.3/server/bin/directory. -
Run the
setNMProps.shscript to set the StartScriptEnabled property to true:cdMW_HOME/oracle_common/common/bin -
Stop the Node Manager by killing the Node Manager process.
-
Start Node Manager.
10.2.3.2 Validating the WebLogic Administration Server
Perform the following steps to verify that the Administration server is configured properly.
-
Start Weblogic Administration Server by using
./startWeblogic.shin the new domain. -
In a browser, enter the URL for the Oracle WebLogic Server Administration Console, for example:
http://<OESHOST1>:7001/console -
Log in as the WebLogic administrator, for example,
weblogic.
10.2.3.3 Creating a Separate Domain Directory for Managed Servers in the Same Node as the Administration Server
Use the pack and unpack commands to separate the domain directory used by the Administration Server from the domain directory used by the managed server in OESHOST1.
To create a separate domain directory on OESHOST1:
-
Run the pack command to create a template pack as follows:
cdMW_HOME/oracle_common/common/bin./pack.sh -managed=true -domain=ORACLE_BASE/admin/domain_name/aserver/domain_name -template=domaintemplate.jar -template_name=domain_template -
Run the unpack command to unpack the template in the managed server domain directory as follows:
cdMW_HOME/oracle_common/common/bin./unpack.sh -domain=ORACLE_BASE/admin/domain_name/mserver/domain_name -template=domaintemplate.jar
10.2.3.3.1 Propagate Changes to Remote Server
Perform an unpack on remote hosts before you start managed servers on remote hosts, for example, OESHOST2.
-
Copy the file
domaintemplate.jarcreated in Section 10.2.3.3, "Creating a Separate Domain Directory for Managed Servers in the Same Node as the Administration Server" to OESHOST2. -
Run unpack on the host on OESHOST2 using the following commands:
cdMW_HOME/oracle_common/common/bin.
/unpack.sh -domain=ORACLE_BASE/admin/domain_name/mserver/domain_name -template=domaintemplate.jar
10.2.3.4 Start Node Manager on Remote Hosts
To start Node Manager on remote hosts, follow these steps:
-
On OESHOST2, start the Node Manager to create the
nodemanager.propertiesfile by using thestartNodemanager.shscript located in the MW_HOME/wlserver_10.3/server/bindirectory. -
Run the
setNMProps.shscript to set theStartScriptEnabledproperty to true:cdMW_HOME/oracle_common/common/bin./setNMProps.sh -
Stop and start the Node Manager.
10.2.3.5 Stop and Start the WebLogic Administration Server and start oes_server1 and oes_server2
-
Restart the WebLogic Administration Server.
-
In a browser, enter the URL for the Oracle WebLogic Server Administration Console, for example:
http://<OESHOST1>:7001/console -
Log in as the WebLogic administrator, for example,
weblogic. -
Start oes_server1 and oes_server2 managed servers from the WebLogic Server Admin console.
Note:
You can also start the managed server by using thestartManagedWebLogic.shscript in the domain directory subfolder bin. For example:./startManagedWebLogic.sh oes_server1 http://localhost:7001 -
Validate the OES Admin Server instance on OESHOST1 by opening the APM console at the URL
http://<OESHOST1>:14600/apmLog in with the WebLogic username and password.
-
Validate the OES Admin Server Instance on OESHOST2 by opening up the APM Console in a web browser at
http://<OESHOST2>:14600/apm
10.2.4 Configure OES Security Module in Controlled-push Mode with Oracle Entitlements Server Administration Server High Availability
To configure the Oracle Entitlements Server Security Module in controlled-push mode with high availability, you set high availability parameters using the OES Security Module configuration user interface:
-
Change to the bin directory in the appropriate Security Module instance directory and run the following script on the command line.
cd $OES_CLIENT_HOME/oes_sm_instances/SM_Name/bin -
Run
oessmconfig.shto start the SMConfig UI.See Starting the SMConfig UI in the Oracle Fusion Middleware Administrator's Guide for Oracle Entitlements Server for more information.
-
Set the following parameters in the
jps-config.xmlfile:-
oracle.security.jps.runtime.pd.client.backupRegistrationServerURL -
oracle.security.jps.runtime.pd.client.registrationRetryIntervalThe following example shows the
backupRegistrationServerURLused as a backup when theRegistrationServerURLfails.<property name="oracle.security.jps.runtime.pd.client.backupRegistrationServerURL" value="https://slc00bqz:14601/pd-server"/>
See Configuring the Java Security Module in Oracle Fusion Middleware Administrator's Guide for Oracle Entitlements Server for more information.
-
10.2.5 Configure Oracle Entitlements Server Security Module in Proxy Mode with PDP High Availability
To configure the Security Module in proxy mode with PDP high availability:
-
See Using the Security Module Proxy Mode in the Oracle Fusion Middleware Administrator's Guide for Oracle Entitlements Server to configure the Security Module in proxy mode.
-
Change the PDP address by adding a comma-separated value as
oracle.security.jps.pdp.proxy.PDPAddressFor example:
oracle.security.jps.pdp.proxy.PDPAddress=http://ws1:9410,http://ws2:9410See PDP Proxy Client Configuration in the Oracle Fusion Middleware Administrator's Guide for Oracle Entitlements Server for more information.
10.2.6 Configure Oracle Entitlements Server Policy Information Point with High Availability
To configure the Policy Information Point high availability:
-
Change to the bin directory in the appropriate Security Module instance directory and run the following script on the command line:
cd $OES_CLIENT_HOME/oes_sm_instances/SM_Name/bin -
Run
oessmconfig.shto start the SMConfig UI.See Starting the SMConfig UI in the Oracle Fusion Middleware Administrator's Guide for Oracle Entitlements Server for more information.
-
Set attribute retriever parameters for Policy Information Point high availability. See Configuring Attribute Retrievers in the Oracle Fusion Middleware Administrator's Guide for Oracle Entitlements Server for more information.
Note:
You can set multiple values for theldap.url or jdbc.url attribute retriever parameter. Separate values with a comma; the first value is treated as the primary value. See Configuring the LDAP Repository Attribute Retriever Parameters in the Oracle Fusion Middleware Administrator's Guide for Oracle Entitlements Server.10.2.7 Configuring Oracle Entitlements Server Web Service Security Module on WebLogic High Availability
You can configure Oracle Entitlements Server Web Service Security Module on WebLogic for high availability by means of a WebLogic cluster.
To configure Oracle Entitlements Server Web Service Security Module on WebLogic:
-
Run
OESCLIENT_HOME/oessm/bin/config.shto create a Web Service Security Module and a WebLogic Server domain.For example:
./config.sh -smType ws -onWLS -smConfigId <ws_name> -serverLocation <wls_home> -pdServer <oes_admin_server> -pdPort <oes_admin_ssl_port>
-
On the Welcome screen, select Create a WebLogic Domain then click Next.
-
On the Select Domain Source screen, select Generate a domain configured automatically to support the following added products. From the list, select Oracle Entitlements Server Web Service Security Module on Weblogic For Managed Server.
Click Next.
-
On the Specify Domain Name and Location screen, enter the name and location for the domain and all its applications:
-
Domain Name: <domain name>
-
Domain Location: Accept the default entry.
-
-
On the Configure Administration Server Username and Password screen, enter the following:
-
Name:
weblogic -
User Password: Password for the WebLogic user
-
Confirm User Password: Password for the WebLogic user
-
Description: Description for the WebLogic user.
-
-
On the Configure Server Start Mode and JDK screen, select Production Mode and JDK.
-
On the Select Optional Configuration screen, select AdminServer and Managed Servers. Click Next.
-
On the Configure Administration Server screen, enter the following:
-
Name:
AdminServer -
Listen address: All Local Addresses
-
Listen port:
7001 -
SSL Listen port:
7002
Select SSL Enabled then click Next.
-
-
On the Configure Managed Servers screen, the default managed server
wsonwls_server1is created. Change the details ofwsonwls_server1and then add the second managed server:For
wsonwls_server1, enter these values:-
Name:
wsonwls_server1 -
Listen address:
WSSMHOST1 -
Listen port:
14610 -
SSL listen port:
14611
For the second managed server, click Add and enter these values:
-
Name:
wsonwls_server2 -
Listen address:
WSSMHOST2 -
Listen port:
14610 -
SSL listen port:
14611
-
-
In the Configure Clusters screen, click Add and enter
wssm_cluster. Select unicast for Cluster messaging mode then enter the Cluster address as managed_ server1:port,managed_server2: portClick Next.
-
On the Assign Servers to Clusters screen, associate the managed servers with the cluster:
-
Click on the cluster
wssm_clusterin the right window. -
Click on the managed server
wsonwls_server1then click the arrow to assign it to the cluster.Repeat the preceding steps for the managed server
wsonwls_server2.Click Next.
-
-
On the Configure Machines screen, create a machine for each host in the topology.
Click on the Unix tab for a Unix operating system.
For Admin Server Host:
-
Name: Name of your host. A good practice is to use the DNS name here.
-
Node Manager Listen Address: Oracle recommends that the machine IP address be identical to the DNS name of the machine.
-
Node Manager Listen Port: Enter a port for Node Manager to use.
Leave all other values at the default settings.
Repeat the preceding steps for WSSMHOST1 and WSSMOESHOST2 and enter the following values. Leave all other values at the default settings.
-
Name: Name of the host. A good practice is to use the DNS name.
-
Node Manager Listen Address: Oracle recommends that the machine IP address be identical to the DNS name of the machine.
-
Node Manager Listen Port: Enter a port for Node Manager to use.
For Unix operating systems, delete the default local machine entry under the Machines tab.
Click Next.
-
-
On the Assign Servers to Machines screen, assign the managed servers that will run on the machines you just created:
Click on a machine in the right hand window.
Click on the managed servers you want to run on that machine in the left window.
Click on the arrow to assign the managed servers to the machine.
Repeat these steps until you assign all managed servers to the appropriate machine.
Assign servers to machines as follows:
-
ADMINHOST: Admin Server
-
WSSMHOST1: wsonwls_server1
-
WSSMHOST2: wsonwls_server2
Click Next.
-
-
On the Configuration Summary screen, click Create.
-
Start Weblogic Administration Server by using
./startWeblogic.shin the new domain. -
Start Managed Server. Switch to created domain directory subfolder
binand type ./startManagedWebLogic.shmanaged server name http://wlsadminserver host:wls_adminserver_portFor example:
./startManagedWeblogic.sh wsonwls_server1 http://localhost:7001
Use the pack and unpack commands to separate the domain directory that the OES WebService SM uses from the domain directory that the managed server in OESHOST1 uses.
See the procedure to separate the domain directory in Section 10.1.1.5, "Oracle Entitlements Server WebLogic Server Security Module High Availability."
10.2.8 Configuring Oracle Entitlements Server WebLogic Security Module High Availability
You can configure Oracle Entitlements Server WebLogic Security Module for high availability by means of a WebLogic cluster.
To configure Oracle Entitlements Server WebLogic Security Module:
-
Run
OESCLIENT_HOME/oessm/bin/config.shto create a WebLogic Security Module and a WebLogic Server domain.For example:
./config.sh -smType wls -smConfigId <wls_name> -serverLocation <wls_home> -pdServer <oes_admin_server> -pdPort <oes_admin_ssl_port>
-
On the Welcome screen, select Create a WebLogic Domain then click Next.
-
On the Select Domain Source screen, select Generate a domain configured automatically to support the following added products. From the list, select Oracle Entitlements Server WebLogic Security Module on Weblogic For Managed Server.
Click Next.
-
On the Specify Domain Name and Location screen, enter the name and location for the domain and all its applications:
-
Domain Name: <domain name>
-
Domain Location: Accept the default entry.
-
-
On the Configure Administration Server Username and Password screen, enter the following:
-
Name:
weblogic -
User Password: Password for the WebLogic user
-
Confirm User Password: Password for the WebLogic user
-
Description: Description for the WebLogic user.
-
-
On the Configure Server Start Mode and JDK screen, select Production Mode and JDK.
-
On the Select Optional Configuration screen, select AdminServer and Managed Servers. Click Next.
-
On the Configure Administration Server screen, enter the following:
-
Name:
AdminServer -
Listen address: All Local Addresses
-
Listen port:
7001 -
SSL listen port:
7002
Select SSL Enabled then click Next.
-
-
On the Configure Managed Servers screen, the default managed server
wlssm_server1is created. Change the default managed server details and then add the second managed server:For the default managed server, enter these values:
-
Name:
wlssm_server1 -
Listen address:
WLSSMHOST1 -
Listen port:
14610 -
SSL listen port:
14611
For the second managed server, click Add and enter these values:
-
Name:
wlssm_server2 -
Listen address:
WLSSMHOST2 -
Listen port:
14610 -
SSL listen port:
14611
-
-
In the Configure Clusters screen, click Add and enter
wlssm_cluster. Select unicast for Cluster messaging mode then enter the Cluster address as managed_ server1:port,managed_server2: portClick Next.
-
On the Assign Servers to Clusters screen, associate the managed servers with the cluster:
-
Click on the cluster
wlssm_clusterin the right window. -
Click on the managed server
wlssm_server1then click the arrow to assign it to the cluster.Repeat the preceding steps for the managed server
wlssm_server2.Click Next.
-
-
On the Configure Machines screen, create a machine for each host in the topology.
Click on the Unix tab for a host that uses a Unix operating system.
For Admin Server Host:
-
Name: Name of your host. A good practice is to use the DNS name here.
-
Node Manager Listen Address: Oracle recommends that the machine IP address be identical to the DNS name of the machine.
-
Node Manager Listen Port: Enter a port for Node Manager to use.
Leave all other values at the default settings.
Repeat the preceding steps for WLSSHOST1 and WLSSMOESHOST2 and enter the following values. Leave all other values at the default settings.
-
Name: Name of the host. A good practice is to use the DNS name.
-
Node Manager Listen Address: Oracle recommends that the machine IP address be identical to the DNS name of the machine.
-
Node Manager Listen Port: Enter a port for Node Manager to use.
For Unix operating systems, delete the default local machine entry under the Machines tab.
Click Next.
-
-
On the Assign Servers to Machines screen, you assign the managed servers that will run on the machines you just created. Follow these steps:
Click on a machine in the right hand window.
Click on the managed servers you want to run on that machine in the left window.
Click on the arrow to assign the managed servers to the machine.
Repeat these steps until you assign all managed servers to the appropriate machine.
Assign servers to machines as follows:
-
ADMINHOST: Admin Server
-
WLSSMHOST1: wlssm_server1
-
W:SSMHOST2: wlssm_server2
Click Next.
-
-
On the Configuration Summary screen, click Create.
-
Start Weblogic Administration Server by using
./startWeblogic.shin the new domain. -
Start Managed Server. Switch to created domain directory subfolder
binand type ./startManagedWebLogic.shmanaged server name http://wlsadminserver host:wls_adminserver_portFor example:
./startManagedWeblogic.sh wlssm_server1 http://localhost:7001
Use the pack and unpack commands to separate the domain directory that WebLogic Server Security Module uses from the one that the managed server in OESHOST1 uses.
To create a separate domain directory on OESHOST1:
-
Run the pack command to create a template pack as follows:
cdMW_HOME/oracle_common/common/bin./pack.sh -managed=true -domain=domain_path-template==domaintemplate.jar -template_name=domain_template -
Run the unpack command to unpack the template in the managed server domain directory as follows:
cdMW_HOME/oracle_common/common/bin./unpack.sh -domain=new_domain_path-template=domaintemplate.jarRun the unpack operation on the remote hosts before you start the managed server, for example, OESHOST2.
-
Copy the file
domaintemplate.jarfrom step 1. to OESHOST2. -
Run unpack on the host on OESHOST2 using these commands:
cdMW_HOME/oracle_common/common/bin./unpack.sh -domain=domain_path-template==domaintemplate.jar -
Start the managed server then switch to the domain directory subfolder
binthat you created. Enter./startManagedWebLogic.shmanaged_server_name http://wlsadminserver host:wls_adminserver_portFor example:
./startManagedWeblogic.sh wlssm_server2 http://localhost:7001
10.2.9 Using RAC Datasource for Security Module in Controlled-pull Mode and Non-controlled Mode
Connection to policy store is used for Oracle Entitlements Server Security Modules in controlled-pull mode and non-controlled mode. Due to an SMConfig UI limitation, you must configure JDBC properties at the time that you create Security Module instances.
To use a RAC datasource in WebLogic Server Security Modules or Web Service Security Modules on WebLogic Server, run the following steps after you create a Security Module instance:
-
Log in to Weblogic Administrator Console of the domain that Security Module is deployed in. Configure the RAC datasource with database information identical to that of the Oracle Entitlements Server Administration Server.
-
Edit the Security Module configuration with the SMConfig UI:
-
Run
OES_CLIENT_HOME/oes_sm_instances/SM_Name/bin -
Run
oessmconfig.sh. -
Select Database Configuration through JNDI Name and enter the RAC datasource JNDI name into the Data source JNDI Name field. Click Save & Close.
-
10.2.10 Configuring Oracle Entitlements Server to Work with the Web Tier
This section describes how to configure Oracle Entitlements Server to work with the Oracle Web Tier and includes the following topics:
-
Section 10.2.10.2, "Configuring Oracle HTTP Servers to Front End the OES Managed Servers"
-
Section 10.2.10.3, "Validate the Oracle HTTP Server Configuration"
10.2.10.1 Prerequisites
Verify that the following tasks have been performed:
-
Oracle Web Tier has been installed on WEBHOST1 and WEBHOST2.
For instructions on installing Oracle HTTP Server on WEBHOST1 and WEBHOST2, see Section 8.5.3.5.1, "Installing Oracle HTTP Server for the Web Tier."
-
Oracle Entitlements Server has been installed and configured on OESHOST1 and OESHOST2.
-
The load balancer has been configured with a virtual hostname (
sso.example.com) pointing to the web servers on WEBHOST1 and WEBHOST2. -
The load balancer has been configured with a virtual hostname (
oesinternal.example.com) pointing to web servers WEBHOST1 and WEBHOST2.
10.2.10.2 Configuring Oracle HTTP Servers to Front End the OES Managed Servers
-
On each of the web servers on WEBHOST1 and WEBHOST2, create a file
oes.confin the directoryORACLE_INSTANCE/config/OHS/component/moduleconf.This file must contain the following information:NameVirtualHost *:7777 <VirtualHost *:7777> ServerName http://sso.example.com:7777 RewriteEngine On RewriteOptions inherit UseCanonicalName On # OES admin console <Location /apm> SetHandler weblogic-handler WebLogicCluster oeshost1.example.com:14600, oeshost2.example.com:14600 </Location>
-
Save the file on both WEBHOST1 and WEBHOST2.
-
Stop and start the Oracle HTTP Server instances on both WEBHOST1 and WEBHOST2.
10.2.10.3 Validate the Oracle HTTP Server Configuration
To validate that Oracle HTTP Server is configured properly:
-
In a web browser, enter the following URL for the Oracle Identity Manager Console:
http://sso.example.com:7777/apm -
In the APM login page, use weblogic user credentials to log in.
