4 Configuring SSL for Integrated IdM Components
After integrating identity management components like Oracle Access Management Access Manager, Oracle Identity Manager, and Oracle Adaptive Access Manager, you can configure SSL to secure the communication between these components.
This chapter contains these topics:
4.1 About SSL for Integrated IdM
You must be aware of certain background information before using the procedures to enable SSL in an IdM environment.
This section contains these topics:
4.1.1 Assumptions about Integrated IdM Environment
This discussion makes certain assumptions which you should take into account before using the procedures here.
The assumptions are as follows:
-
You have used the procedures in the following guides to install and scale out your Oracle Identity Manager (OIM), Oracle Oracle Access Manager (OAM), and Oracle Adaptive Access Manager (OAAM) components:
-
Installation Guide for Oracle Identity and Access Management
-
High Availability Guide
-
-
You are performing these SSL procedures in the context of an integrated IdM environment. This means that you have already used the roadmap in Table 1-2 to integrate OAM, OIM, and OAAM.
-
You are using Oracle Unified Directory (OUD) as your identity store. Configuring OUD for the integrated IdM environment is described in applicable chapters of this guide.
4.1.2 Roadmap for End-to-End IdM SSL
Table 4-1 shows the stages in which you implement SSL wiring for integrated IdM components:
Table 4-1 Roadmap for End-to-end IdM SSL
| Procedure | Notes |
|---|---|
|
Configure Clustering for Managed Servers |
Out of scope of this document. For details about clustering IdM components, see High Availability Guide. |
|
Configure SSL in the Domain Hosting OAM |
|
|
Configure SSL in the Domain Hosting OIM |
|
|
Configure SSL in the Domain Hosting OAAM |
|
|
Configure SSL for OUD |
|
|
Configure SSL for Oracle HTTP Server |
|
|
Complete SSL Configuration for Integrated IdM |
4.2 Configuring SSL on Servers in the OAM Domain
To configure SSL on all the servers residing in the OAM domain:
-
Log in to the WebLogic console, expand Environment, and click Servers.
-
Select the OAM server to configure.
-
In the Settings for server page, under the server properties, check the SSL Listen Port Enabled box.
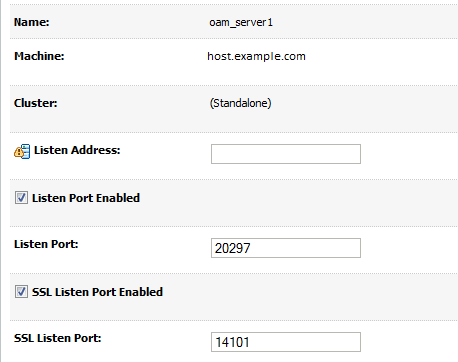
-
Click Save.
-
Log in to the OAM console.
-
Click the Access Manager Settings tab.
-
Update OAM Server Port to point to the server SSL port which you specified in Step 3. Select the https protocol for OAM Server Protocol.
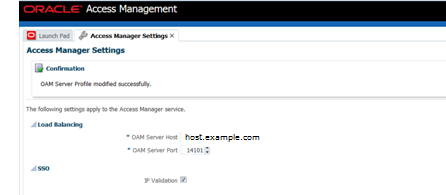
-
Click Apply.
-
Update the secure port in the
oam-config.xmlconfiguration file as follows:-
Navigate to the folder
OAM_HOME/iam/common/binand launch thewlstscript. -
Connect as administrator.
-
Execute the command:
updateOIMHostPort(hostName = "oimhost" , port = "4443", secureProtocol = "true")
-
For additional information about configuring SSL in the Oracle Access Manager environment, see Administrator's Guide for Oracle Access Management.
4.3 Configuring SSL for Oracle Identity Manager
This section describes the procedure for generating keys, signing and exporting certificates, setting up SSL Configuration for Oracle Identity Manager and for the components with which Oracle Identity Manager interacts, and establishing secure communication between them.
This section includes the following topics:
Note:
-
Use these procedures to generate certificates for OIM as well as its SOA server. The same custom identity and trust stores are usable for both.
-
Section 4.3.1 through Section 4.3.4 provide example commands that will be used later in the procedure. These are for reference and the sample values are not mandatory; use your own data during configuration.
-
See "Enabling SSL Communication" in the Oracle Fusion Middleware Developing and Customizing Applications for Oracle Identity Manager for information about enabling Secure Sockets Layer (SSL) communication for various Segregation of Duties (SoD) purposes.
-
See Administering Oracle Identity Manager for additional SSL configuration in the OIM environment.
4.3.1 Generating Keys
You can generate private and public certificate pairs by using the keytool command.
The syntax is:
$JAVA_HOME/jre/bin/keytool -genkey -alias alias -keyalg algorithm -keysize key-size -dname DN -keypass key-password -keystore keystore-name -storepass keystore-password
The following example creates an identity keystore named support.jks:
$JAVA_HOME/jre/bin/keytool -genkey
-alias support
-keyalg RSA
-keysize 1024
-dname "CN=localhost, OU=Identity, O=MyCorp Corporation,C=US"
-keypass weblogic1
-keystore support.jks
-storepass weblogic1
When generating the certificate for OIM, in CN attribute specify the machine name where OIM is deployed. Likewise when generating the certificate for SOA, in CN attribute specify the machine name where SOA is deployed. For example:
-dname "CN=myhost.us.example.com, OU=Identity, O=Example Corporation,C=US"
Note:
-
Change the parameter values passed to the keytool command according to your requirements. Ensure that there is no line break in the keytool arguments.
-
If JDK 7u40 or later is used, then the value of the keysize option must be greater than or equal to 1024. For more information about this limitation, see "Default x.509 Certificates Have Longer Key Length" at the following URL:
http://www.oracle.com/technetwork/java/javase/7u40-relnotes-2004172.html
4.3.2 Signing the Certificates
Use the keytool command to sign the certificates that you created. In this example, both the certificate and keystore have the same password (weblogic1):
$JAVA_HOME/jre/bin/keytool -selfcert -alias support
  -sigalg MD5withRSA -validity 2000 -keypass weblogic1
  -keystore support.jks
  -storepass weblogic1
Note:
Change the parameter values passed to thekeytool command according to your requirements. Ensure that there is no line break in the keytool arguments.4.3.3 Exporting the Certificate
Use the keytool command to export the certificate from the identity keystore to a file.
The syntax is:
$JAVA_HOME/jre/bin/keytool -export -alias alias -file file-to-export -keypass key-password -keystore keystore-name -storepass keystore-password
For example, the following command exports the certificate to a file named supportcert.pem:
$JAVA_HOME/jre/bin/keytool -export -alias support
  -file supportcert.pem
  -keypass weblogic1
  -keystore support.jks
  -storepass weblogic1
Note:
Change the parameter values passed to the keytool command according to your requirements. Ensure that there is no line break in the keytool argument.4.3.4 Importing the Certificate
Use the keytool command to import the certificate from a file.
keytool -import -alias alias -trustcacerts -file file-to-import -keystore keystore-name -storepass keystore-password
In this example, the certificate file supportcert.pem is imported to the identity keystore client_store.jks with password weblogic1:
keytool -import -alias serverwl -trustcacerts -file supportcert.pem -keystore client_store.jks -storepass weblogic1
Note:
Change the parameter values passed to thekeytool command according to your requirements. Ensure that there is no line break in the keytool arguments.4.3.5 Enabling SSL for Oracle Identity Manager and SOA Servers
The following tasks need to be performed to configure Oracle Identity Manager and SOA servers to operate in SSL mode:
For additional information about configuring SSL in the Oracle Identity Manager environment, see Administering Oracle Identity Manager.
4.3.5.1 Enabling SSL for Oracle Identity Manager
You can enable SSL for Oracle Identity Manager by using default keystore settings, or by specifying your own keystore.
Note:
See "Generating Keys" in Administering Oracle Identity Manager for information about generating custom keys.To enable SSL for Oracle Identity Manager with a specific keystore:
-
In the WebLogic Server Administration Console, click Environment, Servers, and select the OIM server. On the Settings for Server page click the Configuration tab, and then General.
-
Click Lock & Edit.
-
Check the SSL Listen Port Enabled box. The default port is 14001.
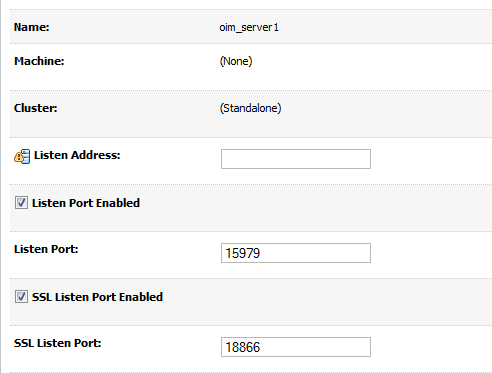
Click Save.
-
Select the Keystores tab.
-
From the Keystores drop-down, select Custom Identity and Custom Trust.
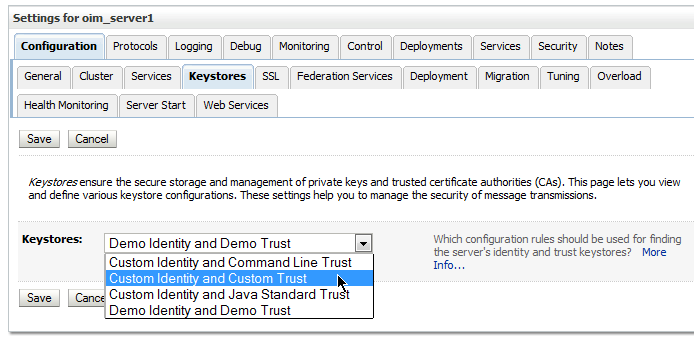
Click Save.
-
Back on the Keystores tab, in the Custom Identity Keystore field, enter the absolute path of custom identity keystore filename. For example:
DOMAIN_HOME/config/fmwconfig/support.jks
Note:
-
The keystore created at
DOMAIN_HOME/config/fmwconfig/ by Oracle Identity Manager during installation isdefault-keystore.jks. -
If you are using a different name for truststore than the default name
default-keystore.jks, take the following steps:-
Add Oracle Identity Manager credential store map key. If you are using any other name, such as
support.jks, then create a key in the credential store by using Oracle Enterprise Manager. -
Change
DirectDBconfig in theoim-Config.xmlfile either by exporting/importing this file from MDS or by using Enterprise Manager. If the latter, navigate toXMLConfigin Application Defined MBeans section of System Mbean Browser, and then change the SSL parameters, for example:SSLConfig dBTrustStore="support.jks"
-
-
-
Specify JKS as the custom identity keystore type.
-
Type the password into the Custom Identity Keystore Passphrase and the Confirm Custom Identity Keystore Passphrase fields. This is the same password that you specified for the -
storepassproperty when generating keys in Section 4.3.1 (for example,weblogic1). -
In the Custom Trust Keystore field, enter the absolute path of custom trust keystore filename. For example:
DOMAIN_HOME/config/fmwconfig/client_store.jks
-
Specify
JKSas the custom trust keystore type. -
Type the password into the Custom trust Keystore Passphrase and the Confirm Custom Trust Keystore Passphrase fields. In both fields, enter the same password that you specified for the -
storepassproperty when importing the certificate in Section 4.3.4 (for example,weblogic1). -
Click Save.
-
Click the SSL tab.
-
Enter the private key alias. This is the same alias that you specified for the -alias property when generating keys in Section 4.3.1.
-
Type the password into the Private Key Passphrase and the Confirm Private Key Passphrase fields. This is the same password that you specified for the -
keypassproperty when generating keys in Section 4.3.1 (for example,weblogic1). -
Click Advanced.
-
Set Hostname Verification to "None".
-
Click Save.
-
Click Activate changes.
-
Restart all servers for these changes to take effect.
-
Repeat steps 1 through 20 for the SOA server (soa_server1). OIM server's custom identity and custom trust stores (support.jks and client_store.jks respectively) can play the same role for SOA server as well, so you do not need to regenerate custom identity and custom trust stores for soa_server1. Instead, reuse OIM's custom identity store and custom trust store for SOA.
Note:
-
On JDK 7u40 or later, the value of the keysize option must be greater than or equal to 1024. For more information about this limitation, see "Default x.509 Certificates Have Longer Key Length" at the following URL:
http://www.oracle.com/technetwork/java/javase/7u40-relnotes-2004172.html
After enabling SSL on Oracle Identity Manager and SOA Servers, perform the following changes for establishing secured communication between them:
4.3.5.2 Changing Front End URLs using MBeans
Modify the front end URLs as follows:
-
When the WebLogic admin and Oracle Identity Manager managed servers (at least one server if clustered) are running, log in to Enterprise Manager (EM).
For example:
http://AdminServer/em -
Expand Identity and Access, and under OIM locate the Oracle Identity Manager instance.
-
Right click the instance and select System MBean Browser.
-
Under Application Defined MBeans, navigate to
oracle.iam,Server:oim_servername,Application:oim,XMLConfig,Config,XMLConfig.DiscoveryConfig, and thenDiscovery.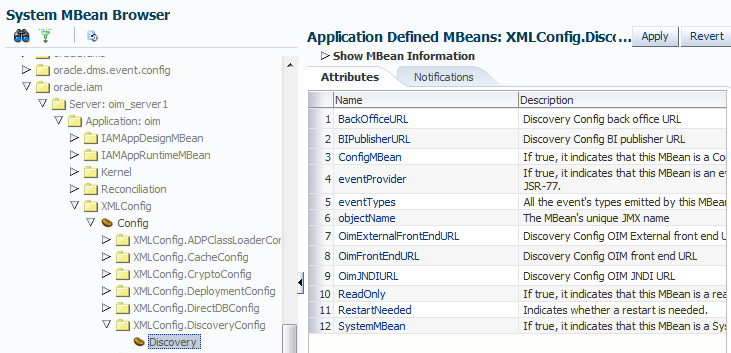
-
Enter a new value for the "
OimFrontEndURL" attribute, providing a non-SSL value, in the format:http://OIM-Host:OIM-Non-SSL-PortFor example:
http://myoimserver.mydomain.com:14000
Note:
In a clustered deployment, the change to theOimFrontEndURLmust be made on each server in the cluster. -
Enter a new value for the "
OimExternalFrontEndURL" attribute, providing the protocol ashttpsand the OHShttpsport, in the format:https://OHS-host-front-ending-OIM:OHS-SSL-PortFor example:
https://myoimserver.mydomain.com:4443
Note:
In a clustered deployment, the change to theOimExternalFrontEndURLmust be made on each server in the cluster. -
Click Save to apply the changes.
4.3.5.3 Changing SOA Server URL to Use SSL Port
To change SOA server URL to use SSL port:
-
When the admin server and Oracle Identity Manager managed servers are running, log in to Enterprise Manager (EM).
For example:
http://ADMINISTRATIVE_SERVER/em
-
Navigate to Identity and Access, Oracle Identity Manager.
-
Right click and select System MBean Browser.
-
Under Application Defined MBeans, navigate to
oracle.iam,Application:oim,XMLConfig,Config,XMLConfig.SOAConfig,SOAConfig.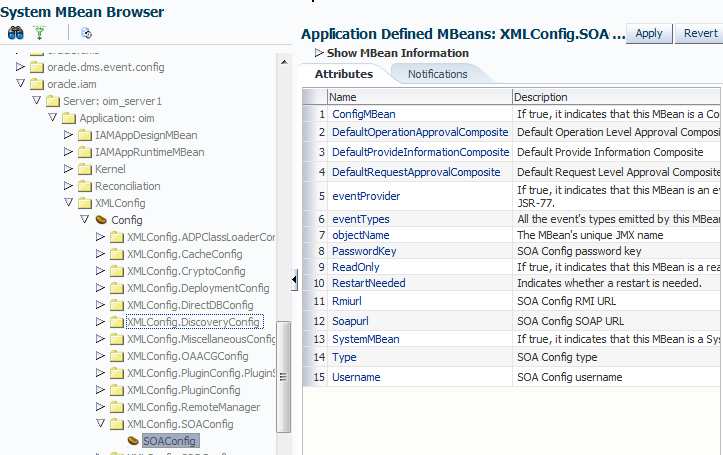
-
Change the values of the
Rmiurlattribute, providing thet3sprotocol.This is the application server URL. For a clustered installation, it is a comma-separated list of all the SOA managed server URLs in the format:
t3s://SOA-Host:SOA-SSL-Port
For example:
t3s://mysoaserver1.mydomain.com:8002
t3s://mysoa1.mydomain.com:8001,mysoa2.mydomain.com:8002,mysoa3.com:8003
Note:
Rmiurlis used for accessing SOA EJBs deployed on SOA managed servers. -
Change the value of the
Soapurlattribute, providing the URL in the format:t3s://SOA-Host:SOA-SSL-Port
For example:
https://mysoa.mydomain.com: 8001
Note:
Soapurlis used to access SOA web services deployed on SOA managed servers. This is the web server/load balancer URL, in case of a SOA cluster front ended with web server/load balancer. In case of single SOA server, it can be the application server URL. -
Click Apply to save the changes.
4.3.5.4 Configuring SSL for Oracle Identity Manager Utilities
Oracle Identity Manager client utilities include setDomainEnv.sh and startWeblogic.sh. Under JDK7, SSL configuration requires adding certain Java options to these utilities.
The steps are:
-
Open
DOMAIN_HOME/bin/setDomainEnv.shof the OIM domain for editing. -
After the line export
JAVA_DEBUG, add the followingJAVA_OPTIONS:JAVA_OPTIONS="${JAVA_OPTIONS} -Dweblogic.security.SSL.protocolVersion=SSL3 " JAVA_OPTIONS="${JAVA_OPTIONS} -Djavax.net.ssl.trustStore= Location of OIM trust store -Dweblogic.security.SSL.ignoreHostnameVerification=true -Dweblogic.security.SSL.enforceConstraints=off "For example, specify the trust store as:
JAVA_OPTIONS="${JAVA_OPTIONS} -Djavax.net.ssl.trustStore=/scratch/mydir/client_store1.jks -Dweblogic.security.SSL.ignoreHostnameVerification=true -Dweblogic.security.SSL.enforceConstraints=off " -
Locate the section:
if [ "${debugFlag}" = "true" ] ; then
JAVA_DEBUG="-Xdebug -Xnoagent -Xrunjdwp:transport=dt_socket,address=${DEBUG_PORT},server=y,suspend=n -Djava.compiler=NONE"
export JAVA_DEBUG
Below it, add these
JAVA_OPTIONS:JAVA_OPTIONS="${JAVA_OPTIONS} -Dweblogic.security.SSL.protocolVersion=SSL3 -Dssl.debug=true -Dweblogic.security.TrustKeyStore=DemoTrust" JAVA_OPTIONS="${JAVA_OPTIONS} -Djavax.net.ssl.trustStore= Location of OIM trust store -Dweblogic.security.SSL.ignoreHostnameVerification=true -Dweblogic.security.SSL.enforceConstraints=off "For example, specify the trust store as:
JAVA_OPTIONS="${JAVA_OPTIONS} -Djavax.net.ssl.trustStore= /scratch/mydir/client_store1.jks -Dweblogic.security.SSL.ignoreHostnameVerification=true -Dweblogic.security.SSL.enforceConstraints=off " -
Locate the
EXTRA_JAVA_PROPERTIES:EXTRA_JAVA_PROPERTIES="${EXTRA_JAVA_PROPERTIES} -Dsoa.archives.dir=${SOA_ORACLE_HOME}/soa -Dsoa.oracle.home=${SOA_ORACLE_HOME} -Dsoa.instance.home=${DOMAIN_HOME} -Dtangosol.coherence.clusteraddress=227.7.7.12 -Dtangosol.coherence.clusterport=9778 -Dtangosol.coherence.log=jdk -Djavax.xml.soap.MessageFactory=oracle.j2ee.ws.saaj.soap.MessageFactoryImpl -Dweblogic.transaction.blocking.commit=true -Dweblogic.transaction.blocking.rollback=true -Djavax.net.ssl.trustStore=${WL_HOME}/server/lib/DemoTrust.jks"Remove the reference to
DemoTrust.jksso modifiedEXTRA_JAVA_PROPERTIESwill look like this:EXTRA_JAVA_PROPERTIES="${EXTRA_JAVA_PROPERTIES} -Dsoa.archives.dir=${SOA_ORACLE_HOME}/soa -Dsoa.oracle.home=${SOA_ORACLE_HOME} -Dsoa.instance.home=${DOMAIN_HOME} -Dtangosol.coherence.clusteraddress=227.7.7.12 -Dtangosol.coherence.clusterport=9778 -Dtangosol.coherence.log=jdk -Djavax.xml.soap.MessageFactory=oracle.j2ee.ws.saaj.soap.MessageFactoryImpl -Dweblogic.transaction.blocking.commit=true -Dweblogic.transaction.blocking.rollback=true" -
Save and close
setDomainEnv.sh. -
Open the file
DOMAIN_HOME/bin/startWebLogic.shfor editing. ChangeJAVA_OPTIONSfrom:JAVA_OPTIONS="${JAVA_OPTIONS} -Dlaunch.main.class=${SERVER_CLASS} -Dlaunch.class.path="${CLASSPATH}" -Dlaunch.complete=weblogic.store.internal.LockManagerImpl -cp ${WL_HOME}/server/lib/pcl2.jarto:
JAVA_OPTIONS="${JAVA_OPTIONS} -Dlaunch.main.class=${SERVER_CLASS} -Dlaunch.class.path="${CLASSPATH}" -Dlaunch.complete=weblogic.store.internal.LockManagerImpl -cp ${WL_HOME}/server/lib/pcl2.jar -Djavax.net.ssl.trustStore=location of trust store -Dweblogic.security.SSL.ignoreHostnameVerification=true -Dweblogic.security.SSL.enforceConstraints=off"For example:
JAVA_OPTIONS="${JAVA_OPTIONS} -Dlaunch.main.class=${SERVER_CLASS} -Dlaunch.class.path="${CLASSPATH}" -Dlaunch.complete=weblogic.store.internal.LockManagerImpl -cp ${WL_HOME}/server/lib/pcl2.jar -Djavax.net.ssl.trustStore=/scratch/myhost/client_store.jks -Dweblogic.security.SSL.ignoreHostnameVerification=true -Dweblogic.security.SSL.enforceConstraints=off" -
Save and close
startWebLogic.sh.
Caution:
These utility files are overwritten every time the domain is updated (for example after WebLogic upgrade, after runningconfig oim, offline upgrade, and so on), so you must repeat this procedure after every update.For additional details about configuring SSL in the Oracle Identity Manager environment, see Administering Oracle Identity Manager.
4.4 Configuring SSL on Servers in the OAAM Domain
OAAM shares a domain with Access Manager, so we can also refer to this domain as the OAM-OAAM domain. SSL must be configured in this domain for both the OAAM server and the admin server for OAAM.
The steps are as follows:
-
Log in to WebLogic Server console.
-
Click Servers, and select the OAAM admin server.
-
Check the option "SSL Listen Port Enabled" and provide the SSL Listen port.
-
Repeat these steps for the OAAM server.
4.5 Configuring SSL for Oracle Unified Directory
You can configure Oracle Unified Directory to accept SSL-based connections using a self-signed certificate.
When using this procedure, note that:
-
Using a self-signed certificate is not recommended for production purposes. To install a certificate for production purposes, see "Configuring Key Manager Providers" in Administering Oracle Unified Directory.
-
This procedure is required only if the SSL and StartTLS settings were not specified during installation, or if you want to change those settings.
This procedure assumes the following:
-
Oracle Unified Directory is installed on the system on which you are working.
-
The Java
keytoolutility is in your path. If not, either add it to your path or provide the complete path to it when invoking the commands. Thekeytoolutility is provided with the Java Runtime Environment (JRE). -
The administration connector is listening on the default port (4444) and the
dsconfigcommand is accessing the server running on the local host. If this is not the case, the--portand--hostnameoptions must be specified in that command.
-
Generate a private key for the certificate, using the
keytoolcommand with the-genkeypairoption.For example:
$ keytool -genkeypair -alias server-cert -keyalg rsa \
  -dname "CN=myhost.example.com,O=Example Company,C=US" \
  -keystore config/keystore -storetype JKS
-
-aliasalias. Specifies the name used to refer to the certificate in the keystore. The default name used by the server isserver-cert. -
-keyalgalgorithm. Specifies the algorithm used to generate the private key. This is usuallyrsa. -
-dnamesubject. Specifies the subject to use for the certificate.Change the value of the
-dnameargument so that it is suitable for your environment:The value of the
CNattribute should be the fully-qualified name of the system on which the certificate is being installed.The value of the
Oattribute should be the name of your company or organization.The value of the
Cattribute should be the two-character abbreviation for your country. -
-keystorepath. Specifies the path to the keystore file. The file will be created if it does not already exist.The default keystore path used by the server is
config/keystore. This config folder exists where your OUD middleware is installed, and the path to the config folder is structured as:/Middleware/oud_instance_name/OUD/configFor example:
/scratch/mytest/OUDR2PS2/Oracle/Middleware/asinst_1/OUD/config
-
-keypasspassword. Specifies the password used to protect the private key in the keystore. If the password is not provided, you will be prompted for it. -
-storepasspassword. Specifies the password used to protect the contents of the keystore. If the password is not provided, you will be prompted for it. -
-storetypetype. Specifies the keystore type. For the JKS keystore, for example, the value should always beJKS.
You are prompted for a password to protect the contents of the keystore and for a password to protect the private key.
-
-
Generate a self-signed certificate for the key.
For example:
$ keytool -selfcert -alias server-cert -validity 1825 \
   -keystore config/keystore -storetype JKS
-
-aliasalias. Specifies the name used to refer to the certificate in the keystore. This name should be the same as the value used when creating the private key with the-genkeypairoption. -
-validitydays. Specifies the length of time in days that the certificate should be valid. The default validity is 90 days. -
-keystorepath. Specifies the path to the keystore file. The file will be created if it does not already exist. -
-keypasspassword. Specifies the password used to protect the private key in the keystore. If this is not provided, then you will be interactively prompted for it. -
-storepasspassword. Specifies the password used to protect the contents of the keystore. If this is not provided, then you will be interactively prompted for it. -
-storetypetype. Specifies the keystore type. For the JKS keystore, the value should always beJKS.
When you are prompted for the keystore password and private key password, enter the same passwords that you provided in the previous step.
-
-
Create a text file named
config/keystore.pin.The file must contain the password that you chose to protect the contents of the keystore. If you change this file, remember that it must match the keystore manager configuration. If you decide to create a file with a different name, for example, the corresponding keystore manager's
key-store-fileproperty for JKS must match the path and file name. -
Export the public key for the certificate that you created.
For example:
$ keytool -exportcert -alias server-cert -file config/server-cert.txt -rfc \
   -keystore config/keystore -storetype JKS
-
Create a new trust store and import the server certificate into that trust store.
For example:
$ keytool -importcert -alias server-cert -file config/server-cert.txt \
  -keystore config/truststore -storetype JKS
-
Use the
dsconfigutility to enable the key manager provider, trust manager provider, and connection handler.dsconfigis present in thebindirectory of OUD's installed path (a typical path looks like/asinst_1/OUD/bin). You must supply the OUD admin port and the OUD server hostname as well.For example:
./dsconfig -D "cn=directory manager" -j pwd.txt -X -n \set-key-manager-provider-prop --provider-name JKS --set enabled:true --port 1111 --hostname myhost.us.example.com

./dsconfig -D "cn=directory manager" -j pwd.txt -X -n \set-trust-manager-provider-prop --provider-name "Blind Trust" \--set enabled:true --port 1111 --hostname myhost.us.example.com

./dsconfig -D "cn=directory manager" -j pwd.txt -X -n \set-connection-handler-prop --handler-name "LDAPS Connection Handler" \--set "trust-manager-provider:Blind Trust" --set key-manager-provider:JKS \--set listen-port:1636 --set enabled:true --port 1111 --hostname myhost.us.example.com
For
–set listen-portprovide any port number which is not in use; Port1636is the standard LDAPS port, but you cannot use this port if it is already taken.-
If you have specified a different value for
-keypassand-storepasswhen generating the private key in step 1, you must provide the key password usingdsconfig:$ dsconfig -D "cn=directory manager" -j pwd-file -X -n \ create-key-manager-provider-key-pin --provider-name JKS --set key-pin-file:<file with key password> --type generic --pin-name server-cert
For the name of the key pin, provide the same name as the alias of the certificate. This identifies which key pin/password is associated with each certificate in the key manager provider.
-
In step 3, if you created a text file with a location and name other than
config/keystore.pin, for example a text file calledconfig/mykeystore.pin, specify that information as follows:$ dsconfig -D "cn=directory manager" -j pwd-file -X -n \ set-key-manager-provider-prop --provider-name JKS --set enabled:true \ --set keystore-pin-file:/config/mykeystore.pin
-
-
The server now has a second listener that accepts SSL-based client connections. Test the configuration with the
ldapsearchcommand, for example:$ ldapsearch --port 1636 --useSSL --baseDN "" --searchScope base "(objectClass=*)"
You are prompted to trust the server's certificate. On typing
yes, the root DSE entry should be returned.
For detailed information about keystores and truststores for OUD, see "Configuring Key Manager Providers" and "Configuring Trust Manager Providers", respectively in Administering Oracle Unified Directory.
4.6 Configuring SSL for Oracle HTTP Server
You configure SSL for Oracle HTTP Server (OHS) manually by updating the opmn.xml file.
Perform the following steps to enable SSL manually:
-
Open
opmn.xmlin a text editor. -
In the
<ias-component id="HTTP_Server">entry, change the start mode from "ssl-disabled" to "ssl-enabled". After modification, the entry should look as follows:<data id="start-mode" value="ssl-enabled"/>
-
Save and close
opmn.xml. -
Reload OPMN using the following command:
opmnctl reload
-
Stop Oracle HTTP Server using the following command:
Linux: ORACLE_HOME/opmn/bin> opmnctl [verbose] stopproc ias-component=HTTP_Server Windows: ORACLE_HOME\opmn\bin> opmnctl [verbose] stopproc ias-component=HTTP_Server -
Start Oracle HTTP Server using the following command:
Linux: ORACLE_HOME/opmn/bin> opmnctl [verbose] startproc ias-component=HTTP_Server Windows: ORACLE_HOME\opmn\bin> opmnctl [verbose] startproc ias-component=HTTP_Server -
You can verify if SSL was enabled successfully by navigating to the SSL port, for example:
HTTPS://hostname:4443
4.7 Securing IdM Components against the Poodle Vulnerability
It is recommended that you use the TLSv1 protocol due to the security vulnerability affecting SSL v3.0 (Padding Oracle On Downgraded Legacy Encryption, or ”Poodle”). In Release 11.1.2.3.0, which relies on WebLogic Server 10.3.6 or higher, configuring the entire domain to use JSSE SSL is recommended.
The following topics provide details:
4.7.1 Configuring OAM and OIM Domains with the TLSv1 Protocol
Configure your OAM and OIM domains as follows:
-
Open the (OAM or OIM) domain's
setDomainEnv.shfor editing. -
Enable JSSE SSL by adding the following Java option:
JAVA_OPTIONS="${JAVA_OPTIONS} -Dweblogic.ssl.JSSEEnabled=true " -
Enable TLSv1 by adding the following two Java options:
JAVA_OPTIONS="${JAVA_OPTIONS} -Dweblogic.security.SSL.protocolVersion=TLS1 "and:
JAVA_OPTIONS="${JAVA_OPTIONS} -Dweblogic.security.SSL.minimumProtocolVersion=TLSv1.0 " -
Disable the SSLv3 protocol by removing or commenting out the Java option:
JAVA_OPTIONS="${JAVA_OPTIONS} -Dweblogic.security.SSL.protocolVersion=SSL3 " -
In the OIM domain, locate the section:
if [ "${debugFlag}" = "true" ] ; then
JAVA_DEBUG="-Xdebug -Xnoagent -Xrunjdwp:transport=dt_socket,address=${DEBUG_PORT},server=y,suspend=n -Djava.compiler=NONE"
        export JAVA_DEBUG
Following
export JAVA_DEBUG, add the Java option:JAVA_OPTIONS="${JAVA_OPTIONS} -Dweblogic.security.SSL.protocolVersion=TLS1 -Dssl.debug=true -Dweblogic.security.TrustKeyStore=DemoTrust" -
Restart all servers in each OAM and OIM domain.
For additional information about protecting components in Oracle Identity Manager from this vulnerability, follow the instructions in support alert Doc ID 1944350.1 CVE-2014-3566 - Instructions to Mitigate the SSL v3.0 Vulnerability (aka "Poodle Attack") in Oracle Identity Manager at:
4.7.2 Configuring OUD with the TLSv1 Protocol
To enable TLSv1 on OUD, follow the instructions in support alert Doc ID 1950331.1 CVE-2014-3566 Instructions to Mitigate the SSL v3.0 Vulnerability (aka "Poodle Attack") in Oracle Unified Directory at:
If you are using Java 7, refer to the section ”OUD with Java 7”. If using Java 6, refer to the section ”OUD with Java 6”.
4.7.3 Configuring OHS with the TLSv1 Protocol
To enable TLSv1 on OHS 11g, follow the instructions in support alert Doc ID 1936300.1 How to Change SSL Protocols (to Disable SSL 2.0/3.0) in Oracle Fusion Middleware Products at:
Refer to the section "Oracle HTTP Server (OHS) 11g".
4.8 Completing SSL Configuration for Integrated IdM
Certain additional tasks are required to complete SSL wiring for the integrated components.
The steps are as follows:
-
Export the OUD server certificate to a file using
keytool export. For example, his command saves the OUD certificate in a file named ldapcert.pem:keytool -export -alias server-cert -file ldapcert.pem -keypass weblogic1 -keystore keystore -storepass weblogic1
-
To ensure the OUD server is trusted, import the OUD certificate from Step 2 into OAM's Java keystore using the
keytool importcommand:keytool -import -alias alias -file certificate_file -keystore cacerts_file
For example:
keytool -import -alias trust -file  /scratch/jre/bin/ldapcert.pem
-keystore /scratch/jre/lib/security/cacerts
-
When prompted, enter the password as
changeit. -
Ensure that the OAM user identity store points to OUD's SSL port, as follows:
-
Log in to the OAM console.
-
Edit
userIdentityStore. -
Check the "Enable SSL" option.
-
In the Location text box, specify OUD's SSL port.
-
Save your changes.
-
-
To ensure that clients access the OAM, OIM, and OAAM servers using the OHS host and SSL port, take these steps:
-
Login to the OAM WebLogic Server console.
-
Navigate to Servers, then AdminServer, then Configuration, then General, then Advanced.
-
Enable "WebLogic Plug-In Enabled".
-
Repeat these steps for all servers in OAM and OIM domains.
-
-
To configure logout from the OAM, OIM, and OAAM servers:
-
Log in to the OAM console.
-
Open the profile for the version 11g agent which was registered through
idmConfigTool configOAM(see Section D.4.4 for command details).This profile is named
webgateName_11g, for exampletestwebgate_11g. -
As originally configured, the Logout Redirect URL has the format:
http://host_name:14100/oam/server/logout
Modify the URL to specify the
httpsprotocol and the managed server SSL port. It should look like this:https://host_name:14101/oam/server/logout
-
-
Update these OAAM properties to specify the
httpsprotocol and the SSL port of OHS:bharosa.uio.default.signon.links.enum.selfregistration.url bharosa.uio.default.signon.links.enum.trackregistration.url
-
To ensure that resources protected by
Tapschemeare redirected to the OAAM managed server's SSL port, update the following section of the OAM configuration fileoam-config.xml:<Setting Name="HOST_ALIAS_1" Type="htf:map"> <Setting Name="serverhost" Type="xsd:string">example.us.com</Setting> <Setting Name="serverprotocol" Type="xsd:string">https</Setting> <Setting Name="serverport" Type="xsd:string">14301</Setting> </Setting>
Note that
serverprotocolishttpsandserverportis the SSL port of OAAM's managed server. -
Restart all servers in the OAM and OAAM domains.
-
Log in to the OIM domain's EM console.
-
Expand Application Deployments, then SOA.
-
Click
DefaultOperationalApproval. -
In the detail pane, click the Dashboard tab, and locate
ApprovalTask.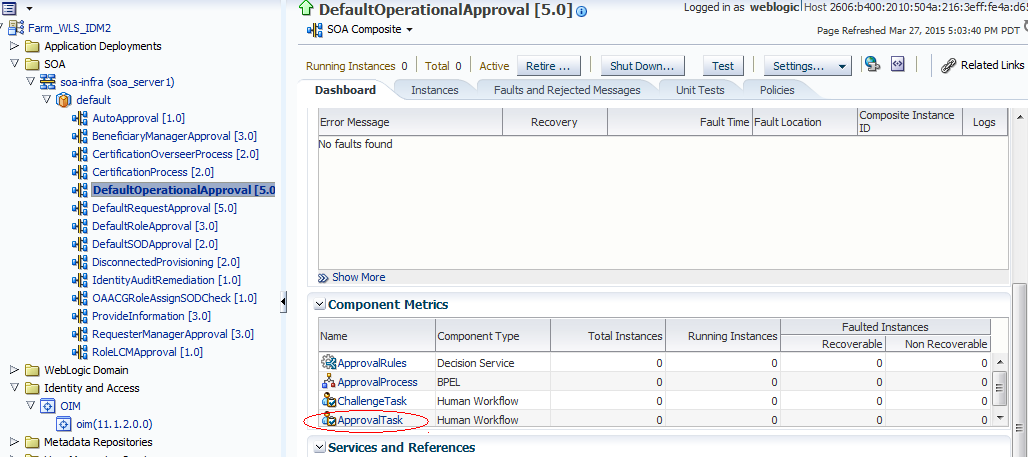
-
Click the Administration tab and provide the value for the
httpsport of OHS.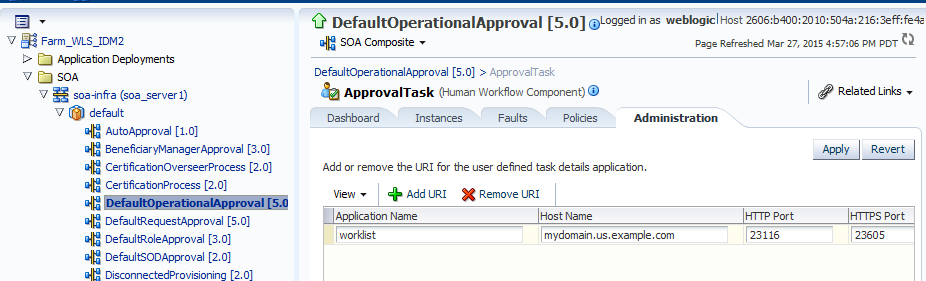
-
Click Apply to save the change.
-
Repeat Steps 12 through 15 for the SOAComposite's
DefaultRequestApproval, again supplying thehttpsOHS port. -
Restart OIM servers.