5 Integrating Oracle Mobile Security Suite and Oracle Identity Manager
This chapter explains how to integrate Oracle Mobile Security Suite (OMSS) with Oracle Identity Manager. Oracle Mobile Security Suite gives an organization the necessary controls to streamline management of mobile devices and access to business applications from mobile devices. By integrating Oracle Mobile Security Suite with Oracle Access Management Access Manager and Oracle Identity Manager organizations will inherit a rationalized platform through which they can securely manage access to business applications and mobile devices.
For instructions about how to install the components described in this example integration, see Installation Guide for Oracle Identity and Access Management and Installing Oracle Mobile Security Access Server.
For instructions on integrating Oracle Identity Manager and Access Manager, see Chapter 2, "Integrating Access Manager and Oracle Identity Manager."
This chapter contains the following topics:
-
About the Oracle Mobile Security Suite and Oracle Identity Manager Integration
-
Oracle Mobile Security Suite and Oracle Identity Manager Integrated Architecture
-
Integrating Oracle Mobile Security Suite and Oracle Identity Manager
-
Configuring Administrators for Oracle Identity Manager and Mobile Security Suite Administration
-
Integrating Oracle Mobile Security Suite in Upgrade Scenarios
-
Viewing Oracle Mobile Security Manager Console Pages in the Oracle Identity Manager Console
5.1 About the Oracle Mobile Security Suite and Oracle Identity Manager Integration
Setting up Oracle Identity Manager and Oracle Mobile Security Suite enables you to manage identities with Oracle Identity Manager and access corporate applications and data with Access Manager. Oracle Identity Manager is a user provisioning and administration solution that automates user account management and Access Manager provides a centralized and automated single sign-on (SSO) solution to corporate applications. Oracle Mobile Security Suite enables the system to securely provide access to enterprise data on mobile devices. It enables business users by giving them secure access to enterprise applications and data from mobile devices.
5.2 Oracle Mobile Security Suite and Oracle Identity Manager Integrated Architecture
This section briefly covers the architecture for Oracle Mobile Security Suite integrated with Oracle Identity Manager.
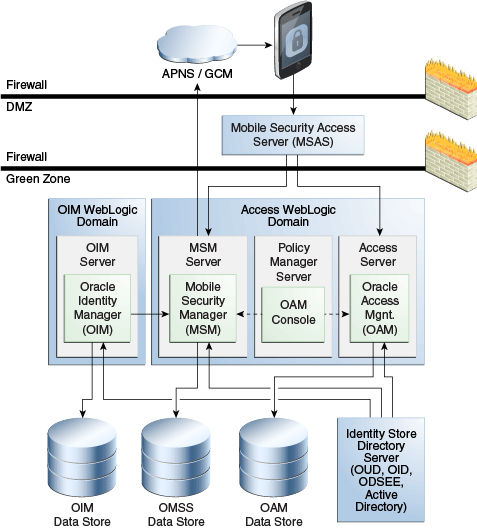
Oracle Mobile Security Manager and Oracle Access Management are deployed together in a WebLogic domain. When Oracle Identity Manager is integrated with Oracle Mobile Security Suite, Oracle Identity Manager is deployed in a separate Oracle Identity Manager WebLogic domain.
Oracle Mobile Security Suite and Oracle Identity Manager are configured to use a common Identity Store. Access Manager uses a user identity store pointing to the same directory as Oracle Mobile Security Suite and Oracle Identity Manager. All applications are based on the same user population.
The Mobile Security Manager user interface (console) pages are rendered within the Oracle Identity Manager interface by using the Oracle Mobile Security Suite shared library, which is deployed on the Oracle Identity Manager server and acts as a Representation State Transfer (REST) client to the Mobile Security Manager server. Users can manage their Oracle Mobile Security Suite accounts from Oracle Identity Manager. Oracle Identity Manager persists its data in the Oracle Identity Manager data store.
Figure 5-1 shows Oracle Identity Manager integrated with Oracle Mobile Security Suite.
Figure 5-1 Logical Diagram Showing Oracle Identity Manager integrated with Oracle Mobile Security Suite
Description of ''Figure 5-1 Logical Diagram Showing Oracle Identity Manager integrated with Oracle Mobile Security Suite''
5.3 Integrating Oracle Mobile Security Suite and Oracle Identity Manager
Oracle Mobile Security Suite (including the OAM server) can also be integrated with Oracle Identity Manager 11.1.2.3. Customers can use the OIM Admin Console to manage mobile devices, policies and apps. Self-service users can use the OIM self-service console to manage mobile devices and Workspaces, in addition to managing their user profiles and accounts.
This section provides step-by-step instructions for integrating Mobile Security Suite and Oracle Identity Manager. It contains the following topics:
-
Oracle Mobile Security Suite and Oracle Identity Manager Integration Roadmap
-
Oracle Mobile Security Suite and Oracle Identity Manager Integration Prerequisites
-
Setting Up Trust Between Oracle Mobile Security Suite and Oracle Identity Manager Domains
-
Wiring Oracle Mobile Security Manager and Oracle Identity Manager
5.3.1 Oracle Mobile Security Suite and Oracle Identity Manager Integration Roadmap
Table 5-1 lists the high-level tasks for setting up Oracle Mobile Security Suite with Oracle Identity Manager.
Table 5-1 Setting Up Oracle Mobile Security Suite with Identity Manager
| No. | Task | Information |
|---|---|---|
|
1. |
Verify that all required components have been installed and configured prior to integration. |
For more information, see Section 5.3.2, "Oracle Mobile Security Suite and Oracle Identity Manager Integration Prerequisites." |
|
2. |
Set up trust between Oracle Mobile Security Suite and Oracle Identity Manager domains. |
For information, see Section 5.3.3, "Setting Up Trust Between Oracle Mobile Security Suite and Oracle Identity Manager Domains." |
|
3. |
Perform Oracle Mobile Security Manager wiring with Oracle Identity Manager. |
For information, see Section 5.3.4, "Wiring Oracle Mobile Security Manager and Oracle Identity Manager." |
|
4. |
Configure Administrators for Oracle Identity Manager and Oracle Mobile Security Suite administration. |
For information, see Section 5.4, "Configuring Administrators for Oracle Identity Manager and Mobile Security Suite Administration." |
If you are upgrading an Oracle Identity Manager and Access Manager integrated environment to 11.1.2.3 and want to integrate Oracle Mobile Security Suite, you must perform additional steps prior to the main integration tasks as documented in "Integrating Oracle Mobile Security Suite During an Upgrade of an Oracle Identity Manager and Access Manager Integrated Environment."
5.3.2 Oracle Mobile Security Suite and Oracle Identity Manager Integration Prerequisites
Before you start integrating Oracle Mobile Security Suite with Oracle Identity Manager, ensure you have installed the required components and necessary dependencies and set up the prerequisite environment.
Table 5-2 lists the required components and prerequisite environment.
Table 5-2 Required Components and Environment Configurations
| Component/Requirement | Information |
|---|---|
|
Oracle Mobile Security Manager, Access Manager, and Oracle Identity Manager schemas |
The appropriate schemas were created for Oracle Mobile Security Manager, Access Manager, and Oracle Identity Manager. The schemas reside in the same database or different databases. Oracle Mobile Security Manager and Oracle Identity Manager must have different schemas. For more information, see "Creating Database Schema Using the Oracle Fusion Middleware Repository Creation Utility (RCU)" in Installation Guide for Oracle Identity and Access Management. |
|
Oracle Access Management and Oracle Mobile Security Manager |
Oracle Access Management and Oracle Mobile Security Manager were configured in the same WebLogic domain when you ran the Oracle Fusion Middleware Configuration Wizard. The IDM Configuration Tool ( For more information on Oracle Mobile Security Manager configuration with Oracle Access Manager, see "Configuring Oracle Mobile Security Suite" in Installation Guide for Oracle Identity and Access Management. When you configured the domain, Access Manager was configured with the database policy store. |
|
Oracle Mobile Security Access Server |
The Oracle Mobile Security Access Server software was installed and wired with Oracle Mobile Security Manager. For information the installation of Oracle Mobile Security Access Server, refer to Installing Oracle Mobile Security Access Server. |
|
Oracle Identity Manager |
Oracle Identity Manager was installed and integrated with Access Manager. For information on the configuration of Oracle Identity Manager, see "Configuring Oracle Identity Manager" in Installation Guide for Oracle Identity and Access Management. For information about the integration of Access Manager and Oracle Identity Manager, see Chapter 2, "Integrating Access Manager and Oracle Identity Manager." Note: LDAP synchronization must already be configured. |
|
Oracle Unified Directory, Active Directory, or Oracle Internet Directory |
Oracle Identity Manager, Access Manager and Oracle Mobile Security Suite point to the same LDAP directory. Access Manager, Oracle Mobile Security Suite, and Oracle Identity Manager must have been configured against the same identity store so that all applications are based on the same user population. |
|
Data Sources |
Oracle Identity Manager, Access Manager, and Oracle Mobile Security Suite must use different data sources. |
5.3.3 Setting Up Trust Between Oracle Mobile Security Suite and Oracle Identity Manager Domains
Oracle Identity Manager will make remote ReST calls to the Oracle Mobile Security Manager server for accessing data. In order to have secure exchange, trust has to be established between Oracle Mobile Security Manager and Oracle Identity Manager servers.
To set up trust between the Oracle Mobile Security Suite and Oracle Identity Manager domains, perform the following steps:
-
Export the default signing certificate
xell.crtindefault-keystore.jksfrom the Oracle Identity Manager domain. In Oracle Identity Manager,default-keystore.jksis located in the$DOMAIN_HOME/config/fmwconfig/directory.keytool -keystore default-keystore.jks -storepass oim-keystore-password -exportcert -alias xell -file xell.crtoim-keystore-passwordis entered when you configure Oracle Identity Manager using the Oracle Identity Manager Configuration Wizard. -
Obtain the Oracle Web Services Manager (OWSM) password from the JPS Credential Store. Perform the following steps in the Oracle Mobile Security Manager domain:
-
Log in to Oracle Enterprise Manager Fusion Middleware Control at
http://weblogic_host:port/em
-
From the target navigation pane, expand WebLogic Domain and select the base_domain.
-
On right side of the Fusion Middleware Control navigation panel, click the Weblogic Domain menu and select System MBean Browser.
-
Using the System MBean Browser, search for JpsCredentialStore.
-
Click the Operation tab shown in the details pane, and then, click getPortableCredential.
For P1, enter:
oracle.wsm.securityFor P2, enter:
keystore-csf-key -
Click the Invoke button.
The Return Value table is displayed below the Parameters table. The
owsm-password(the password for the JPS keystore of the domain-default-keystore.jks) is displayed in the password field.Once
owsm-passwordis retrieved, use it to loadxell.crtin the keystore.
-
-
Import signing certificate
xell.crtindefault-keystore.jksof the Oracle Mobile Security Suite domain.keytool -keystore default-keystore.jks -storepass owsm-password -importcert -alias xell -file xell.crt
Note:
These steps are optional. This configuration should be done only when communication is over SSL (HTTPS port of Mobile Security Manager server).-
Export the Oracle Mobile Security Manager CA certificate from the Oracle Mobile Security Manager trust store. The trust store is located in
$DOMAIN_HOME/config/fmwconfig/wlstrust.jks.keytool -keystore wlstrust.jks -storepass msm-keystore-pass -exportCert -file selfsigned.crt -alias cacertmsm-keystore-passis an input inidmConfigTool -configOMSS->"OMSS_KEYSTORE_PASSWORD". -
Import the Oracle Mobile Security Manager CA certificate into the Oracle Identity Manager Server trust store.
keytool -keystore DemoTrust.jks -storepass DemoTrustKeyStorePassPhrase -importcert -file selfsigned.crt -alias msmcaIf the Oracle Identity Manager server is configured against a custom trust store, Oracle Mobile Security Manager's CA certificate should be imported there. If the server uses a default trust store, then this certificate should be imported into
DemoTrust.jks. TheDemoTrust.jksfile is located in$WL_HOME/server/lib/DemoTrust.jks.Oracle Mobile Security Manager's CA certificate is stored in $
DOMAIN_HOME/config/fmwconfig/server-identity.jksagainst alias "ca". The password to access this keystore is provided when you run theidmConfigTool -configOMSScommand.
5.3.4 Wiring Oracle Mobile Security Manager and Oracle Identity Manager
If you have upgraded Oracle Identity Manager to 11.1.2.3 and want to use the WebLogic Scripting Tool instead of the idmConfigTool command to perform wiring, see "Wiring Oracle Mobile Security Manager and Oracle Identity Manager if Oracle Identity Manager is Upgraded."
To perform wiring of Oracle Mobile Security Suite and Oracle Identity Manager using the idmConfigTool, proceed as follows:
Note:
Skip this step if you ran theidmConfigTool -configOIM command with the OIM_MSM_REST_SERVER_URL parameter during Access Manager and Oracle Identity Manager integration. Oracle Mobile Security Suite and Oracle Identity Manager are already wired if you performed this step. For details, see Section 2.5, "Integrating Access Manager with Oracle Identity Manager."-
Create a properties file called
config_omss.prop. This file will be used to seed the Oracle Mobile Security Manager server URL in Oracle Identity Manager and set the system propertyOMSS Enabledwhen you run theidmConfigTool-configOIMcommand with the properties file. -
Add the following properties to the
config_omss.propfile.OIM_MSM_REST_SERVER_URL:https://msm_server_host:msm_server_port/ WLSPASSWD:WebLogic-Server-administrator-password
or
OIM_MSM_REST_SERVER_URL:http://msm_server_host:msm_server_port/
WLSPASSWD:WebLogic-Server-administrator-password
The
OIM_MSM_REST_SERVER_URLparameter is used to enable the Oracle Mobile Security Manager task flows in the Oracle Identity Manager Console. -
Ensure that the Oracle Identity Manager Managed Server is up and running.
For information on starting the managed server, see "Starting or Stopping the Oracle Stack" in Installation Guide for Oracle Identity and Access Management.
-
Set the environment variables required for the
idmconfigtoolcommand. For information on setting environment variables, see Section D.2, "Set Up Environment Variables." -
Change the directory to the
IAM_ORACLE_HOME/idmtools/bindirectory:cd IAM_ORACLE_HOME/idmtools/binYou will be running the
idmConfigToolcommand from theIAM_ORACLE_HOME/idmtools/bindirectory. -
Enable Oracle Mobile Security Manager task flows by running the
idmConfigTool -configOIMcommand:idmConfigTool.sh -configOIM input_file=inputpropfile log_level=FINEST log_file=logfilename
For example:
idmConfigTool.sh -configOIM input_file=config_omss.prop log_level=FINEST log_file=omss_log
For information on the
configOIMcommand option, see Section D.4.5, "configOIM Command." -
Restart the Oracle Identity Manager Managed Server.
The Oracle Identity Manager managed server must be restarted for the
OMSS Enabledproperty to take effect.For information on starting and stopping the managed server, see "Starting or Stopping the Oracle Stack" in Installation Guide for Oracle Identity and Access Management.
5.4 Configuring Administrators for Oracle Identity Manager and Mobile Security Suite Administration
In an Oracle Identity Manager and Oracle Mobile Security Suite integrated environment, you can configure Administrators who can act as both Oracle Identity Manager and Oracle Mobile Security Suite Administrators in the following ways:
-
Configure Oracle Mobile Security Suite Administrator and Help Desk User in Oracle Identity Manager
-
Grant Oracle Identity Manager Administrator privileges to an Access Manager Administrator
Note:
If you have upgraded Oracle Identity Manager to 11.1.2.3, you must perform additional steps in the 11.1.2.3 Oracle Identity Manager Console for the Administration Role tab to be available for configuring Administrators. For more information, see "Configuring Administrators for Oracle Identity Manager and Mobile Security Suite Administration if Oracle Identity Manager is Upgraded."5.4.1 Setting Up Administrators
To configure Administrators, you must complete the steps in this section.
Setting Up an Administrator Group in Oracle Identity Manager
To set up an Administrator Group in Oracle Identity Manager, perform the following steps:
-
Log in to the Oracle Identity Manager Console:
http://oimhost:oimport/identity
-
Click Manage in the upper right corner.
-
Select Administration Roles.
The Create Admin Role train component is displayed to create the Administrator Role.
-
In the General Role Information section, fill in the following information:
Name: The name of the role.
Display Name: The name displayed in the console.
Description: The description of the role.
-
In the Capabilities tab, add all capabilities.
-
In the Members stop/tab, assign all members that you want as Administrators:
-
Click the Assign Users button to search for users.
-
Select users from the results table.
-
Click the Add Selected button.
-
Click Select.
-
-
In the Scope of Control stop/tab, assign the organization in which this role will take effect:
Note:
It is important to select a scope. You can select Top if you want these privileges to apply across the system.-
Click the Add Organization button to search for the organization.
-
Select organizations from the results table.
-
Click the Add Selected button.
-
Click Select.
-
-
In the Summary tab, click Finish.
Determining the Oracle Mobile Security Suite System Administrator Groups
Before granting Oracle Mobile Security Suite System Administrators the Oracle Identity Manager Administrator Role, you need to determine the names of the Oracle Mobile Security Suite System Administrator Groups.
Look up the Oracle Mobile Security Suite System Administrator Groups using the Access Policy Manager Console:
-
Log in to the Access Policy Manager Console.
-
Click Configuration.
-
Choose Settings, View, Mobile Security Manager Settings, and then Identity Store Settings.
-
View the set of Group Names configured as System Administrator Groups.
Setting Up an Administrator Group in Oracle Mobile Security Suite
To set up an Administrator Group in Oracle Mobile Security Suite, follow these steps:
-
Prepare the directory: Create an Administrator Role and make all assigned Administrators a member of this role, as documented in "Setting Up an Administrator Group in Oracle Identity Manager".
-
Determine the Oracle Mobile Security Suite System Administrator Groups, as documented in "Determining the Oracle Mobile Security Suite System Administrator Groups".
-
Log in to the Access Policy Manager Console as an existing Administrator:
http://oamhost:oamport/access
-
Click Mobile Security Settings > Identity Store Settings.
-
Within the System Admin Groups section, click +Add to add the Administrator Group.
5.4.2 Configuring Help Desk Users
To configure Help Desk Users, you must complete the steps in this section.
Setting Up a Help Desk User Group in Oracle Identity Manager
To set up a Help Desk User Group in Oracle Identity Manager, perform the following steps:
-
Log in to the Oracle Identity Manager Console:
http://oimhost:oimport/identity
-
Click Manage in the upper right corner.
-
Select Administration Roles.
The Create Admin Role train component is displayed to create the Administrator Role.
-
In the General Role Information section, fill in the following information:
Name: The name of the role.
Display Name: The name displayed in the console.
Description: The description of the role.
-
In the Capabilities tab, add the capabilities Role Modify and Role View/Search, and All capabilities on users.
-
In the Members stop/tab, assign all members that you want as Administrators:
-
Click the Assign Users button to search for users.
-
Select users from the results table.
-
Click the Add Selected button.
-
Click Select.
-
-
In the Scope of Control stop/tab, assign the organization in which this role will take effect:
Note:
It is important to select a scope. You can select Top if you want these privileges to apply across the system.-
Click the Add Organization button to search for the organization.
-
Select organizations from the results table.
-
Click the Add Selected button.
-
Click Select.
-
-
In the Summary tab, click Finish.
Determining the Oracle Mobile Security Suite Help Desk User Group
Before granting Oracle Mobile Security Suite Help Desk Administrators the Oracle Identity Manager Help Desk Administrator Role, you need to determine the names of the Oracle Mobile Security Suite Help Desk User Groups.
Look up the Oracle Mobile Security Suite Help Desk User Groups using the Access Policy Manager Console:
-
Log in to the Access Policy Manager Console.
-
Click Configuration.
-
Choose Settings, View, Mobile Security Manager Settings, and then Identity Store Settings.
-
View the set of Group Names configured as Help Desk User Groups.
Setting Up the Help Desk User Group in Mobile Security Suite
To set up a Help Desk User Group in Mobile Security Suite, follow these steps:
-
Prepare the directory: Create a Help Desk role and make all assigned Help Desk Users a member of this role as documented in "Setting Up a Help Desk User Group in Oracle Identity Manager".
-
Determine the Oracle Mobile Security Suite Help Desk User Groups, as documented in "Determining the Oracle Mobile Security Suite Help Desk User Group".
-
Log in to the Access Policy Manager Console as an existing Administrator:
http://oamhost:oamport/access
-
Click Mobile Security Settings > Identity Store Settings.
-
Within the Helpdesk Groups section, click +Add to add the Help Desk User Group.
5.5 Integrating Oracle Mobile Security Suite in Upgrade Scenarios
This section contains information about additional steps you need to perform before or during the integration of Mobile Security Suite and Oracle Identity Manager if you have upgraded Oracle Identity Manager or an Oracle Identity Manager and Access Manager integrated environment to 11.1.2.3. The steps do not apply to new installations of Oracle Identity Manager.
Integrating Oracle Mobile Security Suite During an Upgrade of an Oracle Identity Manager and Access Manager Integrated Environment
If you are upgrading an Oracle Identity Manager and Access Manager integrated environment to 11.1.2.3 and want Oracle Mobile Security Suite to be integrated in the upgrade, you must perform these steps:
Note:
It is recommended that you follow these steps after upgrade, but before setting up trust between Oracle Mobile Security Suite and Oracle Identity Manager domains and wiring Oracle Identity Manager and Oracle Mobile Security Manager.-
In the OIM Domain, add the following lines in the
jps-config.xmlfile under thetrust.provider.embeddedproperty set. (Skip this step if the lines are already present.)<property name="trust.issuerName" value="www.oracle.com"/> <property name="trust.aliasName" value="xell"/>
-
If the Oracle Mobile Security Manager SSL URL is or will be provided in
OIM_MSM_REST_SERVER_URL, as documented in "Wiring Oracle Mobile Security Manager and Oracle Identity Manager," the following steps are required.Note:
If non-SSL communication is intended, these steps are not required.-
Log in to the WebLogic Administration Console.
-
Navigate to servers > oim_server1 > Configuration > SSL.
-
Select Use JSSE SSL.
Ignore this step if Use JSSE SSL is already selected.
-
Click Save.
-
Restart the managed servers (once) after wiring of Oracle Mobile Security Suite with Oracle Identity Manager.
For information on starting and stopping the managed server, see "Starting or Stopping the Oracle Stack" in Installation Guide for Oracle Identity and Access Management.
-
Wiring Oracle Mobile Security Manager and Oracle Identity Manager if Oracle Identity Manager is Upgraded
If you upgraded Oracle Identity Manager to 11.1.2.3 and want to use the WebLogic Scripting Tool instead of idmConfigTool to perform wiring, follow these steps:
-
Log in to the Oracle Identity Manager System Administration Console:
http://OIM-Host:OIM-port/sysadmin
-
Navigate to Configuration Properties, search for the property OMSS Enabled, and provide the value as
true. -
Run the WebLogic Scripting Tool from the following location:
/Oracle_IDM1/common/bin/wlst.sh
-
Run the following command:
createCred(map="msm", key="msmLoginConfig",user="https://OMSM-Host-Machine:OMSM-SSL-Port/" , password="www.oracle.com",desc="RestConfig")
For example:
createCred(map="msm", key="msmLoginConfig",user="https://abcde.example.com:14181/" , password="www.oracle.com",desc="RestConfig")
-
After running the command, restart the OIM Server.
Configuring Administrators for Oracle Identity Manager and Mobile Security Suite Administration if Oracle Identity Manager is Upgraded
If you upgraded Oracle Identity Manager to 11.1.2.3, perform the following steps in the 11.1.2.3 Oracle Identity Manager Console to make the Administration Role tab available for configuring Administrators:
-
Log in to the Oracle Identity Manager Console.
-
Click Configuration Properties.
-
Search for Workflow Policies Enabled.
-
Set Workflow Policies Enabled to true.
-
Restart the OIM Managed Server.
5.6 Viewing Oracle Mobile Security Manager Console Pages in the Oracle Identity Manager Console
The screens that can be displayed in Oracle Identity Manager after enabling Oracle Mobile Security Suite are listed in Table 5-3.
Table 5-3 Oracle Mobile Security Suite Screens
| Interface | Screen | Navigation | Who can access? |
|---|---|---|---|
|
Identity Self Service |
Devices tab in the My Access page |
Manage tab, My Access |
User who is part of a role to which at least one mobile security policy has been granted. |
|
Identity Self Service |
Devices tab in the user details page |
Manage tab, Users, open user details |
Is available only when:
|
|
Identity Self Service |
Mobile Policy tab in the role details page |
Manage tab, Roles, open role details |
User who is part of a role to which privilege to view all mobile security policies has been granted, and the role is associated with at least one mobile security policy. |
|
Identity Self Service |
Mobile Security Policies page |
Manage tab, Policies, Mobile Security Policies |
User who is part of a role to which privilege to view all mobile security policies has been granted. |
|
Identity Self Service |
Devices page |
Manage tab, Mobile Security, Devices |
User who is part of a role to which privilege to view the details of all the devices and workspaces in the system has been granted. Note: When integrated with Oracle Identity Manager, Oracle Mobile Security Suite does not consider the Oracle Identity Manager delegated Administrator Role (Organization Administrator, Role Administrator, and so on) privileges. When a Delegated Administrator like an Organization Administrator in Oracle Identity Manager accesses the Devices page, he can see all the devices for all users who are not under his purview. However, when he navigates to the Users page in Oracle Identity Manager he can only see the users who he is supposed to and the devices associated to those users. |
|
Identity Self Service |
Device Configurations |
Manage tab, Mobile Security, Device Configurations |
User who is part of a role to which privilege to view all the device configuration has been granted. |
|
Identity Self Service |
Mobile Applications |
Manage tab, Mobile Applications |
User who is part of a role to which privilege to view all the mobile applications has been granted. |
|
Identity System Administration |
Mobile Security Server Settings |
Provisioning Configuration, Mobile Security Server Settings |
User who is part of a role to which privilege to view all the mobile security server settings has been granted. |
See Oracle Fusion Middleware Help Reference for Oracle Mobile Security Suite Consoles for information about Oracle Mobile Security Suite menus and screens.