12 Predefined Providers for Generic Technology Connectors
The following predefined providers are shipped Oracle Identity Manager:
Note:
You must determine the values of parameters for providers that you decide to use. You would need to use these values while creating the generic technology connector by using Oracle Identity System Administration.12.1 Shared Drive Reconciliation Transport Provider
The shared drive reconciliation transport provider reads data from flat files stored in staging directories and moves the files to an archiving directory. The staging and archiving directories must be shared for access from the Oracle Identity Manager server.
The following are parameters of this provider:
-
Staging Directory (Parent identity data)
Use this parameter to specify the path of the directory in which files containing parent data are stored. It is mandatory to specify a value for this parameter. This is a run-time parameter.
In this guide, parent data means the user account information that is stored in the target system.
Sample value for this parameter:
T:/TargetSystemDirectory/ParentData
Note:
If the staging directory is not on the server on which Oracle Identity Manager is installed, it must be shared and mapped as a network drive on the Oracle Identity Manager server.Data stored in the parent data files must conform to the following conventions:
-
First line of the file
The first line of the parent data file must be the file header that describes the contents of the file.
The file header can be preceded by any number of lines that begin with the hash-mark or pound-sign (#). These are ignored while the file is read. However, you must ensure that there are no spaces at the start of the header. If you are using a language other than English, you must not enter non-ASCII characters on this line.
Note:
There are no checks to stop you from entering non-ASCII characters on the first line. In addition, the generic technology connector framework can parse such characters. However, the use of non-ASCII characters would result in problems at the time when the connector objects are automatically created for the generic technology connector that you create. -
Second line of the file
The second line of the parent data file must contain the field names (metadata) for the data in the file.
Note:
In the generic technology connector context, the term metadata refers to the set of identity fields that constitute the user account information.If you are using a language other than English, you must not enter non-ASCII characters on this line. See the Note in the preceding point for more information about this limitation.
-
Third line of the file onward
From the third line onward, the parent data file can contain data in the language that you have selected for Oracle Identity Manager. This language can have an ASCII or non-ASCII character set.
Even if there is no data from the third line onward, reconciliation will take place and the files are archived.
The following are contents of a sample parent data file:
##Active Directory user
Name TD,Address TD,User ID TD
John Doe,Park Street,jodoe
Jane Doe,Mark Street,jadoe
-
-
Staging Directory (Multivalued identity data)
Use this parameter to specify the path of the directory in which files containing multivalued (or child) account or identity data (for example, role membership data) are stored. It is not mandatory to specify a value for this parameter. This is a run-time parameter.
Note:
In this guide, the terms multivalued account or identity data and child data have been used interchangeably.Sample value for this parameter:
T:/TargetSystemDirectory/ChildData
Note:
-
The staging directory for parent data files cannot be the same as the staging directory for multivalued user data files. In addition, if the staging directory is not on the same server on which Oracle Identity Manager is installed, it must be shared and mapped as a network drive on the Oracle Identity Manager server.
-
If you select the Trusted Source Reconciliation option on the Step 1: Provide Basic Information page, you must not specify a value for the Staging Directory (Multivalued Identity Data) parameter. This is because the reconciliation of multivalued (child) data is not supported in trusted source reconciliation.
For each type of multivalued account or identity data, there must be a different file in the shared directory. For example, if the multivalued user data for a particular target system is group membership data and role data, there must be one file for group membership data and a different file for role data.
Data stored in the child data files must conform to the conventions (first line, second line, and remaining lines) that are specified for the parent data files.
In addition, the same unique field must be present in the parent data file and each child data file. This field is used to uniquely link each record in the child data files with a single record in the parent data file. This structure is similar to the concept of integrity constraints (primary key-foreign key) in RDBMSs.
Note:
The unique field must be the first field in the child data files.The following are contents of a sample child data file holding role information that is linked to the sample parent data file listed earlier:
###Role
User ID TD,Role Name TD,Role Type TD
jodoe,admin1,admin
jadoe,admin2,admin
The following are contents of a sample child data file holding group membership information that is linked to the sample parent data file listed earlier:
###Group Membership
User ID TD,Group Name TD,Group Type TD
jodoe,OracleDev1,OracleDev
jadoe,OracleDev2,OracleDev
jadoe,OracleDev3,OracleDev
jadoe,OracleDev4,OracleDev
jadoe,OracleDev5,ConnectorDev
Note that the name of the unique field,
User ID TD, is the same in the child data files and the parent data file.On the Step 3: Modify Connector Configuration page as described in "Step 3: Modify Connector Configuration Page" in Administering Oracle Identity Manager, the name of a child data set is the same as the header that you provide in the child data file. For these sample child data files, the child data sets would be labeled
RoleandGroup Membership. In addition, on the Step 4: Verify Connector Form Names page, the default names displayed for forms corresponding to the child data sets would beRoleandGroup Membership. As mentioned in "Step 4: Verify Connector Form Names Page" in Administering Oracle Identity Manager, you can either accept the default form names or change them. -
-
Archiving Directory
Use this parameter to specify the path of the directory in which parent and child data files that have already been reconciled are to be stored. This is a run-time parameter.
It is mandatory to specify a value for this parameter.
At the end of the reconciliation run, the data files are copied into the archiving directory and deleted from the staging directory.
The files moved to the archiving directory are not time stamped or marked in any way. Therefore, while specifying the path of the archiving directory, bear in mind the following guidelines:
-
The archiving directory path that you specify must not be the same as the staging directory path. If you specify the same path, the existing files in the archiving directory are deleted at the end of the reconciliation run.
-
If data files with the same names as the files used in the last reconciliation run are placed in the staging directory, the existing files in the archiving directory are overwritten by the new files from the staging directory at the end of the current reconciliation run.
These points are also mentioned in "Step 2: Specify Parameter Values Page" in Administering Oracle Identity Manager.
-
-
File Prefix
Use this parameter to specify the prefix used to filter the names of files in the staging directories for both parent and child data files. During reconciliation, all files (in the staging directories) with names that start with the specified prefix are processed, regardless of the file extension. This is a run-time parameter.
For example:
If you specify
usrdataas the value of the File Prefix parameter, data is parsed from the following files placed in the staging directory for multivalued (child) user data files:usrdataRoleData.csv usrdataGroupMembershipData.txt
Data is not extracted from the following files in the same directory, because the file names do not begin with
usrdata:RoleData.csv GroupMembershipData.txt
-
Specified Delimiter
Use this parameter to specify the character that is used as the delimiter character in the parent and child data files. You can specify only a single character as the value of this parameter. This is a run-time parameter. This parameter overrides the Tab Delimiter parameter.
Note:
You cannot use the space character ( ) as a delimiter.In addition, you must ensure that the character you specify is used only as the delimiter in the data files. If this character is also used inside the data itself, the data row (or record) is not parsed correctly. For example, you must not use the comma (,) as the delimiter if any data value contains a comma.
-
Tab Delimiter
Use this parameter to specify whether or not the file is delimited by tabs. This is a run-time parameter. This parameter is ignored if you specify a value for the Specified Delimiter parameter.
-
Fixed Column Width
If the input file contains fixed-width data, use this parameter to specify the width in characters of the data columns. This is a run-time parameter.
Note:
In this context, the term "fixed-width" refers to the number of characters in the data field, not the byte length of the field. This means that, for example, four characters of single-byte data and four characters of multibyte data are the same in terms of width.This parameter is ignored if you specify a value for the Specified Delimiter or Tab Delimiter parameter.
-
Unique Attribute (Parent Data)
For multivalued user data, use this parameter to specify the field that is common to both the parent data and child data files. In the examples described earlier, the requirement for a unique attribute is fulfilled by the
User ID TDfield, which is present in both the parent and child data files. This is a run-time parameter.Note:
If you select the Trusted Source Reconciliation option on the Step 1: Provide Basic Information page, you must not specify a value for the Unique Attribute (Parent Data) parameter. This is because the reconciliation of multivalued (child) data is not supported in trusted source reconciliation. -
File Encoding
Use this parameter to specify the character set encoding used in the parent and data files. This is a design parameter.
Specify
Cp1251for data files stored on a computer running an operating system with the English-language setting. This is the canonical name for thejava.ioAPI that is supported by the generic technology connector framework. For any other language that you select from the list given in the "Multilanguage Support" section, you must specify the canonical name for the correspondingjava.ioAPI.
Permissions to Be Set on the Staging and Archiving Directories
You must ensure that the required permissions are set on the staging and archiving directories. The following table describes the effect of the various permissions on the shared directories that are used to hold staging and archiving data files.
| Storage Entity | Access Permission | Reason for Access Permission Requirement |
|---|---|---|
| Staging directory for parent data files | Read | This permission is required for reconciliation to take place. An error message is logged if this permission is not applied. |
| Staging directory for parent data files | Write | This permission is required for the deletion of data files from the parent staging directory at the end of the archive process. |
| Staging directory for parent data files | Execute | Not applicable |
| Staging directory for child data files | Read | This permission is required for the reconciliation of child data. An error message is logged if this permission is not applied. |
| Staging directory for child data files | Write | This permission is required for the deletion of data files from the child staging directory at the end of the archive process. |
| Staging directory for child data files | Execute | Not applicable |
| Archiving directory | Write | This permission is required for the copying of parent and child data files to the archiving directory during the archive process. Even if this permission is not applied:
|
| Archiving directory | Execute | Not applicable |
| Parent or child data file in staging directory | Read | This permission is required for the reconciliation of the data in the file. An error message is logged if this permission is not applied. |
| Parent or child data file in staging directory | Write | This permission is required for the deletion of the data file at the end of the archive process. An error message is logged if this permission is not applied. However, data in this file is reconciled. |
| Parent or child data file in staging directory | Execute | Not applicable |
Note:
Data files in the staging directory cannot be deleted if they are open in any editor or are open for writing by any other program.12.2 CSV Reconciliation Format Provider
The CSV reconciliation format provider converts reconciliation data that is in character-delimited, tab-delimited, or fixed-length format into a format that is supported by Oracle Identity Manager.
Although the CSV reconciliation format provider is packaged as a standalone provider, all of its parameters are bundled with the shared drive transport provider. If you select the shared drive transport provider on the Step 1: Provide Basic Information page, you must select the CSV format provider. When you select this provider, its parameters are displayed along with the shared drive transport provider parameters.
12.3 SPML Provisioning Format Provider
The SPML provisioning format provider converts the provisioning data generated during a provisioning operation on Oracle Identity Manager into an SPML request that can be processed by an SPML-compatible target system.
Figure 12-1 shows the setup of the system in which the SPML provisioning format provider acts as the requesting authority (RA), and the target system provides the provisioning service provider (PSP) and the provisioning service target (PST).
Figure 12-1 Communication Between the SPML Provisioning Format Provider and the Target System
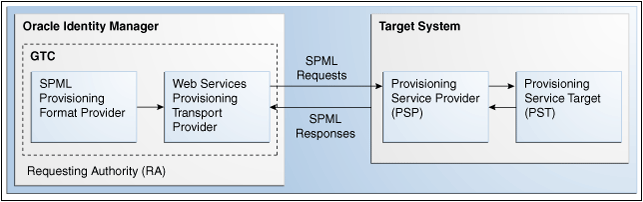
Description of ''Figure 12-1 Communication Between the SPML Provisioning Format Provider and the Target System''
During actual provisioning, a Velocity template engine is used to create the SOAP-SPML requests. For the following processes, the provider generates SOAP requests based on the SPML 2.0 DSML profile:
-
Add request
-
Modify request for the following Oracle Identity Manager process tasks:
-
Field updated
-
Add child data
-
Modify child data
-
Delete child data
-
-
Suspend request (for Disable Oracle Identity Manager process tasks)
-
Resume request (for Enable Oracle Identity Manager process tasks)
-
Delete request
The Create Organization, Update Organization, and Delete Organization are not supported. This is because the resource object created for a generic technology connector does not support provisioning operations for organizations. The Create Group, Update Group, and Delete Group operations are not supported. This is because Oracle Identity Manager does not support operations to provision groups.
When you select this provider, the following identity fields are displayed by default on the Step 3: Modify Connector Configuration page as described in "Step 3: Modify Connector Configuration Page" in Administering Oracle Identity Manager, along with the ID field:
-
objectClass -
containerID
For each provisioning task (for example, Create User and Modify User), the provider generates a request in a predefined format.
The following sections discuss the parameters of this provider:
Depending on the application server that you use, some of the run-time and design parameters are mandatory and some have fixed values. The following sections discuss these parameters:
12.3.1 Run-Time Parameters
The following are run-time parameters of the SPML provisioning format provider:
-
Target ID
This value uniquely identifies the target system for provisioning operations.
-
User Name (authentication)
This is the user name of the account required to connect to the target system (PST) through the Web service interface (PSP).
-
User Password (authentication)
This is the password of the user account required to connect to the target system (PST) through the Web service interface (PSP).
12.3.2 Design Parameters
The following are design parameters of the SPML provisioning format provider:
See Also:
For more information about the SOAP elements and attributes mentioned in this section, visit the following Web site-
Web Service SOAP Action
In the WSDL file, this is the value of the
soapActionattribute of theoperationelement. -
WSSE Configured for SPML Web Service?
Select this check box if the Web service is configured to authenticate incoming requests by using WS-Security credentials.
-
Custom Authentication Credentials Namespace
Note:
You need not specify a value for this parameter if you select the SPML Web Service WSSE Configured? check box.This is the name of the credentials namespace that you have defined for the Web service. In most cases, this namespace is the same as the target namespace.
-
Custom Authentication Header Element
Note:
You need not specify a value for this parameter if you select the SPML Web Service WSSE Configured? check box.This is the name of the element that will contain the credentials of the user account used to connect to the target system. In other words, this is the parent element in the custom authentication section of the SOAP message header.
-
Custom Element to Store User Name
Note:
You need not specify a value for this parameter if you select the SPML Web Service WSSE Configured? check box.This is the name of the element in the custom authentication section that will contain the user name you specify as the value of the User Name (authentication) parameter.
-
Custom Element to Store Password
Note:
You need not specify a value for this parameter if you select the SPML Web Service WSSE Configured? check box.This is the name of the element in the custom authentication section that will contain the user name you specify as the value of the User Password (authentication) parameter.
-
SPML Web Service Binding Style (DOCUMENT or RPC)
In the WSDL file, this is the value of the
styleattribute of thebindingelement. You must enter eitherDOCUMENTorRPC.Note:
You must enter the valueDOCUMENTorRPC. Do not use lowercase letters in the value that you specify. -
SPML Web Service Complex Data Type
In the WSDL file, this is the value of the
nameattribute of thecomplexTypeelement. This parameter is applicable only if the binding style isDOCUMENT.You must specify a value for this parameter if the target Web service is running on Oracle WebLogic Server. -
SPML Web Service Operation Name
In the WSDL file, this is the value of the
nameattribute of theoperationelement. This parameter is applicable only if the binding style isRPC. -
SPML Web Service Target Namespace
In the WSDL file, this is the value of the
targetNamespaceattribute of thedefinitionelement. -
SPML Web Service Soap Message Body Prefix
This is the name of the custom prefix element that contains the SOAP message body. If the target Web service is running on Oracle WebLogic Server, then you need not specify a value for this parameter. However, if you are using a different application server, you must enter the name of the custom prefix element. The following is the prefix element if the Web service is running on Oracle WebLogic Server:
<SPMLv2Document xmlns="http://xmlns.oracle.com/OIM/provisioning">
-
ID Attribute for Child Dataset Holding Group Membership Information
This is the name of the unique identifier field for a provisioning staging child data set that holds group membership information. For provisioning operations on the child data set that contains this field, the SOAP packet will contain SPML code for group operations. The following is an SPML code block for this type of group operation:
<modification modificationMode="add">
  <capabilityData capabilityURI="urn:oasis:names:tc:SPML:2:0:reference" mustUnderstand="true">
    <reference typeOfReference="memberOf" xmlns="urn:oasis:names:tc:SPML:2:0:reference">
    <toPsoID ID="Groups:1" targeted="120"/>
</reference>
  </capabilityData>
</modification>
For provisioning operations on the child data sets that do not contain this field, the SOAP packet will contain ordinary SPML code. The following is an SPML code block for this type of group operation:
<modification>
  <dsml:modification name="Group Membership" operation="add">
    <dsml:value>AdminOra, System Admins, USA</dsml:value>
  </dsml:modification>
</modification>
12.3.3 Nonmandatory Parameters
For Oracle WebLogic Server, you need not specify values for the following parameters:
-
SPML Web Service Complex Data Type
-
SPML Web Service Soap Message Body Prefix
-
ID Attribute for Child Dataset Holding Group Membership Information
12.3.4 Parameters with Predetermined Values
For Oracle WebLogic Server, you can specify predetermined values for the following parameters:
-
Web Service URL:
http://IP_address:port_number/spmlws/OIMProvisioning -
SPML Web Service Binding style (DOCUMENT or RPC):
RPC -
SPML Web Service Operation Name:
processRequest
12.4 Web Services Provisioning Transport Provider
The Web Services provisioning transport provider acts as a Web service client and carries provisioning request data from Oracle Identity Manager to the target system Web service.
The following types of target system Web services are supported:
-
RPC-literal
-
RPC-encoded
-
DOCUMENT-literal
The following is the parameter of the Web Services provisioning transport provider:
Web Service URL
Use this parameter to specify the URL of the Web service that you want to use for sending a provisioning request to the target system. This is a run-time parameter. In the WSDL file, the Web service URL is the value of the location attribute of the wsdlsoap:address element.
If you include the Web Services provisioning transport provider in the generic technology connector that you create, you may want to configure Secure Sockets Layer (SSL) communication between the target system and Oracle Identity Manager. The following section provides information about this procedure.
12.4.1 Configuring SSL Communication Between Oracle Identity Manager and the Target System Web Service
This section describes the procedure to configure the application server on which Oracle Identity Manager is installed for SSL communication.
You can perform this procedure only if all the following conditions are true:
-
You want to include the Web Services provisioning transport provider in the generic technology connector that you plan to create.
-
The target Web service is running on an SSL-enabled application server.
To configure SSL communication between Oracle Identity Manager and the target system Web service:
Note:
You can perform this procedure prior to creating the generic technology connector.-
Export the target application server certificate as follows:
-
For a target system Web service deployed on JBoss Application Server, Oracle WebLogic Server, or Oracle WebLogic Server, run the following command:
JAVA_HOME/jre/bin/keytool -export -alias default -file exported-certificate-file -keystore app-server-specific-keystore -storetype jks –storepass keystore-password –provider sun.security.provider.Sun
In this command:
-
Replace
JAVA_HOMEwith the full path to the SUN JDK directory. -
Replace
exported-certificate-filewith the name of the file in which you want the exported certificate to be stored. -
Replace
app-server-specific-keystorewith the path to the keystore on the application server. -
Replace
keystore-passwordwith the password for the keystore.
-
-
For a target system Web service deployed on Oracle WebLogic Server on AIX, run the following command:
JAVA_HOME/jre/bin/keytool -export -alias default -file exported-certificate-file -keystore app-server-specific-keystore -storetype jks –storepass keystore-password -provider com.ibm.crypto.provider.IBMJCE
In this command:
-
Replace
JAVA_HOMEwith the full path to the IBM JDK directory. -
Replace
exported-certificate-filewith the name of the file in which you want the exported certificate to be stored. -
Replace
app-server-specific-keystorewith path to the keystore on the application server. -
Replace
keystore-passwordwith the password for the keystore.
When the command is run, the exported certificate file is stored in the file that you specify as the value of
exported-certificate-file. -
-
-
Import the certificate file exported in the preceding step into the Oracle Identity Manager truststore as follows:
-
Copy the certificate file exported in the preceding step into a temporary directory on the Oracle Identity Manager server.
-
Run the following command:
JAVA_HOME/jre/bin/keytool -import -trustcacerts -alias servercert -noprompt -keystore OIM_HOME\config\.xlkeystore -file certificate_file
In this command:
-
Replace
JAVA_HOMEwith full path to the JDK directory. For Oracle Identity Manager deployed on Oracle WebLogic Server, the path must be that of the SUN JDK directory. -
Replace
OIM_HOMEwith the full path of the Oracle Identity Manager home directory -
Replace
certificate_filewith the path of the temporary directory into which you copy the certificate file.
-
Note:
If the application server is enabled for one-way SSL communication, you need not perform the rest of this procedure. -
-
Import the Oracle Identity Manager certificate into the target system application server truststore as follows:
Note:
Perform the following steps only if the application server is enabled for two-way SSL communication.-
Export the Oracle Identity Manager certificate file.
For Oracle Identity Manager deployed on Oracle WebLogic Server, run the following command:
JAVA_HOME/jre/bin/keytool -export -alias xell -file OIM_HOME\config\xell.cert -keystore OIM_HOME\config\.xlkeystore -storetype jks –provider sun.security.provider.Sun
In this command:
- Replace
JAVA_HOMEwith the full path to the SUN JDK directory.- Replace
OIM_HOMEwith the full path of the Oracle Identity Manager home directory. -
Import the certificate file that you export in Step 3a into the truststore of the application server as follows:
Copy the exported Oracle Identity Manager certificate file to a temporary directory on the target application server.
Next, run the following command on the target application server, which is Oracle WebLogic Server:
JAVA_HOME/jre/bin/keytool –import –alias alias -trustcacerts -file OIM-certificate-file -keystore app-server-specific-truststore -storetype jks –storepass truststore-password –provider sun.security.provider.Sun
In this command:
* Replace
JAVA_HOMEwith the full path to the SUN JDK directory.* Replace
aliaswith an alias for the certificate in the truststore of the target application server.* Replace
OIM-certificate-filewith the name of the exported Oracle Identity Manager certificate file.* Replace
app-server-specific-truststorewith path to the truststore on the target application server.* Replace
truststore-passwordwith the password for the truststore on the target application server.See Also:
SSL configuration documentation for the target application server
-
12.5 Transformation Providers
Note:
Use the information provided in this section while performing the instructions given in "Step 3: Modify Connector Configuration Page" in Administering Oracle Identity Manager.A transformation provider is used to transform user data while it is in transit between the source and destination data sets listed in the following table.
| Source Data Set | Destination Data Set | Purpose of the Transformation |
|---|---|---|
| Source | Reconciliation Staging | Data is transformed before it is used to create reconciliation events. |
| Oracle Identity Manager | Provisioning Staging | Data is transformed before it is used to create the provisioning request to be sent to the target system. |
The following predefined transformation providers are available in Oracle Identity Manager:
12.5.1 Concatenation Transformation Provider
You use the concatenation transformation provider to concatenate the values of two fields of data sets to create the input for a single field of another data set.
The following example explains the output format of this provider:
Suppose the input values are the following fields of the source data set:
-
First Name:
John -
Last Name:
Doe
When the concatenation transformation provider is applied to these two fields, the output value is as follows:
John Doe
Note:
As shown in the preceding example, the concatenation transformation provider adds a space between the values of the two input fields.The following procedure describes how to add a concatenation transformation provider while creating a generic technology connector:
Note:
This procedure explains in detail the instruction given in Step 5 of "Adding or Editing Fields in Data Sets" in Administering Oracle Identity Manager. It is assumed that you have already selected the Concatenation option from the Mapping Action list on the Step 1: Field Information page and that you have performed Steps 2 and 3 given in that section.On the Step 2: Mapping page in the pop-up window, perform the following steps:
-
From the Dataset list in the Input 1 region, select the data set containing the first field that you want to concatenate. From the Field Name list, select the first field. Alternatively, you can use the Literal option to specify a literal (or fixed) value as the first concatenation input.
For the example described earlier, from the Dataset list in the Input 1 region, select the data set containing the First Name field. Then, from the Field Name list, select First Name.
-
From the Dataset list in the Input 2 region, select the data set containing the second field that you want to concatenate. Then, from the Field Name list, select the second field. Alternatively, you can use the Literal option to specify a literal (or fixed) value as the second concatenation input.
For the example described earlier, from the Dataset list in the Input 2 region, select the data set containing the Last Name field. Then, from the Field Name list, select Last Name.
12.5.2 Translation Transformation Provider
A translation operation involves accepting a certain (literal) value as input and converting it into another value.
The following example illustrates a translation operation:
Suppose the Source data set contains the Country field and data values stored in this field can take one of the following values:
-
Austria
-
France
-
Germany
-
India
-
Japan
When these values are propagated to the reconciliation staging data set, you want to convert these values to the following:
-
AT
-
FR
-
DE
-
IN
-
JP
To automate this translation, you can use the translation transformation provider.
To use the translation transformation provider:
-
Use the Design Console to create a lookup definition that stores the input and decoded values.
Note:
While creating a lookup definition in the Lookup Definition form, you must select the Lookup Type option, and not the Field Type option.For the Country field example described earlier, the Code Key and Decode values are as shown in the following table.
Code Key Decode Austria AT France FR Germany DE India IN Japan JP -
Define a transformation (translation) mapping between the input field and output field for the translation. As mentioned earlier, a transformation can be set up between the following pairs of data sets:
-
Source and Reconciliation Staging
-
Oracle Identity Manager and Provisioning Staging
Note:
This procedure explains in detail the instruction given in Step 5 of "Adding or Editing Fields in Data Sets" in Administering Oracle Identity Manager. It is assumed that you have already selected the Concatenation option from the Mapping Action list on the Step 1: Field Information page and that you have performed Steps 2 and 3 given in that section.-
On the Step 3: Mapping page, from the Dataset list in the Input region, select the data set containing the field that will provide the input value for the translation operation. Then, from the Field Name list, select the field itself.
For the Country field example described earlier, select the data set containing the Country field and select the Country field.
-
In the Lookup Code Name region, select Literal and enter the name of the lookup definition that you create in the preceding step.
Note:
You must not specify a data set name and field in the Lookup Code Name region. Although there is no validation to stop you from selecting a data set name and field, the translation operation would fail during actual reconciliation or provisioning operations.This point is also mentioned in the Mappings section .
For the Country field example described earlier, select Literal and select the lookup definition you create in Step 1.
-
12.5.2.1 Configuring Account Status Reconciliation
User account status information is used to track whether or not the owner of a target system account is to be allowed to access and use the account. If required, you can use the translation transformation provider to reconcile account status information.
Note:
The Design Console offers an alternative method to configure account status reconciliation. This method does not involve the use of a generic technology connector. Section 2.1.2.2.1, "User Account Status Reconciliation" describes this method.You need to use the translation transformation provider only if account status values used in the target system are not the same as the values used in Oracle Identity Manager. For a target resource, Oracle Identity Manager uses the following values:
-
Enabled state:
Enabled -
Disabled state:
Disabled
For a trusted source, Oracle Identity Manager uses the following values:
-
Enabled state:
Active -
Disabled state:
Disabled
The procedure to configure account status reconciliation can be summarized as follows:
Note:
Detailed instructions to perform these steps are provided later in this section.-
Create a lookup definition that maps the status values used in the target system with the values used in Oracle Identity Manager.
-
While creating the generic technology connector, use the translation transformation provider to create a transformation mapping between the fields that hold account status values in the Source data set and the reconciliation staging data set.
The following example describes the action that you must perform:
Suppose the following fields are used to hold account status values:
-
The User Status field of the Source data set holds the values
True(for a user in the Enabled state) andFalse(for a user in the Disabled state). -
The User Status field of the reconciliation staging data set must hold one of the following pairs of values:
-
For target resource reconciliation, the field must hold
EnabledorDisabled. -
For trusted source reconciliation, the field must hold
ActiveorDisabled.
-
You must create a transformation mapping that converts the
True/Falsevalues in the User Status field of the Source data set into correspondingEnabled/DisabledorActive/Disabledvalues. During reconciliation, these converted values are sent to the User Status field of the reconciliation staging data set. -
-
Create a mapping between the field that holds account status values in the reconciliation staging data set and one of the following fields:
-
The OIM Object Status field of the OIM – Account data set, for target resource reconciliation
-
The Status field of the OIM – User data set, for trusted source reconciliation
During reconciliation, this mapping is used to propagate status values from the reconciliation staging data set to the OIM – Account or OIM – User data set.
-
Detailed steps to configure account status reconciliation are as follows:
-
Create a lookup definition that maps the status values used in the target system with the values used in Oracle Identity Manager.
The Code Key values in the lookup definition must be the same as the values used to represent the account status in the target system. The Code Key and Decode values for both trusted and target resource reconciliation are as shown in the following table:
Code Key Decode (for Trusted Source Reconciliation) Decode (for Target Resource Reconciliation) Target system status value for a user account that is in the Enabled state ActiveEnabledTarget system status value for a user account that is in the Disabled state DisabledDisabledExamples of Code Key values are
True/False,Yes/No, and1/0. The Decode values must be set to the exact value, including the case (uppercase and lowercase), shown in the table.Note:
While creating the lookup definition in the Lookup Definition form, you must select the Lookup Type option, and not the Field Type option. -
The procedure to create the generic technology connector is described in Chapter 11, "Using Generic Technology Connectors". While creating the generic technology connector, perform the following steps on the Step 3: Modify Connector Configuration page:
Note:
These steps are a condensed version of the procedure described in "Adding or Editing Fields in Data Sets" in Administering Oracle Identity Manager. Refer to that section for a description of the terms and GUI elements mentioned in the following steps.-
If the target system status field is displayed on the Step 3: Modify Connector Configuration page, click the Edit icon for the field in the reconciliation staging data set.
If the field is not displayed, click the Add icon of the reconciliation staging data set.
-
On the Step 1: Field Information page, specify values for the following GUI elements:
-
Field Name: If you are adding the field, specify a name for it. The field name that you specify must contain only ASCII characters, because non-ASCII characters are not allowed.
-
Mapping Action: Select Create Mapping With Translation from this list.
-
Matching Only: Ensure that this check box is deselected.
-
Create End-to-End Mapping: If you are adding the field, select this check box.
-
Multi-Valued Field: Ensure that this check box is deselected.
-
Data Type: Select the data type of the field.
-
Length: Specify the character length of the field.
-
Required: Select this check box if you want to ensure that the field always contains a value.
-
Encrypted: Ensure that this check box is deselected.
-
Password Field: Ensure that this check box is deselected.
-
-
Click Continue.
-
On the Step 3: Provide Mapping Information page, perform the following steps:
In the Input region:
-
From the Dataset list, select Source.
-
From the Field Name list, select the field that stores status values.
In the Lookup Code Name region, select Literal and enter the name of the lookup definition that you create in Step 1.
-
-
If required, select a validation check for the field and click Add. In other words, select the validation provider that you want to use.
-
Click Continue, and click Close.
-
-
Create a mapping between the status field of the reconciliation staging data set and either the OIM Object Status field of the OIM - Account data set or the Status field of the OIM - User data set as follows:
Note:
These steps are a condensed version of the procedure described in "Adding or Editing Fields in Data Sets" in Administering Oracle Identity Manager.-
For target resource reconciliation, click the edit icon for the OIM Object Status field of the OIM - Account data set.
For target resource reconciliation, click the edit icon for the Status field of the OIM - User data set.
Note:
If a mapping already exists between the status field of the reconciliation staging data set and the OIM Object Status field or Status field, apply the instructions given in this step only where required. -
On the Step 1: Field Information page, specify values for the following GUI elements:
-
Mapping Action: Select Create Mapping Without Transformation from this list.
-
Matching Only: Ensure that this check box is deselected.
-
-
Click Continue.
-
In the Input region on the Step 3: Mapping page, select the status field of the reconciliation staging data set.
-
Click Continue, Continue, and click Close.
-
To add or edit other fields displayed on the Step 3: Modify Connector Configuration page, continue with the procedure described in "Adding or Editing Fields in Data Sets" in Administering Oracle Identity Manager.
-
12.6 Validation Providers
Table 12-1 describes the validation providers that are shipped with Oracle Identity Manager.
Note:
Except for the Validate Date Format provider, all the providers in this table are implementations of methods of theGenericValidator class in the Apache Jakarta Commons API.Table 12-1 Validation Providers
| Validation Provider | Description |
|---|---|
|
IsBlankOrNull |
Returns true if the field value is null and is not blank |
|
IsInRange |
Returns true if the field value is within a range specified by a minimum and maximum value pair |
|
IsByte |
Checks if the field value can be converted to a byte primitive |
|
IsDouble |
Checks if the field value can be converted to a double primitive |
|
IsFloat |
Checks if the field value can be converted to a float primitive |
|
IsInteger |
Checks if the field value can be converted to an integer primitive |
|
IsLong |
Checks if the field value can be converted to a long primitive |
|
IsShort |
Checks if the field value can be converted to a short primitive |
|
MatchRegexp |
Checks if the field value matches the specified regular expression Note: A regular expression is a string that is used to describe or match a set of strings according to specific syntax rules. |
|
MaxLength |
Checks if the length of the field value is less than or equal to the specified value |
|
MinLength |
Checks if the length of the field value is greater than or equal to the specified value |
|
Validate Date Format |
Validates date values in target system records before these records are reconciled into Oracle Identity Manager The value of the Source Date Format parameter is used as the basis for validation. This validation provider is applied if you specify a value for the Source Date Format parameter on the Step 2: Specify Parameter Values page, regardless of whether or not you select this provider on the Step 3: Modify Connector Configuration page. Note: Unlike the other providers in this table, the Validate Date Format is not an implementation of a method of the |