| Oracle® Clinical Conducting a Study Release 5.1 E53564-01 |
|
|
PDF · Mobi · ePub |
| Oracle® Clinical Conducting a Study Release 5.1 E53564-01 |
|
|
PDF · Mobi · ePub |
Oracle Clinical provides several utilities for cleaning data.
This chapter contains the following topics:
Oracle Clinical checks that all collected data conforms to restrictions built into the study by question definitions and Validation and Derivation Procedures. The system creates a Discrepancy record in the Discrepancy Database, either during manual data entry or update, batch data load, or Batch Validation, if the response to a question is invalid. Discrepancies usually result from human error: either transcription errors during data entry or illegible CRFs. They may also indicate flawed logic in Validation or Derivation Procedures or in question definitions, or real, though unexpected, clinical data.
Managing discrepancies includes reviewing them, investigating their cause, and either resolving them or declaring them irresolvable, so that your clinical data is as clean and complete as possible for analysis and submission to regulatory agencies. Resolving discrepancies most often means correcting incorrectly entered patient data, but may also mean editing Validation Procedures or question definitions.
To rerun changed Procedures, recheck data against changed question definitions, and re-evaluate changed data, run Batch Validation (see "Batch Validation Process").
The system stores discrepancies separately from patient data, but associates each discrepancy with its Patient, Visit, Lab and other Received DCM header information and the specific response(s) that triggered its creation. Review statuses are used to track the process of resolving discrepancies; the past and current status(es) and related comments are also stored with each discrepancy (see "Single-Record View").
You can use profiles to control access to data entry update and to filter queries on the Discrepancy Database. See "Selecting a Profile".
Oracle Clinical offers many utilities to help you resolve discrepancies, including:
Viewing CRF Images: If your company has set up this feature, you can view an image of the actual clinical report form that includes the discrepant response. From the Maintain Discrepancy Database window's Special menu, select Get Image. See "Browse and Update Patient Data".
Data Clarification Forms (DCFs): To facilitate handling of large numbers of discrepancies, you can group them by review status, Investigator, site, DCM, visit, or any combination of these criteria, print a report based on the criteria you choose, and send it to an Investigator for review (see Chapter 5, "Using Data Clarification Forms"). DCFs contain discrepancies related to the data of only one patient.
Group Updates: Query for and hand-select a group of discrepancies and simultaneously update their review status, comment text, or CRF page numbers, mark them for passive review, or create DCFs for them. See "Selecting a Group of Records to Change".
Mass Changes: Use SQL statements to select a set of patient data and make the same correction to all of it at once. See Chapter 6, "Making Mass Changes".
Reports: From the Conduct menu, select Conduct Report, then select Data Validation to run many data validation reports.
You may also use the Oracle Thesaurus Management System, which compares patient data responses to terms in standard dictionaries such as MedDRA and WHO-Drug (or your organization's internal dictionary) and, when fully integrated with Oracle Clinical, derives standard dictionary terms for Oracle Clinical responses.
To open the Maintain Discrepancy Database window, from the Conduct menu, select Data Validation, then select Discrepancy Database. To set up the system and administrative settings that control access to the discrepancy database, see the chapter on "Configuring Data Management Utilities" in the Oracle Clinical Administrator's Guide.
Oracle Clinical tracks four types of discrepancies:
Univariate. During data entry or batch data load, Oracle Clinical checks data entered as a response to a question against the definition of the question, and generates a discrepancy if the response does not meet the definition's specifications, such as: wrong data type or length, response not one of a discrete value group (for example, the answer to a Yes/No question is X), mandatory response missing, precision of response greater than allowed (for example, temperature of 98.689F), incorrect partial date (for example, day of month missing where required), or responses to the question that are above the upper bound or below the lower bound.
Multivariate. A response may have to meet the criteria set out in one or more Validation Procedures, which compare responses to one or more other responses for the same patient. The system creates discrepancies when it runs Validation Procedures, either during Batch Validation or manual execution of a Procedure.
Indicator. The response to an indicator question determines which set of the remaining questions require responses. For example, if the response to the indicator question "Do you smoke?" is Yes, then the question "How often?" must also be collected. If the response to "Do you smoke?" is No, then "How often?" must not be collected. If a follow-up question is either not collected when it should be, or collected when it should not be, Oracle Clinical creates an indicator discrepancy during Batch Validation. The discrepancy is logged against the indicator question; for example, "Do you smoke?", not "How often?".
Manual. If there is a problem transcribing data from a CRF, you can enter a manual discrepancy. There are two types:
Manual Data Point. If there is a problem with the CRF, such as illegibility, you can enter a manual discrepancy either during data entry (see Chapter 1, "Entering Data") or directly into the discrepancy database (see "Entering Manual Discrepancies").
Manual Header. This type of discrepancy is not directly associated with a single response, but with the CRF in general. You can enter a manual header discrepancy associated with a Received DCM directly in the Maintain Discrepancy Database window.
The system creates univariate, multivariate, and indicator discrepancies. Users create manual discrepancies.
In order to collect a patient's blood pressure, your organization creates two questions, one for the diastolic and one for the systolic number. To check the validity of the values entered in response to each question, each question is defined as being of data type Number and having an upper and lower limit marking an acceptable, medically plausible, range of values. In addition, your organization defines a Validation Procedure to compare the responses of questions collecting systolic and diastolic blood pressure and to create a discrepancy if the diastolic response value is higher than the systolic response value.
When the system finds a case where, at a particular visit, a patient's diastolic blood pressure is recorded as higher than the systolic blood pressure, it creates a multivariate discrepancy. If the diastolic value is out of the range defined for its question, the system also creates a univariate discrepancy. Both discrepancies appear in the Maintain Discrepancy Database window when you enter an appropriate query.
In the Maintain Discrepancy Database window you can click the More button in order to see the questions and their responses containing the blood pressure figures. If you select the diastolic question and click Details, you see both discrepancies, the multivariate one and the univariate one, listed in the bottom panel of the window.
If your organization has the feature set up, you can go to the Special menu and select Get Image to see an image of the actual paper CRF where the figures were recorded at the patient's visit. If you see that the two values were transposed during Data Entry, and if you have the necessary privileges, you can go to the Special menu, select Update Patient Data, correct the two values, enter a comment, and update the discrepancy's review status according to your organization's policies. Assuming that the diastolic value is now within range, the system closes both discrepancies during the next batch validation.
Alternatively, you could select the DCF Report? box for each question (Procedure variable) involved in the multivariate discrepancy, so that when the discrepancy is included in a DCF Report for an Investigator, both values are displayed. The Investigator then has the responsibility for directing the changes to be made. The changes are entered and the discrepancy review status updated according to your organization's policies.
The section contains the following topics:
The Batch Validation job, accessed from the Conduct menu by selecting Data Validation and then Batch Validation Session, checks data in a single study for all types of discrepancies. Most organizations set up Batch Validation to run at regular intervals, usually nightly.
Which Data is Processed During Batch Validation
Batch validation always runs incrementally; that is, it runs on selected data based on changes that have occurred since the last Batch Validation, as follows:
If a patient has any new or changed data, Batch Validation runs all Procedures over all data for that patient.
If the definition of a Procedure has been changed, Batch Validation runs that Procedure on all data for all patients, even if patient data has not changed.
Note:
If a derivation Procedure definition has been changed, and other validation or derivation Procedures are dependent on the changed Procedure (they use the value it derives), the system detects the dependencies and also runs the dependent Procedure(s) on all patients.If the definition of a question has been changed, Batch Validation runs a validation check on all responses to that question.
Discrepancy Creation and Obsolescence
As the Batch Validation job processes data, it opens and "obsoletes" discrepancies and counts those that remain current, and reports all in its output file (viewable from the Batch Validation submission window by selecting Job Status and then View Output) as follows:
New Discrepancies. The system creates new discrepancies as appropriate on new or changed data or as a result of changes to Procedure or question definitions.
Obsolete Discrepancies. The system gives a status of Obsolete to previously created discrepancies that have been manually closed, either by correcting data or by giving them a status equivalent to Irresolvable.
Remain Current. Although the system runs the same Procedures and other validation checks on the same data (because it processes all of a patient's data whenever any of the patient's data is new or changed), the system does not replace existing discrepancies with new ones for the same error in the same data.
In the Batch Validation output file you can see information on the number of discrepancies created during that run, the number that remain current, and the number that became obsolete. However, these numbers reflect only one run of Batch Validation, so the number of discrepancies remaining current includes only those records that were processed during that run because data or definitions had changed. If you want an accurate figure for the total number of existing discrepancies, go to the Maintain Discrepancy Database window and query for the information you need. The number of records retrieved by the query appears at the bottom of the window.
To see the total number of current discrepancies generated in the study by a single Procedure, execute the Procedure explicitly; from the Conduct menu, select Data Validation, then select Execute Single Procedure, and look at the .out file. See "Executing a Single Procedure" in the Oracle Clinical Creating a Study manual.
Batch validation includes six major phases that run sequentially and commit separately. Where noted, a major phase also has intermediate commits. The major phases are:
Univariate revalidation. The system checks patient data (question responses) against the definition of their questions. This is called "revalidation" because the system performs the same checks as the data is entered.
Discrete Value Group (DVG) resolution. Checks responses against the values defined for their question's discrete value group (list of valid values), if any. Includes subtypes that commit separately, in the following order:
DVG
DVG Subset
Thesaurus DVG
Procedures. Checks responses against the values of other responses, as specified in user-defined Validation Procedures. Also uses responses to derive values for derived questions as specified in user-defined Derivation Procedures. Separate commit for each Procedure, with all tracking related to the Procedure, in the following order:
Derivation Procedures. Processed in the order specified in the Sort field in the Maintain Derivation Procedures window. If two Procedures have the same Sort Order Number, they are processed in alphabetical order (by Procedure Name).
Validation Procedures. Processed after all derivation Procedures in alphabetical order by Procedure Name.
Indicator Questions. Checks if responses to questions defined as follow-ups to indicator questions have been collected when they should not have been collected or not collected when they should have been collected (see "Discrepancy Types"). In either case, the system associates the discrepancy with the indicator question value, not the follow-up question value(s).
Oracle Thesaurus Management System (TMS) integration. If TMS is fully integrated with Oracle Clinical, Batch Validation checks for verbatim term (Oracle Clinical Response) classifications created in TMS since the last Batch Validation run. For each occurrence of the same parent question with the same response, the system populates each of the associated derived question(s) with the requested TMS dictionary term or attribute. There are separate commits for each verbatim term and each of its derived values.
Validation status. The most important tracking milestone for restarting processing after a failure is the successful completion timestamp. "Successful completion" logic assumes that all processing that determines what to process depending upon a timestamp (such as univariate re-execution or modified patient validation) takes the previous successful completion as a starting point until a subsequent Batch Validation succeeds. This means, for instance, that the processing will be repeated, but the derivative work will not need to be performed.
After completing the batch validation job, the system automatically runs the incremental expectedness calculation job for all patients whose data changed. If batch validation detects changes in Enhanced DCI Books, the system runs the full expectedness calculation job instead. See Oracle Clinical Creating a Study for more information.
In general, database changes are a significant part of the work, so a restart should execute the redundant processing significantly faster than the original process. Also, rollback segment use (and, in the TMS case, distributed commits) will be smaller.
Locking to prevent multiple Batch Validation sessions for the same study from starting now uses transaction-independent named locks instead of row locks.
To run Batch Validation, from the Conduct menu, select Data Validation, then select Batch Validation.
Choose a study from the pop-up List of Values.
Click Submit Job. The system runs Batch Validation.
There are no choices other than the study name. Batch validation automatically runs all discrepancy checks for all data in the chosen study, as described in "Batch Validation Process".
If you have an integrated TMS and Oracle Clinical environment, Batch Validation processes TMS procedures with Oracle Clinical procedures. You can run Batch Validation on TMS Procedures separately by following these instructions: To run TMS Batch Validation procedures separately, from the Conduct menu, select Data Validation, then select TMS Validation. If necessary, choose a study from the pop-up List of Values and click the Submit Job button. TMS Validation jobs operate the same way as the combined validation process.
You can use the Oracle database Resource Group feature to limit the percentage of CPU capacity used by Batch Validation when other processes—such as RDC data entry—with a higher priority need the resources. See the Oracle® Database Administrator's Guide 11g for details.
Use the following steps as an example of how to create and activate the resource group:
Log in as SYS or SYSDBA to the back end to grant privileges to RXC for the dbms_resource_manager package:
EXEC DBMS_RESOURCE_MANAGER_PRIVS.GRANT_SYSTEM_PRIVILEGE -
  (GRANTEE_NAME => 'rxc', PRIVILEGE_NAME =>
  'ADMINISTER_RESOURCE_MANAGER', -
  ADMIN_OPTION => FALSE);
Log in as RXC to the back end and create the resource plan and resource groups:
BEGIN
DBMS_RESOURCE_MANAGER.CREATE_SIMPLE_PLAN(SIMPLE_PLAN => 'test_group',
CONSUMER_GROUP1 => 'test_group1', GROUP1_CPU => 80,
CONSUMER_GROUP2 => 'test_group2', GROUP2_CPU => 20);
END;
As RXC, grant switching privileges to the RXCLIN_MOD role. This role is assigned to every user who runs batch validation where switching of resource groups takes place.
EXEC DBMS_RESOURCE_MANAGER_PRIVS.GRANT_SWITCH_CONSUMER_GROUP ('rxclin_mod', -'test_group1', FALSE);
Log in to Oracle Clinical, navigate to Admin, then Reference Codelists, then Local Reference Codelists, and query for OCL_STATE.
Add a new short value BV_RESOURCE_GRP with the resource group name as the long value and save.
Log in to the back end as either SYS or SYSTEM and make the resource plan active:
ALTER SYSTEM SET RESOURCE_MANAGER_PLAN ='test_group';
If you want to check Study data for discrepancies generated by a particular Procedure, you can execute that Procedure at any time, independent of batch validation. Go to Conduct=>Data Validation=>Execute a Single Procedure.
If you are not already working on a particular Study, choose a Study from the pop-up List of Values.
In the Current Value column of the Procedure Name row, choose the Procedure you want to execute from the drop-down list.
Enter a Procedure Version Sequence Number.[what is this?]
In the Execute Procedure in Debug Mode line, choose Y to run in Debug mode and N to run in regular mode.
Submit the job.
This section contains the following topics:
In order to work in the Maintain Discrepancy Database window, you must have a valid profile. A profile is a named collection of access privileges and selection criteria. Profiles are set up by system administrators to control access to data in the discrepancy database. If you have the privileges necessary to modify the profile settings, you can use them as a filter for discrepancy queries. See Table 4-1, "Fields of the Profiles for Discrepancy Management Dialog Box" for a list of query selection criteria available.
To open the Profiles dialog box, first open the Maintain Discrepancy Database window by accessing the Conduct menu, selecting Data Validation, and then selecting Discrepancy Database. The Profiles dialog box may open before you can access the Maintain Discrepancy Database window.
If either you or your administrator chooses a profile to be your default profile, you do not see the Profiles dialog box. If you want to open it, click the Profiles button in the Maintain Discrepancy Database window. To choose a profile as your default, select the Make This My Default Profile box in the lower-left corner of the Profiles dialog box.
Note:
Your group's administrator may prevent you from modifying your default profile. If so, the Profiles dialog box does not open when you click the Profiles button.Your group's administrator may prevent you from accessing some fields by locking them in your profile configuration. Locked fields have gray backgrounds, and the label text of locked box fields is in italics.
Information on creating master profiles is included in the Oracle Clinical Administrator's Guide chapter on configuring Discrepancy Management.
You can choose a profile by selecting a profile name from the profile list, modifying the query criteria, if necessary, and clicking the Use button. Oracle Clinical displays your choice in the title bar of the Maintain Discrepancy Database window. The list includes the following types of profiles:
Master profiles assigned to your user role.
Study profiles assigned to your user role.
Personal profiles created by you or the administrator.
Personal profiles created by others with your user role. (Select the Show all Users box to display other personal profiles.)
The More… button displays a pop-up box that contains additional fields you can use as profile criteria. The values you enter in these fields can include SQL wildcards. See Table 4-1, "Fields of the Profiles for Discrepancy Management Dialog Box" for a list of query selection criteria available.
For more complex queries, you can enter SQL query conditions in the SQL Text field at the bottom of the box. Oracle recommends that you use this field only if you are familiar with both SQL and Oracle Clinical's underlying database structure.
You can change the value of any unlocked field in the profile window. Oracle Clinical applies these changes to the selected profile when you click the Use button.
You can use the profile setting as a temporary query filter without permanently applying your changes to the profile; modify the criteria, then click the Use button, leaving the Save My Changes box blank. To change the criteria later in the session, click the Change Profile button in the Maintain Discrepancy Database window to reopen the Profiles dialog box.
To keep profile changes for later use, first check the Save My Changes box, then click Use.
Note:
You can only update the personal profiles you have created. You cannot make permanent changes to master profiles or the personal profiles created by other users.You can switch to another profile during a session. In the Maintain Discrepancy Database window, click the Change Profile button to select a different profile. Note that if you change profiles, dynamic grouping (see "Changing the Display of Discrepancy Information") resets to the default empty Master section.
You can create personal or study-specific profiles. To create a new profile, click the Create button to open the Create a New Profile dialog box. The dialog box contains a Profile Name field and three radio buttons. Enter a unique name for your profile. Then choose one of the three choices in the radio button group:
Create Profile from Default Master creates a new personal profile for you based on your default master profile. Since a user group may have more than one master profile, the default master flag identifies the default.
Create Profile from Current Profile creates a new personal profile based on the current profile's settings.
Create Study-Specific Profile from Current Profile creates a study-specific profile for the present study using the current profile displayed in the field on the main window.
An administrator assigns you one default master profile (see the Oracle Clinical Getting Started manual for more information). The default master contains the basic functions required for your job. If you have more than one master profile assigned to you, the administrator designates one as the default.
Clicking the OK button stores the new profile and closes the dialog box. The new profile is now available in the list of profile names. Clicking the Cancel button closes the pop-up window without creating the new record.
Table 4-1 Fields of the Profiles for Discrepancy Management Dialog Box
| Field | Description |
|---|---|
|
User Profile list |
The list at the top of the dialog box contains all of the profiles the current user can access. |
|
Show All Users box |
Select this to access all of the profiles in your default user group in the Profile list. |
|
Creation Date Between |
Limit the discrepancies you access by entering a starting date in this field. Use the date format DD-MON-YYYY. |
|
And |
Limit the discrepancies you access by entering an ending date in this field. Use the date format DD-MON-YYYY. |
|
System Status Code |
Click this field to limit the discrepancies you view to a particular system status: Current or Obsolete. |
|
Accessible Data Only? |
Check this box to limit the discrepancies to data that has completed first pass Data Entry, and — if required — second pass Data Entry. |
|
Last Modified by Userid |
Check this box to limit your queries to the discrepancies modified by the current user. |
|
Review Status Panel |
The values in this panel are set by the group's system administrator. Values that appear in italics are locked. |
|
Make This My Default Profile box |
Select to make the current settings the default ones. |
|
Save My Changes box |
Select to save any criteria changes to the profile. |
|
Exit button |
Click the Exit button to exit the profile selection window with no changes to a profile. (You must choose a profile when you start a discrepancy management session.) |
|
More… button |
Opens the More Profile Criteria dialog box for customizing a session's data access. |
|
Create button |
For creating a new profile. |
|
Create button |
Click the Use button to make your current profile criteria the criteria for the current session. This allows you to set criteria that are useful for the current session, but that you would be unlikely to use in future sessions. |
This section contains the following topics:
See also:
From the Conduct menu, select Data Validation, then select Discrepancy Database to open the Maintain Discrepancy Database window. (If the Profiles dialog box opens, choose a profile and click the Use button.) This window has single- and multi- view layout modes. You can switch view modes by toggling the View Mode button in the upper right corner of the window. (See Figure 4-1 and Figure 4-2.)
Single-record view is the default arrangement of the Maintain Discrepancy Database window.
Figure 4-1 Single-Record View of the Maintain Discrepancy Database Window
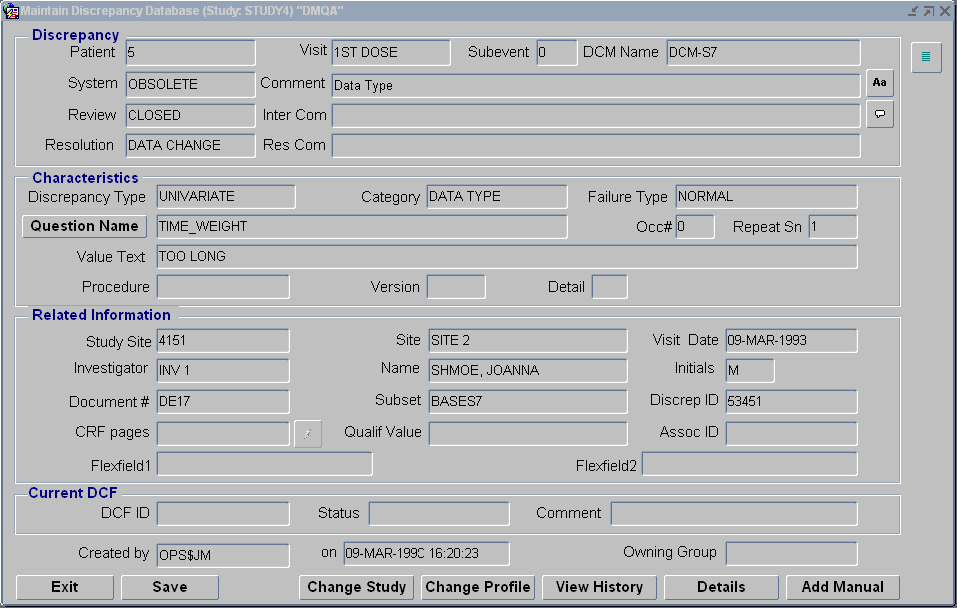
In single-record view the window displays all of the information related to a single discrepancy. It has four sections:
The Discrepancy section, at the top of the window and labeled Discrepancy, displays information about the discrepancy's patient, visit and DCM information; system, review, and resolution statuses; and comments associated with each status. See Table 4-2, "Maintain Discrepancy Database Window: Discrepancy Panel".
The Characteristics section provides information on the cause of the discrepancy. The information displayed varies depending on the type of discrepancy. The value of the discrepant response is displayed for all types except multivariate discrepancies; since more than one response is involved in creating a multivariate discrepancy, you must click on the More button to see all the contributing responses. See Table 4-3, "Maintain Discrepancy Database Window: Characteristics Panel".
The Related Information section contains further information about the question and the discrepancy, including two flexfields your company can utilize. See Table 4-4, "Maintain Discrepancy Database Window: Related Information Panel".
The Current DCF section identifies the DCF associated with the discrepancy, if any. If the discrepancy is not linked to a DCF, the fields in this section are blank. (See Chapter 5, "Using Data Clarification Forms".) See also Table 4-5, "Maintain Discrepancy Database Window: Current DCF Panel".
You use the Exit button to cancel a query, discard changes, and to close the window. You can use the Save button on the window or toolbar, the F10 key, or from the Data menu, select Save to save changes without exiting the window. See also Table 4-6, "Maintain Discrepancy Database window: outside of panels".
In Enter Query mode, the field background color changes to blue. Click F7 to enter query mode, the Exit button to cancel a query, and F8 to execute a query. For more information on query functions, see "Introducing the Oracle Clinical Interface" in the Oracle Clinical Getting Started manual.
To view the details of many discrepancies at the same time, click the Multi button in the upper right corner of the Maintain Discrepancy Database window. The discrepancy window displays discrepancy details in columns. (See Figure 4-2, "Multi-Record View of the Maintain Discrepancy Database".)
Note:
If you perform a query in multi-record view, Oracle Clinical temporarily reverts to single-record view while executing the query. When finished, the system returns to multi-record view.Figure 4-2 Multi-Record View of the Maintain Discrepancy Database

The following tables describe each field in each of the Maintain Discrepancy Database window's panels and the area outside the panels.
Table 4-2 Maintain Discrepancy Database Window: Discrepancy Panel
| Field | Description |
|---|---|
|
Patient |
The patient about whom the discrepant response was collected. |
|
Visit |
The visit at which the discrepant response was collected. |
|
Subevent |
The subevent, if any, at which the discrepant response was collected. |
|
DCM Name |
The DCM of the question whose response triggered the discrepancy. |
|
System |
This field stores the system status. Oracle Clinical maintains a system status of either CURRENT or OBSOLETE for discrepancies. A new discrepancy has a system status of CURRENT. Oracle Clinical automatically sets the system status to OBSOLETE when you fix the data or otherwise resolve the problem that created the discrepancy. |
|
This field stores the comment text, which is an enterable field (except for discrepancies with a review status of CLOSED or a system status of OBSOLETE) for up to 2000 characters of free form text of supplemental information about the discrepancy. The system enters a default value for new discrepancies according to the discrepancy type: for univariate discrepancies, the text is the same as the Category field; for indicator discrepancies, the field is blank; and for multivariate discrepancies the text is taken from the Message field of the Procedure that generated the discrepancy. You can enter the long value for the review status as defined in the DISCREPANCY_REVIEW_STATUS reference codelist by entering three pound signs (###) in the field and saving. You can query for text values in this field. |
|
|
Review |
This field stores the review status. A new discrepancy has a review status of Unreviewed. During the discrepancy management process, you change the review status to reflect the state of investigation into the problem. (See "Review Status Code".) 2000 characters maximum. |
|
Inter Com |
Reviewer internal comments. 1900 characters maximum. |
|
Resolution status; populated only for discrepancies that have been closed. Valid values are set in the installation reference codelist DISCREPANCY RESOLU TYPE CODE. |
|
|
Res Com |
For discrepancies with a value in the Resolution field, the Resolution Comment is an enterable field for up to 2000 characters of free form text of information about why the discrepancy was closed. |
Table 4-3 Maintain Discrepancy Database Window: Characteristics Panel
| Field | Description |
|---|---|
|
Discrepancy Type |
See "Discrepancy Types"; univariate, multivariate, manual (manual header or manual data point), or indicator. |
|
Category |
The discrepancy subtype. For example, univariate discrepancies have categories such as UPPERBOUND, DATA TYPE, DVG, and so on. Multivariate discrepancy categories give information on the data that was compared by the Validation Procedure that created the discrepancy, such as 1- EVENT, 1-DCM or 1-EVENT, 2-DCM. |
|
Failure Type |
Severity of the discrepancy (e.g., NORMAL or CRITICAL). You can specify search criteria in this field in query mode. This is a display-only field. |
|
Question Name |
(Three-way toggle with Question Name, SAS Label and Default Prompt.) The question whose response is discrepant. |
|
SAS Label |
Click the Question Name button to see the SAS Label defined for the question. This text is supplied to the SAS Labels field in SAS views and SAS datasets, to describe the question. |
|
Default Prompt |
Click the Question Name, then SAS Label, to see the Default Prompt defined for the question. This is the label displayed in the Data Entry window for the field that collects data for the question. |
|
Occ# |
The occurrence number of the question (for questions in Repeating question groups only). |
|
Repeat Sn |
The repeat sequence number of the question (for Repeating questions only). |
|
More... |
(Multivariate discrepancies only). Click this button to see the response data involved in generating the discrepancy, one or more of which may be discrepant. The Validation Values window appears, listing the questions and their responses that were used as variables in the Validation Procedure that generated the discrepancy. Questions are displayed as they are in the Procedure, as X.QUESTION_NAME where X is the DCM Question Group alias. If you want a question and its response to be included in the discrepancy's DCF, select the DCF Report? box (see Chapter 5, "Using Data Clarification Forms"). |
|
Value Text |
(Non-multivariate discrepancies only). The question response value that triggered the discrepancy (if any; may be blank for manual and indicator discrepancies). |
|
Procedure |
The name of the Procedure that created the discrepancy (multivariate discrepancies only). |
|
Version |
The version of the Procedure that created the discrepancy (multivariate discrepancies only). |
|
Detail |
The Detail (program code) of the Procedure that created the discrepancy (multivariate discrepancies only). |
Table 4-4 Maintain Discrepancy Database Window: Related Information Panel
| Field | Description |
|---|---|
|
Study Site |
A site in the context of a study. |
|
Site |
A site defined in Oracle Clinical independent of a study. |
|
Visit Date |
The date of the visit at which the discrepant response was collected. |
|
Investigator |
Code of the Investigator responsible for resolving the discrepancy. |
|
Name |
Name of the Investigator responsible for resolving the discrepancy. |
|
Initials |
Initials of the patient. |
|
Document # |
DCI Page number of the discrepant response. For multivariate discrepancies, the DCI Page number of the question group defined as the primary reference in the definition of the Procedure that generated the discrepancy. |
|
Subset |
The DCM Subset containing the discrepant data. For multivariate discrepancies, the DCM Subset containing the question group defined as the primary reference in the definition of the Procedure that generated the discrepancy. |
|
Discrep ID |
The unique ID of the discrepancy. |
|
CRF Pages |
The page number on the physical Case Report Form containing the discrepant response. |
|
Qualif Value |
The response to the Qualifying question, if any, for the DCM containing the question with the discrepant response. |
|
Assoc ID |
Enterable field for the ID of a discrepancy that is the root cause of the current discrepancy; whose resolution will trigger the resolution of the current discrepancy. List of values available. |
|
Flexfield 1 |
Customizable field; may have a user-defined label. Follow your organization's instructions to use this field. See "Reference Codelists" in the Oracle Clinical Administrator's Guide for information about modifying codelists to customize these fields. |
|
Flexfield 2 |
Same as above. |
Table 4-5 Maintain Discrepancy Database Window: Current DCF Panel
| Field | Description |
|---|---|
|
DCF ID |
The ID of the DCF associated with this discrepancy. |
|
Status |
The DCF Status of the DCF associated with this discrepancy. |
|
Text to appear in the Resolution Text field of the DCF report. This field's contents are automatically entered from the CRF Page Number field, provided that the DCF COMMENT TEXTS local reference codelist has an entry for this study, and that entry is not a null string. If you enter your own text in this field, there is no automatic entry made. You can change or delete any entry in this field. |
Table 4-6 Maintain Discrepancy Database window: outside of panels
| Field | Description |
|---|---|
|
Multi/Single View button |
Use this button in the upper right corner of the window to toggle between single-record and multi-record views. |
|
Created By |
Identification of the user who created the entry in the discrepancy audit trail. |
|
on |
Date discrepancy was created. |
|
Owning Group |
When you create a manual discrepancy in the Maintain Discrepancy Database window, the system populates the Owning Group field with the User Group for your discrepancy management profile. For example, if you log into discrepancy management as DM Master Profile, the system records 'DM' as the Owning Group for any manual discrepancies you create; 'DM' is the user group for this profile. |
|
Exit |
Click this button to: cancel a query, discard changes, or close this window and return to the Data Validation menu path. You receive a prompt to save changes. |
|
Save |
Saves your changes to the database. You must click this button after making some group changes in other windows in order to save the changes. |
|
Change Study |
Click this button to work on a different clinical study. |
|
Change Profile |
Click this button to change your user profile (if you have the necessary privileges). See "Selecting a Profile". |
|
View History |
Click this button to see the review history of the discrepancy. See "Viewing a Discrepancy's History". |
|
Details |
Click this button to see further information about univariate discrepancies. See "Viewing Univariate Discrepancies' Related Discrepancies". |
|
Add Manual |
Click this button to add a manual discrepancy of either type Manual Data Point or Manual Header. See "Discrepancy Types". |
|
Multi-record View |
(Displayed in single-record view only.) Toggles to multi-record view. |
|
Single-record View |
(Displayed in multi-record view only.) Toggles to single-record view. |
|
Group Action on Selected Records |
(Displayed in multi-record view only.) Click this button to make group changes to discrepancies, including: updating review status, adding CRF page numbers, inserting standard comment text, marking for passive review, and creating a DCF for the group you select. See "Selecting a Group of Records to Change". |
|
Change Layout |
(Displayed in multi-record view only.) Click this button to change the display order of discrepancy information or to use as a query filter. |
You can both customize the display of the multi-record view of the Maintain Discrepancy Database window and filter the discrepancies displayed there.
Your organization may have one or more pre-defined layouts available. In multi-record view, from the Special menu, select User Group Layouts, then select Default Layouts. Then choose a layout name from the list of values. When you click OK, the system reorganizes the discrepancy details according to the selected layout.
Information on customizing layout definitions is included in the Oracle Clinical Administrator's Guide chapter on configuring discrepancy management.
You can control the order in which the discrepancy information is displayed during this session. To change the display:
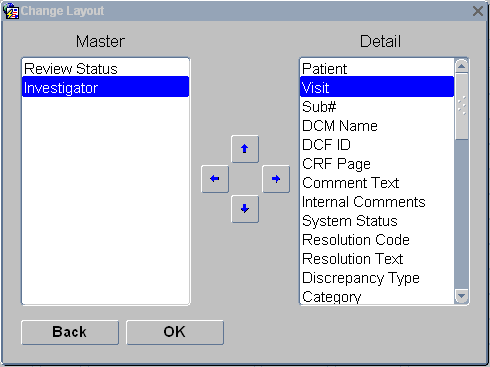
In the multi-record view (only) of the Maintain Discrepancy Database window, click the Change Layout button.
The Change Layout window opens (see Figure 4-3). The Details section lists all the items in the Maintain Discrepancy Database window.
Use the Left arrow to move the fields you select into the Master, or upper, section of the window in multi-record view. The system populates the fields in the Master section with values from the discrepancy that is highlighted in the lower section of the window. You can see all the fields in the Master section (up to eight fields) without scrolling.
Use the Right arrow to move fields from the Master section into the Detail, or lower, section of the window.
Use the Up and Down arrows to adjust the display order of the items. The topmost item in either the Master or Details list appears leftmost in the appropriate section of the Maintain Discrepancy Database window. The second item displayed in the Details section appears second to the left, and so on.
Click OK to save your changes or click Back to return without saving your changes.
You return to the Maintain Discrepancy Database window. If you clicked OK, the system refreshes the view of the window to reflect the changes you made.
You can also use the Change Layout utility to filter the discrepancies displayed. You can use the following fields as filters: Patient, Visit, Subevent, DCM Name, Review Status, DCF ID, CRF Page, and Investigator.
The Change Layout window has two sections: Master and Detail. (see Figure 4-3). Items listed in the Master section are displayed in the upper panel of the Maintain Discrepancy Database window and act as a filter for the discrepancies displayed. Only discrepancies whose value matches the value of the first item listed in the Master section are displayed. If there is a second item listed in the Master section, its value is used as a secondary filter, and so on.
For example, if you've moved the Patient item to the Master section and set its value to Patient 001, the system displays only discrepancies associated with Patient 001. If Visit is the second item listed in the Master section, and its value is set to Visit 6, only discrepancies associated with Patient 001 and Visit 6 are displayed.
To change the order in which the discrepancy detail columns are arranged:
In the multi-record view of the Maintain Discrepancy Database window, click the Change Layout button.
The Change Layout window opens (see Figure 4-3). The Detail section lists all the items in the Maintain Discrepancy Database window.
Use the Left and Right arrows to move items between the Master and Detail section. (All items are in the Detail section of an unmodified layout.) The system grays out the Left and Right arrows if you select an item in the Detail section that is not allowed in the Master section.
|
Note: Be sure to finish Step 2 before proceeding to Step 3. If you need to start over, click Back and then close the Maintain Discrepancy Database window as well, then come back. |
Use the Up and Down arrows to adjust the order of the items. The topmost item appears leftmost in the Maintain Discrepancy Database window. The second item displayed in the Details section appears second to the left in the Maintain Discrepancy Database window, and so on.
The Detail section affects only the order of display in the lower panel of the Maintain Discrepancy Database window.
The Master section affects both the display of the upper panel of the Maintain Discrepancy Database window and the information displayed; only discrepancies whose values match the values of the items in the upper panel are displayed.
Click OK to save your changes or click Back to return without saving your changes.
You return to the Maintain Discrepancy Database window. If you clicked OK, the system refreshes the view of the window to reflect the changes you made.
Note:
If you change studies or change profiles, Oracle Clinical resets the Maintain Discrepancy Database window to the default display; it places all items in the Detail section.Figure 4-3 Maintain Discrepancy Database Window's Change Layout Dialog Box
To change the values of the items in the upper panel of the Maintain Discrepancy Database window and therefore the filter for the information displayed, you must use the vertical scroll bar on the left side of the upper panel.
If you want to query on a value represented in the lower panel of the Maintain Discrepancy Database window, click F7, or from the Query menu, select Enter Query. The system displays the Maintain Discrepancy Database window in single-record view with the values of the filter items supplied. These values will be included in any query you enter.
To view other discrepancies associated with the same question, select the discrepancy in the Maintain Discrepancy Database window and click the Details button. A dialog box opens. The bottom section of the Response Details window contains a list of discrepancies associated with the same question, with the current discrepancy listed at the top. There is information on the related discrepancies' type, category, and review status. If the discrepancy is a multivariate one, you see the name of the Procedure, and the number of the Detail (code) within the Procedure that generated the discrepancy.
The top section displays much of the same information as the Maintain Discrepancy Database window, but also shows Event Time, Investigator Data Comment, Data Change Reason, and Audit Comment.
If you have the necessary database privileges, you can access Data Entry by selecting Update Patient Data from the Special menu to modify the responses (see "Browse and Update Patient Data"). See "Discrepancy Types" for more information on univariate discrepancies.
If you have Oracle Clinical Release 3.1-style Procedures, you can prevent processing variables (questions) with univariate errors. (See "Validation and Derivation Procedures" in the Oracle Clinical Oracle Clinical Creating a Study manual.)
Multivariate discrepancies are created by Validation Procedures that compare multiple question responses as variables. They are associated with all the question responses that created the discrepancy (see "Discrepancy Types").
To view the response data that triggered a multivariate discrepancy, select the discrepancy in the single-record view of the Maintain Discrepancy Database window and click the More button. (The system displays the More button only for multivariate, accessible discrepancies.) The Validation Values window opens, listing the questions (Procedure variables) whose responses triggered the discrepancy, with the response value. If you have the necessary database privileges, you can access Data Entry from the Special menu, by selecting Update Patient Data to modify the responses (see "Browse and Update Patient Data").
|
Note: If you want the response value of a question (Procedure variable) to be displayed in the discrepancy's DCF Report, select its DCF Report? box. For more information on DCFs, see Chapter 5, "Using Data Clarification Forms". |
You can select any question from the list and click the Details button to view any other discrepancies associated with that question (in the bottom section, with the current discrepancy listed at the top). You cannot change the response data from this window.
Oracle Clinical generates a discrepancy history record whenever there is a change in the discrepancy's:
Review status
Resolution status
Internal comment text
Resolution text
Either or both flexfields
To view the history of a discrepancy, select the discrepancy in the Maintain Discrepancy Database window and click the View History button. The Discrepancy History window opens. The history record includes all of a discrepancy's change details, as well as the changes' owners and timestamps. Click the icon to the right of the Internal Comments field to read the internal comments.
The Discrepancy History window is display-only. Click the Back button to return to the Maintain Discrepancy Database window.
To view all of a selected discrepancy's internal comments, click the Internal Comments button (to the right of the Inter Com field in single mode) of the Maintain Discrepancy Database window. The Internal Comment History window opens. It displays comments in chronological order, with the most recent entries at the top of the list. Each entry includes a header with the internal comment's creator's user name, user group, and the creation timestamp. This listing is read-only.
This section contains the following topics:
Your organization must set up a process for resolving discrepancies, and create a review status for each stage of the process. Each person who completes one stage of the process must update the review status of the discrepancy in the Discrepancy Database. Oracle Clinical provides tools for you to use in the review process, including these special functions available from the Special menu from the Maintain Discrepancy Database window:
Scanned CRF images. If your organization has set up this feature, from the Special menu, select Get Image to see an image of the actual paper CRF used to collect the data that led to this discrepancy. (To set up this link initially, your system administrator must modify the procedure OCL_CLIENT_PACK.PASSKEYS database function to call the imaging system. See the Interfacing from Oracle Clinical manual.)
Show RDCM information. If you have the necessary database privileges, you can view a discrepancy's DCM responses directly from the Maintain Discrepancy Database window. From the Special menu, select Show RDCM Info.
Audit RDCIs. View the history of changes to Received DCM(S) and Received DCI(S) involved in a discrepancy, including the original and update timestamps, comments, and owners.
Data Clarification Forms. You can group similar discrepancies for a single patient together on a Data Clarification Form and send them out for review. See Chapter 5, "Using Data Clarification Forms".
CRF Page Tracking. You can associate the discrepancy with the page number of the physical Case Report Form where the discrepant response was recorded. See "Including CRF Page Numbers With Discrepancies".
If you determine that a discrepancy was caused by entering incorrect data, and you have the necessary privileges, you can go to the Data Entry window in Update mode directly from the Maintain Discrepancy Database window and update the data. See "Browse and Update Patient Data".
You can also create discrepancies manually. See "Entering Manual Discrepancies".
Discrepancies are associated with three types of status codes: system, review, and resolution.
The system automatically assigns a system status code to each discrepancy that reflects the actual state of the data that triggered the creation of the discrepancy. The system status code is CURRENT as long as the data is discrepant. When the data is no longer discrepant—either because the data is updated or because the validation procedure or question attribute that flagged the data as discrepant is changed in such a way that the data is no longer discrepant—the system automatically updates the system status to OBSOLETE.
Oracle Clinical ships with these review status codes:
Unreviewed: Oracle Clinical assigns an initial review status value of Unreviewed to each new discrepancy.
CRA Review: Assigned to the Clinical Research Associate for review.
DM Review: Assigned to the Data Manager for review
INV Review: Assigned to the Investigator for review.
TMS in Progress: The system assigns this status to discrepancies that are currently owned by Oracle Thesaurus Management System (TMS). This happens when a question response that is set up to be coded to a dictionary term in Oracle Thesaurus Management System (TMS) cannot be automatically classified, and First Review is set to TMS, or after a user in Oracle Clinical has set the status to TMS Evaluation. You cannot take any action on this discrepancy in Oracle Clinical.
TMS Evaluation: If a TMS user has a question about a response that he or she is trying to code in TMS, he or she can assign an action to the term asking for clarification or some other action. The system then assigns a status such as INV Review (this is configurable; see the Oracle Thesaurus Management System User's Guide for information). After you take the action on the term, set the discrepancy's status to TMS Evaluation so that batch validation transfers ownership of the discrepancy back to TMS and changes its status to TMS in Progress.
Resolved: Not assigned to any person or process. Setting a discrepancy's status to RESOLVED does not cause the system to close the discrepancy. That happens only when the data is no longer discrepant, either because the data has been updated to a nondiscrepant value or because the validation procedure or question attribute that flagged the value as discrepant has been changed in such a way that the existing value is no longer considered discrepant.
If you set the discrepancy review status to Resolved, you must also select a resolution status.
Irresolvable: Not assigned to any person or process because it is not possible to resolve the discrepancy. Setting a discrepancy's status to IRRESOLVABLE does not cause the system to close the discrepancy.
If you set the discrepancy review status to Irresolvable, you must also select a resolution status.
Closed: The system sets a discrepancy's status to Closed when it is resolved by either updating the data to a nondiscrepant value or changing the validation procedure or question attribute in such a way that the existing data is no longer discrepant. The discrepancy's system status changes to Obsolete and the discrepancy is removed from its DCF (if any) and no longer appears as current in discrepancy reports.
Your organization can create custom review statuses to reflect your own review process, and specify which personnel (user roles) are allowed to set which review statuses, by defining several Installation Reference Codelists; see the Oracle Clinical Administrator's Guide for more information.
Describes how the discrepancy was resolved; for example, CRA ACTION, QA ACTION, or NO ACTION REQD. Resolution statuses are configured in the DISCREPANCY RESOLU TYPE CODE installation reference codelist; see the Oracle Clinical Administrator's Guide for information.
The following example shows how two sequential human errors cause discrepancies for a single question response. In this study, the question PULSE RATE has an upperbound limit of 150 and a lowerbound limit of 50. The following table describes user actions and the consequences in the system.
| User Action | System Reaction |
|---|---|
| Operator enters a value of 800 for PULSE RATE during data entry | System creates a new upperbound discrepancy #100. |
| The user changes the value for PULSE RATE from 800 to 8. | The system changes the upperbound discrepancy #100 status to Closed.
The system creates a new lowerbound discrepancy #101. |
| The user returns to data entry and changes the value for PULSE RATE from 8 to 80. | The system changes the lowerbound discrepancy #101 status to Closed. |
If a discrepancy has been triggered by incorrect response data entered into Oracle Clinical, and if you have the necessary privileges, you can resolve the discrepancy by correcting the response data. During the next Batch Validation, Oracle Clinical changes the system status of the discrepancy to Obsolete and the Review status to Closed and removes the discrepancy from its DCF (if it was included in a DCF).
To correct the response for a univariate discrepancy, choose Update Patient Data from the Special menu in the Maintain Discrepancy Database window. To correct the response(s) for a multivariate discrepancy, click the More button and then choose Update Patient Data from the Special menu.
In both cases, the Data Entry window opens in Update mode at the same record. Enter the correct data. When you tab out of the field you edited, an Audit pop-up box appears and you must enter the type of correction you have just made, and then a comment. To exit the window, from the Action menu, select Exit. Then update the Review Status, Resolution, and Comment fields in the Maintain Discrepancy Database window, according to your company's standard operating procedures.
If your organization maintains scanned CRF images, you can display them by clicking the Get Image button in the Maintain Discrepancy Database window (or from Data Entry). You can make an immediate comparison of the original CRF and the data entered into Oracle Clinical.
|
Note: If you click the question mark (?) Help icon from this window, you get information on the Question and question group associated with the response. |
If there is a general problem with a visit record, you can enter a manual header discrepancy. This type of discrepancy is not directly associated with a single response, but to a Received DCM's data in general. You can enter manual header discrepancies only from the Maintain Discrepancy Database window. If you are unable to enter a particular response because, for example, the entry is illegible in the Case Report Form, you can create a manual data point discrepancy, either from the Data Entry window or directly in the Maintain Discrepancy Database window.
To create a manual discrepancy from the Maintain Discrepancy Database window:
Select an existing discrepancy that is similar to the discrepancy you are creating; the system populates the record you are creating with the values of the currently selected discrepancy. (If there are no similar discrepancies, the current selection does not matter.)
Click the Add Manual button in the lower right corner of the window. The Add a Manual Discrepancy dialog box opens, populated with values inherited from the selected discrepancy in the Maintain Discrepancy Database window.
Choose a Discrepancy Type radio button.
Note:
The system opens with Manual Header as the default Discrepancy type. Choose Manual (Data Point) if the discrepancy concerns a particular question response.Adjust the inherited values that populate the dialog box. The data point fields are only active if you selected the Manual (Data Point) radio button.
You can clear all values by clicking the Clear button.
Optional: Add comment text, internal comment text and resolution text. If your organization has standard text values for comments for univariate discrepancies, they become available when you select a field. Enter a standard text name, or choose a name from the standard text list of values.
You can define custom standard text; see the Oracle Clinical Administrator's Guide for information.
Select a Review Status from the list of values. The current profile may limit the list.
Click Save to create the new discrepancy. Click Back to close the dialog box without creating a discrepancy; the dialog box closes.
The system does not display the new discrepancy until you query the Discrepancy Database again.
Note:
It is possible that the currently selected profile restricts viewing the discrepancy you just created.If your study is using CRF Page Tracking, you can store the number of the page of the Case Report Form on which the discrepant response was originally collected. (You can see a scanned image of the actual CRF by selecting Get Image from the Special menu, if your organization has set this up.)
From single-record view, click the CRF Page Number button located next to the CRF Pages field. In multi-record view, select multiple records and use the Group Function to populate the page numbers. (See "Group-Updating CRF Page Numbers".) If the CRF Page Tracking option is enabled, the system retrieves the page numbers. Otherwise, the DCI Book associated with the current patient is referenced.
If there is no patient-specific book, the system populates the field with the default book for the study.
You can directly access Data Clarification Form information related to a discrepancy directly from the Maintain Discrepancy Database window. (For more information on DCFs, see Chapter 5, "Using Data Clarification Forms".) From the Special menu, select Data Clarification Forms. If the current discrepancy is associated with a DCF, the Maintain Data Clarification Form opens to display the details of the DCF. Otherwise, the Maintain Data Clarification Form opens in query mode.
With the Group Function utility, you can query for and select a group of discrepancies and simultaneously update their review status, comment text, or CRF page numbers, mark them for passive review, or create DCFs for them. To access the Group Function utility, open the Maintain Discrepancy Database window in multi-record view; from the Conduct menu, select Data Validation, then select Discrepancy Database, and then the Multi button. You can make the several types of changes, including:
The process involves the following general steps:
Making the change and saving your work
Select records using the standard Windows selecting procedure: Ctrl-click individual selections or Shift-click a successive group of records. To select all records, from the Special menu, select Select All. Once selected, records are displayed as white text on a dark blue background.
Ctrl-click to toggle the selected state of any individual record. Clicking on any selected record without also pressing Ctrl deselects all records.
Notes:
Your group changes are not permanent until you save them in the Maintain Discrepancy Database window (except for creating DCFs).
The Select All function takes place on the Web server; if you have a large group of records, selecting them all may take a while to process.
After you have selected the record(s) to change:
Click the Group Action on Selected Records button located the upper right corner of the Master section.
The Discrepancy Group Functions dialog box opens.
Choose the type of group change to make to the selected records by clicking one of the radio buttons.
Click OK to proceed, or click Back to return and halt the Group Function.
The system tests that the change you want to make is valid for all chosen records. If any records fail this validation check, you receive an error message and the Group Function dialog box closes.
If all selected records are valid, the Value Selection dialog box opens.
This Group Function allows a user to change the review status code for multiple discrepancies. You must assign the same status to all the discrepancies you select. If you select the status Irresolvable, you must also apply the same resolution code to all selected discrepancies. To update the review status of a group of discrepancies:
Select a group of records to update (see "Selecting a Group of Records to Change").
Click the Group Function button located in the upper right corner of the Maintain Discrepancy Database window.
Click the Update Review Status Code radio button.
Click OK. The system verifies that you have the necessary database privileges to update review status. If so, a list of review status values opens.
Select a review status value.
(If you select review status Irresolvable, the Resolution Codes List of Values dialog box opens. Choose a resolution code to apply to all selected records.)
Click OK to assign the selected code to all of the selected records. Click Cancel to halt the group change. In either case, you return to the Maintain Discrepancy Database window.
Click Save to commit your changes to the database.
Note:
Your group changes are not permanent until you save them in the Maintain Discrepancy Database window.If your study is using CRF Page Tracking, you can apply CRF page numbers to a group of selected discrepancy records. See "Including CRF Page Numbers With Discrepancies".
Select a group of records to which to apply CRF page number values (See "Selecting a Group of Records to Change").
Click the Group Action on Selected Records button located in the upper right corner of the Master section. The Discrepancy Group Functions dialog box opens.
Click the Update CRF Page Numbers radio button. The system verifies that you have the necessary database privileges to update the CRF Page field and that all of the selected records have not already been assigned a CRF Page.
Click OK to generate the page numbers, or click Cancel to halt the Group Function. In either case, you return to the Maintain Discrepancy Database window.
Click Save to commit your changes to the database.
Note:
Your group changes are not permanent until you save them in the Maintain Discrepancy Database window.You can use the Group Function to insert the same text into one of the Comment fields for multiple discrepancies at the same time. The fields into which you can make group text insertions are Comments, Internal Comments, and Resolution Comments.
If predefined standard text is available for the type of discrepancy you selected, you can choose a standard comment and insert it (press F9 to see the list of values). If not, you can enter free form text and insert it into all the selected discrepancies' records.
To insert predefined standard text:
Select a group of records to update (see "Selecting a Group of Records to Change").
Click the Group Action on Selected Records button located the upper right corner of the Master section. The Discrepancy Group Functions dialog box opens.
Click the radio button for the field into which you want to insert standard text: Standard Text for Comments, Standard Text for Internal Comments, or Standard Text for Resolution.
Click OK. (Click Back to exit without making changes). The system verifies that you have the database privileges necessary to insert standard comments, and that all of the discrepancies are in the same category. If so, a list of standard text options opens.
Select a standard text option. You can query in this dialog box. Enter a standard text value or part of a value plus wildcards (%) in the Text field, then click the Search button.
In the Maintain Discrepancy Database window, click Save to commit your changes to the database. Click Exit to abandon your changes.
Note:
Your group changes are not permanent until you save them in the Maintain Discrepancy Database window.If you chose Manual, Manual Header, or Multivariate discrepancies, and there is no standard text value, the system opens the Comment Text Editor:
Select a group of records to update (see "Selecting a Group of Records to Change").
Click the Group Action on Selected Records button located the upper right corner of the Master section. The Discrepancy Group Functions dialog box opens.
Click the radio button for the field into which you want to insert standard text: Comments, Internal Comments, or Resolution Comments.
Click OK. (Click Back to exit without making changes). The system verifies that you have the database privileges necessary to insert comments, and that all of the discrepancies are in the same category. If so, the Comment Text Editor window opens.
Enter free form text.
Click OK to complete the group change, or Cancel to return to the Maintain Discrepancy Database window. If you click OK, a Forms window opens which lists the number of discrepancies that will be updated and prompts you to press F10 to commit the changes to the database.
Click OK to close the Forms window, then press F10 to commit these changes to the database.
Passive Review is a status that allows you to reduce the number of discrepancy queries and the number of discrepancies on a DCF by associating one or more discrepancies with a primary discrepancy. You can then include all the discrepancies in a single query. When you create the DCF, do not include discrepancies marked as Passive Review in the printed DCF.
Example If you have a page with three lab results and all three lab results are missing, you would have three discrepancies such as:
AST lab units missing, please provide.
ALT lab units missing, please provide.
RBC lab units missing, please provide.
You could send three queries, but to save time, money, and paper you could choose to send only one query such as: Page 7 all lab units are missing, please provide.
To do this, mark the second two discrepancies for passive review associated with the first discrepancy as the primary discrepancy. Then create a DCF, include all three discrepancies in the DCF, but mark the primary discrepancy's status as For Distribution and the other discrepancies' status as Not For Distribution. When you print the DCF, only the primary discrepancy appears, but all three are included in the electronic DCF.
When the answer to the query returns, you can update the data for all three discrepancies.
Note:
You may want to add a status called PASSIVE, for example, to the DISCREPANCY REV STATUS CODE specifically for this purpose. You must also assign user roles to the code in theTo associate discrepancies with a primary discrepancy:
In the Maintain Discrepancy Database multi-record view, make a note of the ID of the primary discrepancy and its current review status.
Select the secondary discrepancies and the primary discrepancy in the Maintain Discrepancy Database window; see Selecting a Group of Records to Change.
Click the Group Action on Selected Records button located the upper right corner of the Master section.
The Discrepancy Group Functions dialog box opens.
Click the Mark for Passive Review radio button and then click OK. The Discrepancy Association and Passive Review dialog box opens.
Enter the ID of the primary discrepancy. A list of values is available.
Enter a review status for the primary discrepancy. You can set a new review status for it here. A list of values is available.
Enter a passive review status for the secondary discrepancies or leave it as the default value: Passive Review. A list of values is available.
Click OK to save changes and return to the Maintain Discrepancy Database window. You must press Save again there to save the changes to the database.
OR
Click Back to return to the Maintain Discrepancy Database window without saving your changes.
|
Note: If you are using V3.1-style Procedures in your study, you can avoid creating secondary discrepancies by defining your Validation Procedures so that they do not process variables (Questions) with univariate discrepancies. See "Validation and Derivation Procedures" in the Oracle Clinical Creating a Study manual. |
You can create a DCF for discrepancies that you hand-select by using the Group Function from the Maintain Discrepancy Database window, in multi-record view. See Chapter 5, "Using Data Clarification Forms" for information on DCFs and how to create them by using selection criteria.
Note:
A DCF can contain discrepancies associated with only one patient. Selecting discrepancy records for more than one patient causes the system to create multiple DCFs.Note:
The Create DCF Group Function saves the new DCF(s) to the database directly when you perform step 6 of the following instructions — not when you save your changes in the Maintain Discrepancy Database window as with other Group Functions.Select the discrepancy records upon which to base the DCFs (See "Selecting a Group of Records to Change").
Click the Group Function button located in the upper right corner of the Maintain Discrepancy Database window.
Click the Create DCFs radio button.
Click OK. The system verifies that you have the database privileges necessary to create DCFs, and that the selected records are not currently active on any existing DCFs. If appropriate, the Create DCF dialog box opens.
Enter values into the five fields. Except for the Description field, each field has an accompanying list of values:
In the Owning User field, enter or select the person responsible for the DCFs. The system defaults to the current user.
Write a description in the Description field. The system places this text in the Description field of the new DCF for the selected records.
In the Non-Distribution Status field, select Passive Review or another status. Discrepancies with the status you choose here are included in the DCF but do not appear in the printed report.
Choose a standard header text value from the list of values.
Choose a standard footer text value from the list of values.
Caution:
When you perform the next step —Step 6 — the system saves the new DCF records to the database.Click OK (or click Cancel to halt the group change). The system creates one new DCF for each patient whose discrepancies you selected.
The system displays the number of created DCFs in a message box when it finishes processing the change.
The new DCF is now listed in the Maintain Discrepancy Database window for each discrepancy. You can also see the new DCF in the Maintain Data Clarification Forms window (see Chapter 5, "Using Data Clarification Forms").
From the Definition menu, select Test a Study, then select Discrepancy Database to view discrepancies created on test data.
Any discrepancies resulting from entering test data or running Procedures in test mode are entered in the Test Discrepancy Database. Unlike production mode, each time you run a test, the previous discrepancy data for that test is erased in the Test Discrepancy Database.
Oracle Clinical provides a duplicate set of data tables, called a Test Database, for the purpose of testing Data Entry windows, data extract views, Procedures, and DCFs. Whenever you do anything in test mode (using any menu path with the word "test"), Oracle Clinical points your account to the test tables, so you cannot corrupt the data in the production database. Oracle Clinical populates the test tables with a few dummy sites, Investigators, and patients, each of which contains "dummy" in its name. You may need to add more test data.
|
Note: When you create test data, we suggest you follow a naming convention that is easily distinguishable from production data, such as including the word "test" or the letter "T", so that any reports you generate are easily identifiable as test reports. |
|
Copyright © 1996, 2014, Oracle and/or its affiliates. All rights reserved. Legal Notices |
|