| Oracle® Clinical Conducting a Study Release 5.1 E53564-01 |
|
|
PDF · Mobi · ePub |
| Oracle® Clinical Conducting a Study Release 5.1 E53564-01 |
|
|
PDF · Mobi · ePub |
This section contains the following topics:
The chapter describes the Oracle Clinical data entry process. It provides background information about the structure of the components you use to enter CRF data into Oracle Clinical, it outlines the tasks that data entry entails, and it describes the utilities you use to enter data.
Every DCI begins with a header window, which Oracle Clinical uses to collect the information that uniquely identifies the DCI. For example, the header stores such information as the study and site names, the visit and patient number, and the visit date. The system provides some of this information, and you supply other items during initial data entry. When the system validates all of the header information, one or more DCMs displays. Each DCM is a logical grouping of questions collected together at a visit. The minimum configuration for a DCI then, is the header information plus one DCM.
When data entry occurs, your organization has defined a set of Data Collection Instruments (DCIs) that you use to collect the data that is saved, or committed, to the study database. Each DCI is modeled on the Case Report Forms (CRFs) that are utilized in the study to collect data at the clinical sites. The DCI is comprised of an informational section, which holds information about the data, such as the patient number and visit date, and one or more question section, which are named Data Collection Modules or DCMs.
Log-in the DCI header
First-pass data entry
Second-pass data entry
Entering a single CRF in Oracle Clinical is also a two-stage process: entering the header information, and entering the data. This process can be a single operation or separated into two. If a second pass is required, then after the first-pass data is validated the DCI can be invoked in second-pass data entry mode.
DCIs are created prior to the data entry stage. However, since DCIs are the basis in Oracle Clinical for capturing the CRF information, this section illustrates several possible examples for DCI creation.
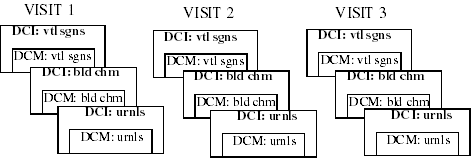
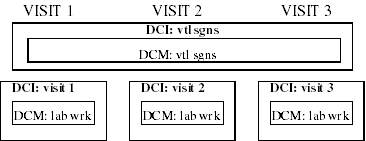
Consider the case of a study that requires vital signs, a blood chemistry workup, and a urinalysis performed at each visit for 3 visits. The possible configurations for building the necessary DCIs are numerous. Beginning with three component DCMs, one containing vital signs questions, one containing blood chemistry questions, and one containing urinalysis questions, there are still many possible sets of DCIs, three of which are illustrated below.
Example 1: Each DCI includes a single DCM. Therefore, entering the data for each visit requires three DCIs.
Example 2: One DCI per visit that includes all three DCMs. Therefore, entering the data from each visit requires a single DCI.

Example 3: One DCI to collect the vital signs for all visits, and a separate one for both of the other DCMs. Therefore, entering the data from each visit requires two DCIs, and one would be ongoing through the study.
This section contains the following topics:
When a CRF is received for data entry, its associated DCI is "logged into" Oracle Clinical. Logging in means that you enter the header information and Oracle Clinical validates it. You can log in a group of CRFs, without entering data, or you can log in and start first-pass data entry for a single CRF. In either case, a DCI is available online for data entry after it is logged in.
Oracle Clinical assigns a status to each DCI, which indicates its stage in the data entry process. The system displays the status each time you open the DCI. (The status of the DCI is visible in the Status field of the DCI header.) Based on the status and the occurrence of batch validation, the system designates the accessibility of each DCI. Accessibility determines how certain other functionality proceeds. Specifically, auditing of data changes is directly affected by the accessibility of a DCI.
There are three "levels" of accessibility:
not accessible
internally accessible
externally accessible
A DCI is not accessible until it becomes internally accessible. This means that until the DCI becomes accessible, the system permits you to enter and update data using the Initial Log-in and the first- and/or second-pass data entry windows. Also, the system does not prompt you for a change reason when you do make updates.
When a DCI reaches the entry complete status, it becomes internally accessible. This status is dependant on the definition of the DCI, specifically, whether single- or double-pass data entry is required. For a single-pass document, the system defines the DCI as internally accessible when it is Pass 1 Complete status. If you want to update a DCI that is internally accessible, you use the Update window. If you want to update the DCI header data, you use the Key Changes window. When you make changes to the data, the system displays the Audit Change Reason window, which prompts you select a change reason and include an explanatory comment, if necessary.
When an internally accessible document undergoes batch validation, it becomes externally accessible. This level of accessibility allows the document to be made available to users out the data entry group.
The following sections describe the process of entering a CRF into Oracle Clinical. They provide an overall picture of the process and understand many of the tasks. To more fully understand the features of working in the Data Entry modes, refer to "Managing Data Entry and User Preferences" in the Oracle Clinical Administrator's Guide.
This section contains the following topics:
The first step in entering a CRF into Oracle Clinical is logging in the study or header information. To initiate this action, select Data Entry, then select Initial Log-In. If you have not yet selected a study, you are prompted for one now. If the study has a DCI Book, a new DCI Book window opens. See "Using DCI Books" for instructions on entering data using a DCI book.
If the study does not have a DCI Book, the log-in window displays.
The actual window you see may be different because the field locations and prompts are customizable. However, the type of information being collected should be similar. The status field at this stage displays "not complete."
To complete the Initial Log-In window:
Complete the Patient field, using the list of values (LOV) if you want.
When you complete the Patient field first, the system will automatically complete the Investigator and Site fields, if the patient is enrolled.
Depending on the value of the Unrolled Patient Alert setting, the system may present a warning window if the patient is not enrolled.
Complete the remaining unfilled fields.
Change any populated fields that are incorrect for the situation.
You should be able to change data in any field, unless the field has been protected from updating. If this is the case and you must change the entry, talk to your supervisor.
Select Save or Next Block, or tab out of the final field, to initiate the validation process.
The header should successfully validate unless you have failed to complete a mandatory field or if the information you entered duplicates other RDCIs in the system. For additional information on these situations, read the section "If Your Header Information Fails to Validate".
After the header information validates successfully, one of the following things happens:
A RDCM window appears directly below the header.
An associated DCM window displays in the area below the header.
The window clears in preparation for a new entry.
Each of these options is described separately. If the third choice occurs, complete all the required header fields, then move to first-pass entry.
If the header information has failed to validate because of a missing field, Oracle Clinical returns a message describing which field to complete. For example, a missing date results in the message "DCI Date must be entered."
If the validation failure occurred as a result of creating a duplicate record a different message box offers the following options:
Update Existing—the Received DCI window displays the existing DCI record in the correct mode to allow you to make changes to the saved data, such as correcting an incorrect planned event or DCI date. You may not be able to operate in this mode, because it requires special permissions.
Because Update Existing changes the keys, the system creates a new record version for audit/snapshot purposes.
Cancel—the Received DCI window displays in the state it was in before it was processed. You can change the values on the window to proceed with your work.
In most cases, when the header information validates successfully, Oracle Clinical either clears the window so you can log in another DCI, or proceeds immediately to a required DCM. In some instances, however, the system requires some contextual information to proceed. To obtain this information, Oracle Clinical presents a small window that displays immediately below the header.
The fields at the very left of the window indicate how many panels there are to complete—for example, one of two.
This phase logs in the DCMs associated with the Received DCI. Depending on the study definition, all fields may be defaulted from information on the DCI, in which case this phase does not require any user input.
However, the study definition may require the input of one or more of the following DCM-level fields: Qualifying Value, Clinical Planned Event, Sub-event Number, DCM Date and Time, or Lab Name. If any of these fields requires user input, the DCM Log-In phase is also required.
If you do not complete all the DCMs in a DCI during one session, the status of the DCI is set to pass 1 started. Within the DCI, the status of each completed DCM is set to pass 1 complete, and the status of each incomplete DCM is set to pass 1 started. When you query RDCIs for first-pass data entry, the system selects DCIs with a status of pass 1 started by default.
Select the First-pass menu option to complete the initial entry of the data from a Case Report Form (CRF). Before entering the CRF data into the DCI the header information must be logged in and the status of the DCI marked "Received." DCIs in this state are sometimes referred to as Received DCIs, or RDCIs. If your study is set up to accommodate it (the Allow First Pass from Login flag is checked in the Maintain Study States window. To access it, select Conduct, then Security, then Clinical Study States), you can choose to do the data entry in the same operation as logging in the header or as a separate operation.
To complete first-pass data entry as a separate operation:
Select Data Entry then, select First-Pass Entry.
Find the RDCI to complete:
Complete the fields to locate the appropriate RDCI, such as Patient and Visit.
Execute the Query.
If the query finds multiple RDCIs, use Next Record to locate the right one.
The system returns only RDCIs with a status of received or pass 1 started.
If a DCI book displays, it completes some fields automatically from the row that is highlighted. If you need a different DCI book, you can place your cursor in the Book field, invoke a list of values, and choose a different one.
Select Next Block to invoke the first DCM.
The system displays the RDCM window under the RDCI header window. If there is more than one RDCM for the RDCI (see the indicator 1 of X in the first line of the RDCM window), scroll to the RDCM for which you want to enter data, using Next Record and Previous Record.
Select Next Block to move to the data entry window for the given RDCM. Oracle Clinical validates the following criteria:
Data entry form for the DCM is ready for data entry.
The system also checks that the RDCI and its RDCMs are of the appropriate status for the First-Pass Data Entry task. Standard starting statuses for performing first-pass data entry are received and pass 1 started, and the default behavior of the system is to query only RDCIs having these statuses.
You can explicitly query for a later-than-standard status if the accessible timestamp for the RDCI is more recent than the last time batch validation was executed for the study. This restriction guarantees that data that has become available for outside access (externally accessible data) cannot be modified except in Update mode (see "Updating Accessible Data").
Note:
For DCMs that have had PASS 1 completed, you are not allowed to modify a DCM and the data for the DCM unless all of these conditions apply:you are the same person who entered it
you are modifying the DCM or its data within the time frame specified by the long value of the JUSTENTERP1TIME row in the reference codelist OCL_DE_CONFIG (Refer to the "OCL_DE_CONFIG" in the Oracle Clinical Administrator's Guide.)
either PASS 2 is required or, if PASS 2 is not required, the document has not been batch validated. Note that the system populates the accessible time for documents that do not require PASS 2.
The cursor is positioned in the first field available for data entry. Default values, if they exist, are displayed in each field.
Enter data from the CRF into the appropriate fields.
Respond to any univariate validation failures as described in the section "Validating Data Entry".
Note:
If a field contains the word "ATTACHMENT" in uppercase followed by a version number and text, it represents an Extended Text Question that supports up to 10,000 characters. You cannot view the rest of the text or enter or update the response here. You can enter and update responses to these questions only in Oracle Clinical Remote Data Capture (RDC) Onsite.If you are unable to enter text in an empty field, it may be because it is an Extended Text Question.
To complete first-pass entry, either Save or Exit.
If you have made changes, the Changes Pending dialog box offers the options:
Cancel – Places you back in Data Entry and allows you to continue.
Discard – Exits the window and discards all pending changes.
Save Incomplete – Saves pending changes, and exits the window with the RDCM in an incomplete state with a status of pass 1 started.
To complete first-pass data entry, together with logging in the header:
Select Data Entry then, select Initial Log-In and Entry.
Follow the steps in the section titled "Logging In CRF Header Information", then proceed with Step 3.
When you perform initial log-in and first-pass entry in the same operation, the document number field is filled in following log-in and remains there for your reference. If you do the operations separately you do not know the document number when it is system-generated.
To initiate form-level validation on the DCM data, select Save.
If the validation succeeds, Oracle Clinical invokes the next RDCI window, or the next Data Entry form—depending on the setting of the autosequence user preference. For more information on the implication of setting autosequence, see "Exit/Autosequence Behavior".
Oracle Clinical validates data entered to ensure conformance with conditions specified during the data definition phase.
For an overview of how batch validation works across Oracle Clinical, see the "Executing Batch Validation" chapter in the Oracle Clinical Creating a Study manual.
As the cursor is about to leave a response field, Oracle Clinical validates the data entered in the field, checking for each of the following criteria:
Value is entered where response has been defined as mandatory.
Length of value is less than or equal to the definition.
Decimal precision for numeric fields is less than or equal to the definition.
Data type (character, number, date) is correct.
Dates are at least as complete as the date type requires.
Value for a DCM question with a discrete value group (DVG), including an external DVG (thesaurus), is valid.
Value falls within the upper and lower bounds, if bounds exist, for numeric, date, or time fields.
If the Univariate Validation Failure Alert configuration setting is disabled, and the Univariate Beep user preference is disabled, you are working in "silent" mode. The system creates a discrepancy for the error, but does not notify you.
If the Univariate Validation Failure Alert configuration setting is enabled, the system displays the Univariate Validation Failure window. You must respond to this window before the system allows you to continue to the next field (refer to "User Responses to a Univariate Validation Failure"). The window tells you what kind of univariate validation failed. If the Univariate Beep user preference is enabled, the system also beeps to indicate the error.
To respond to the Univariate Validation Failure window, do one of the following:
Save—acknowledges that you know about the error, but you entered it exactly as typed and do not want to change it. A discrepancy is created in the discrepancy database. Enter a comment about the discrepancy in the Comment field, or type ### in this field to populate it with a description from the reference codelist discrepancy type code. This description corresponds to the type of univariate discrepancy.
Cancel—acknowledges that you may have entered the data incorrectly and want to re-enter the value. The data entry window is re-displayed, with your cursor at the beginning of the problem field. No discrepancy is created.
Several display characteristics indicate that a discrepancy exists for a field. These indicators display in all entry modes except those where the operator is explicitly blinded to the presence of univariate validation failures.
blue—indicates an existing discrepancy
red—indicates multiple discrepancies, or a discrepancy plus an Investigator comment
(<Univ.>) displayed in the title bar of the data entry window—univariate discrepancy lamp, indicating a discrepancy
You can display a pop-up window with discrepancy information by invoking the Display Univariate Discrepancy function. If the Resolve Discrepancies during Data Entry configuration parameter is enabled, you can also modify the review status, comment, and mark the discrepancy as resolved.
When a repeating DCM question group is defined, the Maximum Number Of Repeats Expected configuration parameter is set automatically. In addition, the Enforce Max Repeats flag can also be set to indicate if Oracle Clinical should enforce that specified maximum during data entry. If you try to enter more records than the number specified, Oracle Clinical either prevents entry or warns you, depending on how the Enforce Max Repeats flag is set.
Before you can save the data, Oracle Clinical performs several form-wide checks for the following conditions:
All mandatory fields either have values or an associated mandatory discrepancy.
In second-pass entry, all fields containing data in first-pass have data entered in second-pass.
You cannot complete second-pass entry until this criterion is met.
Second-pass data entry ensures that the data entered during the first-pass was entered correctly and verifies that it agrees with the CRF. If the study specifies that second-pass data entry is required the data is not accessible until second-pass entry is complete.
You can decide to perform second-pass data entry even if it is not required. For instance, you might do first-pass data entry when you receive faxed CRFs, and second-pass entry when the actual CRFs arrive with Investigator corrections.
If this requirement is toggled on, data becomes internally accessible after both first-pass and second-pass are complete. If this requirement is toggled off, data is "internally accessible" after second-pass is completed. Data that is internally accessible and has been batch validated is considered to be "externally accessible," which means data extract views will display the data.
The study administrator also defines two configuration settings that particularly affect the behavior of the Data Entry form in second-pass: Second-Pass Comparison Failure Alert, and Prevent Second-Pass Entry by First-Pass Operator. A second pass can require a total re-entry of each response, or may be satisfied with sight verification, depending on the DCM question definition.
To complete second-pass data entry:
Select Data Entry then, select Second-Pass Entry from the Oracle Clinical main menu.
If you are going directly from first- to second-pass entry, select Change Tasks and then Second-Pass Entry from the dialog that displays.
As in first-pass data entry, you can use either query or DCI book query sequencing to drive the order of the RDCIs for which you enter data.
As in first-pass, Oracle Clinical validates the following criteria:
Data Entry form for the DCM is ready for data entry.
Standard starting statuses for performing second-pass data entry are pass 1 complete and pass 2 started.
You can only continue entry for a later-than-standard status if the accessible timestamp for the RDCI is more recent than the last time batch validation was executed for the study. This restriction guarantees that accessible data cannot be modified except in Update mode.
Note:
For a PASS 2 COMPLETE DCM, the system does not permit you to modify either the DCM or its data unless both of the following conditions are present:You are modifying the DCM or its data within the time frame specified by the long value of the JUSTENTERP2TIME row in the reference codelist OCL_DE_CONFIG. (Refer to "OCL_DE_CONFIG" in the Oracle Clinical Administrator's Guide.)
The document is not externally accessible.
The cursor is positioned in the first field available for data entry. If a question has been defined as second-pass sight-verifiable a value is displayed in that field. All other fields lacking default values are blank. Enter data for all fields except those defined as sight-verifiable.
Note:
In second-pass data entry, the data entry window initially displays the default value for repeating or nonrepeating questions, even if a different value was entered during first-pass data entry. But for default repeat values the entered value is displayed; these are considered "sight verified" by definition.Note:
If a field contains the word "ATTACHMENT" in uppercase followed by a version number and text, it represents an Extended Text Question that supports up to 10,000 characters. You cannot view the rest of the text or enter or update the response here. You can enter and update responses to these questions only in Oracle Clinical Remote Data Capture (RDC) Onsite.If you are unable to enter text in an empty field, it may be because it is an Extended Text Question.
To complete second-pass entry, either Save or Exit.
If you have made changes, the Changes Pending dialog box offers the options:
Cancel—places you back in Data Entry and allows you to continue data entry.
Discard—exits the window and discards all pending changes.
Save Incomplete—saves pending changes and exits with the status of the RDCM as pass 2 started.
Oracle Clinical provides several ways to handle differences that arise between CRF data entered on the first pass and the second pass. These activities are usually performed by different people; also, differing permissions and configuration settings will have an effect, and handwriting is sometimes difficult to read—all of these situations are accounted for.
As you enter the CRF information during second-pass data entry, the system compares each input value to the response entered during first-pass data entry. If the value does not match exactly, the system responds as follows:
If the Second-Pass Comparison Failure Alert configuration setting is disabled, Oracle Clinical records comparison failures without displaying the Comparison Failure window. To have the system notify you of comparison failure with a beep, enable the Univariate Beep user preference.
In this situation you should plan to perform a comparison reconciliation to ensure the validity of the data.
If the Second-Pass Comparison Failure Alert configuration setting is enabled, the Comparison Failure window displays the values entered during Pass 1 and Pass 2. Do one of the following:
To accept or change the Pass 2 value, select Cancel to return to the Data Entry field.
To select one of the displayed values, either use the mouse to double-click on the value in that field, or use the Next Field and Previous Field keys to highlight the values in turn. When the value you want is highlighted, select Save.
Note:
In certain cases, the Comparison Failure window may open and display identical values for Pass 1 and Pass 2. You must select one of the values—it does not matter which one—in order for the RDCM's status to change to Pass 2 Complete.This state occurs when the Pass 2 data entry operator first enters a response that is different from the Pass 1 response and chooses Save As Incomplete, then returns and changes the Pass 2 value to be the same as the Pass 1 value.
If you accept the Pass 2 value, the system performs univariate validation. If it detects a univariate validation failure in the new value, it displays the Univariate Validation Failure window before allowing you to proceed, just as with first-pass.
If you accept the Pass 1 value and it has a univariate discrepancy associated with it, Oracle Clinical does not re-display the Univariate Validation Failure window, but sets the field display characteristics to indicate the presence of the discrepancy (it displays with a blue background).
When entering responses to a repeating question group during second-pass data entry, you may discover that a repeat from the CRF was either omitted or duplicated during first-pass entry.
Place the cursor in the first field of the repeating question group preceding the omitted line.
Select Insert Record, which inserts a blank line after the existing line.
Enter the omitted response row.
Place the cursor in the first field of the response row to delete.
Select Delete Record.
You cannot insert or delete repeats into a repeating question group that has protected repeating defaults. Additionally, you cannot exceed the value specified for the Maximum Repeats Expected parameter, if that question group has Enforce Maximum Repeats enabled. To help you detect the presence of extra or omitted repeats, the maximum repeat number entered in first-pass entry is displayed when you enter the repeating group during second-pass entry.
If second-pass data is entered with the Second-Pass Comparison Failure Alert parameter disabled, then any first-pass/second-pass comparison failures are saved in the discrepancy database without the opportunity to make changes. These failures must be resolved using Comparison Reconciliation mode.
To perform comparison reconciliation:
Select Data Entry then, select Comparison Reconciliation.
Access the appropriate RDCI, using either query or DCI book sequencing.
By default, in Comparison Reconciliation mode the system queries only RDCIs having the status pass 2 pending.
However, you can query explicitly for RDCIs with a pass 2 complete status, if the accessible timestamp for the RDCI is more recent than the last time batch validation was executed for the study. Setting this restriction ensures that accessible data can be modified only in Update mode.
Move between fields marked as failing first-pass/second-pass comparison using the special navigation function Next Comparison Failure. You can recognize these fields by their blue background field.
Display the Comparison Failure window for the Pass 1 and Pass 2 values by invoking the Display Comparison Failure function. As you process each field, it returns to the default field color.
When you have resolved all the comparison failures, select Save.
You can close the window before resolving all the comparison failures: select Exit, and choose Save Incomplete or Discard:
Save Incomplete—saves all the changes you have made. When you return, only unresolved fields are highlighted.
Discard—throws away your changes.
You are not required to perform comparison reconciliation. If you visually scan and confirm that the Pass 2 values are correct, you can skip displaying the Comparison Failure window.
This section contains the following topics:
The preceding sections have described the most direct path to entering a CRF in Oracle Clinical. Because Oracle Clinical is highly configurable, you may have had questions as you completed the data entry process described. Read the appropriate section to learn how to make these adjustments during data entry.
Enrolling a patient means assigning patient information to an existing patient position. Patient positions are created during the Study Design phase of Oracle Clinical, when specific patients become candidates for enrollment in a study. You may have to dynamically enroll a patient, if you are logging in a DCI before the patient enrollment is complete.
The changes you can make to the Maintain Patient Enrollment window depend upon where you invoke it from and whether the patient record is frozen.
If you invoke the form from a Log-In window, you see the information for only the current patient. If you invoke the form by selecting Data Entry then, selecting Patient Enrollment from the main menu, the window displays the data for all patients enrolled in the study.
You can transfer all data (RDCIs, RDCMs, responses, and discrepancies) from one patient record number to another. You might need to do this, for example, when a patient begins as a screening patient and becomes a normal patient. You can transfer all the data at once, or continue entering data based on the original patient number.
When you transfer RDCM patient data between patient record numbers, the RDCMs must be unique. This uniqueness is enforced at the DCM level, as the combination of DCM and qualifying value must be unique at a visit—CPE and subevent—for a patient.
To transfer patient data:
Select Conduct then, select Security then, select Patient Transfers. The system displays the Maintain Patient Transfers window.
In the Source Patient field, type the ID of the patient whose data is being transferred; you can also use the list of values.
In the Target Patient field, type the ID of the patient whose record will receive the data; you can also use the list of values.
To continue to enter data under the original patient ID, which will then be transferred to the new record, select the Ongoing Transfer? checkbox. For a one-time transfer, do not select it.
A patient may be the target in multiple one-time transfers.
An ongoing transfer may have only one source and one target patient.
In the Transfer Reason Code field, either type a reason code or use the list of values to select a code from the list. This field is validated against the list of active values in the installation reference codelist RDCI CHANGE REASON TYPE CODE.
In the Transfer Reason Comment field, type an explanatory comment, if necessary. This is an optional field.
Note:
The Transfer Reason Code and Transfer Reason Comment fields are required to meet 21 CFR 11 auditing requirements.Click the Save button to commit the record.
Click the Exit button. The system closes the Maintain Patient Transfers window.
From the tree, select Conduct then, select Security then, select Transfer Patients for a Study.
The "Transfer Patients for a Study" PSUB window opens.
Set the value of the parameters. Both parameters accept either "Y" or "N" as values.
If you choose to freeze the source patient position, the system prevents further data entry to the Source Patient ID, unless the transfer type is ongoing.
If you choose to transfer multivariate discrepancies, the system updates the multivariate discrepancies associated with the Source Patient to reflect the Target Patient information. Otherwise, the system makes these multivariate discrepancies obsolete.
Click the Submit Job button.
The system transfers all RDCIs, RDCMs, responses, and univariate discrepancies for all source patients to their respective target patients. The choices in Step 10 are then implemented.
After Oracle Clinical successfully transfers patient data, the Transferred? box is checked and the number of RDCIs transferred is recorded in the Transfer Comment field in the Patient Transfers window. Check the PSUB log file for more information.
After completing the patient transfer job, the system automatically runs the incremental expectedness calculation job for all patients whose data changed. See "Planning and Designing a Study" in the Oracle Clinical Creating a Study manual for more information.
Studies are usually structured in terms of planned clinical events; usually visits. Oracle Clinical manages unplanned events using the Subevent field. An actual event is documented by a DCI being logged in; the assigned subevent number specifies whether the DCI was a planned or unplanned visit. A planned event has a subevent number equal to zero, and an unplanned visit has a number greater than zero.
To document an unplanned visit:
Access the Actual Events window for the patient by selecting the Actual Events function.
Enter a comment describing the reason for the unplanned visit.
Select Back to return to the calling window.
There are two methods you can use to change from one data entry task to another:
Exit from the current data entry task, and select the other option from the Data Entry menu.
While in the Received DCI or Received DCM window, click Change Task and choose the alternative mode from the task-selection pop-up window
This choice preserves some of the key context; for instance, if you switch from Initial Log-In to Browse mode and return to Initial Log-In, the record you were working on when last in that task is re-displayed. Also any query criteria you enter in one mode are preserved in the new mode.
When changing modes using the Change Task function, your access privilege is controlled by the same permissions as for the equivalent main menu activity.
You can review audit trail information for Received DCIs, Received DCMs, and Responses, since Oracle Clinical captures all changes to patient data and their associated CRF header records. The Audit Trail function can be useful for reviewing the history of changes to data in a study, as well as for documenting the correct behavior of the Oracle Clinical software during a user-acceptance validation. The Audit Trail window is query-only; you cannot make changes to data here.
Note:
The audit trail only contains changes to study data, so the addition of new records to a study is not auditable.To review audit trail information for Received DCIs, Received DCMs, or Responses:
Invoke the Received DCI or the Received DCM from any data entry task.
Select the Show Audit function while in the RDCI or the RDCM window.
If the cursor is in the RDCI window when the function is invoked, the Audit Trail window shows all Received DCMs and all changed response data for the currently displayed Received DCI. If the cursor is in the Received DCM window, the Audit Trail window shows just that Received DCM, along with all changed response data and its parent Received DCI. (The Audit Trail window is not currently available from within the data entry window.)
When you Exit from this window, you return to the window that called the Audit Trail window, and you can continue normal processing.
The Audit Trail window displays the following information:
Received DCIs
Received DCMs
All changed Patient Response Data within the current received DCM
A scrollbar is displayed to the left of each block of information. If the scrollbar for the RDCI block is enabled, there have been changes to the RDCI over time. Clicking on the scrollbar displays these changes in reverse date order.
If the scrollbar for the RDCM block is enabled, there have been changes to the RDCM over time, and/or there are multiple DCMs within the DCI (for example, two patient visits are captured on a single page). Clicking on the scrollbar scrolls through these by DCM, with each RDCM shown in reverse date order. If the scrolling causes the DCM to change, patient data in the bottom block also changes.
If the scrollbar for the Patient Response Data is enabled, there are more than five changed response records to browse. Also, a horizontal scrollbar, to the right of the display, shows information that includes the Userid, Change Reason, and Comment Text for each change.
Understanding the audit trail display requires understanding how Oracle Clinical handles changes made to RDCIs, RDCMs, and response data. For example:
Table 1-1 Audit Trail Example Beginning Data
| Date | Activity |
|---|---|
|
15-JAN-1996 10:00 |
A vital signs DCI for Patient 27, Visit 1 is logged in and First-Pass Entry is completed. |
|
16-JAN-1996 10:00 |
The patient number is changed from 27 to 21. |
|
16-JAN-1996 14:30 |
Second-Pass Entry is performed. During this pass, the patient's Systolic Blood Pressure is changed from 120 to 180. |
|
19-JAN-1996 09:00 |
Following confirmation from the Investigator, the patient's Systolic Blood Pressure is changed back to 120. |
Changes are handled by storing versions of the corresponding RDCI, RDCM, and patient response data records. The Entry and Update fields represent timestamps of when the versions were in effect. Records for the previous example would be:
Table 1-2 Example Received DCI and Received DCI Records
| Entered | Updated | DCI Name | Patient Number | Clinical Planned Event |
|---|---|---|---|---|
|
15-JAN-96 10:00 |
16-JAN-96 10:00 |
VITALS |
27 |
VISIT 1 |
|
16-JAN-96 10:00 |
VITALS |
21 |
VISIT 1 |
Table 1-3 Example Patient Response Data
| Entry Time | Update Time | Question Name | Change From | Change To | Change Reason |
|---|---|---|---|---|---|
|
15-JAN-96 10:00 |
16-JAN-96 14:30 |
SYSTOLIC BP |
120 |
180 |
PASS 2 |
|
16-JAN-96 14:30 |
19-JAN-96 09:00 |
SYSTOLIC BP |
180 |
120 |
INV CORR |
Note that the "current" record is always designated by an Update Time displayed as blank. Note also that for RDCIs and RDCMs, the audit trail consists of a copy of the entire previous record, whereas for the patient response data, the audit trail is maintained individually for each data point; for example, no audit trail records will exist for diastolic blood pressure, since this was never changed.
This section contains the following topics:
Oracle Clinical allows you to modify a DCI after it has been logged in and data has been entered.
Use either Key Changes or Initial Log-in to modify header fields.
Use First-Pass Entry to modify the header blank flag, DCI comments, DCM comments, and DCM data comments.
Use Update, Second-Pass Entry, and Reconciliation to modify DCI header comments, DCM comments, and DCM data comments.
Use Update mode to modify response data.
Depending on the DCI/DCM status, you can use First-Pass Entry, Second-Pass Entry, and Reconciliation to update data.
Changes to DCI/DCM in certain statuses cause the system to display the Reason for Change window. Refer to the "Accessibility" section for additional information.
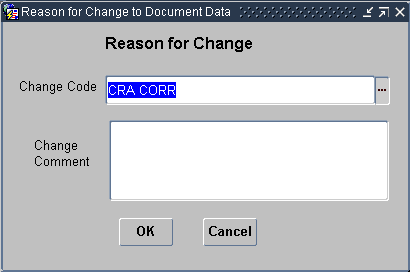
The system displays a Reason for Change window when you update key values or response data in an accessible CRF. The graphic in Figure 1-1 depicts a typical window. The window is comprised of components that allow you to select a change reason and add an optional comment. When the window opens, a default change reason is displayed in the Change Code list box. You can either use the default value or use the list of values to select an alternative.
Select Data Entry then, select Key Changes to change header information for any RDCI, whether or not it is accessible. You can also use this option to log-in data. The difference between Key Changes and Log-in is that Key Changes allows you to update accessible documents.
Note that you cannot query in key changes mode. To open an RDCI you must know either the document number or information in the other fields to uniquely identify the RDCI.
To change accessible header information:
Select Data Entry then, select Key Changes. The data entry window opens.
Enter the document number or enter all key information
Click the Commit button.
If the document is accessible (either internally or externally), the system displays the Reason for Change window. Select a change reason code and, if necessary, type an explanatory comment in the Change Comment field.
Save pending changes.
When an RDCI is accessible, you can modify its data in Update mode.
To update response values in a DCM:
From the tree, select Data Entry then, select Update.
Open the appropriate RDCI.
Navigate to the relevant RDCM.
To update accessible data:
Move to the field you want to change and enter the new value.
Move to another field by clicking in it or by pressing Next Field.
If the system detects a univariate error, it displays the Univariate Validation Failure window before allowing you to move to the next field.
If the new value passes univariate validation, select a reason for the change from the list of values in the Audit Change Reason Type window.
The system displays the Reason for Change window.
Optionally, enter a freeform comment describing the reason for the change.
Select Save to save it and return to the Data Entry window.
If necessary, resolve any duplicate or missing records.
Select Save to save all changes and return to the RDCI window.
Note:
You cannot change the document status in Update mode.When you open an RDCI, the system verifies the following conditions:
the patient record is not frozen
the RDCI is not locked
the Data Entry form for the DCM is ready for data entry
the data is accessible, defined as:
If second-pass is required for the study, status must be pass 2 complete.
If second-pass is not required for the study, status may be pass 1 complete or higher.
Unsuccessful validations produce an error message which instructs you how to proceed.
Successful validation results in the appropriate Data Entry window appearing under the RDCI and RDCM windows. The window is populated with all the saved responses from the Data Entry process. Fields are color-coded to indicate the presence of univariate discrepancies, Investigator comments, and operator comments (manual discrepancies). For more explicit description of the color codes, read "Indicators of an Existing Discrepancy".
As you update a value in a response field, the system performs a univariate validation check. If it validates, the system requires a reason for the change.
The update tasks and processes are exactly the same in this mode. However, if the configuration setting Privileged Update is enabled, you can make changes to locked RDCIs and RDCMs, and you can add more than the maximum number of repeats in a repeating question group, even if Enforce Max Repeats is turned on.
You can make changes to an RDCI in any log-in mode. However, if the data is locked or already access by another user, you must have access to Key Changes mode to make changes. Changes made to a Received DCI affect its associated Received DCMs. When you are delete an RDCI, the system "soft-deletes" it, which means that its status changes to REMOVED, but the record stays in the system. Oracle Clinical requires that records remain available to the system. The system considers records with the status REMOVED to be inactive.
From the tree, select the Data Entry then, select Key Changes.
Enter the Document Number and press the Enter key. The system displays a Forms message window with a message that the document with that number already exists.
In the Forms window, click the Update Existing button.
Update the necessary fields. Use Next Block to navigate to the associated RDCMs, where you can also make changes.
Save to re-validate the Received DCI and Received DCMs.
Exit.
Select Data Entry then, select Key Changes.
Enter the Document Number and press Return.
From the Forms message box that displays, select Update Existing.
The RDCI displays.
Select Delete Record.
The system sets the Status field to REMOVED in the RDCI and all its associated RDCMs. This makes these records inactive, but leaves them in the database. Select Exit from the Action menu when your changes are complete.
Two menu items serve this function. One, Browse, allows you to view a specific RDCI and RDCM data record without making changes to the data. The other possibility is an option accessible from the Special menu.
This section contains the following topics:
You can invoke a scanned image of the CRF you are working with, if your site has set it up. For this task the Special menu provides various functions, such as Invoke Image; you may also be able to select a button on the toolbar. A request to your imaging system results in the scanned image displaying in another window. You can make this happen from the Log-In, Data Entry, or Discrepancy Database Management windows, provided that your site has been set up for this option. See "Interface Configuration" in the Oracle Clinical Application Programming Interface Guide manual that describes enabling and customizing this feature, where instructions are intended for API programmers. Because what you display and how you arrive at the display depends on the particular implementation for your site, Oracle does not provide details on how you interact with the system.
If the configuration setting Manual Discrepancy in Browse is enabled, you can modify an existing operator comment or add a new one.
If the Browse Accessible Data configuration parameter is enabled, you can only browse accessible data. If this parameter is disabled, you can browse all data.
To browse data:
Select Data Entry then, select Browse.
You will be prompted to select a study, if you have not already selected one.
Select RDCIs.
Using query sequencing—RDCIs display in browse mode.
Using DCI book sequencing—use the fields in the DCI book to invoke the appropriate RDCIs.
By default, the system search includes records that are frozen, locked, and from other locations (all of which are unavailable in other tasks).
From the group of RDCIs presented, select Next Block to display the Data Entry window.
All the saved responses from the Data Entry process are displayed. Fields are color-coded to indicate the presence of unresolved univariate discrepancies, Investigator comments, and operator comments (manual discrepancies).
To view an operator comment, move to a color-coded field that indicates an <Oper.> lamp in the title, and select the Operator Comment function. If an operator comment already exists, it is displayed. If you have the appropriate privileges, you can create new operator comments, in addition to viewing existing ones.
Select Save, if you made changes.
Select Exit to leave the block.
Depending on your sequencing options and preferences, and your current entry mode, either your cursor returns to the RDCI Header window, or your cursor proceeds to the first enterable field of the next form in sequence.
Browsing data does not change the Received DCI or Received DCM status.
The Browse Audit Trail window displays the history of changes to RDCIs, RDCMs and Questions. All fields are display-only, but you may want to invoke the Editor window to browse responses that are too long to display completely in the Browse Audit Trail window. Click in the response field that you want to browse, then invoke the Editor window by selecting Data, then select Edit Field. Alternatively, press Ctrl + E.
Access the Browse Audit Trail window in either of the following ways:
From the tree, select Conduct then, select Data Validation then, select Discrepancy Database menu path. The system opens the Profiles for Discrepancy Management window. Select Special then, select Audit RDCIs menu command.
In the Browse window, with a document open, select Action then, select Audit menu command.
|
Copyright © 1996, 2014, Oracle and/or its affiliates. All rights reserved. Legal Notices |
|