| Oracle® Clinical Remote Data Capture Onsite User's Guide Release 5.1 E53567-01 |
|
|
PDF · Mobi · ePub |
| Oracle® Clinical Remote Data Capture Onsite User's Guide Release 5.1 E53567-01 |
|
|
PDF · Mobi · ePub |
In Oracle Clinical Remote Data Capture Onsite (RDC Onsite), the verification process involves checking the entered data against the source data. You can verify CRFs only if you have the VERIFY privilege. You can view the verification requirement and verification status of individual CRFs only if you have at least the BROWSE_VERIFY privilege.
You verify CRFs, one at a time, from the Data Entry window. Alternatively, your sponsor can configure RDC Onsite to make a group verification option available. Techniques for finding the CRFs requiring verification vary slightly, depending upon whether or not you have a Source Data Verification (SDV) plan in effect for the study site. If you do have a published SDV plan in place, then partial SDV is likely in effect, whereby not all CRFs require SDV. You can view the SDV plan for your site only if you have any of these verify privileges: VERIFY, BROWSE_SDVPLAN or UPDATE_SDVPLAN. See Creating and Modifying a Study Site Source Data Verification Plan.
This chapter includes the following topics for sites using or not using partial SDV:
To review patient CRFs and verify the data against the source data, you can:
Use a customized Activities link on the Home page
Select patients on the Home page and navigate to the Review CRFs page
Select patients on the Home page and navigate to the Casebooks page
If there is an active patient SDV plan, and you have the necessary privileges (BROWSE_VERIFY or higher), you can search for Patients requiring 100% SDV. The results include both patients with and without entered data. In order to retrieve only patients with data, use the CRF Status Verification search field, selecting Requires Verification. CRFs requiring source data verification have a V icon.
By default, the Activities section on the Home page includes a Review non-blank CRFs ready for initial verification link. This link has built-in search criteria that automatically finds only those CRFs that are ready for verification, and then displays those CRFs on the Review CRFs page.
Your sponsor can customize the Activities links. They can choose to create additional links, define different search criteria for links, rename links, or make some links unavailable. The links available to you depends on how your sponsor customized the RDC Onsite application.
To use the Activities link to find CRFs for verification:
Select the Review non-blank CRFs ready for initial verification link in the Activities section on the Home page.
The link navigates to the CRF Review page, which lists all CRFs satisfying the criteria specified by the activity.
Note:
The blank Verified column indicates that the CRF has not been verified.Expand the Search pane to view the criteria in effect as a result of selecting the activity.
The non-customized activity displays only CRFs with status Entry or Pass 2 Complete that are not verified and have no open discrepancies. If Partial Source Data Verification is implemented for your site, the CRFs page lists only those CRFs that require source data verification according to the SDV Plan in place.
Click Reset to specify different search criteria, if needed.
Click Search to refresh the page according to your new criteria.
You can select specific patients for review on the Home page, and then navigate to the Review CRFs page to view the CRFs ready for verification. If a patient SDV plan is in effect for your site and you have the appropriate privileges, patients requiring SDV are identified in the Home page. If desired, you can select those patients individually, or you can simply Search for Patients requiring 100% SDV.
Alternatively, select your preferred RDC page directly, using the tabs, then enter the desired CRF search criteria to retrieve all CRFs requiring verification. This may be a better approach if you have an SDV plan where some patients require 100% SDV, but the remaining patients require SDV for critical CRFs only.
To select patients and view CRFs ready for verification:
Open the Home page and expand the Search pane.
Specify patient search criteria. For example, you can specify a patient range, patients assigned to a particular casebook (study protocol), or patients with no open discrepancies or with partial SDV in place, Patients requiring 100% SDV.
Click Search to refresh the patient list according to your criteria.
Select one or more patients for review from the Patients list. In order to do this you can click one row and then use the Ctrl + A keys to select all the patients displayed.
Alternatively, you can click on the table header for the patient icon to select all the patients.
Note:
You can use combinations of keys including Ctrl on all supported devices except for iPad.Click the Action menu and then select Multi-Patient View, Single Patient View or Review CRFs from the list.
Note:
If your SDV plan includes both a patient and a CRF component, this method will not necessarily retrieve all CRFs requiring verification. You will be missing patients who do not require 100% SDV but who have critical CRFs requiring verification. In this case, you should simply search for CRFs requiring verification, either using the activity link or your own search criteria.Depending on your selection, the appropriate page opens:
The Review CRFs page displays all entered CRFs for the selected patients.
The Patient Casebooks page displays all entered and expected CRFs for the selected patients in spreadsheet format. See "Using the Patient Casebooks Page" for information on navigating in the Patient Casebooks page.
Expand the Search pane to specify CRF-level criteria, such as verification status, entry status, or discrepancy status.
Click Search to refresh the CRF list after selecting additional criteria.
To reset your patient selection entirely and specify a different search, click Reset.
Data can be updated even after a CRF has been verified. When this happens, the CRF automatically acquires a verification status of Awaiting Re-Verification.
To find CRFs that require re-verification:
Follow one of the methods described in "Finding CRFs to Verify" to find CRFs ready for verification.
Expand the Search pane on either the Review CRFs page or the Patient Casebooks page.
Click the Verification field and then select Awaiting Re-Verification from the list.
Click Search to refresh the display.
Continue to "Reviewing Changes since Latest Verification".
Note:
CRFs with an Awaiting Re-Verification status are not retrieved when you search for Verification status Requires Verification.After identifying CRFs that require verification, you can review them to ensure that they meet the requirements for verification. Your review of CRFs can include:
To review entered data for errors:
Open a CRF in a Data Entry window.
Review data in the CRF fields.
Create a manual discrepancy if you find a discrepancy between source data and data entered in the eCRF.
To add a discrepancy, you can right click on the field to select Add discrepancy from the pop-up menu, or you can position the cursor in the discrepant field and select the Add discrepancy icon from the toolbar.
Save the CRF if you create a manual discrepancy.
Tip:
Click the Next CRF link to navigate through all CRFs without having to return to the Patient Casebook page or the Review page.As a monitor or CRA, you may need to review discrepancies before you verify a CRF. See Chapter 4, "Managing Discrepancies" for more information.
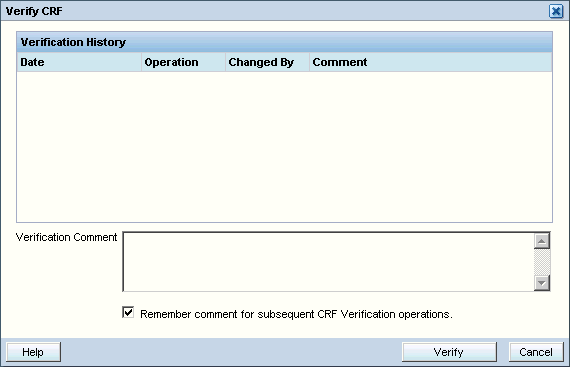
Before you verify a CRF, RDC Onsite lets you view the CRF's verification history, if any. A CRF that has never been verified does not have a verification history.
To view the verification history of a CRF:
Open the CRF in a Data Entry window.
Click the Verify icon in the toolbar. The Verify CRF dialog box displays the following information about the verification history, if any, for the CRF.
Date — Displays the date and time of the entry in the Verification History table.
Operation — Displays the action that caused a change in verification status: Verify or Undo Verify.
Changed By — Displays the full name of the user who changed the verification status.
Comment — Displays additional information about the Verify or Undo Verify action.
Close the Verify CRF dialog box.
The data in a CRF can undergo change even after the CRF has been verified. When this happens, RDC Onsite automatically changes the status of the CRF to Awaiting Re-Verification.
You should always review the changes in a CRF before you verify it again.
To review the changes to a CRF since the latest verification:
Search for CRFs that require re-verification:
Open the Patient Casebooks page or the Review CRFs page.
Expand the Search pane.
Click the Verification field and then select Awaiting Re-Verification from the list. In the Single Patient Casebook page select the filter Requires Re-verification.
Click Search to execute the search and refresh the display.
Note:
If you search for Verification status of Requires Verification, the search does not retrieve CRFs with an Awaiting Re-Verification status.Open a CRF in a Data Entry window.
Click the Highlight field in the toolbar, and select Changed since last verified from the list. Fields updated since the last verification are highlighted in blue. Note that fields whose only update is an update to the investigator comment are highlighted.
Right-click a field highlighted in blue, and select View Audit History. The Audit History pane opens at the bottom of the Data Entry window.
Review the history of changes for the selected field.
Continue to review the changes to other fields in the CRF since the last verification.
Finding Non-highlighted Changes in a CRF
When you select Changed since last verified in the Highlight field in the Data Entry window, RDC Onsite does not highlight fields that have undergone the following changes:
If updates were restricted to discrepancies, RDC Onsite does not highlight the associated fields. To locate such cases:
Click the Verify icon in the Data Entry window toolbar to find the date of the latest verification in the verification history.
Review the Discrepancy History to identify any updates since the last verification.
If the layout of a CRF was modified, the CRF status could revert to Awaiting Re-Verification, even without any data updates.
Follow your sponsor's instructions for re-verifying CRFs with non-highlighted changes.
As a monitor, you need to review the changes to a CRF, especially the changes made to a CRF that was already verified. The Audit History pane provides comprehensive information on the changes to each field in a CRF.
To view the history of the changes to a field:
Open a CRF in a Data Entry window.
Right-click a field and then select View Audit History. The Audit History pane opens at the bottom of the Data Entry window.
Review the history of changes for the selected field.
Note:
The Audit History pane does not include those changes made to discrepancies or investigator comments. You can, however, view the Discrepancy History and the Investigator Comment History for information on those updates.To view other CRF creation history - Generate the CRF History report to view other CRF history not visible in the audit pane, such as the CRF creation and any deleted data rows.
Open a CRF in a Data Entry window.
Right-click a field and then select View Audit History. The Audit History pane opens at the bottom of the Data Entry window.
Review the history of changes for the selected field.
Note:
Generate the CRF History report as above to view other CRF history not visible in the audit pane, such as the CRF creation and any deleted data rows.After identifying CRFs ready for verification as described in "Finding CRFs to Verify", and reviewing CRFs as described in "Reviewing CRFs from the Data Entry Window", you can verify an individual CRF from the Data Entry window. You can use a similar process to undo a verification as well as to redo the verification of a CRF.
Note:
You can verify a CRF only if you have verify privileges and the CRF does not have a status of Received or Entry Started.To verify a CRF:
Open a CRF in a Data Entry window.
Click the Verify icon in the toolbar to open the Verify CRF dialog box.
The Verify CRF dialog box includes the verification history of the CRF, if any.
The verification actions available in the Verify CRF dialog box depends on the current status of the CRF. Based on the status of the CRF, you can:
Click Verify to verify the CRF.
Click UnVerify to undo the verification if the CRF was already verified.
Click Re-Verify to redo the verification of a CRF. A CRF needs to be re-verified if data is updated or added since the last verification.
Save your changes.
See "Reviewing Verification History" if you want to review the verification changes to the CRF.
RDC Onsite assigns Awaiting Re-Verification status to a CRF, if data is updated, new data collected or discrepancies added/updated, after the CRF was verified.
To redo the verification of a CRF:
Search for CRFs that need to be re-verified, as described in "Finding CRFs Requiring Re-verification".
Review changes in the CRF after verification, as described in "Reviewing Changes since Latest Verification".
Review the audit history of changes in the CRF, as described in "Reviewing Audit History", if you want.
Redo the verification of an individual CRF, as described in "Verifying CRFs from the Data Entry Window".
Redo the verification of a group of CRFs, as described in "Verifying Multiple CRFs".
You can verify multiple CRFs simultaneously from the Patient Casebooks page or the Review CRFs page. The group verification option is available only if you have verify privileges, and if your sponsor has configured RDC Onsite to allow it.
To verify multiple CRFs:
Open the Patient Casebooks page or the Review CRFs page.
From the Multi-patient casebook page, select one or more patients whose CRFs you need to verify. Click the Action menu and select Verify from the list.
From the Single patient casebook page, select one or more visits whose CRFs you need to verify. Click the Action menu and select Verify from the list.
From the Review CRFs page, select one or more CRFs to verify. Click the Action menu and select Verify from the list.
Note:
If the Verify option does not appear in the list, either you do not have appropriate privileges, or your sponsor has not configured RDC Onsite for group verification.The Group Verification dialog box opens and displays the following information:
The number of CRFs selected
The number of selected CRFs with open discrepancies
The number of patients you selected (if you started with a patient selection on the Patient Casebooks page)
You can choose from the following options:
Exclude CRFs with discrepancies
Exclude non-migrated CRFs entered from Oracle Clinical or RDC Classic
Exclude Batch loaded CRFs
Include CRFs for this visit only (Otherwise, all visits for the selected patient(s))
Note:
The above-mentioned checkboxes are enabled or disabled, checked or unchecked according to settings in Oracle Clinical. The option to include CRFs for this visit only appears when Group Verify is invoked from the multi-patient casebooks page.Enter a comment in the Verification Comment field, if you want.
Click Verify to proceed with the group verification.
RDC Onsite verifies all the selected CRFs. A dialog box reports when the verification is complete, and displays the total number of CRFs that were verified.
Click Close to close the dialog box
RDC Onsite automatically refreshes the page and updates the verification status of the affected CRF icons.
Note:
The number of CRFs verified may be less than the number of CRFs selected for any of the following reasons:Any of the optional checkboxes is selected, depending on the settings from Oracle Clinical.
The CRF is already verified.
The CRF has a database lock (another user or a validation procedure is updating the CRF).
The CRF has an Oracle Clinical lock.
The CRF is entered from another site.
The CRF is at status Received or Entry Started.
If you unintentionally verify a group of CRFs, you can reverse the action with the Undo Group Verification option. You can undo verification of multiple CRFs simultaneously from the Casebooks page or the Review CRFs page.
The Undo Group Verification option is available only if you have the appropriate privileges, and your sponsor has configured RDC Onsite to allow it.
To undo the verification of a group of CRFs:
Open the Patient Casebooks page or the Review CRFs page.
From the Multi-patient casebook page, select one or more patients whose CRFs you need to unverify. Click the Action menu and select UnVerify from the list.
From the Single patient casebook page, select one or more visits whose CRFs you need to unverify. Click the Action menu and select UnVerify from the list.
From the Review CRFs page, select one or more CRFs for which you need to undo the verification. Click the Action menu and select UnVerify from the list.
Note:
If the UnVerify option does not appear in the list, either you do not have appropriate privileges, or your sponsor has not configured RDC Onsite for the group undo verification.The UnVerify CRFs dialog box opens and displays the following information:
The number of CRFs selected
The number of patients you selected (if you started with a patient selection on the Multi-Patient Casebooks page)
If you invoke this action from the Patient Casebooks in the multi-patient view, you see the checkbox Include CRFs for this visit only (Otherwise all visits for the selected patient(s)). This checkbox appears enabled or disabled, checked or unchecked according to settings in Oracle Clinical.
Enter a comment, if you want.
Click Continue to proceed with undoing the group verification.
RDC Onsite undoes the verification of the selected CRFs. A dialog box reports when the unverify operation is complete, and displays the total number of CRFs that were unverified.
Click Close to close the dialog box.
RDC Onsite automatically refreshes the page and updates the verification status of the affected CRF icons.
|
Copyright © 1996, 2014, Oracle and/or its affiliates. All rights reserved. Legal Notices |
|