| Oracle® Clinical Remote Data Capture Onsite Administrator's Guide Release 5.1 E53568-01 |
|
|
PDF · Mobi · ePub |
| Oracle® Clinical Remote Data Capture Onsite Administrator's Guide Release 5.1 E53568-01 |
|
|
PDF · Mobi · ePub |
Using forms and settings in either the RDC Administration application or the Oracle Clinical application, you can oversee RDC Onsite security, configure certain application components, and maintain session settings for RDC Onsite users.
This chapter includes the following topics:
You can use the RDC Administration application to assign privileges. You can assign one privilege or a set of privileges to a user.
Privileges give RDC Onsite users the permission to perform a certain task or an action for a specific study or study site. For example, you may give some users the right to browse (view) data, but not update data. Other users may receive the privilege to update, verify, and approve CRFs.
Privileges are independent of user roles. However, you often assign the same set of privileges to all users in a particular role.
You can assign privileges on a study basis or a study site basis. For example, you can grant a user BROWSE access to all sites in the study, and then grant the same user UPDATE privileges for one site.
Table 2-1 describes the privileges that you can assign to users.
Note:
Some privileges also apply to Oracle Clinical users who have access to the Discrepancy Management form.For more information, see ”Configuring Discrepancy Management” in the Oracle Clinical Administrator's Guide.
All users must be assigned at least one privilege in order to start a RDC Onsite session. If RDC Onsite determines at login that the user is not assigned at least one privilege, the login fails and the session does not start.
The minimum privilege you can assign is the BROWSE or BRW_BATCH privilege. However, all other privileges also include the BROWSE privilege. Therefore, you only need to grant the BROWSE privilege to users who will have no other privilege.
Note that BROWSE does not include BRW_BATCH.
Note:
In addition to granting privileges, you must grant each user a role.Table 2-1 Functional Privileges for RDC Onsite Users
| Privilege | Access Granted | Applies To… |
|---|---|---|
|
BROWSE |
Provides read-only access to manually-entered data. The BROWSE privilege does not include the privileges defined by BRW_BATCH, BROWSE_REVIEW, BROWSE_VERIFY or BROWSE_SDVPLAN. |
|
|
BRW_BATCH |
Provides read-only access to batch-loaded data. The BRW_BATCH privilege does not include the privileges defined by BROWSE_VERIFY, BROWSE_REVIEW or BROWSE_SDVPLAN. |
|
|
BROWSE_VERIFY |
Provides read-only access to CRF VERIFICATION status. Also provides visibility into CRF verification requirement status when Partial Source Data Verification is being used. This privilege is required to be able to search for CRFs based on verification status or verification requirement status and to view metrics regarding CRF verification status. These functions are only included in the VERIFY, BROWSE_SDVPLAN, and UPDATE_SDVPLAN privileges, as well as the BROWSE_VERIFY privilege. |
|
|
BROWSE_SDVPLAN |
Provides read-only access to SDV plan. The BROWSE_SDVPLAN privilege includes the privileges defined by BROWSE and BROWSE_VERIFY. |
|
|
BROWSE_REVIEW |
Grants read-only access to view CRF status in terms of all the custom review types defined and in use for your study. For more information on defining Custom Review Types, see "Configuring Custom Review Types." |
|
|
Update privileges for custom review types |
The update privilege for a custom review type allows the user to update the CRF status for that review type. You create the update privilege for each custom review type when you define the review types for your installation. See"Configuring Custom Review Types" for more information. |
|
|
UPDATE |
Lets the user enter data into a CRF, update manually-entered data, and update discrepancies. The UPDATE privilege includes the privileges defined by UPD_DISCREP. However, the UPDATE privilege does not include the privileges defined by UPD_BATCH. |
|
|
UPD_BATCH |
Lets the user update data, initiate discrepancies, and update discrepancies in CRFs that are batch-loaded. The UPD_BATCH privilege includes the privileges defined by BRW_BATCH. |
|
|
UPD_DISCREP |
Lets the user initiate or update a discrepancy in CRFs that are manually entered as well as batch-loaded. |
|
|
UPDATE_SDVPLAN |
Lets the user update SDV plans. The UPDATE_SDVPLAN privilege includes the privileges defined by BROWSE_SDVPLAN and BROWSE_VERIFY. |
|
|
ADMIN_SDVPLAN |
Lets the user unlock a plan that another user left unlocked. The ADMIN_SDVPLAN privilege includes the privileges defined by BROWSE_SDVPLAN |
|
|
VERIFY |
Lets the user electronically confirm that the source data has been verified. The VERIFY privilege includes the privileges defined by BROWSE_SDVPLAN and BROWSE_VERIFY. However, the VERIFY privilege does not include the privileges defined by UPDATE_SDVPLAN. Users with this privilege have access to the tools for verifying CRFs. |
|
|
APPROVE |
Lets the user electronically sign CRFs. Users with this privilege have access to the tools for approving CRFs. Note: You can grant this privilege at the site level only. |
|
|
UPD_LOCK_OC |
Assigns privileged update to the user, and lets the user update locked documents in Oracle Clinical. |
|
Batch-loaded CRFs are a distinct type of CRF. For any user who needs to view or update batch-loaded CRFs, you must assign one of the following separate privileges:
BRW_BATCH
UPD_BATCH
The VERIFY and APPROVE privileges are the same for batch-loaded and manually-entered CRFs. However, a user with VERIFY or APPROVE privileges must also have either the BRW_BATCH or the UPD_BATCH privilege to open and view a batch-loaded CRF.
In addition, the UPD_BATCH privilege only lets you update response data and investigator comments in a batch-loaded CRF.
Users with UPDATE and UPD_BATCH privileges can create or update responses and discrepancies for batch-loaded and non-batch-loaded CRFs.
Users with BRW_BATCH and UPD_DISCREP privileges can create or update discrepancies but not responses for a batch-loaded CRF.
Users with BRW_BATCH and UPD_BATCH (and no UPDATE) can see batch-loaded CRFs in Browse mode only.
For RDC Onsite, you can assign any privilege at either the site level or the study level except for the APPROVE privilege. You can assign the APPROVE privilege at the site level only.
Privileges granted at the site level take precedence over privileges granted at the study to which the site belongs. This hierarchy gives you the flexibility to grant a user privileges that are more extensive at one site and still let that user access data at other sites within the same study.
Example 2-1 Using Site- and Study-Level Privileges to Limit Access
Suppose a study has Site001 through Site006. If you want to let a user UPDATE data at all sites except Site003, assign the following privileges to that user:
UPDATE privilege at the study level
BROWSE privilege for the Site003 site
Because privileges at the site level take precedence over those at the study level, BROWSE is the only privilege that has affect at Site003. This setup effectively limits the user to view-only access to all CRFs associated with patients assigned to Site003.
Example 2-2 Assigning Site- and Study-Level Privileges to Provide Full Access
Suppose a study has Site001 through Site006. If you assign a user the UPDATE privilege at the study level, the user can update data and discrepancies at all sites in the study. If you then assign the user a site-level APPROVE privilege for Site001 and Site002 only, the user can APPROVE CRFs at those two sites, but cannot UPDATE data at those two sites. The site privilege takes precedence over the study privilege.
To allow the user to update data at all sites in the study, you must assign the user site-level UPDATE, as well as APPROVE privilege, at Site001 and Site002:
UPDATE at the study-level, and
UPDATE and APPROVE at Site001 and Site 002
Table 2-2 lists sample sets of privileges typically granted to different roles. Note that certain privileges are granted at the study level, while other privileges are granted at the site level (that is, on a site-by-site basis).
To use the Study Security and Site Security options, you must have one of the following privileges:
RXC_ADMIN
RXC_SUPER
RXC_SUPER_NOGL
Other users who have study access can use the Query Study Security and the Query Site Security options to view the study and site security forms. These users can view the forms, but cannot update any information.
You can define and maintain users' study and site privileges either from RDC Administration or from Oracle Clinical.
To define study privileges, navigate to Maintain, and then select Study Security.
To define site privileges, navigate to Maintain, and then select Site Security.
To define study privileges, navigate to Admin, Users and Roles, and then select Study Security.
To define site privileges, navigate to Admin, Users and Roles, and then select Site Security.
Once you open either the Maintain Access to Studies form or the Maintain Access to Sites within a Study form, you can use the standard menu commands, toolbar icons, or shortcut keys to:
Query for one or more records. You can use the % sign as a wildcard search character.
Add a new record or update existing records.
Delete one or more records.
Switch to a different study or site.
For the Study field, Site field, and User field, you can type directly into the field. You can also open a list of valid values and select from the list.
To add or modify the privileges for a user:
Open either RDC Administration or Oracle Clinical.
In RDC Administration, navigate to Maintain.
In Oracle Clinical, navigate to Admin, Users and Roles.
Open the correct form:
To grant privileges to a user for a particular study, select Study Security.
To grant privileges to a user for a particular site, select Site Security.
Query for a particular record or query all records and navigate to the record you want to update. Alternatively, press F6 to insert a blank row and add a new record.
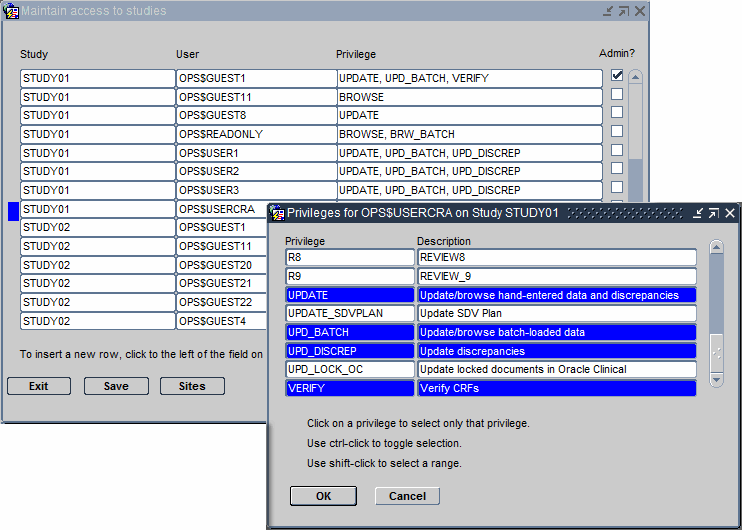
Click the Privilege column for the user whose privileges you want to update. The dialog box for configuring privileges opens. See Figure 2-1.
Select the privileges to assign to the user:
To select one privilege, click that privilege.
To select several privileges, Ctrl-click each privilege. Ctrl-click also toggles the selection on and off.
To select a range, Shift-click the first and last privilege in the range.
Click OK to save the privileges for the selected user. Add or modify privileges for other users, as appropriate. Save your changes when finished.
Figure 2-1 Assigning Privileges to a User for a Particular Study
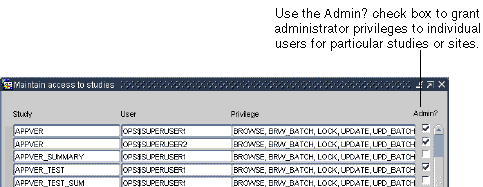
You can grant administrator privileges to individual users for particular studies or sites. For example, you can give users with study design roles (RXC_DES and RXC_DMGR) administrator privileges only for the studies they manage.
Note that the administrator privilege alone does not include any access to patient data. You must also grant the user at least the BROWSE privilege.
To grant administrator privileges to a user:
Open either RDC Administration or Oracle Clinical.
In RDC Administration, navigate to Maintain.
In Oracle Clinical, navigate to Admin, Users and Roles.
Open the correct form:
To grant administrator privileges to a user for a particular study, select Study Security. Execute a query for the user or study.
To grant administrator privileges to a user for a particular site, select Site Security. The system lists the available sites and defined users.
Enable the appropriate Admin? check box to grant administrator privileges.
A user who has access to a study in Oracle Clinical does not automatically have access to that study in RDC Onsite unless you use the Study Security form in the RDC Administration application to assign specific privileges to the user.
Alternatively, you can use the DMGR RDC ACCESS short value in the OCL_STATE local reference codelist to automatically grant an Oracle Clinical user access to the studies in RDC Onsite.
Users with the Superuser flag selected in the Oracle Accounts form in Oracle Clinical always have access to all studies in both Test and Production modes.
To automatically grant an Oracle Clinical user access to RDC Onsite:
Define the study or studies that the user can access. See the Oracle Clinical Administrator's Guide for more information.
Open Oracle Clinical.
Navigate to Admin, Reference Codelists, and then select Local Codelists.
Query for the OCL_STATE local reference codelist:
Enter OCL_STATE in the Name field.
Press F8 to execute the query.
Scroll to the DMGR RDC ACCESS short value.
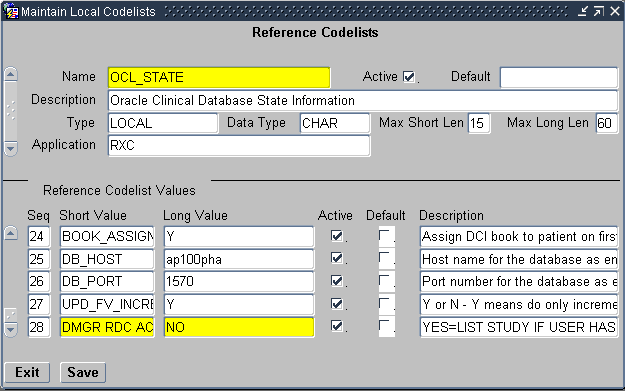
Set the long value to YES.
Save your changes.
A user who is granted RDC Onsite study access in this manner has all RDC Onsite privileges defined in Table 2-1 except the APPROVE and VERIFY privileges. (The UPD_LOCK_OC privileges, which is an Oracle Clinical privilege only, is also excluded). You can restrict such a user's access to RDC Onsite by limiting privileges at the study or site level.
When set to YES, a user with no study privileges defined for RDC Onsite but with study access defined in Oracle Clinical is automatically given RDC Onsite access to the study as well, in both Test and Production modes.
When set to NO, a user granted access to a study in Oracle Clinical does not automatically have access to that study in RDC Onsite. You can use the Study Security form in the RDC Administration application to assign specific privileges to the user.
As shown in Figure 2-2, the Maintain Installation Configuration form has two data entry configuration settings that are relevant to RDC Onsite. These settings let you:
Control whether a user can resolve discrepancies at the time the discrepancy is raised.
Enable privileged update for the user. With privileged update enabled, the user can:
Update data and discrepancies for locked documents (RDCMs and RDCIs)
Override and update protected repeating defaults
You can define the configuration at the local database level. You can then override the configuration settings at the study or user level.
Note:
Most settings in the Maintain Installation Configuration form do not apply to RDC Onsite. With the exception of the Resolve Discrepancies in Data Entry setting and the Privileged Update setting, all other settings in the form pertain only to Oracle Clinical and RDC PDF data entry.You have two ways to change the data entry configuration settings: by using a form or by using a reference codelist.
You have the option of changing these settings at the local database level either by using the Maintain Installation Configuration form or by using the OCL_DE_CONFIG local reference codelist.
To use the Maintain Installation Configuration form:
Open Oracle Clinical.
Navigate to Admin, DE Admin, and then select DE Config Settings. See Figure 2-2.
Figure 2-2 Data Entry Configuration Settings for RDC Onsite
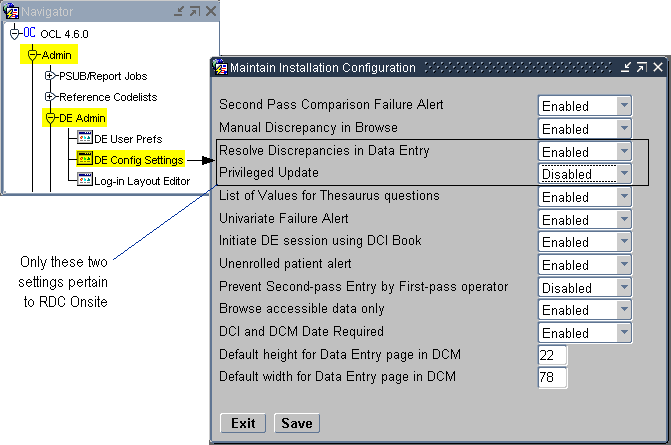
Use the Resolve Discrepancies in Data Entry setting to define whether the user has permission to resolve discrepancies at the time the discrepancy is created.
If Enabled, the user can resolve discrepancies during data entry and route discrepancies for further action by another user. The default value is Enabled.
If Disabled, routing actions are enabled at discrepancy creation time, but resolution actions are not made available.
Use the Privileged Update setting to define whether the user can perform the following actions:
Update data and discrepancies for locked RDCMs and RDCIs
Override protected repeating defaults.
Exceed the maximum number of repeats defined for a repeating question group, even if Enforce Repeats is set. Note that this action pertains only to Oracle Clinical.
You can enable or disable the Privileged Update setting. The default value is Disabled.
See Section 2.5, "Restricting Actions Against Locked CRFs" for information on how you can prevent users from approving CRFs, verifying CRFs, and updating discrepancies for locked documents.
You can set the two Data Entry Configuration settings — Resolve Discrepancies in Data Entry and Privileged Update — at the user level, the study level, or the local database level.
At the user level and the study level, you can select Not Set as the value for these settings. If you select Not Set at the user level, then RDC Onsite uses the value set at the study level. If neither the study nor the user level is set, then RDC Onsite uses the value set for the local database.
With this hierarchy, it is best to define the configuration at the local database level, and then override at the study or user level.
To define the data entry configuration setting at the local database level, you can use the Maintain Installation Configuration form or the OCL_DE_CONFIG local reference codelist.
To navigate to the Maintain Installation Configuration form for the local database:
Open Oracle Clinical.
Navigate to Admin, DE Admin, and then select DE Config Settings.
Navigate to the setting that you want to modify.
Change the value to Enabled or Disabled.
Save your changes.
Alternatively, to make the same changes using the OCL_DE_CONFIG codelist:
Open Oracle Clinical.
Navigate to Admin, Reference Codelists, and then select Local Codelists.
Query for the OCL_DE_CONFIG codelist:
Enter OCL_DE_CONFIG in the Name field.
Press F8 to execute the query.
Scroll to and modify the values as follows:
To let the user resolve discrepancies at the time the discrepancy is raised, set the DISC RES IN DE value to Y.
To enable privileged update, set the PRIV UPDATE value to Y.
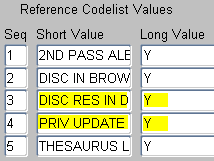
Save your changes.
To define the data entry configuration settings at either the study or the user level:
Open Oracle Clinical.
Navigate to the correct configuration form as follows:
To change the settings at the study level, navigate to Conduct, Security, and then select Clinical Study States.
To change the settings at the user level, navigate to Admin, Users and Roles, and then select Oracle Accounts.
Query for the study or user that you want to update.
Press F7 to enter a query.
Specify your search criteria. You can use the % wildcard.
Press F8 to display the studies or users that match your criteria.
Select the applicable study or user.
Open the Special menu, and then select DE Config.
Navigate to the setting that you want to modify.
Change the value to Enabled, Disabled, or Not Set.
At the study level, you can set any value to Not Set. For any setting with a Not Set value, RDC Onsite uses the value at the local database level.
At the user level, you can set any value to Not Set. For any setting with a Not Set value, RDC Onsite first looks at the value set at the study level. If the value is Not Set, RDC Onsite uses the value at the local database level.
Save your changes.
By default, RDC Onsite restricts access to locked CRFs.
You can use the RSTRCT LCKD CRF setting in the OCL_DE_CONFIG local reference codelist to control a users ability to:
Update the discrepancies in a locked CRF
Verify a locked CRF
Approve a locked CRF
Even if you change the restriction access, users can work with a locked CRF only if they have the proper privileges: UPD_DISCREP, VERIFY, or APPROVE.
To change the restriction access to locked CRFs:
Open Oracle Clinical.
Navigate to Admin, Reference Codelists, and then select Local Codelists.
Query for the OCL_DE_CONFIG codelist:
Enter OCL_DE_CONFIG in the Name field.
Press F8 to execute the query.
Scroll to the RSTRCT LCKD CRF short value.
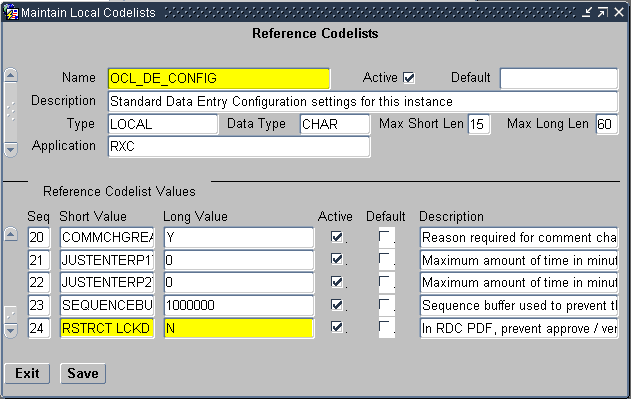
Set the long value. Do you want to restrict access to locked CRFs?
Y — Specifies that users cannot update discrepancies for a locked CRF, verify a locked CRF, or approve a locked CRF unless the CRF is specifically unlocked for them.
N — Specifies that any user with UPD_DISCREP privileges can work on discrepancies in a locked CRF, any user with VERIFY privileges can verify a locked CRF, and any user with APPROVE privileges can approve a locked CRF.
Save your changes.
Recall that the DCIs you create in Oracle Clinical are the CRFs that users work with in the RDC Onsite application. You can limit which DCIs a users can access when they are working in RDC Onsite.
To limit DCI access, you can:
Specify the limits by user role and by study.
Specify the limits in inclusive or exclusive terms. In other words, you can specify which DCIs to include and which DCIs to exclude.
You first specify the default DCI Access at the installation level. For each user role, you define access as:
UNRESTRICTED (that is, all DCIs are visible to the user). If you do not define any exceptions to this unlimited access, the level of access depends upon privileges granted to the user at the study and site level.
RESTRICTED (that is, no DCIs are visible to the user).
Once you define the default DCI access, you can override these settings at the study level. For any user role, you can specify a list of DCIs that the user can access (an INCLUSION list) or cannot access (an EXCLUSION list).
RDC Onsite includes a default set of user roles. For each user role, Oracle Clinical sets the default value for DCI access to UNRESTRICTED. In other words, all users can access all DCIs regardless of user role. You use the Maintain DCI Access by Role form to limit the DCIs a user can access.
Caution:
If you create a new user role but do not specify a default value for DCI access, users assigned to that role cannot log in to the RDC Onsite application. You must define the default access to DCIs for every user role you plan to assign.The default DCI access specification applies to both production mode and test mode.
Before you can change the default DCI access for a user, the user role must exist (must be valid). You cannot change the default DCI access if the user role does not exist.
To define the DCI access for a user role:
Open Oracle Clinical.
Navigate to Admin and then select Users and Roles.
Select Default DCI Access by Role.
Alternatively, you can select one of the following menu options depending upon your administrator privileges and current task:
Select Test Default DCI Access if you want to try out DCI access before implementing the feature in a live study.
Select Query Default DCI Access by Role if you only want to view the current settings but make no changes.
Enter a valid user role in the User Role field. You can:
Type the name of a valid user role into the field.
Click the List of Values button, and then select a user role from the list. The list includes all the user roles currently defined in the USER GROUP ROLES installation reference codelist.
Enter the default DCI access for the selected user role. Valid entries are:
UNRESTRICTED — Allows study/site access to all DCIs unless otherwise restricted in the DCI Access form for the study.
RESTRICTED — Does not allow access to any DCIs unless you specify exceptions in the DCI Access form for the study.
You can type a valid entry directly into the field. Alternatively, you can click the List of Values button, and then select from the list.
Continue to enter each user role and the type of DCI access allowed.
Save your changes.
For each record in the Maintain Default DCI Access by Role form, Oracle Clinical creates and maintain an audit trail.
Upon initial entry to the form after an upgrade, Oracle Clinical populates the form with all the user roles defined in the USER GROUP ROLES reference codelist. For each user role, the Default DCI Access field is set to UNRESTRICTED. You must add any new user roles that you create.
After you define the default DCI access for a user role, you can refine the access on a study-by-study basis. You define exceptions to the default DCI access. For example:
You can define one or more specific DCIs that users with the selected role cannot access. When you exclude a DCI, you can also specify whether the user role does not see the DCI at all or whether the user role can open the DCI in browse mode only.
You can define one or more DCIs that users with the selected role can access. When you include a DCI, you can also specify whether the user role can open the DCI with the default study/site privileges or with browse only privileges.
If a user does not have access to a study based on the defined study-level or site-level access, the Study DCI Access does not provide the user with access to the DCI or to the study.
Table 2-3 describes the various ways that you can open the Maintain Access to DCIs within Study form.
Table 2-3 Options for Opening the Maintain Access to DCIs within Study Form
| If you want to… | For this mode… | Open Oracle Clinical and navigate to… |
|---|---|---|
|
Define DCI access for a study |
Production |
Definition, DCIs, DCI Access |
|
View the DCI access for a study |
Production |
Definition, DCIs, Qry DCI Access |
|
Define DCI access for a study |
Test |
Definition, Test a study, DCI Access |
To define the DCI access for a study:
Open Oracle Clinical.
Navigate to Definition, DCIs, and then select DCI Access.
Enter the name of the study for which you want to define DCI access. Oracle Clinical opens the Maintain Access to DCIs within Study form.
Enter a valid user role in the User Role field. You can:
Type the name of a valid user role into the field.
Click the List of Values button, and then select a user role from the list. The list includes all the user roles currently defined in the USER GROUP ROLES installation reference codelist. Note that the list also displays the default access.
Enter the DCI List Type for the selected user role. Valid entries are:
INCLUSION — Indicates that the user role will be able to access only the DCIs listed in the DCI Name column. The user role has no access to unlisted DCIs.
EXCLUSION — Indicates that the user role cannot access the DCIs listed in the DCI Name column. All other DCIs are accessed according to the user's study/site privileges.
You can type a valid entry directly into the field. Alternatively, you can click the List of Values button, and then select from the list.
Click the DCI Name field and then enter the name of the DCI that you are including or excluding.
Alternatively, you can leave the DCI Name column empty. An empty DCI list is interpreted differently, depending on whether you are defining an INCLUSION or EXCLUSION list.
If the DCI List Type is set to INCLUSION and the DCI Name column is empty, then the user has access to no DCIs for this study. Use this approach when the default DCI access for the user role is UNRESTRICTED, but for a specific study the user role has access to no DCIs.
If the DCI List Type is set to EXCLUSION and the DCI Name column is empty, then the user has access to all DCIs for this study. Use this approach when the default DCI access for the user role is RESTRICTED, but for a specific study the user role has access to all DCIs.
Note that for individual users, you usually define the same access with study security.
Click the Access field and then enter the type of access to allow for this DCI. Your options vary depending on whether you are including or excluding access to the DCI.
If the DCI List Type is set to INCLUSION, you can select:
Default study/site privileges — Indicates that the DCI is accessed according to the user's study/site privileges.
Browse — Indicates that the user role can open and view the DCI only in browse mode.
If the DCI List Type is set to EXCLUSION, you can select:
None — Indicates that the user role cannot access the DCI.
Browse — Indicates that the user role can open and view the DCI only in browse mode.
Continue to define the DCIs that this user role can access (include and exclude). Save your changes when you are finished.