| Oracle® Clinical Remote Data Capture Onsite Administrator's Guide Release 5.1 E53568-01 |
|
|
PDF · Mobi · ePub |
| Oracle® Clinical Remote Data Capture Onsite Administrator's Guide Release 5.1 E53568-01 |
|
|
PDF · Mobi · ePub |
You can customize the help that users can display when using the RDC Onsite application. You can create help text for each field in a CRF, modify the existing online help topics installed with RDC Onsite, and create help information for CRFs displayed in the Data Entry window.
This chapter includes the following topics:
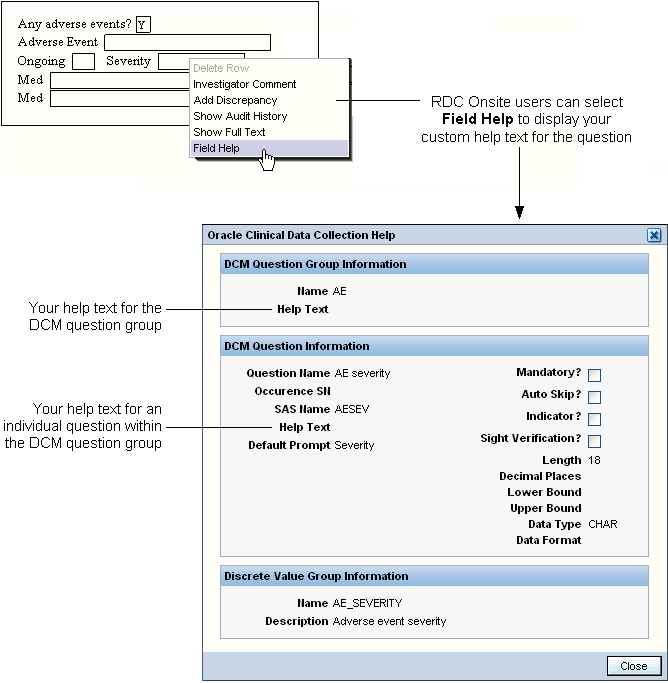
When using RDC Onsite to enter and update data in a CRF, users can right-click a field and select Field Help to get more information about the field.
RDC Onsite opens the Oracle Clinical Data Collection Help window, which displays the help text for the field's DCM Question Group, the help text for the selected field, and other details. See Figure 12-1.
To define this field-level help, you add text to the Oracle Clinical data collection definitions.
Figure 12-1 Custom Help Text for Fields in a CRF
You can enter CRF field help text in Oracle Clinical at the study level for:
DCM question groups
Individual DCM questions within a group
Note:
You can define help text for active or provisional DCMs only.To enter help text for a DCM question group and its DCM questions:
Open Oracle Clinical.
Navigate to Definition, DCMs, and then select DCMs.
Select the study where you are defining help text. The Maintain Study DCMs form opens.
Select a DCM and then click DCM Question Groups. The DCM Question Groups form opens, listing the question groups that are part of the study's DCM.
To define help text for a DCM question group:
Select a question group.
Scroll to the right until you view the Help Text field.
Enter up to 200 characters of text.
To define help text for an individual question in a DCM question group:
Select a question group.
Click DCM Questions. The DCM Questions form opens, displaying the individual questions that comprise the question group.
Scroll to the right until you view the Help Text field.
Enter up to 200 characters of text.
Save your changes and regenerate the CRF.
RDC Onsite includes context-sensitive online help files that describe using the application's features. Users invoke the online help by clicking the Help link or button displayed on the application pages, in the Data Entry window, or in a dialog box.
The online help includes several navigation frames and a large content frame that displays the contextual topics. The topic files are in HTML format and are generated from the Oracle Clinical Remote Data Capture Onsite User's Guide content. You can customize a copy of the online help files and redirect RDC Onsite to display your copy.
Note:
The online help is dynamically generated and changes may not be consistent between generations. Oracle does not document changes to the structure or content of the online help between upgrades. If you customize the online help, you may have to reconcile your changes after installing a patch or an upgrade. Release notes indicate if the patch or upgrade affects the online help.The tasks required to customize the RDC Onsite online help are as follows:
The online help files for RDC Onsite are bundled within the olsardc.ear and are extracted on deployment in a location like:
middleware_home\user_projects\domains\OPADomain\servers\AdminServer\upload\olsardc\5.x-b2\app\olsardc.ear\RdcSurroundAdfWebUIWebApp.war\xhelp\rdc\footprint\
The x from 5.x above represents the version of the application installed
To edit, open the archive and add files to the package.
Login to admin server console for the OPADomain and locate the olsardc.ear file. See Section D.1, "Locating the olsardc.ear File" for more information.
Open olsardc.ear using any utility to unzip.
Navigate to the following path:
middleware_home\user_ projects\domains\OPADomain\servers\AdminServer\upload\olsardc\5.x-b2\app\olsardc.ear
Add or edit help files as required.
Save your changes.
Redeploy olsardc.ear.
See Section D.3, "Redeploying a Version with Customizations" for more information.
Restart the OpaServer.
See Section D.4, "Restarting the OpaServer" for more information.
Note:
Also see Section D.5, "Manually Extracting and Repacking the olsardc.ear File" for an alternative method to unzip and rebuild the .ear file.Before you customize the help files edit the web.xml file. See Section 12.2.4, "Diverting the Help Call to a Custom Location" for more information.
The context-sensitive help calls from RDC Onsite require that the directory structure for your customized online help matches the help directory structure provided with RDC Onsite.
You can locate your custom help directory on the shared drive of another application server, but the new location must be accessible by URL.
Note:
Do not place your custom help directory in the same directory where the Oracle-provided online help is installed:middleware_home\user_projects\domains\OPADomain\servers\AdminServer\upload\olsardc\5.x-b2\app\olsardc.ear\RdcSurroundAdfWebUIWebApp.war\xhelp\rdc\footprint\
The x in 5.1 above represents the version of the application installed.
This directory may be overwritten by subsequent upgrades or patches.
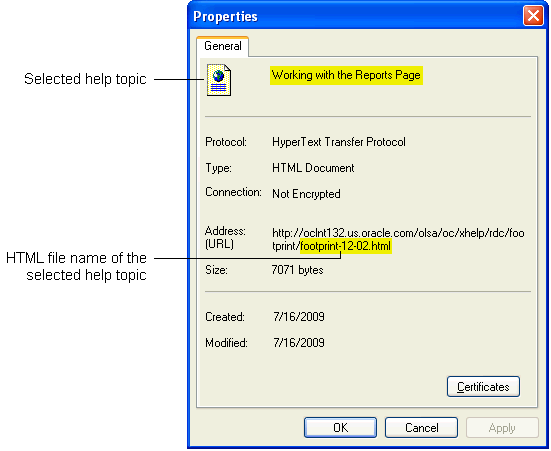
The RDC Onsite online help system does not use file names in its context calls. Therefore, the most reliable method for identifying a topic's file name is to invoke the topic from RDC Onsite and then open the Properties dialog box.
To identify the file name of a help topic:
Open RDC Onsite to the feature you are documenting.
Click Help to open the help topic in a new browser window.
Right-click the topic area of the window, and then select Properties.
Note the address listed in the Address (URL) field. The file name for the selected topic is located at the end of the URL address as filename.html. See Figure 12-2.
Note:
Be careful to immediately identify the topic file after you open it from RDC Onsite. If you use the help system's navigation aids to browse, you might open another topic file instead of the topic file you want to edit.Figure 12-2 Identifying the File Name of Individual Help Topics
To modify the text for an online help topic:
Navigate to the directory location of your customized online help files.
Open the file that you identified as the HTML file associated with the topic you want to modify.
Edit the text.
Save your changes.
When modifying a help topic, keep the following issues in mind to ensure that you retain RDC Onsite's context-sensitivity:
Do not change header content, file names, anchors, or other metadata. The topic files include metadata identifiers for the context calls from RDC Onsite and for navigating and searching. Changing this metadata may break the context calls from the application or the system's navigation aids.
Save the file with the same name and to the same relative location.
When a user clicks Help in RDC Onsite, the application constructs a URL based on the current session and the default installation location of the online help system.
To divert the help call to the custom location you created in Section 12.2.1, you edit the OPA_DOC_DIR parameter in the web.xml file.
To divert the help call to a custom location:
Log into the admin server console for the OPADomain and locate the olsardc.ear file. See Section D.1, "Locating the olsardc.ear File" for more information.
Open olsardc.ear using any utility to unzip.
Navigate to the location of web.xml at the following path:
middleware_home\user_projects\domains\OPADomain\servers\AdminServer\upload\olsardc.ear\RdcSurroundAdfWebUIWebApp.war\WEB-INF\
Open the web.xml file with a text editor.
Insert the following lines in the file:
<context-param>

    <param-name>OPA_DOC_DIR</param-name>

    <param-value>%HTTP URL OF THE Custom Location%</param-value>

</context-param>
Note:
Make sure the XML syntax is preserved when you insert these lines.Replace %HTTP URL OF THE Custom Location% with the location of your customized online help files. The syntax of the location is as follows:
https://help-doc-hostname/directory-name/xhelp
For example, https://appserverurl/opa51/xhelp.
Note:
Do not add a slash (/) to the end of the URL. RDC Onsite adds a slash and several parameters to the URL to open the file.Save your changes.
Click OK when prompted to replace the modified files in the .war and .ear. files
Close the unzip utility.
Re-deploy olsardc.ear.
See Section D.3, "Redeploying a Version with Customizations" for more information.
Restart the OpaServer. See Section D.4, "Restarting the OpaServer" for more information.
See Section D.5, "Manually Extracting and Repacking the olsardc.ear File" for an alternative method to unzip and rebuild the .ear file.
Note:
If you do not specify a location for the OPA_DOC_DIR parameter, RDC Onsite opens the topic files in the default installation location.To enter and update data in a CRF, users open the CRF in a Data Entry window. By default, the Data Entry window does not display the Help icon in its toolbar.
RDC Onsite adds the Help icon to the toolbar only if you create the context-sensitive help that displays when the user clicks the icon.
To create custom help text for the Help icon, you use the Maintain Links form in the RDC Administration application. For more information, see Section 11.6, "Defining a Link for CRF Help."
|
Copyright © 1996, 2014, Oracle and/or its affiliates. All rights reserved. Legal Notices |
|