
|
|
|
ORMS Calendar View - Configuration Alerts and Rules
When the Calendar View button is selected from the ORMS Alerts and Rules Dashboard (ORMS>Configuration>Alerts and Rules) the Calendar View screen displays. This screen displays the dates the selected alert is in effect, along with the configured seasons and events within the selected time period.
Seasons and events are initially selected for an alert on the Add, Edit, or Copy New Hurdle Alerts & Auto Apply Hurdles Screen; Add, Edit, or Copy New On the Books & Forecast Alerts Screen; or Add, Edit, or Copy New Overbooking Alerts & Auto Apply Overbooking Screen. When a season and/or event is initially selected to apply to the current alert, the Calendar View screen will display all of the dates within the season and/or event as having the alert applied to them. The Calendar View screen allows you to manually customize the dates for the current alert by either applying or unapplying the alert to dates within the season or event, or to those dates outside.
The calendar displays twelve months. When the screen first opens, the first month in the calendar grid is the current month, with the next eleven subsequent months displayed thereafter. Various dates are already highlighted as configured:
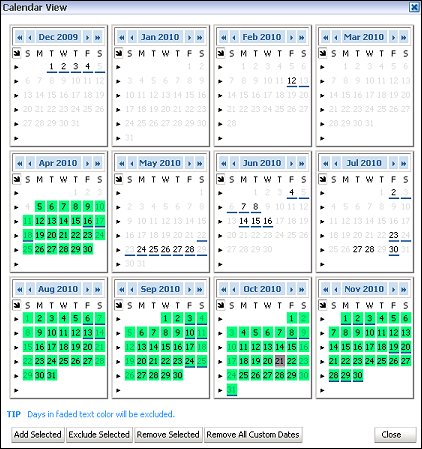
If you want to display a different set of 12 months, click on the (back) << < or (forward) > >> arrows at the top of the selected calendar month. The double arrow moves the calendar back 12 or forward 12 months, respectively. The single arrow moves the calendar back or forward one month, respectively. All other calendar months in the grid appear in sequence.
![]()
Individual Days - To select one day, simply click the one day. For several individual days not in a sequence (i.e. Monday Wednesday, and Friday) use Ctrl and click the separate days.
Same Days of the Week for the Month - To select a specific day of the week for the entire month, for example all Thursdays, simply place the cursor at the top of the day of the week (i.e. T) and click. You can also use Ctrl and select more than one day of the week for the entire month, for example, all Saturdays and Sundays.
Entire Week - To select the entire week, click the pointer for the appropriate week.
Entire Month - To select the entire month, click the arrow at the top of the month.

When a date, or dates, have been manually selected to apply or unapply (customize) the alert to the date, the following buttons are enabled. When you are finished, select the Close button to exit the Calendar View screen.
Add Selected. When you want to make the alert effective for the selected dates, select this button. The dates become bold, indicating the alert is in effect. The dates selected are stored in the database.
Exclude Selected. When you want to exclude the selected dates from triggering the alert, select this button. The dates become faded, indicating that the selected alert is not active for this date. The dates will still be stored in the database for the alert code, but the dates will always be excluded for this alert, even if the alert changes in any way. The days will remain excluded unless they are selected and get added again through the Add Selected button.
Remove Selected. When you want to remove those dates from the database that had been customized previously with the Add Selected button, select those dates. Then, select the Remove Selected button and the dates will be removed from the database.
Note: The Remove Selected button is only applicable for manually added, customized dates. If you want to remove any date(s) that belong to a selected Event or Season, you need to use the Exclude Selected button.
Exclude All Custom Dates. (This button is always enabled.) Select this button to reset all previously customized dates. This process removes all previously manually customized dates for this alert and resets the dates to their original state.
See Also