
|
|
|
Adding, Sending, and Resending Leads
In order to create and send a lead, a Business Block must be created first, (see Creating Business Blocks in SFA for details on setting up business blocks). Once the business block has been created, select the Leads button from the Business Block screen to display the Leads screen, (see Leads Screen for detailed information about this screen).
Important! When leads are sent to SFA from an external system, a lead master (see Creating Business Blocks in SFA) is created in SFA on insertion of the lead. That lead then gets attached to the newly generated master. Any updates of the lead from the external source will then also update the lead master.
You may use the Leads screen to perform the following activities:
To add a new lead to a business block, select the Leads button from the Business Block screen. The Leads screen appears. Select the New button. The Property Filter screen appears.
Adding a new lead to a business block requires the selection of one or more properties to which the lead should be sent. The Property Filter screen may be used to quickly identify the properties that have the features and characteristics the client seeks. The filter produces a list of properties that meet your criteria; you may then review all property details and choose individual properties to receive the lead. (See Property Filter for details.)
Once you have made your selections, press the Search button. The Properties screen appears, listing those properties that meet your filter criteria.
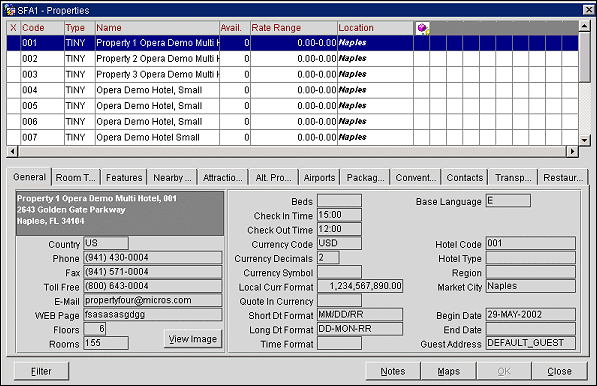
The Properties screen displays a list of all properties that fit the filter criteria you selected on the Property Filter screen. To choose the individual properties to send leads to, mark the property entry with an X in the X column. (To mark your selections, click in the X column or highlight your choice and press the space bar.)
The Properties screen contains detailed information about each property and can be used as an online hotel directory. Besides the information provided in the grid in the upper portion of the screen, you may click on any property to display more complete information in the tabbed area in the lower part of the screen. (See Properties Screen for details.)
Once all the properties that should receive leads have been checked, click the OK button. You are returned to the Leads screen where the grid has now been populated with lead entries for the appropriate properties.

You may create and manage leads for a tour series very easily by following these steps.
Lead notes are specific to the lead with which you associate them. Lead notes are different from the notes you attach to a business block, which are associated with every lead sent out for the booking.
To create lead notes for a specific lead, highlight the lead on the Leads screen and select the Notes button. Or, you may select the Notes button from the Lead screen (to access the Lead screen, highlight the lead on the Leads screen and select the Edit button.) The Lead Notes screen appears.
When creating leads from a master booking, all business block notes are copied down to the lead bookings. Subsequent updates of notes on the master booking are synchronized to the lead bookings. From the master booking, the Notes button allows access to only those note types configured under the Business Block (BOOKING) notes group. From the lead records, you have access to all master booking notes as well as the lead booking notes. However, only lead booking notes can be created and updated for the lead record. Master booking notes are view-only.
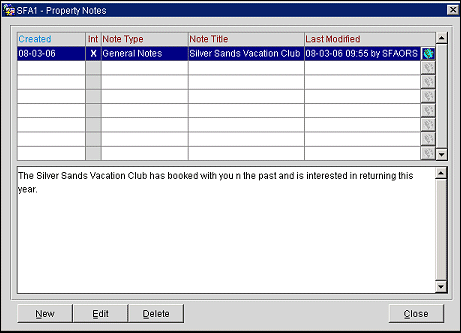
The Lead Notes screen shows the following information:
Created. The date when the note was created.
Int. An X appears in this column if the lead note is internal. This is the default. A lead note is designated as "internal" on the Lead Notes Add screen or the Lead Notes - Edit screen. The "internal' designation means that the note will not be included as part of any document or report prepared for the client.
Note Type. Lead Notes may be either of the following types:
Note Title. The title assigned to the note to identify its contents.
Last Modified. The date and property time when the note was last modified.
To create a new lead note select the New button. To edit an existing lead note, highlight the note you wish to edit and select the Edit button. The Lead Notes - Add or Edit screen appears.
Provide the following information on this screen.
Date. Today's date appears by default. You may not change this information.
Internal. This check box is selected by default. The "internal' designation means that the note will not be included as part of any document or report prepared for the client.
Note Type. Lead Notes may be either of the following types:
Note Title. Assign a title to the note to identify its contents.
Enter the text of the note in the text entry area. When you are done, select Save to save the note and return to the Lead Notes screen.
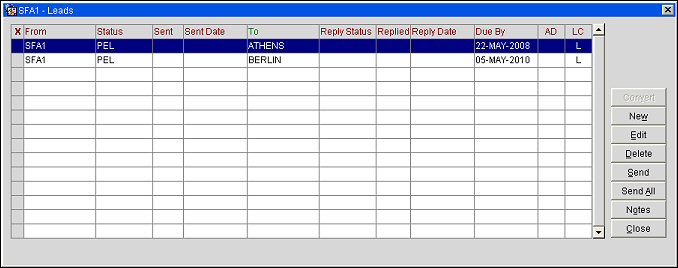
Use the Leads screen to send and resend leads to the properties to which the booking business is being offered. This screen is accessed by selecting the Leads button from the Business Block screen. The Leads screen shows the leads that have been created for a business block. Leads that have already been sent have an X in the Sent column.
Lead delivery methods and addressees are set up for each receiving property on the Lead screen. OPERA provides features for "sending" leads via any of these methods:
Email - In order to send leads via email, the originating property must have a properly configured email interface. (Configuring the email interface for leads delivery is discussed in Property Configuration - Confirmation Delivery.) The email lead is delivered to the receiving property as an attachment in PDF format. Provided the receiving property has an Internet connection and access to the OPERA Web Reply web page, the recipient can reply to the lead via the Web Lead Reply feature. Otherwise, the recipient can use the standard email "reply" feature from the email application to respond to the sender of the lead email message.
Selecting the delivery method and specifying the addressee at the receiving property are discussed in Editing Leads. In most cases properties have set up default lead delivery methods and addressees, and therefore the leads do not need to be edited before sending. However, if lead addressees or delivery method need to be changed for a receiving property, or if a receiving property has no default lead delivery method and/or addressee, the lead will have to be edited before it can be sent. See Editing Leads and Designating Lead Recipients for details.
To send a selected lead, highlight the lead and select the Send button. The Send button is not available if the highlighted lead has already been sent. To send all leads on the lead screen that have not yet been sent, select the Send All button. The Send All button is not available if all leads listed on the Leads screen have already been sent. Messages appear as each lead is processed.
Once the Leads have been sent, a Lead Report is generated for printed, e-mailed and faxed Leads. See Lead Report Manual below for further details.
At times it may be desirable to resend one or more leads that have already been sent to the receiving property. You may want to resend a lead, for example, if the recipient has not responded in a timely fashion; or send the lead to a different recipient or use an alternate delivery method (and you have changed the delivery method or addressee on the Lead screen); or if a notes or other additional details (such as a room grid or Meeting agenda) have been added to the lead information.
To resend a selected lead, highlight the lead and select the Resend button. The Resend button is not available if the highlighted lead has not already been sent. To resend all leads on the lead screen that have already been sent, select the Resend All button. The Resend All button is not available if none of the leads listed on the Leads screen have already been sent.
The Lead Report shows existing leads with the reply notes that were received for the lead from the different properties that accepted it. Because this report can be run from the Lead and/or Lead Search screens, as opposed to a traditional report form, only the features and functions pertaining to this report will be discussed in this topic.
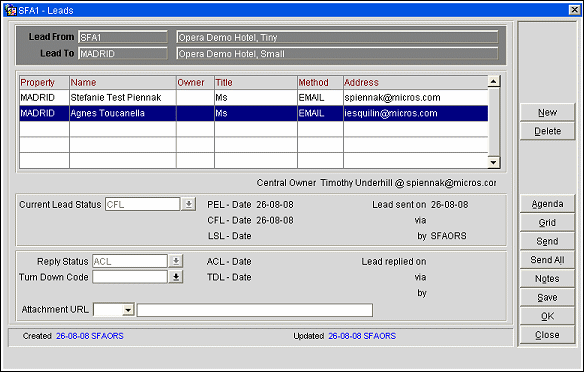
Property. Name of the property where the owner listed (Name field) is added as a user. This field displays on both the sending and receiving property's Lead Main screen display grid.
Name. Name of the employee listed as an Owner for the selected Lead.
Note: When a new owner is added to a lead at the property level, the Name LOV only displays those owners that belong to the lead property; not all owners in the schema. See Hotel Contacts Tab for more details.
Owner. Owner code assigned to the contact. It is possible to change the owner initials at the receiving property on the Lead Main screen, prior to the Lead being confirmed or turned down, making it possible to assign a new owner to a lead while is still is a lead.
Title. Business title of the property employee.
Method. Communication method that was used to send this lead.
Address. Displays the actual contact method for the communication method type selected; this can be a telephone or fax number, URL or email address.
New. Create a new contact (See Lead Contacts Tab for details).
Delete. Delete the highlighted contact.
Send. Send the lead bookings to the selected lead contacts.
Send All. Send the lead bookings to all of the lead contacts.
Notes. Select to view, create, or edit lead notes to attach to the lead (See Adding and Sending Leads - Lead Notes for details).
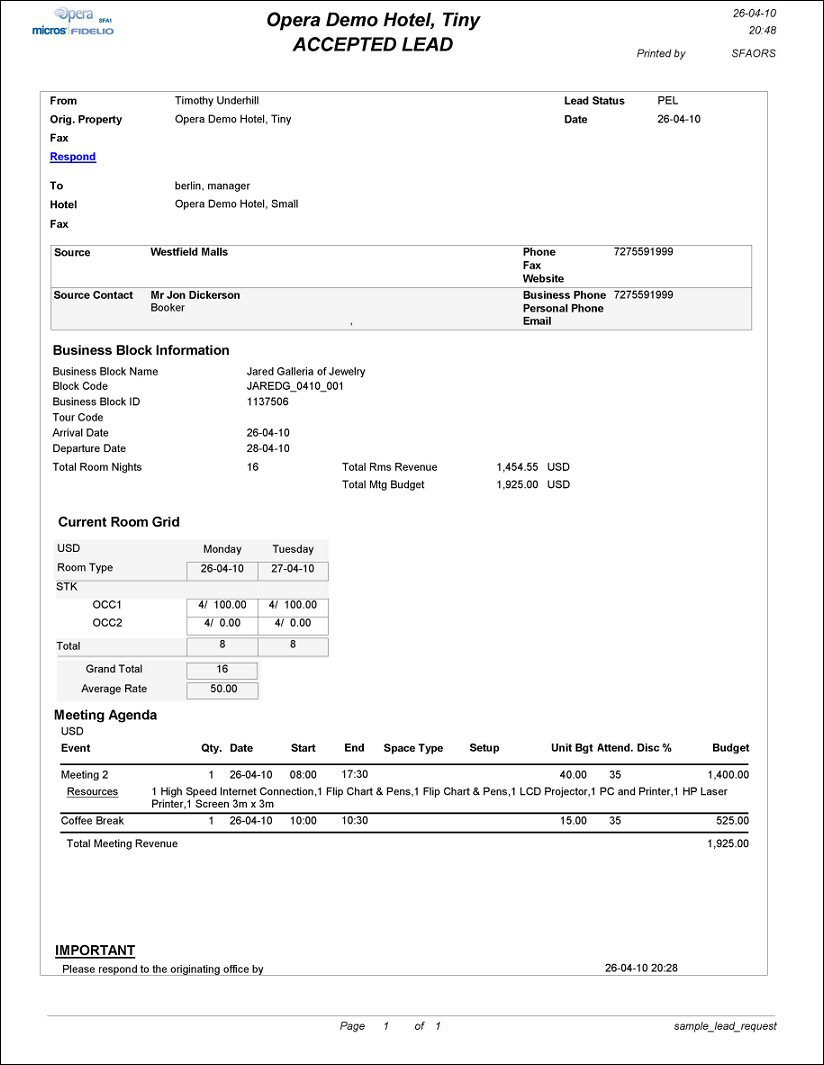
The header of this report will contains the date and time the report was sent. The layout of this report contains the items in the following order: Lead Originator's Contact Information - From Name, Lead Status, Originating Property, Date Lead was sent, Fax Number (if applicable) and a hyperlink (Respond) that directs the Lead Recipient to the Lead Web Reply page.
Note: When the Lead Status is LSL (LOST) the lost reason will also print on the lead report header, underneath the lead status.
Note: When an email lead is sent with Lead History, the history data will now also contain the Lost To Destination and Lost To Property information where applicable.
Lead Recipient's Contact Information - To Name, Hotel, Fax Number (if applicable), followed by contact information for one or all of the following Lead Account, Lead Contact, Lead Agent, Lead Agent Contact.
Next is the Priority, Market Segment and Industry Code associated with the Lead followed by Business Block Information such as, Business Block Name, Block Code, Business Block ID, Tour Code, Arrival/Departure Dates, Total Room Nights, Total Rooms Revenue and Total Meeting Budget. A Room Grid and Meeting Agenda are also displayed on this report.
Finally, the end of this report contains both Lead Notes and Business Block notes (if any) that were sent with the Lead.
Once leads have been sent, changes to the Lead Master Business Block are not passed on to the lead recipients (in the form of updated leads) except under the following conditions.
When changes are made in these cases, a series of two prompts will guide you through the lead regeneration process. The first prompt will ask you to verify (Yes/No) whether or not to regenerate the selected Lead. After having answered Yes, an additional prompt will appear only if the Lead to be resent is of a status LSL (LOST) and is transmitted via email to those properties that receive email leads. Answer Yes to regenerate an email for the LSL Lead. For data leads, LSL status updates are always sent in order to keep lead/booking statuses in sync between SFA and remote properties. This will include Leads that were originally turned down (TDL) because the initial conditions of the Lead Master could not be met. You must select Yes to proceed, or No to cancel any modifications made to the Lead Master.
Note: Only data leads may be sent from the properties to central, not email leads.
When the Lead>Property Lead Creation application parameter is set to Y, properties may create leads from business blocks that they initiate. These are called "referral leads." (See Referral Leads for additional details.)
To create a referral lead, select the Leads button from the business block that has the REFERRAL status. The Leads screen appears with the Destination button.
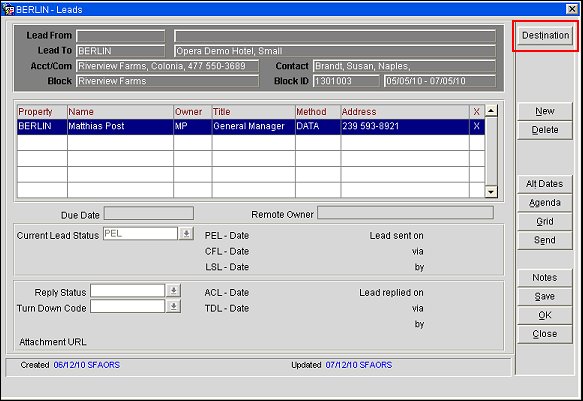
Select the Destination button. The Referral Properties screen appears.
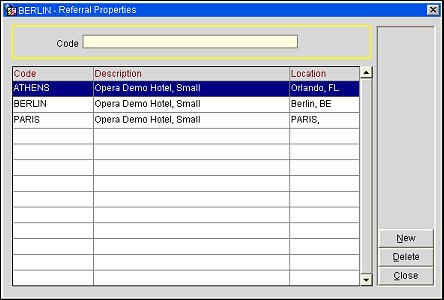
For properties in a schema that has an active SFA license, the Referral Properties screen lists all active properties that the user has access to in the schema. (If the user has Blocks>Ignore Access Permissions for Leads permission, all active properties are listed, regardless of the user's access rights.)
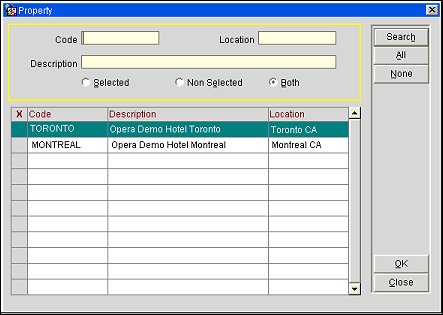
For properties in a schema where an SFA license is not active, select the New button to call a web service which displays all available properties configured in SFA central. (Properties are configured in central via Configuration>Setup>External Databases. Select the Webservices button from the Databases screen. See External Database Setup for details.) Mark your choices and select OK.
Return to the Leads screen and select the Send button to send the lead to the selected destination(s).
Note: Once a referral lead is sent, the property cannot change or delete the business block.
Referral leads are forwarded to SFA central where a lead master is automatically created. A new lead notification (type = New Property Lead) can be generated to alert central that a new property referral lead has been received. If destinations were added to the referral lead by the property, leads for the appropriate destinations are created and sent automatically, provided that a lead contact and communication method are configured for the receiving properties in SFA. These leads are then handled as regular leads in SFA.
See Also