
|
|
|
Report Search Screen
Reports are a valuable shortcut to managing, tracking and analyzing OPERA data. OPERA ships with a number of predefined standard reports in an REP format. Each property has the ability to change the displayed title of each report. Therefore, to maintain consistency throughout all OPERA applications, the REP name will remain static and cannot be changed.
To choose from OPERA’s standard reports, select Miscellaneous>Reports from the OPERA main menu. The Reports screen appears. (The Reports screen also appears wen you select the Print button from the Profile screen Options menu for company. travel agent, source, and contact type profiles.)
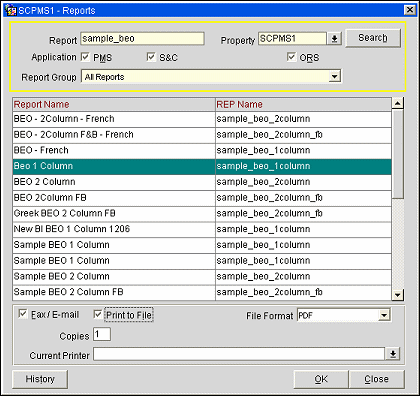
To search for a report, enter your search criteria and select the Search button:
Property. Select the down arrow to choose the property from which you wish to select a report. (This feature is available if the OPP_MHOT multi-property add-on license is active.)
Search by Report Name. Select this check box and enter the report title (e.g., Credit History Report, Deposit Activity Report) in the Report field.
Search by REP Name. Select this check box and enter the REP filename (e.g., creditcard_history, deposit_activity, etc.) in the Report field.
Application. Select the check box or boxes that correspond to the applications to locate reports. All licensed applications are selected by default. When you select the Print button from the Profile screen Options menu, the Application check boxes are not available; the application is automatically determined by the OPERA product with which you are working when you selected the Print option.
Report Group. After you have searched, select the down arrow to filter the search results grid by the report group (e.g., Accounts Receivable, Financial, Profiles, etc.) in which you are interested. All report groups are shown by default. When you select the Print button from the Profile screen Options menu, the Report Group filter is not available; the group is automatically determined by the type of profile from which you selected the Print option.
Each report offers you the option to fax or e-mail the report output to one or more recipients, or to print the output to a file.
Note: When you select OK from the Reports screen (or double-click on the report name), an individual report options screen appears. From this screen you will have an opportunity to preview the report and/or print hard copy in addition to faxing, e-mailing, and creating an output file.
Fax/E-mail automatically selects the Print to File check box. You may then select the appropriate file format. If you are e-mailing the report, the file will be attached to an email message (e.g., as a PDF or HTML file). If you are faxing the report, the file will be rendered in the selected format and the image will be faxed. When faxing or e-mailing a report, you can select the recipient from existing profiles or create a new recipient.
Print to File exports a report in your choice of the following file formats. HTML, PDF, RTF, Delimited, or Delimited Data. If you select Delimited or Delimited Data, you are prompted to select the field delimiter character you wish to use (e.g., comma, tab).
Current Printer. Displays the default reports printer that was set up for the current workstation in System Configuration> Setup> Workstations> Print Tasks. (The printer selected for the LIST_REP print task is displayed in the Current Printer field.) Select another printer from the drop down list, if desired.
See Also