
|
|
|
Searching for an Account
From the main menu, select Customer Management>Accounts. The Account Search screen appears.
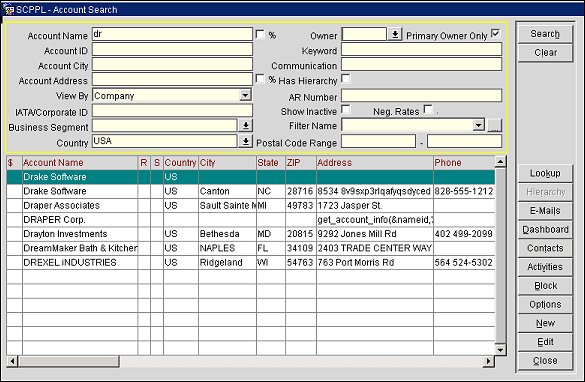
Use this screen to search for existing accounts, to create new accounts, and to access contacts, activities, business blocks, and other information related to accounts.
Lamps (indicators or notations) may appear in the lower part of the screen to alert you about information that pertains to the account (See Indicator Lamps for a complete list and details).
Note: Certain search criteria fields will only display results when information is selected in another search criteria field. For example, the Postal Code fields will only display results if the country is selected in the Country field. Also, another example would be that the Account City field will not return any results, unless the other information is entered, such as the whole Account Name or complete Account ID number.
Account Name. Type the account name you are searching for. Use the % checkbox to search for all accounts. If you enter text in the Account Name filter and select the % check box, OPERA will return all the Accounts with that text anywhere in the Account Name. For instance, if you enter 'woo' in the Name filter and select the % check box, returned search results might include 'Hollywood' as well as 'Underwood' because the string 'woo' is found in both names. If you enter 'woo' in the Account Name filter and do NOT select the % check box, OPERA would return only names starting with the characters Woo.
The % check box does not use an index, therefore performance for a search using this option may take longer than when not using the % check box. When more than one Partial Search option is selected (for example the Account Name and Account Address fields together) it may take longer than a search for a full name.
Note: When the application parameter Profiles>Extended Account Name Search is set to Y searching by Account Name on the Account Search screen will also search the Account Name 2 and Account Name 3 fields. The Name 2 and Name 3 fields will be added as columns and are available in the Account Search screen Grid Definition.
Account ID. This is the unique system generated ID number for the account. The whole number must be entered to find the correct account.
Account City. Type the name of the city associated with the account you are searching for. Search for all Accounts in a specific City, by entering the City name in Account City field, and % in Account Name field.
Account Address. Type in the street address associated with the account you are searching for. Use the % check box option to search for partial address strings, such as a street name. This field must be used in conjunction with the Account Name and/or the Account City fields and will only become enabled when either of the two fields are populated. If either fields (Account Name or Account City) becomes blanked out, this field will automatically be disabled. This option will search the Address 1 field of any address attached to the account.
View By. Select the down-arrow to choose a specific type of account to search for. Options include View All (the default), or company, travel agent, or source.
IATA/Corporate ID. Type the IATA number (for a travel agent) or a corporate ID associated with the account you are searching for.
Business Segment. Select the down-arrow to choose the business segment(s) associated with the accounts you are searching for. You can choose one or more market segments for the search.
Country. Country where the company listed on the account is located.
No Relationships. Select this option to exclude from search results any accounts that have a relationship to another account as a subsidiary itself.
Note: This option only displays, when the Account Search screen is called by selecting the New button from the Profile Relationships screen (Accounts>Edit>Options>Relationships). The logic behind this option is to provide a means to search for accounts that are already considered a master (master to subsidiary) or a regular account (no relationships). However, in the event that a subsidiary must be attached to an account that is also a subsidiary of another account (e.g., relationship models with more than 2 levels), this flag must be unchecked in order to make other subsidiaries visible. The reverse is also valid, for instance, to make an account a master the assumption is that it should be a master of regular accounts and not set as a 'higher' master over existing masters (master to master) and therefore other master accounts are filtered out by the flag unless it gets unchecked.
Owner. Select the down-arrow to choose the sales manager owner(s) of the account(s) you are looking for. You can choose one or more owners for the search.
Primary Owner Only. Select this option to search for Accounts by their primary owner only. See Ownership for more details.
Keyword. Enter a keyword specific to the account you are searching for. (Available when the Profiles>Keyword application function is set to Y.)
Communication. Use this field to search by any communication type (e.g., Phone, Fax, Email) associated with the Account’s profile.
AR Number. Enter the accounts receivable number assigned to the account you are searching for. In ORS and SFA, any record that has the searched for AR number attached for any property in the environment will be returned. In PMS and S&C, only those records where the AR number is valid in the currently logged in property will be returned (even in a multi-property environment where PMS OPP_MHOT or the S&C OPS_MHOT Multi-Property license code is active).
Show Inactive. Select to include inactive accounts by selecting the Show Inactive check box. Inactive accounts are differentiated by appearing with a gray background. The account can be made active/inactive using the Active check box on the Account screen. A message informs you that the profile is inactive when you attempt to make a block reservation for a guest whose account is inactive. If you select Yes to proceed, the account is automatically activated.
Note: When you make an account inactive or active, the action is recorded in the User Activity Log.
Neg. Rates. Select this check box to search for Accounts that have negotiated rates. Available when the Rates>Negotiated Rates application function is set to Y, and when used in conjunction with at least one of the following search criteria: Account Name, Account ID, IATA/Corporate ID, Country, Owner, Keyword, Communication, AR Number, and/or Filter Name.
Has Hierarchy. Select this check box to search for and display only the accounts that have relationships linked to them via a default, primary, or hierarchical relationship. Default is unselected. Available when the Profiles>Advanced Relationships and Profiles>Relationship Hierarchy application parameters are set to Y.
Filter Name. Select the down arrow to choose a pre-configured filter to assist your search. Or, select the ellipsis button to create new filters and edit existing filters. (Available when the General>Filter Search application function is set to Y.)
When creating and using filters, the following rules apply:
Postal Code Range. Enter in the postal code range to display the accounts that fall within the two postal codes. If only the starting postal code is entered, the all postal codes from that one entered will be displayed in the results. And if only the second postal code is entered, then all postal codes up to the one entered will be returned in the results.
Note: When the Country field does not have a country selected in it, then the postal code range is not accessible.
The results to your search display in the grid. To modify the grid display see Customize Search Display Results and Search Grid Color Maintenance.
The search results are displayed in this grid. Results can display up to 1000 Accounts, provided that many accounts fit your submitted search criteria. The following fields of information are provided:
$. Displays a $ when a negotiated rate is associated with the account. $$ is displayed if more than one negotiated rate exists.
But when the Profiles>Relationships Rate Inherit application parameter is set to Y, a (#) or (##) appear in this column for those account profiles that have a top level entity in their relationship hierarchy from which they inherit one or more negotiated rates. For example, if the ABC EAME is a subsidiary of ABC, then ABC EAME inherits profile rates from ABC.
Company Name. Company with which this account is associated.
R. Displays a P when the account is the parent in a hierarchical relationship.
S. Displays an S when the account is the subsidiary in a hierarchical relationship.
Note: The R and S columns will only display when the Profiles>Relationship Hierarchy application parameter is set to Y.
Country. Country where the company is located.
City. City where the company is located.
State. State where the company is located.
Zip. Postal code where the company is located.
Address. Street address where the company is located.
Phone. Primary company phone number.
Owner. Primary sales manager owner of the account. Additional owners may be attached to the account.
Market. Market codes that describe the market to which this company belongs.
Industry. The industry codes that describe the industry segments to which this company belongs.
Type. Type of account: G = Group, C = Company, S = Source, T = Travel Agent.
Active. X indicates an active account.
CIS. Where the CIS Lookup interface is installed, an H in this field indicates that a CIS profile is linked to this account and a CIS stay history is available for viewing (select the CIS History button form the Account Search screen Options menu); an L indicates that a CIS profile is linked to the account but no stay history is available; and a blank field means that the account is not linked to a CIS profile and no CIS stay history is available.
The following fields are configurable via the Field and Button Maintenance Default screen:
Show Inactive (Y or N available Field Values)
Primary Owner Only (with Y or N available Field Values)
Country
A right-click on the column headers in the search results grid allows you to change the sort order of the search results and make other modifications to the grid. Options include:
Add this Item to Order By. Use this option to add the selected column to the sort order.
Add this item in order by, descending. Use this option to add the selected column to the sort order, in descending order.
Order by this item in descending order. Use this option to start the sort order using the selected column.
Remove this item from Order By. Use this option to remove the selected column from the sort order.
Don't Order By Any Column. Use this option to display results without a sort order.
Show Existing Order By. Use this option to display results with the current sort order.
Column. To increase or decrease the width of a selected column in the Search result grid, select the Column option and select Increase Width or Decrease Width. You can also select and drag the right border of the column header to the desired width. The changes only remain in place in the Search grid when the Search screen is open. If you want permanent changes to the column adjustment:
- Select Save Grid in the right-click Order by menu.
- Or, select Modify Grid. The Grid Definition screen appears where you can set the desired width in the Preview Grid and select Save.
Save Grid. Save the grid.
Modify Grid. Use this option to add or remove columns from the grid, edit column headers, change the column width or change the column order. If the Modify Grid option is grayed out, you must first select Save Grid.
Extract. Right-click on an account in the search results grid to select it for extraction, then click on the Extract hover button. This action marks the account for extraction and mail-merge. Once an account has been selected for extract, each entry is shaded in cyan in the search results grid. Please note that accounts can also be selected for extraction by using the space bar once the account is selected in the grid. In order to execute the extraction, you must select the Extract button in Account Options (see Profile Options for details).
The buttons on the Account Search screen provide access to the following functions.
Note: Some of the Function Buttons listed here require that certain application functions, parameters and/or settings be configured for these options to be available from the Account Search screen. Because of this, some of the buttons listed here may or may not appear on the Account Search screen initially.
Hierarchy. Available when the highlighted profile has at least one hierarchical relationship configured. When the Hierarchy button is selected, the Relationship Hierarchy screen opens where the current profile’s hierarchical position in a tree view style diagram appears.
Lookup. Available only when the application parameter Profiles>Force Auto Central Lookup is active and the setting Profiles>Profile Lookup Types are set to include in the lookup function Company, Group, Source, and Travel Agent profile types. Select this button to initiate a central profile lookup, or select Yes at the Central Profile prompt (see New for further details).
E-Mails. Select this option to display the Email Sent Out List screen which contains a list of all electronic communications sent to email addresses attached to this account. Email must be configured for this option to display, see Email Activities for further details.
Dashboard. Select to display the Accounts Dashboard and view essential information about the highlighted account (See Accounts Dashboard for details).
CIS Lookup. This button is only available when the CIS interface is installed and the Profile>CIS Lookup application setting is a valid database name. Select this button to search for a CIS Company Profile associated with the highlighted account.
Contacts. To add a new contact or search for an existing contact, this button takes you to the Contact Search screen. The account that you have highlighted in the grid automatically populates the Account Name field in the search criteria section of the Contact Search screen.
Activities. This button takes you to the Activity Search screen to add a new activity or search for an existing activity. The account that you have highlighted in the grid automatically populates the Account field in the search criteria section of the Activity Search screen.
Block. This button takes you to the Business Block Search screen to add a new business block or search for an existing business block for the account highlighted in the Account Search screen grid.
Options. Select this button to go to the Account Options menu. See Account Options for details.
Note: When the General> Enhanced Options Management application parameter is set to Y, you have another way of quickly accessing options without selecting the Options button to open the Options menu itself. You can press Ctrl+T to display the blue Option field. ![]()
To view all the available options in alphabetical order, scroll through the options list by selecting the Up and Down arrow keys. Press Enter to select the displayed option and open the corresponding option screen. Or, instead of scrolling through the options list, type the first three letters of the desired option. The corresponding options screen appears. (For example, type c-a-n for Cancel.)
You may also enter the first letter of the desired option and all options beginning with that letter will appear in alphabetical order as you scroll. To scroll, use the arrow keys or repeatedly press the beginning letter key. For example, if you typed a-a-a-a you might scroll through the options of Accompanying, Add on, Agent/Company, Alerts. Press Enter to open the desired option.
New. Create a new account profile. See Create and Edit an Account for details.
Note: When the Profiles>Profile Name String application parameter is set to Y and a new profile is being created, a match and validation takes place against a configured profile type and name to see if the new profile name string matches with the profile type (see Profile Name String for details). If a validation is done and the name string does not match the profile type, a warning prompt is displayed stating the following, "Profile Type for this profile should be <Profile Type>. Do you want to continue?" Selecting Yes will create the new profile and selecting No will not create the profile.
Note: When the application parameter Profiles>Force Auto Central Lookup is active and the application setting Profiles>Profile Lookup Type is set to include Company, Groups, Source and Travel Agent profile types and the New button is selected from this screen, you are prompted to either do a central lookup for the account you are attempting to create. Select Yes to do a central lookup at this time, or No to continue creating the account.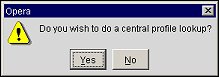
Edit. Display and edit the account you have highlighted in the search results grid. See Create and Edit an Account for details.
See Also