
|
|
|
Activity Priority Setup
To set up priority levels to be assigned to activities, select Setup>Configuration>Database>Priorities from the main menu. The Priorities screen appears.
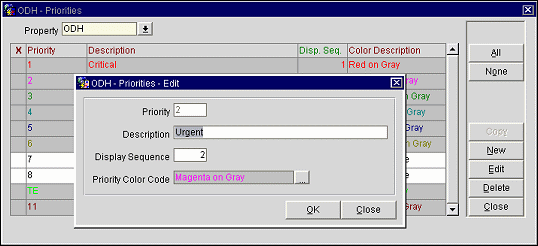
This screen shows the following information:
X. An X in this column indicates that the entry has been selected for action (i.e. Copy, Edit, Delete).
Priority. The code that is seen within the pick box from the application.
Description. The description that is seen within the pick box from the application.
Disp. Sequence. The sequence order number of the code indicating where it will appear when listed in pick boxes. The default is alphabetic listing.
Color Description. The color to be used to display To Do items having this priority on the Scheduler screen. For example, as in the case above, Priority 2 with a description of Urgent is set to display as Magenta text on a Gray background.
All/None. Use the All or None buttons to select all records, or to un-select all records.
Copy. Use the Copy button to copy a selected priority or priorities to another property.
New. Create a new record for this pick box.
Edit. Edit the highlighted record. You can edit the description, sequence, and color code.
Delete. Remove or delete the highlighted record.
Close. Close this screen without saving. A confirmation message will appear to remind you to save.
To create a new priority, select the New button from the Priorities screen. To modify an existing priority, highlight your choice on the Priorities screen and select the Edit button. The Priorities- New or Priorities- Edit screen appears.
Provide the following information and select the OK button.
See Also