
|
|
|
E-Certificate Types
Requirements/Prerequisites
Select Setup > System Configuration > Profile > E-Certificate > E-Certificate Types to open the E-Certificate Types screen. Use the E-Certificate Types screen to configure E-Certificates based on a scope and membership type and define where the E-Certificate can be consumed. You will also be able to define the format for how numbers will be generated for an E-Certificate type.
E-Certificate numbers will be generated for the E-Certificate type and available for attaching to profiles. These profiles will be eligible for the E-Certificate based on the membership types linked to the E-Certificate. For example, if the membership type linked to an E-Certificate is "GC," only profiles with this membership type can be issued a number generated for the particular E-Certificate. The E-Certificate number will remain on the profile until consumed. See E-Certificate Consumption for information on how E-Certificates are issued and attached to guest profiles.
Guests who have been issued E-Certificates will be able to consume their E-Certificates through the hotel front desk.
Note: PMS users cannot issue E-Certificates to guests. Only consumption is available at PMS level.

Refine your search results by selecting from the following search criteria.
E-Cert Code. Select the down arrow and choose an E-Certificate code from the list of values.
Property. Select the down arrow and choose one or more properties from the list of values.
Group. Select the down arrow to filter the search results based on the Group the E-Certificate is referenced to.
Inactive. Select to display only inactive E-Certificates.
Certificate. The code used to identify the E-Certificate.
Mem. Type. The membership type linked to the E-Certificate.
Award Code. The award code linked to the E-Certificate.
Promotion. The promotion code attached to the E-Certificate.
Property. The property attached to the E-Certificate.
Label. The display label for the E-Certificate.
Group. E-Certificate Group the certificate is referenced to.
Value. The value of the E-Certificate.
Cost. The cost in membership points for consumption of the E-Certificate.
Expiry. The number of months until expiration.
Prefix. The prefix appended to the E-Certificate.
Format. The format used when generating the E-Certificate.
Begin Date. The begin date for the E-Certificate availability.
End Date. The end date for the E-Certificate availability.
Scope. The scope of the E-Certificate (i.e., property level, multi-property, or global).
Search. Select to begin search and display search results.
New. Select to open the OPERA E-Certificate Type - New screen and add a new E-Certificate type.
Edit. Select to open the OPERA E-Certificate Type - Edit screen and edit an E-Certificate type.
Delete. Select to delete an E-Certificate type that is highlighted in the search results grid.
Select the New button to add a new E-Certificate Type or select the Edit button edit an existing one. The OPERA E-Certificate Type-New/Edit screen will open.
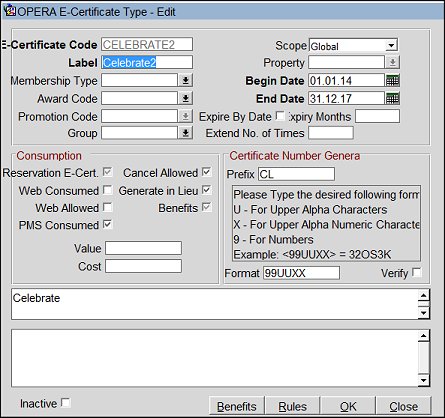
E-Certificate Code. (Read only when editing an E-Certificate.) Enter a code for the E-Certificate. This is used for identifying the E-Certificate type.
Scope. Select the down arrow and choose either Property or Global as the scope for the E-Certificate. The scope will determine whether the E-Certificate type is available for a single property or an entire chain.
Label. Enter a label for the E-Certificate. This is the label that will be displayed for the E-Certificate type.
Property. (Only available when "Property" is selected for the scope) Select the down arrow and choose one or more properties to attach to the E-Certificate type. The E-Certificate type will be available to the selected properties.
Note: The properties available for selection will be limited to properties the user has access to.
Membership Type. The Membership type to which the E-Certificate is linked. The E-Certificate will be available to profiles with this membership type.
Begin Date. Select the calendar tool and choose a begin date for the E-Certificate to become available.
Award Code. The award type to which the E-Certificate is linked.
End Date. Select the calendar tool and choose an end date for the E-Certificate.
Promotion Code. The Promotion code to which the E-Certificate is attached.
Expire by Date. (Selecting this option changes the Expiry Months field to a Calendar field.) Select this option to choose a calendar date on which the E-Certificate expires as opposed to basing the expiration on a number of months. When selected, a date must be entered into the Calendar field.
Expiry Months. Enter the number of months until the E-Certificate type expires. This will define the number of months the guest has to redeem the E-Certificate.
Extend Number of Times. (Profiles>OCIS E-CERTIFICATE EXTEND permission must be granted to the user for this field to be available.) Enter the number of times a user can extend the expiration of an E-Certificate.
Group. Select the down arrow to choose an E-Certificate Group to reference the E-Certificate Type to.
Define where the E-Certificate can be consumed by selecting from the following:
Reservation E-Cert. Select if the E-Certificate can be consumed against reservations.
Web Consumed. Select if the E-Certificate can be consumed in OWS.
Web Allowed. Select to make E-Certificate consumption allowable on the web.
PMS Consumed. Select if the E-Certificate can be consumed in PMS.
Cancel Allowed. Select if the E-Certificate Type can be cancelled.
Generate in Lieu. Select if the E-Certificate Type can be used to book another reservation if the original E-Certificate reservation is cancelled. This happens when a reservation that is carrying an E-Certificate, or a reservation in which an E-Certificate was used for, is cancelled, the E-Certificate is also cancelled and another E-Certificate is created with a new number and the credit is granted back to the guest for future use. But, the new E-Certificate will still maintain the same Expiry Date as the original certificate that was cancelled.
Benefits. (Available for selection when the Reservations>OPERA BENEFITS parameter is set to Y.) Select to make the Benefits button active. For more information, see the description for the Benefits button below.
Value. The value of the E-Certificate to the guest.
Cost. The cost in membership points to consume the E-Certificate.
In this area, specify the format for the E-Certificate numbers.
Prefix. Any prefix that needs to be appended to the E-Certificate.
Format. Enter a format for the E-Certificate number generation. When E-Certificate numbers are generated, they will be based on this format.
Verify. Select if you want to enable verification for this E-Certificate type.
Short Description. Enter a short description for the E-Certificate.
Long Description. Enter a long description for the E-Certificate.
Inactive. Select to make the E-Certificate code inactive. When inactive, the E-Certificate code will still display in the search results, but it will not be used for generating certificate numbers for attaching to guest profiles.
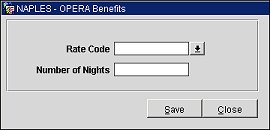
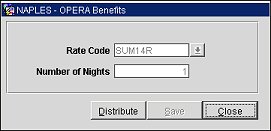
Benefits. (Available for selection when the Reservations>OPERA BENEFITS parameter is set to Y and the Benefits check box is selected for the e-certificate). Select this button to attach a rate code to the e-certificate as a benefit. Select the down arrow and choose a rate code from the Rate Code LOV and enter a number in the Number of Nights field. See Applying a Benefit E-Certificate to a Reservation for configuration details.
Note: Only rate codes that have the Benefit Rate Code option selected will be available in the Rate Code LOV. See the Rate Header Tab topic for more information on the Benefit Rate Code.
Rules. (Only available when the Scope field is set to "Global.") Select to open the E-Certificate Generation Rule screen.
OK. Select to save changes.
Show Me
![]() Applying a Benefit E-Cert to a Reservation
Applying a Benefit E-Cert to a Reservation
![]() Applying a Benefit Coupon to a Reservation
Applying a Benefit Coupon to a Reservation
See Also