
|
|
|
Function Diary (Shift + F9)
In PMS, the Function Diary can be accessed by selecting [Shift+F9] when:
In S&C, the Function Diary can be accessed when the application function Catering>Function Diary is set to Y. Access the Function Diary by selecting Business Management>Function Diary. You may also select the [Shift+F9] Quick Key. When accessing the Function Diary [Shift + F9] from an event on the main Events screen, the Events screen remains open so users can conveniently access it again.
Note: When the Sales & Catering license code (OPS_<version number>) is not active, and the PMS license code (OPP_<version number>) or the OPERA XPRESS license code (OPE_<version number>) is active, the Blocks>Diary application function may be set to Y in order to activate an abbreviated version of the S&C Function Diary within OPERA PMS or OPERA XPRESS. The simplified Function Diary is accessed by selecting Reservations>Blocks>Function Diary and requires the permission Blocks>Function Diary to be granted.

Note: When using the Diary Function in SFA (Sale Force Automation) it is possible to view the Function Diaries of remote OPERA properties and to book events into function spaces of remote properties (Diaries and Events in the same schema as SFA are also available) with event information being transported between SFA and the remote properties via OXI-OPERA. Resources, apart from the function space, are NOT exchanged and NOT available in SFA. The application function Blocks>Central Diary must be active and the permission Blocks>Function Diary must be granted to access the Function Diary in SFA.
Use the function diary to view availability for function spaces, including PMS sleeping rooms that have been configured with the Can Be Meeting Room option selected in room type setup. View the function room inventory (including combination, sharing, individual, and sleeping rooms that can be sold as meeting rooms) by the hour, day, week, or by multiple weeks. Loud events, events held in shareable spaces, events with sub-events, events in alternate space and events belonging to catering only business blocks are clearly marked in the function diary and easily recognized at a glance.
You can tailor the function diary to your properties’ standards by assigning distinctive colors to display each status (to do so, select System Configuration>Reservations>Codes>Status Codes to display the Status Codes Edit screen). The Show Diary option on the same screen lets you choose whether to display events of this status on the diary (for example, you may not want to display cancelled events in the function diary). You may also specify how many function spaces are displayed per screen without scrolling by using the Catering>Number of Rooms per Diary Page application setting.
If a sleeping room is configured to double as a meeting room (that is, if the Can Be Meeting Room flag is selected on the Room configuration screen), a PMS reservation against the room will impact its availability for catering functions. When using the Function Diary to review and set up catering events, it may be desirable to know when such rooms are reserved for PMS guests. On the other hand, because querying for PMS reservations involves performance overhead, the property may not wish to query PMS reservations automatically, especially if its Can Be Meeting Room rooms are only rarely used for catering functions.
The application setting, Catering>Function Diary Query PMS Reservations, can be used to control whether or not the Function Diary displays the PMS reservations when the screen is opened and when a search is performed using the screen. When the parameter is set to Y, the Function Diary always looks for PMS reservations every time it is opened or refreshed using new search criteria.
Note: When a room designated as Can Be a Meeting Room that is reserved as a PMS sleeping room is displayed in the Function Diary, the views alway display as close to the hotel's check-in time and check out time as is possible.
To improve Function Diary performance, the property user may wish to forego checking for PMS reservations associated with Can Be Meeting Room rooms. To sidestep queries for PMS reservations, the Function Diary Query PMS Reservations application setting may be set to N. When this is done, the Function Diary will not automatically query for PMS reservations. A check box added to the Function Diary search criteria, however, will allow the user to 'manually' include PMS reservations in the query.
This feature applies only to S&C installations that are integrated with PMS (OPP<version number> with OPS<version number>). At standalone S&C installations, there is never a query for PMS reservations. At PMS installations without S&C, and at OPERA Express installations, the Function Diary always queries PMS reservations.
Note: OPERA saves certain values by user when this screen is closed and default those values the next time that user opens the Diary. These values are: Property, View Type, Start Time, Selected Status Codes, Event Label, Sort Order (Advanced Tab), Individual / Combo / Both (Advanced Tab), Status 1 and Status 2 (Show Rooms).
![]()
To display events in the function diary event grid use any combination of these search fields to define your search criteria. A search can also be executed by selecting the tab key. Search criteria include:
Property. Select the down arrow to choose the property to search. As this is a required field, if no value exists in this field when completing a search or tabbing out of the field, a message prompt stating "Property must be selected." appears. (This feature is available when the OPP or OPS MHT2 license is active.)
Start Date. Defaults to the date of the block or event from which the function diary is accessed; if you open the function diary prior to selecting a block or event, the date defaults to the system date. Select any date using the calendar tool or enter a date manually.
Space. Select the down arrow to choose one or more function spaces to search for (See Select Function Space for details).
Event Label. Select the down arrow to choose how you wish to have events labeled on the display. By default, events are labeled by Booking Name. Other choices include the following:
Note: Prospective Events are calculated as non-deduct or inquiry events other than the event displayed. For example, if there are 3 non-deduct events booked in the same space on the same date and time, when 1 of the events is selected in the Diary, the Prospective Events is calculated as 2 because there are 2 non-deduct events in addition to the current event in the same space at the same or overlapping time.
Include PMS. Include PMS reservations that are booked into sleeping rooms which are configured as Can Be a Meeting Room. This check box is visible when the Catering>Function Diary Query PMS Reservations application parameter is set to N.
Hide Deduct Space. When selected, only the Function Space with No Events booked or with Events booked in a Non-Deduct Status appears. Function Space with Events booked in a Deduct Status are not displayed. In a multi-day view, if the space is booked as Deduct for any of the dates, then it will not be displayed.
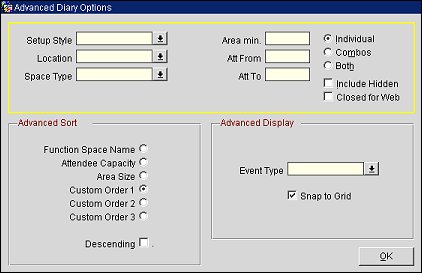
Select the Advanced button to display additional search options. These options apply to a single property or multiple properties where you can search and display for the best available space based on the setup style and other criteria.
Setup Style. Select the down arrow to choose the setup style for which you want to search. Only the Function Spaces configured with the selected Setup Style are returned.
Location. Select the down arrow to choose the location of the function space to search. The Function Space configured with the selected Location is returned.
Space Type. Select the down arrow to choose the type of room to search. Only Function Spaces configured with the selected Space Type are returned.
Area Minimum. Enter the minimum area of the rooms to search. The Function Space having at least this area appears.
Att From and Att To. When no Setup Style is selected, these fields are used to filter the results by the maximum capacity configured for each Function Space as configured in the Rooms – Edit>Function Space Tab.
For example:
If a Setup Style selected in conjunction with attendees, the filtering is based on the maximum configured for the setup style in the Function Space Setup screen.
For example:
Type of Room. Select the radio button for the type of function space to search:
Include Hidden. This check box works in conjunction with the Display in Diary option which was set when the function space was defined in room configuration. If Display in Diary is set to N for the space (as may be the case for function spaces that are also used as sleeping rooms), selecting Include Hidden here will display that space. If Display in Diary is set to Y for the space, it will be shown here by default.
Closed for Web. When the S&C/OWS license code Webservices Sales & Catering WCS_<version number> or Webservices Conference Center WCC_<version number> is active and a function space has been designated as Bookable via Website, it may occasionally be necessary to make the function space unavailable for booking via the internet. Select this option to view function spaces that are placed in a Closed to OWS status, meaning that the room (while still available to be booked through S&C) cannot be booked via website. Function Spaces that have been placed in a Closed to OWS status will display a magenta colored line through the date/time span for which is has been made unavailable for booking via the website. See Internet Bookings for more details on this functionality.
Advanced Sort. Select the sort features you wish to apply to the search result display.
Function Space Name. List function spaces in alphabetical order (the default). The order is based on the short name. If no short name has been configured, the function space name will be used.
Attendee Capacity. List function spaces by the maximum attendees specified in the function space room configuration screen. Spaces are automatically displayed from smallest to largest attendee numbers.
Area Size. List function spaces from smallest square-foot or square-meter area to largest square-foot or square-meter area. If there is a space that has no information in this field then it will appear on the top of the list.
Custom Order 1/2/3. List function spaces by these custom listing alternatives designated for the function spaces in room configuration.
Property. (Available when the OPP or OPS MHT2 license is active and more than one property is selected from the Property LOV in the Function Diary search criteria.) Select this check box to sort function spaces alphabetically by property first, then in the sort order indicated by the Advanced Sort radio button.
Descending. This check box works in conjunction with the radio button selection to display spaces in descending order rather than in the default or ascending order. For example, if you are sorting on Area, by default the list is displayed from smallest to largest square feet or meters. By selecting this check box, the display runs from largest to smallest area.
Advanced Display. Select the display to further narrow your search.
Event Type. Select the down arrow to select a specific event type to highlight in the Diary display.
Snap to Grid. On creation of an event from the function diary directly, Snap to Grid locks the event start and end time to the closest grid cell line that the cursor is clicked on, rather than estimating the times based on the area in the grid where you clicked. (e.g., 10:00 rather than 09:57).
The function diary includes many features that can be customized per user. The following description gives you an overview of the many tools and conveniences built into this screen.
The Catering Demand Days label appears below the Search criteria and above the View LOV. When Catering Demand Days are configured for the property and date range (Setup>Catering>Catering Demand Days), the demand level per day for catering events is visible to users. When the Rates>Display Cat Demand Days application parameter is active, the Demand Days level displays in color. When this parameter is not active, only the Day Type Code displays. (When the View LOV is selected for 21 Days, only the first three digits of the Day Type Code display.)
![]()
![]()
When Catering Demand Days are not configured, this row remains blank.
![]()
The Catering Demand Days label and indicators can be replaced for viewing by Rate Protect and/or No Compete information when either one or both application parameters are active: Block>Rate Protect and/or Block>Non Compete. Right click the Catering Demand Days label to display the popup menu option. In the example below, both Block>Rate Protect and Block>Non Compete application parameters are active and display as options in the menu.
In the example below, the menu option Rate Protect/Non-Compete was selected. See the section Rate Protect and Non Compete Indicators for more information. To toggle back to the option menu to choose Catering Demand Days, right click on the label (i.e. Rate Protect / Non-Compete).
![]()
Just below the Catering Demand Days and Rate Protect and/or Non Compete labels, an LOV exists that allows you to set the scope of your view of the Function Diary events displayed in the grid. Select the down arrow on the view field to choose the period of time to see events. Options include 5-Hour View, 10-Hour View, Day View (the default), 5-Day View, 7-Day View, and 21-Day View. The names of the days of the week appear when a day view is selected.
Date. The date(s), such as Fri, 12.18.09, appear for both Hour and Day views in the heading. The grid adjusts to include the selected period, and the date and time gradations adjust appropriately. Dates displayed in yellow are weekend days as defined in the application setting General>Weekend Days.
When the Application Parameter>Property Calendar is set to Y, users can double-click on the date (i.e. Fri, 12.18.09) to open the Property Calendar that displays an overview of all the events and day types defined for the time period. With the Property Calendar, you can see at a glance a broad view of the daily status of the property and manage events or special periods that can affect rates.
Note: Dates displayed in yellow are weekend days as defined in the application setting General>Weekend Days.

View Example
You might wish to start with the widest view (21 days), then "zoom in" to 5 days or 1 day for more detail. The << and >> and < and > buttons below the grid let you slide the "viewing window" left or right to look at adjacent time periods. The << and >> move a full window at a time, while < and > move a single grid division at a time. For example, if you are set to a 5-hour view, selecting >> will slide the window to the right and display the 5-hour period that follows the 5-hour period you originally were viewing. If you slide the window to the left using the < button, the window will slide to the right by one division to show a 5-hour period starting 15 minutes earlier than the original display.
Note: When you choose the 5 Hour View, the scale is divided into 15-minute increments. If you use the > or < buttons to slide the viewing window so that the scale starts with a time other than a full hour (e.g., 08:15, 08:30, 08:45, etc.), the scale will continue to start on the quarter hour, half hour or three-quarters hour if you switch from the 5 Hour View to the 1 Day View. If you want your scale to start on the full hour, change the 5 Hour View scale to start with a full hour before switching to the 1 Day view. Gray shading implies that the times are PM and the white implies AM.
DOW. When the 5-, 7-, or 21- Day Views are chosen for the grid display, Days of the Week (DOW) check boxes appear in the lower screen allowing you to choose the days of the week you want to show in the grid. The default is the Day View with all days of the week selected. A red block following the DOW boxes means that the DOW option has been changed and the Search button should be selected to re-display information for the new DOW options.
Rooms List. Listed in the left-most column are the names of the function rooms. <C> next to a room name indicates a combination, or combo, room; <S> indicates a shareable space. <A> indicates that a space requires the booking of an alternate space. Double-click the left mouse button (or press Alt Z) to view detailed room information about the function space. The information displayed is View Only on the Rooms Screen Function Space Tab.
Note: Use the Catering>Number of Rooms per Diary Page application setting to choose whether you wish to display a maximum of 6, 9, or 18 rooms in the room list at a time (18 is the default).
Single-click with the right mouse button to display these options:
Info. The following information is available:
Main. This selection links to the main Room Set Up screen in Configuration. You can view the overall structure of the room.
Set Up. This selection links to the Room Set Up screen in Configuration. You can view the set up styles applicable to this room.
Rates. This selection links to the Rate Set Up screen in Configuration. You can view the Rate Name and values applicable to this room.
Combo Elements. If this room is marked as a Combination room (<<C>>), you will have access to the Combo Set Up screen where you can view the single-rooms that combine to create this room.
Dimensions. This selection links to the Dimensions screen where you may view the measurements of this room.
Images. Display view-only graphics showing the function space in various setup styles (if available).
OO/OS. If the function space is Out of Order/Out of Service, this option shows the reason. You may set a room Out of Order or Out of Service if your permissions allow. Only displayed when the Rooms Management>Out of Order and Rooms Management>Out of Service application functions are active.
Event Grid. The event blocks are the colored areas that represent scheduled events on the grid. (See the Function Diary Legend for an explanation of the "language" of the event blocks.) Briefly, the color of the block is determined by the status of the event. If additional time is required for set up or set down before and/or after the event, plus signs will be added before the event block for set up (++++), and minus signs will be added after the event block for set down (----). To highlight an event, place your mouse in the color bar and clicking the left key on your mouse. Make sure that the event you wish to work with is completely in the view of the function diary.
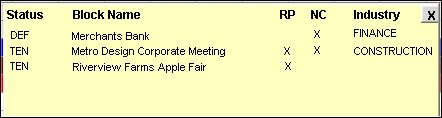
When either or both the Blocks>Rate Protect application parameter or the Blocks>Non Compete application parameter is set to Y, a line is displayed above the weekdays to indicate if any bookings on that date are flagged as Rate Protect and/or Non Compete on the Business Block screen Details tab. Bookings may be rate protect and/or non compete for all dates of the booking, or only for selected dates. (See Business Block Details Tab for additional information.)
If any booking is designated non compete on a given date, NC appears above that date; if any booking is designated rate protect on a given date, RP appears above the date; and if a booking is designated as both, the RP and NC indicators both display. When a designated booking is returned-to-inventory (Lost or Cancelled) for both Room Status and Catering Status, neither the NC or RP display above the date. If at least one Room Status or Catering Status is still active, the appropriate indicator will display.
Note: Rate Protect / Non Compete indicators can be replaced by Catering Demand Days indicators by right clicking the label and selecting Catering Demand Days. See the section Catering Demand Days above for more information.

RP. Rate protect means that no other groups should be booked using rates lower than those assigned to the block that is flagged as rate protect. The rate protect flag may be applied to all or selected dates of the flagged block. (Note that OPERA does not enforce this restriction.)
NC. Non compete means that no competing accounts (accounts having the designated NC Industry code) should be booked at the same time as this block. The non compete flag may be applied to all or selected dates of the flagged block. (Note that OPERA does not enforce this restriction.)
Click on a cell to display details about the rate protect and/or non compete booking, including the status and block name. An X in the RP and/or NC column indicates whether the booking is rate protect and/or non compete; if non compete, the NC Industry that should not be booked on that same date is also shown. Bookings are sorted by status and block name.
You can easily schedule additional events directly from the Function Diary screen. To do so, zoom in on the day when you want the event to start. Choose the grid row for function space where the event is to be held and click in the grid column for the approximate start time. Then click in the column for the approximate end time. You may refine the start time and end time when the Event screen displays.
You are prompted to select whether the new event should be associated with the Current Block, an Existing Block, a New Block or a Quick Event (when the Catering>Quick Event application function is set to Y.) When Current Block is selected, the event will be attached to the business block highlighted or being edited when the diary was called. When Existing Block is selected, you will be directed to the Business Block search screen to select an already created business block that is in house on the day the event is blocked and with a catering status that is not in a return-to-inventory status. When New Block is selected, you will be directed to a new Business Block or Quick Business Block screen (if the application parameter Blocks>Business Block is set to N) to create a new business block to which the event will be attached.
When Quick Event is selected, entries on the Event screen may be directly made into the Account and Contact fields and are used as parameters in the Quick Profile screen. Default reservation types for deduct and nondeduct reservations associated with the Quick Event are set by the Catering>Default Res Type Deduct and the Default Res Type Nondeduct application settings.
Gray markers appear to notify you of the times you chose. Prompts guide you through the process. You may add the event to an existing business block or to a new business block. See Show Me, below.
Note: When booking subsequent events into a function space that has been booked as shareable for the first event, a screen is displayed notifying the user of the events that are already booked for that room. The screen displays the booking name, event type, and attendees for the already booked events.
To move an event from one function space to another, click and drag the existing event to the desired function space/date/time on the grid. If the new space does not have the same Rate and Setup Style as the Source Space, then you are prompted if you agree to the new room, date, or time; and the Select Function Space screen displays where you can change the Rate and Setup Style. If the new space does have the same Rate and Setup, then the only prompts will be to confirm that you want to change the room, date, or time.
With the cursor on an event, the following features are available using the mouse:
Left click on an event to display event details.

Account. Name of the account associated with the business block.
Contact. Business block contact.
Keep in mind that account and contact information is displayed according to the following profile type hierarchy:
Block Name. Name of the business block.
Event Name. Name of the event.
Event Start/End. Date and time when the event starts/ends.
Function Space Start/End. Start and end dates and times of the event (or Master event if sub events are also scheduled). For example, if company A were to have a cocktail reception from 5:00pm to 6:30pm and a dinner & dance from 6:30pm to 9:00pm the Block Start time would be 5:00pm and the Block End time would be 9:00pm.
Status. Business block status/catering status.
Event Type. Event type code (e.g., LUN, MTG, CKT, etc.).
Attendees. Number of attendees (guaranteed) for the event.
Function Space. Name of the function space that is booked for the event.
Setup. Set up style for this event.
Catering / Rooms Manager. Name of the primary owner of the Catering section / Rooms section of the business block.
Rooms. Yes or No, indicating if there are rooms (i.e., sleeping rooms) and how many are attached to this business block.
Sub Events. Yes or None, indicating if there are sub-events attached to this event.
Catering Decision. Catering decision date.
Catering Follow Up. Catering follow up date.
Rooms Follow Up. Rooms follow up date.
Waitlisted Events. The number of waitlisted events for this space and time slot.
Prospective Events. The number of events on a non-deduct or inquiry status for this space and time slot in addition to the highlighted event.
Events Created On. The event creation date and time.
Block Ranking. Business block ranking. A ranking code may be applied to a business block to indicate the rank (or priority) of the business block. Ranking is available when the Blocks>Block Ranking application parameter is set to Y.
Block Conversion. Conversion value. A conversion value can be applied to a business block to indicate a percentage of likelihood that the booking will turn definite. Conversion is available when the Blocks>Conversion application parameter is set to Y.
Block Rate Protect. YES indicates rate protect applies to all or some dates of the booking. Rate protect means that no other groups should be booked using rates lower than those assigned to the block that is flagged as rate protect. The rate protect flag may be applied to all or selected dates of the flagged business block. (Note that OPERA does not enforce this restriction.) Rate Protect is available when the Blocks>Rate Protect application parameter is set to Y.
Block Non Compete/NC Industry. YES indicates non compete applies to all or some dates of the booking. Non compete means that no competing accounts (accounts having the designated NC Industry code) should be booked at the same time as this block. The non compete flag may be applied to all or selected dates of the flagged business block. (Note that OPERA does not enforce this restriction.) Non Compete is available when the Blocks>Non Compete application parameter is set to Y. When a block is designated non compete, the NC Industry code for the industry that should not be booked at the same time as that block.
New. Create a new event. Links to the Business Block screen to create a new business block.
Copy Event. Copy the current event within the current business block or to another business block. Links to the Copying Events screen.
Move Event. Move the current Event within the current business block or to another business block. Links to the Moving Events screen.
Delete Event. Delete this event. A confirmation message appears requesting you to confirm this action.
Reassign Room. Go directly to the Event Space Setup screen, where the current room, rate and set up are in the selected area. You must de-select and select another room.
Event Info. This option provides access to more options allowing you to view the attached profiles (including Account and Contact), Business Block, and Resources. Click the Event arrow to access the following options: Edit, Sub Events, Shared, Overbooked Events, Prospective Events, and Attendees (Attendees is available when the application function Catering>Attendee Management is active and the event requires registration. This option displays a list of registered attendees for the event).
Waitlist Events. If there are any events waiting for this room for this date and time, this option will be available. Selecting Waitlist Events takes you directly to the Waitlist screen where you can see the event that you have highlighted in the Current grid (lower grid). On the Waitlist grid (the top grid) you can see the events waiting for this room.
PMS Reservation. If a room is configured with the option Can Be Meeting Room, that room can be booked as a regular PMS reservation, without an associated business block or event. Select this option to see the reservation.
PMS Profile. Select this option to see the profile associated with a reservation for a meeting room which has been reserved using a PMS reservation. Room must be configured with the Can Be Meeting Room option.
Do Not Move. If you do NOT wish to have this event moved, then select this option. When you select this option, it changes to Allow to Move so that you can reverse your decision.
Show All. Select this option to show both master and sub-events at the same time.
When you click on an event block, the following buttons are available, as appropriate.
Account. This button is enabled or disabled depending on various conditions. When the application parameter Profiles>NEGOTIATED CATERING PACKAGES is active, the Account button will always be enabled. When this parameter is active:
When the application parameter Profiles>NEGOTIATED CATERING PACKAGES is not active, the Account button is only be enabled when the highlighted event has an account attached to it. Selecting the Account button displays the primary account linked to this event.
Contact. If a contact is attached to the highlighted event, use this button to display the primary contact linked to this event.
Block. Display the business block that is attached to the highlighted event.
Event. Display the Events screen for the highlighted event.
Resources. Display the Resource screen for the highlighted event. When the event or catering status of a block is a return-to-inventory status such as LOST or CANCELED, the Event Resources screen will display in VIEW ONLY mode when this button is selected.
Subevents. If there are sub-events attached to this event, this button will be available when the event is selected and will display a list of the sub events.
Shared. If there are shared events for this room for this date and time, this button will be available when the event is selected and will display the list of shared events.
OB Events. If there are overbooked events for this room for this date and time, this button will be available when the event is selected and will display the list of over booked events.
Waitlisted. If there are waitlisted events for this room for this date and time, this button will be available when the event is selected. This takes you directly to the Waitlist screen where you canl see the event that you have highlighted in the Current grid (lower grid). On the Waitlist grid (the top grid) you can see the events waiting for this room.
Prospective. If there are prospective events for this room for this date and time, this button will be available when the event is selected and will display the list of events in this space and time in a non-deduct status.
Resv. If a room is configured with the option Sleeping Room Can Be Meeting Room, that room can be booked through a regular PMS reservation, without an associated business block or event. Select this button see the reservation.
Profile. Select this button to see the profile associated with a reservation for a meeting room which has been reserved using a PMS reservation. (Room must be configured with the Sleeping Room Can Be Meeting Room option.)
GRC. This button links to the Group Rooms Control (Ctrl+5) screen with the Start Date and Property field information passed from the Function Diary. The GRC button displays by default except in the following scenario: no active S&C is present and the application Function Diary is set to Y.
Layout. If the S&C add-on license OPS_MM (MeetingMatrix interface) is active and the function space selected for this Event has a MeetingMatrix layout diagram available, this button launches MeetingMatrix. Meeting Matrix can be used to customize the function space layout for this Event.
Show Rms. Display the sleeping room availability for each date. Only visible if the Day View is 5 days or greater. The Show Rooms option provides such useful information as: the Sales Allowance Availability for the day, House Availability for the day, and the total number of blocked rooms for two different statuses which can be seen for each day.
Note: When Show Rms. is selected, another button, Ref. Rooms, becomes available to refresh the room's availability display without having to exit/reenter the Function Diary screen.
Note: House Availability figures Include Overbooking Rooms, Out of Order, Out of Service Rooms and Master Allocation Rooms, but DO NOT Include Non Deduct reservations.
No Space. This button displays when the grid display period includes at least one event that has no function space attached and if that Event is in the status set by the Catering>Diary Warning for No Space application parameter. Select this button to go to the Event Search screen from which you may display the Event and assign a function space. Once a function space is assigned to the Event, this button no longer appears.
Show Me
![]() Creating an Event from the Function Diary
Creating an Event from the Function Diary
See Also