
|
|
|
Global Alerts
Global alerts are automatically and dynamically attached to all reservations that meet the alert criteria. This topic covers configuration of global alerts. Alerts functionality is available when the RESERVATIONS > ALERTS application function is set to Y.
Global alerts are dynamic in nature. They appear only when the conditions set up for the alert are met by the reservation (for example, at check out when the reservation departure time is between 11:30 AM and 12:30 PM). This dynamic functionality permits global alerts to be initiated on an ad-hoc basis and precludes the need to edit alert information for specific reservations when conditions change. For example, assume a global alert announcing a lunch special in the hotel restaurant is configured to appear at check out if the departure is between 11:30 AM and 12:30 PM. If the guest checks out at 10:00 AM, the alert will not appear. Because of the fundamental differences in purpose and functionality between global alerts and standard alerts, global alerts are not listed on the reservation-specific Alerts screen (available by selecting the Alerts button on the Reservation Options menu.)
Global alerts can be set up to appear at any or all of the following times: at check in, at check out, in house, and/or whenever the reservation is opened. Sets of display conditions further restrict the global alert display based on reservation type, block code, number of adults/children, arrival/departure time, and a host of other criteria.
To configure global alerts, select Configuration > Reservations > Codes > Alert Definition > Global Alerts. The Global Alerts screen displays.
Property. Select the down arrow to choose the property to configure global alerts. Available when the OPP_MHOT Multi-property PMS add-on license is active and when the OPR<version_number> ORS license is active.
This screen lists the global alerts that have been set up for the property. The following information is shown.
X. An X in this column indicates that the global alert has been selected to be copied to another property. Available when the OPP_MHOT Multi-property PMS add-on license is active and when the OPR<version_number> ORS license is active.
Code. An alphanumeric code that identifies the alert. (These codes are set up as part of the alert message setup. See Alert Message Setup.)
Area. Activity area where the alert will display: at check-in (Check In), at check-out (Check Out), while in-house (In-House), or whenever the reservation is opened (Reservation).
Description. Description of the global alert.
To create a new global alert, select the New button. To edit an existing global alert, highlight your choice and select the Edit button. The Global Alerts - New or Global Alerts - Edit screen appears.
Provide the following information and select the OK button.
Note: When you select the OK button, OPERA verifies that the alert is correctly configured. OPERA will not allow you to save the global alert if a problem is detected. If problems exist in global alert messages configured prior to this verification being implemented, an error message appears when the applicable screen is opened (e.g., the Reservation screen, the Billing screen, etc.) and OPERA attempts to display the global alert. The error message identifies the global alert that is causing the problem so that the configuration for that alert can be corrected.
Code. Select the down arrow to choose the alert code. (These codes are set up as part of the alert message setup. See Alert Message Setup.) The message text for the alert code appears in the Description area where it may be edited.
Area. Select the down arrow to choose the reservation status that will trigger the alert message display. Options are: at check in (Check In), at check out (Check Out), while in-house (In-House), and when the reservation is opened (Reservation).
Screen Notification. Select this check box to provide alert notification to the user on-screen when the alert criteria are satisfied. This check box is selected by default.
Printer Notification. Select this check box to provide alert notification by printing a selected alert report at the designated printer. When you select the Printer Notification check box, you have an opportunity to specify the printer which will handle the global alert printing, and the customized alert report to be printed.
See Alert Printing, below, for details.
Email Notification. Select this check box to provide the alert notification to the user as an email when the alert criteria are satisfied. This check box is available when the Global Alert Delivery Method (in Configuration > Property > Delivery Methods) Email tab is populated with the appropriate Information and when the ‘Activate Email Delivery’ check box on that screen is checked.
Text Message Notifications. Select this check box to provide the alert notification to the user as a text message when the alert criteria are satisfied. This check box is available when the General > Text Message Handling application function is set to Y.
Description. The alert message text for the alert code selected in the Code field. This text may be edited.
Query Display. Below the Description are any query conditions that will control when the alert displays.
Stop Check-In / Stop Check-Out. Select this check box to ensure that the profile and reservation fields are properly filled at check-in or check-out before a guest can register; otherwise, the check-in or check-out process cannot be completed. This check box will be available when the Area selected is Check-In or Check-Out.
Note: When the permission RESERVATIONS > OVERRIDE GLOBAL ALERT VALIDATION has been granted, users that have override permission can override the Stop Check-In / Check-Out validation and complete the check-in or check-out process. This activity is recorded in the User Activity Log.
You must set up at least one condition under which the global alert displays.
Designing alert conditions is a step-by-step process. The Global Alerts screen guides you through the steps. As you complete each step, appropriate choices become active in the following steps, based on your previous actions and choices. When you complete all the steps and select the Add button, the condition statement you composed appears in the text box in the lower part of the screen.
Although some simple conditions consist of a single statement and can be built in a single pass through the Global Alerts Conditions steps, you may need to go back and repeat the steps one or more times to construct complex sets of conditions that contain multiple (and possibly nested) statements.
Following is a description of the basic steps for building a set of conditions.
Step 1. Select a Field for Filter Condition. Select the down arrow to choose the field that will be used as a filter for the condition. (The field list contains fields from the reservation record and the primary profile record (typically the guest's profile) linked to the reservation.) It is a good idea to put what you are looking for into words — a short statement that can guide you in constructing your statement. For example, you might say, "I want to find all reservations that have an arrival time before 3PM." See entire list of Step 1 Filter Conditions
Notes:
Key Valid Until - An active key interface, which assigns a key PIN number and the Reservations > Cashiering Flow at Check In/During Stay application setting value set to FORCE ADVANCE BILL, FORCE PAYMENT or FORCE ADVANCE BILL AND PAYMENT are required for the Key Valid Until field/column to be populated and for an alert based on this field to display.
NAME_VIEW - The NAME_VIEW fields reference the primary profile attached to the reservation (typically the guest).
Packages - The filter condition for Packages will apply only to packages added to a reservation, not those that are attached at the rate code level.
Total Stays - This option refers to the total stays for all years for the profile (Res_Arrivals + Res_Day_Use in the NAME_BUDGETS view).
Step 2. Specify a Filter Condition. Based on your choice in step 1, various filter conditions will be available for you to choose from when you select the down arrow. The following are some examples of the Filter Conditions that will display based on the type of Filter Condition selected in Step 1:
Note: Filter conditions ‘Before Departure Date’ and/or 'After Departure Date' actually mean ‘Before’ or ‘Equal To’ and/or 'After' or 'Equal To'; therefore, the alert always displays for days before and/or after the departure date as well as on the departure date itself. Per development, this was intentionally designed to be this way for Data Extraction.
Note: When a date field Filter Condition is selected for the Step 1 Filter Condition, a range (Before/After Business Date) can be configured for the Global Alert filter by selecting the check boxes below. By checking any of the check boxes for Day, Month, Year, the user defines which parts of the date OPERA should match. For example, if the Step 1 Filter Condition is Date of Birth and the Step 2 is set to ‘Is between’ and then the check boxes are checked and set up as Business Date -2 and Business Date 2 then OPERA will display this alert for anybody that has a Birthday 2 days before up to 2 days after the current business date. Since in case of the birthday, it does not matter which year the guest was born, the Year check box has to be unchecked so OPERA is not looking for Guests that were born in the current year (since the business date is being matched, which is in the current year). All parts of the date can be included/excluded using those check boxes depending on what the user is attempting to set up.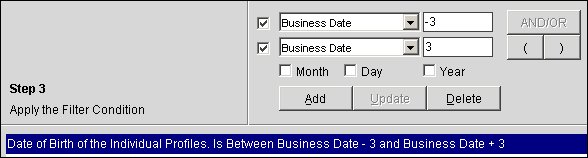
Step 3. Apply the Filter Condition. Now, select the Add button to copy the condition statement you created into the text area.
Note: The Add or Update buttons, as appropriate, become available when you have entered the required parameter(s) and tab out of the filter text entry field. If a second parameter is required by the filter condition (for example, for the Is Between filter condition) the buttons will not be enabled until you enter the second parameter and tab out of the second text entry field.
Repeat these steps to add follow-on statements, if they are required. In our example, where you are looking for reservations having at least one child, you would add another statement that selects reservations with a Children field that Is Not Empty.
By default, as you add new statements they are combined with those that went before using the AND operator. If you want to change an AND operator to an OR operator, highlight the AND statement, click the AND/OR button, and then click the Update button. The AND operator changes to OR. You can also change an OR operator back to an AND operator using this same process: Highlight the OR statement that you want to change to an AND statement, click the AND/OR button, then select the Update button. The OR operator changes back to AND.
To nest statements, place them in parentheses. Highlight the statement where you want the nesting to start and click on the open paren [(] button. Select the Update button. Next highlight the statement that you want to be the last statement inside the parens. Click the close paren [)] button. Finally, select the Update button. When you are nesting statements, the number of open parens must equal the number of close parens.
Tags. Select this button to open the Tags screen to select merge codes to include in the message to be sent in the e-mail and the test messages. These are the available tags:
When you are done, select the OK button.
To configure an alert to notify users of the source of a guest's membership enrollment, follow these steps:
When booking or editing a reservation for a guest with a membership enrollment source that matches the global alert's enrollment source condition, the alert will be triggered and display the text you entered for the alert description.
Note: One alert should be configured for each enrollment source to ensure that the source is identified by a global alert.
Alerts can be displayed on screen and/ or trigger printed output when some special conditions are met. When print output is selected, any of a variety of standard format messages to be sent to any properly configured, designated printer.
For example, if a reservation with young children is checked in, a message can be directed to a printer in Guest Services notifying staff in that department that young children are in-house and "Mickey Mouse" should be dispatched to greet them. Or, when the OPERA Track It feature is used, a guest's arrival can trigger a message to staff in charge of stored luggage directing them where to deliver the guest's belongings.
When you select the Printer Notification check box, you have an opportunity to specify the printer which will handle the global alert printing, and the customized alert report to be printed.
The printers to be used to print alert reports must be defined in Printer configuration as belonging to the alerts printing group (the Use Alert Printing check box must be selected on the Printers - New or Printers - Edit screen.)
To accommodate a variety of print outputs, the sample_alert.rdf report can be customized for each reporting need. (See Reports Setup and Reports Groups for details.) Merge codes available on this report include:
When the OPERA OPP_MHOT Multi Property PMS add on license code is active or when the OPR<version_number> ORS license code is active, global alerts can be copied from one property (the "source" property) to another property (the "target" property). The following conditions should be noted:
1. The user copying the global alert must have RESERVATIONS > ALERT NEW and ALERT EDIT permission at both the source and target properties.
2. The target property must already have an Alert Code that matches the Alert Code belonging to the global alert being copied to the target property.
3. The global alert being copied to the target property does not overwrite a global alert that has the same Code and Area (e.g., Check In, Check Out, Reservation, In House) at the target property; instead, a new global alert is created at the target property with the same Code and Area.
4. If Printer Notification is selected for the global alert that is to be copied, the target property may need to edit the Report and Printer information from the source property to match the configuration of these features at the target property in order to make the alert printing functional.
5. There is no validation of the global alert query itself when a global alert is copied between properties. For example, if the source property global alert includes a filter on rate code CORP1, and there is no corresponding CORP1 rate code configured for the target property, copying the alert to the target property will be permitted although the query will not be functional at the target property. In addition, there is no validation of the Report or the Printer when a global alert is copied from one property to another property.
To copy a global alert, highlight your choice on the Global Alerts screen. To copy multiple global alerts, mark the global alerts you want to copy by typing an X in the X column of the alerts you want to copy or by highlighting each alert you want to copy and hitting the space bar to mark an X in the X column. When you have indicated the alerts, select the Copy button. The Properties LOV appears.
Using the multi-select Properties LOV, select the properties to copy the global alerts to. Select OK and the global alerts will be copied to the target properties. Messages will report the success of the copy action. Error messages warn you if the copy cannot be performed for whatever reason.
Note: There is no validation of the global alert query itself when a global alert is copied between properties. For example, if the source property global alert includes a filter on rate code CORP1, and there is no corresponding CORP1 rate code configured for the target property, copying the alert to the target property will be permitted although the query will not be functional at the target property. In addition, there is no validation of the Report or the Printer when a global alert is copied from one property to another property.
When a reservation meets the criteria for a Global Alert to be displayed, it can be displayed in two different ways based on the RESERVATIONS > JOIN ALERTS application parameter. When set to N, all of the Global Alerts for a reservation are displayed one at a time, one after the other, when the OK button is clicked for the previous Global Alert. When set to Y, the Global Alerts are displayed in one window in the same order.
Show Me
See Also