IATA Load
The OPERA IATA Load feature allows you to import travel agent information to your OPERA database from an IATA, CLIA, or ARC source file. Once you complete the import process described in this topic, you can conveniently access thousands of travel agent profiles directly from the OPERA database. The following information is automatically imported into each travel agent’s profile.
- Travel agent name
- Location and mailing address
- Telephone and fax numbers
- E-mail and Web site addresses
The data is imported either from a) an IATA ASCII text file or from b) a third-party using CLIA or ARC source files.
- The IATA ASCII text file is distributed by IATA (International Air Transport Association) by means of a CD-ROM, email attachment, or other external source such as the IATA Web site. For more information on how to get this file and IATA subscription details, go to the IATA Website at http://www.iata.org/.
- Third-party CLIA (Cruise Lines International Association) files can also be distributed from a CD-ROM and email attachment or other source. The .zip data files can be extracted to a network folder (either a Transfer or the application server export folder). The new control file, clia.ctl for CLIA, can also be extracted to a network folder (either a Transfer or the application server export folder).
- Third-party ARC (Airlines Reporting Corporation) files can also be distributed from a CD-ROM and email attachment or other source. The new control file, arc.ctl for ARC files, can also be extracted to a network folder (either a Transfer or the application server export folder). (ARC Compile File Example or ARC Data File Example)
To access the IATA Load feature, in System Configuration mode, select Setup>IATA Load. The IATA processing screen opens.

Standard IATA Load Setup
Third-Party IATA Data File Setup
Enabling the IATA Load Feature - Application Settings Configuration
By default, the IATA Load feature is enabled in the application settings. However, if you do not see the menu command Setup>IATA Load when in system configuration mode, you need to enable IATA Load functionality in the Application Settings under General>Parameters>IATA Upload.
Importing IATA Data for the First Time
The following procedure describes how to import IATA data for the first time from a CD- ROM or other source file location. This procedure should only be done once for each database schema that you use. Subsequently, for maintenance purposes, you can update the OPERA database every time you receive a new IATA CD-ROM or source file. For more information, see Maintenance - Updating OPERA with new IATA Data below.
To import IATA Data to OPERA for the first time:
From CD-ROM
- If you are importing from the IATA CD-ROM, insert it into your CD drive.
- Open ORS or PMS in systems configuration mode and select Setup>IATA Load. The IATA Processing screen opens.
- Select Read CD and update database.
From Network
- If you are importing a file, such as a CLIA or an ARC file, from the network located on a network folder (either in a Transfer folder or the application server export folder), select Read DATA Only.
- For a CLIA file, ensure that the clia.ctl file is located on the network. For an ARC file, the arc.ctl file must reside on the network.
Field Entries
- In the Data File box, enter the path to the source file including the file name. By default, your CD drive is entered here - you only need to add the file name and additional path information if applicable. If the source file is stored on a network or local drive, enter the path including the file name. The file must be an ASCII text file and the file name can have any extension. For example, D:\iata_data\domw.tc.
- In the Control File box, enter the path to the IATA control file.
- With a standard IATA file, enter - new_agency.ctl. By default, this is automatically entered for you based on your registry settings. However, if you stored this control file in a different location, you must modify the path accordingly.
- With a third-party file, such as a CLIA or an ARC file, enter the path to the control file. As of OPERA v5.0.01.02, these files are located in the \RUNTIMES directory of every OPERA installation. The names of the control files are as follows: clia.ctl for CLIA files and arc.ctl for ARC files.
- In the Log File box, enter the path to the IATA log file.
- With a standard IATA file, enter- new_agency.log. By default, this is automatically entered for you. However, at your discretion, you can change the path and file name. The contents of the log file also displays at the bottom of the IATA Process window showing the total records that successfully imported and failed.
- With a third-party file, such as a CLIA or ARC file, enter new_agy.log. The contents of the log file also displays at the bottom of the IATA Process window showing the total records that successfully imported and failed.
- In the SQLLDR Home box, enter the path to the SQL Loader home name. For thick clients, this is the Oracle home. For thin clients, specify where the Oracle utility files are installed – specifically the SQLLDR.EXE file. For example, if SQLLDR.EXE is installed in D:\Oracle\IAS\BIN, enter D:\Oracle\IAS in this box.
- In the User box, enter the user name you used to access this OPERA database schema.
- In the Password box, enter the password used to access this OPERA database schema.
- In the Connect String box, enter the system identifier string used to connect to this OPERA database.
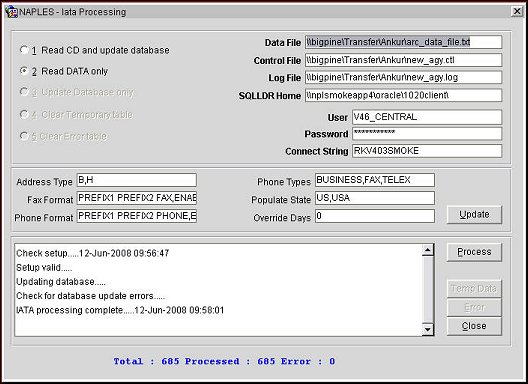
- The Default Format Type fields are automatically entered for you based on your OPERA installation setup and configuration. For example, the Phone Types field may already have these entries: BUSINESS,FAX,TELEX. These fields can be modified if required. Select Update if you make changes to any one of these fields.
- Select Process. Travel agent profiles are created in the OPERA database using the IATA data. The results are shown in the bottom part of the window. If an error occurs, see Resolving Import Errors below.
Maintenance - Updating OPERA with new IATA Data
You may receive IATA updates on a monthly or annual basis depending on your IATA subscription. To maintain this implementation and to ensure your OPERA database and profiles contain the latest information on travel agents, you must import new IATA data to the OPERA database.
Perform the below procedure each time you receive an updated IATA source file. For first time use, see Importing IATA Data for the First Time above.
To update IATA Data in the OPERA database.
- If you are updating the OPERA database from the IATA CD-ROM, insert it into your CD drive.
- In systems configuration mode, select Setup>IATA Load. The IATA Processing window opens.
- Select Read DATA only.
- In the Data File box, enter the path to the source file including the file name. By default, your CD drive is entered here - you only need to add the file name and additional path information if applicable. If the source file is stored on a network or local drive, enter the path including the file name. The file must be an ASCII text file and the file name can have any extension. For example, D:\iata_data\domw.tc.
- In the Control File box, enter the path to the IATA feature control file.
- With a standard IATA file, enter - new_agency.ctl. By default, this is automatically entered for you based on your registry settings. However, if you stored this control file in a different location, you must modify the path accordingly.
- With a third-party file, such as a CLIA or an ARC file, enter the path to the control file. As of OPERA v5.0.01.02, these files are located in the \RUNTIMES directory of every OPERA installation. The names of the control files are as follows: clia.ctl for CLIA files and arc.ctl for ARC files.
- In the Log File box, enter the path to the IATA feature log file.
- With a standard IATA file, enter- new_agency.log. By default, this is automatically entered for you. However, at your discretion, you can change the path and file name. The contents of the log file also displays at the bottom of the IATA Process window showing the total records that successfully imported and failed.
- With a third-party file, such as a CLIA or ARC file, enter new_agy.log. The contents of the log file also displays at the bottom of the IATA Process window showing the total records that successfully imported and failed.
- In the SQLLDR Home box, enter the path to the SQL Loader home name. For thick clients, this is the Oracle home. For thin clients, specify where the Oracle utility files are installed – specifically the SQLLDR.EXE file. For example, if SQLLDR.EXE is installed in D:\Oracle\IAS\BIN, enter D:\Oracle\IAS in this box.
- In the User box, enter the user name you used to access this OPERA database schema.
- In the Password box, enter the password used to access this OPERA database schema.
- In the Connect String box, enter the system identifier string used to connect to this OPERA database.
- The Default Format Type fields are automatically entered for you based on your OPERA installation setup and configuration. For example, the Phone Types field may already have these entries: BUSINESS,FAX,TELEX. These fields can be modified if required. Select Update if you make changes to any one of these fields.
- Select Process. Only new data is imported into a temporary table. The results are shown in the bottom part of the window. If an error occurs, see Resolving Import Errors.
- After the process is complete and no errors are found, select Update Database only.
- Select Process. The new data is uploaded from the temporary table to the OPERA database. The results are shown in the bottom part of the window.
- If an error occurs, see Resolving Import Errors below. If the process is successful, you can clear the temporary table for the next use. To do this, select Clear Temporary table, then select Process.
Resolving Import Errors
If an error occurs during the import process, the import fails and the Error button is enabled in the IATA Processing window. Click Error to open the IATA Processing Error table where you can determine if it is an Oracle or format issue. These errors must be resolved before the records can be successfully imported to the OPERA database.
Note: You can ignore these two errors: (1) nnnnnnn with trx_code = X already exists in NAME table. (2) nnnnnn with trx_code = Does not exist in NAME table
exists in NAME table, update/insert/inactivate not allowed.
To update the database after an error occurs.
- Select the Error button to identify the problem. The IATA Processing Error screen opens.
- Resolve the issue as identified in the Description column.
- Go back to the IATA Processing window and select Clear Error Table, then select Process.
- Select Update Database only, then select Process. The data that failed on the previous attempt is uploaded to the OPERA database.
- If new errors are found, repeat this procedure. If no errors are found, the Temporary Table can be cleared for the next import process. Select Clear Temporary Table, then select Process.
