
|
|
|
Campaign Management
In OCMM, marketing campaigns can target specific segments from the OPERA database or target lists, which are created by joining individual segments. Marketing campaigns can offer promotions and special offers to these target lists.
Through an Email Service Provider (ESP), OCMM users can select templates for their campaigns, review a campaign before sending it and choose a communication method or file format for the campaign, such as a flat file, XML or CSV format.
Note: OCMM can integrate with any Email Service Provider. Specifications for each ESP (APIs, etc.) will need to be obtained from the provider in order to configure the data exports and communication specifications.
Permissions
The below permissions must be granted for the user to create, edit or approve campaigns.
SETUP CONFIG>OCRM CAMPAIGN PROCESS
SETUP CONFIG>OCRM ESP CAMPAIGN CONFIGURATION
The following target source types are available:
Scheduling of a campaign is handled through OPERA Scheduler and a unique job ID is assigned to each campaign. OPERA users with the required permissions can approve each campaign before sending it. This is accomplished by selecting the Approve button on the Campaigns screen.
OCMM can deploy campaigns based on the following types:
Campaign deployment can be automated based on a "business trigger" type. In OCMM, users can define business triggers and associate them with campaigns. For example, when a guest checks in, a business trigger can fire to send the guest a welcome email. Another business trigger could be configured to send an email when a guest upgrades to a gold membership level.
After each campaign is deployed, the ESP will mine all campaign data and send it to OPERA. This information will be available on the OCMM Dashboard screen, where users can view the campaign analytics, such as the delivery rates, open rates, and click activity metrics.
The Campaigns screen opens from the OCMM Home screen by selecting the Campaigns menu option. This screen displays a complete list of all campaigns and features the following functionality:
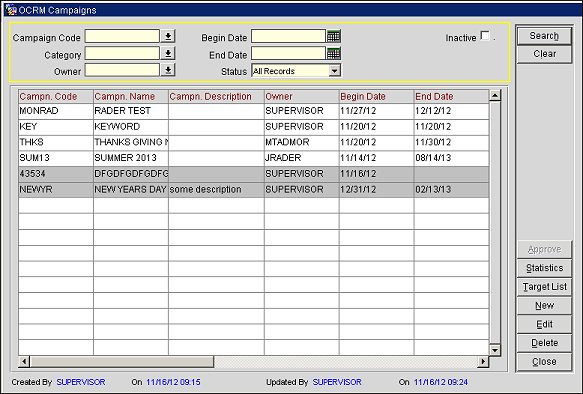
Campaigns Screen
Choose from the following search fields to filter the campaign records displayed on this screen.
Campaign Code. Select the down arrow and choose a campaign code from the list of values (LOV).
Category. Select the down arrow and choose a campaign category from the LOV.
Begin Date >=. Select the calendar button and choose a begin date. The search will display results for begin dates greater than or equal to the selected date.
End Date<=. Select the calendar button and choose an end date. The search will display results for end dates less than or equal to the selected date.
Owner. Select the down arrow and choose a campaign owner. This will limit the search result records to campaigns with the selected owner.
Inactive. Select to view inactive campaigns in the display grid.
The display grid for the search results features the following columns:
Campaign Code. The campaign code.
Campaign Name. The campaign name.
Campaign Description. The campaign description.
Owner. The campaign owner.
Begin Date. The begin date for the campaign.
End Date. The end date for the campaign.
Search. Select to display campaign records based on your defined search criteria.
Approve. Select to approve the campaign.
Statistics. Select to open the Dashboard screen and view the statistics for the campaign.
Target List. Select to open the Target List and view the target lists associated with the campaign based on a Batch ID.
New. Select to open the Campaign Wizard and create a new campaign by following the steps in the wizard.
Edit. Select to open the Campaign Wizard for a selected campaign and make changes to the campaign.
Delete. Select to delete a selected campaign.
Close. Select to close the Campaigns screen.
Select New to open the Campaign Wizard and create a new campaign or select Edit to make changes to an existing one.
See Also